Reportlab学习笔记
Python制作PDF的一个库,效率非常高,比pypdf不知道快了多少。
文档下载地址:https://www.reportlab.com/docs/reportlab-userguide.pdf
Chapter 1 环境篇
编程语言:Python3.8
1.1 安装
pip install reportlab
如果有缺失的依赖包(比如之前没有安装pillow),pip会自动进行安装
Chapter 2 Graphics and Text with pdfgen - 有pdfgen的图形和文本
2.1 Basic Concepts - 基本概念
from reportlab.pdfgen import canvas
def hello(c):
    c.drawString(0, 0, "Hello World")
c = canvas.Canvas("hello.pdf")
hello(c)
c.showPage()  # 保存当前画布页面
c.save()  # 保存文件并关闭画布
结果如下图:

pdfgen软件包是用于生成PDF文档的最低级别的接口,其本质相当于在一个画布上进行绘画的工具。
画布应被视为一张白纸,并且在纸上使用笛卡尔坐标确定点(X,Y)坐标,默认情况下在页面的左下角具有(0,0)起点。
此外默认情况下,第一个坐标x朝右,第二个坐标y朝上。
2.2 More about the Canvas - 关于画布
一张画布有很多属性可以进行配置。
首先这个是画布对象的初始属性:
def __init__(
            self, filename, pagesize=(595.27, 841.89), bottomup=1,
            pageCompression=0, encoding=rl_config.defaultEncoding,
            verbosity=0, encrypt=None):
- filename - 控制最终PDF文件的名称。
也可以传入任何打开的二进制流(例如sys.stdout,带有二进制编码的python处理标准输出),然后将PDF文档写入其中。
注意:不能在HTML页面中间内联传递PDF文档! - pagesize
以点(1/72英寸)为单位的两个数字的元组。画布默认为A4(国际标准页面大小与美国标准字母大小不同),但最好明确指定它。在reportlab.lib.pagesizes中可以找到最常见的页面大小,因此可以使用如下表达式:
from reportlab.pdfgen import canvas
from reportlab.lib.pagesizes import letter, A4
myCanvas = canvas.Canvas('myfile.pdf', pagesize=A4)
如果打印文档时遇到问题,请确保使用正确的页面尺寸(通常为A4或Letter)。某些打印机无法处理太大或太小的页面。
可以使用width变量将右边距定义为width-inch,而不是使用常量。通过使用变量,即使页面大小发生变化,页边距仍然有意义。
bottomup
已被弃用,将来可能会被删除- pageCompression - 是否压缩每个页面
默认情况下,不压缩页面流,因为压缩会减慢文件生成过程。
如果输出大小很重要,请设置pageCompression=1。但是请记住,压缩后的文档会变小,但生成起来会更慢。请注意,图像始终是压缩的,并且只有在每页上都有大量文本和矢量图形时,此选项才会节省空间。 - encoding
在2.0版中已过时,99%的用户可能会忽略它。所有TTF和常用的CID字体,此处传递的编码将被忽略,因为在这些情况下reportlab库本身知道正确的编码。 - encrypt
默认情况下,文档未加密。如果encrypt是字符串对象,则将其用作pdf的用户密码。如果encrypt是reportlab.lib.pdfencrypt.StandardEncryption的实例,则此对象用于加密pdf。
2.3 Drawing Operations - 绘图操作
先看示例:
from reportlab.pdfgen import canvas
from reportlab.lib.units import inch

def hello(c):
    # 将原点坐标都移动1英寸
    c.translate(inch, inch)  # 不写这行的话,原点会是0,0

    c.setFont("Helvetica", 14)  # 定义字体

    # 设置一些颜色
    c.setStrokeColorRGB(0.2, 0.5, 0.3)
    c.setFillColorRGB(1, 0, 1)
    # 画几条线
    c.line(0, 0, 0, 1.7 * inch)
    c.line(0, 0, 1 * inch, 0)
    c.rect(0.2 * inch, 0.2 * inch, 1 * inch, 1.5 * inch, fill=1)  # 画一个长方形
    c.rotate(90)  # 将文字旋转90度
    c.setFillColorRGB(0, 0, 0.77)

    # 注意:旋转后,y坐标必须为负数
    c.drawString(0.3 * inch, -inch, "Hello World")

c = canvas.Canvas("hello.pdf")
hello(c)
c.showPage()  # 保存当前画布页面
c.save()  # 保存文件并关闭画布
观察上述代码可以发现,使用画布执行的操作基本上有两种:
第一种在页面上绘制内容,例如文本字符串,矩形或线条。
第二种类型更改画布的状态,例如更改当前的填充或笔触颜色或更改当前的字体类型和大小。
想象成正在使用Windows自带的画图工具,"绘制"操作使用当前的一组工具(颜色,线条样式,字体等)将颜料施加到画布上,而"状态更改"操作将更改当前的其中一个工具(例如,将填充颜色从原来的颜色更改为蓝色,或者将当前字体更改为15点的Times-Roman)。
2.4 The tools: the "draw" operations - 工具:"绘制"操作
- Line methods
在画布上绘制直线段
有如下几种方法:
canvas.line(x1,y1,x2,y2)
canvas.lines(linelist)
- Shape methods
绘制常见的复杂形状
有如下几种方法:
canvas.grid(xlist, ylist)
canvas.bezier(x1, y1, x2, y2, x3, y3, x4, y4)
canvas.arc(x1,y1,x2,y2)
canvas.rect(x, y, width, height, stroke=1, fill=0)
canvas.ellipse(x1,y1, x2,y2, stroke=1, fill=0)
canvas.wedge(x1,y1, x2,y2, startAng, extent, stroke=1, fill=0)
canvas.circle(x_cen, y_cen, r, stroke=1, fill=0)
canvas.roundRect(x, y, width, height, radius, stroke=1, fill=0)
- String drawing methods
绘制单行文本
有如下几种方法:
canvas.drawString(x, y, text):
canvas.drawRightString(x, y, text)
canvas.drawCentredString(x, y, text)
- The text object methods
文本对象用于格式化画布不直接支持的文本。
使用beginText()方法在画布上创建一个文本对象,然后把这个文本对象传递给canvas.drawText(textobject)方法,去设置文本格式。
reportlab使用drawText()方法将textobject绘制到画布上。
有如下几种方法:
textobject = canvas.beginText(x, y)
canvas.drawText(textobject)
- The path object methods
路径对象类似于文本对象:它们提供专用控件来执行复杂的图形绘图,而画布界面并未直接提供该图形。
程序使用beginPath创建路径对象,并使用该路径对象的方法使用图形填充该路径,然后使用drawPath在画布上绘制该路径。
也可以使用clipPath方法将路径用作“剪切区域”。例如,圆形路径可用于剪切掉矩形图像的外部,而仅在页面上可见图像的圆形部分。
如果指定fill=1,则fillMode参数可用于设置0、1、奇数或非零填充模式。这将改变复杂路径的填充方式。如果使用默认的None值,则使用canvas_fillMode属性值(通常为0,即奇数)。
有如下几种方法:
path = canvas.beginPath()
canvas.drawPath(path, stroke=1, fill=0, fillMode=None)
canvas.clipPath(path, stroke=1, fill=0, fillMode=None)
- Image methods
该功能需要依赖python的pillow库
有如下几种方法:
canvas.drawInlineImage(self, image, x,y, width=None,height=None)
canvas.drawImage(self, image, x,y, width=None,height=None,mask=None)
1). 推荐使用drawImage()方法!该方法实现了一个缓存系统,定义一次图像并绘制多次,它仅在PDF文件中存储一次。drawImage还公开了一个高级参数,即透明蒙版,将来还会有更多的介绍。
2). 较旧的drawInlineImage()方法将图像放置在画布上、存储在页面流中,如果文档中多次使用同一图像,效率将非常低下。但是如果图像非常小且不重复,PDF会渲染得更快。image参数可以是PIL Image对象或图像文件名。接受常见的文件格式,包括GIF和JPEG。以(宽度,高度)元组的形式返回实际图像的大小(以像素为单位)。
3). drawImage()方法的参数和返回值与drawInlineImage相同。但是,drawImage()使用了缓存系统,给定的图像只会在第一次使用时存储,并且在以后的使用中会被引用。如果提供文件名,则假定相同的文件名表示相同的图像。如果提供了PIL图像,它将在重新嵌入之前测试内容是否已实际更改。
4). mask参数可以创建透明图像。它有6个数字,并定义了将被掩盖或视为透明的RGB值范围。
例如,使用[0,2,40,42,136,139],它将掩盖任何具有0或1的红色值,绿色40或41的颜色以及136、137或138的蓝色的像素(在0-255的范围内) 。目前,需要知道哪种颜色是"透明"或背景颜色。
- Ending a page
完成当前页面,所有其他绘图将在另一页上完成。
有如下几种方法:
canvas.showPage()
警告!当使用新的pdfgen页面时,所有状态(字体更改,颜色设置,几何变换等)都会被抛弃。任何状态设置都必须在程序进行绘图之前重新设置!
2.5 The toolbox: the "state change" operations - 工具箱:"状态更改"操作
- Changing Colors
有如下几种方法:
canvas.setFillColorCMYK(c, m, y, k)
canvas.setStrikeColorCMYK(c, m, y, k)
canvas.setFillColorRGB(r, g, b)
canvas.setStrokeColorRGB(r, g, b)
canvas.setFillColor(acolor)
canvas.setStrokeColor(acolor)
canvas.setFillGray(gray)
canvas.setStrokeGray(gray)
PDF支持三种不同的颜色模型:灰度,加性(红色/绿色/蓝色或RGB)和带有暗度降解的参数(青色/品红色/黄色/暗度或CMYK)。ReportLab库还提供了诸如草坪绿之类的命名颜色。
图形状态中有两个基本颜色参数:图形内部的填充颜色和图形边界的描边颜色。上述方法支持使用四种颜色规范中的任何一种来设置填充或描边颜色。
- Changing Fonts
有如下几种方法:
canvas.setFont(psfontname, size, leading = None)
根据给定的psfontname和size,改变当前的文本字体。leading参数指定从一个文本行前进到下一个文本行时,向下移动的距离。
- Changing Graphical Line Styles
有如下几种方法:
canvas.setLineWidth(width)
canvas.setLineCap(mode)
canvas.setLineJoin(mode)
canvas.setMiterLimit(limit)
canvas.setDash(self, array=[], phase=0)
PDF中绘制的线条可以多种图形样式显示。线可以具有不同的宽度,可以以不同的端点风格样式结束,可以以不同的连接样式相遇,并且可以连续,也可以点划线。以上方法调整了这些各种参数。
- Changing Geometry
改变几何形状
有如下几种方法:
canvas.setPageSize(pair)
canvas.transform(a,b,c,d,e,f):
canvas.translate(dx, dy)
canvas.scale(x, y)
canvas.rotate(theta)
canvas.skew(alpha, beta)
所有PDF图纸都适合指定的页面尺寸。在指定页面尺寸之外绘制的元素不可见。此外,所有绘制的元素都要经过仿射变换,仿射变换可以调整其位置和/或扭曲其外观。
setPageSize()方法调整当前页面大小。变换,平移,缩放,旋转和倾斜方法将其他变换添加到当前变换中。重要的是要记住,这些转换是渐进式的-新的转换会修改当前的转换(但不能替代它)。
- State control
有如下几种方法:
canvas.saveState()
canvas.restoreState()
保存当前字体、图形转换、线条样式和其他图形状态非常重要,以便以后恢复它们。
saveState()方法将当前图形状态标记为以后通过匹配的restoreState恢复。请注意,保存和还原方法的调用必须匹配-还原调用会将状态还原为尚未还原的最新保存状态。不能在一个页面上保存状态,而不能在下一页上恢复状态,但是页面之间不会保留任何状态。
2.6 Other canvas methods
并非所有的画布对象方法都适合"工具"或"工具箱"类别。以下是一些不适当的地方,出于完整性考虑,此处包含了一些不适当的地方。
canvas.setAuthor()
canvas.addOutlineEntry(title, key, level=0, closed=None)
canvas.setTitle(title)
canvas.setSubject(subj)
canvas.pageHasData()
canvas.showOutline()
canvas.bookmarkPage(name)
canvas.bookmarkHorizontalAbsolute(name, yhorizontal)
canvas.doForm()
canvas.beginForm(name, lowerx=0, lowery=0, upperx=None, uppery=None)
canvas.endForm()
canvas.linkAbsolute(contents, destinationname, Rect=None, addtopage=1, name=None, **kw)
canvas.linkRect(contents, destinationname, Rect=None, addtopage=1, relative=1, name=None, **kw)
canvas.getPageNumber()
canvas.addLiteral()
canvas.getAvailableFonts()
canvas.stringWidth(self, text, fontName, fontSize, encoding=None)
canvas.setPageCompression(onoff=1)
canvas.setPageTransition(self, effectname=None, duration=1, direction=0,dimension='H',motion='I')
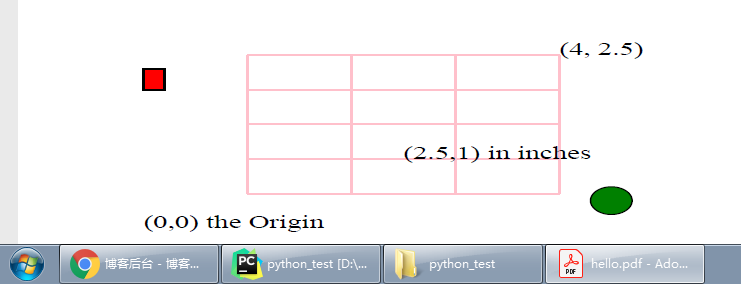
2.7 Coordinates (default user space) - 坐标(默认用户空间)
默认情况下,页面上的位置由一对数字标识。例如,(4.5 * inch,1 * inch)就是从左下角开始向右移动4.5英寸并向上移动一英寸来标识页面上找到的位置。
示例代码:
from reportlab.pdfgen import canvas

canvas = canvas.Canvas("hello.pdf")

def coords(canvas):
    from reportlab.lib.units import inch
    from reportlab.lib.colors import pink, black, red, blue, green

    c = canvas
    c.setStrokeColor(pink)
    c.grid([inch, 2 * inch, 3 * inch, 4 * inch], [0.5 * inch, inch, 1.5 * inch, 2 * inch, 2.5 * inch])
    c.setStrokeColor(black)
    c.setFont("Times-Roman", 20)
    c.drawString(0, 0, "(0,0) the Origin")
    c.drawString(2.5 * inch, inch, "(2.5,1) in inches")
    c.drawString(4 * inch, 2.5 * inch, "(4, 2.5)")
    c.setFillColor(red)
    c.rect(0, 2 * inch, 0.2 * inch, 0.3 * inch, fill=1)
    c.setFillColor(green)
    c.circle(4.5 * inch, 0.4 * inch, 0.2 * inch, fill=1)
    c.showPage()
    c.save()

coords(canvas=canvas)
最终效果如下图:

在默认用户空间中,原点(0,0)点位于左下角。
- Moving the origin: the translate method
canvas.translate(x,y)方法将当前页面的原点移动到指定的(x,y)坐标位置。
本示例代码直接使用了上面的那个示例,只是加了2行新的代码(新代码已在行末注释说明了):
from reportlab.pdfgen import canvas

canvas = canvas.Canvas("hello.pdf")

def coords(canvas):
    from reportlab.lib.units import inch
    from reportlab.lib.units import cm  # 厘米单位
    from reportlab.lib.colors import pink, black, red, blue, green

    c = canvas
    c.translate(2.3 * cm, 0.3 * cm)  # 移动原点坐标
    c.setStrokeColor(pink)
    c.grid([inch, 2 * inch, 3 * inch, 4 * inch], [0.5 * inch, inch, 1.5 * inch, 2 * inch, 2.5 * inch])
    c.setStrokeColor(black)
    c.setFont("Times-Roman", 20)
    c.drawString(0, 0, "(0,0) the Origin")
    c.drawString(2.5 * inch, inch, "(2.5,1) in inches")
    c.drawString(4 * inch, 2.5 * inch, "(4, 2.5)")
    c.setFillColor(red)
    c.rect(0, 2 * inch, 0.2 * inch, 0.3 * inch, fill=1)
    c.setFillColor(green)
    c.circle(4.5 * inch, 0.4 * inch, 0.2 * inch, fill=1)
    c.showPage()
    c.save()

coords(canvas=canvas)
最终效果如下,可看到与上面那张效果图相比,下图有了明显的位移变化:

注意:移动原点坐标可能会导致"脱离页面"的情况。简而言之,就是错误地将整个图形移到页面的可见区域之外。如果程序产生空白页,则所有绘制的对象都可能不在该页面上。
- Shrinking and growing: the scale operation - 缩小和放大,比例操作
通过使用canvas.scale(dx,dy)方法,来伸展或收缩尺寸。dx和dy通常相同,例如要在所有尺寸上将图形缩小一半,可指定dx=dy=0.5
演示一个收缩比例的示例:
from reportlab.pdfgen import canvas

canvas = canvas.Canvas("hello.pdf")

def coords(canvas):
    from reportlab.lib.units import inch
    from reportlab.lib.units import cm  # 厘米单位
    from reportlab.lib.colors import pink, black, red, blue, green

    c = canvas
    c.translate(2.3 * cm, 0.3 * cm)  # 移动原点坐标,在绘画开始前就必须设定好
    c.scale(0.75, 0.5)  # 指定收缩的比例
    c.setStrokeColor(pink)
    c.grid([inch, 2 * inch, 3 * inch, 4 * inch], [0.5 * inch, inch, 1.5 * inch, 2 * inch, 2.5 * inch])
    c.setStrokeColor(black)
    c.setFont("Times-Roman", 20)
    c.drawString(0, 0, "(0,0) the Origin")
    c.drawString(2.5 * inch, inch, "(2.5,1) in inches")
    c.drawString(4 * inch, 2.5 * inch, "(4, 2.5)")
    c.setFillColor(red)
    c.rect(0, 2 * inch, 0.2 * inch, 0.3 * inch, fill=1)
    c.setFillColor(green)
    c.circle(4.5 * inch, 0.4 * inch, 0.2 * inch, fill=1)

    c.showPage()
    c.save()

coords(canvas=canvas)
最终效果如下:
注意:缩放比例还可能使对象或对象的一部分移出页面,或者可能导致对象缩小到看不见。
scale()方法和translate()方法可以联合使用,但前后出现的顺序很重要!
先看如下代码:
from reportlab.pdfgen import canvas
from reportlab.lib.units import inch
from reportlab.lib.units import cm  # 厘米单位
from reportlab.lib.colors import pink, black, red, blue, green

canvas = canvas.Canvas("hello.pdf")

def coords(canvas):
    canvas.setStrokeColor(pink)
    canvas.grid([inch, 2 * inch, 3 * inch, 4 * inch], [0.5 * inch, inch, 1.5 * inch, 2 * inch, 2.5 * inch])
    canvas.setStrokeColor(black)
    canvas.setFont("Times-Roman", 20)
    canvas.drawString(0, 0, "(0,0) the Origin")
    canvas.drawString(2.5 * inch, inch, "(2.5,1) in inches")
    canvas.drawString(4 * inch, 2.5 * inch, "(4, 2.5)")
    canvas.setFillColor(red)
    canvas.rect(0, 2 * inch, 0.2 * inch, 0.3 * inch, fill=1)
    canvas.setFillColor(green)
    canvas.circle(4.5 * inch, 0.4 * inch, 0.2 * inch, fill=1)

def scaletranslate(canvas):
    canvas.setFont("Courier-BoldOblique", 12)
    canvas.saveState()  # 保存当前状态
    # 先缩放然后再调整原点
    canvas.scale(0.3, 0.5)
    canvas.translate(2.4 * inch, 1.5 * inch)
    canvas.drawString(0, 2.7 * inch, "Scale then translate")
    coords(canvas)

    canvas.restoreState()  # 重置所有的状态
    # 先调整原点再缩放
    canvas.translate(2.4 * inch, 1.5 * inch)
    canvas.scale(0.3, 0.5)
    canvas.drawString(0, 2.7 * inch, "Translate then scale")
    coords(canvas)

scaletranslate(canvas=canvas)
canvas.showPage()
canvas.save()
最终效果如下:
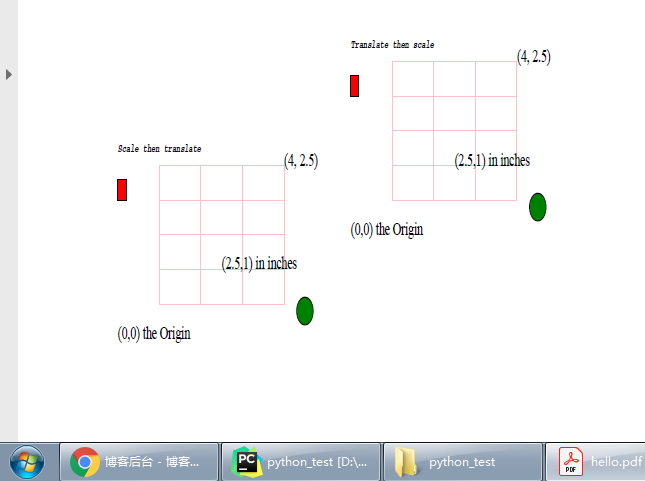
注意:缩放会缩小或增长包括线宽在内的所有内容,因此使用canvas.scale()缩放的微观单位渲染微观图形可能会产生斑点(因为所有线宽都会大量扩展)。以米为单位缩放比例的飞机机翼可能会导致线条缩小到消失的程度。出于工程或科学目的,在使用画布进行渲染之前,应先将其进行缩放且移动原点。
- Saving and restoring the canvas state: saveState and restoreState - 保存、重置画布状态:saveState()、restoreState()
保存和恢复画布当前状态。通过将一系列操作,包含在一对匹配的canvas.saveState()和canvas.restoreState()操作中,可以将字体图形的所有更改(颜色,线条样式,缩放,旋转或其他画布图像状态)恢复到saveState()所标记的位置。请记住,保存/恢复调用必须匹配:孤立的保存或恢复操作可能导致无法预期的意外发生。另外,分页符之间不会保留任何画布状态,并且跨分页符无法使用保存/恢复机制。 - Mirror image - 镜像
相当于PS中的水平翻转画布,将canvas.scale(dx,dy)方法中的第一个参数dx设置为-1.0即可
from reportlab.pdfgen import canvas
from reportlab.lib.units import inch
from reportlab.lib.units import cm  # 厘米单位
from reportlab.lib.colors import pink, black, red, blue, green

canvas = canvas.Canvas("hello.pdf")

def coords(canvas):
    canvas.setStrokeColor(pink)
    canvas.grid([inch, 2 * inch, 3 * inch, 4 * inch], [0.5 * inch, inch, 1.5 * inch, 2 * inch, 2.5 * inch])
    canvas.setStrokeColor(black)
    canvas.setFont("Times-Roman", 20)
    canvas.drawString(0, 0, "(0,0) the Origin")
    canvas.drawString(2.5 * inch, inch, "(2.5,1) in inches")
    canvas.drawString(4 * inch, 2.5 * inch, "(4, 2.5)")
    canvas.setFillColor(red)
    canvas.rect(0, 2 * inch, 0.2 * inch, 0.3 * inch, fill=1)
    canvas.setFillColor(green)
    canvas.circle(4.5 * inch, 0.4 * inch, 0.2 * inch, fill=1)

def mirror(canvas):
    # 把原点的x坐标增加一定距离,不然的话就是在原点的位置上进行水平翻转
    # 一翻就翻出了画布,导致看不到任何内容
    canvas.translate(5.5 * inch, 0)

    canvas.scale(-1.0, 1.0)  # 将第一个参数设置为-1.0即可实现水平翻转
    coords(canvas)

mirror(canvas)
canvas.showPage()
canvas.save()
注意:文本对象是向后绘制的。
最终效果如下:
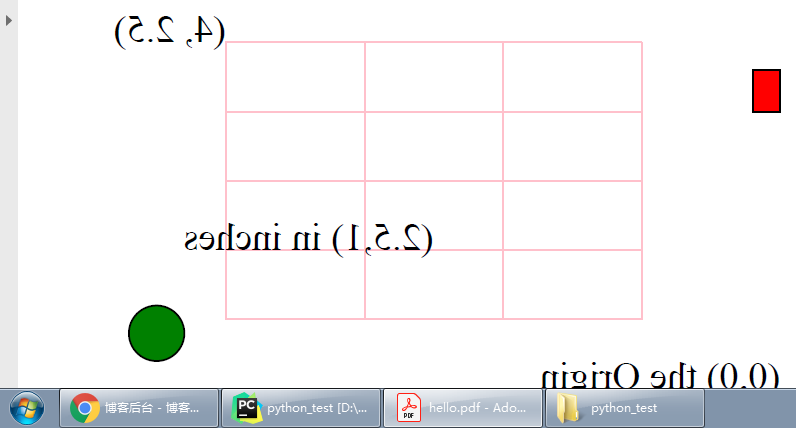
PS中的效果,图像->变换->水平翻转画布

2.8 Colors
PDF中通常使用两种颜色,具体取决于使用PDF的媒介。最常见的屏幕颜色模型RGB可以在PDF中使用。但是在专业印刷中,主要使用另一种颜色模型CMYK,它可以更好地控制将墨水应用于纸张的方式。
- RGB Colors
pdfgen中有三种指定RGB色彩的方式:使用color模块的名称、指定红/绿/蓝(RGB)值、灰阶度
下例中,演示了这三种方式:
from reportlab.pdfgen import canvas
from reportlab.lib.units import inch
from reportlab.lib.units import cm  # 厘米单位
from reportlab.lib.colors import pink, black, red, blue, green
from reportlab.lib import colors

canvas = canvas.Canvas("hello.pdf")

def colorsRGB(canvas):
    black = colors.black
    y = x = 0
    dy = inch * 3 / 4.0
    dx = inch * 5.5 / 5
    w = h = dy / 2
    rdx = (dx - w) / 2
    rdy = h / 5.0
    texty = h + 2 * rdy
    canvas.setFont("Helvetica", 10)

    # 指定color模块的名称
    for [namedcolor, name] in (
            [colors.lavenderblush, "lavenderblush"], [colors.lawngreen, "lawngreen"],
            [colors.lemonchiffon, "lemonchiffon"], [colors.lightblue, "lightblue"],
            [colors.lightcoral, "lightcoral"]):
        canvas.setFillColor(namedcolor)
        canvas.rect(x + rdx, y + rdy, w, h, fill=1)
        canvas.setFillColor(black)
        canvas.drawCentredString(x + dx / 2, y + texty, name)
        x = x + dx

    y = y + dy
    x = 0

    # 指定RGB数值
    for rgb in [(1, 0, 0), (0, 1, 0), (0, 0, 1), (0.5, 0.3, 0.1), (0.4, 0.5, 0.3)]:
        r, g, b = rgb
        canvas.setFillColorRGB(r, g, b)
        canvas.rect(x + rdx, y + rdy, w, h, fill=1)
        canvas.setFillColor(black)
        canvas.drawCentredString(x + dx / 2, y + texty, "r%s g%s b%s" % rgb)
        x = x + dx

    y = y + dy
    x = 0

    # 灰阶度
    for gray in (0.0, 0.25, 0.50, 0.75, 1.0):
        canvas.setFillGray(gray)
        canvas.rect(x + rdx, y + rdy, w, h, fill=1)
        canvas.setFillColor(black)
        canvas.drawCentredString(x + dx / 2, y + texty, "gray: %s" % gray)
        x = x + dx

colorsRGB(canvas)
canvas.showPage()
canvas.save()
最终效果如下:

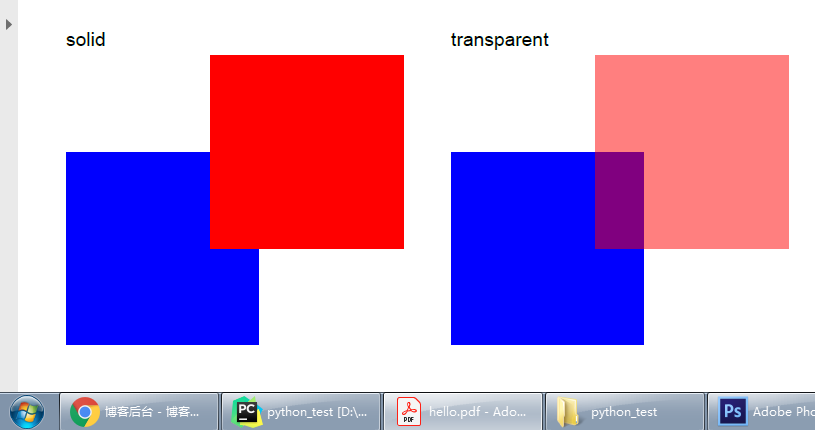
- RGB Color Transparency - RGB透明色
在pdfgen中可以将对象涂在其他对象上。有两种处理空间重叠物体的模式,顶层中的默认对象将隐藏位于其下方的其他对象的任何部分。如果需要透明度,则有两种选择:
1). 如果要以专业方式打印文档,并且正在使用CMYK色彩空间,则可以使用overPrint()。在套印中,颜色会在打印机中物理混合,从而获得新的颜色。默认情况下,将应用剔除,并且仅出现顶部对象。
2). 如果文档用于屏幕输出,并且使用的是RGB颜色,则可以设置一个alpha值。其中alpha是颜色的不透明度值,默认的Alpha值为1(完全不透明),使用0-1范围内的实数值进行设置。
Alpha透明度(alpha)与套印类似,但只在RGB颜色空间中有效。访问网站 http://www.reportlab.com/snippets/ ,查找overPrint和alpha的摘要,以获得详情。
以下演示RGB模式下的透明方式:
from reportlab.pdfgen import canvas
from reportlab.lib.units import inch
from reportlab.lib.units import cm  # 厘米单位
from reportlab.lib.colors import pink, black, red, blue, green
from reportlab.lib import colors
from reportlab.lib.colors import Color

canvas = canvas.Canvas("hello.pdf")

def alpha(canvas):
    red50transparent = Color(100, 0, 0, alpha=0.5)
    canvas.setFillColor(black)
    canvas.setFont('Helvetica', 10)
    canvas.drawString(25, 180, 'solid')
    canvas.setFillColor(blue)
    canvas.rect(25, 25, 100, 100, fill=True, stroke=False)
    canvas.setFillColor(red)
    canvas.rect(100, 75, 100, 100, fill=True, stroke=False)
    canvas.setFillColor(black)
    canvas.drawString(225, 180, 'transparent')
    canvas.setFillColor(blue)
    canvas.rect(225, 25, 100, 100, fill=True, stroke=False)
    canvas.setFillColor(red50transparent)
    canvas.rect(300, 75, 100, 100, fill=True, stroke=False)

alpha(canvas)
canvas.showPage()
canvas.save()
- CMYK Colors
CMYK或减法方法是遵循将打印机的三种颜料(青色,品红色和黄色)混合形成颜色的方式。因为混合化学物质比混合光更困难,所以存在第四个参数:暗色。
例如,CMY颜料的化学组合通常不能产生完美的黑色,而是产生浑浊的颜色。因此,使用黑色打印机,请勿使用CMYK颜料,而应使用直接黑色墨水。由于CMYK的工作方式是更直接地映射到打印机硬件,因此在CMYK中指定的颜色可能会在打印时提供更好的保真度和更好的控制。
表示CMYK颜色的方式有两种:每种颜色都可以用0到1之间的实数值,或0到100之间的整数值表示。根据自己的喜好,可以使用0-1之间实值的CMYKColor()或0-100之间整数的PCMYKColor()。0表示"无墨水",因此在白纸上打印可得到白色。1(如果使用PCMYKColor,则为100)表示"最大墨水量"。 例如 CMYKColor(0,0,0,1)为黑色,CMYKColor(0,0,0,0)表示"无墨水",而CMYKColor(0.5,0,0,0)表示50%的青色。
示例:
from reportlab.pdfgen import canvas
from reportlab.lib.units import inch
from reportlab.lib.colors import pink, black, red, blue, green
from reportlab.lib.colors import CMYKColor, PCMYKColor

canvas = canvas.Canvas("hello.pdf")

def colorsCMYK(canvas):
    # create a black CMYK, CMYKColor use real values
    black = CMYKColor(0, 0, 0, 1)

    # create a cyan CMYK, PCMYKColor use integer values
    cyan = PCMYKColor(100, 0, 0, 0)

    y = x = 0
    dy = inch * 3 / 4.0
    dx = inch * 5.5 / 5
    w = h = dy / 2
    rdx = (dx - w) / 2
    rdy = h / 5.0
    texty = h + 2 * rdy

    canvas.setFont("Helvetica", 10)

    y = y + dy
    x = 0

    for cmyk in [(1, 0, 0, 0), (0, 1, 0, 0), (0, 0, 1, 0), (0, 0, 0, 1), (0, 0, 0, 0)]:
        c, m, y1, k = cmyk
        canvas.setFillColorCMYK(c, m, y1, k)
        canvas.rect(x + rdx, y + rdy, w, h, fill=1)
        canvas.setFillColor(black)
        canvas.drawCentredString(x + dx / 2, y + texty, "c%s m%s y%s k%s" % cmyk)
        x = x + dx


colorsCMYK(canvas)
canvas.showPage()
canvas.save()
最终效果如下:
2.9 Color space checking - 色彩空间检查
canvas对象的executeColorSpace属性,用于增强文档中使用的颜色模型的一致性。它接受以下值:CMYK,RGB,SEP,SEP_BLACK,SEP_CMYK。"SEP"是指命名的颜色分离,例如Pantone专色-可以根据使用的参数将它们与CMYK或RGB混合。默认值为"MIXED",它允许使用任何颜色空间中的颜色。如果使用的任何颜色都无法转换为指定的模型,将引发异常。(例如rgb和cmyk更多信息,请参见test_pdfgen_general)。这种方法不检查文档中包含的外部图像。
2.10 Color Overprinting - 色彩叠印
当两个CMYK彩色对象在打印中重叠时,则"顶部"对象将剔除其下一个对象的颜色,或者两个对象的颜色在重叠区域混合。可以使用属性overPrint设置此行为。套印功能将导致颜色的重叠区域混合。
用法:
canvas.setFillOverprint(bool)
示例代码:
from reportlab.pdfgen import canvas
from reportlab.lib.colors import PCMYKColorSep

canvas = canvas.Canvas("hello.pdf")

def overprinting(canvas):
    # 好像必须使用PCMYKColorSep。其他CMYKColor和PCMYKColor,没有任何效果
    blue = PCMYKColorSep(91.0, 43.0, 0.0, 0.0, density=100, spotName="blue")  # spotName必须指定
    red = PCMYKColorSep(0.0, 100.0, 91.0, 0.0, density=100, spotName="red")

    canvas.setFillOverprint(True)  # 使用叠印模式
    canvas.setFillColor(blue)
    canvas.rect(25, 25, 100, 100, fill=True, stroke=False)
    canvas.setFillColor(red)
    canvas.rect(100, 75, 100, 100, fill=True, stroke=False)

    canvas.setFillOverprint(False)  # 不使用叠印模式。这行代码没有的话,连同接下来的绘图,都一直使用叠印模式
    canvas.setFillColor(blue)
    canvas.rect(225, 25, 100, 100, fill=True, stroke=False)
    canvas.setFillColor(red)
    canvas.rect(300, 75, 100, 100, fill=True, stroke=False)

overprinting(canvas)
canvas.showPage()
canvas.save()
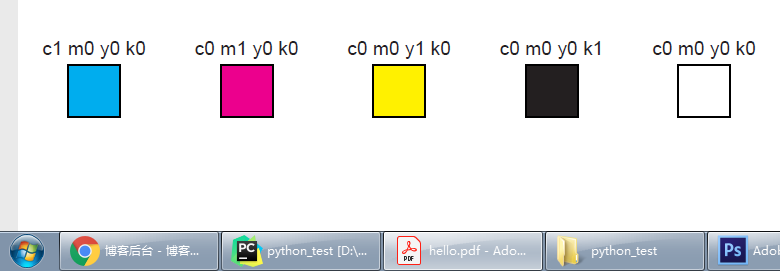
左侧矩形的颜色在重叠的位置处呈现混合显示,最终效果如下:

如果看不到这种效果,则可能需要在PDF查看软件中启用"套印预览"选项。某些PDF查看器(例如evince)不支持套印。Adobe Acrobat Reader是支持套印的。
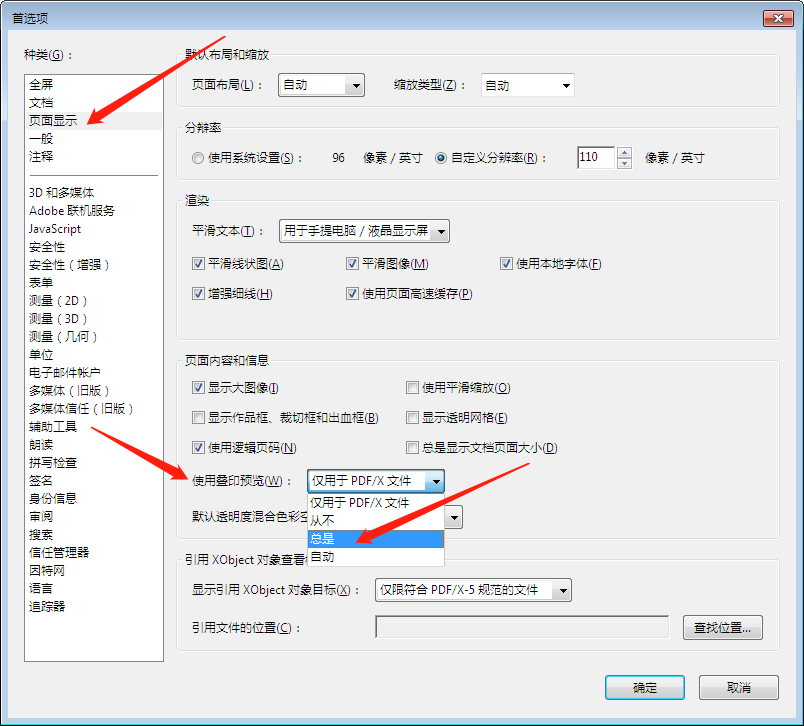
Adobe Acrobat Reader开启叠印的方式:
- Other Object Order of Printing Examples - 打印示例的其他对象顺序
from reportlab.pdfgen import canvas
from reportlab.lib.units import inch
from reportlab.lib.colors import pink, black, red, white, green, brown

canvas = canvas.Canvas("hello.pdf")

def spumoni(canvas):
    x = 0
    dx = 0.4 * inch
    for i in range(4):
        for color in (pink, green, brown):
            canvas.setFillColor(color)
            canvas.rect(x, 0, dx, 3 * inch, stroke=0, fill=1)
            x = x + dx
    canvas.setFillColor(white)
    canvas.setStrokeColor(white)
    canvas.setFont("Helvetica-Bold", 85)
    canvas.drawCentredString(2.75 * inch, 1.3 * inch, "SPUMONI")

spumoni(canvas)
canvas.showPage()
canvas.save()
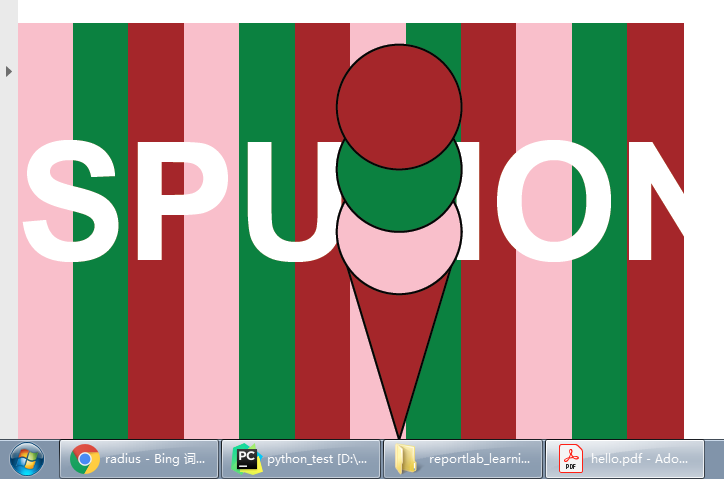
最终效果如下:

该单词的最后一个字母不可见,是因为默认的画布背景为白色,并且在白色背景上绘制白色字母,造成视觉上的不可见效果。
这种在层上面构建复杂绘画的方法可以在pdfgen的很多层中完成,物理限制比处理物理绘画要少。
在上图的基础上,画一个冰淇淋:
from reportlab.pdfgen import canvas
from reportlab.lib.units import inch
from reportlab.lib.colors import pink, black, red, white, green, blue, brown

canvas = canvas.Canvas("hello.pdf")

def spumoni(canvas):
    x = 0
    dx = 0.4 * inch
    for i in range(4):
        for color in (pink, green, brown):
            canvas.setFillColor(color)
            canvas.rect(x, 0, dx, 3 * inch, stroke=0, fill=1)
            x = x + dx
    canvas.setFillColor(white)
    canvas.setStrokeColor(white)
    canvas.setFont("Helvetica-Bold", 85)
    canvas.drawCentredString(2.75 * inch, 1.3 * inch, "SPUMONI")

def spumoni2(canvas):
    # 在spumoni的基础上,画一个冰淇淋

    # 复用spumoni的代码
    spumoni(canvas)

    # 首先画一个冰淇淋的圆锥体(空心的圆锥体)
    p = canvas.beginPath()
    xcenter = 2.75 * inch  # 198.0
    radius = 0.45 * inch  # 32.4
    p.moveTo(xcenter - radius, 1.5 * inch)  # 线条路径移动至(x,y)
    p.lineTo(xcenter + radius, 1.5 * inch)  # 线条滑动,从x到y
    p.lineTo(xcenter, 0)  # 线条从xcenter开始(相当于x的点),滑动到0(相当于y的点)
    p.lineTo(xcenter - radius, 1.5 * inch)
    canvas.setFillColor(brown)
    canvas.setStrokeColor(black)
    canvas.drawPath(p, fill=1)

    # 画冰淇淋上面的圆球(从下往上画)
    y = 1.5 * inch
    for color in (pink, green, brown):
        canvas.setFillColor(color)
        canvas.circle(xcenter, y, radius, fill=1)
        y = y + radius

spumoni2(canvas)
canvas.showPage()
canvas.save()
冰淇淋最终效果:(注意:圆锥体和圆球的不同部分是彼此重叠的)
2.11 Standard fonts and text objects - 标准字体及文本对象
在pdfgen中,可以用许多不同的颜色、字体和大小来绘制文本。
示例1:
from reportlab.pdfgen import canvas
from reportlab.lib.units import inch
from reportlab.lib.colors import magenta, red

canvas = canvas.Canvas("hello.pdf")
lyrics = [
    "well she hit Net Solutions", "and she registered her own .com site now",
    "and filled it up with yahoo profile pics", "she snarfed in one night now",
    "and she made 50 million when Hugh Hefner", "bought up the rights now",
    "and she'll have fun fun fun", "til her Daddy takes the keyboard away"
]

def textsize(canvas):
    canvas.setFont("Times-Roman", 20)
    canvas.setFillColor(red)
    canvas.drawCentredString(2.75 * inch, 2.5 * inch, "Font size examples")
    canvas.setFillColor(magenta)
    size = 7
    y = 2.3 * inch
    x = 1.3 * inch

    for line in lyrics:
        canvas.setFont("Helvetica", size)
        canvas.drawRightString(x, y, f"{size} points:")  # RightString相当于:x = x - textLen
        canvas.drawString(x, y, line)
        y = y - size * 1.2
        size = size + 1.5

textsize(canvas)
canvas.showPage()
canvas.save()
示例1的最终效果:

pdfgen中始终提供许多不同的字体。这些字体不需要存储在PDF文档中,就可以保证它们会出现在Acrobat Reader中。
示例2
from reportlab.pdfgen import canvas
from reportlab.lib.units import inch

canvas = canvas.Canvas("hello.pdf")

def fonts(canvas):
    text = "Now is the time for all good men to..."
    x = 1.8 * inch
    y = 2.7 * inch
    for font in canvas.getAvailableFonts():  # 获取所有的自带的可用字体
        canvas.setFont(font, 10)
        canvas.drawString(x, y, text)
        canvas.setFont("Helvetica", 10)
        canvas.drawRightString(x - 10, y, font + ":")
        y -= 13

fonts(canvas)
canvas.showPage()
canvas.save()
示例2的最终效果:
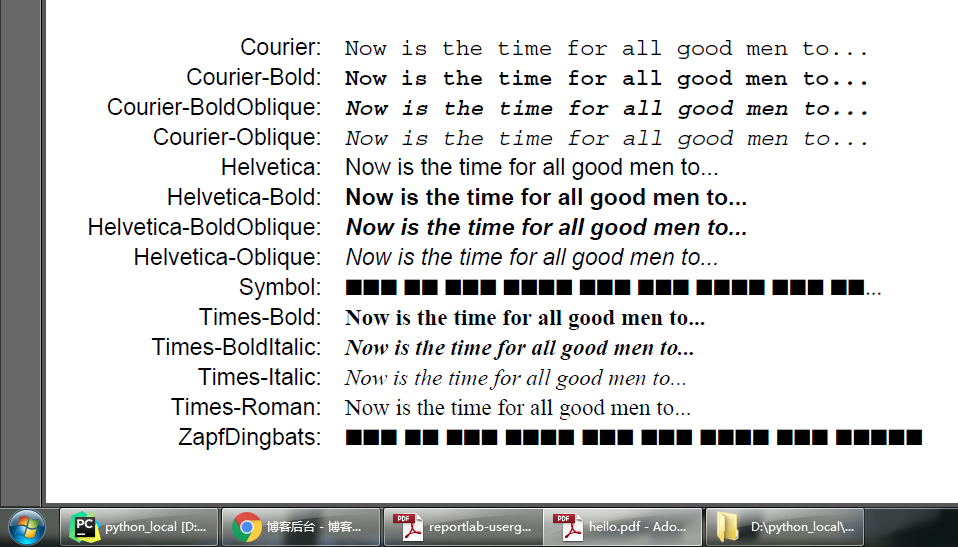
Symbol和ZapfDingbats字体无法显示,是因为这些字体中不存在所需要的字形。(估计是因为字体的呈现需要字形依赖)
2.12 Text object methods - 文本对象的方法
对于PDF文档中的文本专用显示,请使用文本对象。文本对象接口提供了对文本布局参数的详细控制,这些参数在画布级别上不直接可用。另外,它产生的PDF较小,比对drawString()的许多单独调用而言,文本对象的渲染速度更快。
以下一些文本对象的方法与基本文字几何有关:
textobject.setTextOrigin(x,y)
textobject.setTextTransform(a,b,c,d,e,f)
textobject.moveCursor(dx, dy) # from start of current LINE
(x,y) = textobject.getCursor()
x = textobject.getX()
y = textobject.getY()
textobject.setFont(psfontname, size, leading = None)
textobject.textOut(text)
textobject.textLine(text='')
textobject.textLines(stuff, trim=1)
文本对象维护一个文本光标,该光标在绘制文本时在页面上移动。例如,setTextOrigin将光标放置在已知位置,textLine和textLines方法将文本光标向下移动到缺少的行上方。
下例中,演示了:当文本对象的原点设置后,文本对象将依赖于文本光标的自动移动来放置文本
from reportlab.pdfgen import canvas
from reportlab.lib.units import inch
canvas = canvas.Canvas("hello.pdf")
lyrics = [
"well she hit Net Solutions", "and she registered her own .com site now",
"and filled it up with yahoo profile pics", "she snarfed in one night now",
"and she made 50 million when Hugh Hefner", "bought up the rights now",
"and she'll have fun fun fun", "til her Daddy takes the keyboard away",
]
def cursormoves1(canvas):
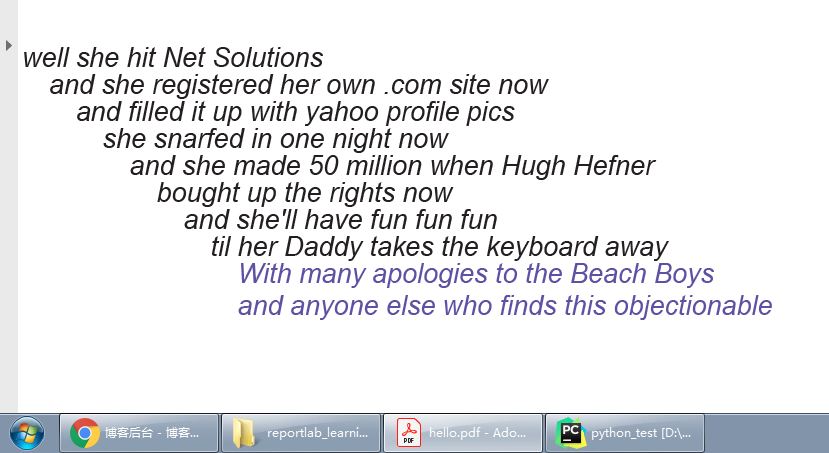
textobject = canvas.beginText()
textobject.setTextOrigin(inch, 2.5 * inch)
textobject.setFont("Helvetica-Oblique", 14)
for line in lyrics:
textobject.textLine(line)
textobject.setFillGray(0.4)
# 下面这个方法,如果少一个"s"变成了textLine,那么换行符会被渲染成一个黑色的实心框框
textobject.textLines("""With many apologies to the Beach Boys
and anyone else who finds this objectionable""")
canvas.drawText(textobject)
cursormoves1(canvas)
canvas.showPage()
canvas.save()
最终效果如下:

也可以通过使用moveCursor()方法来更明确地控制光标的移动。
例:
from reportlab.pdfgen import canvas
from reportlab.lib.units import inch
canvas = canvas.Canvas("hello.pdf")
lyrics = [
"well she hit Net Solutions", "and she registered her own .com site now",
"and filled it up with yahoo profile pics", "she snarfed in one night now",
"and she made 50 million when Hugh Hefner", "bought up the rights now",
"and she'll have fun fun fun", "til her Daddy takes the keyboard away",
]
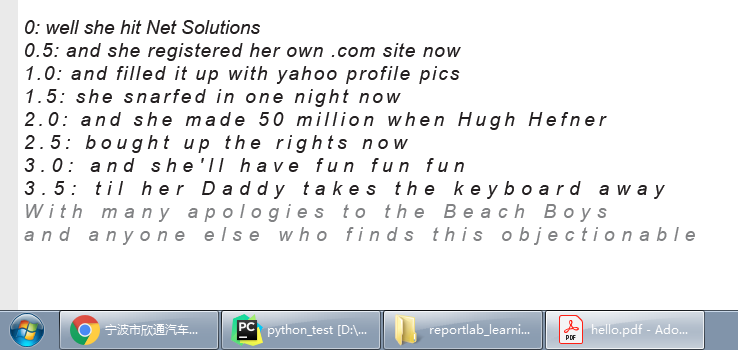
def cursormoves2(canvas):
textobject = canvas.beginText()
textobject.setTextOrigin(2, 2.5 * inch)
textobject.setFont("Helvetica-Oblique", 14)
for line in lyrics:
textobject.textOut(line)
textobject.moveCursor(14, 14) # 根据给定的值进行移动
textobject.setFillColorRGB(0.4, 0, 1)
textobject.textLines("""With many apologies to the Beach Boys
and anyone else who finds this objectionable""")
canvas.drawText(textobject)
cursormoves2(canvas)
canvas.showPage()
canvas.save()
与textLine()函数向下移动相比,此处的textOut()不会向下移动一行,是通过moveCursor()方法进行移动。
moveCursor()方法的作用:从当前行的起始处偏移(dx,dy)开始新行。这不会相对于当前位置移动光标,它会更改以后绘制的每条线的当前偏移量(例如,下次调用textLine()方法,它将光标移动到比此调用中指定的位置低一行的位置)
最终效果如下:
- Character Spacing - 字符间距(字间距)
注意:该方法是控制每个字符的间距,而不是单词之间的间距!
用法:
textobject.setCharSpace(int)
示例:
from reportlab.pdfgen import canvas
from reportlab.lib.units import inch

canvas = canvas.Canvas("hello.pdf")

lyrics = [
    "well she hit Net Solutions", "and she registered her own .com site now",
    "and filled it up with yahoo profile pics", "she snarfed in one night now",
    "and she made 50 million when Hugh Hefner", "bought up the rights now",
    "and she'll have fun fun fun", "til her Daddy takes the keyboard away",
]

def charspace(canvas):
    textobject = canvas.beginText()
    textobject.setTextOrigin(3, 2 * inch)
    textobject.setFont("Helvetica-Oblique", 10)
    charspace = 0
    for line in lyrics:
        textobject.setCharSpace(charspace)
        textobject.textLine(f"{charspace}: {line}")
        charspace += 0.5
    textobject.setFillGray(0.4)
    textobject.textLines("""With many apologies to the Beach Boys
and anyone else who finds this objectionable""")
    canvas.drawText(textobject)

charspace(canvas)
canvas.showPage()
canvas.save()
最终效果如下:
- Word Spacing - 单词间距
注意:该方法是控制单词之间的间距(词间距)!
用法:
textobject.setWordSpace(int)
示例:
from reportlab.pdfgen import canvas
from reportlab.lib.units import inch

canvas = canvas.Canvas("hello.pdf")

lyrics = [
    "well she hit Net Solutions", "and she registered her own .com site now",
    "and filled it up with yahoo profile pics", "she snarfed in one night now",
    "and she made 50 million when Hugh Hefner", "bought up the rights now",
    "and she'll have fun fun fun", "til her Daddy takes the keyboard away",
]

def wordspace(canvas):
    textobject = canvas.beginText()
    textobject.setTextOrigin(3, 2 * inch)
    textobject.setFont("Helvetica-Oblique", 12)
    wordspace = 0
    for line in lyrics:
        textobject.setWordSpace(wordspace)
        textobject.textLine(f"{wordspace}: {line}")
        wordspace += 2.5
    textobject.setFillColorCMYK(0.4, 0, 0.4, 0.2)
    textobject.textLines('''With many apologies to the Beach Boys
    and anyone else who finds this objectionable''')
    canvas.drawText(textobject)

wordspace(canvas)
canvas.showPage()
canvas.save()
最终效果如下:

- Horizontal Scaling - 水平缩放
可以使用setHorizScale()方法水平拉伸或缩小文本行。实际上就是拉伸或压缩文本。
用法:
textobject.setHorizScale(horizScale)
setHorizScale()方法的参数,实际上是一个百分比,默认为100
示例:
from reportlab.pdfgen import canvas
from reportlab.lib.units import inch

canvas = canvas.Canvas("hello.pdf")
lyrics = [
    "well she hit Net Solutions", "and she registered her own .com site now",
    "and filled it up with yahoo profile pics", "she snarfed in one night now",
    "and she made 50 million when Hugh Hefner", "bought up the rights now",
    "and she'll have fun fun fun", "til her Daddy takes the keyboard away",
]

def horizontalscale(canvas):
    textobject = canvas.beginText()
    textobject.setTextOrigin(3, 2 * inch)
    textobject.setFont("Helvetica-Oblique", 12)
    horizontalscale = 80
    for line in lyrics:
        textobject.setHorizScale(horizontalscale)  # setHorizScale()方法的参数,实际上是一个百分比值,默认是100
        textobject.textLine(f"{horizontalscale}: {line}")
        horizontalscale += 10
    textobject.setFillColorCMYK(0.0, 0.4, 0.4, 0.2)
    textobject.textLines('''With many apologies to the Beach Boys
    and anyone else who finds this objectionable''')
    canvas.drawText(textobject)

horizontalscale(canvas)
canvas.showPage()
canvas.save()
最终效果如下:

- Interline spacing(Leading) - 行间间距(行距)
一条线的起点与下一条线的起点之间的垂直偏移称为行距。setLeading()方法调整行距偏移。
用法:
textobject.setLeading(leading)
示例:
from reportlab.pdfgen import canvas
from reportlab.lib.units import inch

canvas = canvas.Canvas("hello.pdf")
lyrics = [
    "well she hit Net Solutions", "and she registered her own .com site now",
    "and filled it up with yahoo profile pics", "she snarfed in one night now",
    "and she made 50 million when Hugh Hefner", "bought up the rights now",
    "and she'll have fun fun fun", "til her Daddy takes the keyboard away",
]

def leading(canvas):
    textobject = canvas.beginText()
    textobject.setTextOrigin(3, 2 * inch)
    textobject.setFont("Helvetica-Oblique", 14)
    leading = 5
    for line in lyrics:
        textobject.setLeading(leading)
        textobject.textLine(f"{leading}: {line}")
        leading += 2
    textobject.setFillColorCMYK(0.8, 0, 0, 0.3)
    textobject.textLines('''With many apologies to the Beach Boys
    and anyone else who finds this objectionable''')
    canvas.drawText(textobject)

leading(canvas)
canvas.showPage()
canvas.save()
最终效果如下:

- Other text object methods - 其他的文本对象方法
a).```
textobject.setTextRenderMode(mode)
b).```
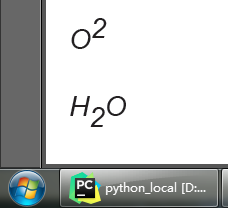
textobject.setRise(float)
```将文本设置为上标或者下标
如果不再需要上标或者下标,必须要复原:setRise(0),不然下一次输出文本内容时,还是在老位子显示文本内容。
setRise()示例:
```python
from reportlab.pdfgen import canvas
from reportlab.lib.units import inch
canvas = canvas.Canvas("hello.pdf")
lyrics = [
"well she hit Net Solutions", "and she registered her own .com site now",
"and filled it up with yahoo profile pics", "she snarfed in one night now",
"and she made 50 million when Hugh Hefner", "bought up the rights now",
"and she'll have fun fun fun", "til her Daddy takes the keyboard away",
]
def leading(canvas):
textobject = canvas.beginText()
textobject.setTextOrigin(10, 50)
textobject.setFont("Helvetica-Oblique", 12)
# textOut()在当前位置输出文本内容,文本游标横向移动
# textLine()在当前位置输出文本内容,文本游标移动到下一行
textobject.textOut("O")
textobject.setRise(5)
textobject.textLine("2")
# 不再需要使用上标或者下标时,就必须进行复原
# 文本对象会记忆它当前的所有状态,否则下一次输出的文本内容还是会出现在老地方
textobject.setRise(0)
textobject.textLine() # 空一行而已
textobject.textOut("H")
textobject.setRise(-5)
textobject.textOut("2")
textobject.setRise(0) # 复原
textobject.textOut("O")
canvas.drawText(textobject)
leading(canvas)
canvas.showPage()
canvas.save()
最终效果如下:
2.13 Paths and Lines - 路径和线
路径对象是为图形的专用构造而设计的。将路径对象绘制到画布上时,它们将被绘制为一个图形(如矩形),并且可以调整整个图形的绘制方式:图形的线条是否可以绘制(描边);图的内部是否可以填充等等。
示例,画一颗星型:
from math import pi, cos, sin

from reportlab.pdfgen import canvas
from reportlab.lib.units import inch

canvas = canvas.Canvas("hello.pdf")

def star(canvas, title="Title Here", aka="Comment here.", xcenter=None, ycenter=None, nvertices=5):
    radius = inch / 3

    if xcenter is None:
        xcenter = 1.2 * inch

    if ycenter is None:
        ycenter = 1 * inch

    canvas.drawCentredString(xcenter, ycenter + 1.3 * radius, title)
    canvas.drawCentredString(xcenter, ycenter - 1.4 * radius, aka)

    p = canvas.beginPath()
    p.moveTo(xcenter, ycenter + radius)

    angle = (2 * pi) * 2 / 5.0
    startangle = pi / 2.0

    for vertex in range(nvertices - 1):
        nextangle = angle * (vertex + 1) + startangle
        x = xcenter + radius * cos(nextangle)
        y = ycenter + radius * sin(nextangle)
        p.lineTo(x, y)

    if nvertices == 5:
        p.close()

    canvas.drawPath(p)

star(canvas)
canvas.showPage()
canvas.save()
最终效果如下:

- Line join settings - 线连接设置
setLineJoin()方法可以调整线段连接顶点的样式(圆形、棱角……)。
线连接设置仅对粗线有用,对于细的线无法清晰地看到。
from math import pi, cos, sin

from reportlab.pdfgen import canvas
from reportlab.lib.units import inch

canvas = canvas.Canvas("hello.pdf")

def star(canvas, title="Title Here", aka="Comment here.", xcenter=None, ycenter=None, nvertices=5):
    radius = inch / 3

    if xcenter is None:
        xcenter = 2.7 * inch

    if ycenter is None:
        ycenter = 1 * inch

    canvas.drawCentredString(xcenter, ycenter + 1.3 * radius, title)
    canvas.drawCentredString(xcenter, ycenter - 1.4 * radius, aka)

    p = canvas.beginPath()
    p.moveTo(xcenter, ycenter + radius)

    angle = (2 * pi) * 2 / 5.0
    startangle = pi / 2.0

    for vertex in range(nvertices - 1):
        nextangle = angle * (vertex + 1) + startangle
        x = xcenter + radius * cos(nextangle)
        y = ycenter + radius * sin(nextangle)
        p.lineTo(x, y)

    if nvertices == 5:
        p.close()

    canvas.drawPath(p)

def joins(canvas):
    canvas.setLineWidth(5)  # 将线条加粗

    # setLineJoin()所提供的参数 -> {0:'miter', 1:'round', 2:'bevel'}
    # miter:尖头的(默认)、round:圆形的、bevel:方角的

    star(canvas, "Default: mitered join", "0: pointed", xcenter=1 * inch)

    canvas.setLineJoin(1)
    star(canvas, "Round join", "1: rounded")

    canvas.setLineJoin(2)
    star(canvas, "Bevelled join", "2: square", xcenter=4.5 * inch)

joins(canvas)
canvas.showPage()
canvas.save()
最终效果如下:

- Line cap settings - 线帽设置

 浙公网安备 33010602011771号