
C语言实现单向循环链表:创建、插入与删除操作
在本篇博客中,我们将深入探讨如何用 C 语言实现一个单向循环链表。我们将逐步实现循环链表的基本操作,包括节点的增、删、改、查和遍历等,并解释相关的概念与代码实现。单向循环链表与普通链表的区别在于最后一个节点的 next 指针指向的是头节点,从而形成了一个闭环。
什么是循环链表?
链表是一种常见的数据结构,通常包含多个节点,每个节点包含一个数据元素和一个指向下一个节点的指针。而循环链表的特点是:
- 单向循环链表中,最后一个节点的
next指针不指向NULL,而是指向头节点。也就是说,遍历链表时,最后会回到头节点,形成一个闭环。 - 循环链表非常适用于需要重复遍历的数据结构,比如缓冲区、任务调度等。
设计单向循环链表
为了实现单向循环链表,我们首先需要定义一个链表节点的结构体(CircLList_t)。该结构体包含两个成员:
data:存储节点的数据。next:指向下一个节点的指针。
接下来,我们将实现几个基本操作:
- 链表创建:创建一个空的单向循环链表。
- 节点插入:在链表的头部、尾部或指定位置插入节点。
- 节点删除:删除链表中的指定节点(头节点、尾节点或指定值节点)。
- 链表遍历:遍历并打印链表中的所有节点。

版本:
/**
 * @file name : CircularLinkedList.c
 * @brief     : 实现单向循环链表的增删改查
 * @author    : qrshxc@163.com
 * @date      : 2025/04/18
 * @version   : 1.0
 * @note      :
 * CopyRight (c)  2025-2026   qrshxc@163.com   All Right Reseverd
 */
1. 创建单向循环链表
首先,我们需要实现一个函数来创建一个空的单向循环链表,并返回链表的头结点。头结点不存储实际数据,它的 next 指针指向自己,表示链表为空。
/**
 * @name       CircularLinkedList_Create
 * @brief     创建一个空单项循环链表,并对空链表进行初始化
 * @param
 * @return
 *      @retval head 头结点地址
 * @date      2025/04/18
 * @version   1.0
 * @note
 */
CircularLinkedList * CircularLinkedList_Create(void)
{
    //1.创建一个头结点并对头结点申请内存
    CircularLinkedList *head = (CircularLinkedList *)calloc(1,sizeof(CircularLinkedList));
    if (NULL == head)
    {
        perror("Calloc memory for head is Failed");
        exit(-1);
    }

    //2.对头结点进行初始化,头结点是不存储数据域,指针域指向自身,体现“循环”思想
    head->next = head;

    //3.把头结点的地址返回即可
    return head;
}
2. 创建新节点
接下来,我们定义一个函数来创建一个新节点,并初始化其数据和指针域。
/**
 * @name       CircularLinkedList_NewNode
 * @brief     创建新节点,并进行初始化(数据域+指针域)
 * @param     data 数据域
 * @return
 *      @retval New 新结点地址
 * @date      2025/04/19
 * @version   1.0
 * @note
 */
CircularLinkedList * CircularLinkedList_NewNode(DataType_t data)
{
    //1.创建一个新结点并对新结点申请内存
    CircularLinkedList *New = (CircularLinkedList *)calloc(1,sizeof(CircularLinkedList));
    if (NULL == New)
    {
        perror("Calloc memory for NewNode is Failed");
        return NULL;
    }

    //2.对新结点的数据域和指针域进行初始化
    New->data = data;
    New->next = NULL;

    return New;
}
3.插入节点
头部插入
我们可以实现一个头部插入操作,将新节点插入到链表的开头。

/**
 * @name       CircularLinkedList_headInsert
 * @brief     头部插入新节点
 * @param     head 头结点
 * @param     data 数据域
 * @return
 *      @retval true 插入成功
 *      @retval false 插入失败
 * @date      2025/04/19
 * @version   1.0
 * @note
 */
bool CircularLinkedList_headInsert(CircularLinkedList *head, DataType_t data)
{
    //创建新节点
    CircularLinkedList *New = CircularLinkedList_NewNode(data);
    if (New == NULL)
    {
        printf("Can not insert NewNode!\n");
        return false;
    }
    //判断链表是否为空,如果为空,则直接插入
    if (head->next == head)
    {
        head->next = New;
        New->next = New; //自己指向自己
        return true;
    }
    CircularLinkedList *tail = head->next; //备份当前节点
    //遍历链表,找到尾结点
    while (tail->next != head->next)
    {
        tail = tail->next; //直接后继节点为当前节点
    }
    New->next = head->next; // 新节点指向原首节点
    head->next = New; //头结点指向新节点
    tail->next = New; //尾结点指向头结点
    return true;
}
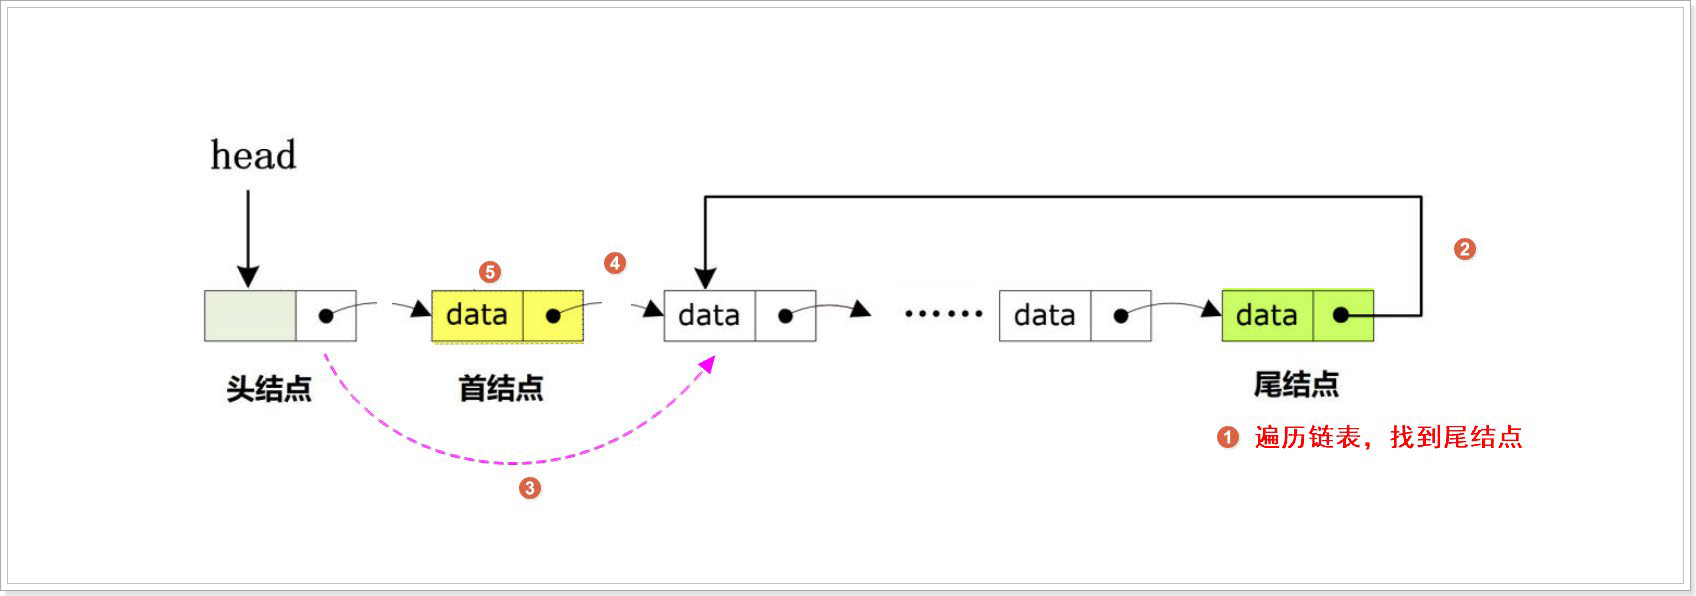
尾部插入
尾部插入操作将新节点插入到链表的末尾。此时我们需要遍历链表找到尾节点,将尾节点的 next 指针指向新节点。

/**
 * @name       CircularLinkedList_tailInsert
 * @brief     尾部插入新节点
 * @param     head 头结点
 * @param     data 数据域
 * @return
 *      @retval true 插入成功
 *      @retval false 插入失败
 * @date      2025/04/19
 * @version   1.0
 * @note
 */
bool CircularLinkedList_tailInsert(CircularLinkedList *head, DataType_t data)
{
    //创建新节点
    CircularLinkedList *New = CircularLinkedList_NewNode(data);
    if (New == NULL)
    {
        printf("Can not insert NewNode!\n");
        return false;
    }
    //判断链表是否为空,如果为空,则直接插入
    if (head->next == head)
    {
        head->next = New;
        New->next = New; //自己指向自己
        return true;
    }
    CircularLinkedList *tail = head->next; //备份当前节点
    //遍历链表,找到尾结点
    while (tail->next != head->next)
    {
        tail = tail->next; //直接后继节点为当前节点
    }
    tail->next = New; //尾结点指向新节点
    New->next = head->next; //新节点指向首节点,维持循环
    return true;
}
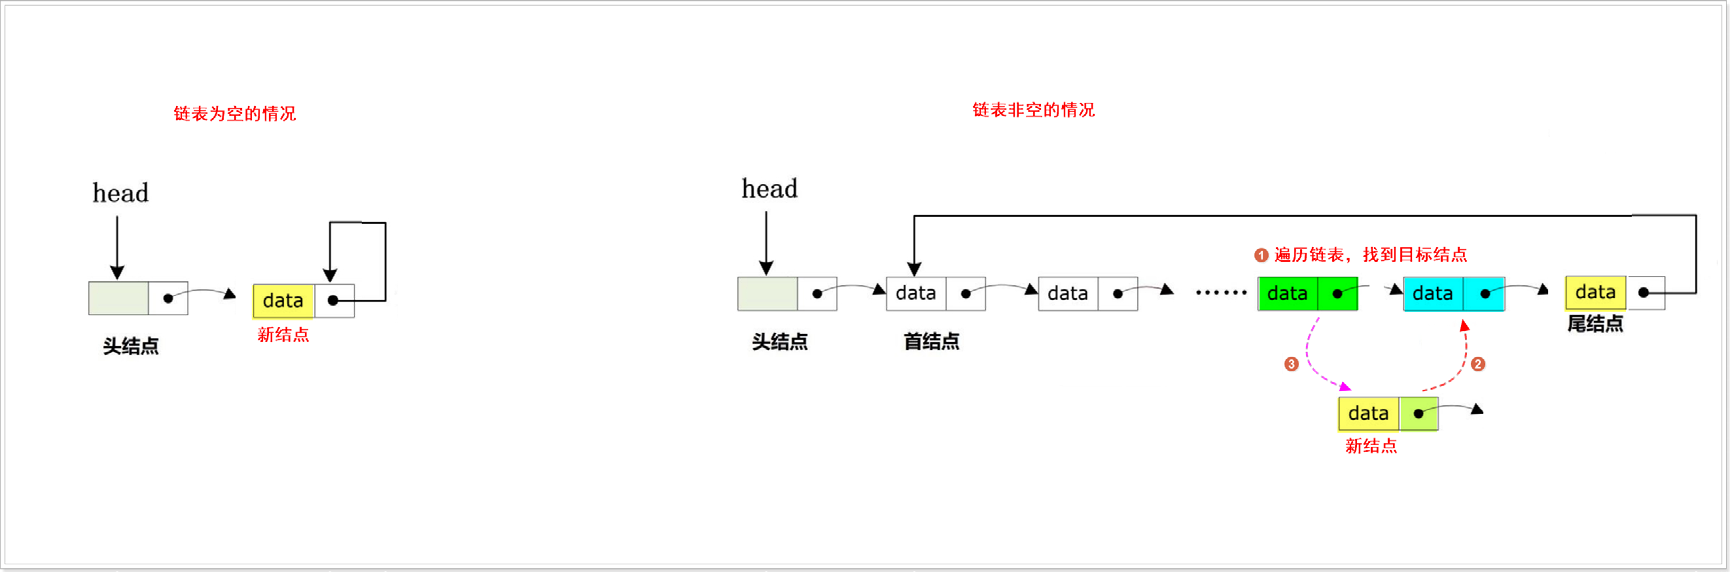
指定位置插入
我们还可以根据指定的目标值(destval)来插入新节点。我们遍历链表,找到目标节点后,将新节点插入到目标节点之后。
/**
 * @name       CircularLinkedList_DestInsert
 * @brief     在指定节点后插入新节点
 * @param     head 头结点
 * @param     destval 目标值
 * @param     data 数据域
 * @return
 *      @retval true 插入成功
 *      @retval false 插入失败
 * @date      2025/04/19
 * @version   1.0
 * @note
 */
bool CircularLinkedList_DestInsert(CircularLinkedList *head, DataType_t destval, DataType_t data)
{
    //创建新节点
    CircularLinkedList *New = CircularLinkedList_NewNode(data);
    if (New == NULL)
    {
        printf("Can not insert NewNode!\n");
        return false;
    }
    //判断链表是否为空,如果为空,则直接插入
    if (head->next == head)
    {
        head->next = New;
        New->next = New; //自己指向自己
        return true;
    }
    CircularLinkedList *current = head->next; //备份当前节点来找目标节点
    //遍历链表,找到目标值节点
    do {
        if (current->data == destval)  // 找到目标节点
        {
            New->next = current->next;
            current->next = New;
            return true;
        }
        current = current->next;
    } while (current != head->next);  // 循环直到回到起始节点
    //如果到这,说明没找到目标值
    printf("Can not find destval!\n");
    return false;
}
4. 删除节点
删除节点时,我们可以根据目标值或位置来删除相应的节点。我们提供头部删除、尾部删除和按值删除三种操作。
头部删除
头部删除操作删除链表的第一个节点。
/**
 * @name      CircularLinkedList_headDel
 * @brief     删除头部节点
 * @param     head 头结点
 * @return
 *      @retval true 删除成功
 *      @retval false 删除失败
 * @date      2025/04/19
 * @version   1.0
 * @note
 */
bool CircularLinkedList_headDel(CircularLinkedList *head)
{
    // 空链表检查
    if (head->next == head)
    {
        printf("Invalid node!\n");
        return false;
    }
    CircularLinkedList *FirstNode = head->next; //备份首节点方便释放
    //1.只有首节点
    if (head->next->next == head->next)
    {
        head->next = head;
        free(FirstNode);
        return true;
    }
    //2.多个节点
    CircularLinkedList *tail = head->next; //备份当前节点
    //遍历循环找到尾结点,让尾结点指向新首节点
    while(tail->next != head->next)
    {
        tail = tail->next;
    }
    head->next = FirstNode->next; //跳过首节点指向第二个节点
    tail->next = head->next; //尾结点指向新首节点
    free(FirstNode); //释放内存
    return true;
}
尾部删除
尾部删除操作删除链表的最后一个节点。

/**
 * @name      CircularLinkedList_tailDel
 * @brief     删除尾部节点
 * @param     head 头结点
 * @return
 *      @retval true 删除成功
 *      @retval false 删除失败
 * @date      2025/04/19
 * @version   1.0
 * @note
 */
bool CircularLinkedList_tailDel(CircularLinkedList *head)
{
    // 空链表检查
    if (head->next == head)
    {
        printf("Invalid node!\n");
        return false;
    }
    CircularLinkedList *tail = head->next; //备份首节点方便释放
    CircularLinkedList *prev = head; //备份当前节点的直接前驱节点
    //1.只有首节点
    if (head->next->next == head->next)
    {
        head->next = head;
        free(tail);
        return true;
    }
    //2.多个节点
    //遍历循环找到尾结点,让尾结点指向新首节点
    while (tail->next != head->next)
    {
        tail = tail->next;
        prev = prev->next;
    }
    prev->next = head->next; //尾结点直接前驱节点指向首节点
    free(tail); //释放尾结点内存
    return true;
}
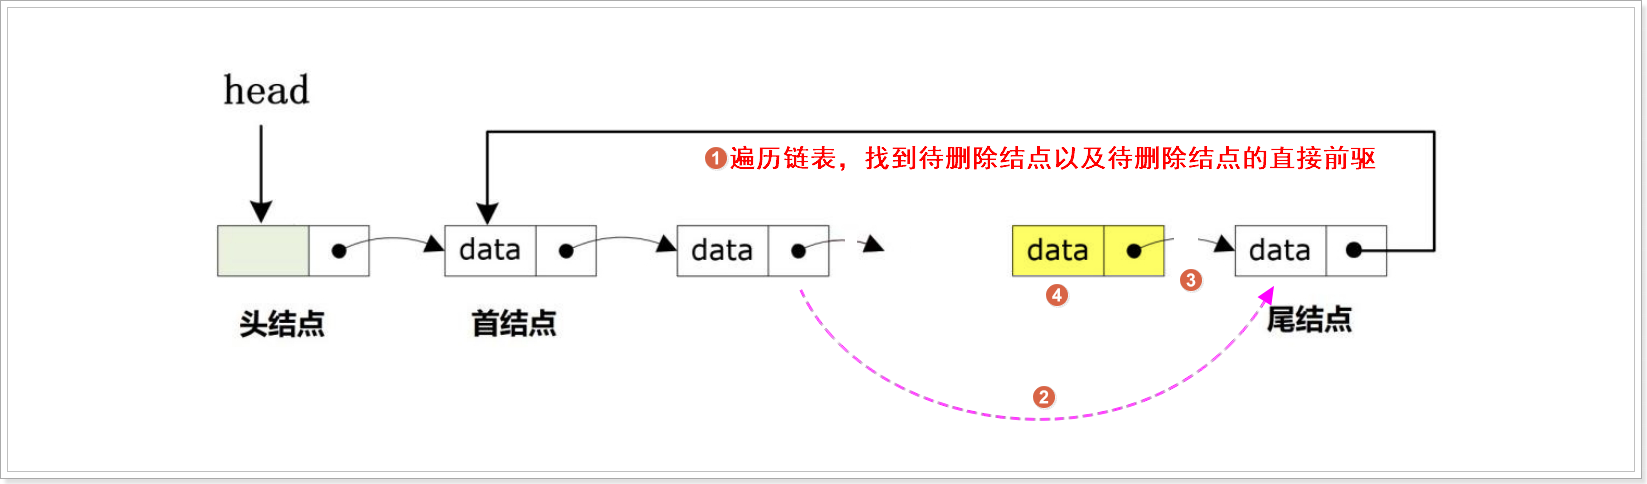
指定删除
按值删除操作删除链表中第一个匹配目标值的节点。
/**
 * @name  CircularLinkedList_DestDel
 * @brief 删除链表中第一个值为destval的节点
 * @param head 链表头指针
 * @param destval 要删除的目标值
 *      @retval true 删除成功
 *      @retval false 删除失败
 * @date      2025/04/19
 * @version   1.0
 * @note
 */
bool CircularLinkedList_DestDel(CircularLinkedList *head, DataType_t destval)
{
    // 空链表检查
    if (head->next == head)
    {
        printf("Invalid node!\n");
        return false;
    }
    CircularLinkedList *current = head->next; //当前节点
    CircularLinkedList *prev = head; //当前节点的直接前驱
    //1.只有首节点
    if (head->next->next == head->next)
    {
        if (current->data == destval)
        {
            head->next = head; // 删除唯一节点
            free(current);
            return true;
        }
        else
        {
            printf("Not find destval!\n");
            return false;
        }
    }
    //2.多个节点
    //遍历循环找到目标值节点
    do
    {
        if (current->data == destval)
        {
            prev->next = current->next; //跳过当前节点
            free(current);
            return true;
        }
        prev = current;
        current = current->next;

    } while (current != head->next); //循环直到回到起始节点

    printf("Not find destval\n");
    return false;
}
5. 打印链表
我们可以通过遍历链表并打印每个节点的数据来实现链表的打印功能。
/**
 * @name       CircularLinkedList_Print
 * @brief     遍历并打印链表
 * @param     head 头结点
 * @return
 *      @retval true 打印成功
 *      @retval false 打印失败
 * @date      2025/04/19
 * @version   1.0
 * @note
 */
bool CircularLinkedList_Print(CircularLinkedList *head)
{
    CircularLinkedList *Phead = head;

    //判断当前链表是否为空,为空则直接退出
    if (head->next == head)
    {
        printf("Circular LinkedList is empty!\n");
        return false;
    }

    //从首结点开始遍历
    while (Phead->next)
    {
        //把头结点的直接后继作为新的头结点
        Phead = Phead->next;

        //输出头结点的直接后继的数据域
        printf("data = %d\n", Phead->data);

        //判断是否到达尾结点,尾结点的next指针是指向首结点的地址
        if (Phead->next == head->next)
        {
            break;
        }
    }
    return true;
}
6.测试及结果
int main() {
    // 1. 创建空循环链表
    CircularLinkedList *list = CircularLinkedList_Create();

    // 2. 头部插入测试
    CircularLinkedList_headInsert(list, 3);
    CircularLinkedList_headInsert(list, 2);
    CircularLinkedList_headInsert(list, 1);
    printf("Head Insert Test:\n");
    CircularLinkedList_Print(list); // 输出: 1 -> 2 -> 3 -> (head)
    printf("------------------------\n");

    // 3. 尾部插入测试
    CircularLinkedList_tailInsert(list, 4);
    printf("Tail Insert Test:\n");
    CircularLinkedList_Print(list); // 输出: 1 -> 2 -> 3 -> 4 -> (head)
    printf("------------------------\n");

    // 4. 指定位置插入测试
    CircularLinkedList_DestInsert(list, 2, 5);
    printf("Destination Insert Test:\n");
    CircularLinkedList_Print(list); // 输出: 1 -> 2 -> 5 -> 3 -> 4 -> (head)
    printf("------------------------\n");

    // 5. 头部删除测试
    CircularLinkedList_headDel(list);
    printf("Head Delete Test:\n");
    CircularLinkedList_Print(list); // 输出: 2 -> 5 -> 3 -> 4 -> (head)
    printf("------------------------\n");

    // 6. 尾部删除测试
    CircularLinkedList_tailDel(list);
    printf("Tail Delete Test:\n");
    CircularLinkedList_Print(list); // 输出: 2 -> 5 -> 3 -> (head)
    printf("------------------------\n");

    // 7. 指定值删除测试
    CircularLinkedList_DestDel(list, 5);
    printf("Destination Delete Test:\n");
    CircularLinkedList_Print(list); // 输出: 2 -> 3 -> (head)

    return 0;
}
结果
Head Insert Test:
data = 1
data = 2
data = 3
------------------------
Tail Insert Test:
data = 1
data = 2
data = 3
data = 4
------------------------
Destination Insert Test:
data = 1
data = 2
data = 5
data = 3
data = 4
------------------------
Head Delete Test:
data = 2
data = 5
data = 3
data = 4
------------------------
Tail Delete Test:
data = 2
data = 5
data = 3
------------------------
Destination Delete Test:
data = 2
data = 3
在这篇博客中,我们实现了一个基础的单向循环链表,并详细讲解了如何实现循环链表的增、删、改、查等操作。循环链表具有常见链表的优点,并且通过循环连接使得链表更加灵活,适用于各种需要重复遍历的数据结构。
望这篇博客能帮助你理解并实现单向循环链表,提升你对链表数据结构的掌握。

 浙公网安备 33010602011771号