


WCF开发框架形成之旅---WCF的几种寄宿方式
WCF寄宿方式是一种非常灵活的操作,可以在IIS服务、Windows服务、Winform程序、控制台程序中进行寄宿,从而实现WCF服务的运行,为调用者方便、高效提供服务调用。本文分别对这几种方式进行详细介绍并开发例子进行说明,以求大家对WCF寄宿的方式进行全面的认识和了解。
1、 WCF服务的IIS服务寄宿
我在我前面几篇WCF开发框架的介绍文章中,介绍过了WCF常用的一种寄宿方式,IIS服务寄宿。这种寄宿方式是最为方便的方式,而且由于服务只需要IIS运行就能自动运行起来,因此广为使用。
创建这种方式IIS寄宿方式的,只需要在解决方案里面,添加WCF服务应用程序,就可以生成这种的服务模块了。
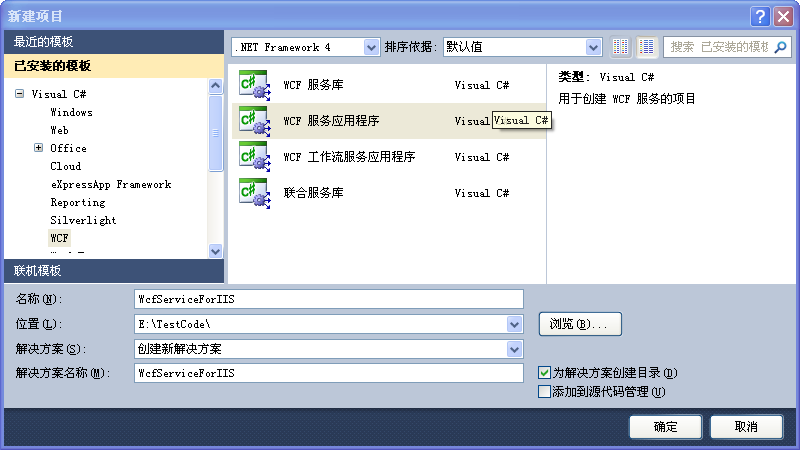
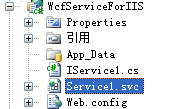
这个是一个基于Web的应用程序,创建项目后会生成一个Service1.svc的服务页面,以及相关的WCF服务接口和实现,如下图所示。
这个就是简单的WCF服务,当然如果是复杂的实际应用,会考虑和数据库打交道,而且可能项目会分成几个进行管理,从而实现更好的逻辑分离操作。
2、 创建WCF服务库为多种寄宿做准备
除了上面常用的IIS服务寄宿,一般还会有各种各样的寄宿方式,不过如果采用其他方式的寄宿方式,一般会把WCF服务和寄宿方式进行项目的分离,实现更好的重用操作,特别WCF需要考虑多种寄宿方式的情况下。下面是WCF服务库和WCF服务应用程序的介绍说明,先了解一下基础。
WCF服务库,可以认为是一个包含WCF服务以及契约定义的类库。这里WCF服务库还不能直接运行,你可以在其他项目里引用,在宿主里启用托管这个库。
而WCF应用程序,是一个可以执行的程序,它有独立的进程,WCF服务类契约的定义,可以直接看到运行的效果。此项目模板应该是基于IIS托管的程序。
前者一般考虑WCF服务设计的时候,服务类的定义为单独的库,可以为其它项目使用。提高代码的复用性。后者在开发基于IIS托管的WCF服务程序时,比较多见,自学的时候也可以使用这种类型。当然你也可以修改这些代码,比如把WCF服务程序里的类,移到一个单独的类库里。
创建WCF服务库,可以理解为我们开发.NET程序时创建的一个类库模块,不含界面,如下所示,创建一个WCF服务库。

确定后就只有一个示例服务Service1生成了。

这里,我们为了演示,就不修改任何它们的代码,原始的代码如下所示。

using System;
using System.Collections.Generic;
using System.Linq;
using System.Runtime.Serialization;
using System.ServiceModel;
using System.Text;

namespace WcfServiceLibrary
{
    public class Service1 : IService1
    {
        public string GetData(int value)
        {
            return string.Format("You entered: {0}", value);
        }

        public CompositeType GetDataUsingDataContract(CompositeType composite)
        {
            if (composite == null)
            {
                throw new ArgumentNullException("composite");
            }
            if (composite.BoolValue)
            {
                composite.StringValue += "Suffix";
            }
            return composite;
        }
    }
}
3、 WCF服务的控制台程序寄宿
这种也是一种常见的WCF服务寄宿方式,通过启动一个类似DOS窗口的控制台软件,实现WCF服务的动态寄宿,关闭控制台程序,服务就自然终止。
这种方式很简单,创建一个控制台程序,然后添加WCF服务类库的项目应用,在Main函数里面添加下面代码即可实现。
namespace WcfService_HostConsole
{
    class Program
    {
        static void Main(string[] args)
        {
            try
            {
                ServiceHost serviceHost = new ServiceHost(typeof(Service1));
                if (serviceHost.State != CommunicationState.Opened)
                {
                    serviceHost.Open();
                }

                Console.WriteLine("WCF 服务正在运行......");
                Console.WriteLine("输入回车键 <ENTER> 退出WCF服务");
                Console.ReadLine();
                serviceHost.Close();

            }
            catch (Exception ex)
            {
                Console.WriteLine(ex);
            }
        }
    }
}

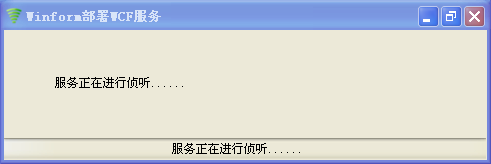
4、 WCF服务的Winform程序寄宿
和控制台程序一样,我们创建一个Winform项目,然后在窗体启动代码里面添加寄宿方式的代码即可,为了较好的响应体验,可以使用后台线程程序进行服务启动,如下所示。
namespace WcfService_HostWinform
{
    public partial class FrmMain : Form
    {
        ServiceHost serviceHost = null;
        BackgroundWorker worker = null;

        public FrmMain()
        {
            InitializeComponent();

            worker = new BackgroundWorker();
            worker.RunWorkerCompleted += new RunWorkerCompletedEventHandler(worker_RunWorkerCompleted);
            worker.DoWork += new DoWorkEventHandler(worker_DoWork);

            if (!worker.IsBusy)
            {
                tssTips.Text = "正在启动......";
                lblTips.Text = tssTips.Text;
                worker.RunWorkerAsync();
            }
        }

        void worker_DoWork(object sender, DoWorkEventArgs e)
        {
            try
            {
                serviceHost = new ServiceHost(typeof(Service1));
                if (serviceHost.State != CommunicationState.Opened)
                {
                    serviceHost.Open();
                }

                e.Result = "正常";
            }
            catch (Exception ex)
            {
                e.Result = ex.Message;
            }
        }

        void worker_RunWorkerCompleted(object sender, RunWorkerCompletedEventArgs e)
        {
            if (e.Result != null)
            {
                if (e.Result.ToString() == "正常")
                {
                    tssTips.Text = "服务正在进行侦听......";
                }
                else
                {
                    tssTips.Text = string.Format("错误:{0}", e.Result);
                }

                lblTips.Text = tssTips.Text;
            }
        }
        ...........................
    }
}
当然为了防止Winform程序被不小心关闭,可以添加托盘代码,把程序缩小到托盘图标里面。
5、 WCF服务的Windows 服务程序寄宿
这种方式的服务寄宿,和IIS一样有一个一样的优点,系统启动后,WCF服务也会跟着启动了,不用人工干预,也是一种较好的寄宿方式。
为了实现这种方式的寄宿,我们创建一个控制台程序,然后添加响应的Window服务和安装程序类
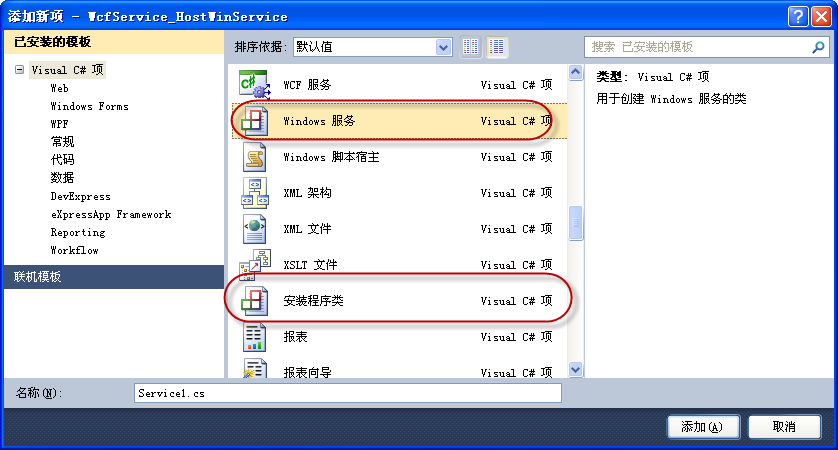
然后在服务类启动里面添加WCF的寄宿代码,如下所示。
    public class ServiceManager : ServiceBase
    {
        private static object syncRoot = new Object();//同步锁
        private ServiceHost serviceHost = null; //寄宿服务对象

        public ServiceManager()
        {
            this.ServiceName = Constants.ServiceName;
        }

        /// <summary>
        /// 设置具体的操作,以便服务可以执行它的工作。
        /// </summary>
        protected override void OnStart(string[] args)
        {
            try
            {
                serviceHost = new ServiceHost(typeof(Service1));
                if (serviceHost.State != CommunicationState.Opened)
                {
                    serviceHost.Open();
                }
            }
            catch (Exception ex)
            {
                LogTextHelper.Error(ex);
            }

            LogTextHelper.Info(Constants.ServiceName + DateTime.Now.ToShortTimeString() + "已成功调用了服务一次。");

            LogTextHelper.Info(Constants.ServiceName + "已成功启动。");
        }
为了实现通过该控制台程序实现参数化安装和卸载服务,我们需要拦截控制台的参数,并进行相应的操作,如下所示。
        /// <summary>
        /// 应用程序的主入口点。
        /// </summary>
        [STAThread]
        static void Main(string[] args)
        {
            ServiceController service = new ServiceController(Constants.ServiceName);

            // 运行服务
            if (args.Length == 0)
            {
                ServiceBase[] ServicesToRun;
                ServicesToRun = new ServiceBase[] { new ServiceManager() };
                ServiceBase.Run(ServicesToRun);
            }
            else if (args[0].ToLower() == "/i" || args[0].ToLower() == "-i")
            {
                #region 安装服务
                if (!ServiceIsExisted(Constants.ServiceName))
                {
                    try
                    {
                        string[] cmdline = { };
                        string serviceFileName = System.Reflection.Assembly.GetExecutingAssembly().Location;

                        TransactedInstaller transactedInstaller = new TransactedInstaller();
                        AssemblyInstaller assemblyInstaller = new AssemblyInstaller(serviceFileName, cmdline);
                        transactedInstaller.Installers.Add(assemblyInstaller);
                        transactedInstaller.Install(new System.Collections.Hashtable());

                        TimeSpan timeout = TimeSpan.FromMilliseconds(1000 * 10);
                        service.Start();
                        service.WaitForStatus(ServiceControllerStatus.Running, timeout);
                    }
                    catch (Exception ex)
                    {
                        LogTextHelper.Info(ex);
                        throw;
                    }
                }
                #endregion
            }
            else if (args[0].ToLower() == "/u" || args[0].ToLower() == "-u")
            {
                #region 删除服务
                try
                {
                    if (ServiceIsExisted(Constants.ServiceName))
                    {
                        string[] cmdline = { };
                        string serviceFileName = System.Reflection.Assembly.GetExecutingAssembly().Location;

                        TransactedInstaller transactedInstaller = new TransactedInstaller();
                        AssemblyInstaller assemblyInstaller = new AssemblyInstaller(serviceFileName, cmdline);
                        transactedInstaller.Installers.Add(assemblyInstaller);
                        transactedInstaller.Uninstall(null);
                    }
                }
                catch (Exception ex)
                {
                    LogTextHelper.Info(ex);
                    throw;
                }
                #endregion
            }
        }
编译程序成功后,我们添加两个批处理的DOS脚本来实现执行程序的自动安装和卸载,如下所示。
安装脚本
"WcfService_HostWinService.exe" -i
pause
卸载脚本
"WcfService_HostWinService.exe" -u
pause
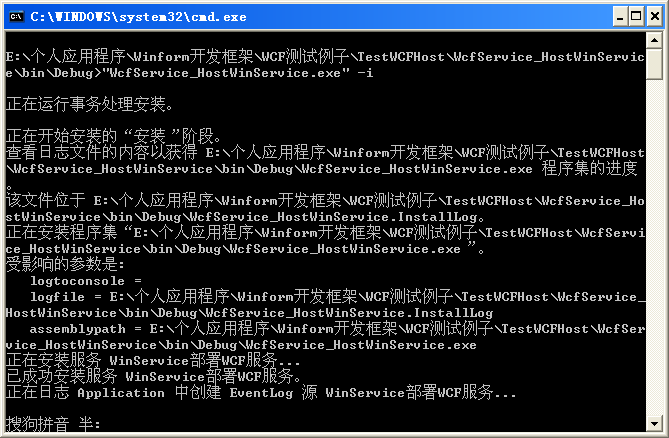
顺利执行脚本后,服务列表里面就增加一个服务项目了。
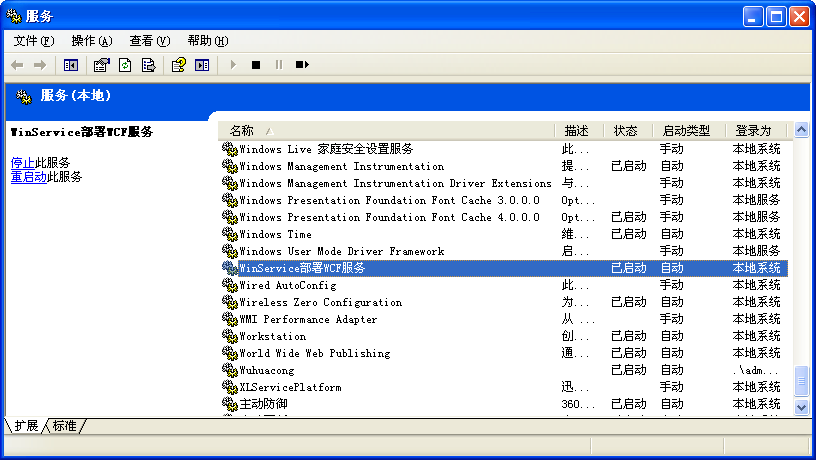
卸载操作,直接执行脚本就会卸载服务,非常方便哦。
6、 WCF服务的Web寄宿
当然,除了以上几种方式,这种以WCF服务库的方式,也可以在Web方式进行寄宿(IIS方式),这种方式更简单,添加一个后缀名的svc的文件,只需要一行代码即可,如下所示。

7、 使WCF服务支持GET方式调用
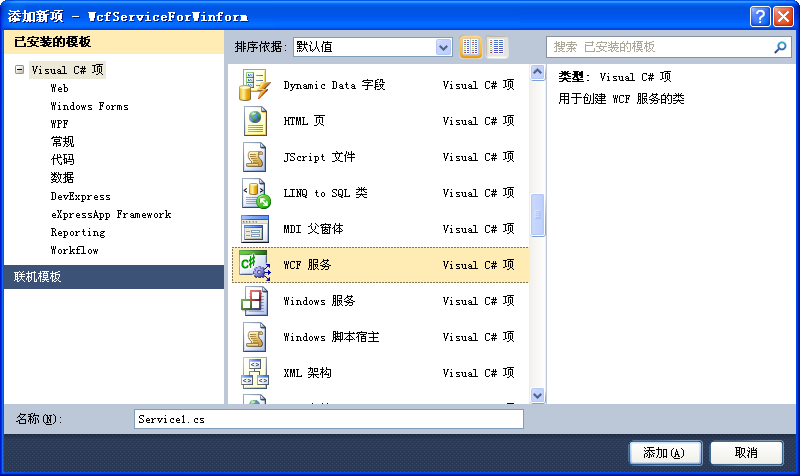
有时候,我们为了需要,可能通过一个小程序发布一个服务,然后供其他程序进行调用,可能是Web,也可以是Winform,但是我们是想提供一个基于HTTP,GET或者POST方式来实现接口的调用的,例如,提供一个JSON格式或者文本格式的内容返回操作。
如果是整合在Winform里面,那么我们在Winform里面添加一个WCF的项,修改里面的代码就可以了,如下所示。
首先要在使用GET方式的WCF服务接口的添加说明。如果是POS方式,增加设置有点不同([WebInvoke(Method = "POST", BodyStyle = WebMessageBodyStyle.Wrapped, ResponseFormat = WebMessageFormat.Json)])。
namespace WcfServiceForWinform
{
    [ServiceContract]
    public interface IService1
    {
        [OperationContract]
        void DoWork();

        [OperationContract]
        [WebInvoke(Method = "GET", ResponseFormat = WebMessageFormat.Json)]
        string GetData(int value);
    }
}
第二,在实现类里面添加相应的设置
namespace WcfServiceForWinform
{
    [AspNetCompatibilityRequirements(RequirementsMode = AspNetCompatibilityRequirementsMode.Allowed)]
    public class Service1 : IService1
    {
        public void DoWork()
        {
        }

        public string GetData(int value)
        {
            return string.Format("You entered: {0}", value);
        }
    }
}
配置文件如下所示,颜色标注特别的要注意:
<?xml version="1.0"?>
<configuration>

  <system.web>
    <compilation debug="true"/>
  </system.web>

  <system.serviceModel>
    <services>
      <service name="WcfServiceForWinform.Service1"  behaviorConfiguration="ServiceConfig">
        <endpoint address="" binding="webHttpBinding"
                  bindingConfiguration="webHttpBindingWithJsonP" behaviorConfiguration="webHttpBehavior"
                  contract="WcfServiceForWinform.IService1">
        </endpoint>
        <endpoint address="mex" binding="mexHttpBinding" contract="IMetadataExchange" />
        <host>
          <baseAddresses>
            <add baseAddress="http://localhost:9000/Service1/" />
          </baseAddresses>
        </host>
      </service>
    </services>

    <bindings>
      <webHttpBinding>
        <binding name="webHttpBindingWithJsonP" crossDomainScriptAccessEnabled="true"  />
      </webHttpBinding>
    </bindings>

    <behaviors>
      <endpointBehaviors>
        <behavior name="webHttpBehavior">
          <webHttp/>
        </behavior>
      </endpointBehaviors>

      <serviceBehaviors>
        <behavior name="ServiceConfig">
          <serviceMetadata httpGetEnabled="True" policyVersion="Policy15"/>
          <serviceDebug includeExceptionDetailInFaults="False"/>
        </behavior>
      </serviceBehaviors>
    </behaviors>

    <serviceHostingEnvironment aspNetCompatibilityEnabled="true" />
  </system.serviceModel>

  <startup>
    <supportedRuntime version="v4.0" sku=".NETFramework,Version=v4.0"/>
  </startup>
</configuration>
运行Winform程序,启动了WCF服务后,我们可以在浏览器(Chrome)上进行操作,如下结果所示。

从上图我们可以看到,这个通过Winform启动起来的WCF服务,连接也能通过GET方式进行接口调用了,接口可以通过参数进行传递,对于一些方便传输数据的接口如JSON接口,就是一种非常方便的调用了。
======================================================================
WCF全面解析一书中的例子S104,直接将Service目录部署到iis是无法得到服务相应的,需要在项目中新建一个web项目,删除掉自动生成的所有文件之后,把Service目录下的CalculatorService.cs,CalculatorService.svc,Web.config三个文件拷贝到新建的web项目根目录下。
如下图所示:

然后在iis里建立虚拟目录。设置本地路径为webApplication1的根目录。
 在iis中点击wcf虚拟目录,找到CalculatorService.svc文件,右键浏览,可以在浏览器中发现服务寄宿成功。

服务寄宿成功!

把客户端client项目中的app.config文件endpoint address修改为iis服务寄宿的地址:
<configuration>
  <system.serviceModel>
    <client>
      <endpoint name="calculatorservice"
                address="http://192.168.5.17:9999/wcf/CalculatorService.svc"
                binding="wsHttpBinding"
                contract="Artech.WcfServices.Service.Interface.ICalculator"/>
    </client>
  </system.serviceModel>
</configuration>
运行客户端程序client得到服务返回结果,iis寄宿wcf服务调用成功!


===========================================================
若要公开WCF服务,需要提供一个运行服务的宿主环境。就像.NET CLR需要创建宿主环境以托管代码一般,WCF的宿主环境同样运行在进程的应用程序域中。在应用程序域中可以创建一个或多个ServiceHost实例,其关系如图一所示:
图一 托管ServiceHost
WCF并不推荐在应用程序域中创建多个ServiceHost实例。如果要托管多个服务,完全可以在一个宿主中通过多个Endpoint公开多个WCF服务。由于应用程序域对安全进行了隔离,如果需要提供不同的安全上下文,则有必要创建多个ServiceHost实例。
WCF的典型宿主包括以下四种:
1、"Self-Hosting" in a Managed Application(自托管宿主)
2、Managed Windows Services(Windows Services宿主)
3、Internet Information Services(IIS宿主)
4、Windows Process Activation Service(WAS宿主)
以下将通过一个具体的实例分别介绍这几种宿主的托管方式及其相关的注意事项。在这样的一个实例中,我们定义了如下的服务契约:
namespace BruceZhang.WCF.DocumentsExplorerServiceContract
{
[ServiceContract]
public interface IDocumentsExplorerService
{
[OperationContract]
[FaultContract(typeof(DirectoryNotFoundException))]
DocumentList FetchDocuments(string homeDir);
[OperationContract]
Stream TransferDocument(Document document);
}
}
服务的实现则如下所示:
namespace BruceZhang.WCF.DocumentsExplorerServiceImplementation
{
[ServiceBehavior(InstanceContextMode=InstanceContextMode.Single)]
public class DocumentsExplorerService : IDocumentsExplorerService
{
#region IDocumentsExplorerService Members
public DocumentList FetchDocuments(string homeDir)
{
//implementation code
}
public Stream TransferDocument(Document document)
{
//implementation code
}
#endregion
}
}
在服务契约的操作中,DocumentList与Document则为自己定义的数据契约:
namespace BruceZhang.WCF.DocumentsExplorerDataContract
{
[DataContract]
public class Document
{
//DataMembers
}
}
namespace BruceZhang.WCF.DocumentsExplorerDataContract
{
[KnownType(typeof(Document))]
[CollectionDataContract]
public class DocumentList:IList<Document>
{
//IList<Document> Methods
}
}
注意以上定义的服务契约、服务类与数据契约的命名空间。
1、自托管宿主
利用WCF提供的ServiceHost<T>提供的Open()和Close()方法,可以便于开发者在控制台应用程序,Windows应用程序乃至于ASP.NET应用程序中托管服务。不管自宿主的环境是何种应用程序,实质上托管服务的方式都是一致的。例如在控制台应用程序中:
using (ServiceHost host = new ServiceHost(typeof(DocumentsExplorerService)))
{
host.Open();
Console.WriteLine("The Service had been launched.");
Console.Read();
}
由于ServiceHost实例是被创建在应用程序域中,因此我们必须保证宿主进程在调用服务期间不会被关闭,因此我们利用Console.Read()来阻塞进程,以使得控制台应用程序能够一直运行,直到认为地关闭应用程序。如果是Windows应用程序,则可以将创建ServiceHost实例的代码放在主窗体的相关代码中,保证服务宿主不会被关闭。
相应地,我们需要配置应用程序的app.config配置文件:
<configuration>
<system.serviceModel>
<services>
<service name="BruceZhang.WCF.DocumentsExplorerServiceImplementation.DocumentsExplorerService" behaviorConfiguration="DocumentExplorerServiceBehavior">
<host>
<baseAddresses>
<add baseAddress="http://localhost:8008/DocumentExplorerService"/>
</baseAddresses>
</host>
<endpoint
address=""
binding="basicHttpBinding"
bindingConfiguration="DocumentExplorerServiceBinding"
contract="BruceZhang.WCF.DocumentsExplorerServiceContract.IDocumentsExplorerService"/>
<endpoint address="mex" binding="mexHttpBinding" contract="IMetadataExchange"/>
</service>
</services>
<bindings>
<basicHttpBinding>
<binding name="DocumentExplorerServiceBinding" sendTimeout="00:10:00" transferMode="Streamed"
messageEncoding="Text" textEncoding="utf-8" maxReceivedMessageSize="9223372036854775807">
</binding>
</basicHttpBinding>
</bindings>
<behaviors>
<serviceBehaviors>
<behavior name="DocumentExplorerServiceBehavior">
<serviceMetadata httpGetEnabled="true"/>
</behavior>
</serviceBehaviors>
</behaviors>
</system.serviceModel>
</configuration>
注意,配置文件中的服务名必须包含服务契约以及服务类的命名空间。此外,在配置文件中我通过<baseAddresses>标签为服务添加了基地址,因此在endpoint中,address为""。
此时,调用服务的客户端配置文件也应与服务的配置保持一致:
<configuration>
<system.serviceModel>
<client>
<endpoint
address="http://localhost:8008/DocumentExplorerService"
binding="basicHttpBinding"
bindingConfiguration="DocumentExplorerServiceBinding"
contract="IDocumentsExplorerService"/>
</client>
<bindings>
<basicHttpBinding>
<binding name="DocumentExplorerServiceBinding" sendTimeout="00:10:00" transferMode="Streamed"
messageEncoding="Text" textEncoding="utf-8" maxReceivedMessageSize="9223372036854775807">
</binding>
</basicHttpBinding>
</bindings>
</system.serviceModel>
</configuration>
注意,两个配置文件中的服务地址都是一样的,对于绑定的配置也基本一致。
在通常的企业应用中,我们很少会采用自宿主方式托管服务,这是因为这种方式必须要在应用程序运行下,客户端才能够调用服务,且并不便于随时启动和停止服务。除了不具有易用性与易管理性之外,在可靠性、性能等诸多方面受到很多限制。但由于它简单、易于实现,因而往往用于开发期间的调试或演示环境。
自托管宿主支持所有的绑定。
2、Windows Services宿主
Windows Services宿主则完全克服了自托管宿主的缺点,它便于管理者方便地启动或停止服务,且在服务出现故障之后,能够重新启动服务。我们还可以通过Service Control Manager(服务控制管理器),将服务设置为自动启动方式,省去了服务的管理工作。此外,Windows Services自身还提供了一定的安全性以及检测机制和日志机制。
Windows Services宿主的实现也非常简单。我们可以在Visual Studio中创建Windows Services项目。在创建项目之后,就可以创建一个继承了System.ServiceProcess.ServiceBase类的Windows服务类。Windows服务类继承了ServiceBase类的OnStart()和OnStop()方法,完成Windows服务的启动与停止。我们可以重写这两个方法,将ServiceHost的启动与关闭对应地放入这两个方法的实现中。例如我们创建的DocumentsExplorerWindowsService类:
namespace BruceZhang.WCF.DocumentsExplorer
{
public partial class DocumentsExplorerWindowsService : ServiceBase
{
private ServiceHost m_serviceHost = null;
public static void Main()
{
ServiceBase.Run(new DocumentsExplorerWindowsService());
}
public DocumentsExplorerWindowsService()
{
InitializeComponent();
ServiceName = "DocumentsExplorerService";
}
protected override void OnStart(string[] args)
{
if (m_serviceHost != null)
{
m_serviceHost.Close();
}
m_serviceHost = new ServiceHost(typeof(DocumentsExplorerService));
m_serviceHost.Open();
}
protected override void OnStop()
{
if (m_serviceHost != null)
{
m_serviceHost.Close();
m_serviceHost = null;
}
}
}
}
在Main函数中,我们通过ServiceBase.Run()静态方法创建Windows服务实例,并在Windows服务类的构造函数中,调用ServiceBase类的ServiceName属性指定服务名。在重写的OnStart()方法中,我们首先判断是否已经存在ServiceHost实例,如果不存在,则创建它。创建ServiceHost实例的方法与自托管宿主方式相同。
为了完成ServiceHost实例的创建,我们同样需要在项目中添加app.config配置文件,配置文件的内容与前完全一样。
如果在企业应用中要使用WCF技术,最佳的宿主方式我认为就是Windows Services,尤其是服务器的操作系统不是Vista的情况之下。它便于服务的管理,能够维持服务长时期的运行,同时它还支持所有的绑定,因而受到的限制最小。然而,这种方式唯一的缺点却是对宿主的部署相对比较复杂,必须通过.NET提供的Installutil.exe工具完成对服务宿主的安装(也可以通过安装包的自定义操作完成)。
若要完成对服务宿主的安装,我们还需要创建它的安装程序。我们可以自定义一个安装类,使其继承自System.Configuration.Install.Installer类。更简单的办法则是通过Windows服务提供的设计时支持,直接创建安装类。方法是在Windows服务例如DocumentsExplorerWindowsService的设计器视图下,通过单击右键,在快捷菜单中选择“Add Installer”,如图二所示:
图二 添加安装程序
创建的安装程序ExplorerServiceInstaller如下所示:
namespace BruceZhang.WCF.DocumentsExplorer
{
//It needs be ran at the command mode
//Type installutil filename to install the windows service
//Type services.msc to access the Service Control Manager(SCM) and browse the windows services
//Type installutil /u filename to uninstall the windows service
[RunInstaller(true)]
public partial class ExplorerServiceInstaller : Installer
{
private ServiceProcessInstaller m_process;
private ServiceInstaller m_service;
public ExplorerServiceInstaller()
{
InitializeComponent();
m_process = new ServiceProcessInstaller();
m_process.Account = ServiceAccount.LocalSystem;
m_service = new ServiceInstaller();
m_service.ServiceName = "DocumentsExplorerService";
Installers.Add(m_process);
Installers.Add(m_service);
}
}
}
在ExplorerServiceInstaller类中,ServiceAccount是一个枚举类型,可以设置为LocalService,LocalSystem,NetworkService以及User值。其中,LocalService的安全性最低,User值的安全性最高,需要有效的用户账号方才可以安装服务。
对于安装程序而言,也可以直接在设计器视图下设置它的属性。
安装程序直接建立在Windows服务的程序集中,编译之后会获得一个exe文件,例如DocumentsExplorer.exe。然后,我们通过在Visual Studio的Command Prompt模式下运行如下命令:
installutil DocumentsExplorer.exe
即可完成对服务宿主的安装。
打开服务控制管理器(可以在Command Prompt模式下输入Services.msc打开),可以看到名为DocumentsExplorerService的服务:
图三 服务控制管理器
如果要卸载该服务宿主,可以通过installutil的/u开关卸载。
在企业应用中,我们往往会将该Windows服务设置为自动启动,可以简化管理员的工作。
3、IIS宿主(说明,这里讲的IIS为IIS 6.0)
若要使用IIS宿主,需要为程序集中添加一个svc文件。我们可以通过为项目添加一个新项的方式添加svc文件:
图四 添加svc文件
我们也可以直接创建一个WCF Service应用程序作为IIS宿主,它会自动创建一个svc文件,如图五所示:
图五 创建WCF Service应用程序
创建的svc文件如图:
图六 创建的svc文件
WCF Service应用程序创建的svc文件以及通过添加新项获得svc文件,自动会创建WCF服务。因此,如果我们希望在svc文件中嵌入WCF服务的代码,则可以采取这种方式。例如:
<%@ ServiceHost Language="C#" Debug="true" Service="BruceZhang.WCF.DocumentsExplorerServiceImplementation.DocumentsExplorerService"%>
using System;
using System.Collections.Generic;
using System.Linq;
using System.Runtime.Serialization;
using System.ServiceModel;
using System.Text;
using System.IO;
using BruceZhang.WCF.DocumentsExplorerDataContract;
namespace BruceZhang.WCF.DocumentsExplorerServiceImplementation
{
[ServiceBehavior(InstanceContextMode=InstanceContextMode.Single)]
public class DocumentsExplorerService : IDocumentsExplorerService
{
//Service Implementation
}
}
上述代码中的@ServiceHost指示符只能是在右键单击svc文件后,在View Marckup中才能够看到。
Svc文件通过@ServiceHost指示符指定它所要托管的服务,此外还指定了实现服务的语言、调用模式,还可以设置CodeBehind,指定服务代码。不过,在IIS托管中,服务代码或程序集文件受到一定的限制,它只能放在如下的其中一个位置中:
(1) svc文件的内嵌代码中;
(2) 放在注册于GAC的单独程序集中;
(3) 驻留于应用程序的Bin文件夹内的程序集中(此时,bin文件夹不必include)
(4) 驻留于应用程序的App_Code文件夹的源代码文件中(根据Language的设置,或者为C#或者为VB);
即使我们将服务代码放在应用程序根目录下,或者其它文件夹中,然后通过CodeBehind指定代码的路径,仍然不能托管服务。
如果服务契约与服务类是通过引用的方式在宿主应用程序中,则我们可以直接创建一个扩展名为.svc的单个文件,然后include到应用程序根目录下,如图六中的HostService.svc,该文件没有关联的cs文件。此时,在Visual Studio中直接打开该文件,并不能编写服务代码,而是指定@ServiceHost即可。
注意,上述方式的IIS宿主只能创建ServiceHost实例,如果是自定义的ServiceHost,则需要通过@ServiceHost的Factory来指定创建自定义ServiceHost的工厂类。例如这样的自定义ServiceHost以及相应的工厂类:
using System;
using System.ServiceModel;
using System.ServiceModel.Activation;
namespace BruceZhang.WCF.DocumentsExplorerIISHost
{
public class CustomServiceHostFactory : ServiceHostFactory
{
protected override ServiceHost CreateServiceHost(
Type serviceType, Uri[] baseAddresses)
{
CustomServiceHost customServiceHost =
new CustomServiceHost(serviceType, baseAddresses);
return customServiceHost;
}
}
public class CustomServiceHost : ServiceHost
{
public CustomServiceHost(Type serviceType, params Uri[] baseAddresses)
: base(serviceType, baseAddresses)
{
}
protected override void ApplyConfiguration()
{
base.ApplyConfiguration();
}
}
}
则@ServiceHost修改为:
<%@ ServiceHost Language="C#" Debug="true" Service="BruceZhang.WCF.DocumentsExplorerServiceImplementation.DocumentsExplorerService" Factory="BruceZhang.WCF.DocumentsExplorerIISHost.CustomServiceHostFactory"%>
在IIS托管应用程序中,我们需要创建web.config(注意,不是app.config),在<system.serviceModel>节中配置服务的相关内容:
<system.serviceModel>
<services>
<service behaviorConfiguration="DocumentExplorerServiceBehavior"
name="BruceZhang.WCF.DocumentsExplorerServiceImplementation.DocumentsExplorerService">
<endpoint address="" binding="basicHttpBinding" bindingConfiguration="DocumentExplorerServiceBinding"
contract="BruceZhang.WCF.DocumentsExplorerServiceContract.IDocumentsExplorerService" />
<endpoint address="mex" binding="mexHttpBinding" contract="IMetadataExchange" />
</service>
</services>
<bindings>
<basicHttpBinding>
<binding name="DocumentExplorerServiceBinding" sendTimeout="00:10:00" transferMode="Streamed" messageEncoding="Text" textEncoding="utf-8" maxReceivedMessageSize="9223372036854775807">
</binding>
</basicHttpBinding>
</bindings>
<behaviors>
<serviceBehaviors>
<behavior name="DocumentExplorerServiceBehavior">
<serviceMetadata httpGetEnabled="true" />
</behavior>
</serviceBehaviors>
</behaviors>
</system.serviceModel>
注意,这里的配置文件与之前的宿主配置文件有个别的差异,就是没有指定服务的基地址。这是因为IIS托管会自动将svc文件的地址作为服务的基地址,我们无法在配置文件中自行指定。Svc文件的地址为svc文件在IIS虚拟目录或站点所设置的路径。例如,我们在IIS中创建一个虚拟目录DocumentsExplorer指向IIS宿主应用程序DocumentsExplorerIISHost,如图七所示:
图七 在IIS站点中为IIS创建虚拟目录
如果站点的属性没有做任何修改,使用默认的端口号,以及Localhost,则访问服务的基地址为http://localhost/DocumentsExplorer/HostService.svc。如果在配置文件的服务endpoint中设置地址为DocumentsService,如:
<endpoint
address="DocumentsService"
binding="basicHttpBinding"
bindingConfiguration="DocumentExplorerServiceBinding"
contract="BruceZhang.WCF.DocumentsExplorerServiceContract.IDocumentsExplorerService" />
则公开服务的地址则为http://localhost/DocumentsExplorer/HostService.svc/DocumentsServic。
通过IIS启动站点后,不需要做任何操作,服务宿主自动会创建ServiceHost实例或者Factory指定的自定义ServiceHost实例。
由于服务地址发生了变化,因此客户端的配置文件也需要做出相应的修改,必须将服务的地址设置为与之对应的地址。其中,服务的基地址为svc文件在IIS中的地址。
IIS宿主是一种主要的服务托管方式,这是因为它具有易用性、可维护性、安全性、易于部署等多个优势。然而,它却具有一个致命的阿客流斯之踵,那就是它只支持HTTP协议的传输绑定。特别对于局域网场景下,如果使用IIS宿主,就无法利用TCP传输的高效率,甚至无法使用MSMQ以及Peer to Peer传输。
IIS 7.0(基于Windows Vista和Windows Server 2007)提供的Windows激活服务(WAS)突破了IIS 6.0对于HTTP的依赖。
4、WAS宿主
WAS是IIS 7.0的一部分,但也可以独立地安装与配置。WAS支持所有可用的WCF传输协议、端口与队列。
利用WAS托管服务与IIS宿主托管服务的方法并没有太大的区别,仍然需要创建svc文件,同时在IIS中需要在站点中创建应有程序指向托管应用程序,还可以设置访问服务的别名与应用程序池。
由于WAS诉诸支持所有的绑定,因此此时的服务绑定并不会受到宿主的限制。
本文已在IT168发表:http://tech.it168.com/msoft/2007-12-11/200712111008739.shtml

 浙公网安备 33010602011771号