

Windows Phone8 中如何引用 SQLite 数据库
windows phone 8.1开发SQlite数据库引用安装
-
第一步:
安装SQlite forwindows phone 8.1 插件:
插件下载地址:http://visualstudiogallery.msdn.microsoft.com/5d97faf6-39e3-4048-a0bc-adde2af75d1b
进入后下载安装,重启VS2013,然后添加引用,在windows phone 8.1 的扩展选项里面会发现SQlite forwindows phone 8.1 SDK,引用即可.
-
第二步:
在引用SQlite forwindows phone 8.1 SDK 后,会出现Microsoft Visual C++ 2013 Runtime Package for Windows Phone 和SQlite forwindows phone 8.1组件,不过你会发现它们的图片上都会有黄色图标.编译无法通过.
错误提示:
错误 1 引用的 SDK“Any CPU”不支持正在生成的项目的处理器架构“Microsoft.VCLibs, Version=12.0”。请考虑将项目的目标处理器架构更改为 SDK 支持的某个架构(在 Visual Studio 中,此操作可以通过配置管理器完成):“x86, ARM”。
错误 2 引用的 SDK“Any CPU”不支持正在生成的项目的处理器架构“SQLite.WP81, Version=3.8.5”。请考虑将项目的目标处理器架构更改为 SDK 支持的某个架构(在 Visual Studio 中,此操作可以通过配置管理器完成):“x86, ARM”。
解决办法是在在配置管理器中将 Any CPU改为x86或者 ARM,不过你如果要真机调试,则必须配置为ARM.
-
第三步:
右击解决方案管理器,选择 管理NuGet程序包,然后联机搜索 SQlite. 在结果中选择第一项 :SQlite-net;
安装即可. 安装成功后,会发现多了俩个CS文件:SQLite.cs 和SQLiteAsync.cs.
至此,安装全部完成,马上开始操作SQlite数据库吧!
===================================================
在Windows Phone上使用SQLite,并获取和编辑模拟器中的数据库文件
大家知道,在移动端实现数据的离线采集,最重要的一点就是在移动设备上临时存储数据,那么需要移动设备上提供对数据库(不管是本地原生还是第三方)的支持。SQLite是一款轻型的数据库,目前已经在很多嵌入式产品中使用了它,iOS和Android等主流的移动平台也对它提供了支持,关于SQLite数据在此不再赘述,有需要的同学自己谷歌一下。本文主要研究了以下2点:
1、在Windows Phone上使用SQLite数据库。
其实SQLite的使用很简单,学过或了解SQL语句的同学都非常容易上手,在这部分我将详细讲述在WP上使用SQLite的详细步骤,包括安装配置和详细代码,供初学者参考。
2、获取独立存储区中的数据库文件。
独立存储(IsolatedStorage)是Silverlight一个特色,它是Silverlight的虚拟文件系统,关于虚拟文件系统的概念,大家也可以自己百度,Windows Phone 7是基于Silverlight,它的文件系统也是IsolatedStorage,使用SQLite在WP端存储离线数据时,数据库文件就存放在独立存储区,那么这给我们开发者带来的一个困扰是:我们似乎无法看到模拟器中的数据库文件,不知道每次操作时数据库中发生了怎么样的改变,不利于调试,因此,这部分给大家介绍两种工具,分别用来从真机/模拟器的独立存储中取出数据文件和可视化的操作数据文件。
先看第一部分。
1、在Windows Phone上使用SQLite数据库
1)获取SQLite类库
1、从网站下载Sqlite Clientfor Windows Phone 7,截止目前,最新版本为0.6.1,下载地址:http://sqlitewindowsphone.codeplex.com/;
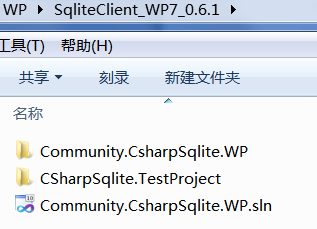
2、下载后解压文件夹内容如下:
3、编译Community.CsharpSqlite.WP程序,获取Community.CsharpSqlite.WP.dll类库文件。
2)在Windows Phone上使用SQLite
1、新建windows Phone应用程序,目标平台选择wpos 7.1;
2、添加对1)中生成的Community.CsharpSqlite.WP.dll文件的引用;
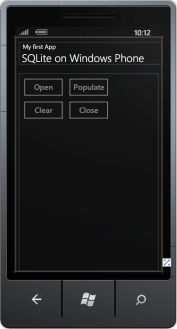
3、在新建的程序主页面中设计4个按钮,分别用来创建、填充、清除和关闭数据库,如下:
4、在后台代码中添加SQLite类库的引用:
using System;
using System.Collections.Generic;
using System.Linq;
using System.Net;
using System.Windows;
using System.Windows.Controls;
using System.Windows.Documents;
using System.Windows.Input;
using System.Windows.Media;
using System.Windows.Media.Animation;
using System.Windows.Shapes;
using Microsoft.Phone.Controls;
using SQLiteClient;
5、添加SQLite数据库连接变量:
namespace SQLiteTest
{
public partial class MainPage : PhoneApplicationPage
{
SQLiteConnection mySQLiteDB = null;
// 构造函数
public MainPage()
{
InitializeComponent();
}
}
}
6、给“Open”按钮添加事件,创建并打开数据库:
private void btnOpen_Click(object sender, RoutedEventArgs e)
{
if (mySQLiteDB == null)
{
mySQLiteDB = new SQLiteConnection("TestSQLiteDB");
mySQLiteDB.Open();
btnOpen.IsEnabled = false;
btnClose.IsEnabled = true;
btnClear.IsEnabled = false;
btnPopulate.IsEnabled = true;
}
}
7、接下来,需要创建表,并往表中填充数据,使用SQLiteCommand对象实现:
private void btnPopulate_Click(object sender, RoutedEventArgs e)
{
//创建表RegisteredStudents,有3个属性:id、姓名、学号
SQLiteCommand cmd = mySQLiteDB.CreateCommand("Create table RegisteredStudents (id int primary key,name text,zipcode numeric(7))");
int i = cmd.ExecuteNonQuery();
int id = 0;
string name = "Name" + id;
int zipcode = 98000;
for (int j = 0; j < 10; j++)
{
id++;
name = "Name" + id;
zipcode = 98000 + id;
cmd.CommandText = " Insert into RegisteredStudents (id, name, zipcode) values (" + id +",\"" + name +"\"," + zipcode +")";
i = cmd.ExecuteNonQuery();
}
btnPopulate.IsEnabled = false;
btnClear.IsEnabled = true;
}
8、清空表中的数据,同样使用SQLiteCommand对象,代码如下:
private void btnClear_Click(object sender, RoutedEventArgs e)
{
SQLiteCommand cmd = mySQLiteDB.CreateCommand("drop table RegisteredStudents");
int i = cmd.ExecuteNonQuery();
btnPopulate.IsEnabled = true;
btnClear.IsEnabled = false;
}
9、断开数据库连接,关闭数据库,如下:
private void btnClose_Click(object sender, RoutedEventArgs e)
{
if (mySQLiteDB != null)
{
mySQLiteDB.Dispose();
mySQLiteDB = null;
btnOpen.IsEnabled = true;
btnPopulate.IsEnabled = false;
btnClear.IsEnabled = false;
btnClose.IsEnabled = false;
}
}
运行程序,点击open可以在WP的模拟器的独立存储空间中创建名为“TestSQLiteDB”数据库,点击populate按钮可以为其填充数据,点击clear可以清空数据库中的数据,close关闭数据库连接。但是所有这些执行成功的操作在数据库中引起了怎样的变化,我们不得而知,所以接下来我们进入到第二步,如何取到模拟器中的数据库文件。
2、获取和操作独立存储区中的数据库文件
1)获取数据库文件
Windows Phone Power Tools工具可以直接连接模拟器/真机,读取独立存储空间中的数据(参考文章)。下载该工具,具体使用方法很简单,如下图:

选择真机或模拟器连接
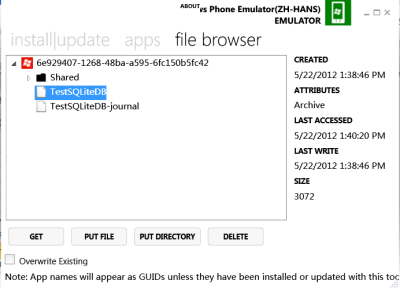
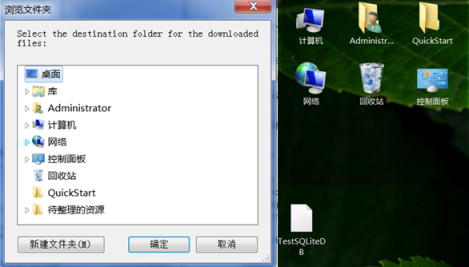
连接成功后,在File Browser中可以看到,已经取到了该应用程序的独立存储区以及其中的数据库文件,点击“get”,将该数据文件存储到本地:
2)可视化操作数据库文件
通过Windows Phone PowerTools将数据库文件导出到电脑中,这个时候我们可以依靠另一种非常好用的可视化工具“SQLite-Manager”来操作和管理数据库文件了。SQLite-Manager帮助我们管理和创建与数据库相关的东西,如database、tables、views等,SQLite-Manager是一个插件,可以在火狐浏览器中安装:

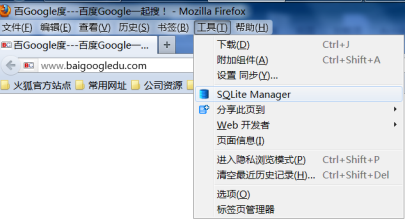
安装好后,在火狐的浏览器菜单中启动SQLite Manager:
接下来,我们就可以非常方便的可视化的操作数据库了:


Windows Phone8 中如何引用 SQLite 数据库
SQLite数据库介绍
1.SQLite是一款轻型的嵌入式数据库,使用C++开发,使用非常广泛
2.SQLite是一款跨平台的数据库,支持Windows、Linux、Android、IOS、Windows Phone行装系统
3.在Windows Phone中的SQLite是一个非托管组件
4.可以在Windows运行时中使用,也可以在C#项目中使用
5.在C#项目中需要通过Windows运行时组件来访问
下面介绍如何在wp中使用SQLite开发应用程序
1.首先我们来下载数据库工具安装包,地址为:http://www.sqlite.org/download.html,找到关于wp8的下载链接下载并安装,安装完后重启visual studio,这时我们就可以在 菜单>工具>扩展和工具 中看到添加的组件
2.下载C++项目sqlite-net-wp8 : https://github.com/peterhuene/sqlite-net-wp8 项目,通过vs添加现有项目的方式添加到项目当中 ,如下图所示:


本博文编写环境 VS2013 + WP8 SDK
上篇介绍完了SQLite在wp中的部署(具体请参阅 Windows Phone8 中如何引用 SQLite 数据库),下面来看如何使用 SQLite 数据库
SQLite的数据库都是程序运行时自动创建的,我们操作的数据库是位于隔离存储空间里的。
这是我仅做了简单的数据库操作:
1.创建数据库链接
|
1
2
3
4
|
private SQLiteAsyncConnection GetConn() { return new SQLiteAsyncConnection(ApplicationData.Current.LocalFolder.Path + "\\people.db"); } |
2.创建数据库
|
1
2
3
4
5
6
7
|
private async void btnCreateDb_Click(object sender, RoutedEventArgs e) { SQLiteAsyncConnection conn = GetConn(); await conn.CreateTableAsync<Student>(); MessageBox.Show("创建成功"); } |
3.插入数据
|
1
2
3
4
5
6
7
8
9
10
11
12
13
14
15
16
17
18
19
20
21
22
23
24
25
26
27
|
private async void btnAdd_Click(object sender, RoutedEventArgs e) { SQLiteAsyncConnection conn = GetConn(); Model.Student student = new Model.Student { Name = "张三", Age = 30, Sex = "男" }; await conn.InsertAsync(student); student = new Model.Student { Name = "李四", Age = 25, Sex = "男" }; await conn.InsertAsync(student); student = new Model.Student { Name = "小华", Age = 23, Sex = "女", Remark = "优秀" }; await conn.InsertAsync(student); MessageBox.Show("插入数据成功!"); } |
4.查询数据
|
1
2
3
4
5
6
7
8
9
10
11
12
13
|
private async void btnQuery_Click(object sender, RoutedEventArgs e) { SQLiteAsyncConnection conn = GetConn(); var query = conn.Table<Student>();//.Where(x => x.Name == "小华"); var result = await query.ToListAsync(); this.stuList.ItemsSource = result; foreach (var item in await conn.Table<Student>().ToListAsync()) { Debug.WriteLine(string.Format("NO:{0} NAME:{1} SEX:{2} AGE:{3} REMARK:{4}", item.Id, item.Name, item.Sex, item.Age, item.Remark)); } } |
5.更新数据
|
1
2
3
4
5
6
7
8
9
10
11
12
13
|
private async void btnUpdate_Click(object sender, RoutedEventArgs e) { //ApplicationData.Current.LocalFolder.Path + "\\people.db" SQLiteAsyncConnection conn = GetConn(); var query = conn.Table<Student>().Where(x => x.Name == "小华"); var result = await query.ToListAsync(); foreach (var item in result) { item.Age = 35; await conn.UpdateAsync(item); MessageBox.Show("数据更新成功!"); } } |
程序运行效果如下图所示

怎么样,是不是很简单哦,这里说明一下,在操作SQLite数据库时也可以不使用SQLiteAsync.cs 和SQLite.cs ,可以自己写 sql 语句的方式来操作,那样会更加灵活些。
源码下载 请点击
如何查看wp8独立存储中的文件呢,大家可以 打开 http://wptools.codeplex.com/ 下载 Windows Phone Power Tools ,使用这个软件可以方便查看保存在独立存储中的文件,也可以添加、导出、删除等操作,运行界面如图所示:

How to Use SQLite with a Windows Phone 8 Application
Table of Contents
Introduction
How to use SQLite with a Windows Phone 8 application
Building the Sample
To build this sample you will need Visual Studio 2012 on a computer running Windows 8 professional x64. The computer will also need to have a microprocessor that support SLAT (Second Layer Address Layer)
Description
To start with you will need to install SQLite for windows phone in visual studio 2012 extensions and updates. You will find it in the tools menu of Visual Studio

Second you will need to go to the GITHUB website and download the code for SQLite-net-wp8. This is a c++ project you will need to access a sqlite database.
https://github.com/peterhuene/sqlite-net-wp8 
(warning if the sqlite-net-wp8 does not use the same version of SQLite for windows phone you will not be able to open the app)
So let's create a new Windows Phone app.

You will need to right click on the solution file and select add existing solution. You will need to add the Sqlite-net-wp8 solution downloaded from github.
Now you need to add the NuGet package Sqlite-net
This will add 2 C# files to the solution. Finally before we start coding add a reference to the sqlite-net-wp8 project in your solution. You also need to add a reference to SQLite.

The 2 files added are Sqlite.cs andSqliteAsync.cs.
To interact with the sqlite database you will need to create a class which defines the table. For this example we will create a person class:
public class Person { [SQLite.PrimaryKey, SQLite.AutoIncrement] public int Id { get; set; } public string FirstName { get; set; } public string LastName { get; set; } }public class Person { [SQLite.PrimaryKey, SQLite.AutoIncrement] public int Id { get; set; } public string FirstName { get; set; } public string LastName { get; set; } }The Id property is marked as the Primary Key and will auto increment as values are added to the table.
In the app.xaml class lets create a database. In the constructor we check if the database exists and if it does not we create it. Since there is no file exists method on the windows phone we try and try and open the file. If the file does not exist we get an exception.
public App() { // Global handler for non-caught exceptions. UnhandledException += Application_UnhandledException; // Standard XAML initialization InitializeComponent(); // Phone-specific initialization InitializePhoneApplication(); // Language display initialization InitializeLanguage(); // Show graphics profiling information while debugging. if (Debugger.IsAttached) { // Display the current frame rate counters. Application.Current.Host.Settings.EnableFrameRateCounter = true; // Show the areas of the app that are being redrawn in each frame. //Application.Current.Host.Settings.EnableRedrawRegions = true; // Enable non-production analysis visualization mode, // which shows areas of a page that are handed off to GPU with a colored overlay. //Application.Current.Host.Settings.EnableCacheVisualization = true; // Prevent the screen from turning off while under the debugger by disabling // the application's idle detection. // Caution:- Use this under debug mode only. Application that disables user idle detection will continue to run // and consume battery power when the user is not using the phone. PhoneApplicationService.Current.UserIdleDetectionMode = IdleDetectionMode.Disabled; } // check if database exists and create it if needed string dbPath = Path.Combine(Windows.Storage.ApplicationData.Current.LocalFolder.Path, "db.sqlite"); if (!FileExists("db.sqlite").Result) { using (var db = new SQLiteConnection(dbPath)) { db.CreateTable<Person>(); } }} private async Task<bool> FileExists(string fileName) { var result = false; try { var store = await Windows.Storage.ApplicationData.Current.LocalFolder.GetFileAsync(fileName); result =true; } catch { } return result; } public App() { // Global handler for uncaught exceptions. UnhandledException += Application_UnhandledException; // Standard XAML initialization InitializeComponent(); // Phone-specific initialization InitializePhoneApplication(); // Language display initialization InitializeLanguage(); // Show graphics profiling information while debugging. if (Debugger.IsAttached) { // Display the current frame rate counters. Application.Current.Host.Settings.EnableFrameRateCounter = true; // Show the areas of the app that are being redrawn in each frame. //Application.Current.Host.Settings.EnableRedrawRegions = true; // Enable non-production analysis visualization mode, // which shows areas of a page that are handed off to GPU with a colored overlay. //Application.Current.Host.Settings.EnableCacheVisualization = true; // Prevent the screen from turning off while under the debugger by disabling // the application's idle detection. // Caution:- Use this under debug mode only. Application that disables user idle detection will continue to run // and consume battery power when the user is not using the phone. PhoneApplicationService.Current.UserIdleDetectionMode = IdleDetectionMode.Disabled; } // check if database exists and create it if needed string dbPath = Path.Combine(Windows.Storage.ApplicationData.Current.LocalFolder.Path, "db.sqlite"); if (!FileExists("db.sqlite").Result) { using (var db = new SQLiteConnection(dbPath)) { db.CreateTable<Person>(); } } } private async Task<bool> FileExists(string fileName) { var result = false; try { var store = await Windows.Storage.ApplicationData.Current.LocalFolder.GetFileAsync(fileName); result =true; } catch { } return result; }In the MainPage.xaml lets add 3 buttons. These buttons will be used to add a record to the database, edit it, and delete it.
<Grid x:Name="ContentPanel" Grid.Row="1" Margin="12,0,12,0"> <StackPanel > <Button Name="btnInsert" Click="BtnInsert_OnClick" Content ="Insert" ></Button> <Button Click="BtnUpdate_OnClick" Name="btnUpdate" Content="Update"></Button> <Button Name="btnDelete" Click="BtnDelete_OnClick" Content="Delete" ></Button> </StackPanel> </Grid><Grid x:Name="ContentPanel" Grid.Row="1" Margin="12,0,12,0"> <StackPanel > <Button Name="btnInsert" Click="BtnInsert_OnClick" Content ="Insert" ></Button> <Button Click="BtnUpdate_OnClick" Name="btnUpdate" Content="Update"></Button> <Button Name="btnDelete" Click="BtnDelete_OnClick" Content="Delete" ></Button> </StackPanel> </Grid>Here is the code to add, delete and modify records in the Sqlite database
string dbPath = Path.Combine(Windows.Storage.ApplicationData.Current.LocalFolder.Path, "db.sqlite"); private void BtnUpdate_OnClick(object sender, RoutedEventArgs e) { using (var db = new SQLiteConnection(dbPath)) { var existing = db.Query<Person>("select * from Person").FirstOrDefault(); if (existing != null) { existing.FirstName = "Denis"; db.RunInTransaction(() => { db.Update(existing); }); } } } private void BtnDelete_OnClick(object sender, RoutedEventArgs e) { using (var db = new SQLiteConnection(dbPath)) { var existing = db.Query<Person>("select * from Person").FirstOrDefault(); if (existing != null) { db.RunInTransaction(() => { db.Delete(existing); }); } } } private void BtnInsert_OnClick(object sender, RoutedEventArgs e) { using (var db = new SQLiteConnection(dbPath)) { db.RunInTransaction(() => { db.Insert(new Person() { FirstName = "Ken", LastName = "Tucker" }); }); } }} string dbPath = Path.Combine(Windows.Storage.ApplicationData.Current.LocalFolder.Path, "db.sqlite"); private void BtnUpdate_OnClick(object sender, RoutedEventArgs e) { using (var db = new SQLiteConnection(dbPath)) { var existing = db.Query<Person>("select * from Person").FirstOrDefault(); if (existing != null) { existing.FirstName = "Denis"; db.RunInTransaction(() => { db.Update(existing); }); } } } private void BtnDelete_OnClick(object sender, RoutedEventArgs e) { using (var db = new SQLiteConnection(dbPath)) { var existing = db.Query<Person>("select * from Person").FirstOrDefault(); if (existing != null) { db.RunInTransaction(() => { db.Delete(existing); }); } } } private void BtnInsert_OnClick(object sender, RoutedEventArgs e) { using (var db = new SQLiteConnection(dbPath)) { db.RunInTransaction(() => { db.Insert(new Person() { FirstName = "Ken", LastName = "Tucker" }); }); } } }
See Also
Another important place to find a huge amount of Windows Phone related articles is the TechNet Wiki itself. The best entry point is Windows Phone Resources on the TechNet Wiki.SQLite
我们知道 SQLServer 可以处理大量的数据,而这里我们将使用 SQLite,这可以让你的 Windows Phone 8 应用处理数据变得轻松和简单,接下来就让我们一睹为快。(本文的图片为英文界面)
获取 Visual Studio 扩展包
1,在 Visual Studio 的中找到工具菜单的扩展管理器。<ignore_js_op> 2,在管理器中,线上搜索一下 “SQLite for Windows Phone”,一切正常的话,你将找到这个扩展,如下图。<ignore_js_op>
 3,下载和安装这个扩展包就行了。你可以在托管或者非托管项目中使用 SQLite。它已经包含了所需的类库,以及为 Windows Phone 模拟器(x86)和 ARM 设备预编译的 DLL。注意:在安装扩展包后,可能需要重新启动 Visual Studio。
使用 SQLite 创建一个简单的 Windows Phone 应用
创建一个空的 Windows Phone 应用项目,并将其命名为 SQLiteSampleApp。下面需要更改一些内容,让该项目支持 SQLite。因为 SQLite 是一个非托管组件,所以如果在托管的 Windows Phone 8 应用中使用该组件,就需要将相应的 API 声明包含在 Windows Phone 运行时组件中,这样运行时就可以调用非托管的 SQLite。为了达到这个目的,github 中已经有了一个专门为 Windows 8 设计的组件,如果你通过 NuGet 下载这个组件到你的项目中。那么可以很方便的访问 SQLite,包括同步和异步的方法。刚才提到的组件并不直接支持 Windows Phone 8 的 SQLite。好在,Peter Huene 为这个组件编写了一个分支,可以支持 Windows Phone 8 的 SQLite。
sqlite-net (1.0.7)
这个 sqlite-net 就是我们上面提到的组件,我们需要把它下载下来并添加到项目中。1,首先需要打开 NuGet 的控制台。<ignore_js_op> 2,在控制台中输入如下的命令:Install-package sqlite-net如果执行成功,你会发现你的项目中多了两个文件:SQLite.cs,SQLiteAsync.cs。
非托管的 C++ 项目 sqlite-net-wp8
最后一步,你需要下载添加一个名为 sqlite-net-wp8 的 C++ 项目到你的解决方案。由于这个项目并没有 NuGet 安装包,所以你需要自己添加:2,下载它的 zip 版本。3,右击下载的 zip 文件,在属性中找到解除阻止的按钮。4,解压缩 zip。5,右击你的解决方案,选择添加现有项目,并选择刚才解压得到的项目 Sqlite.vcxproj。6,为项目添加 sqlite-net-wp8 的引用,并增加一个编译符号 USE_WP8_NATIVE_SQLITE。4,解压缩 zip。为了告诉 sqlit-net,我们希望使用 sqlite-net-wp8,同样需要修改 sqlit-net。在项目的生成选项中,选择所有配置和所有平台,增加一个新的编译符号 USE_WP8_NATIVE_SQLITE。并将 SQLite 项目引用到你的 SQLiteSampleApp。<ignore_js_op> 这样就可以使用 SQLite 中的功能了,如果要参考功能,可以访问 GitHub wiki。
=====================================================
当要执行一个包含SQL语句的字符串,接口将该字符串符号传给标记生成器。标记生成器的工作就是要打破原来的字符串成标记,并将这些标记传递给解析器。
l 解析器
解析器是一块基于标记内容的令牌。SQLite的解析器由 Lemon LALR(1)语法解析器生成,Lemon LALR(1)语法解析器与YACC / BISON,做同样的工作,但它使用了不同的输入语法,使得不容易出错,与此同时,Lemon还生成一个解析器,这是可重入和线程安全的。并且,Lemon定义了非终端的析构函数的概念,因此它不会泄露内存时遇到语法错误。
l 代码生成器
当解析器组装成完整的SQL语句的令牌后,它会调用代码生成器来生成虚拟机代码(SQL语句请求)。
l 虚拟机
由代码生成器生成的程序是由虚拟机执行。在虚拟机实现一个专门设计的操作数据库文件的摘要的计算引擎,另外,虚拟机具有用于中间存储栈。每个指令包含操作码和最多三个额外的操作数。
l B-树
SQLite数据库保持在磁盘上发现btree.c源文件使用一个B-tree实现。一个单独的B-树是用于在数据库中的每个表和索引。所有的B树存储在同一个磁盘文件中。文件格式的详细信息被记录在一个大的评论在btree.c的开头。
l 页面缓存
B-树的模块要求在固定大小的块从磁盘信息。缺省块大小为1024字节,但也可能在512和65536字节之间。页面缓存负责,读,写和缓存这些块。页面缓存还提供了回滚和原子提交的抽象和保护锁定的数据库文件。B-树的驱动程序请求特定页面的页面缓存页面缓存和通知,当它想修改页面或提交或回滚的变化。页面缓存确保的要求迅速处理,安全,有效地处理所有繁琐的细节。
l OS界面
为了提供POSIX和Win32的操作系统之间的可移植性,SQLite使用一个抽象层与操作系统的接口,即OS界面。
l 工具代码
工具代码的主要工作是:内存分配、不区分大小写比较、维护符号映射表、Unicode转换、打印以及随机数发生器。
l 测试代码
如果算上回归测试脚本中,超过半数的代码经过了基于的SQLite库的专门测试。
三、加入SQLite
IOS & Android
IOS
因为sqlite是c语言写的,objective-c可以直接引用sqlite的库:
选择sqlite库:
Android
Android 在运行时(run-time)集成了 SQLite,所以每个 Android 应用程序都可以使用 SQLite 数据库。
Windows应用商店应用
安装
1. 在 Microsoft Visual Studio 中的“工具”菜单上,单击“扩展和更新”。
2. 展开“联机”。如果尚未选择“Visual Studio 库”,请单击它。
3. 在“搜索 Visual Studio 库”框中,键入“SQLite”""。
- 单击“用于 Windows 运行时的 SQLite”旁的“下载”,如下所示。
5. 单击“安装”。
6. 重新启动 Visual Studio。
引用
安装用于 Windows 运行时的 SQLite 包后,在 Visual Studio 中从 Windows 应用商店应用项目设置对它的引用:
1. 当应用的项目在 Visual Studio 中打开时,在“解决方案资源管理器”窗口中,右键单击“引用”文件夹,然后单击“添加引用”,如下所示。
2. 展开“Windows”,并单击“扩展”。
3. 选中“Microsoft Visual C++ 运行时包”和“用于 Windows 运行时的 SQLite”框(如下所示),并单击“确定”。
注意,添加这些引用后,应用的项目可能不会构建或运行。若要修复此问题,请在 Visual Studio 中的“构建”菜单上,单击“配置管理器”。在“活动解决方案平台”框中,单击你的特定目标平台,如“ARM”、“x64”或“x86”。然后单击“关闭”。
获取帮助程序库
在开始编写代码之前,你可能希望安装 SQLite 帮助程序库来简化你的编码工作。提供了许多此类帮助程序库。例如,可以安装 sqlite-net 库。以下是获取该库的方法:
1. 当应用的项目仍然在 Visual Studio 中打开时,在“解决方案资源管理器”窗口中,右键单击“引用”文件夹,然后单击“管理 NuGet 包”。如果你没有看到“管理 NuGet 包”,以下是解决方法:
a. 在 Visual Studio 的“工具”菜单上,单击“扩展更新”。
b. 展开“联机”。如果尚未选定“Visual Studio 库”,请单击它。
c. 在“搜索 Visual Studio 库”框内,键入“NuGet”。
d. 在“NuGet 包管理器”旁,单击“下载”。
e. 单击“安装”。
f. 重新启动 Visual Studio。
g. 如果应用的项目没有自动打开,请将其打开。
h. 请重试:在“解决方案资源管理器”窗口中,右键单击“引用”文件夹,然后单击“管理 NuGet 包”。
2. 展开“联机”。
3. 在“联机搜索”框中,键入“sqlite-net”。
4. 在“sqlite-net”旁,单击“安装”,如下所示。
5. 单击“关闭”。
注意,NuGet 是一种 Visual Studio 扩展,使你可以更轻松地在 Visual Studio 中安装和更新第三方的库和工具。若要了解有关 NuGet 的详细信息,请参阅 NuGet 库。
熟悉 NuGet 后,你会发现可以更轻松地使用 NuGet 的命令行版本。要在 Visual Studio 中使用它,请在“工具”菜单上单击“库程序包管理器”>“程序包管理器控制台”
Windows Phone 8
安装
1. 在 Microsoft Visual Studio 中的“工具”菜单上,单击“扩展和更新”。
2. 展开“联机”。如果尚未选择“Visual Studio 库”,请单击它。
3. 在“搜索 Visual Studio 库”框中,键入“SQLite”""。
- 单击“用于 Windows 运行时的 SQLite”旁的“下载”,如下所示。
5. 单击“安装”。
重新启动 Visual Studio。
引用
同Windows应用商店应用程序
获取帮助程序库
同Windows应用商店应用程序
添加用于Windows Phone 8 的封装
要在Windows Phone 8 解决方案中使用SQLite数据库,需要从GitHub上下载sqlite-net-wp8的C++原生工程加入都解决方案中,sqlite-net-wp8里封装了一些方法供sqlite-net调用,下载链接如下:
https://github.com/peterhuene/sqlite-net-wp8
添加条件编译符号
右击Phone 8工程选择“属性”,在“生成”选项卡下的条件编译符号框中增加USE_WP8_NATIVE_SQLITE,如下图所示:
注意事项
- 由于Windows Phone 8之前的Windows Phone版本不支持原生C++代码,所以以上方法只适用于Windows Phone 8 工程。
- 添加完sqlite-net-wp8原生工程后,将无法面向Any CPU平台生产解决方案,请根据需要,在配置管理器中设置面向平台为Win32(模拟器)或ARM(真机)。
使用模拟器调试时的配置:
使用真机调试时的配置:
- 由于sqlite-net-wp8工程基于特定sqlite版本,所以当Visual Studio的sqlite推出新的版本时,请确定Git上sqlite-net-wp8也作了相应的升级,之后再更新sqlite扩展与原生工程,如果二者的版本不匹配将导致无法加载原生工程。
四、使用SQLite
创建表
对于此示例,我们假设你的 Windows 应用商店应用使用博客文章。这些博客文章在 SQLite 数据库表中以记录的形式表示。使用你安装的 sqlite-net 包,可以通过为代表每篇博客文章的类进行编码来定义表。在此案例中,每篇博客文章都具有唯一的 ID、标题以及文章的文本,如下所示。
public class Post
{
    [PrimaryKey]
    public int Id { get; set; }
    public string Title { get; set; }
    public string Text { get; set; }
}
PrimaryKey 属性在 sqlite-net 包中进行定义。
定义表后,可以使用如下代码创建该表。
private async void CreateTable()
{
    SQLiteAsyncConnection conn = new SQLiteAsyncConnection("blog");
    await conn.CreateTableAsync();
}
SQLiteAsyncConnection 方法的 "blog" 参数可以指定 SQLite 数据库的路径。
CreateTableAsync 方法的类型对应类型为 Post 的表,此表之前已作为类进行编码。
Android中对应的方法:
public void onCreate(SQLiteDatabase db) {
    db.execSQL("CREATE TABLE Post ( Id INTEGER PRIMARY KEY, Title TEXT, Text TEXT )");
}
IOS中对应的方法:
char *errorMsg;
const char *createSql="create table if not exists persons (id integer primary key autoincrement,name text)";

if (sqlite3_exec(database, createSql, NULL, NULL, &errorMsg)==SQLITE_OK) {
    NSLog(@"create ok.");
}
创建记录
创建表后,你可以使用如下代码为它添加记录。
public async void InsertPost(Post post)
{
    SQLiteAsyncConnection conn = new SQLiteAsyncConnection("blog");
    await conn.InsertAsync(post);
}
Android中对应的方法:
public void insertPost(SQLiteDatabase db, String title, String text ) {
    ContentValues values = new ContentValues();

    values.put("Title", title);
    values.put("Text", text);
    long newRowId;

    newRowId = db.insert("Post", null, values);
}
IOS中对应的方法:
const char *insertSql="insert into persons (name) values(‘张三’)";
    if (sqlite3_exec(database, insertSql, NULL, NULL, &errorMsg)==SQLITE_OK) {
        NSLog(@"insert ok.");
    }
删除记录
若要删除记录,请使用如下代码。
public async void DeletePost(Post post)
{
    SQLiteAsyncConnection conn = new SQLiteAsyncConnection("blog");
    await conn.DeleteAsync(post);
}
Android中对应的方法:
public void deletePost(SQLiteDatabase db, Integer id ) {
    String selection = "Id LIKE ?";
    String[] selelectionArgs = { String.valueOf(id) };

    db.delete("Post", selection, selectionArgs);
}
更新记录
若要更新记录,请使用如下代码。
public async void UpdatePost(Post post)
{
    SQLiteAsyncConnection conn = new SQLiteAsyncConnection("blog");
    await conn.UpdateAsync(post);
}
Android中对应的方法:
public void updatePost(SQLiteDatabase db, Integer id, String title, String text ) {
    ContentValues values = new ContentValues();

    values.put("Title", title);
    values.put("Text", text);

    String selection = "Id LIKE ?";
    String[] selelectionArgs = { String.valueOf(id) };

    int count = db.update(
        "Post,
        values,
        selection,
        selectionArgs);
}
读取记录
若要读取单个记录,请使用如下代码。
public async Task GetPost(int id)
{
    SQLiteAsyncConnection conn = new SQLiteAsyncConnection("blog");

    var query = conn.Table().Where(x => x.Id == id);
    var result = await query.ToListAsync();

    return result.FirstOrDefault();
}
Android中对应的方法:
public Cursor getPost(SQLiteDatabase db, Integer id){
    String[] projection = {"Id", "Title", "Text" };
    String selection = "Id LIKE ?";
    String[] selelectionArgs = { String.valueOf(id) };

    Cursor c = db.query(
        "Post",
        projection,
        selection,
        selectionArgs,
        null,
        null,
        null
    );

    return c;
}
IOS中对应的方法:
const char *selectSql="select id,name from persons";
sqlite3_stmt *statement;
if (sqlite3_prepare_v2(database, selectSql, -1, &statement, nil)==SQLITE_OK) {
    NSLog(@"select ok.");
}

while (sqlite3_step(statement)==SQLITE_ROW) {
    int _id=sqlite3_column_int(statement, 0);
    NSString *name=[[NSString alloc] initWithCString:(char *)sqlite3_column_text(statement, 1) encoding:NSUTF8StringEncoding];
    NSLog(@"row>>id %i, name %@",_id,name);
}

sqlite3_finalize(statement);
若要读取所有记录,请使用如下代码。
public async Task<list> GetPosts()
{
    SQLiteAsyncConnection conn = new SQLiteAsyncConnection("blog");

    var query = conn.Table();
    var result = await query.ToListAsync();

    return result;
}
Android中对应的方法:
public Cursor getPosts(SQLiteDatabase db){
    String[] projection = { "Id", "Title", "Text" };

    Cursor c = db.query(
        "Post",
        projection,
        null,
        null,
        null,
        null,
        null
    );

    return c;
}
五、另请参见
SQLite 编程(对比 Android 与 Windows 应用商店应用)
Working with SQLite in Windows Phone 8: a sqlite-net version for mobile

 浙公网安备 33010602011771号