Linux网络文件共享服务之NFS
一、NFS服务简介
NFS全称network file system 网络文件系统,基于内核的文件系统,由sun公司开发,通过使用NFS,用户和程序可以像访问本地文件一样访问远端系统上的文件,它基于rpc实现(rpc是remote procedure call protocol 远程过程调用)。RPC采用C/S模式,客户机请求程序调用进程发送一个有进程参数的调用信息到服务进程,然后等待应答信息。在服务器端,进程保存睡眠状态直到调用信息到达为止。当一个调用信息到达,服务器获得进程参数,计算结果,发送答复信息,然后等待下一个调用信息,最后,客户端调用进程接收答复信息,获得进程结果,然后调用执行继续进行。
NFS优势:节省本地存储空间,将常用的数据,如home目录存放在NFS服务器上且可以通过网络访问,本地终端将可减少自身存储空间的使用。
二、NFS工作原理
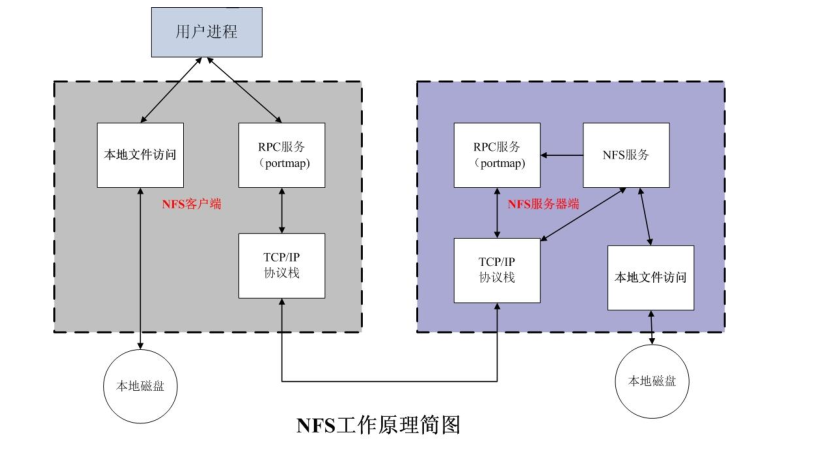
如上图所示,用户需要访问本地的资源,可通过本地文件系统访问,本地磁盘的资源,如果用户访问NFS服务器上的资源,则用户需要通过rpc服务,通过网络去访问NFS服务器,当用户的访问请求到达NFS服务器时,首先到达NFS服务器的tcp/ip协议栈,然后通过询问NFS服务器上的rpc服务,rpc服务在NFS服务器上的作用是当NFS启动时,NFS服务所监听的端口有很多且是随机,不固定,rpc的作用就是记录这些端口,如果有人来访问NFS服务了,它就把NFS的端口信息告诉客户端,然后客户端通过rpc给定端口信息,从而实现访问NFS服务。NFS服务收到客户端的请求,然后通过本地文件系统,访问对应本地磁盘上的文件,从而实现了完成客户端的访问和响应。
三、NFS服务实现
1、软件包信息
[root@test ~]# yum info nfs-utils
已加载插件:fastestmirror
Loading mirror speeds from cached hostfile
 * base: mirrors.aliyun.com
 * extras: mirrors.aliyun.com
 * updates: mirrors.aliyun.com
可安装的软件包
名称    :nfs-utils
架构    :x86_64
时期       :1
版本    :1.3.0
发布    :0.65.el7
大小    :412 k
源    :base/7/x86_64
简介    : NFS utilities and supporting clients and daemons for the kernel NFS server
网址    :http://sourceforge.net/projects/nfs
协议    : MIT and GPLv2 and GPLv2+ and BSD
描述    : The nfs-utils package provides a daemon for the kernel NFS server and
         : related tools, which provides a much higher level of performance than the
         : traditional Linux NFS server used by most users.
         :
         : This package also contains the showmount program.  Showmount queries the
         : mount daemon on a remote host for information about the NFS (Network File
         : System) server on the remote host.  For example, showmount can display the
         : clients which are mounted on that host.
         :
         : This package also contains the mount.nfs and umount.nfs program.

[root@test ~]#
说明:NFS它是文件系统,在内核已经支持,且已经有它的驱动,我们装包的原因是,用软件去管理NFS文件系统,因为用户是没有办法直接和内核交互的。从上面的信息也可了解到nfs-utils的介绍它是NFS实用程序和支持NFS内核服务器的客户机和守护进程。
2、安装nfs-utils
[root@test ~]# yum install nfs-utils
……省略部分信息
依赖关系解决

============================================================================================================
 Package                       架构                 版本                           源                  大小
============================================================================================================
正在安装:
 nfs-utils                     x86_64               1:1.3.0-0.65.el7               base               412 k
为依赖而安装:
 gssproxy                      x86_64               0.7.0-26.el7                   base               110 k
 keyutils                      x86_64               1.5.8-3.el7                    base                54 k
 libbasicobjects               x86_64               0.1.1-32.el7                   base                26 k
 libcollection                 x86_64               0.7.0-32.el7                   base                42 k
 libini_config                 x86_64               1.3.1-32.el7                   base                64 k
 libnfsidmap                   x86_64               0.25-19.el7                    base                50 k
 libpath_utils                 x86_64               0.2.1-32.el7                   base                28 k
 libref_array                  x86_64               0.1.5-32.el7                   base                27 k
 libtirpc                      x86_64               0.2.4-0.16.el7                 base                89 k
 libverto-tevent               x86_64               0.2.5-4.el7                    base               9.0 k
 quota                         x86_64               1:4.01-19.el7                  base               179 k
 quota-nls                     noarch               1:4.01-19.el7                  base                90 k
 rpcbind                       x86_64               0.2.0-48.el7                   base                60 k
 tcp_wrappers                  x86_64               7.6-77.el7                     base                78 k

事务概要
============================================================================================================
安装  1 软件包 (+14 依赖软件包)
……省略部分信息
说明:可以看到nfs-utils依赖这些包,其中rpcbind就是nfs启动时所使用的端口它会记录起来,一旦有客户端访问,它就把nfs的端口信息告诉给客户端
3、写配置文件,让其客户端允许访问本地的资源
[root@test ~]# mkdir /nfsdir
[root@test ~]# cat >> /etc/exports << EOF
> /nfsdir 192.168.0.0/24(rw)
> EOF
[root@test ~]# cat /etc/exports
/nfsdir 192.168.0.0/24(rw)
[root@test ~]#
说明:nfs服务的配置文件是/etc/exports 和/etc/exports.d/*.exports,以上定义了/nfsdir目录允许192.168.0.0/24当用户访问,相当与把/nfsdir给共享出来了
4、启动服务
[root@test ~]# systemctl status rpcbind nfs-server
● rpcbind.service - RPC bind service
   Loaded: loaded (/usr/lib/systemd/system/rpcbind.service; enabled; vendor preset: enabled)
   Active: inactive (dead)

● nfs-server.service - NFS server and services
   Loaded: loaded (/usr/lib/systemd/system/nfs-server.service; disabled; vendor preset: disabled)
   Active: inactive (dead)
[root@test ~]# systemctl start nfs-server
[root@test ~]# systemctl status rpcbind nfs-server
● rpcbind.service - RPC bind service
   Loaded: loaded (/usr/lib/systemd/system/rpcbind.service; enabled; vendor preset: enabled)
   Active: active (running) since 三 2020-01-29 23:52:08 CST; 2s ago
  Process: 4754 ExecStart=/sbin/rpcbind -w $RPCBIND_ARGS (code=exited, status=0/SUCCESS)
 Main PID: 4756 (rpcbind)
    Tasks: 1
   Memory: 1.1M
   CGroup: /system.slice/rpcbind.service
           └─4756 /sbin/rpcbind -w

1月 29 23:52:08 test systemd[1]: Starting RPC bind service...
1月 29 23:52:08 test systemd[1]: Started RPC bind service.

● nfs-server.service - NFS server and services
   Loaded: loaded (/usr/lib/systemd/system/nfs-server.service; disabled; vendor preset: disabled)
   Active: active (exited) since 三 2020-01-29 23:52:08 CST; 1s ago
  Process: 4787 ExecStartPost=/bin/sh -c if systemctl -q is-active gssproxy; then systemctl reload gssproxy ; fi (code=exited, status=0/SUCCESS)
  Process: 4771 ExecStart=/usr/sbin/rpc.nfsd $RPCNFSDARGS (code=exited, status=0/SUCCESS)
  Process: 4768 ExecStartPre=/usr/sbin/exportfs -r (code=exited, status=0/SUCCESS)
 Main PID: 4771 (code=exited, status=0/SUCCESS)
    Tasks: 0
   Memory: 0B
   CGroup: /system.slice/nfs-server.service

1月 29 23:52:08 test systemd[1]: Starting NFS server and services...
1月 29 23:52:08 test systemd[1]: Started NFS server and services.
[root@test ~]#
说明:可看到在rpcbind 服务没有启动的情况下,直接启动nfs-server ,它会把rpcbind给一并启动起来,因为nfs-server依赖rpcbind服务。这个是在centos7上是这样的,centos7上有服务依赖解决,如果启动服务所依赖的服务没有启动,它会激活所依赖的服务,然后启动服务。在centos6上就没有这样的功能,在centos6上如果rpcbind没有启动起来,则nfs服务是启动不了的。
5、在客户端查看共享目录以及挂载nfs共享出来的目录
[root@test-node1 ~]#showmount -e 192.168.0.99
Export list for 192.168.0.99:
/nfsdir 192.168.0.0/24
[root@test-node1 ~]#mount 192.168.0.99:/nfsdir /mnt
[root@test-node1 ~]#df
Filesystem           1K-blocks     Used Available Use% Mounted on
/dev/mapper/VolGroup-lv_root
                      51475068  4746696  44106932  10% /
tmpfs                   959580        0    959580   0% /dev/shm
/dev/sda1               487652    45302    416750  10% /boot
/dev/mapper/VolGroup-lv_home
                     251354900    69264 238510828   1% /home
192.168.0.99:/nfsdir  27560960 13935872  13625088  51% /mnt
[root@test-node1 ~]#
说明:可看到nfs服务器共享出来的目录在服务端是可以查看得到的,这里需要注意客户端也需要安装nfs-utils才可以用showmount命令来查看共享目录。nfs同ftp服务不一样,ftp共享出来的目录,我们是看不出来它在服务器上的具体路径,而nfs是可以看到的。
四、测试在客户新建文件写入数据,看服务端的本地目录的变化
[root@test-node1 ~]#cd /mnt
[root@test-node1 mnt]#ls
[root@test-node1 mnt]#touch clientfile
touch: cannot touch `clientfile': Permission denied
[root@test-node1 mnt]#
说明:默认我们配置的nfs是允许对写,为什么在客户端没法创建文件呢?它告诉我们权限拒绝这到底是为什么呢?我们在服务器上用exportfs -v来查看nfs加载的配置内容
[root@test ~]# exportfs -v
/nfsdir         192.168.0.0/24(sync,wdelay,hide,no_subtree_check,sec=sys,rw,secure,root_squash,no_all_squash)
[root@test ~]#
说明:从上面的信息可以看到我们虽然配置了允许192.168.0.0/24这个网段的所有主机对其/nfsdir有读写权限(rw),但是它还有默认配置了root_squash,这个权限表示客户端root账号权限在NFS服务器上会压榨,也就是说客户端的root到NFS服务器上就不是root权限了,那客户端的root到nfs服务器上是什么权限呢?
[root@test ~]# chmod 777 /nfsdir
[root@test ~]#
说明:把NFS共享出来的目录修改成777权限,然后在客户端在新建文件看看新建的文件的所有者和组就可以知道客户端的root到NFS服务器上是被映射成那个用户了
[root@test-node1 ~]#cd /mnt
[root@test-node1 mnt]#ls
[root@test-node1 mnt]#touch rootfile
[root@test-node1 mnt]#ll
total 0
-rw-r--r-- 1 nfsnobody nfsnobody 0 Jan 30 00:21 rootfile
[root@test-node1 mnt]#
说明:可看到客户端的root在共享目录里新建的文件是nfsnobody的所有者和组,那么我们只需要在服务端把共享目录的权限设置成nfsnobody这个用户可读写权限,客户端root就可在里面创建文件了。
[root@test ~]# chmod 755 /nfsdir
[root@test ~]# ll /nfsdir -d
drwxr-xr-x 2 root root 22 1月  30 00:21 /nfsdir
[root@test ~]# setfacl -m u:nfsnobody:rwx /nfsdir
[root@test ~]# getfacl /nfsdir
getfacl: Removing leading '/' from absolute path names
# file: nfsdir
# owner: root
# group: root
user::rwx
user:nfsnobody:rwx
group::r-x
mask::rwx
other::r-x

[root@test ~]#
说明:设置了/nfsdir这个共享目录nfsnobody用户有读写执行权限,那么客户端的root用户在共享目录新建文件是否还有问题呢?
[root@test-node1 mnt]#pwd
/mnt
[root@test-node1 mnt]#touch rootfile2
[root@test-node1 mnt]#ll
total 0
-rw-r--r-- 1 nfsnobody nfsnobody 0 Jan 30 00:21 rootfile
-rw-r--r-- 1 nfsnobody nfsnobody 0 Jan 30 00:27 rootfile2
[root@test-node1 mnt]#
说明:可看到客户端root用户在共享目录里是可以正常的创建文件的,那么客户端普通用户是否也可以呢?试一试
[root@test-node1 mnt]#su - qiuhom
[qiuhom@test-node1 ~]$cd /mnt
[qiuhom@test-node1 mnt]$ll
total 0
-rw-r--r-- 1 nfsnobody nfsnobody 0 Jan 30 00:21 rootfile
-rw-r--r-- 1 nfsnobody nfsnobody 0 Jan 30 00:27 rootfile2
[qiuhom@test-node1 mnt]$touch qiuhomfile
touch: cannot touch `qiuhomfile': Permission denied
[qiuhom@test-node1 mnt]$
说明:客户端的普通用户为什么就不能在共享目录里新建文件呢?我们在来看看服务端的配置
[root@test ~]# exportfs -v
/nfsdir         192.168.0.0/24(sync,wdelay,hide,no_subtree_check,sec=sys,rw,secure,root_squash,no_all_squash)
[root@test ~]#
说明:虽然服务端允许客户端的root映射成nfsnobody,但是后面又设置了no_all_squash,这个权限表示所有的用户不压榨,也就是说root用户压榨,其他用户不压榨,也就说除root用户,其他用户都不映射成nfsnobody用户。那么其他用户在NFS服务端映射成那个用户了呢?用上面的方法,把服务端共享的目录修改成777权限,然后客户端用普通用在其共享目录新建文件,看看里面新建的文件的所有者和组就知道了
[root@test ~]# chmod 777 /nfsdir
[root@test ~]#
==================================
[qiuhom@test-node1 mnt]$touch qiuhomfile
[qiuhom@test-node1 mnt]$ll
total 0
-rw-rw-r-- 1 qiuhom    qiuhom    0 Jan 30 00:35 qiuhomfile
-rw-r--r-- 1 nfsnobody nfsnobody 0 Jan 30 00:21 rootfile
-rw-r--r-- 1 nfsnobody nfsnobody 0 Jan 30 00:27 rootfile2
[qiuhom@test-node1 mnt]$
说明:把服务端的共享目录权限更改为777后客户端的普通用在其里面新建文件的所有者和组都变成了客户端的普通用名称,但是这是在客户端查看的信息是这样的,我们在服务端查看是不是这样的呢?
[root@test ~]# ll /nfsdir
总用量 0
-rw-rw-r-- 1       503       503 0 1月  30 00:35 qiuhomfile
-rw-r--r-- 1 nfsnobody nfsnobody 0 1月  30 00:21 rootfile
-rw-r--r-- 1 nfsnobody nfsnobody 0 1月  30 00:27 rootfile2
[root@test ~]#
说明:怎么在服务端查看刚才客户端普通用户新建的文件所有者和组是503呢?我们在来看看客户端普通用户的uid就明白了
[qiuhom@test-node1 mnt]$id qiuhom
uid=503(qiuhom) gid=503(qiuhom) groups=503(qiuhom)
[qiuhom@test-node1 mnt]$
说明:是不是明白了,普通用在nfs服务端陪映射成以普通用户uid和gid的用户了,如果服务端有对应uid用户和gid组,则服务端就会显示器名称,如果没有则显示器uid和gid,这个是服务端配置了root_squash和no_all_squash 是这样的。
五、nfs配置文件格式说明
1、nfs配置文件格式
需要共享的目录路径 允许访问的主机或网段1(选项) 主机或网段2(选项)……
2、“#”井号表示注释
3、单个主机可以是ipv4地址,ipv6地址,FQDN(域名)
4、网段支持两种掩码格式如:192.168.0.0/24 或者192.168.0.0/255.255.255.0
5、通配符支持域名,不支持ip,如:*.test.com
6、支持NIS域的主机组,如:@group_name
7、anonymous:表示使用*通配所有客户端
六、配置文件每个条目指定目录导出到的哪些主机,及相关的权限和选项说明
1、默认选项:(ro,sync,root_squash,no_all_squash)
2、ro,rw 只读和读写
3、async 异步,数据变化后不立即写磁盘,性能高
4、sync(1.0.0后为默认)同步,数据在请求时立即写入共享
5、 no_all_squash (默认)保留共享文件的UID和GID
6、 all_squash 所有远程用户(包括root)都变成nfsnobody
7、 root_squash (默认)远程root映射为nfsnobody,UID为65534,早期版本是4294967294 (nfsnobody)
8、no_root_squash 远程root映射成root用户
9、anonuid和anongid 指明匿名用户映射为特定用户UID和组GID,而非nfsnobody,可配合all_squash使用
七、NFS工具使用
rpcinfo:查看rpc信息
qiuhom@test-node1 mnt]$rpcinfo -p 192.168.0.99
   program vers proto   port  service
    100000    4   tcp    111  portmapper
    100000    3   tcp    111  portmapper
    100000    2   tcp    111  portmapper
    100000    4   udp    111  portmapper
    100000    3   udp    111  portmapper
    100000    2   udp    111  portmapper
    100005    1   udp  20048  mountd
    100005    1   tcp  20048  mountd
    100024    1   udp  38042  status
    100024    1   tcp  45458  status
    100005    2   udp  20048  mountd
    100005    2   tcp  20048  mountd
    100005    3   udp  20048  mountd
    100005    3   tcp  20048  mountd
    100003    3   tcp   2049  nfs
    100003    4   tcp   2049  nfs
    100227    3   tcp   2049  nfs_acl
    100003    3   udp   2049  nfs
    100003    4   udp   2049  nfs
    100227    3   udp   2049  nfs_acl
    100021    1   udp  37177  nlockmgr
    100021    3   udp  37177  nlockmgr
    100021    4   udp  37177  nlockmgr
    100021    1   tcp  40293  nlockmgr
    100021    3   tcp  40293  nlockmgr
    100021    4   tcp  40293  nlockmgr
[qiuhom@test-node1 mnt]$
说明:-p选项指定查看指定服务器上rpcbind所注册的端口信息,若-p后面不指定主机表示查看本机的端口注册信息
[qiuhom@test-node1 mnt]$rpcinfo -s 192.168.0.99
   program version(s) netid(s)                         service     owner
    100000  2,3,4     local,udp,tcp,udp6,tcp6          portmapper  superuser
    100005  3,2,1     tcp6,udp6,tcp,udp                mountd      superuser
    100024  1         tcp6,udp6,tcp,udp                status      29
    100003  4,3       udp6,tcp6,udp,tcp                nfs         superuser
    100227  3         udp6,tcp6,udp,tcp                nfs_acl     superuser
    100021  4,3,1     tcp6,udp6,tcp,udp                nlockmgr    superuser
[qiuhom@test-node1 mnt]$
说明:-s选项表示查看rpc注册的程序,若不跟主机地址,则表示查看本机rpc注册的程序信息
exportfs:维护导出的NFS文件系统表
[root@test ~]# exportfs -v
/nfsdir         192.168.0.0/24(sync,wdelay,hide,no_subtree_check,sec=sys,rw,secure,root_squash,no_all_squash)
[root@test ~]
说明:-v选项表示查看本机所有NFS共享详情
[root@test ~]# cat /etc/exports
/nfsdir 192.168.0.0/24(rw)
[root@test ~]# cat > /etc/exports
/nfsdir *
^C
[root@test ~]# cat /etc/exports
/nfsdir *
[root@test ~]# exportfs -r
exportfs: No options for /nfsdir *: suggest *(sync) to avoid warning
[root@test ~]# exportfs -v
/nfsdir         <world>(sync,wdelay,hide,no_subtree_check,sec=sys,ro,secure,root_squash,no_all_squash)
[root@test ~]#
说明:-r选项表示不重启重读配置文件,并共享目录,如果配置文件中没有明确写明是同步写磁盘还是异步写磁盘,它重读配置文件的时候它会警告我们建议加上sync
[root@test ~]# exportfs -v
/nfsdir         <world>(sync,wdelay,hide,no_subtree_check,sec=sys,ro,secure,root_squash,no_all_squash)
[root@test ~]# cat > /etc/exports
/nfsdir *(rw,all_squash)
^C
[root@test ~]# cat /etc/exports
/nfsdir *(rw,all_squash)
[root@test ~]# exportfs -a
[root@test ~]# exportfs -v
/nfsdir         <world>(sync,wdelay,hide,no_subtree_check,sec=sys,rw,secure,root_squash,all_squash)
[root@test ~]#
说明:-a选项表示重读配置并输出本机所有共享,如果停止本机的共享,使用-a会恢复所有共享
[root@test ~]# exportfs -au
[root@test ~]# exportfs -v
[root@test ~]#
说明:-au选项表示停止所有共享
showmount -e hostname:查看指定主机上的共享目录情况
[root@test ~]# showmount -e 192.168.0.99
Export list for 192.168.0.99:
/nfsdir *
[root@test ~]# showmount -e
Export list for test:
/nfsdir *
[root@test ~]#
说明:-e后面若不跟主机地址,则表示查看本机的恭喜那个目录情况
八、客户端NFS挂载说明
基于安全考虑,建议使用nosuid,nodev,noexec挂载选项
NFS相关的挂载选项:
fg(默认)前台挂载,bg后台挂载
hard(默认)持续请求,soft 非持续请求
intr 和hard配合,请求可中断
rsize和wsize 一次读和写数据最大字节数,rsize=32768
_netdev 无网络不挂载
示例:
mount -o rw,nosuid,fg,hard,intr 172.16.0.1:/testdir /mnt/nfs/
开机挂载:编辑/etc/fstab文件在文件最后添加,如:172.16.0.1:/public /mnt/nfs nfs defaults 0 0
九、NFS实现伪根
1、创建目录
[root@test ~]# mkdir /root/dir{1,2} -pv
mkdir: 已创建目录 "/root/dir1"
mkdir: 已创建目录 "/root/dir2"
[root@test ~]# mkdir /test/dir{1,2} -pv
mkdir: 已创建目录 "/test"
mkdir: 已创建目录 "/test/dir1"
mkdir: 已创建目录 "/test/dir2"
[root@test ~]#
2、编写/etc/fstab文件,在其文件中填写如下内容
[root@test ~]# tail -n 2 /etc/fstab
/root/dir1 /test/dir1 none bind 0 0
/root/dir2 /test/dir2 none bind 0 0
[root@test ~]#
3、编写/etc/exports文件,在其文件中添加如下内容
[root@test ~]# cat /etc/exports
/test *(fsid=0,rw,crossmnt)
/test/dir1 192.168.0.0/24(rw,all_squash)
/test/dir2 192.168.0.0/24(rw,all_squash)
[root@test ~]#
4、挂载所有目录,并重读NFS配置
[root@test ~]# mount -a
[root@test ~]# mount |tail -n 2
/dev/mapper/centos-root on /test/dir1 type xfs (rw,relatime,attr2,inode64,noquota)
/dev/mapper/centos-root on /test/dir2 type xfs (rw,relatime,attr2,inode64,noquota)
[root@test ~]# exportfs -r
[root@test ~]# exportfs -v
/test/dir1      192.168.0.0/24(sync,wdelay,hide,no_subtree_check,sec=sys,rw,secure,root_squash,all_squash)
/test/dir2      192.168.0.0/24(sync,wdelay,hide,no_subtree_check,sec=sys,rw,secure,root_squash,all_squash)
/test           <world>(sync,wdelay,hide,crossmnt,no_subtree_check,fsid=0,sec=sys,rw,secure,root_squash,no_all_squash)
[root@test ~]#
说明:到此服务端的配置就完成了,接下来在客户端挂载即可
5、客户端挂载伪根
[root@test-node1 ~]#mkdir xxx
[root@test-node1 ~]#mount 192.168.0.99:/ ./xxx/
[root@test-node1 ~]#df
df: `/mnt': Stale file handle
Filesystem           1K-blocks     Used Available Use% Mounted on
/dev/mapper/VolGroup-lv_root
                      51475068  4746736  44106892  10% /
tmpfs                   959580        0    959580   0% /dev/shm
/dev/sda1               487652    45302    416750  10% /boot
/dev/mapper/VolGroup-lv_home
                     251354900    69268 238510824   1% /home
192.168.0.99:/        27560960 13935360  13625600  51% /root/xxx
[root@test-node1 ~]#ls xxx/
dir1  dir2
[root@test-node1 ~]#
说明:如果客户端需要实现开机挂载,则需要在/etc/fstab下写明挂载关系和挂载选项即可,如:192.168.0.99:/ /root/xxx/ nfs ro 0 0
十、配置NFS使用固定端口
编辑配置文件/etc/sysconfig/nfs在其最后添加RQUOTAD_PORT=875(端口可以根据实际情况来定)修改后的文件如下几项内容
[root@test ~]# grep  "PORT" /etc/sysconfig/nfs
LOCKD_TCPPORT=32803
LOCKD_UDPPORT=32769
MOUNTD_PORT=892
STATD_PORT=662
STATD_OUTGOING_PORT=2020
RQUOTAD_PORT=875
[root@test ~]#
说明:除了以上端口外,防火墙配置还需要开放tcp和udp的111端口和2049端口共4个端口。配置了以上配置文件后,然后重启nfs-server服务,nfs注册的端口就不会变了,如下所示
[root@test ~]# systemctl restart nfs-server
[root@test ~]# rpcinfo -p
   program vers proto   port  service
    100000    4   tcp    111  portmapper
    100000    3   tcp    111  portmapper
    100000    2   tcp    111  portmapper
    100000    4   udp    111  portmapper
    100000    3   udp    111  portmapper
    100000    2   udp    111  portmapper
    100024    1   udp  38042  status
    100024    1   tcp  45458  status
    100005    1   udp    892  mountd
    100005    1   tcp    892  mountd
    100005    2   udp    892  mountd
    100005    2   tcp    892  mountd
    100005    3   udp    892  mountd
    100005    3   tcp    892  mountd
    100003    3   tcp   2049  nfs
    100003    4   tcp   2049  nfs
    100227    3   tcp   2049  nfs_acl
    100003    3   udp   2049  nfs
    100003    4   udp   2049  nfs
    100227    3   udp   2049  nfs_acl
    100021    1   udp  32769  nlockmgr
    100021    3   udp  32769  nlockmgr
    100021    4   udp  32769  nlockmgr
    100021    1   tcp  32803  nlockmgr
    100021    3   tcp  32803  nlockmgr
    100021    4   tcp  32803  nlockmgr
[root@test ~]#
十一、NFS实现自动挂载
1、客户端安装autofs软件包
[root@test-centos7-node1 ~]# yum info autofs
Loaded plugins: fastestmirror
Loading mirror speeds from cached hostfile
Available Packages
Name        : autofs
Arch        : x86_64
Epoch       : 1
Version     : 5.0.7
Release     : 69.el7
Size        : 808 k
Repo        : my_base/7/x86_64
Summary     : A tool for automatically mounting and unmounting filesystems
License     : GPLv2+
Description : autofs is a daemon which automatically mounts filesystems when you use
            : them, and unmounts them later when you are not using them.  This can
            : include network filesystems, CD-ROMs, floppies, and so forth.

[root@test-centos7-node1 ~]# yum install -y autofs
Loaded plugins: fastestmirror
epel                                                                                                     | 5.3 kB  00:00:00
my_base                                                                                                  | 3.6 kB  00:00:00
Loading mirror speeds from cached hostfile
Resolving Dependencies
--> Running transaction check
---> Package autofs.x86_64 1:5.0.7-69.el7 will be installed
--> Processing Dependency: libtirpc.so.1()(64bit) for package: 1:autofs-5.0.7-69.el7.x86_64
--> Processing Dependency: libhesiod.so.0()(64bit) for package: 1:autofs-5.0.7-69.el7.x86_64
--> Running transaction check
---> Package hesiod.x86_64 0:3.2.1-3.el7 will be installed
---> Package libtirpc.x86_64 0:0.2.4-0.10.el7 will be installed
--> Finished Dependency Resolution

Dependencies Resolved

================================================================================================================================
 Package                      Arch                       Version                              Repository                   Size
================================================================================================================================
Installing:
 autofs                       x86_64                     1:5.0.7-69.el7                       my_base                     808 k
Installing for dependencies:
 hesiod                       x86_64                     3.2.1-3.el7                          my_base                      30 k
 libtirpc                     x86_64                     0.2.4-0.10.el7                       my_base                      88 k

Transaction Summary
================================================================================================================================
Install  1 Package (+2 Dependent packages)

Total download size: 927 k
Installed size: 5.3 M
Downloading packages:
(1/3): hesiod-3.2.1-3.el7.x86_64.rpm                                                                     |  30 kB  00:00:00
(2/3): libtirpc-0.2.4-0.10.el7.x86_64.rpm                                                                |  88 kB  00:00:00
(3/3): autofs-5.0.7-69.el7.x86_64.rpm                                                                    | 808 kB  00:00:00
--------------------------------------------------------------------------------------------------------------------------------
Total                                                                                           1.9 MB/s | 927 kB  00:00:00
Running transaction check
Running transaction test
Transaction test succeeded
Running transaction
Warning: RPMDB altered outside of yum.
  Installing : libtirpc-0.2.4-0.10.el7.x86_64                                                                               1/3
  Installing : hesiod-3.2.1-3.el7.x86_64                                                                                    2/3
  Installing : 1:autofs-5.0.7-69.el7.x86_64                                                                                 3/3
  Verifying  : 1:autofs-5.0.7-69.el7.x86_64                                                                                 1/3
  Verifying  : hesiod-3.2.1-3.el7.x86_64                                                                                    2/3
  Verifying  : libtirpc-0.2.4-0.10.el7.x86_64                                                                               3/3

Installed:
  autofs.x86_64 1:5.0.7-69.el7

Dependency Installed:
  hesiod.x86_64 0:3.2.1-3.el7                                  libtirpc.x86_64 0:0.2.4-0.10.el7

Complete!
[root@test-centos7-node1 ~]#
说明:从上面的信息可以知道autofs这个包的主要功能就是自动挂载和卸载文件系统的工具
2、查看autofs的配置文件
[root@test-centos7-node1 ~]# rpm -ql autofs|grep etc
/etc/auto.master
/etc/auto.master.d
/etc/auto.misc
/etc/auto.net
/etc/auto.smb
/etc/autofs.conf
/etc/autofs_ldap_auth.conf
/etc/sysconfig/autofs
[root@test-centos7-node1 ~]#
说明:可以看到autofs的组配置文件是/etc/auto.master 当然也可以把配置文件放到/etc/auto.master.d/下
3、查看主配置文件中定义的内容
[root@test-centos7-node1 ~]# cat /etc/auto.master
#
# Sample auto.master file
# This is a 'master' automounter map and it has the following format:
# mount-point [map-type[,format]:]map [options]
# For details of the format look at auto.master(5).
#
/misc   /etc/auto.misc
#
# NOTE: mounts done from a hosts map will be mounted with the
#       "nosuid" and "nodev" options unless the "suid" and "dev"
#       options are explicitly given.
#
/net    -hosts
#
# Include /etc/auto.master.d/*.autofs
# The included files must conform to the format of this file.
#
+dir:/etc/auto.master.d
#
# Include central master map if it can be found using
# nsswitch sources.
#
# Note that if there are entries for /net or /misc (as
# above) in the included master map any keys that are the
# same will not be seen as the first read key seen takes
# precedence.
#
+auto.master
[root@test-centos7-node1 ~]#
说明:以上主配置文件定义了/misc 目录下的子目录挂载策略的子配置文件是/etc/auto.misc。我们可以这样理解,/etc/auto.master这个文件定义了挂载点的父目录位置,以及该父目录下面的子目录挂载策略的配置文件存放路径和名称。也就是说我们要实现自动挂载,我们需要把挂载点分成两部分,第一部分是挂载点的父目录在哪里,这个需要在/etc/auto.master里面定,除此之外,我们还需要在/etc/master下面定义挂载点的父目录下的子目录挂载策略的配置文件的路径以及名称。当然这个路径和名称可以根据自己的情况来写,通常情况下我们放在/etc/下面。了解了/etc/auto.master的配置文件规则,我们可以清楚的知道/misc 这个目录下的子目录挂载规则是存放在/etc/auto.misc里,接下来我们再来看看这个子配置文件
[root@test-centos7-node1 ~]# cat /etc/auto.misc
#
# This is an automounter map and it has the following format
# key [ -mount-options-separated-by-comma ] location
# Details may be found in the autofs(5) manpage

cd              -fstype=iso9660,ro,nosuid,nodev :/dev/cdrom

# the following entries are samples to pique your imagination
#linux          -ro,soft,intr           ftp.example.org:/pub/linux
#boot           -fstype=ext2            :/dev/hda1
#floppy         -fstype=auto            :/dev/fd0
#floppy         -fstype=ext2            :/dev/fd0
#e2floppy       -fstype=ext2            :/dev/fd0
#jaz            -fstype=ext2            :/dev/sdc1
#removable      -fstype=ext2            :/dev/hdd
[root@test-centos7-node1 ~]#
说明:这个之配置文件除了注释以外就只有一行,从上面的描述,我们不难理解子配置文件中的这个配置是什么意思。结合上面说的 这个之配置文件是/misc目录下的子目录挂载策略的配置。以上配置表示在/misc/cd目录挂载对应的设备上 /dev/cdrom 文件系统是iso9660 以只读,nosuid,nodev选项挂载。看了以上的配置我们就很容易理解,centos7上的"神奇的目录",之所以我们在不访问/misc/cd 的时候是看不到挂载的,一旦访问就有挂载自动挂上去了 ,它的实现原理就是通过autofs自动挂载实现的。理解了上面的配置我们就可以写自己的挂载策略实现自动挂载
4、NFS自动挂载实现
4.1相对路径法
首先解释下说明叫相对路径法,相对路径就是我们上面说的/misc/cd 这个挂载点例子,它是把挂载点分成了了basename和dirname两部分来配置的,所以说在组配置文件中(/etc/auto.master)需要定义dirname路径以及basename子目录挂载策略的配置文件路径和名称。然后在对应的之配置文件中写清楚挂载策略和子目录的关系即可
将192.168.0.99:/nfsdir 自动挂载到本机的/auto/nfs/目录下
4.1.1、编辑组配置文件定义父目录 和子目录配置文件的路径和名称
[root@test-centos7-node1 ~]# grep nfs /etc/auto.master
/auto   /etc/nfs_auto.txt
[root@test-centos7-node1 ~]#
说明:以上内容是我们自己行家挂载点父目录和子目录配置文件的路径和名称,这个子配置文件的名称没有什么要求,可以随意写。
4.1.2、在对应子配置文件中写子目录挂载策略
[root@test-centos7-node1 ~]# cat /etc/nfs_auto.txt
nfs   -fstype=nfs,rw,vers=3   192.168.0.99:/nfsdir
[root@test-centos7-node1 ~]#
说明:配置好子目录的挂载策略后就实现了自动挂载。这里还需要注意一点的是,我们在客户端实现自动挂载的前提是NFS可以在客户端挂载,如果客户端都看不到NFS共享出来的目录,当然也不能实现自动挂载
4.1.3、在客户端查看是否能够看到NFS共享出来的目录
[root@test-centos7-node1 ~]# showmount -e 192.168.0.99
Export list for 192.168.0.99:
/test      *
/test/dir2 192.168.0.0/24
/test/dir1 192.168.0.0/24
/nfsdir    192.168.0.0/24
[root@test-centos7-node1 ~]#
说明:可看到在客户端是可以看到服务端的nfs共享的目录,接下来我们启动autofs服务查看挂载情况
[root@test-centos7-node1 ~]# systemctl status autofs
● autofs.service - Automounts filesystems on demand
   Loaded: loaded (/usr/lib/systemd/system/autofs.service; disabled; vendor preset: disabled)
   Active: inactive (dead)
[root@test-centos7-node1 ~]# systemctl start autofs
[root@test-centos7-node1 ~]# systemctl status autofs
● autofs.service - Automounts filesystems on demand
   Loaded: loaded (/usr/lib/systemd/system/autofs.service; disabled; vendor preset: disabled)
   Active: active (running) since Tue 2020-01-28 18:13:19 CST; 1min 21s ago
  Process: 3862 ExecStart=/usr/sbin/automount $OPTIONS --pid-file /run/autofs.pid (code=exited, status=0/SUCCESS)
 Main PID: 3864 (automount)
   CGroup: /system.slice/autofs.service
           └─3864 /usr/sbin/automount --pid-file /run/autofs.pid

Jan 28 18:13:17 test-centos7-node1 automount[3864]: master_add_map_source: map source used without taking reference
Jan 28 18:13:17 test-centos7-node1 automount[3864]: master_add_map_source: map source used without taking reference
Jan 28 18:13:17 test-centos7-node1 automount[3864]: open_sss_lib:78: lookup(sss): failed to open /usr/lib64/sssd/modules...ctory
Jan 28 18:13:19 test-centos7-node1 automount[3864]: problem reading master map, maximum wait exceeded
Jan 28 18:13:19 test-centos7-node1 automount[3864]: /usr/sbin/automount: warning: could not read at least one map source...g ...
Jan 28 18:13:19 test-centos7-node1 automount[3864]: master_add_map_source: map source used without taking reference
Jan 28 18:13:19 test-centos7-node1 automount[3864]: master_add_map_source: map source used without taking reference
Jan 28 18:13:19 test-centos7-node1 automount[3864]: master_add_map_source: map source used without taking reference
Jan 28 18:13:19 test-centos7-node1 automount[3864]: open_sss_lib:78: lookup(sss): failed to open /usr/lib64/sssd/modules...ctory
Jan 28 18:13:19 test-centos7-node1 systemd[1]: Started Automounts filesystems on demand.
Hint: Some lines were ellipsized, use -l to show in full.
[root@test-centos7-node1 ~]# df
Filesystem     1K-blocks    Used Available Use% Mounted on
/dev/sda3       48209924 3116852  45093072   7% /
devtmpfs         1922828       0   1922828   0% /dev
tmpfs            1932652      20   1932632   1% /dev/shm
tmpfs            1932652    8800   1923852   1% /run
tmpfs            1932652       0   1932652   0% /sys/fs/cgroup
/dev/sda1        2086912  137672   1949240   7% /boot
tmpfs             386532       0    386532   0% /run/user/0
[root@test-centos7-node1 ~]#
说明:我们启动autofs后,我们定义的自动挂载好像没有自动挂载到对应的目录。这个时候我们来直接访问我们定义的挂载点看看有什么情况
[root@test-centos7-node1 ~]# df
Filesystem     1K-blocks    Used Available Use% Mounted on
/dev/sda3       48209924 3116816  45093108   7% /
devtmpfs         1922828       0   1922828   0% /dev
tmpfs            1932652      20   1932632   1% /dev/shm
tmpfs            1932652    8800   1923852   1% /run
tmpfs            1932652       0   1932652   0% /sys/fs/cgroup
/dev/sda1        2086912  137672   1949240   7% /boot
tmpfs             386532       0    386532   0% /run/user/0
[root@test-centos7-node1 ~]# ls /
auto  boot  etc   lib    media  mnt  opt    proc  run   srv  tmp  var
bin   dev   home  lib64  misc   net  patch  root  sbin  sys  usr  www
[root@test-centos7-node1 ~]# ls /auto/
[root@test-centos7-node1 ~]# cd /auto/nfs
[root@test-centos7-node1 nfs]# ll
total 0
[root@test-centos7-node1 nfs]# df
Filesystem           1K-blocks     Used Available Use% Mounted on
/dev/sda3             48209924  3116996  45092928   7% /
devtmpfs               1922828        0   1922828   0% /dev
tmpfs                  1932652       20   1932632   1% /dev/shm
tmpfs                  1932652     8804   1923848   1% /run
tmpfs                  1932652        0   1932652   0% /sys/fs/cgroup
/dev/sda1              2086912   137672   1949240   7% /boot
tmpfs                   386532        0    386532   0% /run/user/0
192.168.0.99:/nfsdir  27560960 13929472  13631488  51% /auto/nfs
[root@test-centos7-node1 nfs]#
说明:可看到我们去访问我们定义的挂载点,就能够立即将NFS给挂载到系统上,其实过上一段时间我们不访问我们的挂载点,它还会自动卸载掉,我们一旦去访问挂载点,它又会立刻触发挂载,把对应的资源给挂载到系统上;这里再说一下,如果子配置文件的挂载目录和NFS的共享目录相同 ,我们可以用*来通配,如:NFS服务器共享的目录是192.168.0.99:/nfsdir 客户端挂载的目录为/misc/nfsdir 这种挂载点的basename和nfs服务器上共享的目录的basename相同时。我们在子配置文件中还可以写成 * -fstype=nfs,rw,vers=3 192.168.0.99:/&
[root@test-centos7-node1 ~]# cat /etc/nfs_auto.txt
*   -fstype=nfs,rw,vers=3   192.168.0.99:/&
[root@test-centos7-node1 ~]# df
Filesystem     1K-blocks    Used Available Use% Mounted on
/dev/sda3       48209924 3117020  45092904   7% /
devtmpfs         1922828       0   1922828   0% /dev
tmpfs            1932652      20   1932632   1% /dev/shm
tmpfs            1932652    8776   1923876   1% /run
tmpfs            1932652       0   1932652   0% /sys/fs/cgroup
/dev/sda1        2086912  137672   1949240   7% /boot
tmpfs             386532       0    386532   0% /run/user/0
[root@test-centos7-node1 ~]# cd /auto/nfsdir
[root@test-centos7-node1 nfsdir]# df
Filesystem           1K-blocks     Used Available Use% Mounted on
/dev/sda3             48209924  3117020  45092904   7% /
devtmpfs               1922828        0   1922828   0% /dev
tmpfs                  1932652       20   1932632   1% /dev/shm
tmpfs                  1932652     8776   1923876   1% /run
tmpfs                  1932652        0   1932652   0% /sys/fs/cgroup
/dev/sda1              2086912   137672   1949240   7% /boot
tmpfs                   386532        0    386532   0% /run/user/0
192.168.0.99:/nfsdir  27560960 13929472  13631488  51% /auto/nfsdir
[root@test-centos7-node1 nfsdir]#
说明:这种写法我们在访问其挂载点的时候,需要清楚知道服务端共享目录的名称才可以,这种写法是可以匹配多个共享目录的,只要挂载点和NFS服务器共享目录路径有相同的,都可以匹配上。如下所示
[root@test-centos7-node1 ~]# showmount -e 192.168.0.99
Export list for 192.168.0.99:
/test      *
/test/dir2 192.168.0.0/24
/test/dir1 192.168.0.0/24
/nfsdir    192.168.0.0/24
[root@test-centos7-node1 ~]# df
Filesystem           1K-blocks     Used Available Use% Mounted on
/dev/sda3             48209924  3116956  45092968   7% /
devtmpfs               1922828        0   1922828   0% /dev
tmpfs                  1932652       20   1932632   1% /dev/shm
tmpfs                  1932652     8776   1923876   1% /run
tmpfs                  1932652        0   1932652   0% /sys/fs/cgroup
/dev/sda1              2086912   137672   1949240   7% /boot
tmpfs                   386532        0    386532   0% /run/user/0
192.168.0.99:/nfsdir  27560960 13929728  13631232  51% /auto/nfsdir
[root@test-centos7-node1 ~]# cd /auto/test/
[root@test-centos7-node1 test]# df
Filesystem           1K-blocks     Used Available Use% Mounted on
/dev/sda3             48209924  3116956  45092968   7% /
devtmpfs               1922828        0   1922828   0% /dev
tmpfs                  1932652       20   1932632   1% /dev/shm
tmpfs                  1932652     8776   1923876   1% /run
tmpfs                  1932652        0   1932652   0% /sys/fs/cgroup
/dev/sda1              2086912   137672   1949240   7% /boot
tmpfs                   386532        0    386532   0% /run/user/0
192.168.0.99:/nfsdir  27560960 13929472  13631488  51% /auto/nfsdir
192.168.0.99:/test    27560960 13929472  13631488  51% /auto/test
[root@test-centos7-node1 test]# ls
dir1  dir2
[root@test-centos7-node1 test]# cd /auto/test/dir2
[root@test-centos7-node1 dir2]# df
Filesystem              1K-blocks     Used Available Use% Mounted on
/dev/sda3                48209924  3116956  45092968   7% /
devtmpfs                  1922828        0   1922828   0% /dev
tmpfs                     1932652       20   1932632   1% /dev/shm
tmpfs                     1932652     8776   1923876   1% /run
tmpfs                     1932652        0   1932652   0% /sys/fs/cgroup
/dev/sda1                 2086912   137672   1949240   7% /boot
tmpfs                      386532        0    386532   0% /run/user/0
192.168.0.99:/test       27560960 13929472  13631488  51% /auto/test
192.168.0.99:/test/dir2  27560960 13929472  13631488  51% /auto/test/dir2
[root@test-centos7-node1 dir2]#
4.2、绝对路径法
绝对路径法就是在主配置文件中(/etc/auto.master)文件中用/-来表示不再主配置文件中定义父目录名称,然后在后面指定子配置文件的路径和名称即可,也就是说和相对路径法不同的是,把绝对路径和挂载策略都写在子配置文件中。
接下来我们把192.168.0.99:/ 挂载到本地的 /a/b/c/d/目录下
4.2.1、编辑主配置文件
[root@test-centos7-node1 ~]# grep "path" /etc/auto.master
/-      /etc/mount_all_path.txt
[root@test-centos7-node1 ~]#
4.2.2、在子配置文件中写挂载策略
[root@test-centos7-node1 ~]# cat /etc/mount_all_path.txt
/a/b/c/d/       -fstype=nfs,rw,all_squash       192.168.0.99:/
[root@test-centos7-node1 ~]#
说明:我们写好子配置文件后,是需要重启autofs服务。然后通过访问挂载点,看看它是否能够挂载NFS共享出来的目录呢
[root@test-centos7-node1 ~]# systemctl restart autofs
[root@test-centos7-node1 ~]# df
Filesystem     1K-blocks    Used Available Use% Mounted on
/dev/sda3       48209924 3116996  45092928   7% /
devtmpfs         1922828       0   1922828   0% /dev
tmpfs            1932652      20   1932632   1% /dev/shm
tmpfs            1932652    8776   1923876   1% /run
tmpfs            1932652       0   1932652   0% /sys/fs/cgroup
/dev/sda1        2086912  137672   1949240   7% /boot
tmpfs             386532       0    386532   0% /run/user/0
[root@test-centos7-node1 ~]# ls /a/b/c/d/
dir1  dir2
[root@test-centos7-node1 ~]# df
Filesystem     1K-blocks     Used Available Use% Mounted on
/dev/sda3       48209924  3116996  45092928   7% /
devtmpfs         1922828        0   1922828   0% /dev
tmpfs            1932652       20   1932632   1% /dev/shm
tmpfs            1932652     8776   1923876   1% /run
tmpfs            1932652        0   1932652   0% /sys/fs/cgroup
/dev/sda1        2086912   137672   1949240   7% /boot
tmpfs             386532        0    386532   0% /run/user/0
192.168.0.99:/  27560960 13929472  13631488  51% /a/b/c/d
[root@test-centos7-node1 ~]#
说明:我们通过访问挂载点也实现了自动挂载。其实autofs对自动挂载NFS提前有在主配置文件中定义,我们可以不用任何配置,装好autofs软件包后,直接cd NFS服务器的主机地址就可实现自动挂载
[root@test-centos7-node1 ~]# grep ^"\/net" /etc/auto.master
/net    -hosts
[root@test-centos7-node1 ~]#
说明:这个配置就是表示我们在通过网络挂载资源的时候,可以直接访问/net/对方ip地址即可,当然这种都是用在局域网里,NFS不建议用在互联网。
[root@test-centos7-node1 ~]# umount /a/b/c/d/
[root@test-centos7-node1 ~]# df
Filesystem     1K-blocks    Used Available Use% Mounted on
/dev/sda3       48209924 3116948  45092976   7% /
devtmpfs         1922828       0   1922828   0% /dev
tmpfs            1932652      20   1932632   1% /dev/shm
tmpfs            1932652    8776   1923876   1% /run
tmpfs            1932652       0   1932652   0% /sys/fs/cgroup
/dev/sda1        2086912  137672   1949240   7% /boot
tmpfs             386532       0    386532   0% /run/user/0
[root@test-centos7-node1 ~]# cd 192.168.0.99
-bash: cd: 192.168.0.99: No such file or directory
[root@test-centos7-node1 ~]# ls /net/
[root@test-centos7-node1 ~]# ls /net/192.168.0.99
nfsdir  test
[root@test-centos7-node1 ~]# df
Filesystem     1K-blocks    Used Available Use% Mounted on
/dev/sda3       48209924 3116952  45092972   7% /
devtmpfs         1922828       0   1922828   0% /dev
tmpfs            1932652      20   1932632   1% /dev/shm
tmpfs            1932652    8776   1923876   1% /run
tmpfs            1932652       0   1932652   0% /sys/fs/cgroup
/dev/sda1        2086912  137672   1949240   7% /boot
tmpfs             386532       0    386532   0% /run/user/0
[root@test-centos7-node1 ~]#
说明:这种方式用df命令是看不到它的挂载情况的,我们需要用mount命令是可以查看到挂载详情。如下所示
[root@test-centos7-node1 ~]# mount |tail
hugetlbfs on /dev/hugepages type hugetlbfs (rw,relatime)
mqueue on /dev/mqueue type mqueue (rw,relatime)
/dev/sda1 on /boot type xfs (rw,relatime,attr2,inode64,noquota)
tmpfs on /run/user/0 type tmpfs (rw,nosuid,nodev,relatime,size=386532k,mode=700)
/etc/auto.misc on /misc type autofs (rw,relatime,fd=7,pgrp=4091,timeout=300,minproto=5,maxproto=5,indirect,pipe_ino=28437)
/etc/nfs_auto.txt on /auto type autofs (rw,relatime,fd=13,pgrp=4091,timeout=300,minproto=5,maxproto=5,indirect,pipe_ino=29313)
/etc/mount_all_path.txt on /a/b/c/d type autofs (rw,relatime,fd=19,pgrp=4091,timeout=300,minproto=5,maxproto=5,direct,pipe_ino=26610)
-hosts on /net type autofs (rw,relatime,fd=24,pgrp=4091,timeout=300,minproto=5,maxproto=5,indirect,pipe_ino=26615)
-hosts on /net/192.168.0.99/nfsdir type autofs (rw,relatime,fd=24,pgrp=4091,timeout=300,minproto=5,maxproto=5,offset,pipe_ino=26615)
-hosts on /net/192.168.0.99/test type autofs (rw,relatime,fd=24,pgrp=4091,timeout=300,minproto=5,maxproto=5,offset,pipe_ino=26615)
[root@test-centos7-node1 ~]#
说明:以上的所有操作都建立在客户端上的操作,且客户端是能够看到其NFS服务器上的共享目录的前提才可以实现自动挂载。

 浙公网安备 33010602011771号