


Diving Into Lync Client Logins
Now that we have a fully functional UC lab it's time to start using the lab to explore various aspects of the UC world. In this post we'll take a deep dive into the Lync Client process of logging into a Lync Server.
First though, if you've been following along in your own lab you will notice some error messages in your Lync Front End Server's Event Logs. You do look at the event logs on a regular basis don't you? Good I thought so. So to fix the errors around MCUs being unable to update health information, you need to add the two DNS records I forgot to document in the last post. The two records are shown in the screen capture below. In short it's the A record for the FQDN of the Lync Pool and the A record for the FQDN of the internal web service override.
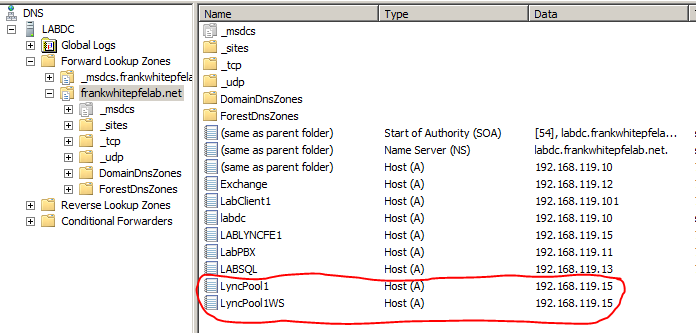
A Records for Pool and Web Services
So the obvious first step in our deep dive into Lync Client logons is to enable our first Lync Users. I will use the GUI for this step. To get to your Lync Administration GUI you can open your browser of choice and go to https followed by the FQDN of your pool or one of your front end servers, forward slash CSCP (which stands for communications server control panel).

URL for Lync Administration GUI
Once you've loaded the Silverlight based control panel, select Users on the left. And let's enable our first Lync users.
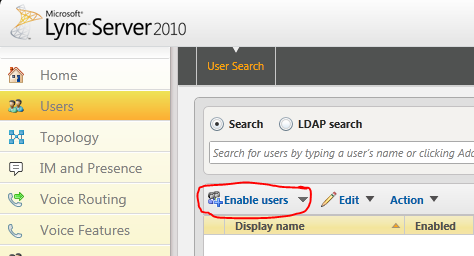
Enable Lync Users
Go ahead and add at least two users from your lab. In my sandbox lab Andy Andrews and Betty Brown already have Exchange mailboxes, so I will enable them for Lync. I always recommend enabling users after their Exchange mailboxes (and primary SMTP addresses) are created. When enabling your users make sure you assign them to the proper pool and set their SIP address to be the same as their email address. Leave their policies set to the Global Defaults, in future posts we'll dive deeper into how policies work in Lync.
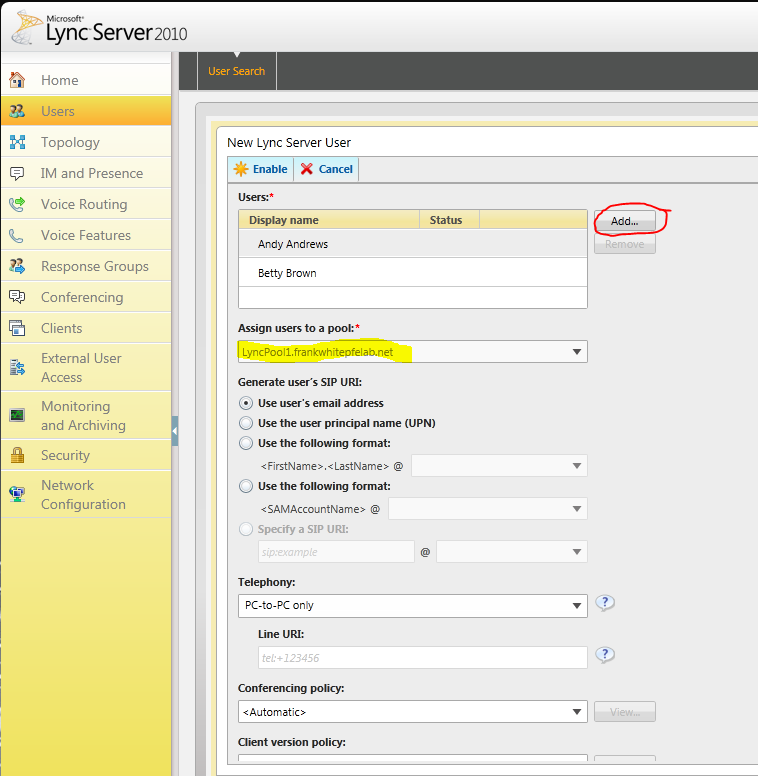
Settings for Our New Lync Users
On our client machines let's make sure we turn on logging in the Lync client. After you install the Lync client on your lab client machines, open the options window and select General. Place check marks into the "Turn on logging in Lync" and "Turn on Windows Event logging in Lync" boxes. Because of the extremely low overhead of this logging (less than 5%) I recommend to all the customers I visit that they turn these options on.
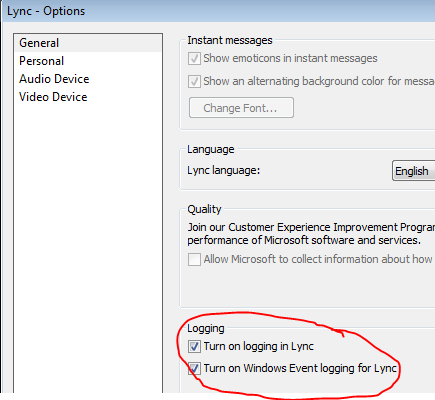
Turn on Client Side logging in Lync
Now let's logon to our Lync environment. I also started a Wireshark network trace before launching and signing into Lync.
Initial Client login to Lync
Well let's see what the Wireshark trace tells us happened.
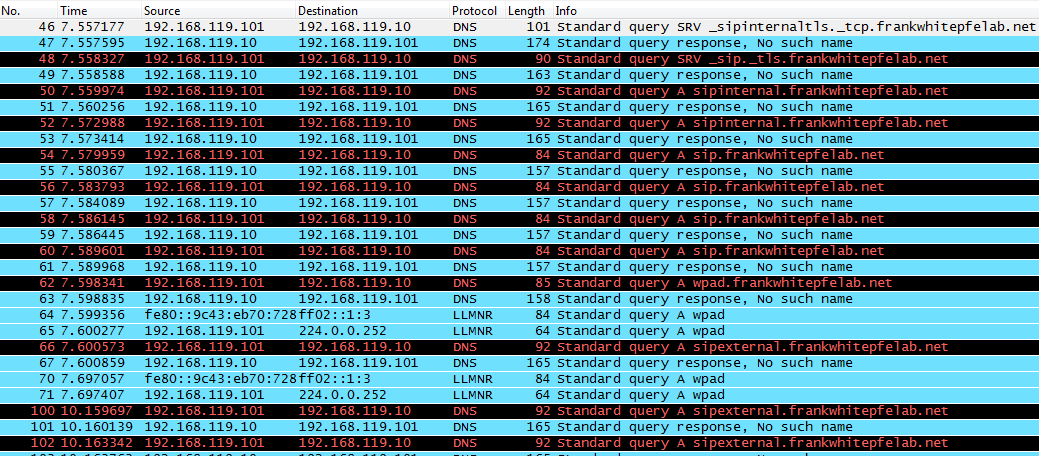
Wireshark trace of client login
So the client tried to query DNS for _sipinternaltls._tcp.<domain name of user>, _sip._tls.<domain name of user>, sipinternal.<domain name of user>, sip.<domain name of user> and finally sipexternal.<domain name of user>. Of course these failed as I have not done any of the DNS records for automatic client login support in my sandbox lab yet. I wanted to show how the Lync client automatically finds its servers for logon purposes. If we look at these DNS queries we notice a few things. First, we see that the first two queries are for SRV (service locator) records. The first SRV record would be for internal client logins and the second one is for external (i.e. Edge Server) connectivity. This is important because this lets the client machine know whether it is logged in internally or externally. The DNS query is constructed by the client by taking _sipinternaltls._tcp and then adding whatever is to the right hand side of the @ symbol in the user sign in dialog box. If those succeed we get a host name and a service port for our connection. When those fail we will fall back to searching for A records and making assumptions about port numbers. The next A record we look for is SIPINTERNAL followed by the right hand side of the @ symbol. When this failed we looked for SIP, then SIPEXTERNAL. The client would have assumed internal connectivity with the first A record and external connectivity with the last two A records.
Now what if we didn't have Wireshark running on the client machine when it failed to login? Well remember the second check box we set on our Lync client software? Well if we go look in the Application log of Windows Event Viewer we will see the following Warning message.
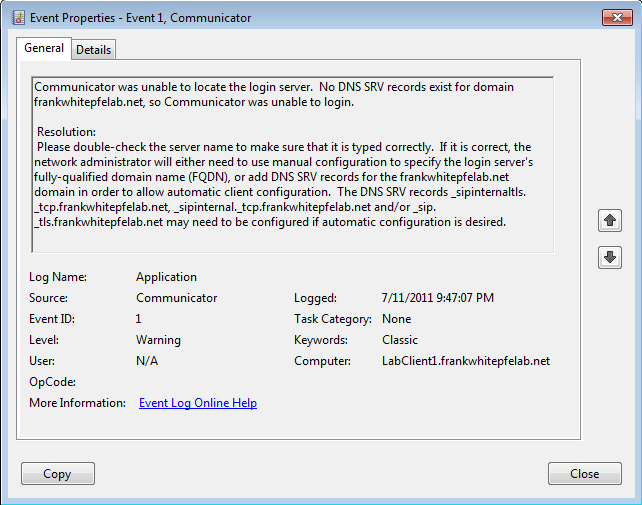
Warning Message
Notice that the event log entry gives us all the information we need in order to fix the issue? Along with suggestions on how to fix it? Why can't all Windows software give us such clear and helpful event log messages? Well at least Lync does. So we need to go to our DNS server and add the records for automatic client login support. If your lab requirements are for manual configuration go ahead and do that instead. In my lab I prefer to use automatic configuration.
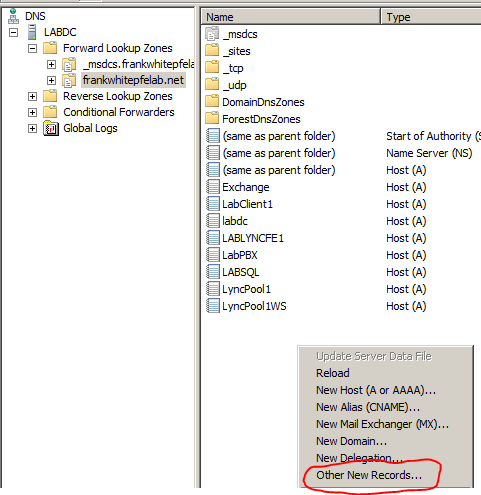
Add SRV Records to the proper DNS zone
Make sure the "Other New Records" you select to create is an SRV record, as shown in the screen capture below.
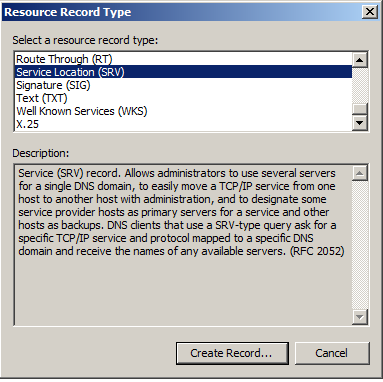
Create an SRV record
Since this is our internal Lync Pool we will create the _SIPINTERNALTLS record. Make sure you select the _tcp protocol for the service. And we will be using port 5061 for connecting to the service. The completed dialog should look similar to what is shown below.
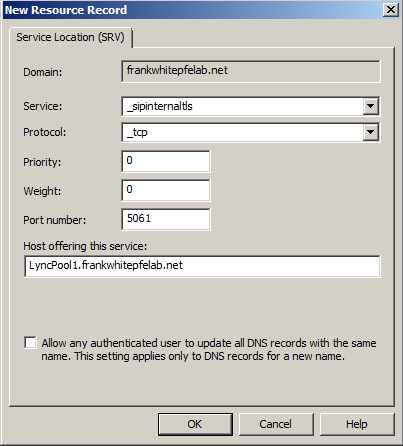
SRV record for internal clients
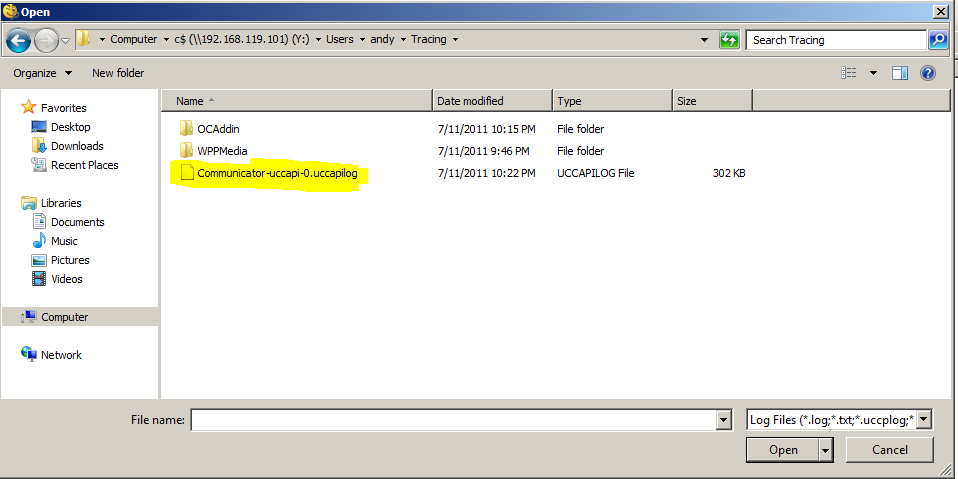
Now we should be able to login to the server successfully. When the client is finished logging into the server we will look at the SIP tracing logs from the client. This will allow us to understand what happens when the client logs in and remove the mystery from the process. The trace files were created for us by the check box we set on the client software. To read the files we will use Snooper from the Lync resource kit. I installed the Lync resource kit on my Front End server. After you've finished that installation you can find Snooper in the following location.
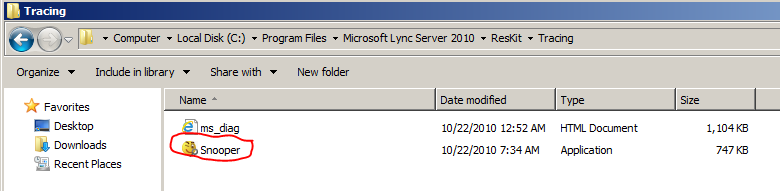
Where do you find Snooper?
Before we can open the trace file from the client we need to map a drive (or copy the file). Once the drive is mapped we can open the file in Snooper.
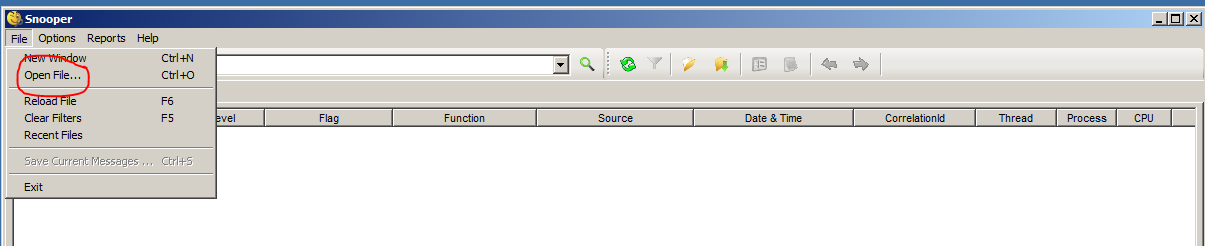
Open the file in Snooper
The location of the file on the client machine is at the following path, and it is the following file. Note if you are having trouble reading any of these screenshots you can click on them to get the full size picture.
The client SIP Trace and Path
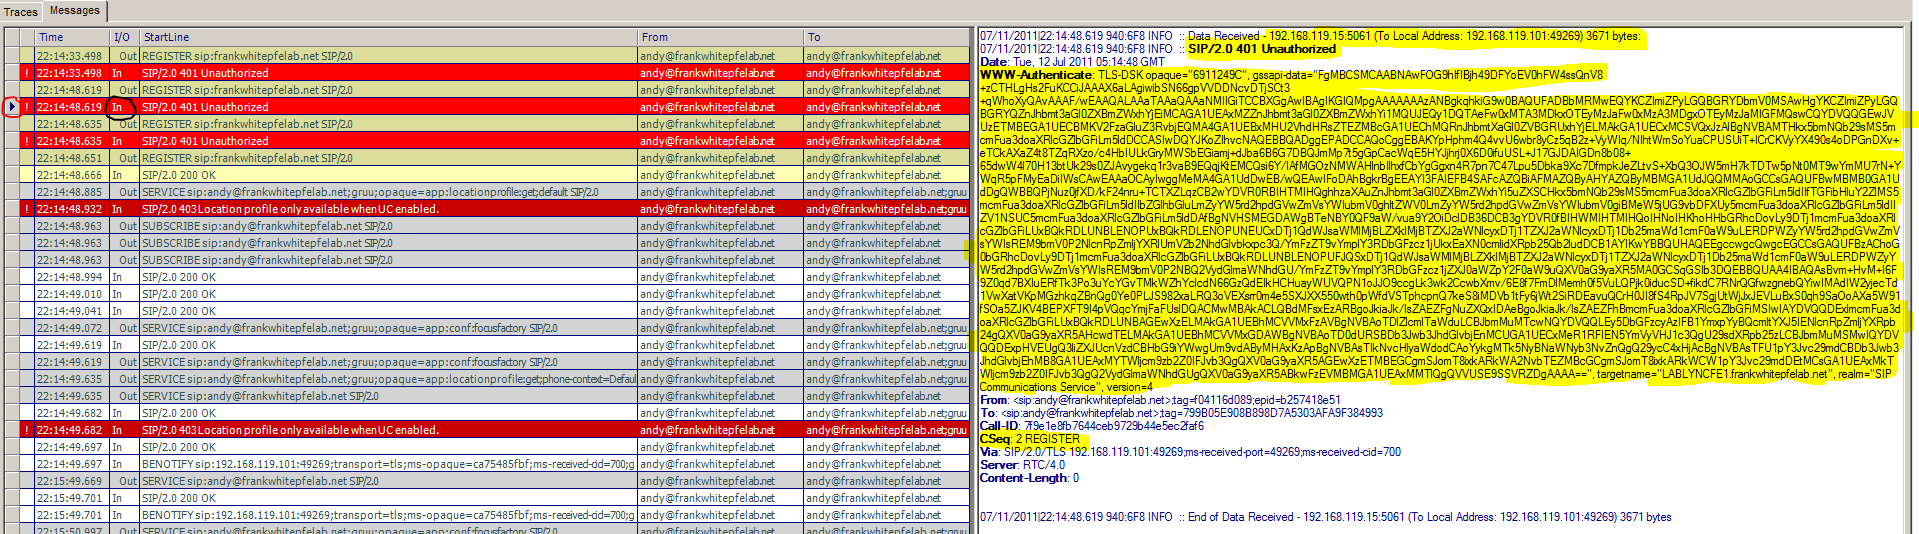
Now when looking at this file in Snooper I prefer to start at the top of the trace. The first thing you should notice is that when you highlight a packet (line) in the trace Snooper auto-magically highlights a bunch of other packets (lines) in the trace file. All of the highlighted packets are part of the same Call-ID. Each Call-ID is unique in the environment. Make sure you're looking at the proper packet and then let's dig into what we're seeing.

Lync Client Registering 1 (note click on image for full size)
Now that the client computer can resolve _sipinternaltls._tcp.frankwhitepfelab.net, the Lync client software can register the endpoint with the lab's pool. As you can see in the screen above, our first SIP packet leaves the client machine (hence the "Out") and asks the pool to REGISTER. The "From" and "To" fields contain the name of the user attempting to register this endpoint. Also, notice that the CSeq for this Call-ID is set to 1. Let's see what response the server gives us to this register attempt.

Lync Client Registering 1 Server Response (note click on image for full size)
As we can see in the above screen, the next SIP packet is received by the client machine (hence the "In"). The server gives the client a response of 401 Unauthorized. But, the server goes on to tell us that it supports NTLM, Kerberos and TLS-DSK authentication schemes. It also tells us the information we need for each method of authentication, such as the target name and version. So are client has not successfully registered with the pool, but has enough information to try again. I wonder what will happen next?

Lync Client Registering 2 (note click on image for full size)
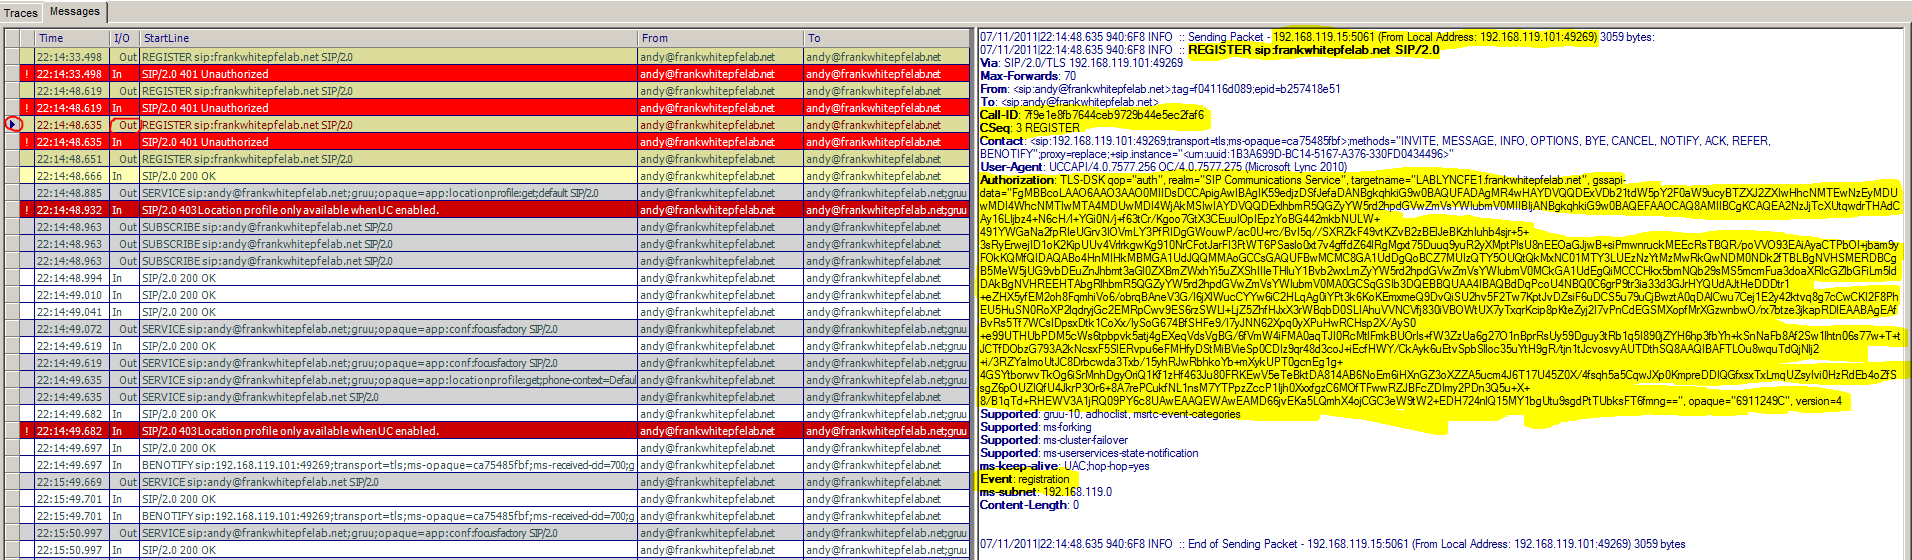
With our next outbound packet, shown above, the client increments the CSeq number and attempts to REGISTER again. This time the client attempts to authenticate. The client chose TLS-DSK as the authentication mechanism and passes a client_handshake, using TLS. The handshake is encoded with Base64 and included in the "gssapi-data=" portion of the message. This is the classic response to the challenge message the server sent us in the first 401 Unauthorized message. Let's see how the server responds to the client.
Lync Client Registering Server Response 2 (note click on image for full size)
We see with the next inbound packet, shown above, that the server has sent another 401 Unauthorized. In this response the server provides a server_hello, the server_key_exchange, a certificate_request, and a server_hello_done message. All of this is encoded again with Base64 and included in the "gssapi-data=" portion of the SIP packet. With this the CSeq 2 is done and the conversation ball is in the client's court, so to speak.
Lync Client Registering 3 (note click on image for full size)
Now we see in our next outbound packet, shown above, the client increases the CSeq value to 3 and continues the registration request (it is the same call-ID). In this packet the client provides the certificate, client_key_exchange, certificate_verify, change_cipher_spec, and the finished portions of the TLS authentication. This will all be encoded with Base64 and put into the "gssapi-data=" portion of the SIP packet and then sent to the server. Boy I can feel the tension building between this client and server! I wonder what the server is going to do?

Lync Client Registering Server Response 3 (note click on image for full size)
Wow that server sure is playing hard to get. As you can see in the screen shot above our next inbound packet from the server is another 401 Unauthorized. Let's look at what the server is doing in this 401 Unauthorized. After verifying the client's CSEQ3 packet the server now knows the ciphersuite that was decided upon, and is capable of computing the client and server authentication keys. Now the server will encode the TLS response to this and send it back to the client in the "gssapi-data=" portion of the SIP packet. Let's see what our client does with this latest 401 Unauthorized.

Lync Client Registering 4 (note click on image for full image)
Well as we can see above, the client increments the CSeq number to 4 and attempts the REGISTER again. This time the client includes the computed HMAC value, encoded in Base64 format, as the response parameter of the Proxy-Authorization line and the CRAND value in the Proxy-Authorization data. This is all sent to the server as part of the authenticated REGISTER. Let's look at how the server responds to this packet.

Lync Client Registering Server Response 4 (note click on image for full size image)
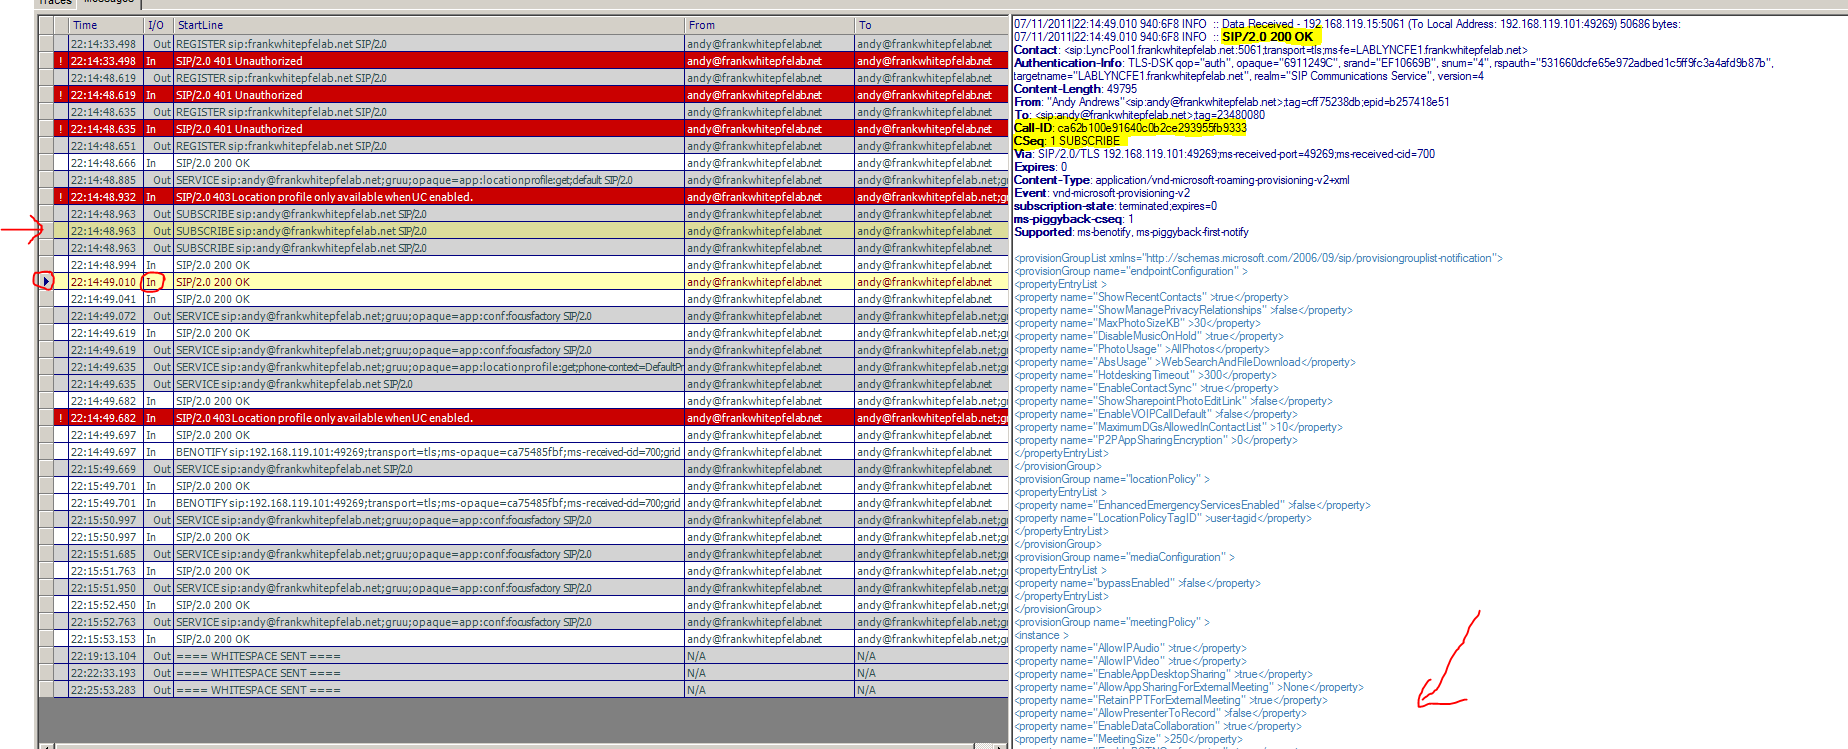
We can see above that the server has responded with a 200 OK message. Within in this 200 OK we see that the server has sent us the Contact information for this user at this end point (EPID). The server has also told us what our current presence-state for this user+EPID. And finally the server tells us what we are allowed to do with the Allow-Events information. The client has now officially logged in to the pool (SIP Registrar), but the client is not done with the complete logon process yet.

Client Service Request (note click on the image for full sized version)
As you can see in the screen above, the client next sends a SERVICE request to the server. Note that this packet has a new Call-ID and a CSeq of 1. We can see in the GRUU (globally routable unique URI) that the client is asking for "opaque=app:locationprofile:get:default". This tells the server to use the application location profile to get us the default location profile for our user. The server will look at the user and figure out which location profile to send the client. In the next screen shot we can see the results of this SERVICE request.

Client Service Request Server Response (note click on the image for full sized version)
Wow we can see that the server told us 403 (SIP Forbidden). But, at least the server is nice enough to tell us we were forbidden a location profile because only users that are UC enabled have a location profile. So our user is not UC enabled and therefore gets no location profile. This is part of the in-band provisioning process that all Lync clients go through when they log into the system.

Client Subscription Request 1 (note click on the image for full sized version)
As we see in the screen shot above, the client now sends a SUBSCRIBE to the server for the user that is logging into the system. We can see in the Event message that we are asking for our contact list "VND-MICROSOFT-ROAMING-CONTACTS". This instructs the server to look up the user's contact list and provide it to us. Since this is the first time this user has ever logged into the system I would expect this list to be empty. We can see from the highlighted packets that the server response is not the next packet in the SNOOPER list, but we will look at it next.

Client Subscription Request 1 Server Response (note click on the image for full sized version)
We see the server responds to us with a 200 OK message. So the user found our contact list in the database and returned it to us in XML format. We can see that the contact list contains 2 (predefined) groups "~" which is our recent contacts and "Pinned Contacts". Of course because we've never logged in before both of these are empty. Now we will see in the next screen shot that before the client even received this response it sent out another packet.

Client Subscription Request 2 (note click on the image for full sized version)
In this client SUBSCRIBE request we can see that the client is asking for an Event "VND-MICROSOFT-PROVISIONING-V2″. We can see in the XML data that the client is asking for provisioning information for endpoint configuration, location policy, media configuration, meeting policy, presence policy v2, privacy publication grammar, publication grammar, server configuration, UC phone settings, UC Policy and user settings.
Client Subscription Request 2 Server Response (note click on the image for full sized version)
So we can see that the server has responded to our request with a 200 OK message. We can see in the body of this message is an XML packet that contains all of the information the client requested. So now the client knows about all of the above policies and configuration information. Again, this is all part of the in-band provisioning of the Lync client.

Client Subscription Request 3 (note click on the image for full sized version)
Ok, now the client is sending a SUBSCRIBE request to the server with an event of "VND-MICROSOFT-ROAMING-SELF". This instructs the server to update our subscribers, those users who have subscribed to our status changes, and our delegates. We can see this in the XML in the packet.
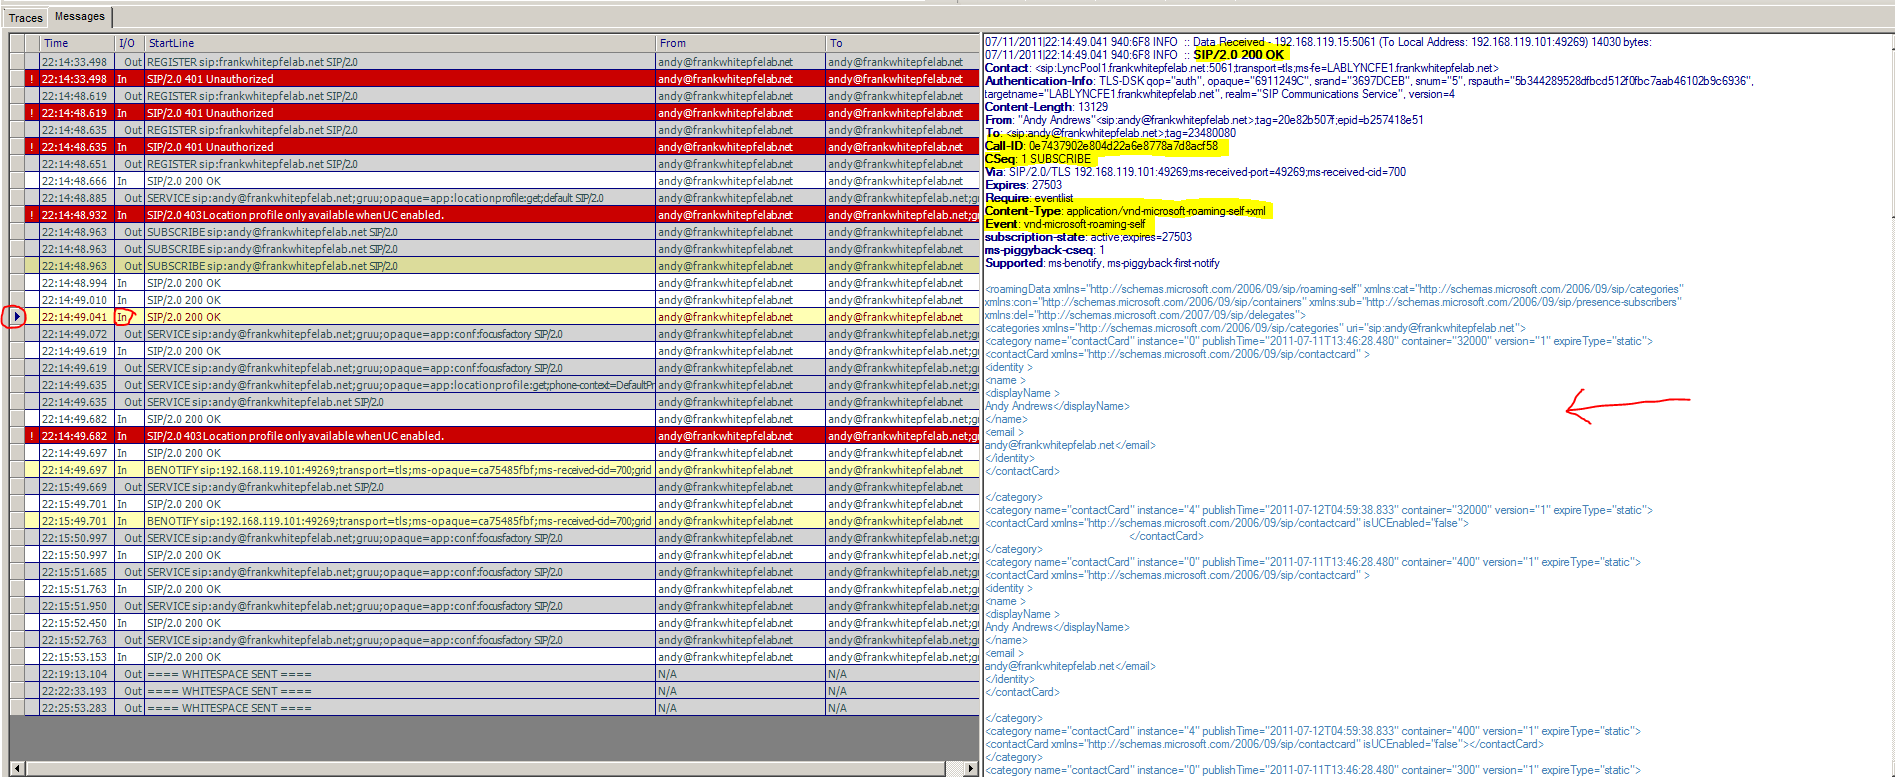
Client Subscription Request 3 Server Response (note click on the image for full sized version)
In the first server response packet we see a 200 OK message. In the body of this packet we see a large amount of XML. This XML data contains, among other things, our contact cards for various levels of trusted contacts, the container numbers denote these trust levels. We can also see in the screen shot above that there are two other packets later on that are part of this same Call-ID.
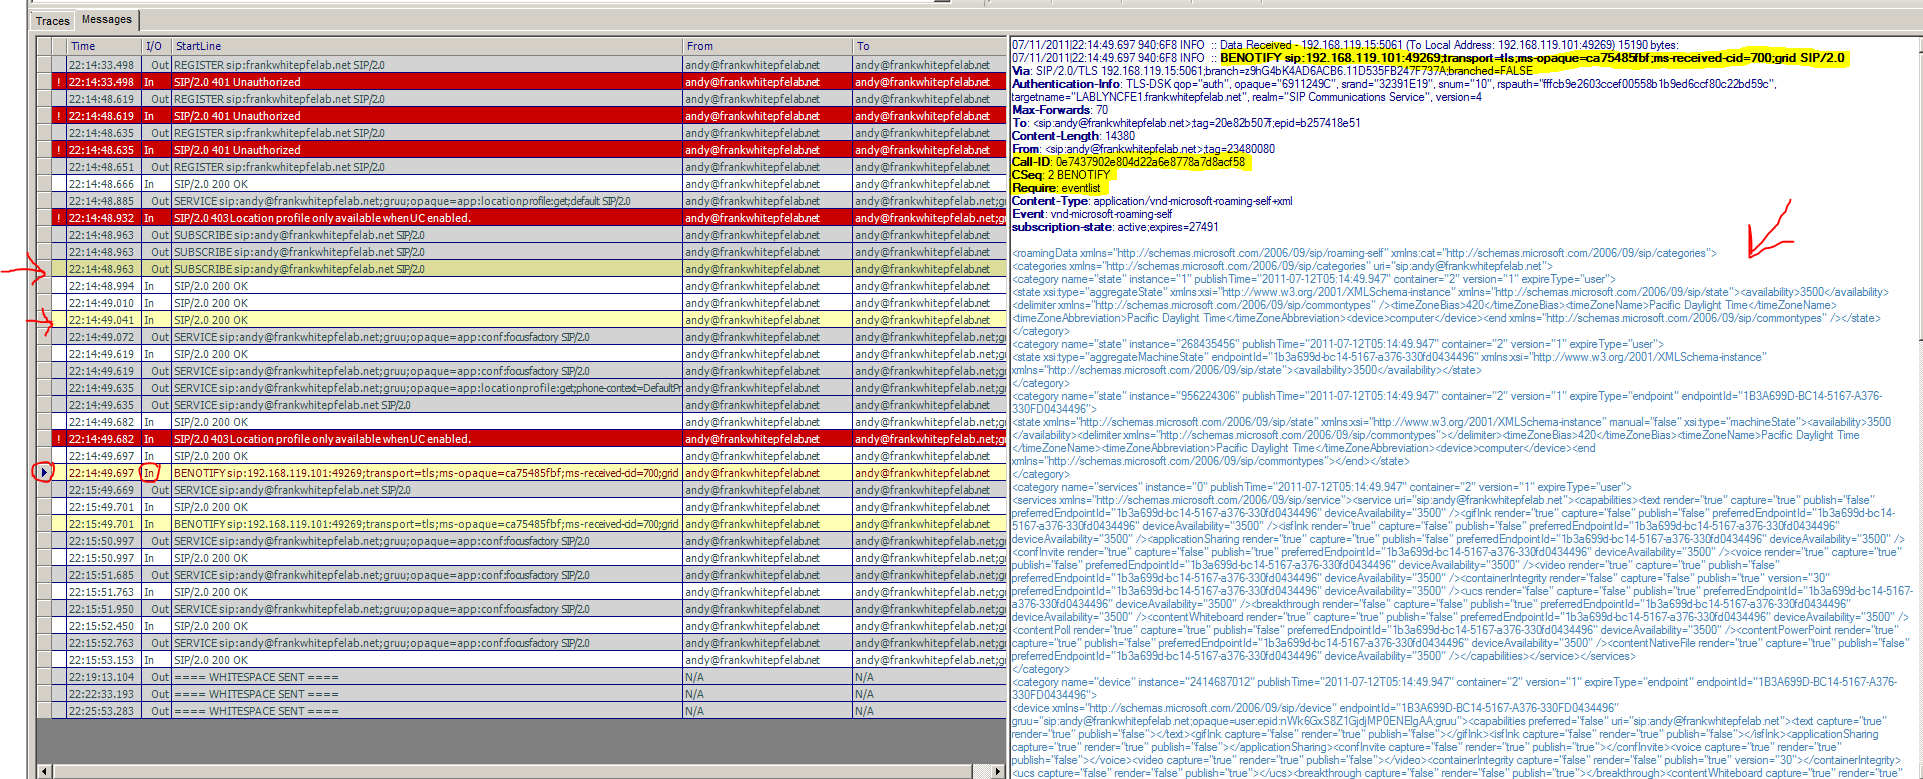
Client Subscription Request 3 Server Response 2 (note click on the image for full sized version)
In this server response packet, shown above, we see that the SIP packet is a BENOTIFY with a lot of XML data contained in the body. This packet has incremented the CSeq number to 2, but it is still the same Call-ID. Inside the XML data is information about how our presence and endpoint state are being published into the various containers. This allows the client to, among other things, draw the information in its window for the user that is logged into the system. Additionally the server is echoing back the capabilities of the endpoint that the client sent in an earlier packet.
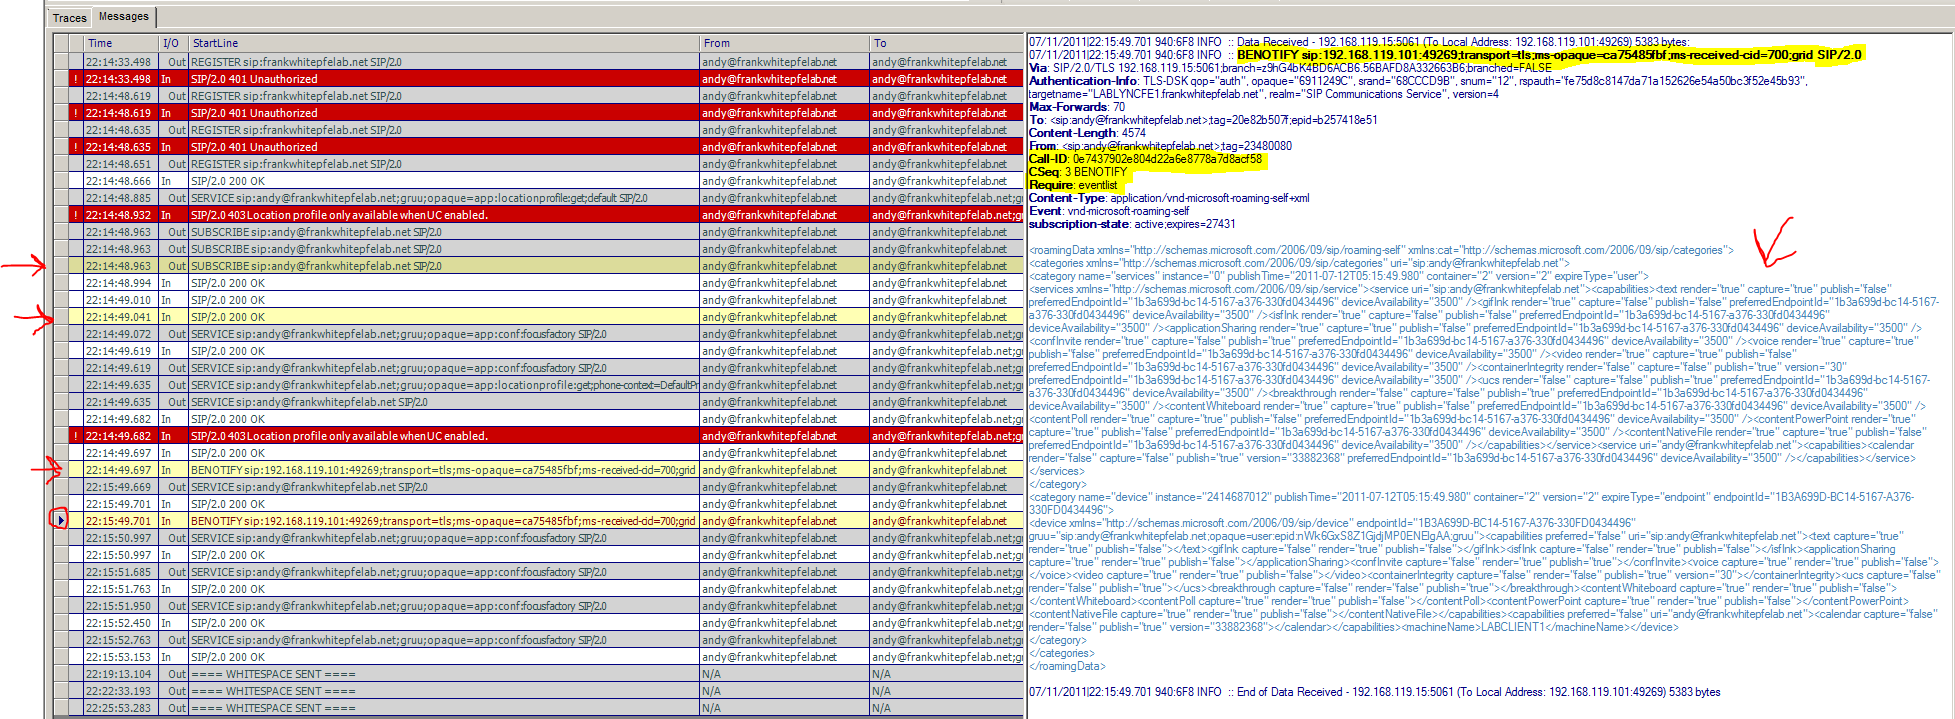
Client Subscription Request 3 Server Response 3 (note click on the image for full sized version)
In the screen shot above the server has sent us another BENOTIFY packet. This is part of the same Call-ID, but the CSeq has been increased to 3. In the XML data of this packet the server is giving the client the endpoint capabilities and the capabilities allowed to the user.

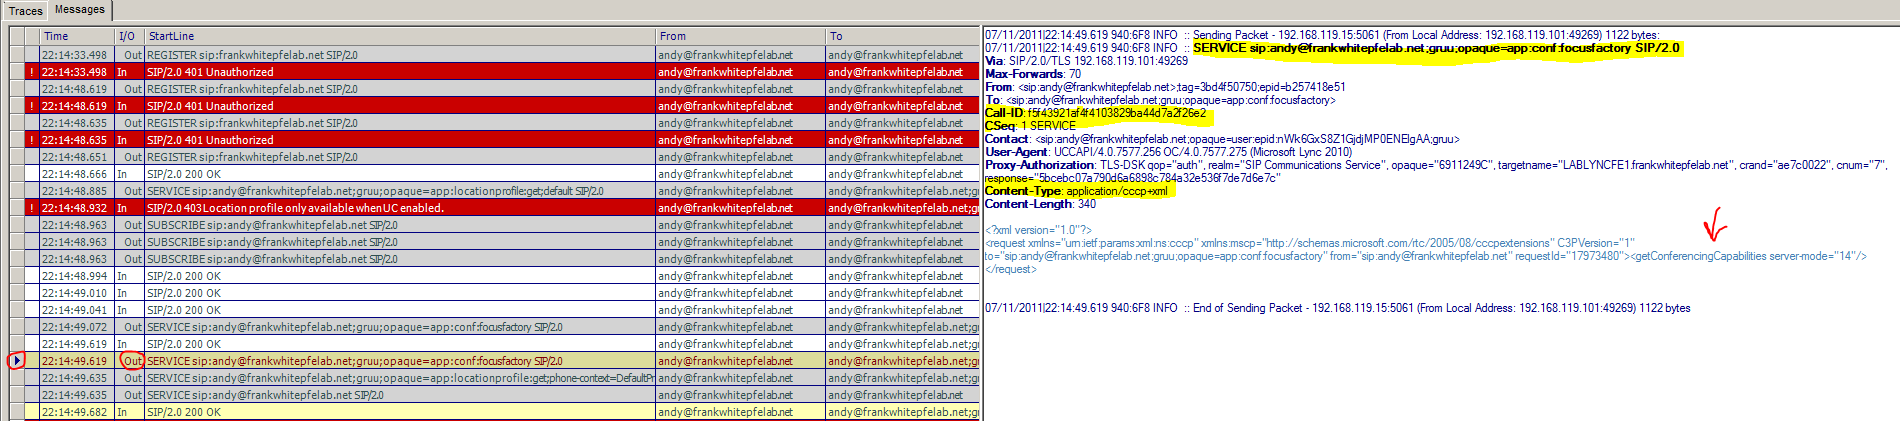
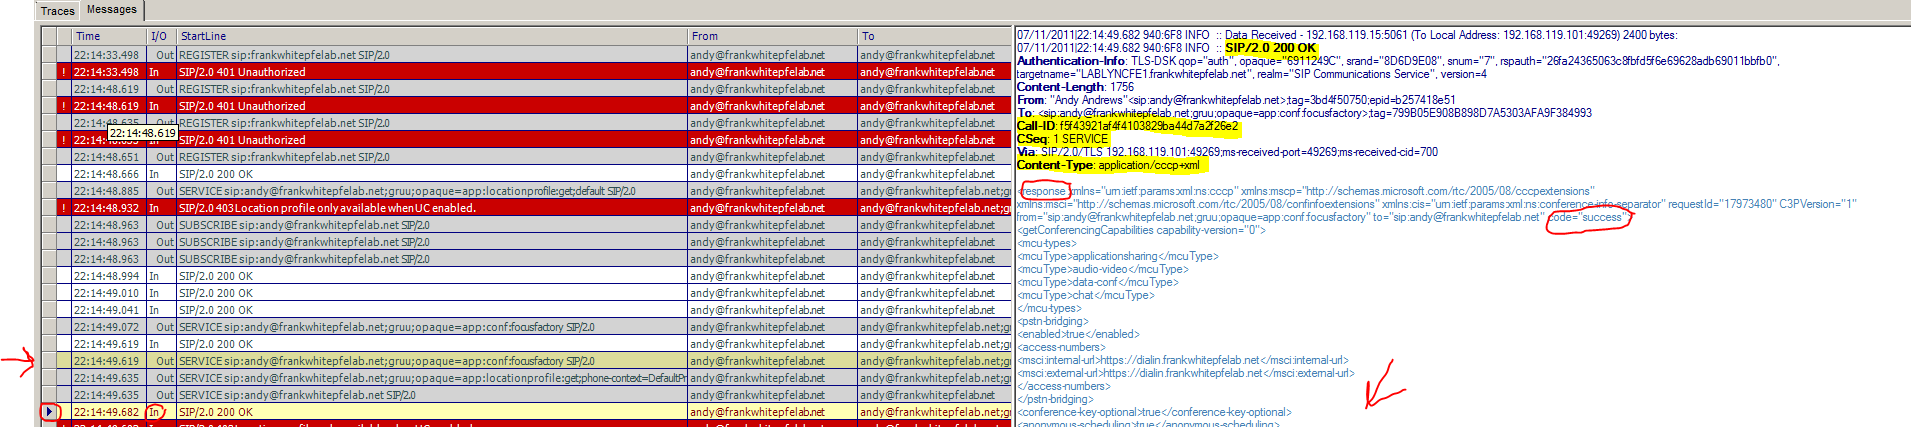
Client Service Request 2 (note click on the image for full sized version)
As shown above the client also sends out a SERVICE request asking the focus factory for conferencing capabilities. We can see this in the opaque and the XML data. The opaque tells the server to query the focus factory for the the server's CCCP (Centralized Conference Control Protocol) capabilities.

Client Service Request 2 Server Response (note click on the image for full sized version)
Well the server responds to us with a 200 OK message. Inside this message is XML data containing information the client will use to connect to each of the MCUs (Multiparty Control Units). Also what media modalities each of these MCUs is capable of hosting.
Client Service Request 3 (note click on the image for full sized version)
In the above screen shot, it appears that the client is asking for conferencing capabilities again. However, because this request for conferencing capabilities includes the same request ID as the last one the server knows we are actually asking for additional information.
Client Service Request 3 Server Response (note click on the image for full sized version)
As you can see above, the server responds with a 200 OK and the additional configuration information for each of the MCUs.
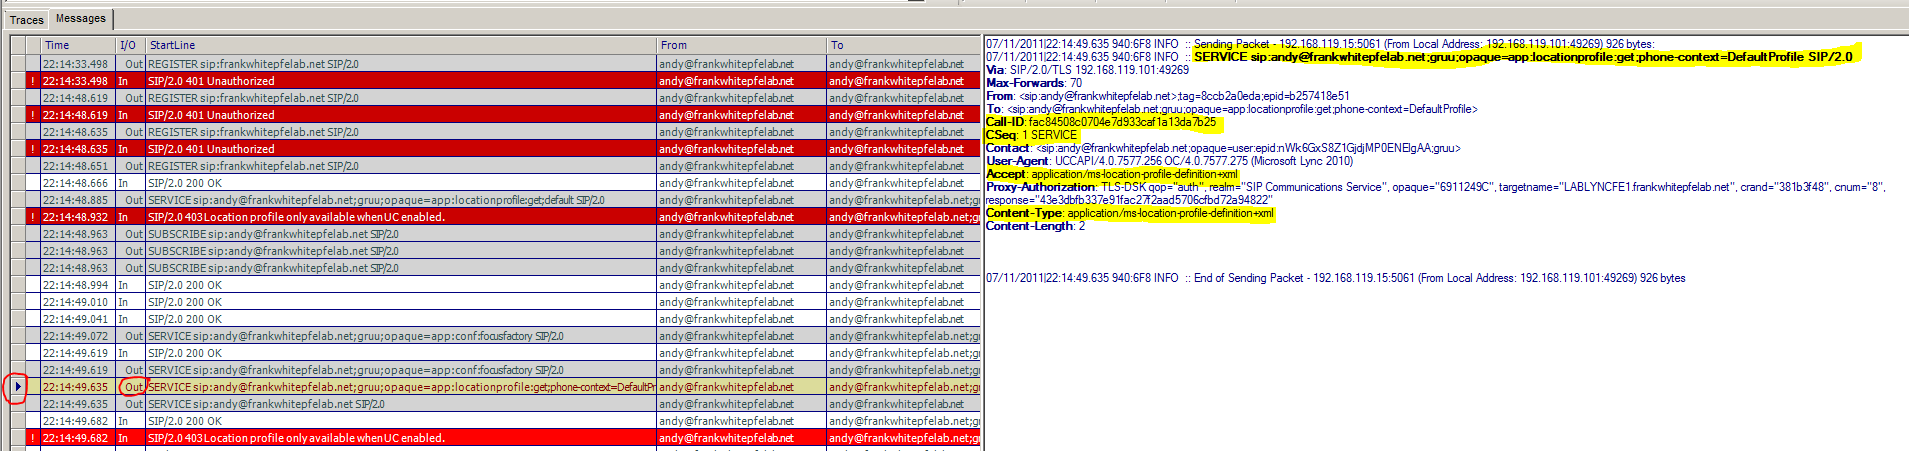
Client Service Request 4 (note click on the image for full sized version)
The client makes another SERVICE request asking for "MS-LOCATION-PROFILE-DEFINITION".

Client Service Request 4 Server Response (note click on the image for full sized version)
As with the last time we asked the server for location profile information, we receive a SIP 403 forbidden message. The details show us that this is because location profiles are only available to UC enabled users.
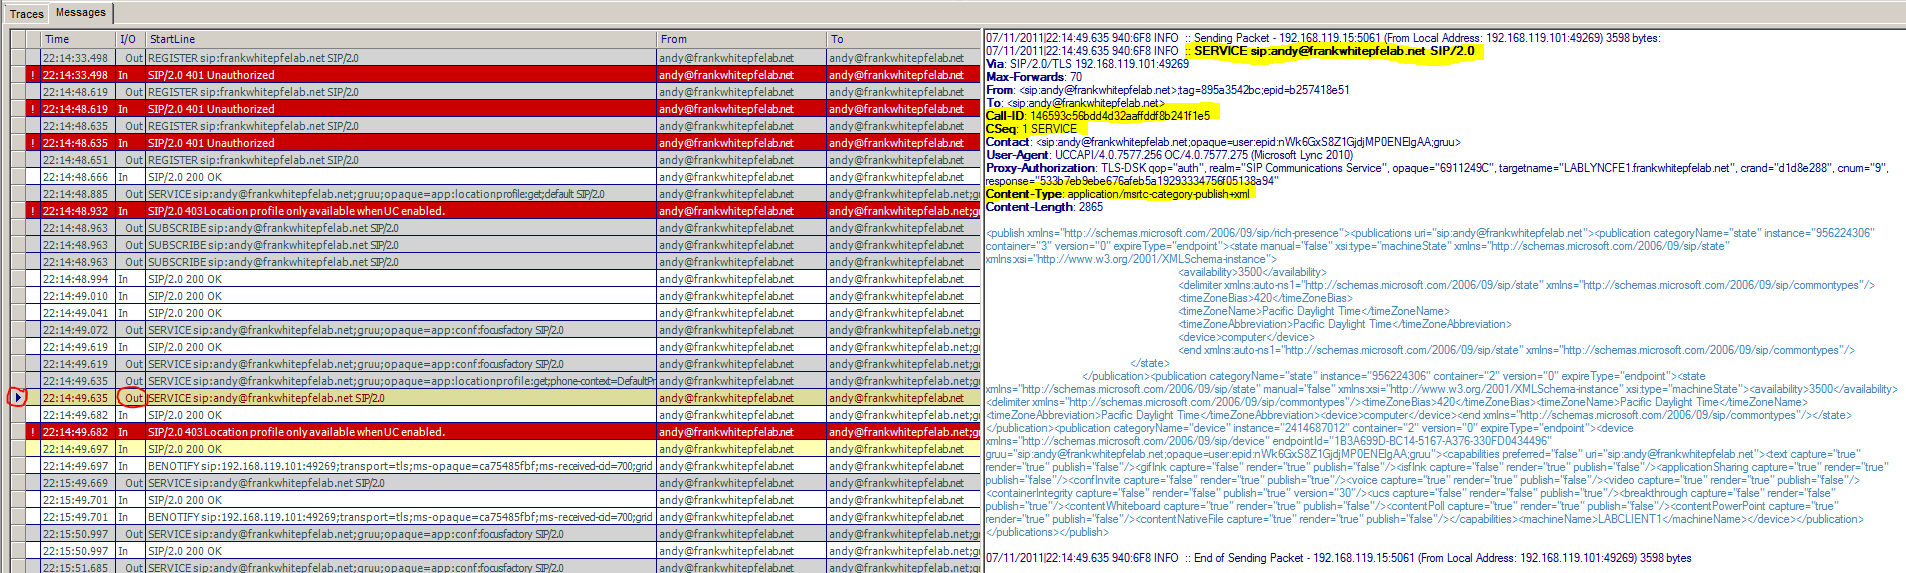
Client Service Request 5 (note click on the image for full sized version)
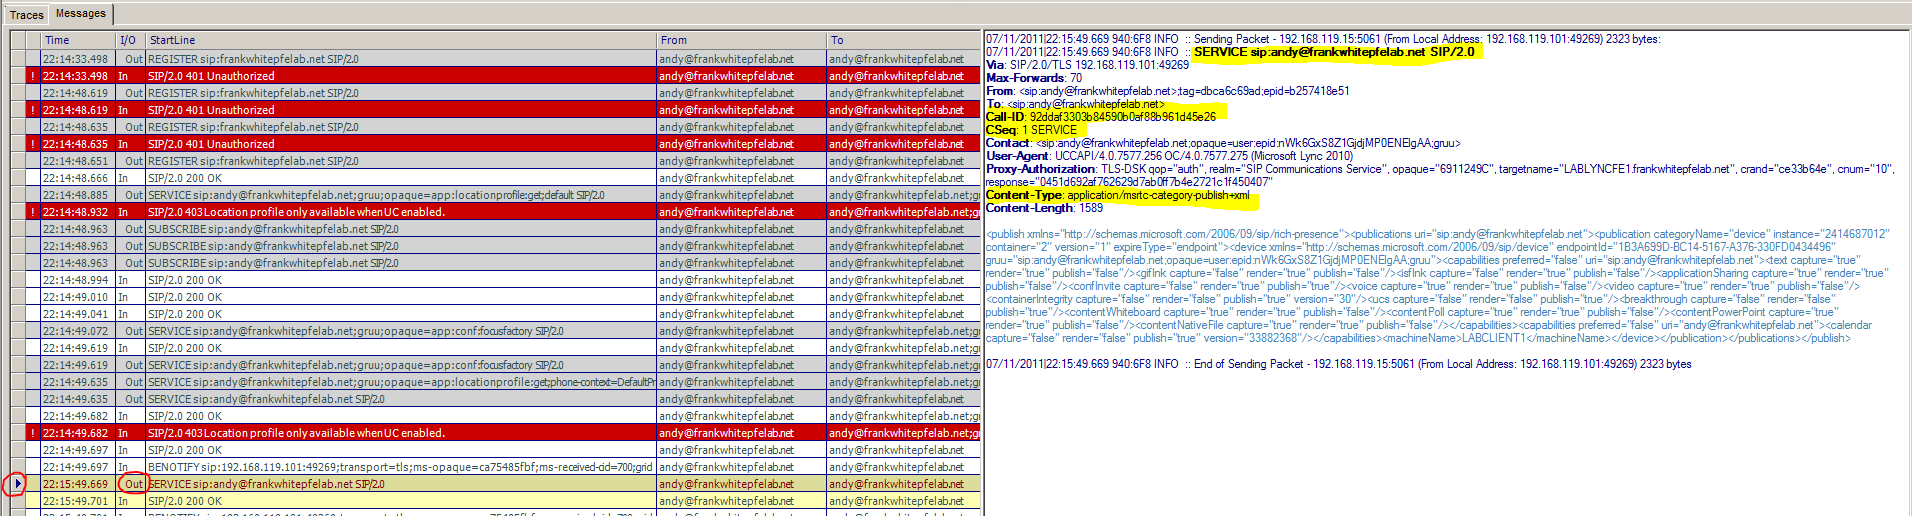
In this SERVICE request sent from the client shown above, we see that the client is sending "MSRTC-CATEGORY-PUBLISH". We can also see in the XML data that the client is publishing the endpoint's machine state (i.e. the presence information for the computer we're logging into).
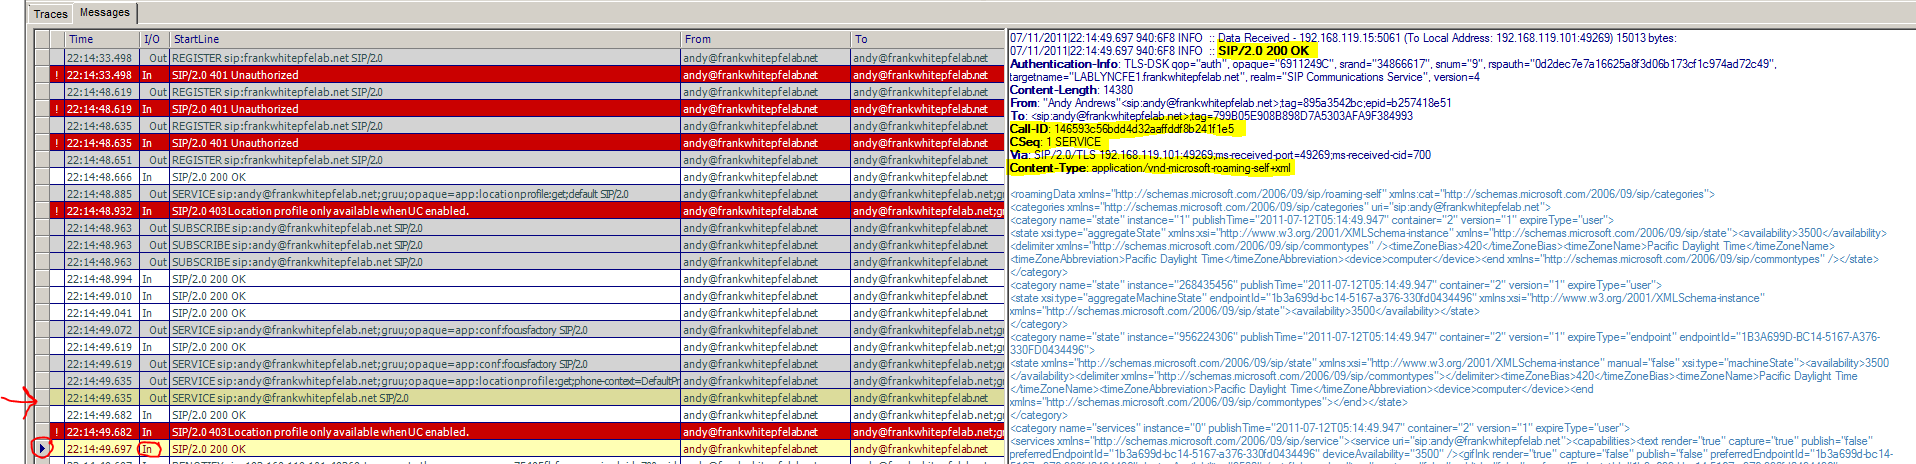
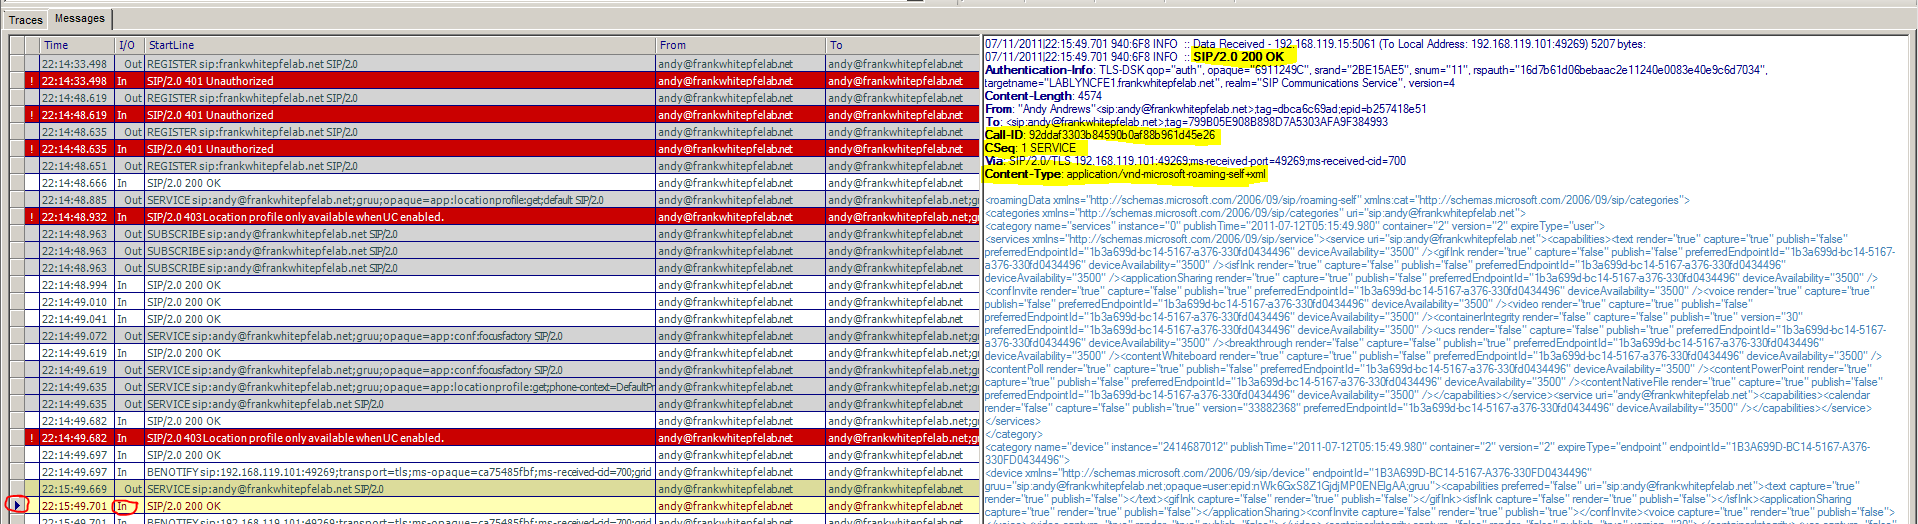
Client Service Request 5 Server Response (note click on the image for full sized version)
The server responds with a 200 OK message, as seen above. In the XML data of this response is the server's interpretation of this machine's published presence, combined with the current user's presence.
Client Service Request 6 (note click on the image for full sized version)
In the client SERVICE request above, we see that the client is asking for "MSRTC-CATEGORY-PUBLISH". This time we see in the XML data that the client is publishing the capabilities of the device we're logged into. In other words is the device capable of capture video, how about capturing text? All of this is published to the server using the device's EPID, which is also associated to the user.
Client Service Request 6 Server Response (note click on the image for full sized version)
In the server's 200 OK message shown above, we see that the server not only accepted our device's published capabilities. But, it also aggregated all of the published information to date and returned it to us in the XML data.
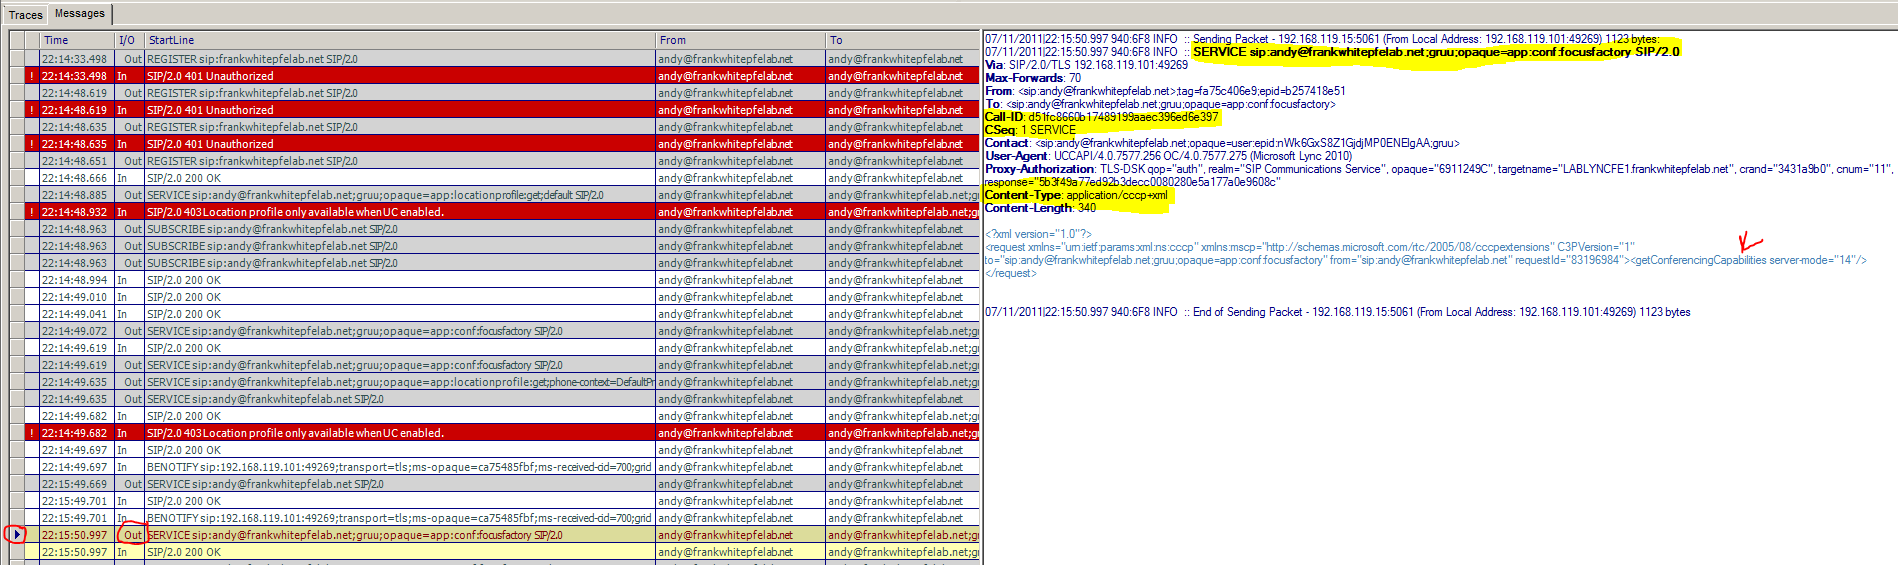
Client Service Request 7 (note click on the image for full sized version)
In the next client SERVICE request, shown above, the client creates a new requestID and asks the focus factory for the current list of conferencing capabilities.
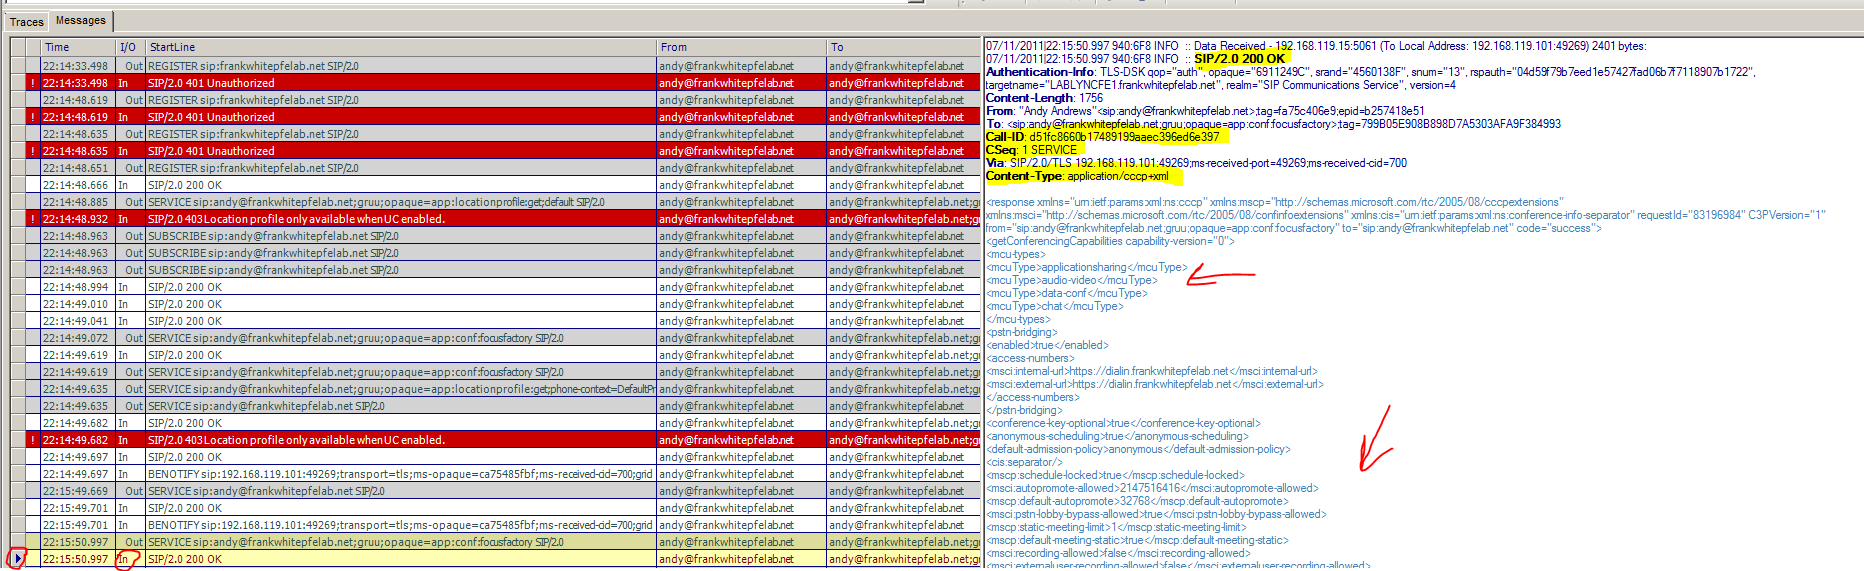
Client Service Request 7 Server Response (note click on the image for full sized version)
The server responds with a 200 OK message, shown above. In the body of this SIP packet is XML data containing all of the pool's currently active MCUs. It also contains the information about how to contact these MCUs and what they can be utilized for, with regards to media capabilities.
Client Service Request 8 (note click on the image for full sized version)
As seen above, the next client SERVICE request does two things. First the request contains the same requestID as the last Service request, letting the server know that this is a continuation of an earlier operation. Second, we see that the client is specifically asking for a list of static conferences. Static conferences are the conferences, including conference IDs, that each user has assigned to them upon activation.
Client Service Request 8 Server Response (note click on the image for full sized version)
As seen above, the server responds with a 200 OK message. In this message the server includes XML data specifying the static conferences the user requested. In our case, because this is the first time this user has logged into the system, the list is empty. This indicates to the client that it has not been assigned a static conference room.
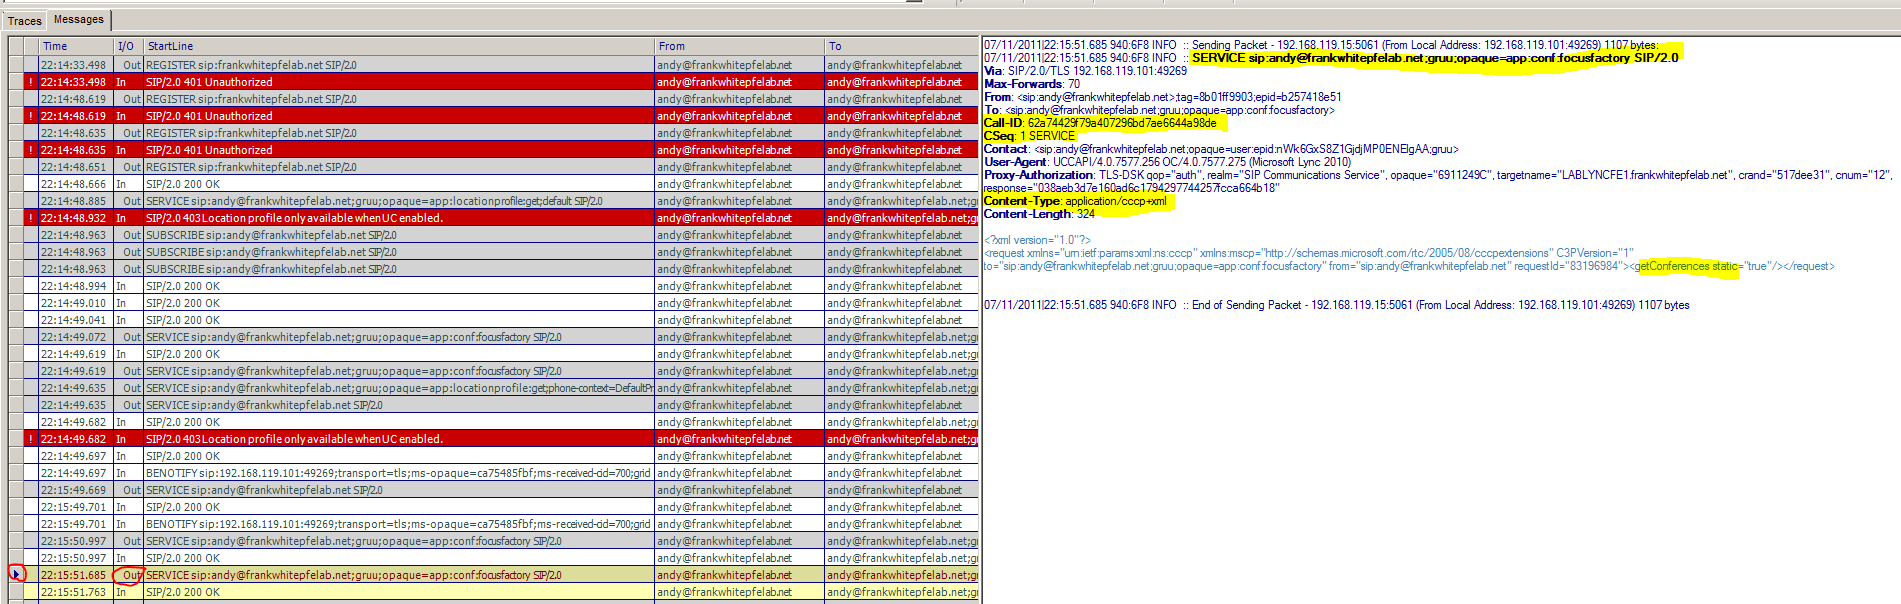
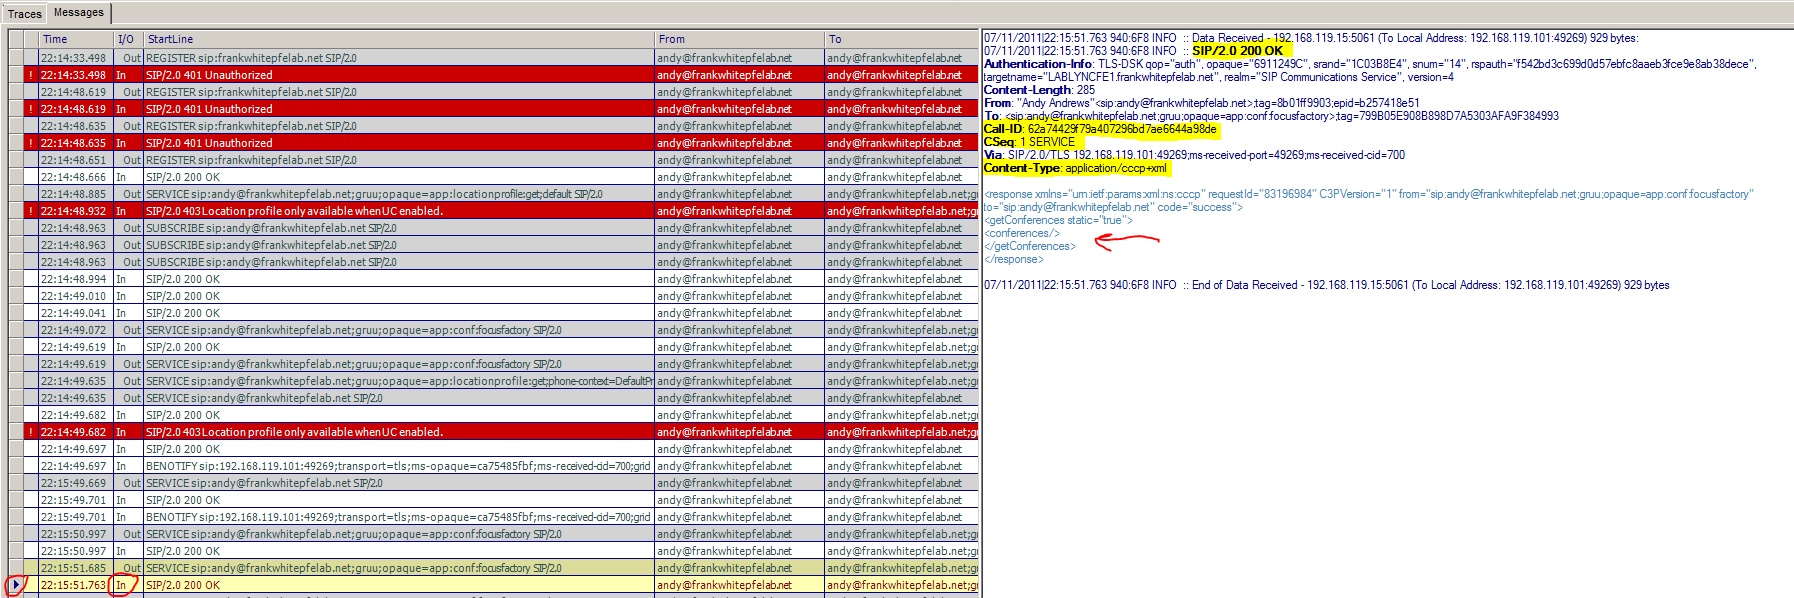
Client Service Request 9 (note click on the image for full sized version)
Since the client doesn't have a static conference room assigned to them yet, the client needs to create one. As we can see above, the client sends a SERVICE request to the server. The requestID is the same as before, this time we tell the server to "addConference" within the XML data of the SIP packet. We also tell the server "static=true", so the server is aware that we are asking it to assign us our permanent conference room.
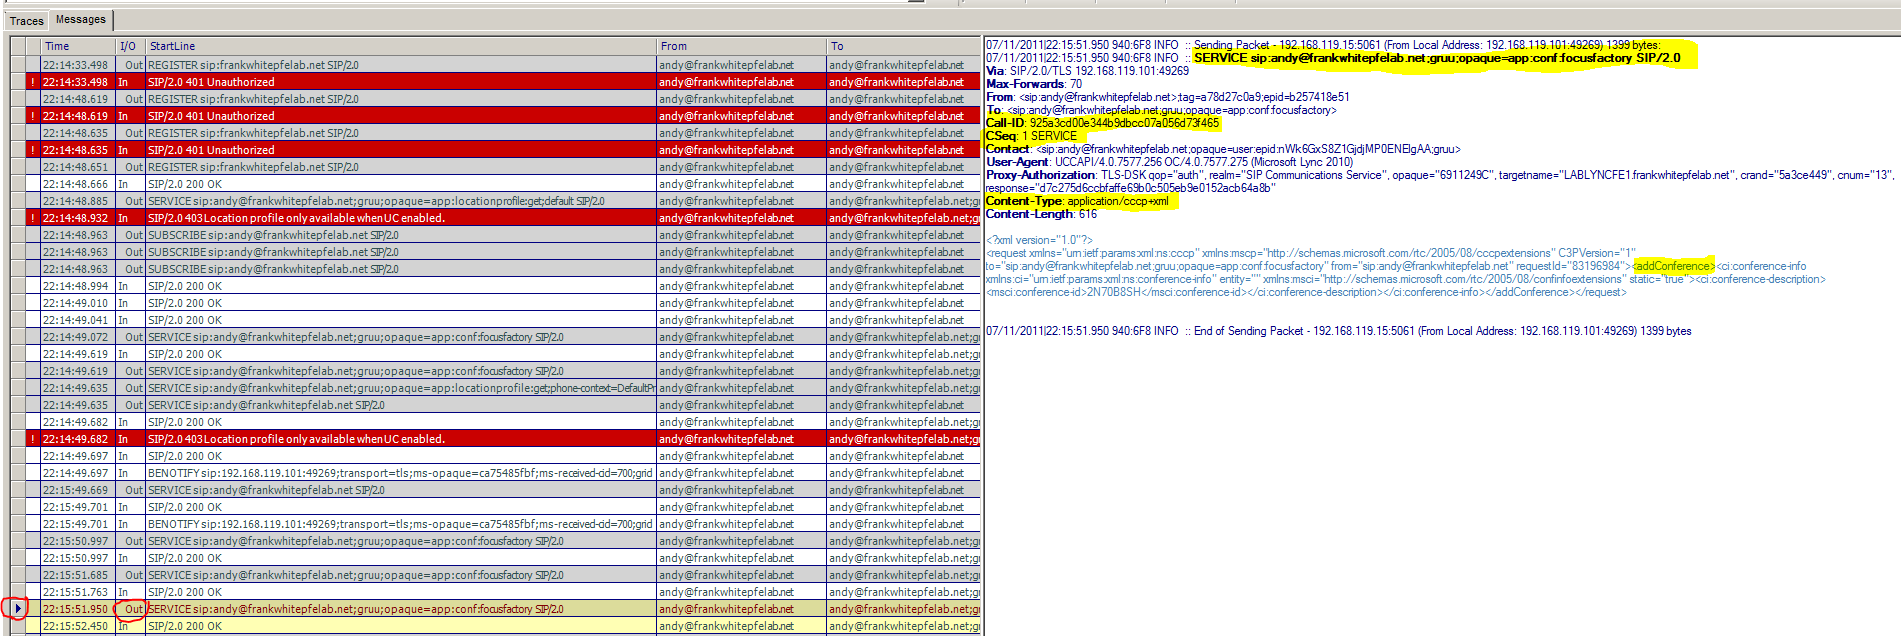
Client Service Request 9 Server Response (note click on the image for full sized version)
As you can see in the above screen shot, the server responds with a 200 OK message and XML data. In the XML data are a number of interesting pieces of data. First, we see that this is a response and it was successful. Second we notice that there is a conf:focus:id of 2N70B8SH. This is the identifier for the focus to find the appropriate conference. Third we see that there is a "state=partial", meaning that the creation of this conference is not completed yet. The last interesting thing, at least to me, is the id of 29905, this is the dial in code for the conference.
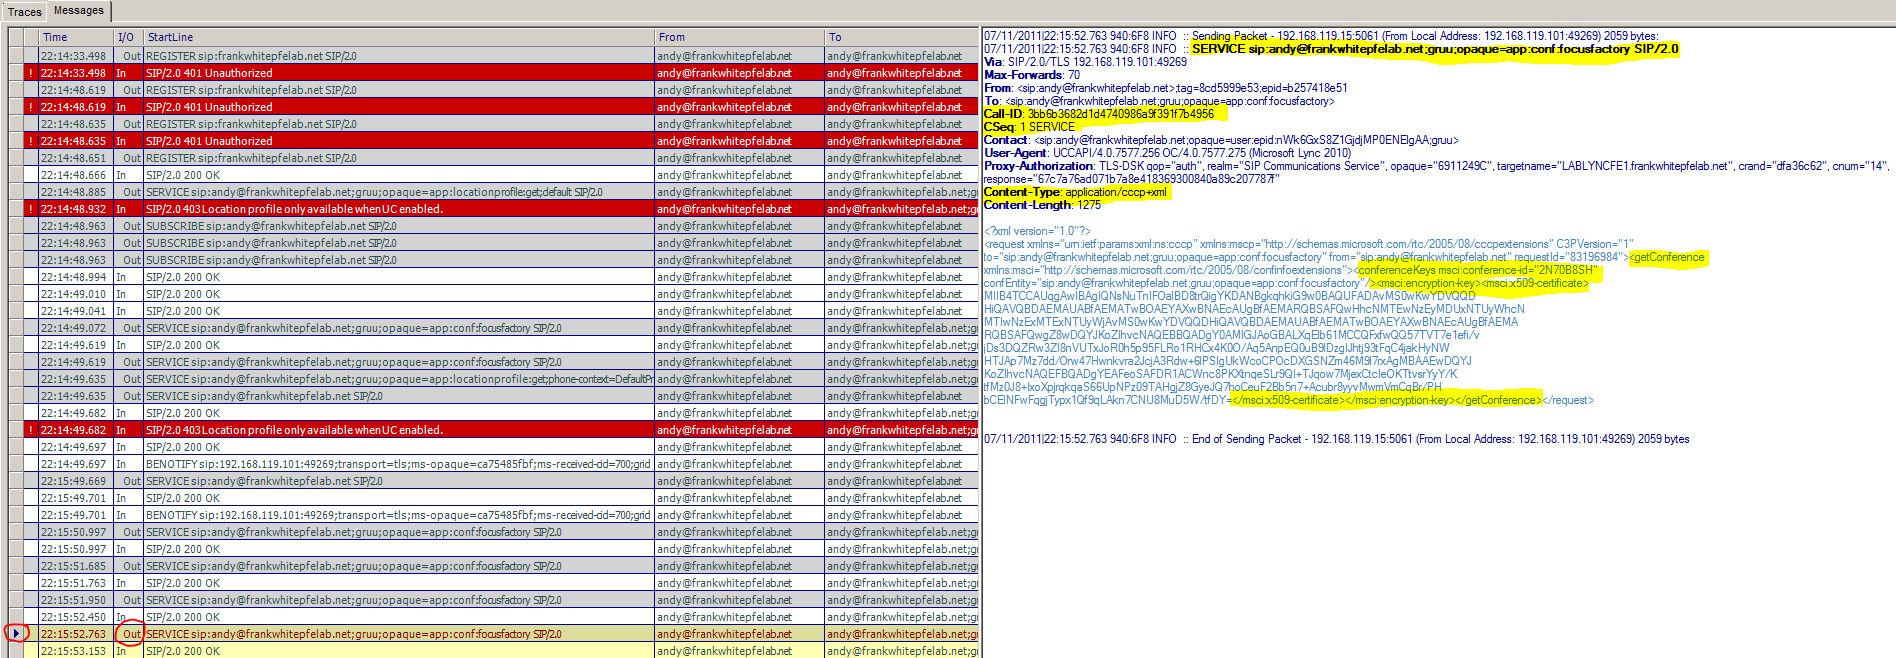
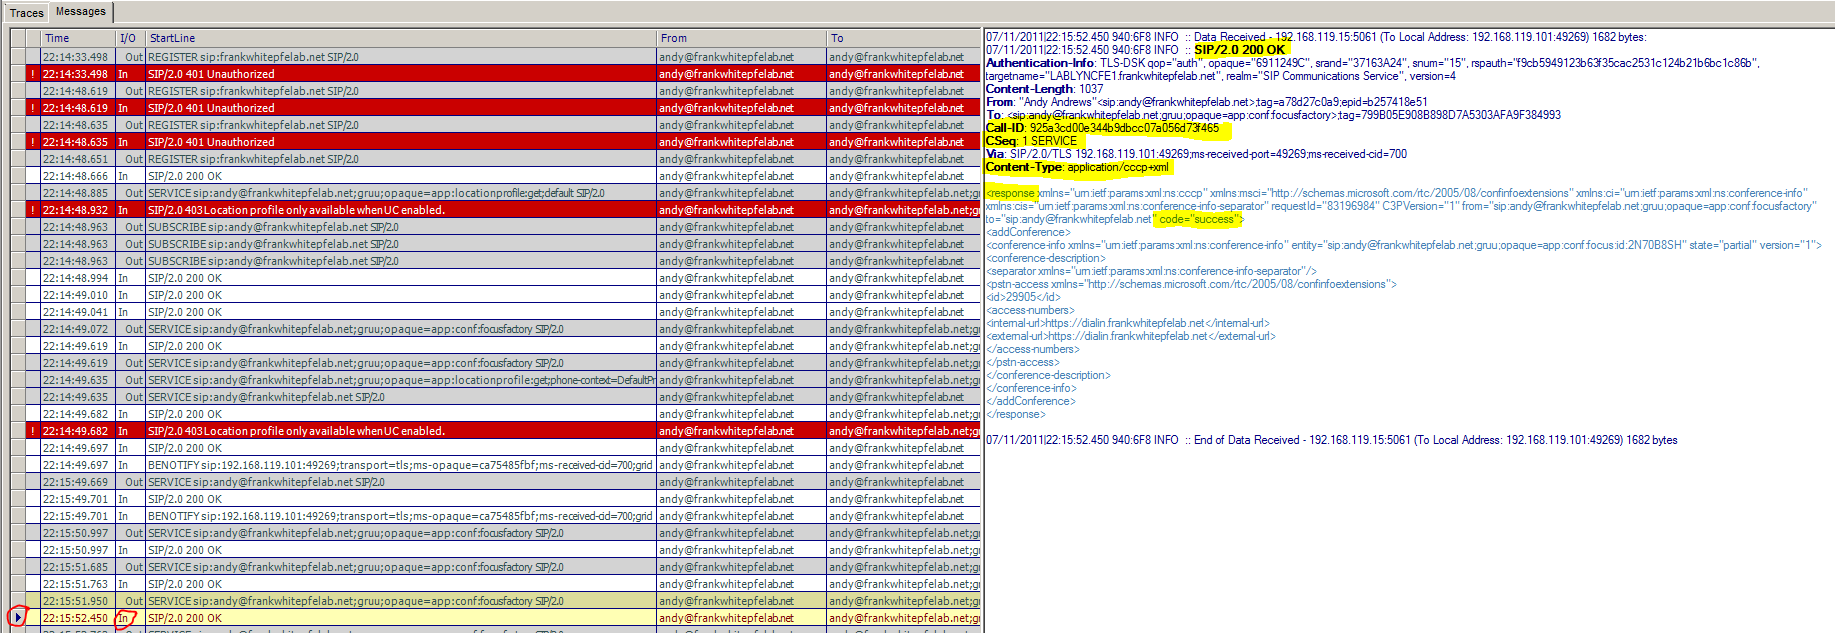
Client Service Request 10 (note click on the image for full sized version)
Shown above is the next client SERVICE request. In this request we are passing the server an X.509 certificate to encrypt data with. We include our conf:focus:id and the requestID from the previous SERVICE requests, to let the server know that it's the same operation.
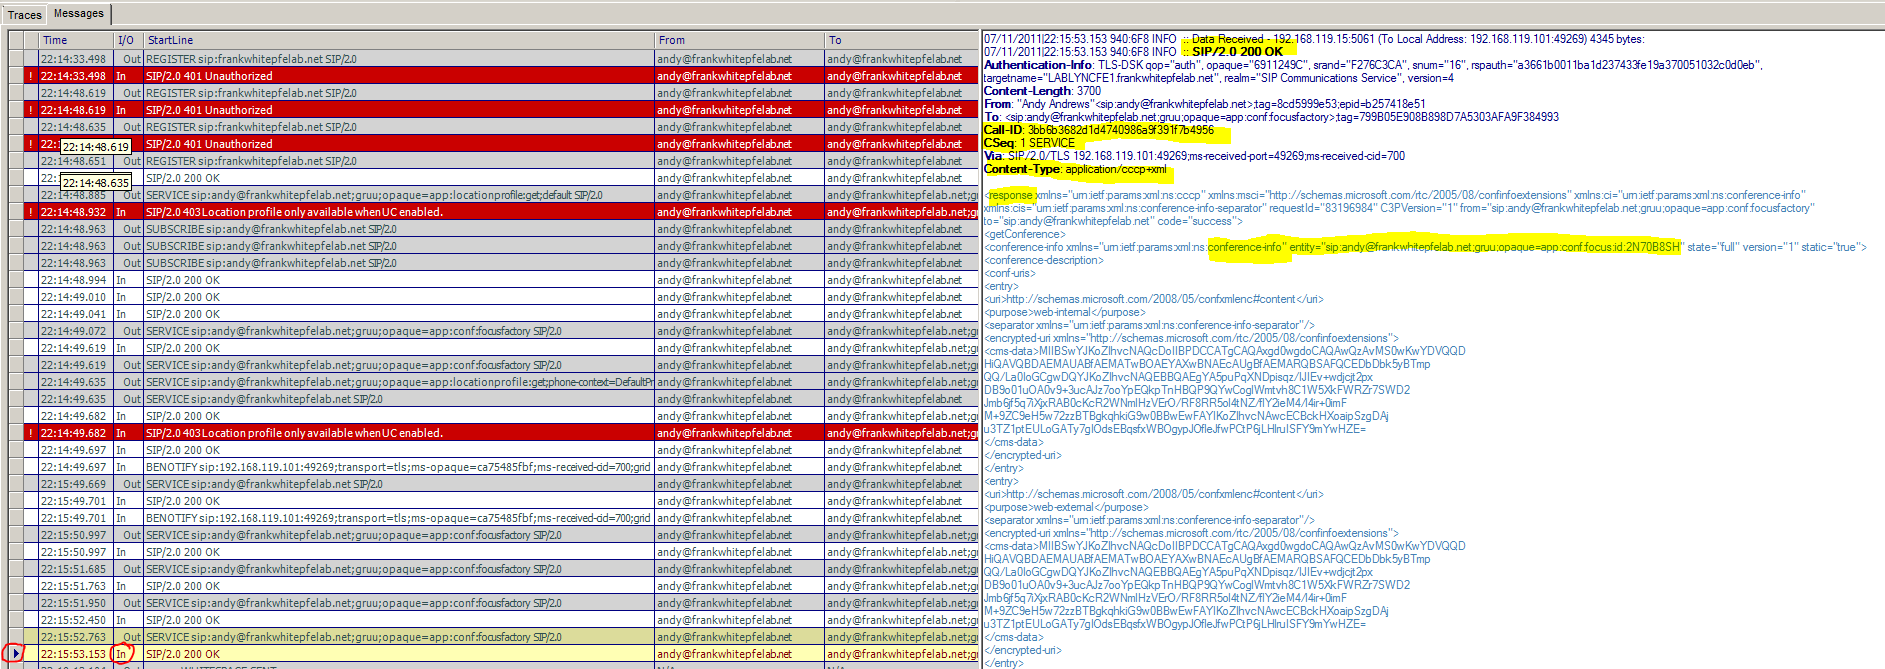
Client Service Request 10 Server Response (note click on the image for full sized version)
In the 200 OK server response shown above, we see that the returns to us the completed conference room's information. The information is encrypted with the certificate we sent earlier.
Our client has finished its first login to the Lync system. The user has finished creating their initial contact list, and static conference room. Congratulations!
Next we will add a Monitoring Server to our UC lab. Stay tuned to the same SIP channel. At the same SIP time.
qishichang

 浙公网安备 33010602011771号