
Mybatis入门学习
为什么要学习Mybatis?
其实一句话就够了,web开发需要框架来提高效率,而Mybatis逐渐替代hibernate成为主流,所以必须掌握。这是从需求来讲。
Mybatis与JDBC相比,除了因为框架开销而导致性能略有下降,其他方面都要好很多。
我体会到的最省事儿的地方就是,把ResultSet循环传入new的实体类中这部分代码简化到了sql配置文件(xml)中。
另外,jdbc的sql都在class中,如果需要改sql语句,还得找到源文件去修改sql,然后编译成class再放到服务器上,然后重启生效。而Mybatis只需要在配置文件中修改CRUD标签中的sql就好了。
下面以一个小项目的实现来学习Mybatis。本文只实现全部查询的操作,至于动态SQL拼接、分页、拦截器等,将在以后的 Mybatis进阶学习 中总结。
【准备工作】
eclipse、tomcat、navicat等软件就不说了。
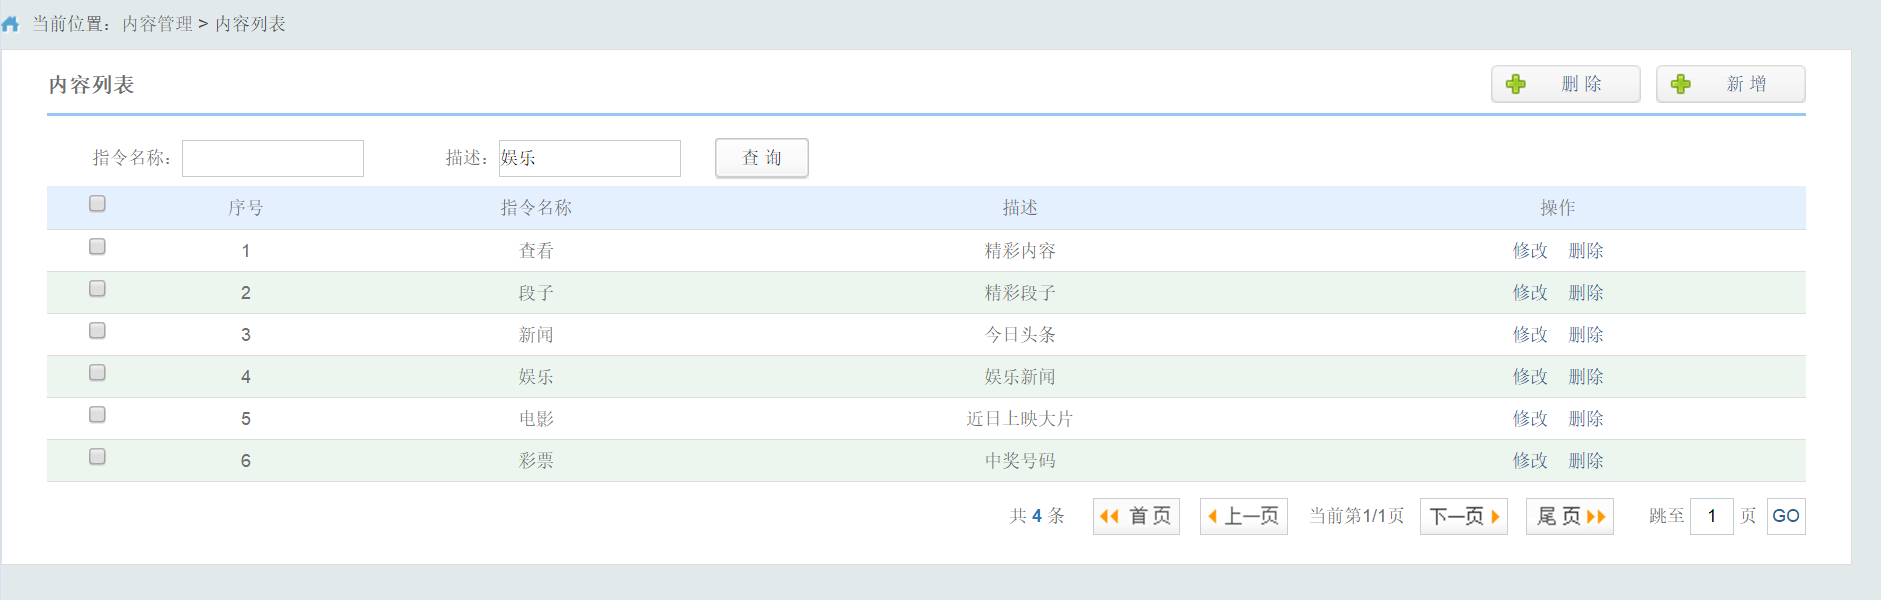
首先,展示一下慕课网上下载的前端页面:
其次,从https://github.com/mybatis/mybatis-3上下载最新的RELEASE版本(mybatis-3.4.5)和相应的资源包(mybatis-3-mybatis-3.4.5),还需要下载mysql驱动包(mysql-connector-java-5.1.42)和JSP标签库的两个jar(jstl.jar和standard.jar)。
导入jar包之后就可以开始项目了。
【项目开发】
一、设计数据库
我个人的习惯是先设计数据库,参照前端页面(其实就是需求)设计好数据库test_mybatis,其中message表包含字段id(int)、command(varchar)、description(varchar)、content(varchar)。
插入数据的sql代码如下:
INSERT INTO `message` VALUES (1, '查看', '精彩内容', '精彩内容');
INSERT INTO `message` VALUES (2, '段子', '精彩段子', '如果你的月薪是3000块钱,请记得分成五份,一份用来买书,一份给家人,一份给女朋友买化妆品和衣服,一份请朋友们吃饭,一份作为同事的各种婚丧嫁娶的份子钱。剩下的2999块钱藏起来,不要告诉任何人');
INSERT INTO `message` VALUES (3, '新闻', '今日头条', '7月17日,马来西亚一架载有298人的777客机在乌克兰靠近俄罗斯边界坠毁。另据国际文传电讯社消息,坠毁机型为一架波音777客机,机载约280名乘客和15个机组人员。\r\n乌克兰空管部门随后证实马航MH17航班坠毁。乌克兰内政部幕僚表示,这一航班在顿涅茨克地区上空被击落。马来西亚航空公司确认,该公司从阿姆斯特丹飞往吉隆坡的MH17航班失联,并称最后与该客机取得联系的地点在乌克兰上空。图为马航客机坠毁现场。');
INSERT INTO `message` VALUES (4, '娱乐', '娱乐新闻', '昨日,邓超在微博分享了自己和孙俪的书法。夫妻同样写幸福,但差距很大。邓超自己都忍不住感慨字丑:左边媳妇写的。右边是我写的。看完我再也不幸福了。');
INSERT INTO `message` VALUES (5, '电影', '近日上映大片', '《忍者神龟》[2]真人电影由美国派拉蒙影业发行,《洛杉矶之战》导演乔纳森·里贝斯曼执导。 \r\n片中四只神龟和老鼠老师都基于漫画和卡通重新绘制,由动作捕捉技术实现。\r\n其中皮特·普劳泽克饰演达芬奇(武器:武士刀),诺尔·费舍饰演米开朗基罗(武器:双节棍),阿伦·瑞奇森饰演拉斐尔(武器:铁叉),杰瑞米·霍华德饰演多拉泰罗(武器:武士棍)。\r\n该片计划于2014年8月8日在北美上映。');
INSERT INTO `message` VALUES (6, '彩票', '中奖号码', '查啥呀查,你不会中奖的!');
二、配置Mybatis
1.首先需要写好Message实体类
public class Message {
    private int id;
    private String command;
    private String description;
    private String content;

    public Message(){}

    public int getId() {
        return id;
    }

    public void setId(int id) {
        this.id = id;
    }

    public String getCommand() {
        return command;
    }

    public void setCommand(String command) {
        this.command = command;
    }

    public String getDescription() {
        return description;
    }

    public void setDescription(String description) {
        this.description = description;
    }

    public String getContent() {
        return content;
    }

    public void setContent(String content) {
        this.content = content;
    }
}
2.接下来配置Configuration.xml和Message.xml
前者是Mybatis的核心配置文件,主要用来连接MySQL数据库和映射Message.xml。
后者用来编写sql语句和把查询的结果集与实体类各属性(4个字段)映射。
没必要自己把这两个xml敲出来,可以在资源包mybatis-3-mybatis-3.4.5\src\test\java\org\apache\ibatis\submitted\complex_property中得到Configuration.xml和User.xml,把相应代码修改后就可以使用了。
Configuration.xml配置文件:
<?xml version="1.0" encoding="UTF-8" ?>

<!DOCTYPE configuration
    PUBLIC "-//mybatis.org//DTD Config 3.0//EN"
    "http://mybatis.org/dtd/mybatis-3-config.dtd">

<configuration>
  <!-- <settings>
    <setting name="useGeneratedKeys" value="false"/>
    <setting name="useColumnLabel" value="true"/>
  </settings>

  <typeAliases>
    <typeAlias alias="UserAlias" type="org.apache.ibatis.submitted.complex_property.User"/>
  </typeAliases> -->

  <environments default="development">
    <environment id="development">
      <transactionManager type="JDBC">
        <property name="" value=""/>
      </transactionManager>
      <dataSource type="UNPOOLED">
        <property name="driver" value="com.mysql.jdbc.Driver"/>
        <property name="url" value="jdbc:mysql://127.0.0.1:3306/test_mybatis"/>
        <property name="username" value="root"/>
        <property name="password" value="21henearkrxnrn!@#$"/>
      </dataSource>
    </environment>
  </environments>

  <mappers>
    <mapper resource="config/sqlxml/Message.xml"/>
  </mappers>

</configuration>
Message.xml配置文件:
<?xml version="1.0" encoding="UTF-8"?>

<!DOCTYPE mapper
    PUBLIC "-//mybatis.org//DTD Mapper 3.0//EN"
    "http://mybatis.org/dtd/mybatis-3-mapper.dtd">

<mapper namespace="Message">

  <resultMap type="javabean.Message" id="MessageResult">
    <id column="id" jdbcType="INTEGER" property="id"/>
    <result column="command" jdbcType="VARCHAR" property="command"/>
    <result column="description" jdbcType="VARCHAR" property="description"/>
    <result column="content" jdbcType="VARCHAR" property="content"/>
  </resultMap>

  <select id="getByName" resultMap="MessageResult">
    select id,command,description,content from message where 1=1
  </select>

</mapper>
三、实现数据库操作
编写DBUtil类和MessageDAO类(由于项目简单,没有写service层和dao与service的Impl层)。前者连接MySQL并返回SqlSession对象,后者实现查询操作。
注意要在dao中处理异常,并在finally中关闭SqlSession。
这一步完成后,可以写一个测试类,检验代码是否正确。
public class DBUtil {
    public SqlSession getSqlSession() throws IOException{
        //通过配置文件Configuration.xml获取数据库连接信息
        Reader reader = Resources.getResourceAsReader("config/Configuration.xml");
        //通过配置信息构建一个SqlSessionFactory
        SqlSessionFactory sqlSessionFactory = new SqlSessionFactoryBuilder().build(reader);
        //通过sqlSessionFactory打开一个数据库会话
        SqlSession sqlSession = sqlSessionFactory.openSession();
        return sqlSession;
    }
}
public class MessageDAO {
    /**
     * 查询列表信息(方法名是为多选择查询起的,会在以后的文章中实现)
     */
    public List<Message> getByName(String command, String description){
        DBUtil dbUtil = new DBUtil();
        SqlSession sqlSession = null;
        List<Message> messageList = new ArrayList<Message>();
        try {
            sqlSession = dbUtil.getSqlSession();
            //通过sqlSession执行SQL语句,需要sql的配置文件Message.xml
            messageList = sqlSession.selectList("Message.getByName");
        } catch (IOException e) {
            // TODO Auto-generated catch block
            e.printStackTrace();
        } finally {
            if(sqlSession!=null){
                sqlSession.close();
            }
        }
        return messageList;
    }

}
四、编写servlet和JSP相应代码
1.servlet类和web.xml中的配置
@SuppressWarnings("serial")
public class ListServlet extends HttpServlet{
    @Override
    protected void doGet(HttpServletRequest req, HttpServletResponse resp) throws ServletException, IOException {
        //编码一律用utf-8
        req.setCharacterEncoding("utf-8");
        resp.setCharacterEncoding("utf-8");

        //接收页面参数的值
        String command = req.getParameter("command");
        String description = req.getParameter("description");
        /*一开始总打印null,原来是name放错位置了,应该放到input里!!!
        System.out.println(command);
        System.out.println(description);*/

        //按command和description查询列表信息
        MessageDAO messageDAO = new MessageDAO();
        List<Message> messageList = messageDAO.getByName(command, description);

        //向页面传值
        req.setAttribute("command", command);
        req.setAttribute("description", description);
        req.setAttribute("messageList", messageList);

        //页面跳转
        /*因为要传递参数,而不用重定向*/
        req.getRequestDispatcher("/jsp/back/list.jsp").forward(req, resp);
    }

    @Override
    protected void doPost(HttpServletRequest req, HttpServletResponse resp) throws ServletException, IOException {
        doGet(req, resp);
    }
}
<?xml version="1.0" encoding="UTF-8"?>
<web-app xmlns:xsi="http://www.w3.org/2001/XMLSchema-instance" xmlns="http://xmlns.jcp.org/xml/ns/javaee" xsi:schemaLocation="http://xmlns.jcp.org/xml/ns/javaee http://xmlns.jcp.org/xml/ns/javaee/web-app_3_1.xsd" id="WebApp_ID" version="3.1">
  <display-name>testMybatis</display-name>
  <welcome-file-list>
    <welcome-file>index.jsp</welcome-file>
  </welcome-file-list>

  <servlet>
      <servlet-name>ListServlet</servlet-name>
      <servlet-class>servlet.ListServlet</servlet-class>
  </servlet>
  <servlet-mapping>
      <servlet-name>ListServlet</servlet-name>
      <url-pattern>/list.action</url-pattern>
  </servlet-mapping>
</web-app>
2.JSP页面
<%@ page language="java" contentType="text/html; charset=UTF-8" pageEncoding="UTF-8"%> <%@ taglib prefix="c" uri="http://java.sun.com/jsp/jstl/core" %> <% String path = request.getContextPath(); String basePath = request.getScheme()+"://"+request.getServerName()+":"+request.getServerPort()+path+"/"; %> <!DOCTYPE html> <html xmlns="http://www.w3.org/1999/xhtml"> <head> <base href="<%=basePath%>"> <meta http-equiv="Content-Type" content="text/html; charset=UTF-8" /> <meta http-equiv="X-UA-Compatible"content="IE=9; IE=8; IE=7; IE=EDGE" /> <title>内容列表页面</title> <link href="css/all.css" rel="stylesheet" type="text/css" /> </head> <body style="background: #e1e9eb;"> <form action="list.action" id="mainForm" method="post"> <div class="right"> <div class="current">当前位置:<a href="javascript:void(0)" style="color:#6E6E6E;">内容管理</a> > 内容列表</div> <div class="rightCont"> <p class="g_title fix">内容列表 <a class="btn03" href="#">新 增</a> <a class="btn03" href="#">删 除</a></p> <table class="tab1"> <tbody> <tr> <td width="90" align="right">指令名称:</td> <td> <input name="command" type="text" class="allInput" value="${command}"/> </td> <td width="90" align="right">描述:</td> <td> <input name="description" type="text" class="allInput" value="${description}"/> </td> <td width="85" align="right"><input type="submit" class="tabSub" value="查 询" /></td> </tr> </tbody> </table> <div class="zixun fix"> <table class="tab2" width="100%"> <tbody> <tr> <th><input type="checkbox" id="all" onclick="#"/></th> <th>序号</th> <th>指令名称</th> <th>描述</th> <th>操作</th> </tr> <c:forEach items="${messageList}" var="message" varStatus="status"> <tr <c:if test="${status.index % 2 !=0}">style="background-color:#ECF6EE;"</c:if>> <td><input type="checkbox" /></td> <td>${status.index + 1}</td> <td>${message.command }</td> <td>${message.description }</td> <td> <a href="#">修改</a> <a href="#">删除</a> </td> </tr> </c:forEach> </tbody> </table> <div class='page fix'> 共 <b>4</b> 条 <a href='###' class='first'>首页</a> <a href='###' class='pre'>上一页</a> 当前第<span>1/1</span>页 <a href='###' class='next'>下一页</a> <a href='###' class='last'>末页</a> 跳至 <input type='text' value='1' class='allInput w28' /> 页 <a href='###' class='go'>GO</a> </div> </div> </div> </div> </form> </body> </html>
【总结】
本文主要用来记录和复习大致过程,因此很多细节没有过多说明。
且由于个人水平有限,很多地方都只有最简单的讲解,而且难免有错,在深入学习之后会做出修改和说明。
PS:写博客真的似乎有点儿浪费时间啊,可能我太不老练吧,感觉有这一个多小时可以学更多东西或者复习所做的项目了。。

 浙公网安备 33010602011771号