
25-Java-Spring框架(三)
Spring框架的了解、SpringIOC的部分内容请阅读23-Java-Spring框架(一)
SpringwebMVC的了解、请求流程、运用等请阅读24-Java-Spring框架(二)
四、Spring AOP(Aspect Oriented Programming)
1.SpringAOP了解
SpringAOP将通用业务和传统业务隔离,通过AOP配置进行结合实现功能叠加的效果(可以利用低耦合模式实现通用业务的调用)
三个相关术语:1.Aspect(方面/切面):指封装了通用业务逻辑,可以切入到其他目标上组件上的方法
2.Pointcut(切入点):指表达式,用于指定被切的目标组件和方法
(1)方法限定表达式:execution(修饰符 返回类型 方法名(参数列表) 抛出异常)
execution(* query*()) 表示所有以query开头的方法会被切入功能(第一个*表示方法返回类型,第二个*表示任意)
execution(* com.spring.*.*(..)) 表示所有以com.spring包下面的所有的类中的所有的方法会被切入功能
execution(* com.spring..*.*(..)) 表示所有以com.spring包以及子包下面的所有的类中的所有的方法会被切入功能
(2)类型限定表达式:within(包名.类名)
within(com.spring.controller.springtest) 表示com.spring.controller包下的springtest组件类中的所有方法都会被切入
within(com.spring.controller..*) 表示com.spring.controller包以及子包下的所有组件类中的所有方法都会被切入
(3)名称限定表达式:bean(id名称)
bean(student) 表示id名称为student的bean对象的所有方法
bean(*ent) 表示id名称为以ent结尾的bean对象的所有方法
bean(std*) 表示id名称为以std开头的bean对象的所有方法
3.Advice(通知):指定切入时机,比如方法调用前,方法调用后,异常发生后等等
 1          try{
 2                  //环绕通知@Around(可以理解为前置通知加后置通知)
 3
 4                  //前置通知@Before
 5                  //执行目标组件方法
 6                  //后置通知@AfterReturning
 7          } catch{
 8                  //异常通知@AfterThrowing
 9          } finally{
10                  //最终通知@After
11          }
2.AOP的运用案例一(案例:计时演示)
第一步:建立web项目
第二步:配置SpringIOC、SpringAOP、SpringMVC环境,引入相关jar包
第三步:配置web.xml
 1 <?xml version="1.0" encoding="UTF-8"?>
 2 <web-app version="3.0"
 3     xmlns="http://java.sun.com/xml/ns/javaee"
 4     xmlns:xsi="http://www.w3.org/2001/XMLSchema-instance"
 5     xsi:schemaLocation="http://java.sun.com/xml/ns/javaee
 6     http://java.sun.com/xml/ns/javaee/web-app_3_0.xsd">
 7   <display-name></display-name>
 8   <welcome-file-list>
 9     <welcome-file>index.jsp</welcome-file>
10   </welcome-file-list>
11
12   <servlet>
13       <servlet-name>springmvc</servlet-name>
14       <servlet-class>org.springframework.web.servlet.DispatcherServlet</servlet-class>
15
16       <init-param>
17           <param-name>contextConfigLocation</param-name>
18           <param-value>classpath:applicationContext.xml</param-value>
19       </init-param>
20
21       <load-on-startup>1</load-on-startup>
22   </servlet>
23
24   <servlet-mapping>
25       <servlet-name>springmvc</servlet-name>
26       <url-pattern>*.do</url-pattern>
27   </servlet-mapping>
28 </web-app>
第四步:编写被切入的目标测试类(实现传统业务)
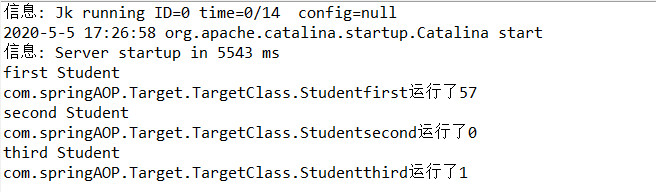
 1 package com.springAOP.Target;
 2
 3 import org.springframework.stereotype.Component;
 4
 5 //切面的触发,都是service的对应代理去触发的,所以,你在service里面直接调用触发切面的方法,是达不到这个效果的,
 6 //所以,需要使用这个ioc注入的代理对象,就会触发切面的方法啦
 7 @Component("targetclass")
 8 public class TargetClass {
 9     public void Studentfirst(){
10         System.out.println("first Student");
11     }
12     public void Studentsecond(){
13         System.out.println("second Student");
14     }
15     public void Studentthird(){
16         System.out.println("third Student");
17     }
18 }
第五步:编写通过AOP实现的通用业务的计时功能
 1 package com.springAOP.AOPTimeTest;
 2
 3 import org.aspectj.lang.ProceedingJoinPoint;
 4 import org.aspectj.lang.annotation.Around;
 5 import org.aspectj.lang.annotation.Aspect;
 6 import org.springframework.stereotype.Component;
 7 import org.springframework.util.StopWatch;
 8
 9 @Component//加载SpringAOPTimeTest到Spring框架中
10 @Aspect//加载一个实现切面AOP功能的对象
11 public class SpringAOPTimeTest {
12
13     @Around("within(com.springAOP.Target.*)")//表示com.springAOP.Target包的所有组件类中的所有方法都会被切入环绕通知
14     public Object time(ProceedingJoinPoint pjp) throws Throwable{
15
16         StopWatch watch = new StopWatch();//调用Spring框架封装好的计时类
17         watch.start();//开始计时
18         Object obj = pjp.proceed();//执行被切入的目标组件方法
19         watch.stop();//结束计时
20
21         String ClassName = pjp.getTarget().getClass().getName();//获取包名+类名
22         String AdviceName = pjp.getSignature().getName();//获取方法名
23         long time = watch.getTotalTimeMillis();//获取时间差
24         System.out.println(ClassName+"."+AdviceName+"运行了"+time);
25
26         return obj;
27     }
28 }
第六步:配置applicationContext.xml
 1 <?xml version="1.0" encoding="UTF-8"?>
 2 <beans xmlns="http://www.springframework.org/schema/beans"
 3        xmlns:xsi="http://www.w3.org/2001/XMLSchema-instance"
 4        xmlns:context="http://www.springframework.org/schema/context"
 5        xmlns:aop="http://www.springframework.org/schema/aop"
 6        xmlns:tx="http://www.springframework.org/schema/tx"
 7        xmlns:jdbc="http://www.springframework.org/schema/jdbc"
 8        xmlns:jee="http://www.springframework.org/schema/jee"
 9        xmlns:mvc="http://www.springframework.org/schema/mvc"
10        xmlns:util="http://www.springframework.org/schema/util"
11        xsi:schemaLocation="
12             http://www.springframework.org/schema/beans http://www.springframework.org/schema/beans/spring-beans.xsd
13             http://www.springframework.org/schema/tx http://www.springframework.org/schema/tx/spring-tx.xsd
14             http://www.springframework.org/schema/aop http://www.springframework.org/schema/aop/spring-aop.xsd
15             http://www.springframework.org/schema/util http://www.springframework.org/schema/util/spring-util.xsd
16             http://www.springframework.org/schema/jdbc http://www.springframework.org/schema/jdbc/spring-jdbc.xsd
17             http://www.springframework.org/schema/jee http://www.springframework.org/schema/jee/spring-jee.xsd
18             http://www.springframework.org/schema/mvc http://www.springframework.org/schema/mvc/spring-mvc.xsd
19             http://www.springframework.org/schema/context http://www.springframework.org/schema/context/spring-context.xsd">
20
21         <!-- 配置AOP组件aspectj自动代理 -->
22         <aop:aspectj-autoproxy/>
23
24         <!-- 配置组件扫描 -->
25         <context:component-scan base-package="com.springAOP"/>
26
27         <!-- 配置注解handler -->
28         <mvc:annotation-driven/>
29
30         <!-- 配置ViewResolver视图解析器 -->
31         <!-- 完整的页面路径:前缀+视图名称+后缀 -->
32         <bean id = "viewresolver" class="org.springframework.web.servlet.view.InternalResourceViewResolver">
33             <!-- 路径前缀 -->
34             <property name="prefix" value="/"></property>
35             <!-- 路径后缀 -->
36             <property name="suffix" value=".jsp"></property>
37         </bean>
38 </beans>
第七步:编写springMVC部分的Controller前端控制器,调用传统业务方法
 1 package com.springAOP.mvccontroller;
 2
 3 import javax.annotation.Resource;
 4
 5 import org.springframework.stereotype.Controller;
 6 import org.springframework.web.bind.annotation.RequestMapping;
 7 import org.springframework.web.servlet.ModelAndView;
 8
 9 import com.springAOP.Target.TargetClass;
10
11 @Controller//此处相当于继承了Controller接口的作用
12 public class StudentController {
13
14     //切面的触发,都是service的对应代理去触发的,所以,你在service里面直接调用触发切面的方法,是达不到这个效果的,
15     //所以,需要使用这个ioc注入的代理对象,就会触发切面的方法啦
16     @Resource(name = "targetclass")
17     private TargetClass tc;
18
19     @RequestMapping("/stu.do")//此处等价于applicationContext.xml中的配置HandlerMapping组件
20     public ModelAndView student(){
21         tc.Studentfirst();
22         tc.Studentsecond();
23         tc.Studentthird();
24
25         ModelAndView mac = new ModelAndView();
26         mac.setViewName("index");
27         mac.getModel();
28         return mac;
29     }
30 }
第八步:测试运行
3.AOP运用案例二(案例:AOP实现异常抛出到日志)
第一步:建立web项目
第二步:配置SpringIOC、SpringAOP、SpringMVC环境,引入相关jar包(同案例一)
第三步:配置web.xml(同案例一)
第四步:编写被切入的目标测试类(实现传统业务)(同案例一)
第五步:编写通过AOP实现的通用业务的异常抛出功能
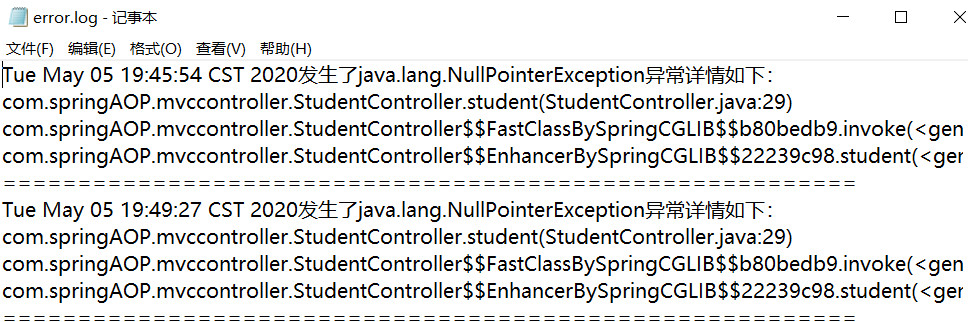
 1 package com.springAOP.test;
 2
 3 import java.io.FileWriter;
 4 import java.io.IOException;
 5 import java.io.PrintWriter;
 6 import java.util.Date;
 7
 8 import org.aspectj.lang.ProceedingJoinPoint;
 9 import org.aspectj.lang.annotation.AfterThrowing;
10 import org.aspectj.lang.annotation.Around;
11 import org.aspectj.lang.annotation.Aspect;
12 import org.springframework.stereotype.Component;
13 import org.springframework.util.StopWatch;
14
15 @Component//加载SpringAOPTimeTest到Spring框架中
16 @Aspect//加载一个实现切面AOP功能的对象
17 public class SpringAOPTest {
18
19     @Around("within(com.springAOP.Target.*)")//表示com.springAOP.Target包的所有组件类中的所有方法都会被切入环绕通知
20     public Object time(ProceedingJoinPoint pjp) throws Throwable{
21
22         StopWatch watch = new StopWatch();//调用Spring框架封装好的计时类
23         watch.start();//开始计时
24         Object obj = pjp.proceed();//执行被切入的目标组件方法
25         watch.stop();//结束计时
26
27         String ClassName = pjp.getTarget().getClass().getName();//获取包名+类名
28         String AdviceName = pjp.getSignature().getName();//获取方法名
29         long time = watch.getTotalTimeMillis();//获取时间差
30         System.out.println(ClassName+"."+AdviceName+"运行了"+time);
31
32         return obj;
33     }
34
35     @AfterThrowing(throwing="ex",pointcut="within(com.springAOP..*)")//表示com.springAOP包以及子包的所有组件类中的所有方法都会被切入异常通知
36     public void logException(Exception ex){
37
38         //异常信息写入日志文件
39         try {
40             FileWriter fw = new FileWriter("F:\\error.log",true);
41             PrintWriter pw = new PrintWriter(fw);
42
43             pw.println(new Date()+"发生了"+ex+"异常"+"详情如下:");
44             StackTraceElement[] stackTrace = ex.getStackTrace();
45             for(StackTraceElement s:stackTrace){
46                 if(s.toString().contains("com.springAOP")){//只写入重要的报错语句
47                     pw.println(s);
48                 }
49             }
50             pw.println("=========================================================");
51             pw.close();
52         } catch (IOException e) {
53             // TODO Auto-generated catch block
54             e.printStackTrace();
55         }
56     }
57 }
第六步:配置applicationContext.xml(同案例一)
第七步:编写springMVC部分的Controller前端控制器,调用传统业务方法
 1 package com.springAOP.mvccontroller;
 2
 3 import javax.annotation.Resource;
 4
 5 import org.springframework.stereotype.Controller;
 6 import org.springframework.web.bind.annotation.RequestMapping;
 7 import org.springframework.web.servlet.ModelAndView;
 8
 9 import com.springAOP.Target.TargetClass;
10
11 @Controller//此处相当于继承了Controller接口的作用
12 public class StudentController {
13
14     //切面的触发,都是service的对应代理去触发的,所以,你在service里面直接调用触发切面的方法,是达不到这个效果的,
15     //所以,需要使用这个ioc注入的代理对象,就会触发切面的方法啦
16     @Resource(name = "targetclass")
17     private TargetClass tc;
18
19     @RequestMapping("/stu.do")//此处等价于applicationContext.xml中的配置HandlerMapping组件
20     public ModelAndView student(){
21         tc.Studentfirst();
22         tc.Studentsecond();
23         tc.Studentthird();
24
25         ModelAndView mac = new ModelAndView();
26         mac.setViewName("index");
27         mac.getModel();
28
29         //此处用于异常报错
30         String str = null;
31         str.length();
32         return mac;
33     }
34 }
第八步:测试运行
3.SpringAOP原理
在使用AOP之后,Spring容器返回的是组件对象,是采用动态代理技术生成一个动态代理对象(是原有组件对象的子类),
对原有组件的方法进行重写,在重写方法中调用切面组件追加功能和原有组件的功能。
动态代理:JDK动态代理:依赖于接口
CGLIB动态代理:不依赖于接口
CGLIB技术:采用子类模式生成动态代理对象,默认目标组件没有接口采用
在使用中,可以追加<aop:aspectj-autoproxy proxy-target-class="true"/> 强制采用CGLIB模式生成动态代理对象,建议使用,因为更安全
Proxy技术:采用接口模式生成动态代理对象,默认目标组件有接口采用

 浙公网安备 33010602011771号