
通过electron-vite创建项目
参考electron-vite官网:https://cn.electron-vite.org/guide/
要求:
1、安装了nodejs和npm,
electron-vite 需要 Node.js 版本 20.19+, 22.12+ 和 Vite 版本 5.0+
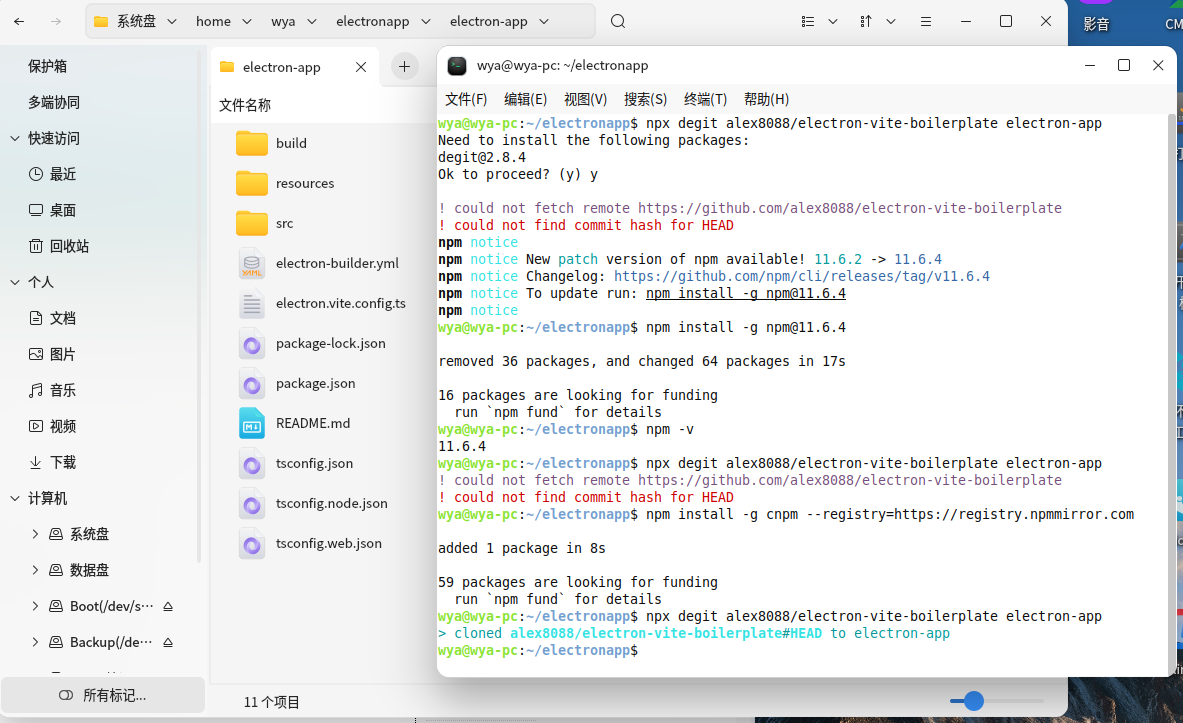
2、克隆模板项目:
npx degit alex8088/electron-vite-boilerplate electron-app
cd electron-app
npm install
npm run dev
如果执行克隆出现不能从远程获取模板错误,需要切换到国内进行即可。
npm install -g cnpm --registry=https://registry.npmmirror.com
这里使用--registry=https://registry.npmmirror.com指定了cnpm的镜像源为中国镜像,这可以加快下载速度。

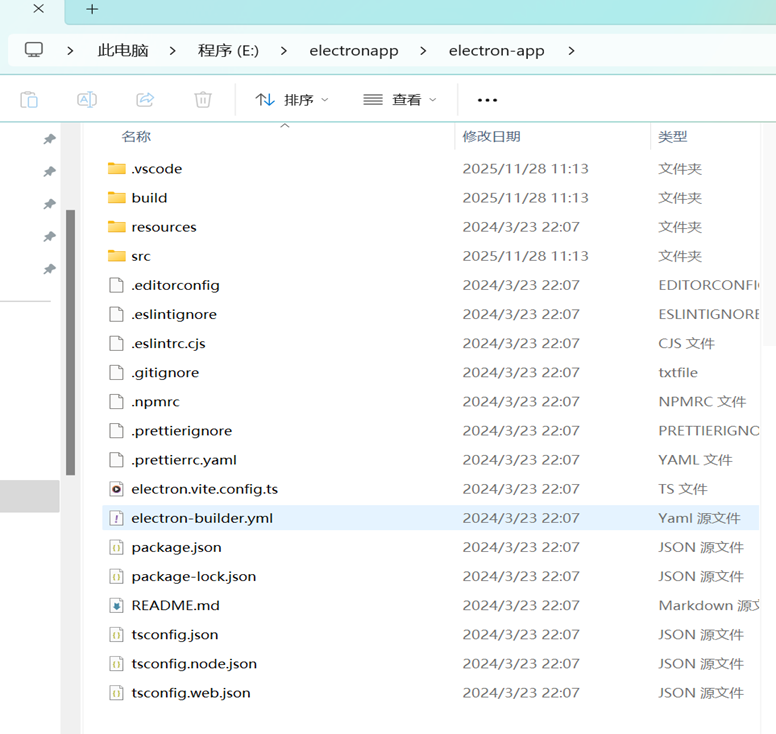
克隆的项目是直接初始化好的vscode、electron-vite项目,可以直接通过vscode打开运行调试,或通过npm命令运行调试。
调试运行前需要执行初始化安装node_modules相关模块,命令:npm install
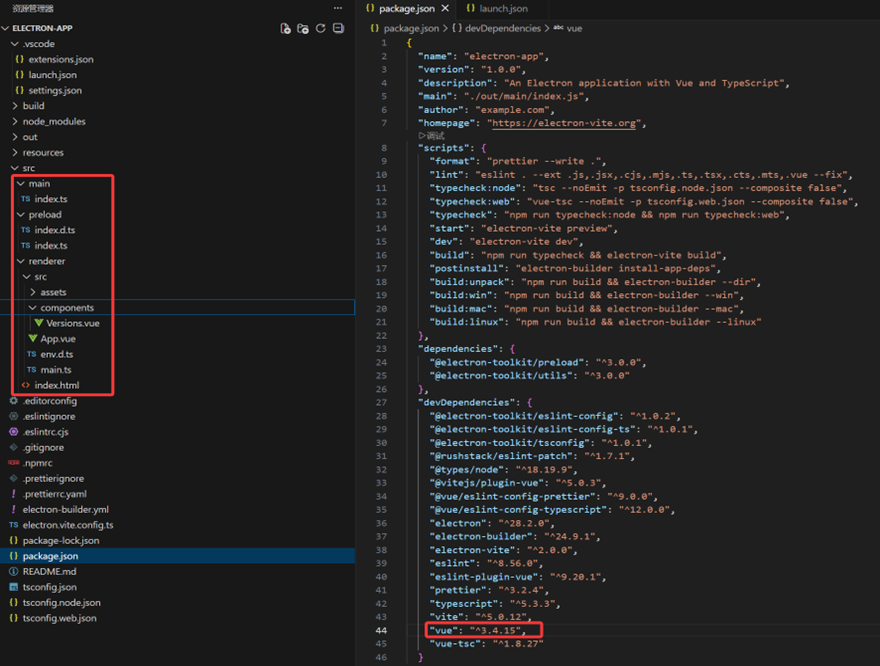
可以通过配置文件看到是一个electron-vite-vue3项目。
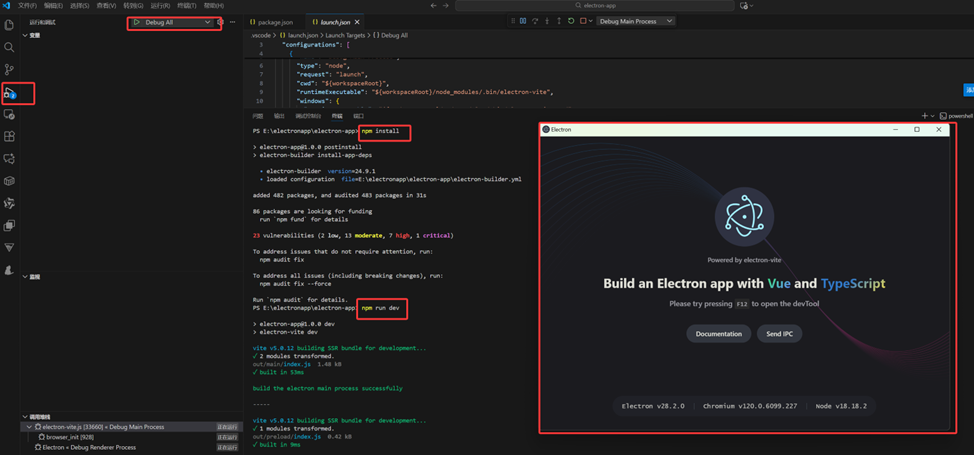
Vscode运行调试electron-vite项目:
1、选择debug all,然后直接点击前边的三角箭头运行即可。
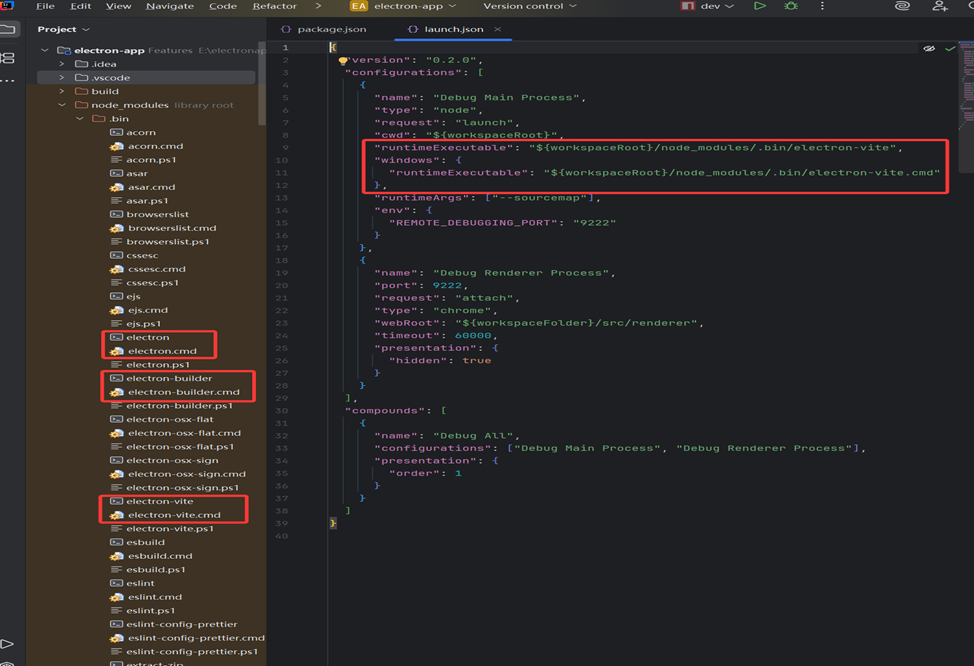
2、 通过launch.json文件可以看到运行时执行的是electron-vite或electron-vite.cmd
"runtimeExecutable": "${workspaceRoot}/node_modules/.bin/ electron-vite ",
"windows": {
"runtimeExecutable": "${workspaceRoot}/node_modules/.bin/electron-vite.cmd"
},
文件位于项目的node_modules/.bin目录下
///////////////////////////////////////////////////////////////////////////////////////////
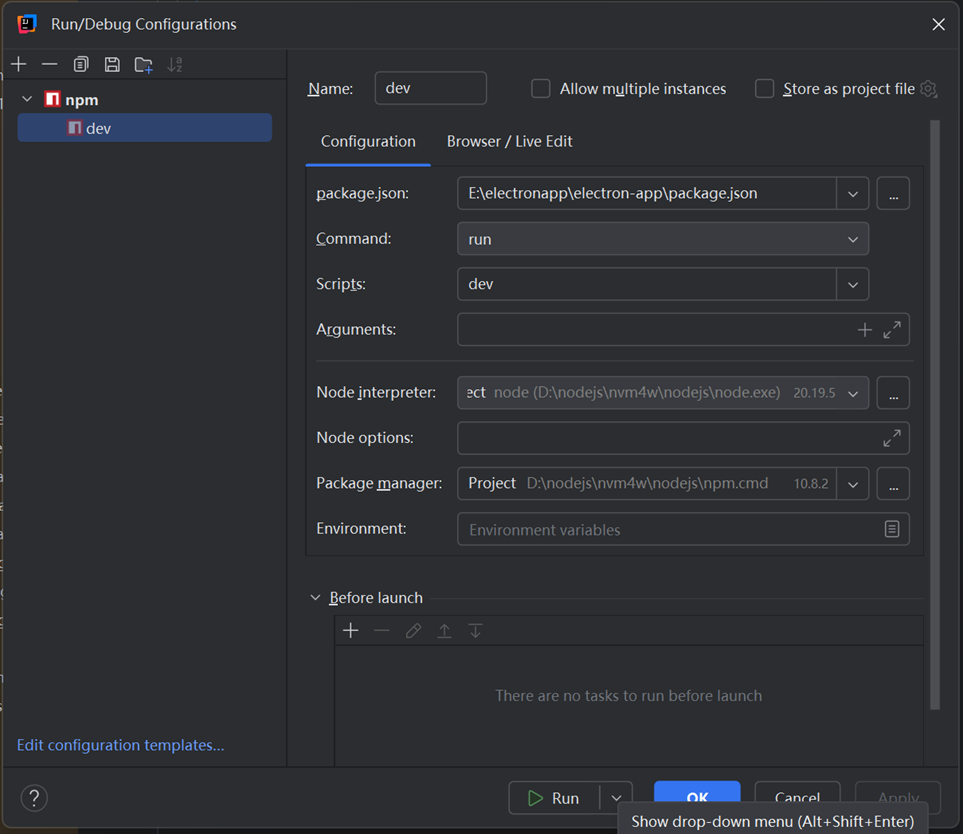
使用idea运行调试electron项目
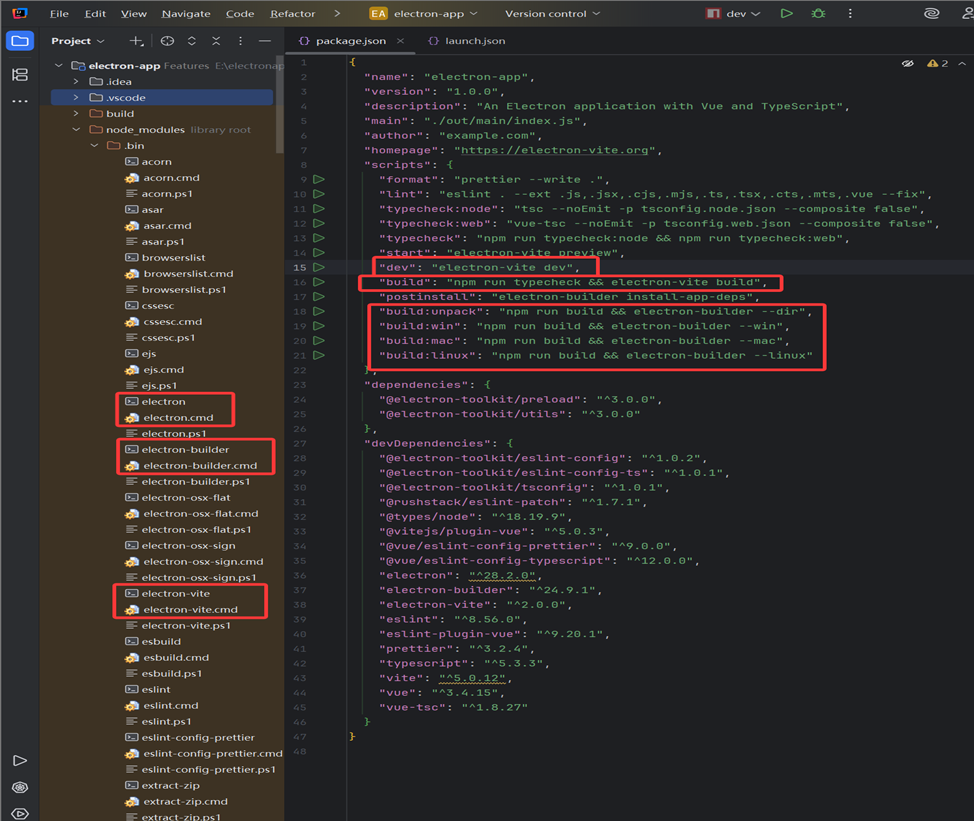
通过配置文件package.json可以看到
可以直接运行:"dev": "electron-vite dev"
构建:"build": "npm run typecheck && electron-vite build",
"postinstall": "electron-builder install-app-deps",
"build:unpack": "npm run build && electron-builder
--dir",
构建windows程序:"build:win": "npm run build &&
electron-builder --win",
构建mac程序:"build:mac": "npm run build && electron-builder
--mac",
构建linux程序:"build:linux": "npm run build &&
electron-builder --linux"
需要在不同操作系统才能构建对应系统下的应用程序。
文件electron、electron.cmd、electron-vite、electron-vite.cmd、electron-builder、electron-builder.cmd位于项目的node_modules/.bin目录下
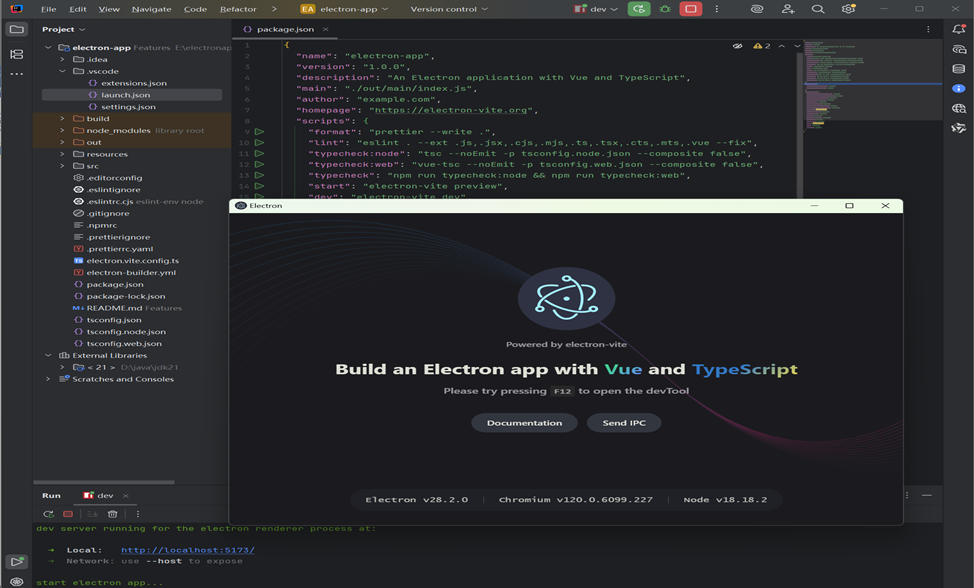
正确执行,也可以在浏览器中浏览:http://localhost:5173/
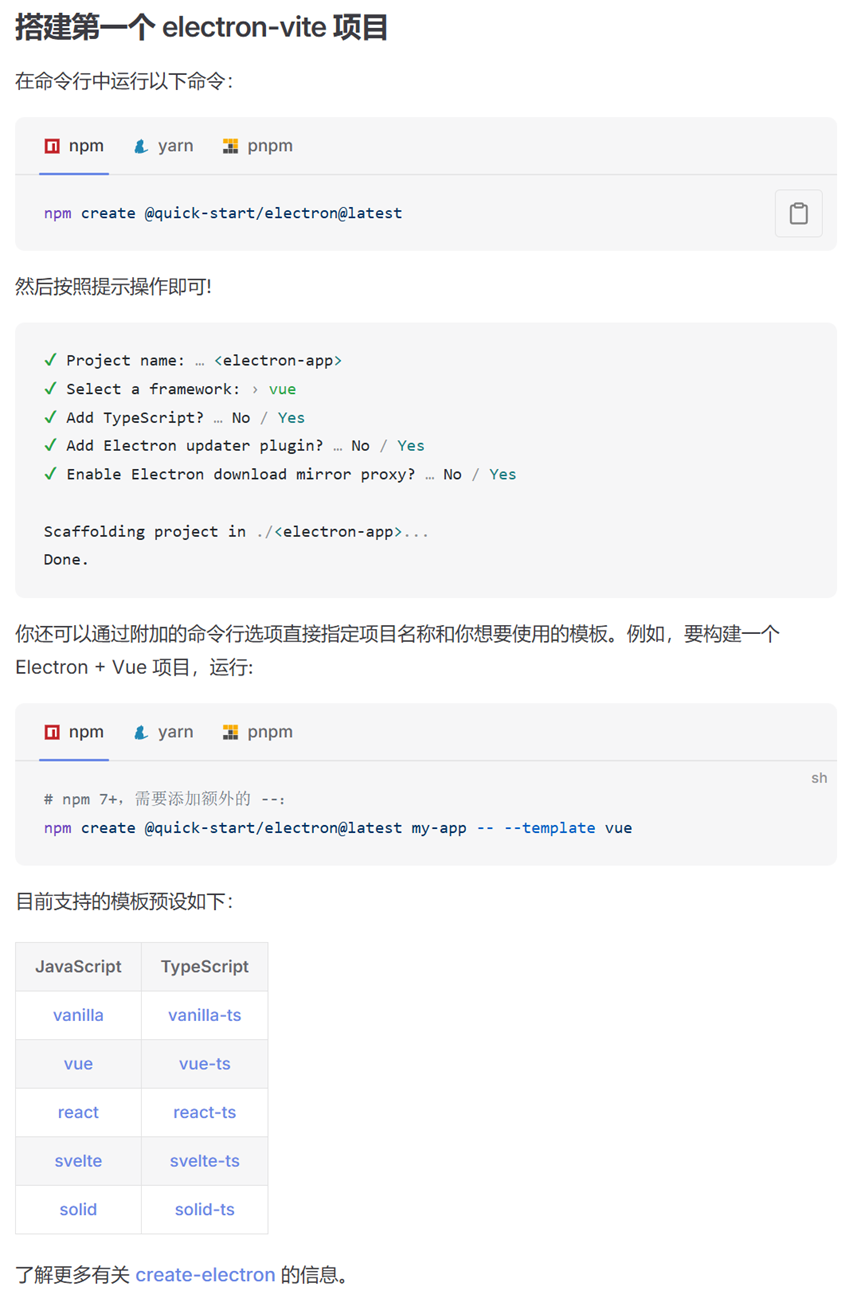
也可通过附加的命令行选项直接指定项目名称和你想要使用的模板,
在银河麒麟桌面版中通过packag.js中的"dev": "electron-vite dev",启动运行程序,出现node版本错误问题,如下
(node:40240) UnhandledPromiseRejectionWarning: Error: Not supported at run (/home/wya/electronapp/electron-app/node_modules/electron-vite/bin/electron-vite.js:27:3) at Object.<anonymous> (/home/wya/electronapp/electron-app/node_modules/electron-vite/bin/electron-vite.js:30:1) at Module._compile (internal/modules/cjs/loader.js:778:30) at Object.Module._extensions..js (internal/modules/cjs/loader.js:789:10) at Module.load (internal/modules/cjs/loader.js:653:32) at tryModuleLoad (internal/modules/cjs/loader.js:593:12) at Function.Module._load (internal/modules/cjs/loader.js:585:3) at Function.Module.runMain (internal/modules/cjs/loader.js:831:12) at startup (internal/bootstrap/node.js:283:19) at bootstrapNodeJSCore (internal/bootstrap/node.js:623:3) (node:40240) UnhandledPromiseRejectionWarning: Unhandled promise rejection. This error originated either by throwing inside of an async function without a catch block, or by rejecting a promise which was not handled with .catch(). (rejection id: 1) (node:40240) [DEP0018] DeprecationWarning: Unhandled promise rejections are deprecated. In the future, promise rejections that are not handled will terminate the Node.js process with a non-zero exit code.
根据收集到的信息,我已经确定了问题所在。错误是因为 Node.js 版本不兼容导致的。从 electron-vite 的 package.json 文件中可以看到,它需要 Node.js 版本为 ^18.0.0 或 >=20.0.0,而从错误堆栈中的路径可以看出你正在使用一个较旧的 Node.js 版本(internal/bootstrap/node.js:283 在较新的 Node.js 版本中不存在)。
让我们来解决这个问题:
首先,确认你的 Node.js 版本过低
然后更新 Node.js 版本或者使用支持的版本
由于我无法直接运行终端命令来查看 Node.js 版本,但从错误信息可以判断版本过低。
下面是我推荐的解决方案:
解决方案
升级 Node.js 到支持的版本(v18.x 或 v20.x)
或者降级 electron-vite 到兼容你当前 Node.js 版本的版本
我们先尝试更新 electron-vite 配置以更好地支持现有环境:
根据搜索结果,你可以通过以下步骤升级 Node.js:
更新系统包:
sudo apt update && sudo apt upgrade
安装 Node.js 20:
curl -fsSL https://deb.nodesource.com/setup_20.x | sudo -E bash -
sudo apt-get install -y nodejs
验证安装:
node -v
npm -v
最后成功运行
以该属于系统底层node版本问题,因为我们手动安装和检测的版本都是v24.11.1

////////////////////////////////////////////////////////////
如果通过electron官网介绍的npm初始化项目:这种方法很少使用,应该使用更先进的工具electron-vite方法创建项目
electron官网:https://www.electronjs.org/zh/docs/latest/tutorial/tutorial-first-app
初始化 npm 项目
Electron 应用基于 npm 搭建,以 package.json 文件作为入口点。 首先创建一个文件夹,然后在其中执行 npm init 初始化项目。
mkdir my-electron-app && cd
my-electron-app
npm init
这条命令会帮您配置 package.json 中的一些字段。 为本教程的目的,有几条规则需要遵循:
- 入口点 应当是 main.js (您很快就会创建它)
- author、license 和 description 可以是任何值,但在稍后的packaging中是必需的。
安装electron : npm install electron --save-dev
在初始化并且安装完 Electron 之后,您的 package.json 应该长下面这样。 文件夹中会出现一个 node_modules 文件夹,其中包含了 Electron 可执行文件;还有一个 package-lock.json 文件,指定了各个依赖的确切版本。
package.json
{
"name": "my-electron-app",
"version": "1.0.0",
"description": "Hello
World!",
"main":
"main.js",
"scripts": {
"test": "echo
\"Error: no test specified\" && exit 1"
},
"author": "Jane
Doe",
"license": "MIT",
"devDependencies": {
"electron": "23.1.3"
}
}
因为 Electron 的主进程就是一个 Node.js 运行时,所以你可以直接用 electron 命令运行任意的 Node.js 代码(甚至还能把它当成 REPL 来用)。 要执行这个脚本,需要在 package.json 的 scripts 字段中添加一个 start 命令,内容为 electron . 。 这个命令会告诉 Electron 在当前目录下寻找主脚本,并以开发模式运行它。
package.json
{
"name": "my-electron-app",
"version": "1.0.0",
"description": "Hello
World!",
"main": "main.js",
"scripts": {
"start":
"electron .",
"test": "echo
\"Error: no test specified\" && exit 1"
},
"author": "Jane
Doe",
"license": "MIT",
"devDependencies": {
"electron": "23.1.3"
}
}
运行程序:npm run start
如果在idea中远行需要配置idea:其中可执行程序electron及electron.cmd存在于你的项目目录中的node_modules/.bin 目录下。
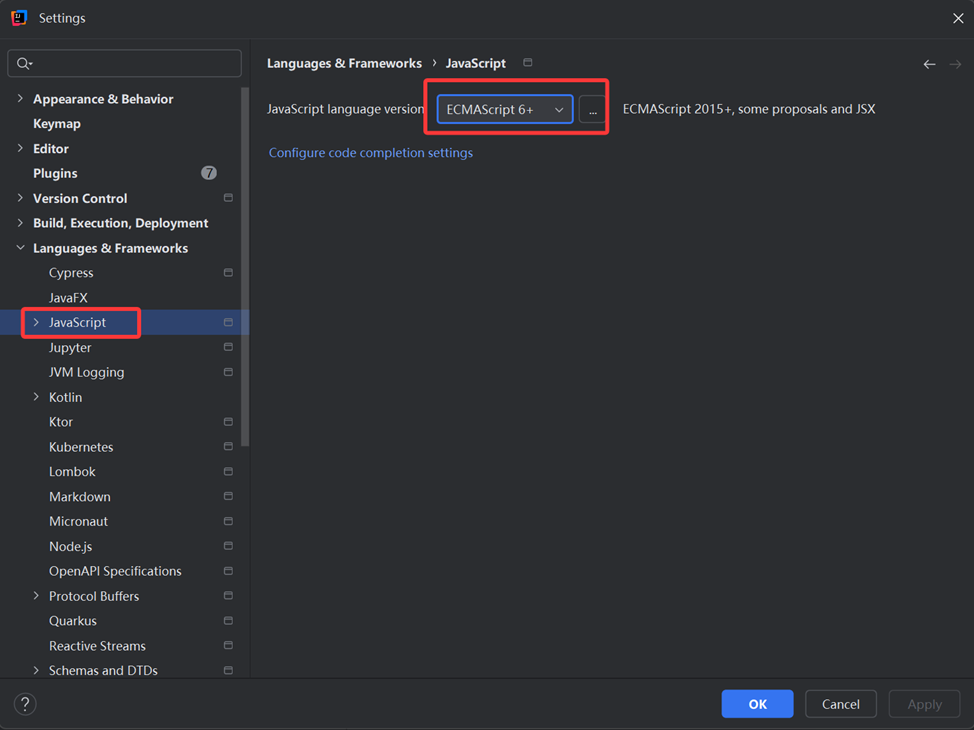
1、electron使用的是ES6语法,需要在设置中修改语法
找到设置菜单,选择language & Frameworks
修改JavaScript的版本
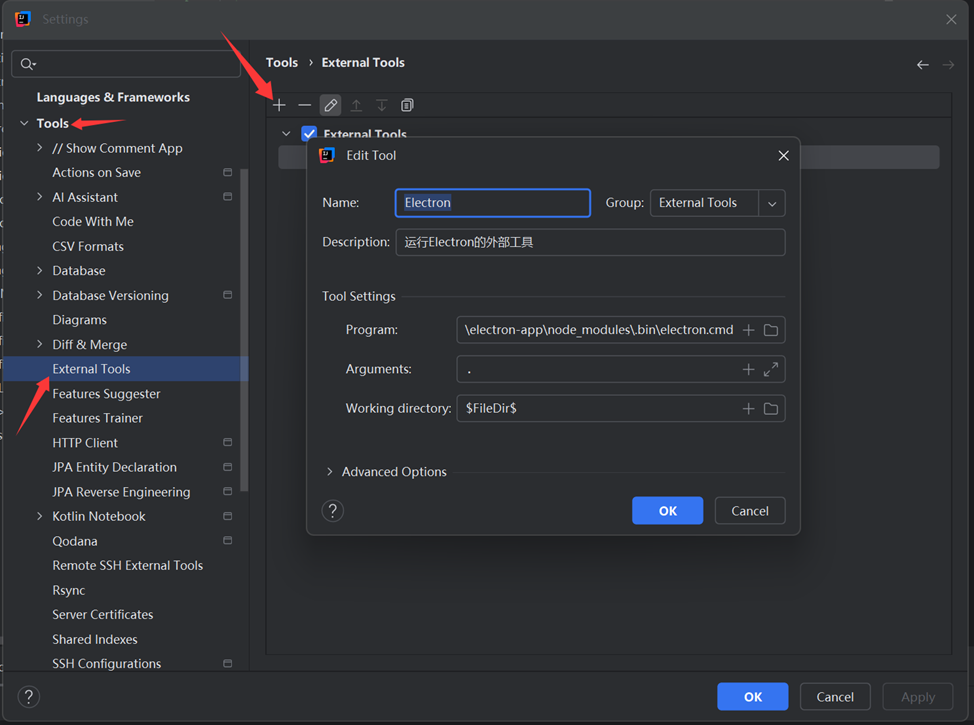
3、 添加一个外部工具,
Name是显示的工具名称随便写,
Description是描述,随便写
program是程序,输入electron.cmd【windows下需要选择electron.cmd文件,苹果系统和linux系统需要选择electron文件】
文件electron、electron.cmd、electron-vite、electron-vite.cmd、electron-builder、electron-builder.cmd位于项目的node_modules/.bin目录下
Argument是参数,输入.表示当前目录
Working directory是工作空间,为当前目录,直接使用变量FileDir即:$FileDir$
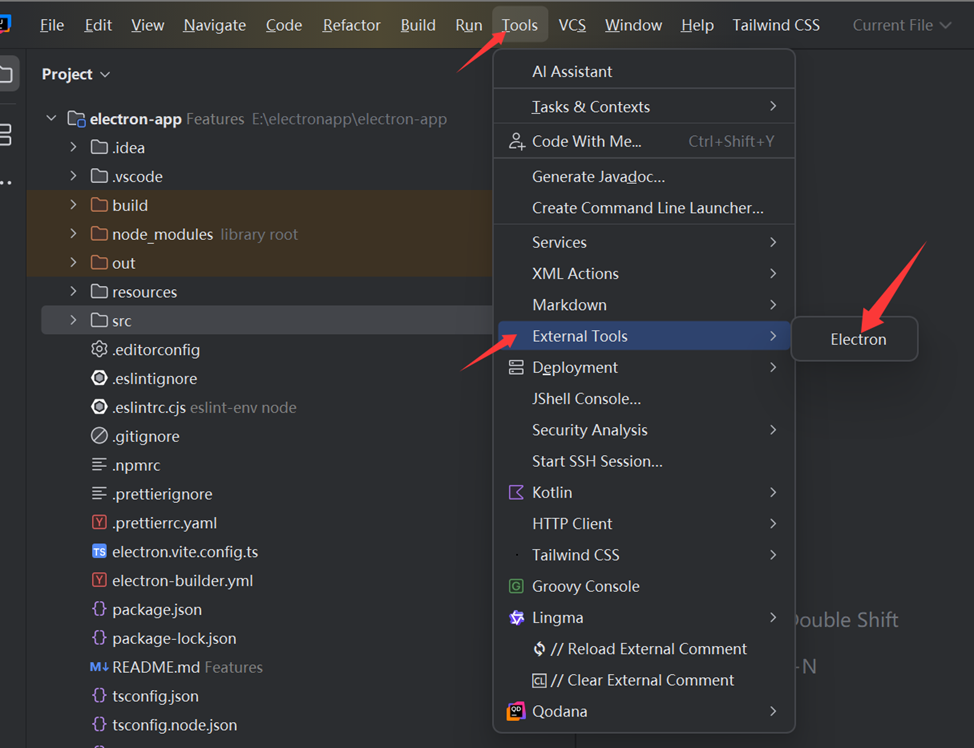
保存后,在项目随意位置右键,外部工具菜单中就可以看到相关的工具了.
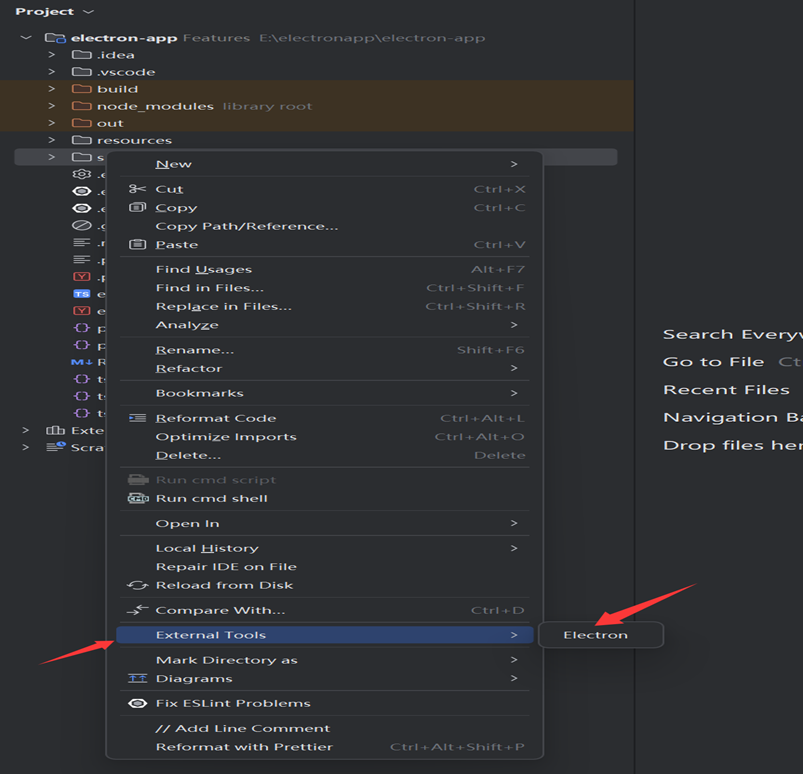
也可通过主菜单:tools-External tools-Electron调出。
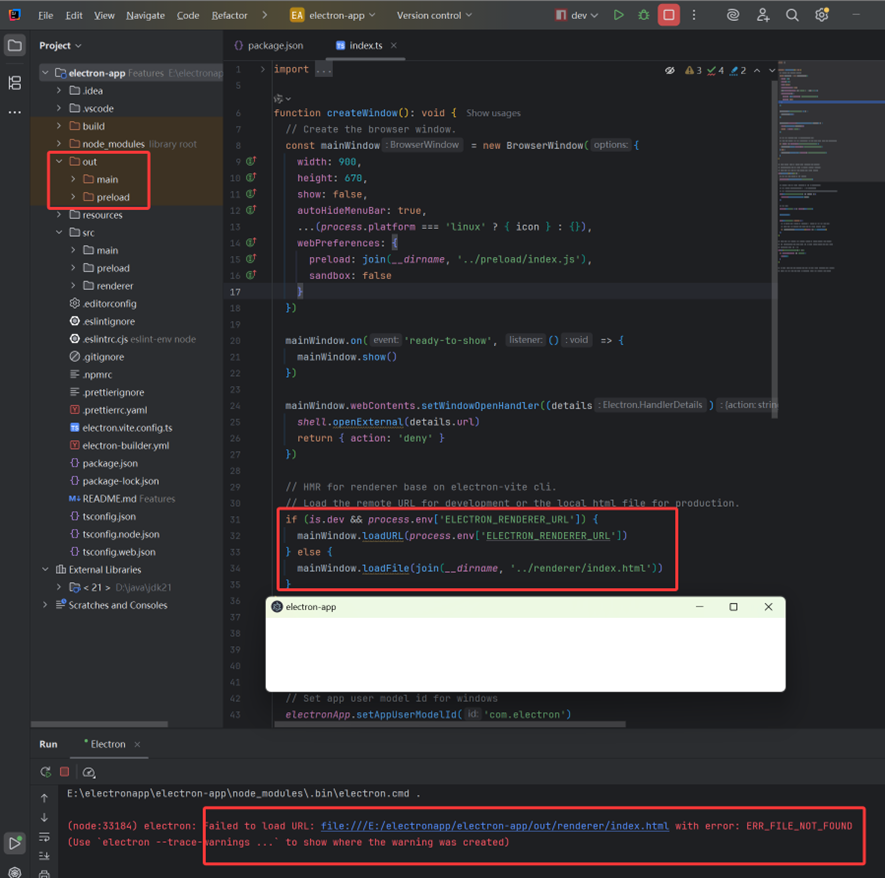
这种方法运行程序了E:\electronapp\electron-app\node_modules\.bin\electron.cmd .
可以看到人有一个错误提示,
Failed to load URL: file:///E:/electronapp/electron-app/out/renderer/index.html
没有编译输出源程序下的index.html到项目out/renderer目录下。


 浙公网安备 33010602011771号