
C# Web开发教程(六)之配置篇和项目分层演示
读取配置
- 读取
系统环境变量演示- 注意事项: 以下方式,必须重启
VS编辑器才有效果
- 注意事项: 以下方式,必须重启
using Microsoft.AspNetCore.Mvc;
using StackExchange.Redis;

namespace WebApplicationAboutCache.Controllers
{
    [ApiController]
    [Route("api/[controller]")]
    public class TestConfigurationController : Controller
    {
        [HttpGet("test")]
        public string? SimpleTest()
        {
            // 读取名为haha的系统环境变量
            return Environment.GetEnvironmentVariable("haha");
        }
    }
}
- 输出打印项目当前的运行环境
// Program.cs
......

var app = builder.Build();
......
Console.WriteLine(app.Environment.EnvironmentName); // Development
Console.WriteLine(app.Environment.IsDevelopment()); // True

- 也可以修改成接口的形式
using Microsoft.AspNetCore.Mvc;
using StackExchange.Redis;

namespace WebApplicationAboutCache.Controllers
{
    [ApiController]
    [Route("api/[controller]")]
    public class TestConfigurationController : Controller
    {

        private readonly IWebHostEnvironment webHostEnvironment;

        public TestConfigurationController(IWebHostEnvironment webHostEnvironment)
        {
            this.webHostEnvironment = webHostEnvironment;
        }

        [HttpGet("test")]
        public string? SimpleTest()
        {
            return webHostEnvironment.EnvironmentName;
        }
    }
}
- 使用"用户机密"来避免敏感信息的泄露
- 底层原理: 把
secrets.json和项目文件完全分离开,这样无论开发者上传啥项目文件,都不会影响secrets.json
- 底层原理: 把
// secrets.json
{
  "App-Key": "sxxdsfsdfsdfksjkjglsajdflaskdfsaldfjksjflaskflaskfsdf"
}

// yourProject.csproj
......
<Project Sdk="Microsoft.NET.Sdk.Web">
  <PropertyGroup>
   ......
    <UserSecretsId>2de3344b-c460-4707-83c0-5f135d8c962e</UserSecretsId>
  </PropertyGroup>

  <ItemGroup>
  ......
  </ItemGroup>

</Project>
配置实验
- 配置需求如下
- 系统的主要配置(例如Redis、Smtp)放到配置专用的数据库中(通过安装Zack.AnyDBConfigProvider库来实现连接: 支持在.NET(.NET Core及.NET Framework)下,从任意关系数据库中加载配置的ConfigurationProvider)
- 库文档地址: https://github.com/yangzhongke/Zack.AnyDBConfigProvider/blob/main/README_CHS.md
- 控制台安装: Install-Package Zack.AnyDBConfigProvider
- 连接配置数据库的连接字符串配置在“用户机密”中,例如"Data Source=.;Initial Catalog=demo1;Integrated
Security=SSPI;"
- 读取数据库的Smtp的配置并显示到界面上
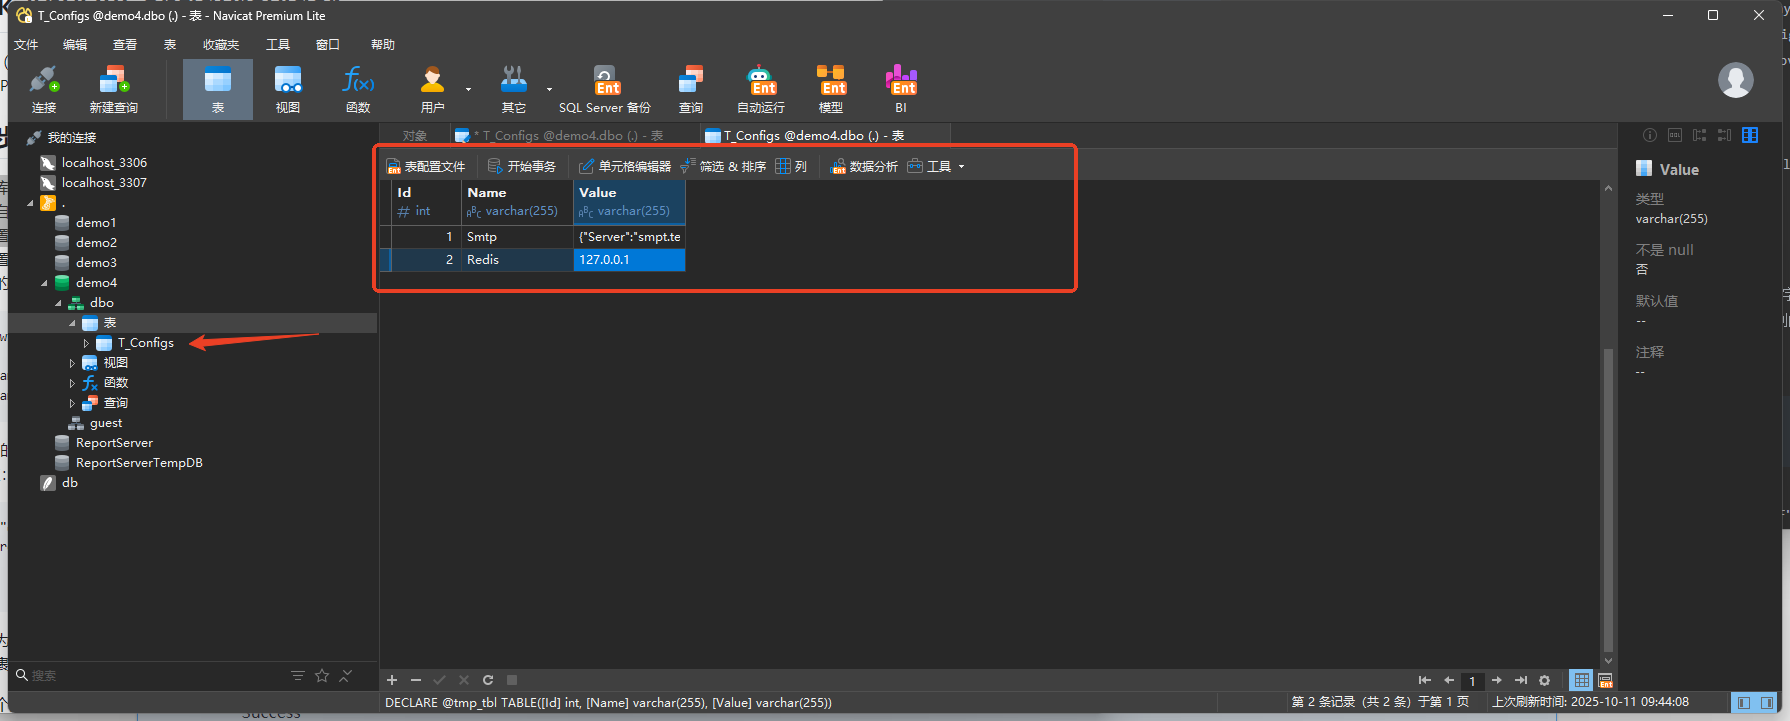
- 在数据库中建一张表,默认名字是T_Configs,这个表名允许自定义为其他名字,具体见后续步骤。表必须有Id、Name、Value三个列,Id定义为整数、自动增长列,Name和Value都定义为字符串类型列,列的最大长度根据系统配置数据的长度来自行确定,Name列为配置项的名字,Value列为配置项的值
- secrets.json配置如下
{
  "App-Key": "sxxdsfsdfsdfksjkjglsajdflaskdfsaldfjksjflaskflaskfsdf",
  "ConnStr": "Data Source=.;Initial Catalog=demo4;Integrated Security=SSPI;"
}
Program.cs配置如下
using WebApplicationAboutCache;
using System.Data.SqlClient; // Install-Package System.Data.SqlClient

var builder = WebApplication.CreateBuilder(args);

......
// 新增数据库连接库
builder.WebHost.ConfigureAppConfiguration((hostCtx, configBuilder) => {
    string connStr = builder.Configuration.GetSection("Connstr").Value;
    configBuilder.AddDbConfiguration(() => new SqlConnection(connStr),
        reloadOnChange: true, reloadInterval: TimeSpan.FromSeconds(2));
});

var app = builder.Build();

......
作用:使用 Zack.AnyDBConfigProvider 库从数据库读取配置
详细解释:
ConfigureAppConfiguration- 配置应用程序的配置源builder.Configuration.GetSection("Connstr").Value- 从现有配置获取数据库连接字符串AddDbConfiguration()- 添加数据库作为配置源() => new SqlConnection(connStr)- 创建数据库连接的工厂方法reloadOnChange: true- 允许配置变化时自动重载reloadInterval: TimeSpan.FromSeconds(2)- 每2秒检查一次配置变化
效果:应用程序会从指定的数据库表中读取配置信息,并支持配置的热重载。
- 安装
Redis库
NuGet\Install-Package StackExchange.Redis -Version 2.9.25
// Program.cs
......
builder.Services.AddSingleton<IConnectionMultiplexer>(sp =>
{
    string constr = builder.Configuration.GetSection("Redis").Value;
    return ConnectionMultiplexer.Connect(constr);
});
作用:注册 Redis 连接为单例服务
详细解释:
-
AddSingleton- 将 Redis 连接注册为单例(整个应用程序生命周期内只有一个实例) -
builder.Configuration.GetSection("Redis").Value- 从配置获取 Redis 连接字符串 -
ConnectionMultiplexer.Connect(constr)- 创建 Redis 连接 -
Redis 连接是单例的,因为创建连接开销较大,应该重用
-
新建
SmtpSettings配置类
namespace WebApplicationAboutCache
{
    public record SmtpSettings
    {
        public string Server { get; set; }
        public string UserName { get; set; }
        public string Password { get; set; }
    }
}

// Program.cs
......
builder.Services.Configure<SmtpSettings>(builder.Configuration.GetSection("Smtp"));
作用:将配置中的 SMTP 部分绑定到 SmtpSettings 类
详细解释:
Configure- 使用选项模式配置 SMTP 设置builder.Configuration.GetSection("Smtp")- 获取配置中的 "Smtp" 节点- 在其他地方可以通过依赖注入
IOptions来使用这些配置
Program.cs完整代码
using WebApplicationAboutCache;
using System.Data.SqlClient;
using StackExchange.Redis;
using Microsoft.Extensions.Configuration;

var builder = WebApplication.CreateBuilder(args);

// Add services to the container.

// 注册redis缓存
builder.Services.AddStackExchangeRedisCache(option =>
{
    option.Configuration = builder.Configuration.GetConnectionString("Redis");
    option.InstanceName = "MyApp-";
});

builder.Services.AddControllers();
// Learn more about configuring Swagger/OpenAPI at https://aka.ms/aspnetcore/swashbuckle
builder.Services.AddEndpointsApiExplorer();
builder.Services.AddSwaggerGen();
// 新增内存缓存
builder.Services.AddMemoryCache();
// 注册User接口服务
builder.Services.AddScoped<IRedisService, RedisService>();


// 新增数据库连接库
builder.WebHost.ConfigureAppConfiguration((hostCtx, configBuilder) => {
    // var configRoot = configBuilder.Build();
    // string connStr = configRoot.GetConnectionString("ConnStr");
    string connStr =builder.Configuration.GetSection("Connstr").Value;
    configBuilder.AddDbConfiguration(() => new SqlConnection(connStr),
        reloadOnChange: true, reloadInterval: TimeSpan.FromSeconds(2));
});

builder.Services.AddSingleton<IConnectionMultiplexer>(sp =>
{
    string constr = builder.Configuration.GetSection("Redis").Value;
    return ConnectionMultiplexer.Connect(constr);
});

builder.Services.Configure<SmtpSettings>(builder.Configuration.GetSection("Smtp"));

var app = builder.Build();

// Configure the HTTP request pipeline.
if (app.Environment.IsDevelopment())
{
    app.UseSwagger();
    app.UseSwaggerUI();
}

app.UseHttpsRedirection();

Console.WriteLine(app.Environment.EnvironmentName);
Console.WriteLine(app.Environment.IsDevelopment());

app.UseAuthorization();

app.MapControllers();

app.Run();
整体流程总结
- 创建构建器 - 初始化应用程序
- 配置数据库配置源 - 从数据库读取应用程序配置
- 注册服务 - 注册 Redis 连接和配置选项
- 构建应用 - 创建 WebApplication 实例
这种配置方式特别适合需要从数据库动态读取配置的场景,比如多租户系统或需要频繁修改配置而不重启应用的情况
- 接口代码如下
using Microsoft.AspNetCore.Mvc;
using Microsoft.Extensions.Options;
using StackExchange.Redis;

namespace WebApplicationAboutCache.Controllers
{
    [ApiController]
    [Route("api/[controller]")]
    public class TestConfigurationController : Controller
    {

        private readonly IWebHostEnvironment webHostEnvironment;
        private readonly IOptions<SmtpSettings> optSmtp;
        private readonly IConnectionMultiplexer connectionMultiplexer;


        public TestConfigurationController(IWebHostEnvironment webHostEnvironment, IConnectionMultiplexer connectionMultiplexer, IOptions<SmtpSettings> optSmtp)
        {
            this.webHostEnvironment = webHostEnvironment;
            this.connectionMultiplexer = connectionMultiplexer;
            this.optSmtp = optSmtp;
        }

        [HttpGet("test")]
        public string? SimpleTest()
        {
            // return Ok("简单测试一下");
            //return Environment.GetEnvironmentVariable("haha");
            return webHostEnvironment.EnvironmentName;
        }

        [HttpGet("synthetical")]
        public string TestSynthetical()
        {
            var ping = connectionMultiplexer.GetDatabase(0).Ping();
            return optSmtp.Value.ToString() + ping;
        }
    }
}
- 测试
- https://localhost:7073/api/TestConfiguration/synthetical
- 返回结果:
SmtpSettings { Server = smpt.test.com, UserName = yzk, Password = 123 }00:00:00.0006936
项目的分层演示
- 先新建一个
Web API项目,再右键解决方案,再添加一个类库(.net或.net standard)---EFCore Book(充当业务类)- 注意事项: 该
类库不要和Web API项目放到同一目录,否则运行项目有一堆的报错...
- 注意事项: 该
// Book.cs

namespace EFCoreBooks
{
    public class Book
    {
        public long Id { get; set; }
        public string Title { get; set; }
        public string AuthorName { get; set; }
        public double Price { get; set; }
        public DateTime PubDate { get; set; }
    }
}
- 在
EFCore Book项目中,安装以下三个包- 注意别装错项目
Install-Package Microsoft.EntityFrameworkCore -Version 6.0.0
Install-Package Microsoft.EntityFrameworkCore.Relational -Version 6.0.0
Install-Package Microsoft.EntityFrameworkCore.SqlServer -Version 6.0.0
Install-Package Microsoft.EntityFrameworkCore.Tools -Version 6.0.0
// 配置类 BookConfig.cs

using System;
using System.Collections.Generic;
using System.Linq;
using System.Text;
using System.Threading.Tasks;

using Microsoft.EntityFrameworkCore;
using Microsoft.EntityFrameworkCore.Metadata.Builders;

namespace EFCoreBooks
{
    public class BookConfig: IEntityTypeConfiguration<Book>
    {
        public void Configure(EntityTypeBuilder<Book> buider)
        {
            buider.ToTable("Books");
        }
    }
}

// MyDbContext.cs

using System;
using System.Collections.Generic;
using System.Linq;
using System.Text;
using System.Threading.Tasks;

using Microsoft.EntityFrameworkCore;

namespace EFCoreBooks
{
   public class MyDbContext : DbContext
   {


        public DbSet<Book> Books { get; set; }
		// 这个构造函数是必须的
        public MyDbContext(DbContextOptions<MyDbContext> options):base(options)
        {

        }


        protected override void OnModelCreating(ModelBuilder modelBuilder)
        {
            base.OnModelCreating(modelBuilder);
            modelBuilder.ApplyConfigurationsFromAssembly(this.GetType().Assembly);
        }


   }
}


// MyDbContextDesignFac.cs

using Microsoft.EntityFrameworkCore;
using Microsoft.EntityFrameworkCore.Design;
using System;
using System.Collections.Generic;
using System.Linq;
using System.Text;
using System.Threading.Tasks;

namespace EFCoreBooks
{
    public class MyDbContextDesignFac: IDesignTimeDbContextFactory<MyDbContext>
    {
        public MyDbContext CreateDbContext(string[] args)
        {
            DbContextOptionsBuilder<MyDbContext> builder = new DbContextOptionsBuilder<MyDbContext>();
            string connStr = "Data Source=.;Initial Catalog=demo4;Integrated Security=SSPI;";
            builder.UseSqlServer(connStr);
            MyDbContext ctx = new MyDbContext(builder.Options);
            return ctx;
        }
    }
}
- 在
Web API项目中,添加对EFCore Book项目的引用
// secrets.json(这个其实不用,已经写在上方的"...Fac.cs"里面)

{
  "ConnStr": "Data Source=.;Initial Catalog=demo4;Integrated Security=SSPI;"
}
// program.cs

using EFCoreBooks;
using Microsoft.EntityFrameworkCore;

var builder = WebApplication.CreateBuilder(args);
......
builder.Services.AddDbContext<MyDbContext>(opt =>
{
    string connStr = builder.Configuration.GetSection("ConnStr").Value;
    opt.UseSqlServer(connStr);
});
......
- 简单写一个测试接口
- 注意事项: 此时还没有作
数据库迁移,故该接口虽然可以运行,但是后端没有数据返回
- 注意事项: 此时还没有作
using EFCoreBooks;
using Microsoft.AspNetCore.Mvc;

namespace WebApplicationAboutLayered.Controllers
{
    [ApiController]
    [Route("api/[controller]")]
    public class Test1Controller : ControllerBase
    {

        private readonly MyDbContext dbCtx;

        public Test1Controller(MyDbContext dbCtx)
        {
            this.dbCtx = dbCtx;
        }

        [HttpGet]
        public string Demo1()
        {
            int c = dbCtx.Books.Count();
            return $"c={c}";
        }
    }
}
- 作
迁移和更新Db的操作- 注意事项: 该操作一定要在
EFCore Book类库底下进行
- 注意事项: 该操作一定要在
PM> Add-Migration init
PM> Update-Database

- 若没有任何报错,说明映射到数据库成功了,打开数据库核实一下~~~
- 再次访问接口,测试数据,返回结果 https://localhost:7044/api/Test1
	- c=0
项目分层架构代码解释
代码结构解析
项目架构
解决方案
├── Web API 项目 (表示层/表现层)
└── EFCore Books 类库 (数据访问层/领域层)
各组件详细解释
1. 实体类 (Book.cs)
public class Book
{
    public long Id { get; set; }
    public string Title { get; set; }
    public string AuthorName { get; set; }
    public double Price { get; set; }
    public DateTime PubDate { get; set; }
}
作用: 定义数据模型,对应数据库中的表结构
2. 实体配置 (BookConfig.cs)
public class BookConfig: IEntityTypeConfiguration<Book>
{
    public void Configure(EntityTypeBuilder<Book> buider)
    {
        buider.ToTable("Books"); // 指定表名
    }
}
作用: EF Core 实体配置,自定义数据库映射规则
3. 数据库上下文 (MyDbContext.cs)
public class MyDbContext : DbContext
{
    public DbSet<Book> Books { get; set; } // 数据表集合

    // 依赖注入构造函数
    public MyDbContext(DbContextOptions<MyDbContext> options):base(options) { }

    protected override void OnModelCreating(ModelBuilder modelBuilder)
    {
        base.OnModelCreating(modelBuilder);
        modelBuilder.ApplyConfigurationsFromAssembly(this.GetType().Assembly);
    }
}
作用:
- 数据库会话上下文
- 管理实体与数据库的映射
- 提供数据操作接口
4. 设计时上下文工厂 (MyDbContextDesignFac.cs)
public class MyDbContextDesignFac: IDesignTimeDbContextFactory<MyDbContext>
{
    public MyDbContext CreateDbContext(string[] args)
    {
        DbContextOptionsBuilder<MyDbContext> builder = new DbContextOptionsBuilder<MyDbContext>();
        string connStr = "Data Source=.;Initial Catalog=demo4;Integrated Security=SSPI;";
        builder.UseSqlServer(connStr);
        return new MyDbContext(builder.Options);
    }
}
作用: 为 EF Core 迁移工具提供数据库连接配置
5. Web API 配置 (Program.cs)
builder.Services.AddDbContext<MyDbContext>(opt =>
{
    string connStr = builder.Configuration.GetSection("ConnStr").Value;
    opt.UseSqlServer(connStr);
});
作用: 依赖注入配置,注册 DbContext 服务
6. 控制器 (Test1Controller.cs)
public class Test1Controller : ControllerBase
{
    private readonly MyDbContext dbCtx; // 依赖注入 DbContext

    public Test1Controller(MyDbContext dbCtx)
    {
        this.dbCtx = dbCtx;
    }

    [HttpGet]
    public string Demo1()
    {
        int c = dbCtx.Books.Count(); // 数据库查询操作
        return $"c={c}";
    }
}
作用: 处理 HTTP 请求,协调业务逻辑和数据访问
项目分层架构流程图
graph TD
A[用户请求] --> B[Web API 控制器]
subgraph 表示层 Presentation Layer
B --> C[依赖注入 DbContext]
end
subgraph 数据访问层 Data Access Layer
C --> D[MyDbContext]
D --> E[数据库操作]
D --> F[实体映射配置]
end
subgraph 领域层 Domain Layer
G[Book 实体类] --> D
H[BookConfig 配置] --> F
end
subgraph 基础设施 Infrastructure
I[设计时工厂] --> J[EF Core 迁移工具]
J --> K[生成数据库表]
end
E --> L[SQL Server 数据库]
K --> L
L --> M[返回数据]
M --> B
B --> N[HTTP 响应]
style 表示层 fill:#e1f5fe
style 数据访问层 fill:#f3e5f5
style 领域层 fill:#e8f5e8
style 基础设施 fill:#fff3e0
数据流详细说明
1. 请求流程
HTTP Request → Controller → DbContext → Database → 返回数据 → HTTP Response
2. 开发流程
1. 定义实体类 → 2. 配置DbContext → 3. 注册服务 → 4. 创建迁移 → 5. 更新数据库 → 6. 编写API
3. 依赖关系
Web API 项目 → 依赖 → EFCore Books 类库
Controller → 依赖注入 → MyDbContext → 依赖 → Entity Framework Core
分层优势体现
- 职责分离: 数据访问逻辑与业务逻辑分离
- 可维护性: 修改数据库结构只需在数据层操作
- 可测试性: 可以 Mock DbContext 进行单元测试
- 复用性: EFCore Books 类库可以被其他项目引用
这种分层架构遵循了单一职责原则,使得代码结构清晰,易于维护和扩展。
批量注册DbContext---Zack.Infrastructure
- 引入场景: 如果一直手动注册
DbContext,当数量多的时候,管理就不方便
// Person.cs

using System;
using System.Collections.Generic;
using System.Linq;
using System.Text;
using System.Threading.Tasks;

namespace EFCoreBooks
{
    public class Person
    {
        public int Id { get; set; }
        public string Name { get; set; }
        public string Age { get; set; }
    }
}


// MyDbPersonContext.cs

using System;
using System.Collections.Generic;
using System.Linq;
using System.Text;
using System.Threading.Tasks;

using Microsoft.EntityFrameworkCore;

namespace EFCoreBooks
{
   public class MyDbPersonContext : DbContext
   {


        public DbSet<Person> Persons { get; set; }

        public MyDbPersonContext(DbContextOptions<MyDbPersonContext> options):base(options)
        {

        }


        protected override void OnModelCreating(ModelBuilder modelBuilder)
        {
            base.OnModelCreating(modelBuilder);
            modelBuilder.ApplyConfigurationsFromAssembly(this.GetType().Assembly);
        }


   }
}

// MyDbPersonContextDesignFac.cs

using Microsoft.EntityFrameworkCore;
using Microsoft.EntityFrameworkCore.Design;
using System;
using System.Collections.Generic;
using System.Linq;
using System.Text;
using System.Threading.Tasks;

namespace EFCoreBooks
{
    public class MyDbPersonContextDesignFac: IDesignTimeDbContextFactory<MyDbPersonContext>
    {
        public MyDbPersonContext CreateDbContext(string[] args)
        {
            DbContextOptionsBuilder<MyDbPersonContext> builder = new DbContextOptionsBuilder<MyDbPersonContext>();
            string connStr = "Data Source=.;Initial Catalog=demo4;Integrated Security=SSPI;";
            builder.UseSqlServer(connStr);
            MyDbPersonContext ctx = new MyDbPersonContext(builder.Options);
            return ctx;
        }
    }
}
- 然后在主项目中
再次注册
// Program.cs
......
builder.Services.AddSwaggerGen();
// Book业务类
builder.Services.AddDbContext<MyDbContext>(opt =>
{
    string connStr = builder.Configuration.GetSection("ConnStr").Value;
    opt.UseSqlServer(connStr);
});
// Person业务类
builder.Services.AddDbContext<MyDbPersonContext>(opt =>
{
    string connStr = builder.Configuration.GetSection("ConnStr").Value;
    opt.UseSqlServer(connStr);
});
- 接口测试
using EFCoreBooks;
using Microsoft.AspNetCore.Mvc;

namespace WebApplicationAboutLayered.Controllers
{
    [ApiController]
    [Route("api/[controller]")]
    public class Test1Controller : ControllerBase
    {

        private readonly MyDbContext dbCtx;
        private readonly MyDbPersonContext dbPersonCtx;

        public Test1Controller(MyDbContext dbCtx, MyDbPersonContext dbPersonCtx)
        {
            this.dbCtx = dbCtx;
            this.dbPersonCtx = dbPersonCtx;
        }

        [HttpGet]
        public string Demo1()
        {
            int c = dbCtx.Books.Count();
            int p = dbPersonCtx.Persons.Count();
            return $"c={c} + p={p}";
        }

    }
}
- 我们引入第三方库
Zack.Infrastructure来解决批量注册的问题- 主项目中安装
Install-Package Zack.Infrastructure - 原理: 利用反射,扫描所有的
DbContext,然后注册进来
- 主项目中安装
// Program.cs
......
builder.Services.AddSwaggerGen();

var asms = ReflectionHelper.GetAllReferencedAssemblies();
builder.Services.AddAllDbContexts(opt =>
{
    string connStr = builder.Configuration.GetSection("ConnStr").Value;
    opt.UseSqlServer(connStr);
},asms);

//builder.Services.AddDbContext<MyDbContext>(opt =>
//{
//    string connStr = builder.Configuration.GetSection("ConnStr").Value;
//    string connStr = builder.Configuration.GetSection("ConnStr").Value;
//});

//builder.Services.AddDbContext<MyDbPersonContext>(opt =>
//{
//    string connStr = builder.Configuration.GetSection("ConnStr").Value;
//    opt.UseSqlServer(connStr);
//});
- 效果和之前一模一样

 浙公网安备 33010602011771号