
C# Web开发教程(一)
学习曲线(DeepSeek推荐)
Web
- 语言基础
- 委托与事件(回调机制)
- 泛型(类型安全的集合操作)
- LINQ(数据查询语言集成)
- 异步编程(async/await 处理I/O密集型任务)
ASP.NET Core 框架
- MVC 模式:理解Model(数据)、View(界面)、Controller(逻辑)的分层协作

- Web API开发:构建RESTful服务,用于前后端分离架构

- 核心机制:

	- 中间件(Middleware:请求处理管道)

	- 依赖注入(DI:解耦组件依赖)

	- 配置系统(如appsettings.json)
-
数据库与ORM
- Entity Framework Core(EF Core):主流ORM,支持数据库操作面向对象化,自动生成SQL

- 数据库知识:基础SQL语句、事务管理、索引优化,搭配SQL Server/PostgreSQL等
进阶与架构
- 身份认证与授权:Cookie、JWT、OAuth2等安全方案

- 性能优化:缓存(Redis)、异步处理、负载均衡

- 部署与运维:Docker容器化、CI/CD流水线、Azure/AWS云部署
项目结构
.net core和.net framework的项目描述文件(xxx.csproj)是不一样的.net core描述简洁.net framework就比较啰嗦
// .net core 简洁

<Project Sdk="Microsoft.NET.Sdk">

  <PropertyGroup>
    <OutputType>Exe</OutputType>
    <TargetFramework>net5.0</TargetFramework>
  </PropertyGroup>

</Project>
// .net framework 详细(啰嗦)

<?xml version="1.0" encoding="utf-8"?>
<Project ToolsVersion="15.0" xmlns="http://schemas.microsoft.com/developer/msbuild/2003">
  <Import Project="$(MSBuildExtensionsPath)\$(MSBuildToolsVersion)\Microsoft.Common.props" Condition="Exists('$(MSBuildExtensionsPath)\$(MSBuildToolsVersion)\Microsoft.Common.props')" />
  <PropertyGroup>
    <Configuration Condition=" '$(Configuration)' == '' ">Debug</Configuration>
    <Platform Condition=" '$(Platform)' == '' ">AnyCPU</Platform>
    <ProjectGuid>{A847C939-DEDB-4E2E-B4AA-43D2714BE047}</ProjectGuid>
    <OutputType>Exe</OutputType>
    <RootNamespace>ConsoleApp1</RootNamespace>
    <AssemblyName>ConsoleApp1</AssemblyName>
    <TargetFrameworkVersion>v4.7.2</TargetFrameworkVersion>
    <FileAlignment>512</FileAlignment>
    <AutoGenerateBindingRedirects>true</AutoGenerateBindingRedirects>
    <Deterministic>true</Deterministic>
  </PropertyGroup>
  <PropertyGroup Condition=" '$(Configuration)|$(Platform)' == 'Debug|AnyCPU' ">
    <PlatformTarget>AnyCPU</PlatformTarget>
    <DebugSymbols>true</DebugSymbols>
    <DebugType>full</DebugType>
    <Optimize>false</Optimize>
    <OutputPath>bin\Debug\</OutputPath>
    <DefineConstants>DEBUG;TRACE</DefineConstants>
    <ErrorReport>prompt</ErrorReport>
    <WarningLevel>4</WarningLevel>
  </PropertyGroup>
  <PropertyGroup Condition=" '$(Configuration)|$(Platform)' == 'Release|AnyCPU' ">
    <PlatformTarget>AnyCPU</PlatformTarget>
    <DebugType>pdbonly</DebugType>
    <Optimize>true</Optimize>
    <OutputPath>bin\Release\</OutputPath>
    <DefineConstants>TRACE</DefineConstants>
    <ErrorReport>prompt</ErrorReport>
    <WarningLevel>4</WarningLevel>
  </PropertyGroup>
  <ItemGroup>
    <Reference Include="System" />
    <Reference Include="System.Core" />
    <Reference Include="System.Xml.Linq" />
    <Reference Include="System.Data.DataSetExtensions" />
    <Reference Include="Microsoft.CSharp" />
    <Reference Include="System.Data" />
    <Reference Include="System.Net.Http" />
    <Reference Include="System.Xml" />
  </ItemGroup>
  <ItemGroup>
    <Compile Include="Program.cs" />
    <Compile Include="Properties\AssemblyInfo.cs" />
  </ItemGroup>
  <ItemGroup>
    <None Include="App.config" />
  </ItemGroup>
  <Import Project="$(MSBuildToolsPath)\Microsoft.CSharp.targets" />
</Project>
- 注意事项
- ".net framework"的项目描述文件中,可能由于协同开发的原因,导致"xxx.csproj"文件冲突,版本冲突==
- ".net core"就没有这种问题(默认包含所有的文件),除非你手动排除它(右键,点击"排除项目")
- 知识点穿插
- 若想某些文件不参与项目,可以右键,然后点击"排除项目"
发布项目注意事项
✅ 启用 ReadyToRun 编译: 编译后的文件会变大,但是程序的速度和性能会得到提升

✅ 剪裁未使用的程序集(预览): 未用到的库会被删除(若使用动态反射之类的逻辑,要慎选)
新的安装库的方式NuGet
-
相当于
Python的pip命令,一键搞定所有的匹配库(以前很麻烦,要一个一个去找) -
安装方式
-
vs图形化安装(傻瓜式)
-
命令行安装:
-
- 打开"程序包管理器控制台"
- 粘贴命令(赋值PMC命令),例如: NuGet\Install-Package FluentFTP -Version 52.1.0
- 卸载命令,前面加Un即可,例如: NuGet\UnInstall-Package FluentFTP -Version 52.1.0
	- 偷懒方法: 连卸载都不用,在"xxx.csproj"文件中注释掉即可

    <Project Sdk="Microsoft.NET.Sdk">
  	......
      <ItemGroup>
      	<!--这行注释掉-->
        <PackageReference Include="FluentFTP" Version="52.1.0" />
      </ItemGroup>

    </Project>

- 更新到最新版: Update-Package xxx
-
-
-
知识点穿插: 公司内网部署
NuGet服务器,供开发团队使用
异步编程
-
通俗理解就两个字:不等
-
误解点解析
-
- 异步编程能提高服务器运行的效率吗? 不行,它只是提升服务器能同时处理请求的数量
	- 比如原本只能同时处理100个请求,现在能同时处理500个请求
	- 用户原本需要等待5秒的时候,现在还是等待5秒,只不过等待的这段时间,用户可以去做别的事情
-
-
传统开发方式和现在开发方式-
- 传统开发方式,多线程去实现异步,问题很多
- 现在开发方式, async 和 await 的方式,化简了传统多线程的开发方式,容易很多
-
-
异步方法就是用async关键字修饰的方法
- 返回值一般是Task<T>,例如 Task<int>
- 即使异步方法没有返回值,也最好把返回值声明为非泛型的Task
- 调用泛型方法时,一般在方法前加上"await",这样拿到的返回值就是泛型指定的T类型
- 一个方法中如果有await调用,则该方法必须加上async修饰("异步方法"的"传染性")
- 使用
普通方法示例: 文件写,读示例
using System;
using System.IO;

namespace ConsoleApp2
{
    class Program
    {
        static void Main(string[] args)
        {
            string filename = @"D:\VS2019\Temp\123.txt";
            File.WriteAllText(filename, "Hello");
            string s = File.ReadAllText(filename);
            Console.WriteLine(s);
        }
    }
}
- 使用
异步方法实现写入文件
using System;
using System.IO;
using System.Threading.Tasks;

namespace ConsoleApp2
{
    class Program
    {

       # async修饰,void修改为Task
       static async Task Main(string[] args)
        {

            string filename = @"D:\VS2019\Temp\123.txt";
            # 异步文件操作(如 WriteAllTextAsync)不会阻塞当前线程,适合 I/O 密集型操作
            # await修饰, 使用 File.WriteAllTextAsync 替代同步方法
            await File.WriteAllTextAsync(filename, "666");
            // 隐式返回 Task.CompletedTask(编译器自动处理,无需再显示返回)

        }
    }
}
- 小拓展,再调用读取的异步方法
using System;
using System.IO;
using System.Threading.Tasks;

namespace ConsoleApp2
{
    class Program
    {
       static async Task Main(string[] args)
        {
            string filename = @"D:\VS2019\Temp\123.txt";
            await File.WriteAllTextAsync(filename, "666");
            # 等待5秒以后再读
            await Task.Delay(5000);
            string content = await File.ReadAllTextAsync(filename);
            Console.WriteLine($"读取的内容: {content}");

        }
    }
}
释疑:await可以理解为智能等待,释放当前任务的线程,让它可以做别的事情,而不是让该线程一直等待任务结束- 注意事项: 如果有没有添加
await,调用异步方法的时候,就会出现不等,直接执行一段代码
- 注意事项: 如果有没有添加
await File.WriteAllTextAsync(...); // await智能等待,保证在文件写入完成后再执行下句代码
Console.WriteLine("在写入后执行");

var task = File.WriteAllTextAsync(...); // 调用异步方法,没有await,难以保证在文件写入完成后再执行下句代码
Console.WriteLine("立即执行"); // 此时文件写入可能未完成
- 实例: 下载某网站的html代码,保存到本地文件
using System;
using System.IO;
using System.Net.Http;
using System.Threading.Tasks;

namespace ConsoleApp2
{
    class Program
    {
        // static void Main(string[] args)
       static async Task Main(string[] args)
       {
            await DownloadHtmlAsync("https://www.youzack.com", @"D:\VS2019\Temp\123.txt");
       }

       // 自定义异步方法
       // 在异步编程中,单纯的Task表示没有返回值
       static async Task DownloadHtmlAsync(string url,string filename)
        {
        	// using语法糖用法
            using (HttpClient httpClient = new HttpClient())
            {
                string html = await httpClient.GetStringAsync(url);
                await File.WriteAllTextAsync(filename,html);
            }
        }
    }
}

- using语法糖解释: 编译器实际生成的代码如下

HttpClient client = new HttpClient();
try
{
    await client.GetStringAsync(url);
}
finally
{
    if (client != null)
        ((IDisposable)client).Dispose(); // 关键释放动作!
}

- 总的来说,两个作用
	- 保证HttpClient使用完以后,自动被释放出来(不被继续占用)
		- 好比图书馆借书,借的书应该及时归还,而不是看完以后,一直不还,别人就看不了
	- 语法糖,简化代码
- 把上述实例修改一下,变成带
返回值的实例
......

namespace ConsoleApp2
{
    class Program
    {

       static async Task Main(string[] args)
       {
            int res_num = await DownloadHtmlAsync("https://www.youzack.com", @"D:\VS2019\Temp\123.txt");
            Console.WriteLine($"OK...+{res_num}");
       }

		// Task<int>代表返回int类型(异步编程中,独有的返回值写法)
        static async Task<int> DownloadHtmlAsync(string url, string filename)
        {
            using (HttpClient httpClient = new HttpClient())
            {
                string html = await httpClient.GetStringAsync(url);
                await File.WriteAllTextAsync(filename, html);

                return html.Length;
            }
        }

    }
}
async和await原理解析
- 本质就是"语法糖",C#编译器在幕后做了很多工作
	- 比如把源码拆分成多个部分来分别执行
	- 比如"状态机"的调用

- 总结:
	- async方法会被C#编译器编译成一个类,会根据await调用切分成多个状态(对async方法的调用,实质就是对MoveNext的调用)
	- await看似在等待,经过编译以后,其实并没有等
- 注意事项: 当某些方法不支持
async和await的写法时(一般是非常老旧的项目),可以这么写,但是有风险(比如死锁,造成程序一直卡在那等,一直不动)
using System;
using System.IO;

namespace ConsoleApp4
{
    class Program
    {
        static void Main(string[] args)
        {
            Console.WriteLine("Hello World!");
            // WriteAllTextAsync是异步方法,意味着主程序不会卡在这里,会继续执行下面的代码
            // 但是,加上Wait()以后,主程序就会在这里等,等待这个IO结束以后,才继续执行下面的代码
            File.WriteAllTextAsync(@"D:\VS2019\Temp\123.txt", "xxxxxxxxxxxxxx").Wait();
            Console.ReadLine();
        }
    }
}

- 注意事项: 在控制台程序中使用 ".Wait()"是相对安全的,因为它只有一个主线程。但在有UI线程的程序(如Windows窗体或WPF程序)中,如果在UI线程上使用 ".Wait()" 可能会导致界面卡死(死锁)[就需要用更优雅的 await 方式],所以需要谨慎使用
- 有返回值的示例: 使用
Result来接收异步方法返回的结果
using System;
using System.IO;
using System.Threading.Tasks;


namespace ConsoleApp4
{
    class Program
    {
        static void Main(string[] args)
        {
            Console.WriteLine("Hello World!");
            // ReadAllTextAsync方法返回一个Task对象
            Task<string> t = File.ReadAllTextAsync(@"D:\VS2019\Temp\123.txt");
            // TaskObj.Result阻塞等待
            string res = t.Result;
            Console.WriteLine($"值为{res.Substring(0,6)}");
            Console.WriteLine("读取完成!");
        }
    }
}

- 关键操作:当访问".Result" 属性时:
    如果文件已读完,直接返回结果
    如果还在读取中,主线程会被阻塞(暂停执行),直到文件读取完成
    相当于说:"我不管你现在读没读完,我就在这等着,直到你给我结果"
- 注意事项: Result这种方式也容易出现死锁的现象,导致主程序一直在那边等,卡住...
- 在
lam表达式中,如何使用async和await,线程池实例
// 正常实例
using System;
using System.IO;
using System.Threading;
using System.Threading.Tasks;


namespace ConsoleApp4
{
    class Program
    {
        static void Main(string[] args)
        {
        	// 创建后台线程并加入无限打印任务
            ThreadPool.QueueUserWorkItem((obj) =>
            {
                while (true)
                {
                    Console.WriteLine("xxxxxxxxxx");
                }
            });
            // 前台线程(主线程)等待用户输入
            // 当主线程终止时,后台线程也随即终止
            Console.Read();
        }
    }
}

// 异步实例

using System;
using System.IO;
using System.Threading;
using System.Threading.Tasks;


namespace ConsoleApp4
{
    class Program
    {
        static void Main(string[] args)
        {

            ThreadPool.QueueUserWorkItem(async (obj) =>
            {
                while (true)
                {
                	// 由于是异步操作,当前线程会被线程池回收,提高效率
                	// 每次循环可能使用不同的线程(线程池动态分配)
                    await File.WriteAllTextAsync(@"D:\VS2019\Temp\123.txt", "yyyyyyyyyyyyyyy");
                    Console.WriteLine("xxxxxxxxxx");

                }
            });
            Console.Read();
        }
    }
}
- 实例演示: 发送网络请求以后,进行文件的写入与读取的异步操作
using System;
using System.IO;
using System.Net.Http;
using System.Threading;
using System.Threading.Tasks;


namespace ConsoleApp4
{
    class Program
    {
        static async Task Main(string[] args)
        {

          	// 发起网络请求异步操作
            using (HttpClient httpClient = new HttpClient())
            {
                string html = await httpClient.GetStringAsync("http://www.baid.com");
                Console.WriteLine(html);
            }

			// 等待网络请求异步操作结束以后,发起文件的写入与读取操作
            string myString = "66666666666666666666666666666666666";
            string fileName = @"D:\VS2019\Temp\123.txt";
            await File.WriteAllTextAsync(fileName, myString);
            Console.WriteLine("文件写入成功");
            await File.ReadAllTextAsync(fileName);
            Console.WriteLine("文件读取成功");
            Console.WriteLine("程序结束!");

        }
    }
}
正确理解:await的"接力"特性
// 示例代码
await Task1();   // 第一个await
await Task2();   // 第二个await
-
当遇到第一个
await时:- 如果Task1未完成 → 立即暂停当前方法,返回控制权
- 不会执行Task2,甚至不会启动Task2
- 整个方法在此"冻结"
-
当Task1完成后:
- 方法从第一个
await后恢复执行 - 开始执行Task2(启动第二个异步操作)
- 遇到第二个
await时,再次暂停
- 方法从第一个
关键点图解:
开始执行
↓
执行Task1() → 启动异步操作
↓
遇到await Task1 → [如果未完成] 暂停方法
↳ 控制权返回给调用者
↳ Task2甚至还没被调用!
↓
[Task1完成] → 恢复执行
↓
调用Task2() → 启动第二个异步操作
↓
遇到await Task2 → 再次暂停
原始代码的具体分析:
// 1. 启动网络请求
string html = await httpClient.GetStringAsync(...);

// 2. 文件写入操作
await File.WriteAllTextAsync(...);
-
执行流程:
- 先启动网络请求(
GetStringAsync返回Task<string>) - 立即遇到
await→ 如果请求未完成,方法在此暂停 - 文件写入操作根本不会执行,代码甚至还没运行到那一行!
- 先启动网络请求(
-
恢复条件:
- 只有当网络请求完成后
- 方法才会从
await后恢复 - 然后才开始执行文件写入操作
如何实现并行执行?
如果您希望两个操作同时进行,需要这样写:
// 同时启动两个任务(不等待)
var networkTask = httpClient.GetStringAsync("http://www.baidu.com");
var fileTask = File.WriteAllTextAsync(@"D:\Temp\123.txt", "content");

// 然后一起等待
await Task.WhenAll(networkTask, fileTask);
用现实世界比喻
假设您有两件事要做:
- 煮咖啡(耗时10分钟)
- 烤面包(耗时5分钟)
错误方式(顺序await):
await 煮咖啡(); // 站在咖啡机前等10分钟
await 烤面包(); // 然后才去烤面包
// 总耗时15分钟
正确并行方式:
var 咖啡任务 = 煮咖啡(); // 按下咖啡机按钮就走开
var 面包任务 = 烤面包(); // 按下烤面包机按钮

// 做其他事情...
await Task.WhenAll(咖啡任务, 面包任务); // 等两者都完成
// 总耗时10分钟
await的本质是:
-
不是"不等待",而是"优雅地等待"
-
在等待期间释放线程资源,但保持代码顺序
-
会有线程之间的切换,比如原来是线程1在处理,释放以后再继续处理,可能是线程2在处理
- 注意事项,也有可能是线程1继续在服务(任务立马完成了,根本不用等)
- 现实类比,接待服务员,然后你只点一个菜,接待服务员就顺手把这件事情做了,因为你立马完成,根本不需要等!
// 不是同一个线程示例
......

namespace ConsoleApp4
{
    class Program
    {
        static async Task Main(string[] args)
        {
			// 打印结果: 1
            Console.WriteLine(Thread.CurrentThread.ManagedThreadId);
            StringBuilder sb = new StringBuilder();
            for (int i = 0; i < 10000; i++)
            {
                sb.Append("XXXXXXXXXXXXXXXXXXXXXXXXXXXXXXXXXXXXXXXXXXX");
            }

            string fileName = @"D:\VS2019\Temp\123.txt";
            await File.WriteAllTextAsync(fileName, sb.ToString());
            // 打印结果 8
            Console.WriteLine(Thread.CurrentThread.ManagedThreadId);


        }
    }
}

- 注意事项: await 不会让后续代码立即执行,它表示:"等待这个异步操作完成,再继续执行后面的代码"

在等待期间:
当前线程被释放(不阻塞),可以处理其他任务,但后续代码不会执行

操作完成后:
由线程池分配线程,继续执行 await 之后的代码,线程ID可能变化

这种机制使得异步编程既能保持代码顺序的直观性,又能高效利用线程资源,避免阻塞。
// 同一个线程示例 ...... namespace ConsoleApp4 { class Program { static async Task Main(string[] args) { // 打印结果: 1 Console.WriteLine(Thread.CurrentThread.ManagedThreadId); StringBuilder sb = new StringBuilder(); // 更改之处 for (int i = 0; i < 2; i++) { sb.Append("XXXXXXXXXXXXXXXXXXXXXXXXXXXXXXXXXXXXXXXXXXX"); } string fileName = @"D:\VS2019\Temp\123.txt"; await File.WriteAllTextAsync(fileName, sb.ToString()); // 打印结果 1 Console.WriteLine(Thread.CurrentThread.ManagedThreadId); } } } - 注意事项: await 不会让后续代码立即执行,它表示:"等待这个异步操作完成,再继续执行后面的代码" 在等待期间: 当前线程被释放(不阻塞),可以处理其他任务,但后续代码不会执行 操作完成后: 由线程池分配线程,继续执行 await 之后的代码,线程ID可能变化 这种机制使得异步编程既能保持代码顺序的直观性,又能高效利用线程资源,避免阻塞。 - 注意事项,也有可能是线程1继续在服务(任务立马完成了,根本不用等)
-
-
要实现真正的并行,需要显式管理多个
Task对象 -
注意事项:
async和await并不一定是成对出现的,以下实例演示(看着异步,实质是同步)
using System;
using System.IO;
using System.Net.Http;
using System.Text;
using System.Threading;
using System.Threading.Tasks;


namespace ConsoleApp4
{
    class Program
    {
        static async Task Main(string[] args)
        {

			// 输出1
            Console.WriteLine("之前: " + Thread.CurrentThread.ManagedThreadId);
            double r = await CalcAsync(5000);
            Console.WriteLine($"r={r}");
            // 输出1
            Console.WriteLine("之后" + Thread.CurrentThread.ManagedThreadId);

        }


		// 自定义异步方法
        public static async Task<double> CalcAsync(int n)
        {
        	// 内部逻辑没有真正的异步操作(方法中没有使用await),这里输出1
            Console.WriteLine("CalcAsync: " + Thread.CurrentThread.ManagedThreadId);
            double res = 0;
            Random rand = new Random();
            for (int i = 0; i < n*n; i++)
            {
                res += rand.NextDouble();
            }
            return res;
        }
    }
}

- 线程行为特点:
    由于没有真正的异步操作,不会释放线程
    所有代码都在同一个线程上执行
    线程ID在整个过程中保持不变

- 缺少真正的异步操作:
    没有I/O操作(文件/网络)
    没有使用Task.Run或Task.Delay
    没有使用async方法中的await


......
namespace ConsoleApp4
{
    class Program
    {
        static async Task Main(string[] args)
        {

			// 输出1
            Console.WriteLine("之前: " + Thread.CurrentThread.ManagedThreadId);
            double r = await CalcAsync(5000);
            Console.WriteLine($"r={r}");
            // 输出4
            Console.WriteLine("之后" + Thread.CurrentThread.ManagedThreadId);

        }

		// 直接返回了 Task 对象,而不是在方法内部使用 await。这是实现异步方法的更高效方式
        public static Task<double> CalcAsync(int n)
        {
            // 使用Task.Run实现异步操作
            return Task.Run(() =>
            {
            	// 输出4
                Console.WriteLine("CalcAsync: " + Thread.CurrentThread.ManagedThreadId);
                double res = 0;
                Random rand = new Random();
                for (int i = 0; i < n * n; i++)
                {
                    res += rand.NextDouble();
                }
                return res;
            });
        }

    }
}

- 使用async 和 await 示例

	public static async Task<double> CalcAsync(int n)
        {
            return await Task.Run(() => {
                Console.WriteLine("CalcAsync: " + Thread.CurrentThread.ManagedThreadId);
                double res = 0;
                Random rand = new Random();
                for (int i = 0; i < n * n; i++)
                {
                    res += rand.NextDouble();
                }
                return res;
            });
        }
- 关键区别:直接返回 Task vs 使用 async/await

- 为什么不需要 async?
	- 没有使用 await,方法内部没有使用 await 关键字,async 关键字主要是为了在方法内使用 await,没有 await 就不需要 async

	- 直接返回 Task 对象:Task.Run() 已经返回了一个 Task<double> 对象,可以直接将这个 Task 返回给调用者,不需要额外的异步状态机制

- 编译器优化:当方法直接返回 Task 时,编译器不需要生成复杂的异步状态机,减少内存分配和方法调用的开销
- 在
同步方法中返回异步操作- 好处: 避免不必要的状态机开销,对于简单传递任务的情况,省略
async更高效
- 好处: 避免不必要的状态机开销,对于简单传递任务的情况,省略
using System;
using System.IO;
using System.Threading.Tasks;

namespace ConsoleApp5
{
    class Program
    {
        static async Task Main(string[] args)
        {
            Console.WriteLine("Hello World!");
            string res = await ReadFileTextAsync(1);
            Console.WriteLine($"结果为: {res}");

        }


		// 没有async修饰
        static Task<string> ReadFileTextAsync(int num)
        {
            if(num == 1)
            {
            	// 返回一个异步操作对象
                return File.ReadAllTextAsync(@"D:\VS2019\Temp\123.txt");
            }
            else if(num == 2)
            {	// 返回一个异步操作对象
                return File.ReadAllTextAsync(@"D:\VS2019\Temp\456.txt");
            }
            else
            {	// 同步处理异常
                throw new ArgumentException();
            }
        }
    }
}
- 修改成真正的
异步方法,实例如下
......

namespace ConsoleApp5
{
    class Program
    {
        static async Task Main(string[] args)
        {
           ......

        }


        // static Task<string> ReadFileTextAsync(int num)
        static async Task<string> ReadFileTextAsync(int num)
        {
            if(num == 1)
            {
            	// 新增await
                return await File.ReadAllTextAsync(@"D:\VS2019\Temp\123.txt");
            }
            else if(num == 2)
            {
            	// 新增await
                return await File.ReadAllTextAsync(@"D:\VS2019\Temp\456.txt");
            }
            else
            {
                throw new ArgumentException();
            }
        }
    }
}
异步方法中的暂停
- 使用 await Task.Delay(),而不是 Thread.sleep()[阻塞调用线程]
// 新建winForm程序
using System;
using System.Collections.Generic;
using System.ComponentModel;
using System.Data;
using System.Drawing;
using System.Linq;
using System.Net.Http;
using System.Text;
using System.Threading;
using System.Threading.Tasks;
using System.Windows.Forms;

namespace WindowsFormsApp1
{
    public partial class Form1 : Form
    {
        public Form1()
        {
            InitializeComponent();
        }

        private async void button1_Click(object sender, EventArgs e)
        {
            using (HttpClient httpClient = new HttpClient())
            {
                string s1 = await httpClient.GetStringAsync("https://www.youzack.com");
                textBox1.Text = s1.Substring(0,20);
				// 这种写法会造成窗体卡死(用户体验很不好)
                Thread.Sleep(5000);

                string s2 = await httpClient.GetStringAsync("https://www.youzack.com");
                textBox1.Text = s2.Substring(21, 40);
            }
        }
    }
}


// 修改为Task.Delay(5000)
......
namespace WindowsFormsApp1
{
    public partial class Form1 : Form
    {
        public Form1()
        {
            InitializeComponent();
        }

        private async void button1_Click(object sender, EventArgs e)
        {
            using (HttpClient httpClient = new HttpClient())
            {
                string s1 = await httpClient.GetStringAsync("https://www.youzack.com");
                textBox1.Text = s1.Substring(0,20);

                // Thread.Sleep(5000);
                // 不会堵塞主线程,窗体相应很丝滑,不会卡死,效果很好!
                await Task.Delay(5000);

                string s2 = await httpClient.GetStringAsync("https://www.youzack.com");
                textBox1.Text = s2.Substring(21, 40);
            }
        }
    }
}
-
异步方法中的CancellationToken参数: 提前终止执行的信号- 应用场景: 请求超时 && 用户取消请求
- 网络请求N次示例: 控制台持续输出网页源码N次
// 正常请求示例(没有添加cancellationToken)
using System;
using System.IO;
using System.Net.Http;
using System.Threading.Tasks;

namespace ConsoleApp5
{
    class Program
    {
        static async Task Main(string[] args)
        {
            Console.WriteLine("Hello World!");
            await DownloadAsync("https://www.youzack.com", 500);

        }

        static async Task DownloadAsync(string url,int num)
        {
            using (HttpClient client = new HttpClient())
            {
                for (int i = 0; i < num; i++)
                {
                    var html = await client.GetStringAsync(url);
                    Console.WriteLine($"{DateTime.Now}: {html}");
                }
            }
        }
    }
}
// 正常请求示例(添加cancellationToken) using System; using System.IO; using System.Net.Http; using System.Threading; using System.Threading.Tasks; namespace ConsoleApp5 { class Program { static async Task Main(string[] args) { // 创建取消令牌源 CancellationTokenSource cts = new CancellationTokenSource(); // 设置5秒后自动取消 cts.CancelAfter(5000); // 获取取消令牌 CancellationToken cToken = cts.Token; // 开始下载任务(下载100次) await DownloadAsync("https://www.youzack.com", 100, cToken); } static async Task DownloadAsync(string url, int num, CancellationToken cancellationToken) { using (HttpClient client = new HttpClient()) { // 循环下载num次(100次) for (int i = 0; i < num; i++) { // 异步获取网页内容 var html = await client.GetStringAsync(url); Console.WriteLine($"{DateTime.Now}: {html}"); // 检查是否收到取消请求 if (cancellationToken.IsCancellationRequested) { Console.WriteLine("请求被取消"); break; // 跳出循环 } } } } } } // 这里可以有另一种写法: 自动抛异常 static async Task DownloadAsync(string url,int num, CancellationToken cancellationToken) { using (HttpClient client = new HttpClient()) { for (int i = 0; i < num; i++) { ...... if (cancellationToken.IsCancellationRequested) { //Console.WriteLine("请求被取消"); //break; // 自动抛异常 cancellationToken.ThrowIfCancellationRequested(); } } } } // 获取响应的时候,还可以传递"取消令牌",实现自动触发异常(效果和上面的例子一模一样) static async Task DownloadAsync(string url,int num, CancellationToken cancellationToken) { using (HttpClient client = new HttpClient()) { for (int i = 0; i < num; i++) { // 传递取消令牌 var res = await client.GetAsync(url, cancellationToken); // var html = await client.GetStringAsync(url); // 获取响应内容 var html = await res.Content.ReadAsStringAsync(); Console.WriteLine($"{DateTime.Now}: {html}"); //if (cancellationToken.IsCancellationRequested) //{ // //Console.WriteLine("请求被取消"); // //break; // cancellationToken.ThrowIfCancellationRequested(); //} } } }实战经验: 在asp.net开发中,CancellationToken无需开发者处理,开发者需要的做的,仅仅是转发就够用了
-
Task类的重要方法
- 以下方法中,任何一个Task完成,Task就算完成
    - Task<Task>
    - WhenAny(IEnumerable<Task> tasks)

- 以下方法中,所有Task完成,Task才算完成,但不在乎执行顺序
	- Task<TResult[]>
	- WhenAll<TResult>(pamars Task<TResult[]tasks>)

- FromResult()创建普通数值的Task对象
WhenAll示例
 	static async Task Main(string[] args)
        {
            // 获取3个Task对象,传给WhenAll并发(顺序是不确定的,但保证所有任务完成)
            Task<string> t1 = File.ReadAllTextAsync(@"D:\VS2019\Temp\123.txt");
            Task<string> t2 = File.ReadAllTextAsync(@"D:\VS2019\Temp\456.txt");
            Task<string> t3 = File.ReadAllTextAsync(@"D:\VS2019\Temp\789.txt");

            string[] sList = await Task.WhenAll(t1,t2,t3);

            string s1 = sList[0];
            string s2 = sList[1];
            string s3 = sList[2];

            Console.WriteLine(s1);
            Console.WriteLine(s2);
            Console.WriteLine(s3);


        }
yield关键字
- 作用: 简化迭代器(Iterator) 的实现,它允许你按需生成序列中的元素(延迟执行),而无需一次性创建整个集合
- 意义: 当整个集合很大的时候,内存一次性加载所有的数据,鸭梨山大.如果分成"按需索取",性能会提升许多!
- 示例
// 不使用yield
......
namespace ConsoleApp5
{
    class Program
    {

        static void Main(string[] args)
        {
            var list1 = GetNumber(101);
            // 一次性释放所有
            Console.WriteLine($"[{string.Join(", ", list1)}]");
        }

		// 生成多条数据的数组
        static IEnumerable<int> GetNumber(int max)
        {
            var list = new List<int>();
            for (int i = 0; i < max; i++)
            {
                list.Add(i);
            }

            return list;
        }
    }
}


// yield示例
......
namespace ConsoleApp5
{
    class Program
    {

        static void Main(string[] args)
        {

            foreach(var num in GetNumber(1000000))
            {

                if (num > 100) break;
                Console.WriteLine(num);
            }


        }


        static IEnumerable<int> GetNumber(int max)
        {

            for (int i = 0; i < max; i++)
            {
                yield return i;
            }

        }

    }
}

// 读取文件示例

......

namespace ConsoleApp5
{
    class Program
    {

        static void Main(string[] args)
        {


            foreach (var line in ReadFileLines(@"D:\VS2019\Temp\123.txt"))
            {
                Console.WriteLine(line);
            }

        }


        static IEnumerable<string> ReadFileLines(string filePath)
        {
            using (var reader = new StreamReader(filePath))
            {
                while (!reader.EndOfStream)
                {
                	// 每次只加载一行,并记录下一次结果(节省性能开销)
                    yield return reader.ReadLine();
                }
            }
        }


    }
}
Linq模块
-
作用: 让数据处理变得更简单,无需自己再去自定义方法去处理数据
-
学习这个
模块的时候,需要先对委托和lam表达式有一定的了解 -
委托复习-
// 声明委托类型并运行(不带参,不带返回值) using System; namespace ConsoleApp6 { // 声明委托类型 delegate void MiddleTrader(); class Program { // 写这里也一样的效果 // delegate void MiddleTrader(); static void Main(string[] args) { // 可以看出,委托实际就是一种数据类型 MiddleTrader middleTrader = TestDeleate; middleTrader(); } static void TestDeleate() { Console.WriteLine("Test Delegate!!!"); } } } -
// 声明委托类型并运行(带参,带返回值)
using System;

namespace ConsoleApp6
{
    // delegate void MiddleTrader();
    class Program
    {
    	// 声明委托类型(带返回值,带参)
        delegate int MiddleTrader1(int i1,int i2);

        static void Main(string[] args)
        {
            //MiddleTrader middleTrader = TestDeleate;
            //middleTrader();

			// 应用
            MiddleTrader1 middleTrader1 = Add;
            var res1 = middleTrader1(1, 2);
            Console.WriteLine(res1);
        }

        static void TestDeleate()
        {
            Console.WriteLine("Test Delegate!!!");
        }

        static int Add(int a, int b)
        {
            return a+ b;
        }

    }
}
// 使用泛型委托示例(既能接受加法,也能接收字符串) using System; namespace ConsoleApp6 { class Program { // delegate int MiddleTrader1(int i1,int i2); // 声明泛型委托 delegate T ManyKind<T>(T a, T b); static void Main(string[] args) { ManyKind<int> manyKind1 = Add; var res1 = manyKind1(1, 2); Console.WriteLine(res1); ManyKind<string> manyKind2 = Cat; var res2 = manyKind2("king", "ing"); Console.WriteLine(res2); } static int Add(int a, int b) { return a + b; } static string Cat(string a, string b) { return a + b; } } }- 注意事项:
自定义委托在实战中应用的比较少,一般用微软写好的Action(无返回值)和Func(有返回值)
using System; namespace ConsoleApp6 { class Program { static void Main(string[] args) { // 声明action Action myAction = TestDeleate; myAction(); // Func实例 Func<int, int, int> CalAdd = Add; var res1 = CalAdd(1, 2); Console.WriteLine(res1); Func<string, string, string> CalConcat = Cat; var res2 = CalConcat("King", "ing"); Console.WriteLine(res2); } static void TestDeleate() { Console.WriteLine("Test Delegate!!!"); } static int Add(int a, int b) { return a + b; } static string Cat(string a, string b) { return a + b; } } } - 注意事项:
-
匿名委托: 旧写法用delegate来声明,新写法用lam表达式-
using System;

namespace ConsoleApp6
{

    class Program
    {


        static void Main(string[] args)
        {

            Action<string, int> myAction = delegate (string s, int i)
             {
                 Console.WriteLine($"{s}---{i}");
             };
            myAction("king",123);

            Func<int, int, int> myFunc = delegate (int i1, int i2)
              {
                  return i1 + i2;
              };
            var res1 = myFunc(1,2);
            Console.WriteLine(res1);

        }

    }
}

// 参数可以简写(编译器自动推断)
		Action<string, int> myAction = (s, i) =>
            {
                Console.WriteLine($"{s}---{i}");
            };
            myAction("king",123);

            Func<int, int, int> myFunc = (int i1, int i2) =>
              {
                  return i1 + i2;
              };

            var res1 = myFunc(1,2);
            Console.WriteLine(res1);

// 只有一行且没有返回值的简写
 Action myAction = () => Console.WriteLine("666");
 myAction();

 // 只有一行代码,可以省略return
 		Func<int, int, int> myFunc = (i1, i2) => i1 + i2;
         var res = myFunc(1, 2);
         Console.WriteLine(res);

 // 只有一个参数,可以省略括号
 Action<int> myAction = i => Console.WriteLine(i);
 myAction(666);
-
-
拓展方法
- 作用: 允许开发者在不修改
原始类型定义、不创建子类的前提下,"添加"新方法到现有类型(包括类、结构体、接口等) - 本质: 是
静态方法的语法糖,但可以像实例方法一样调用,极大提高了代码的可读性和流畅性 - 语法:
- "静态类"中的"静态方法"
	- 扩展方法必须在 static 类中定义为 static 方法

- this 关键字修饰第一个参数
	- 第一个参数前加 this 关键字,指明要扩展的类型和实例

- 调用方式
	- 通过被扩展类型的实例调用(如同调用自己的方法)
- 自定义实例演示
using System;

namespace ConsoleApp6
{

    class Program
    {


        static void Main(string[] args)
        {

           // 像调用实例方法那样,去调用该"拓展方法"
            Person p = new Person() { Name = "Jim Green" };
            p.Report();
        }
    }


	// 自定义类
    class Person
    {
        public string Name { get; set; }
    }

	// 静态类
    static class PersonExtension
    {
    	// 自定义静态方法,第一个参数为this
        public static void Report(this Person person)
        {
            Console.WriteLine($"姓名为: {person.Name}");
        }
    }
}
- 为
string类型添加拓展方法示例
using System;

namespace ConsoleApp6
{

    class Program
    {


        static void Main(string[] args)
        {

            // 使用
            string text = "Hello";
            string reversed = text.Reverse(); // 像实例方法一样调用
            Console.WriteLine(reversed); // 输出 "olleH"


        }
    }

    public static class StringExtensions // 必须是静态类
    {
        // this + 要扩展的类型(string)作为第一个参数
        public static string Reverse(this string input)
        {
            if (string.IsNullOrEmpty(input)) return input;
            char[] chars = input.ToCharArray();
            Array.Reverse(chars);
            return new string(chars);
        }
    }


}
- 底层原理
// 原始代码
text.Reverse();

// 编译后实际执行
StringExtensions.Reverse(text);
Linq实例
using System;
using System.Linq; // 必须引入Linq,数组才有where(where属于"拓展方法")

namespace ConsoleApp7
{
    class Program
    {
        static void Main(string[] args)
        {

            int[] nums = new int[] { 1,2,3,4,5,6,7,8,9 };
            // 使用where可以快速方便实现数据过滤的效果
            var res = nums.Where(a=>a>3);
            foreach (var item in res)
            {
                Console.WriteLine(item);
            }

        }
    }
}
// 自定义实例(稍显麻烦)

using System;
using System.Collections.Generic;
using System.Linq;

namespace ConsoleApp7
{
    class Program
    {
        static void Main(string[] args)
        {


            int[] nums = new int[] { 1,2,3,4,5,6,7,8,9 };
            // 运用
            var res = myWhere(nums, a => a > 3);
            foreach (var item in res)
            {
                Console.WriteLine(item);
            }

        }

		// IEnumerable<T>是泛型集合,这里T指定为Int
		// int类型数组显然符合这个条件
		// 最后再传入Func类型的函数对象(传入int,输出bool)f
        static IEnumerable<int> myWhere(IEnumerable<int> items,Func<int,bool> f)
        {
            List<int> res = new List<int>();
            foreach (var item in items)
            {
                if (f(item) == true)
                {
                    res.Add(item);
                }
            }

            return res;
        }
    }
}
// 性能优化自定义实例,变成yield

......
namespace ConsoleApp7
{
    class Program
    {
        static void Main(string[] args)
        {
            ......

        }

        static IEnumerable<int> myWhere(IEnumerable<int> items, Func<int, bool> f)
        {
            List<int> res = new List<int>();
            foreach (var item in items)
            {
                if (f(item) == true)
                {
                    // res.Add(item);
                    // 返回的是一个迭代器对象
                    yield return item;
                }
            }

            // return res;
        }

    }
}
Linq常用方法介绍,先初始化数据
// Employee.cs

using System;
using System.Collections.Generic;
using System.Linq;
using System.Text;
using System.Threading.Tasks;

namespace ConsoleApp8
{
    class Employee
    {
        public long Id { get; set; }
        public string Name { get; set; }
        public int Age { get; set; }

        public bool Gender { get; set; }

        public int Salary { get; set; }

        public override string ToString()
        {
            return $"Id={Id},Name={Name},Age={Age},Gender={Gender},Salary={Salary}";
        }

    }
}
Where方法: 筛选出符合条件的所有对象Count方法: 统计符合条件的数据个数Any方法: 只要集合中有一个对象满足条件,就返回true,否则返回false
using System;
using System.Collections.Generic;
using System.Linq;

namespace ConsoleApp8
{
    class Program
    {
        static void Main(string[] args)
        {

            List<Employee> list = new List<Employee>();
            initEmployee(list);
            // Where示例
            var res = list.Where(obj => obj.Age > 30);
            foreach (var obj in res)
            {
                Console.WriteLine(obj.Age);
            }
            // Count和Any示例
            Console.WriteLine(list.Count()); // 8
            Console.WriteLine(list.Count(obj=>obj.Age>30)); // 5
            Console.WriteLine(list.Count(obj=>obj.Age>30 && obj.Salary > 8000)); // 2

            Console.WriteLine(list.Any(obj=>obj.Salary > 8000)); // True
            Console.WriteLine(list.Any(obj=>obj.Salary > 800000)); // False


        }

		// 初始化数据
        static void initEmployee(List<Employee> list)
        {
            list.Add(new Employee { Id = 1, Name = "jerry", Age = 28, Gender = true, Salary = 5000 });
            list.Add(new Employee { Id = 2, Name = "jim", Age = 33, Gender = true, Salary = 3000 });
            list.Add(new Employee { Id = 3, Name = "lily", Age = 35, Gender = false, Salary = 9000 });
            list.Add(new Employee { Id = 4, Name = "lucy", Age = 16, Gender = false, Salary = 2000 });
            list.Add(new Employee { Id = 5, Name = "kimi", Age = 25, Gender = true, Salary = 1000 });
            list.Add(new Employee { Id = 6, Name = "nancy", Age = 35, Gender = false, Salary = 8000 });
            list.Add(new Employee { Id = 7, Name = "zack", Age = 35, Gender = true, Salary = 8500 });
            list.Add(new Employee { Id = 8, Name = "jack", Age = 33, Gender = true, Salary = 8000 });
        }


    }
}
- 获取一条数据的几种方法
- Single: 有且只有一条满足要求的数据(返回多条则触发异常)
- SingleOrDefault: 最多只有一条满足要求的数据(返回多条则触发异常,没有结果则返回null)
- First: 至少有一条,返回一条(没有则触发异常)
- FirstOrDefault: 返回第一条或默认值(null)
// Single演示

using System;
using System.Collections.Generic;
using System.Linq;

namespace ConsoleApp8
{
    class Program
    {
        static void Main(string[] args)
        {

            List<Employee> list = new List<Employee>();
            initEmployee(list);

            // 这种写法也是可以的,支持链式查询
            // var item = list.Where(obj => obj.Name == "jerry").Single();
            // 如果变成这句,由于返回了多条数据,Single会自动触发异常
            // IEnumerable<Employee> items = list.Where(obj => obj.Salary == 8000);
            IEnumerable<Employee> items = list.Where(obj => obj.Name == "jerry");

            // Single()会提取IEnumerable类型集合中,符合要求的Employee对象
            Employee item = items.Single();
            // Id=1,Name=jerry,Age=28,Gender=True,Salary=5000
            Console.WriteLine(item);


        }

        static void initEmployee(List<Employee> list)
        {
            list.Add(new Employee { Id = 1, Name = "jerry", Age = 28, Gender = true, Salary = 5000 });
            list.Add(new Employee { Id = 2, Name = "jim", Age = 33, Gender = true, Salary = 3000 });
            list.Add(new Employee { Id = 3, Name = "lily", Age = 35, Gender = false, Salary = 9000 });
            list.Add(new Employee { Id = 4, Name = "lucy", Age = 16, Gender = false, Salary = 2000 });
            list.Add(new Employee { Id = 5, Name = "kimi", Age = 25, Gender = true, Salary = 1000 });
            list.Add(new Employee { Id = 6, Name = "nancy", Age = 35, Gender = false, Salary = 8000 });
            list.Add(new Employee { Id = 7, Name = "zack", Age = 35, Gender = true, Salary = 8500 });
            list.Add(new Employee { Id = 8, Name = "jack", Age = 33, Gender = true, Salary = 8000 });
        }


    }
}
// SingleOrDefault演示
		   var res = list.SingleOrDefault(obj => obj.Name == "Tom");
            if(res == null)
            {
                Console.WriteLine("查询结果为空");
            }
            else
            {
                Console.WriteLine(res);
            }
            // 没找到数据,返回0
		   int[] nums = new int[] {1,2,3,4,5,6 };
		   // var data = nums.SingleOrDefault(num => num > 5); // 返回6
            var data = nums.SingleOrDefault(num => num > 10);
            Console.WriteLine(data);
var data = list.First(obj => obj.Salary == 8000);
// 有两条数据符合要求,但只选择第一条数据: Id=6,Name=nancy,Age=35,Gender=False,Salary=8000
Console.WriteLine(data);
排序的几种方法介绍
- OrderBy: 升序排列
- OrderByDescending: 降序排列
- ThenBy: 链式查询
		   //  var objs = list.OrderByDescending(obj => obj.Salary);
		   var objs = list.OrderBy(obj => obj.Salary);
            foreach (var obj in objs)
            {
                Console.WriteLine(obj.Salary);
            }

            1000
            2000
            3000
            5000
            8000
            8000
            8500
            9000

            // 数组排序示例
            List<int> nums = new List<int> {2,3,6,8,9,4,1 };
            var res = nums.OrderBy(num => num);
            foreach (var num in res)
            {
                Console.WriteLine(num);
            }

            // 链式查询
            var objs = list.OrderBy(obj => obj.Age).ThenBy(obj => obj.Salary);
            foreach (var obj in objs)
            {
                Console.WriteLine(obj);
            }
- Skip: 跳过几条数据
- Take: 获取几条数据
		   // 跳过两条数据,然后获取前三条数据
		   var objs = list.Skip(2).Take(3);
            foreach (var obj in objs)
            {
                Console.WriteLine(obj);
            }
聚合函数
- Max
- Min
- Average
- Count
- Sum
 var obj = list.Max(obj=>obj.Age);
 Console.WriteLine(obj);

 var res = list.Where(obj => obj.Age > 30).Average(obj => obj.Salary);
 Console.WriteLine(res);
GroupBy分组函数
// 根据年龄进行分组
var objSets = list.GroupBy(obj => obj.Age);
foreach (var objset in objSets)
{
	// Key就是"分组键",这里会被赋值为Age
    Console.WriteLine(objset.Key);
    // 统计每组Age中,Salary最大的记录
    Console.WriteLine(objset.Max(obj=>obj.Salary));

    foreach (var obj in objset)
    {
    Console.WriteLine(obj.Age);
    }
}

- 返回结果
28
28
33
33
33
35
35
35
35
16
16
25
25


// 如果想对分组以后的年龄进行排序,可以这么做
var objSets = list.GroupBy(obj => obj.Age).OrderBy(group=>group.Key);
投影: 把集合中的每一项转换成另一种类型
- Select(): 从集合中提取特定的值或转换元素
// 从Employee提取Age并转换为IEnumerable<int>类型集合
IEnumerable<int> groupSet = list.Select(obj => obj.Age);
foreach (int group in groupSet)
{
	Console.WriteLine(group);
}

Console.WriteLine("-------------------------");

var items = list.Where(obj => obj.Age > 30);
foreach (var item in items)
{
	Console.WriteLine(item);
}

- 返回结果:
28
33
35
16
25
35
35
33
-------------------------
Id=2,Name=jim,Age=33,Gender=True,Salary=3000
Id=3,Name=lily,Age=35,Gender=False,Salary=9000
Id=6,Name=nancy,Age=35,Gender=False,Salary=8000
Id=7,Name=zack,Age=35,Gender=True,Salary=8500
Id=8,Name=jack,Age=33,Gender=True,Salary=8000


// string类型实例
IEnumerable<string> groupSet = list.Select(obj => obj.Name);
foreach (string group in groupSet)
{
	Console.WriteLine(group);
}
Console.WriteLine("-------------------------");

- 返回结果:
jerry
jim
lily
lucy
kimi
nancy
zack
jack
-------------------------
- 使用
Select提取两个字段示例
IEnumerable<string> groupSet = list.Select(obj => obj.Name + "--" + obj.Age);
foreach (string group in groupSet)
{
	Console.WriteLine(group);
}

Console.WriteLine("-------------------------");

- 返回结果:
jerry--28
jim--33
lily--35
lucy--16
kimi--25
nancy--35
zack--35
jack--33
-------------------------
- 示例: 提取
Salary大于5000的记录,并根据Gender筛选男或者女
var items = list.Where(obj => obj.Salary > 5000).Select(obj=>obj.Gender?"男":"女");
foreach (var item in items)
{
    Console.WriteLine(item);
}

- 结果:
	女
    女
    男
    男
- 使用
Select实现类型转换示例
// Cat.cs

using System;
using System.Collections.Generic;
using System.Linq;
using System.Text;
using System.Threading.Tasks;

namespace ConsoleApp8
{
    class Cat
    {
        public string nickName { get; set; }
        public int Age { get; set; }
    }
}

// 主程序

IEnumerable<Cat> items = list.Select(obj => new Cat { nickName = obj.Name, Age = obj.Age });
// Cat类型
foreach (Cat item in items)
{
	Console.WriteLine($"{item.nickName}--{item.Age}");
}
匿名类型(使用Var来声明)
Cat c1 = new Cat { nickName = "Kitty" };
// 声明匿名类型
var obj1 = new { Name = "Jim", Age = 20, Hobby = "Basketball", Department = "Net" };
Console.WriteLine(c1.nickName);
// 输出 Net
Console.WriteLine(obj1.Department);
- 使用
Select从别的类型数据提取字段,然后填充给匿名类型示例
var itmes = list.Select(obj => new { Name = obj.Name, Age = obj.Age, Gender=obj.Gender?"男":"女" });
foreach (var item in itmes)
	{
		Console.WriteLine(item);
	}
集合转换
- ToArray(): 把IEnumerable<T>集合类型转换为"数组"
- ToList(): 把IEnumerable<T>集合类型转换为"列表"
IEnumerable<Employee> items = list.Where(obj => obj.Salary > 4500);
List<Employee> list1 = items.ToList();
Employee[] arr = items.ToArray();
查询语法(SQL语法的风格): 比较少用到,但要了解一下(看着别扭...)
 var items = from obj in list
 			where (obj.Salary > 4500)
 			select (new { Name = obj.Name, Age = obj.Age, Gender = obj.Gender ? "男" : "女" });


foreach (var item in items)
{
Console.WriteLine(item);
}
知识点穿插
- 在C#中,List(列表)和Array(数组)是两种完全不同的类型,它们具有显著区别
C# 中的区别
| 特性 | Array(数组) | List(列表) |
|---|---|---|
| 类型定义 | 固定长度数据结构(如 int[]) |
动态集合(泛型类 List) |
| 长度 | 创建后长度固定 | 长度动态可变(自动扩容) |
| 内存分配 | 连续内存块 | 内部基于数组实现,但封装了动态扩容逻辑 |
| 功能方法 | 基础操作(如索引访问) | 提供丰富方法(Add(), Remove(), Find()等) |
| 命名空间 | 语言内置(System.Array) |
System.Collections.Generic |
| 示例代码 | int[] arr = new int[5]; |
List list = new List(); |
关键差异:
- 长度可变性:数组长度固定,列表长度动态。
- 功能扩展:列表提供更多便捷方法(如添加、删除、搜索)。
- 性能:数组访问更快;列表在频繁插入/删除时可能触发扩容(有额外开销)。
依赖注入
- 通俗理解
- 自己发电:准备一大堆东东
- 用电厂的电(依赖注入)
- 引入实例: 从头到尾自己组装
using System;

namespace ConsoleApp9
{
    class Program
    {
        static void Main(string[] args)
        {

		   // 接口引用指向实现类对象
            ITestService t = new TestServiceImp1();
            t.Name = "Jim Green";
            t.SayHi();
        }
    }


    public class TestServiceImp1 : ITestService
    {
        public string Name { get; set; }
        public void SayHi()
        {
            Console.WriteLine($"I'm {Name}");
        }
    }

    public interface ITestService
    {
        public string Name { get; set; }
        public void SayHi() { }
    }

}
- 实例演示: 展示如何注册一个服务(TestServiceImp1)并从中获取实例,同时说明了服务的生命周期(这里是Transient)
using Microsoft.Extensions.DependencyInjection; // 引入依赖注入框架
using System;

namespace ConsoleApp9
{
    class Program
    {
        static void Main(string[] args)
        {

			// 创建服务容器
            ServiceCollection services = new ServiceCollection();
            // 将 TestServiceImp1 注册为瞬时(Transient)服务
            services.AddTransient<TestServiceImp1>();
            // 构建服务提供者
            using (ServiceProvider sp = services.BuildServiceProvider())
            {
            	// 解析服务
                TestServiceImp1 t = sp.GetService<TestServiceImp1>();
                t.Name = "Jim Green";
                t.SayHi();
            }


        }
    }


    public class TestServiceImp1 : ITestService
    {
        public string Name { get; set; }
        public void SayHi()
        {
            Console.WriteLine($"I'm {Name}");
        }
    }

    public interface ITestService
    {
        public string Name { get; set; }
        public void SayHi() { }
    }

}
- 服务生命周期
| 生命周期 | 注册方法 | 特点 |
|---|---|---|
| Transient | AddTransient<> |
每次请求创建新实例(最常用) |
| Scoped | AddScoped<> |
每个作用域一个实例(如 Web 请求) |
| Singleton | AddSingleton<> |
整个应用一个实例 |
- 引用
生命周期,检验是否属于同一对象
	static void Main(string[] args)
        {

            ServiceCollection services = new ServiceCollection();
            services.AddTransient<TestServiceImp1>();
            using (ServiceProvider sp = services.BuildServiceProvider())
            {
                TestServiceImp1 t = sp.GetService<TestServiceImp1>();
                t.Name = "Jim Green";
                t.SayHi();

				// 创建新示例
                TestServiceImp1 t1 = sp.GetService<TestServiceImp1>();
				// 返回False,说明AddTransient创建了两个实例
                Console.WriteLine(object.ReferenceEquals(t,t1));
            }


        }
- 补充说明
- using Microsoft.Extensions.DependencyInjection
	- 提供服务容器,服务注册,解析
static void Main(string[] args)
{
    // 创建服务容器
    ServiceCollection services = new ServiceCollection();

    // 注册服务
    services.AddTransient<TestServiceImp1>();

    // 构建服务提供者
    using (ServiceProvider sp = services.BuildServiceProvider())
    {
        // 解析服务
        TestServiceImp1 t = sp.GetService<TestServiceImp1>();
        t.Name = "Jim Green";
        t.SayHi();
    }
}
- 运行效果: 与直接
new对象的效果相同,但创建对象的方式由依赖注入容器管理
- 小结: 在小型项目中,DI 的优势可能不明显,甚至会觉得 "多此一举"。但在大型项目中,随着类数量增加、依赖关系复杂化,DI 带来的解耦、可维护性、可测试性等优势会变得至关重要,能显著降低团队协作成本和后期维护难度。这也是为什么几乎所有现代大型框架(如ASP.NET Core、Spring 等)都将依赖注入作为核心特性。
AddScoped实例演示
using Microsoft.Extensions.DependencyInjection;
using System;

namespace ConsoleApp9
{
    class Program
    {
        static void Main(string[] args)
        {

            ServiceCollection services = new ServiceCollection();
            // 将接口映射为TestServiceImp1类实例
            // 容器会创建 TestServiceImp1 类的实例,并以 ITestService 接口类型返回(多态特性)
            services.AddScoped<ITestService,TestServiceImp1>();
            using (ServiceProvider sp = services.BuildServiceProvider())
            {
				// 每次请求服务,就创建一个TestServiceImp1实例
                ITestService t = sp.GetService<ITestService>();
                // t 虽然声明为 ITestService 接口类型,但实际指向的是 TestServiceImp1 实例
                t.Name = "Jim Green";
                t.SayHi();

            }


        }
    }


    public class TestServiceImp1 : ITestService
    {
        public string Name { get; set; }
        public void SayHi()
        {
            Console.WriteLine($"I'm {Name}");
        }
    }

    public interface ITestService
    {
        public string Name { get; set; }
        public void SayHi() { }
    }

}
非泛型写法:替换一句代码,一模一样的效果(泛型的兼容性更好)
......

namespace ConsoleApp9
{
    class Program
    {
        static void Main(string[] args)
        {

            ......
            // services.AddScoped<ITestService,TestServiceImp1>();
            services.AddSingleton(typeof(ITestService),typeof(TestServiceImp1));
            using (ServiceProvider sp = services.BuildServiceProvider())
            {

              ......
            }


        }
    }

  .......

}
- 本质: 依然是建立
“接口 - 实例”的映射关系,并指定服务生命周期 - 手动
类型转换示例(看上去有点啰嗦)
......

namespace ConsoleApp9
{
    class Program
    {
        static void Main(string[] args)
        {

            ServiceCollection services = new ServiceCollection();
            services.AddScoped<ITestService, TestServiceImp1>();
            using (ServiceProvider sp = services.BuildServiceProvider())
            {
			   // 啰嗦
			   // typeof(ITestService)返回的是object对象,所以要转换一下类型
                ITestService t = (ITestService)sp.GetService(typeof(ITestService));
                t.Name = "Jim Green";
                t.SayHi();

            }

        }
    }


    public class TestServiceImp1 : ITestService
    {
        public string Name { get; set; }
        public void SayHi()
        {
            Console.WriteLine($"I'm {Name}");
        }
    }

    public interface ITestService
    {
        public string Name { get; set; }
        public void SayHi() { }
    }

}
GetRequiredService<T>(): 若服务容器中没有对应类型的T服务,则自动触发异常
using Microsoft.Extensions.DependencyInjection;
using System;

namespace ConsoleApp9
{
    class Program
    {
        static void Main(string[] args)
        {

            ServiceCollection services = new ServiceCollection();
            // 注册接口服务
            services.AddScoped<ITestService, TestServiceImp1>();
            using (ServiceProvider sp = services.BuildServiceProvider())
            {

                // ITestService t = sp.GetRequiredService<ITestService>();
                // 报错: 并没有找到对应的服务
                TestServiceImp1 t = sp.GetRequiredService<TestServiceImp1>();
                t.Name = "Jim Green";
                t.SayHi();

            }

        }
    }


    public class TestServiceImp1 : ITestService
    {
        public string Name { get; set; }
        public void SayHi()
        {
            Console.WriteLine($"I'm {Name}");
        }
    }

    public interface ITestService
    {
        public string Name { get; set; }
        public void SayHi() { }
    }

}

- 修复方式1: 注册TestServiceImp1服务(耦合性高,完全不推荐这种方式,类一多,根本忙不过来...)
......
services.AddScoped<ITestService, TestServiceImp1>();
services.AddScoped<TestServiceImp1>();
......

- 修复方式2: 手动强制转换类型
......
ITestService t = sp.GetRequiredService<ITestService>();
// 强制转换类型......
TestServiceImp1 t1 = (TestServiceImp1)t;
t1.Name = "Jim Green";
t1.SayHi();
- 注意事项
- GetRequiredService 与 GetService 的区别:
	- GetService<T>():当服务未注册时,返回 null。
	- GetRequiredService<T>():当服务未注册时,直接抛出异常(而不是返回 null),强制要求服务必须存在。
- 一个接口对应多个实现” 的注册与获取方式---
GetServices<>()
using Microsoft.Extensions.DependencyInjection;
using System;
using System.Collections.Generic;


namespace ConsoleApp9
{
    class Program
    {
        static void Main(string[] args)
        {

            ServiceCollection services = new ServiceCollection();
            // 同一个接口,注册为多个服务
            services.AddScoped<ITestService, TestServiceImp1>();
            services.AddScoped<ITestService, TestServiceImp2>();
            using (ServiceProvider sp = services.BuildServiceProvider())
            {

				// 获取服务集合,遍历展示
                IEnumerable<ITestService> items = sp.GetServices<ITestService>();
                foreach (var item in items)
                {
                	// ConsoleApp9.TestServiceImp1
				  // ConsoleApp9.TestServiceImp2
                    Console.WriteLine(item.GetType());
                }

            }

        }
    }


    public class TestServiceImp1 : ITestService
    {
        public string Name { get; set; }
        public void SayHi()
        {
            Console.WriteLine($"I'm {Name}");
        }
    }


	// 新增实现类
    public class TestServiceImp2 : ITestService
    {
        public string Name { get; set; }
        public void SayHi() { Console.WriteLine($"I'm {Name},I'm in TestServiceImp2"); }
    }

    public interface ITestService
    {
        public string Name { get; set; }
        public void SayHi() { }
    }


}
依赖注入针对类的构造函数,可以自动传参,大大方便了调用者
以下代码包含三个主要部分:
	- 接口定义:IConfig、IStorage、ILog 三个接口,定义了不同服务的规范。
	- 实现类:ConfigImp1、StorageImp1、LogImp1 分别实现上述接口,提供具体功能。
	- 控制器(Controller):作为业务逻辑的入口,依赖 ILog 和 IStorage 服务完成操作。
	- 依赖注入配置:在 Main 方法中注册服务并通过容器解析实例。
using System;
using Microsoft.Extensions.DependencyInjection;

namespace ConsoleApp10
{
    class Program
    {
        static void Main(string[] args)
        {

            var services = new ServiceCollection();

            services.AddScoped<Controller>();
            services.AddScoped<IStorage,StorageImp1>();
            services.AddScoped<ILog,LogImp1>();
            services.AddScoped<IConfig,ConfigImp1>();

            using (var sp = services.BuildServiceProvider())
            {
            	// 从容器获取 Controller 实例(自动注入其依赖的 ILog 和 IStorage)
                var c = sp.GetRequiredService<Controller>();
                c.Test();
            }

            Console.ReadLine();
        }
    }

    class ConfigImp1 : IConfig
    {
        public string GetValue(string value)
        {
            Console.WriteLine($"I'm in ConfigImp1,your value is {value}");
            return value;
        }
    }

	// 实现类:具体的存储逻辑,依赖 IConfig
    class StorageImp1 : IStorage
    {
        private readonly IConfig config;

		// 依赖关系:StorageImp1 依赖 IConfig,通过构造函数注入获取 IConfig 实例(无需手动 new,由 DI 容器自动提供)
        public StorageImp1(IConfig config)
        {
            this.config = config;
        }

        public string Save(string content,string name)
        {
            string server = config.GetValue("server");
            Console.WriteLine($"向服务器{server}的文件名为{name}上传{content}");
            return $"向服务器{server}的文件名为{name}上传{content},上传动作完成!";
        }
    }

    class LogImp1 : ILog
    {
        public string Log(string content)
        {
            Console.WriteLine($"I'm in LogImp1,your log is {content}");
            return $"I'm in LogImp1,your log is {content}";
        }
    }

    class Controller
    {
        private readonly ILog log; // 依赖注入的日志服务
        private readonly IStorage storage; // 依赖注入的存储服务

		// 依赖关系:通过构造函数注入获取 ILog 和 IStorage 实例,无需关心它们的具体实现和依赖(如 IStorage 依赖的 IConfig 由容器自动处理)
        public Controller(ILog log, IStorage storage)
        {
            this.log = log;
            this.storage = storage;
        }

        public void Test()
        {
            log.Log("开始上传");
            this.storage.Save("xxxxxxxxxxxxx", "1.txt");
            log.Log("上传完毕");
        }
    }

    interface IConfig
    {
        public string GetValue(string name);
    }

    interface IStorage
    {
        public string Save(string content, string name);
    }

    interface ILog
    {
        public string Log(string content);
    }
}


- 好处: 依赖链自动解析,当获取 Controller 实例时,容器会自动创建其依赖的 ILog(LogImp1)和 IStorage(StorageImp1);而 StorageImp1 依赖的 IConfig(ConfigImp1)也会被容器自动创建并注入,形成完整的依赖链。
- 注意事项
- 如果没有注册 services.AddScoped<ILog, LogImp1>() 和 services.AddScoped<IStorage, StorageImp1>(),调用 sp.GetRequiredService<Controller>() 时不会自动填充 Controller 构造函数的参数,反而会直接抛出异常

- 依赖注入容器的 “自动填充构造函数参数” 能力,完全依赖于预先注册的服务映射关系。只有当构造函数中所有参数的类型(或其实现)都已在容器中注册时,容器才能成功解析并创建实例

- 如果缺少任何一个依赖的注册,GetRequiredService<T>() 会直接报错
JSON配置
- 安装工具库
Microsoft.Extensions.configuration和Microsoft.Extensions.configuration.Json - 先用比较土的方式来读取配置
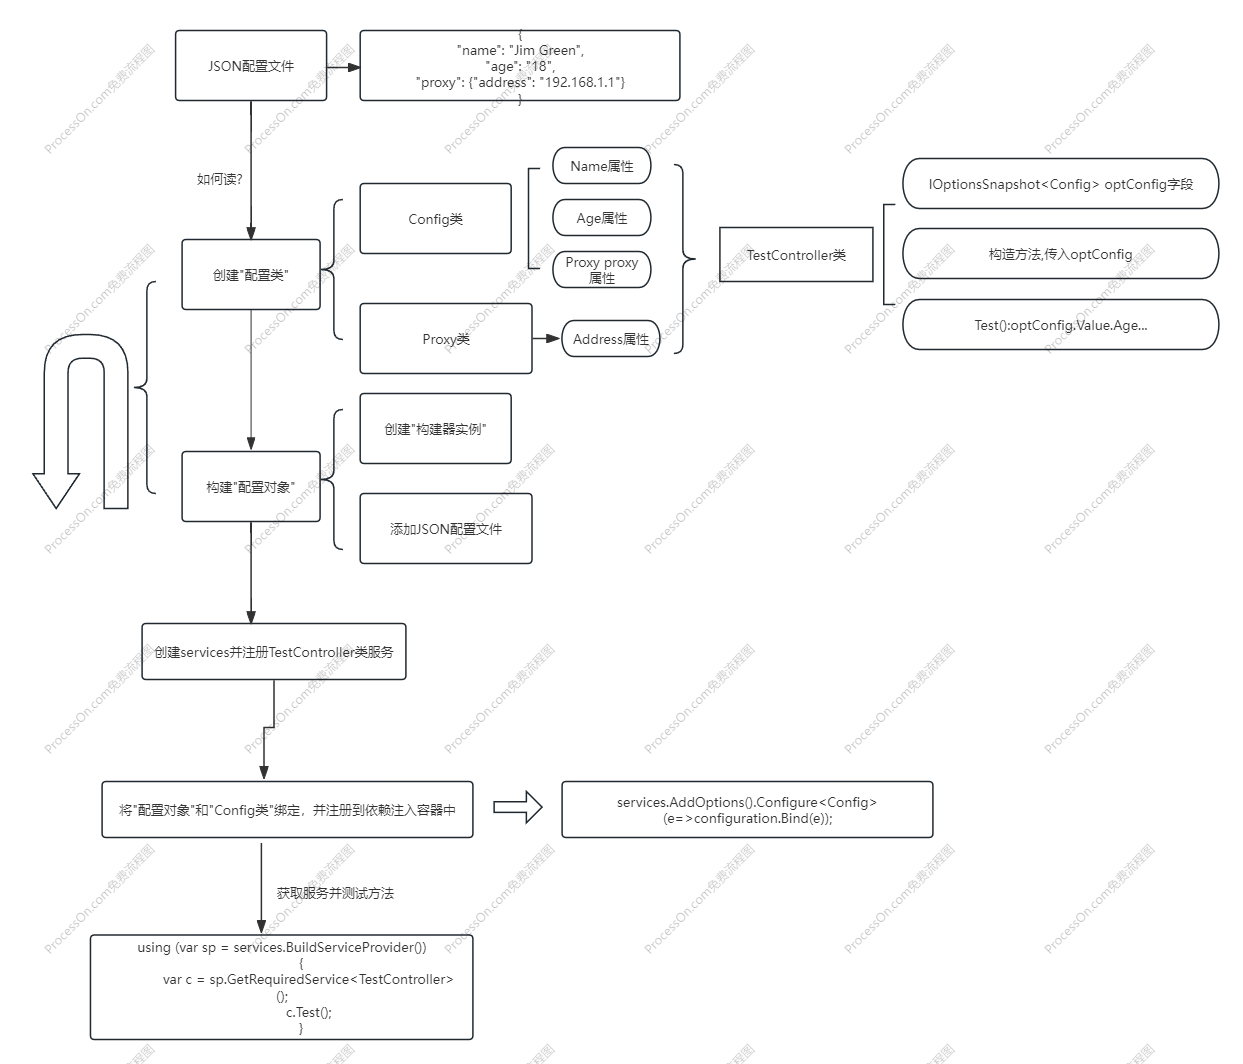
- 新建 config.json,放一点实验数据(文件属性-较新则复制)

{
  "name": "Jim Green",
  "age": "18",
  "proxy": {"address": "192.168.1.1"}
}
using System;
using Microsoft.Extensions.Configuration; // 引入配置库
using Microsoft.Extensions.Configuration.Json; // 引入json库

namespace ConsoleApp11
{
    class Program
    {
        static void Main(string[] args)
        {
            // 创建构建器容器实例
            ConfigurationBuilder configurationBuilder = new ConfigurationBuilder();
            // 把json文件加进容器实例
            // - optional: true:表示该文件是可选的(不存在也不会报错)
            //  - reloadOnChange: true:表示当文件内容变化时会重新加载配置
            configurationBuilder.AddJsonFile("config.json", optional: true, reloadOnChange: true);
            // 创建json文件对应的的配置实例
            IConfiguration configuration = configurationBuilder.Build();
            // 读取各个字段
            string name = configuration["name"];
            string age = configuration["age"];
            string proxyAddress = configuration["proxy:address"];  // 读取嵌套对象的属性,使用冒号分隔层级
            // Jim Green--18--192.168.1.1
            Console.WriteLine($"{name}--{age}--{proxyAddress}");

        }
    }
}

- 另一种读取配置文件的方式: 把
config.json当做一个类,然后读取配置
// 安装 Microsoft.Extensions.Configuration.Binder
// 实现目标: 从 JSON 配置文件中读取并解析嵌套的proxy配置信息,并将其映射到自定义的Proxy类对象

// 新建类

......
namespace ConsoleApp11
{
	// 对应配置文件
    class Proxy
    {
        public string Address { get; set; }
        public int Port { get; set; }

        // 修改默认的输出行为,返回Address
        public override string ToString()
        {
            return Address;
        }
    }

    class Config
    {
        public string Name { get; set; }
        public int Age { get; set; }
        public Proxy proxy { get; set; }
    }
}

// 主程序
using System;
using Microsoft.Extensions.Configuration;
using Microsoft.Extensions.Configuration.Json;

namespace ConsoleApp11
{
    class Program
    {
        static void Main(string[] args)
        {

            ConfigurationBuilder configurationBuilder = new ConfigurationBuilder();
            configurationBuilder.AddJsonFile("config.json", optional: true, reloadOnChange: true);
            IConfiguration configuration = configurationBuilder.Build();
            // - 从配置中获取proxy节点(对应 JSON 中的"proxy": {"address": "192.168.1.1"})
            // - 将proxy节点的内容自动映射到Proxy类的实例中(需要Proxy类定义与 JSON 结构匹配)
            Proxy proxy = configuration.GetSection("proxy").Get<Proxy>();
            // 192.168.1.1--80
            Console.WriteLine($"{proxy.Address}--{proxy.Port}");

            Console.ReadLine();


        }
    }
}

- 补充: 这里也可以映射整个config对象,然后通过config对象再点出来需要的值

ConfigurationBuilder configurationBuilder = new ConfigurationBuilder();
configurationBuilder.AddJsonFile("config.json", optional: true, reloadOnChange: true);
IConfiguration configuration = configurationBuilder.Build();

// 获取整个配置对象
var config = configuration.Get<Config>();
// - 点出现需要的值
Console.WriteLine($"{config.Name}--{config.Age}--{config.proxy}");
......
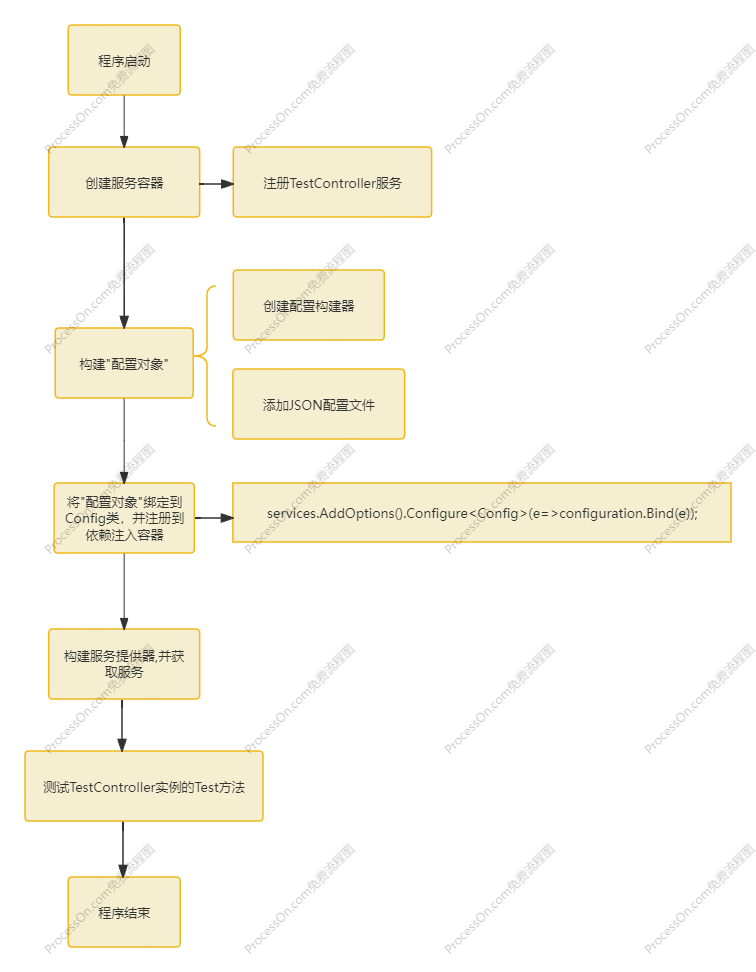
高级用法:配置类+依赖注入,实现读取配置文件并展示配置项的值(支持自动重新加载[当config.json文件内容变化])
// 安装 Microsoft.Extensions.Options;
// TestController.cs

using Microsoft.Extensions.Options;
using System;

namespace ConsoleApp11
{
	// 传入配置对象,输出配置对象的信息
    class TestController
    {
    	// 声明存储配置选项的快照对象(理解为就是配置对象)
        private readonly IOptionsSnapshot<Config> optConfig;

		// 新增构造方法,用于依赖注入
        public TestController(IOptionsSnapshot<Config> optConfig)
        {
            this.optConfig = optConfig;
        }

        public void Test()
        {
            Console.WriteLine(optConfig.Value.Age);
            Console.WriteLine("------------------");
            Console.WriteLine(optConfig.Value.Age);
        }
    }
}
// 主程序

using System;
using Microsoft.Extensions.Configuration;
using Microsoft.Extensions.Configuration.Json;
using Microsoft.Extensions.DependencyInjection;

namespace ConsoleApp11
{
    class Program
    {
        static void Main(string[] args)
        {


			// 创建服务容器并注册服务(指定声明周期)
            ServiceCollection services = new ServiceCollection();
            services.AddScoped<TestController>();

			// 构建指定的json文件配置对象
            ConfigurationBuilder configurationBuilder = new ConfigurationBuilder();
            configurationBuilder.AddJsonFile("config.json", optional: true, reloadOnChange: true);
            IConfiguration configuration = configurationBuilder.Build();

			// 将配置绑定到Config类,并注册到依赖注入容器
            services.AddOptions().Configure<Config>(e=>configuration.Bind(e));

			// 获取服务
            using (var sp = services.BuildServiceProvider())
            {
                var c = sp.GetRequiredService<TestController>();
                c.Test();
            }


        }
    }
}
- 新增第二个
配置类的依赖注入
......

namespace ConsoleApp11
{
    class TestController
    {
        ......
    }


    class TestProxy
    {
        private readonly IOptionsSnapshot<Proxy> optProxy;

        public TestProxy(IOptionsSnapshot<Proxy> optProxy)
        {
            this.optProxy = optProxy;
        }

        public void Test()
        {
            Console.WriteLine(optProxy.Value.Address);
        }

    }
}


using System;
using Microsoft.Extensions.Configuration;
using Microsoft.Extensions.Configuration.Json;
using Microsoft.Extensions.DependencyInjection;

namespace ConsoleApp11
{
    class Program
    {
        static void Main(string[] args)
        {


            ServiceCollection services = new ServiceCollection();
            services.AddScoped<TestController>();
            # 注册服务
            services.AddScoped<TestProxy>();

            ConfigurationBuilder configurationBuilder = new ConfigurationBuilder();
            configurationBuilder.AddJsonFile("config.json", optional: true, reloadOnChange: true);
            IConfiguration configuration = configurationBuilder.Build();

			# 把Proxy类和配置文件绑定并注册到依赖服务
            services.AddOptions().Configure<Config>(e => configuration.Bind(e))
                                 .Configure<Proxy>(e => configuration.GetSection("proxy").Bind(e));

            using (var sp = services.BuildServiceProvider())
            {
                var c = sp.GetRequiredService<TestController>();
                c.Test();

                var proxy = sp.GetRequiredService<TestProxy>();
                proxy.Test();
            }

        }
    }
}
命令行和环境变量的方式来调整配置文件
命令行配置方式
......
ConfigurationBuilder configurationBuilder = new ConfigurationBuilder();
// configurationBuilder.AddJsonFile("config.json", optional: true, reloadOnChange: true);
// 换成这句
configurationBuilder.AddCommandLine(args);
IConfiguration configuration = configurationBuilder.Build();

- 终端: D:\VS2019\Projects\Demo\ConsoleApp11\bin\Debug\net5.0>ConsoleApp11.exe name=Tom age=20

环境变量配置示例
- 先在系统的环境变量设置键值对
	- variable name: age
	- variable value: 18

......
 ConfigurationBuilder configurationBuilder = new ConfigurationBuilder();
 // 引入环境变量,导入配置
 configurationBuilder.AddEnvironmentVariables();
 IConfiguration configuration = configurationBuilder.Build();
 ......
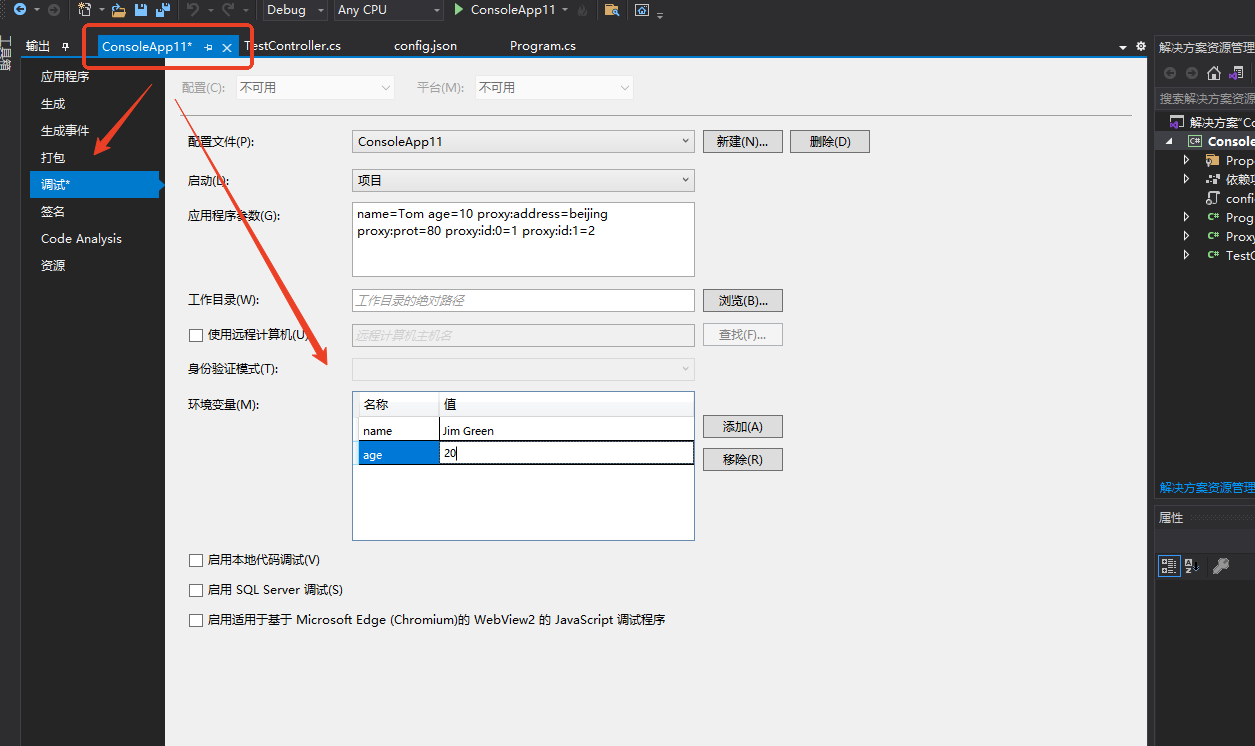
-
注意事项:
环境变量的命名方式不要和别的变量冲突,在命名方式上面要显著和其他变量区分开来,比如vs_xxx和vs_yyy -
多配置源
- 顺序: 顺序在后面的,会覆盖前面的配置,优先级比较高
......
configurationBuilder.AddEnvironmentVariables();
configurationBuilder.AddCommandLine(args);
# 最终的配置以"json文件"为主
configurationBuilder.AddJsonFile("config.json", optional: true, reloadOnChange: true);
......
UserSecrets:敏感信息配置(该文件不和项目文件一起存放,安装库单独放一个地方)
- 安装 Microsoft.Extensions.Configuration.UserSecrets
- 右键项目-管理用户机密-配置这个新生成的json文件,例如
	{
      "name": "Kate Green",
      "age": 188
    }

- 使用方法:
	ConfigurationBuilder configurationBuilder = new ConfigurationBuilder();
    configurationBuilder.AddEnvironmentVariables();
    # 新增配置
    configurationBuilder.AddUserSecrets<Program>();
    IConfiguration configuration = configurationBuilder.Build();
日志系统
日志级别:
- 依赖库: using Microsoft.Extensions.Logging;
- Trace < Debug < Information < Warning < Error < Critical
- LoggingProvider: 把日志输出到控制台,文件,数据库等待
- 日志测试实例: 通过
依赖注入获取日志服务并输出不同级别的日志信息
// TestLogger类

using Microsoft.Extensions.Logging;

namespace ConsoleAppLogSys12
{
    class TestLogger
    {
        private readonly ILogger<TestLogger> logger;

        public TestLogger(ILogger<TestLogger> logger)
        {
            this.logger = logger;
        }

        public void TestProgramLog()
        {
            logger.LogDebug("开始调试...logDebug");
            logger.LogWarning("开始调试...logWarning");
            logger.LogError("开始调试...logError");

        }
    }
}

// 主程序

using Microsoft.Extensions.DependencyInjection;
using Microsoft.Extensions.Logging;

namespace ConsoleAppLogSys12
{
    class Program
    {
        static void Main(string[] args)
        {

            ServiceCollection services = new ServiceCollection();
            services.AddScoped<TestLogger>();
			// 配置日志系统(添加控制台日志输出器)
            services.AddLogging(logBuilder => logBuilder.AddConsole());

            using (var sp = services.BuildServiceProvider())
            {
                var t1 = sp.GetRequiredService<TestLogger>();
                t1.TestProgramLog();
            }
        }
    }
}

- 运行结果:

warn: ConsoleAppLogSys12.TestLogger[0]
      开始调试...logWarning
fail: ConsoleAppLogSys12.TestLogger[0]
      开始调试...logError

 - 注意事项: 默认情况下,Debug 级别的日志可能不会显示,因为日志系统默认的最低日志级别是 Information,要显示 Debug 级别日志需要额外配置

            services.AddLogging(logBuilder => {
                logBuilder.AddConsole();
                // 新增这句
                logBuilder.SetMinimumLevel(LogLevel.Trace);
            });

dbug: ConsoleAppLogSys12.TestLogger[0]
      开始调试...logDebug
warn: ConsoleAppLogSys12.TestLogger[0]
      开始调试...logWarning
fail: ConsoleAppLogSys12.TestLogger[0]
      开始调试...logError
- 若想捕获"报错信息",可以这么写
......

namespace ConsoleAppLogSys12
{
    class TestLogger
    {
        ......

        public void TestProgramLog()
        {
            logger.LogDebug("开始调试...logDebug");
            ......

            try
            {
                File.ReadAllText("D:\\123.txt");
                logger.LogDebug("读取文件成功!!!");
            }
            catch(Exception ex)
            {
            	// 输出异常信息
                logger.LogError(ex, "读取文件失败!!!");
            }

        }
    }
}
Window系统专属---EventLog配置
- 安装using Microsoft.Extensions.Logging.EventLog;
- 查看: 事件管理器-Windows日志-应用程序
- 本次实例一直报错,故障还未解决: System.PlatformNotSupportedException:“EventLog access is not supported on this platform
......
using Microsoft.Extensions.Logging.EventLog;
using System.Runtime.InteropServices;
......

namespace ConsoleAppLogSys12
{
    class Program
    {
        static void Main(string[] args)
        {

          ......

            services.AddLogging(logBuilder =>
            {
                logBuilder.AddConsole();

                // 仅在 Windows 上添加 EventLog
                if (RuntimeInformation.IsOSPlatform(OSPlatform.Windows))
                {
                    logBuilder.AddEventLog();
                }


                logBuilder.SetMinimumLevel(LogLevel.Trace);
            });

            using (var sp = services.BuildServiceProvider())
            {
               ......
            }
        }
    }
}
Nlog库的使用: 把日志保存到独立的文件中
- Install-Package NLog.Extensions.Logging
- 项目根目录新建
nlog.config(文件属性-如果较新则复制,没这个配置,则不会生成文件)
<?xml version="1.0" encoding="utf-8" ?>
<nlog xmlns="http://www.nlog-project.org/schemas/NLog.xsd" xmlns:xsi="http://www.w3.org/2001/XMLSchema-instance"
      xsi:schemaLocation="http://www.nlog-project.org/schemas/NLog.xsd NLog.xsd">
	autoReload="true"
	internalLogLevel="Info"
	internalLogFile="d:\temp\internal-nlog-AspNetCore.txt">

	<!-- enable asp.net core layout renderers -->
	<extensions>
		<add assembly="NLog.Web.AspNetCore"/>
	</extensions>

	<!-- the targets to write to -->
	<targets>
		<!-- File Target for all log messages with basic details -->
		<target xsi:type="File" name="allfile" fileName="d:\temp\nlog-AspNetCore-all-${shortdate}.log"
				layout="${longdate}|${event-properties:item=EventId_Id:whenEmpty=0}|${level:uppercase=true}|${logger}|${message} ${exception:format=tostring}" />

		<!-- File Target for own log messages with extra web details using some ASP.NET core renderers -->
		<target xsi:type="File" name="ownFile-web" fileName="d:\temp\nlog-AspNetCore-own-${shortdate}.log"
				layout="${longdate}|${event-properties:item=EventId_Id:whenEmpty=0}|${level:uppercase=true}|${logger}|${message} ${exception:format=tostring}|url: ${aspnet-request-url}|action: ${aspnet-mvc-action}" />

		<!--Console Target for hosting lifetime messages to improve Docker / Visual Studio startup detection -->
		<target xsi:type="Console" name="lifetimeConsole" layout="${MicrosoftConsoleLayout}" />
	</targets>

	<!-- rules to map from logger name to target -->
	<rules>
		<!--All logs, including from Microsoft-->
		<logger name="*" minlevel="Trace" writeTo="allfile" />

		<!--Output hosting lifetime messages to console target for faster startup detection -->
		<logger name="Microsoft.Hosting.Lifetime" minlevel="Info" writeTo="lifetimeConsole, ownFile-web" final="true" />

		<!--Skip non-critical Microsoft logs and so log only own logs (BlackHole) -->
		<logger name="Microsoft.*" maxlevel="Info" final="true" />
		<logger name="System.Net.Http.*" maxlevel="Info" final="true" />

		<logger name="*" minlevel="Trace" writeTo="ownFile-web" />
	</rules>
</nlog>
- 注意事项
- 类似 internalLogFile="d:\temp\internal-nlog-AspNetCore.txt" 文件路径的配置,默认是在C盘,但是windows系统默认C盘需要很大的权限,所以这里修改为D盘比较稳妥,不然有可能碰到权限问题!
// 主程序

......
using NLog.Extensions.Logging; # 引入


namespace ConsoleAppLogSys12
{
    class Program
    {
        static void Main(string[] args)
        {

           ......

            services.AddLogging(logBuilder =>
            {
            	......
                logBuilder.AddConsole();
                # 新增
                logBuilder.AddNLog();
                logBuilder.SetMinimumLevel(LogLevel.Trace);
            });

            using (var sp = services.BuildServiceProvider())
            {
               ......
            }
        }
    }
}
- 运行结果
- nlog-AspNetCore-all-2025-08-12.log

	- 用于记录所有日志源的基础信息(包括系统框架、第三方库等),适合全面追踪程序运行状态,不区分是否为 Web 场景

- nlog-AspNetCore-own-2025-08-12.log

	- 主要用于记录应用自身业务日志,并附加 Web 上下文信息(如请求 URL、Action),适合 Web 应用中定位具体请求的问题

2025-08-12 09:25:37.6198|0|DEBUG|ConsoleAppLogSys12.TestLogger|开始调试...logDebug
2025-08-12 09:25:37.6571|0|WARN|ConsoleAppLogSys12.TestLogger|开始调试...logWarning
2025-08-12 09:25:37.6571|0|ERROR|ConsoleAppLogSys12.TestLogger|开始调试...logError
2025-08-12 09:25:37.7320|0|ERROR|ConsoleAppLogSys12.TestLogger|读取文件失败!!! System.IO.FileNotFoundException: Could not find file 'D:\123.txt'.
File name: 'D:\123.txt'
......
D:\VS2019\Projects\Demo\ConsoleAppLogSys12\TestLogger.cs:line 29
- 利用
nlog.config 配置,实现根据不同的命名空间输出各自的日志
// TestLogger.cs

......
namespace ConsoleAppLogSys12
{
    class TestLogger
    {
        private readonly ILogger<TestLogger> logger;

        public TestLogger(ILogger<TestLogger> logger)
        {
            this.logger = logger;
        }

        public void TestProgramLog()
        {
            logger.LogDebug("开始调试...logDebug");
            logger.LogWarning("开始调试...logWarning");
            logger.LogError("开始调试...logError");

            try
            {
                File.ReadAllText("D:\\123.txt");
                logger.LogDebug("读取文件成功!!!");
            }
            catch(Exception ex)
            {
                logger.LogError(ex, "读取文件失败!!!");
            }

        }
    }
}
// TestLogger2.cs

......
namespace SystemServers
{
    class TestLogger2
    {
        private readonly ILogger<TestLogger2> logger;

        public TestLogger2(ILogger<TestLogger2> logger)
        {
            this.logger = logger;
        }

        public void TestProgramLog2()
        {
            logger.LogDebug("开始调试...logDebug2");
            logger.LogWarning("开始调试...logWarning2");
            logger.LogError("开始调试...logError2");

            try
            {
                File.ReadAllText("D:\\456.txt");
                logger.LogDebug("读取文件成功2222!!!");
            }
            catch (Exception ex)
            {
                logger.LogError(ex, "读取文件失败222!!!");
            }

        }
    }
}
// 主程序

......

namespace ConsoleAppLogSys12
{
    class Program
    {
        static void Main(string[] args)
        {

            ServiceCollection services = new ServiceCollection();
            services.AddScoped<TestLogger>();
            services.AddScoped<TestLogger2>();

            services.AddLogging(logBuilder =>
            {
                logBuilder.AddConsole();
                // 关键配置
                logBuilder.AddNLog();
                logBuilder.SetMinimumLevel(LogLevel.Trace);
            });

            using (var sp = services.BuildServiceProvider())
            {
                var t = sp.GetRequiredService<TestLogger>();
                t.TestProgramLog();

                var t1 = sp.GetRequiredService<TestLogger2>();
                t1.TestProgramLog2();
            }
        }
    }
}
// nlog.config

<?xml version="1.0" encoding="utf-8" ?>
<nlog xmlns="http://www.nlog-project.org/schemas/NLog.xsd" xmlns:xsi="http://www.w3.org/2001/XMLSchema-instance"
      xsi:schemaLocation="http://www.nlog-project.org/schemas/NLog.xsd NLog.xsd">
	autoReload="true"
	internalLogLevel="Info"
	internalLogFile="d:\temp\internal-nlog-AspNetCore.txt">

	<!-- enable asp.net core layout renderers -->
	<extensions>
		<add assembly="NLog.Web.AspNetCore"/>
	</extensions>

	<targets>
		<!-- 控制台目标(targetConsole):输出到控制台 -->
		<target xsi:type="Console" name="targetConsole"
				layout="${longdate}|${level:uppercase=true}|${logger}|${message}" />

		<!-- 系统服务日志文件(sysServicesFile):记录SystemServers命名空间的日志 -->
		<!-- 系统服务日志文件(sysServicesFile):记录SystemServers命名空间的日志 -->
		<target xsi:type="File" name="SystemServersFile"
		fileName="d:\temp\nlog-system-servers-${shortdate}.log"
		layout="${longdate}|${level:uppercase=true}|${logger}|${message} ${exception:format=tostring}" />

		<!-- 默认日志文件(defaultFile):记录所有Warn及以上级别的日志 -->
		<target xsi:type="File" name="defaultFile"
				fileName="d:\temp\nlog-default-${shortdate}.log"
		layout="${longdate}|${level:uppercase=true}|${logger}|${message} ${exception:format=tostring}" />
	</targets>

	<!-- rules to map from logger name to target -->
	<rules>

		<!-- 调整规则顺序,确保SystemServers命名空间的日志优先处理 -->
		<logger name="SystemServers.*" minlevel="Trace" writeTo="SystemServersFile" final="true" />
		<!-- 修正目标名称引用 -->
		<logger name="*" minlevel="Warn" maxlevel="Fatal" writeTo="targetConsole" />
		<logger name="*" minlevel="Warn" writeTo="defaultFile" />
	</rules>
</nlog>
- 运行结果: 生成的日志文件各自输出log,各自独立,不互相影响
- nlog-default-2025-08-12.log
- nlog-system-servers-2025-08-12.log
// TestLogger类的输出内容
2025-08-12 10:27:03.9965|WARN|ConsoleAppLogSys12.TestLogger|开始调试...logWarning
2025-08-12 10:27:04.0164|ERROR|ConsoleAppLogSys12.TestLogger|开始调试...logError
2025-08-12 10:27:04.0932|ERROR|ConsoleAppLogSys12.TestLogger|读取文件失败!!! System.IO.FileNotFoundException: Could not find file 'D:\123.txt'.
......
D:\VS2019\Projects\Demo\ConsoleAppLogSys12\TestLogger.cs:line 29
// TestLogger2类的输出内容
2025-08-12 10:27:04.0932|DEBUG|SystemServers.TestLogger2|开始调试...logDebug2
2025-08-12 10:27:04.0932|WARN|SystemServers.TestLogger2|开始调试...logWarning2
2025-08-12 10:27:04.0932|ERROR|SystemServers.TestLogger2|开始调试...logError2
2025-08-12 10:27:04.1131|ERROR|SystemServers.TestLogger2|读取文件失败222!!! System.IO.FileNotFoundException: Could not find file 'D:\456.txt'.
......
D:\VS2019\Projects\Demo\ConsoleAppLogSys12\TestLogger2.cs:line 30
结构化日志配置库:Serilog
- 安装: Serilog.Asp.NetCore
- 作用: 输出json类型的日志
......

namespace ConsoleAppLogSys12
{
    class TestLogger
    {
        private readonly ILogger<TestLogger> logger;

        public TestLogger(ILogger<TestLogger> logger)
        {
            this.logger = logger;
        }

        public void TestProgramLog()
        {
            logger.LogDebug("开始调试...logDebug");
            logger.LogWarning("开始调试...logWarning");
            logger.LogError("开始调试...logError");

			// 新增
            User user = new User { Name="Jim Green",Email="xxxx@google.com" };
            logger.LogDebug("注册了一个{@person}", user);

            try
            {
                File.ReadAllText("D:\\123.txt");
                logger.LogDebug("读取文件成功!!!");
            }
            catch(Exception ex)
            {
                logger.LogError(ex, "读取文件失败!!!");
            }

        }
    }

    class User
    {
        public string Name { get; set; }
        public string Email { get; set; }
    }
}
// 主程序

......
using Serilog;
using Serilog.Formatting.Json;

namespace ConsoleAppLogSys12
{
    class Program
    {
        static void Main(string[] args)
        {

            ServiceCollection services = new ServiceCollection();
            services.AddScoped<TestLogger>();
            services.AddScoped<TestLogger2>();

            services.AddLogging(logBuilder =>
            {


				// 配置
                Log.Logger = new LoggerConfiguration()
                .MinimumLevel.Debug()
                .Enrich.FromLogContext()
                .WriteTo.Console(new JsonFormatter())
                .CreateLogger();
				// 将Serilog集成到Microsoft日志框架
                logBuilder.AddSerilog();


                logBuilder.SetMinimumLevel(LogLevel.Trace);
            });

            using (var sp = services.BuildServiceProvider())
            {
                var t = sp.GetRequiredService<TestLogger>();
                t.TestProgramLog();

               ......
            }
        }
    }
}
{"Timestamp":"2025-08-12T11:49:16.8586600+08:00","Level":"Debug","MessageTemplate":"开始调试...logDebug","Properties":{"SourceContext":"ConsoleAppLogSys12.TestLogger"}}
{"Timestamp":"2025-08-12T11:49:16.8951519+08:00","Level":"Warning","MessageTemplate":"开始调试...logWarning","Properties":{"SourceContext":"ConsoleAppLogSys12.TestLogger"}}
{"Timestamp":"2025-08-12T11:49:16.8953574+08:00","Level":"Error","MessageTemplate":"开始调试...logError","Properties":{"SourceContext":"ConsoleAppLogSys12.TestLogger"}}
}}
{"Timestamp":"2025-08-12T11:49:16.9740798+08:00","Level":"Error","MessageTemplate":"读取文件失败!!!","Exception":"System.IO.FileNotFoundException: Could not find file 'D:\\123.txt'.\r\nFile name: 'D:\\123.txt'\r\n   at System.IO.FileStream.ValidateFileHandle(SafeFileHandle fileHandle)\r\n   at System.IO.FileStream.CreateFileOpenHandle(FileMode mode, FileShare share, FileOptions options)\r\n   at System.IO.FileStream..ctor(String path, FileMode mode, FileAccess access, FileShare share, Int32 bufferSize, FileOptions options)\r\n   at System.IO.StreamReader.ValidateArgsAndOpenPath(String path, Encoding encoding, Int32 bufferSize)\r\n   at System.IO.StreamReader..ctor(String path, Encoding encoding, Boolean detectEncodingFromByteOrderMarks)\r\n   at System.IO.File.InternalReadAllText(String path, Encoding encoding)\r\n   at System.IO.File.ReadAllText(String path)\r\n   at ConsoleAppLogSys12.TestLogger.TestProgramLog() in D:\\VS2019\\Projects\\Demo\\ConsoleAppLogSys12\\TestLogger.cs:line 32","Properties":{"SourceContext":"ConsoleAppLogSys12.TestLogger"}}
{"Timestamp":"2025-08-12T11:49:17.0144093+08:00","Level":"Debug","MessageTemplate":"开始调试...logDebug2","Properties":{"SourceContext":"SystemServers.TestLogger2"}}
{"Timestamp":"2025-08-12T11:49:17.0145002+08:00","Level":"Warning","MessageTemplate":"开始调试...logWarning2","Properties":{"SourceContext":"SystemServers.TestLogger2"}}
{"Timestamp":"2025-08-12T11:49:17.0145608+08:00","Level":"Error","MessageTemplate":"开始调试...logError2","Properties":{"SourceContext":"SystemServers.TestLogger2"}}
{"Timestamp":"2025-08-12T11:49:17.0388197+08:00","Level":"Error","MessageTemplate":"读取文件失败222!!!","Exception":"System.IO.FileNotFoundException: Could not find file 'D:\\456.txt'.\r\nFile name: 'D:\\456.txt'\r\n   at System.IO.FileStream.ValidateFileHandle(SafeFileHandle fileHandle)\r\n   at System.IO.FileStream.CreateFileOpenHandle(FileMode mode, FileShare share, FileOptions options)\r\n   at System.IO.FileStream..ctor(String path, FileMode mode, FileAccess access, FileShare share, Int32 bufferSize, FileOptions options)\r\n   at System.IO.StreamReader.ValidateArgsAndOpenPath(String path, Encoding encoding, Int32 bufferSize)\r\n   at System.IO.StreamReader..ctor(String path, Encoding encoding, Boolean detectEncodingFromByteOrderMarks)\r\n   at System.IO.File.InternalReadAllText(String path, Encoding encoding)\r\n   at System.IO.File.ReadAllText(String path)\r\n   at SystemServers.TestLogger2.TestProgramLog2() in D:\\VS2019\\Projects\\Demo\\ConsoleAppLogSys12\\TestLogger2.cs:line 30","Properties":{"SourceContext":"SystemServers.TestLogger2"}}
- 如果想把
log输出到本地文件,这里可以这么配置
- 安装文件输出插件: Install-Package Serilog.Sinks.File
// 主程序中的 services.AddLogging 部分修改如下
services.AddLogging(logBuilder =>
{
    Log.Logger = new LoggerConfiguration()
        .MinimumLevel.Debug()
        .Enrich.FromLogContext()
        .WriteTo.Console(new JsonFormatter()) // 保留控制台输出(可选)
        // 添加文件输出配置
        .WriteTo.File(
            path: "logs/log.txt", // 日志文件路径(logs文件夹会自动创建)
            formatter: new JsonFormatter(), // 输出JSON格式(可选,也可改用文本格式)
            rollingInterval: RollingInterval.Day, // 按天滚动日志(每天一个文件)
            retainedFileCountLimit: 7, // 保留最近7天的日志文件
            encoding: Encoding.UTF8 // 编码格式
        )
        .CreateLogger();

    logBuilder.AddSerilog(); // 关键:将Serilog集成到日志框架
    logBuilder.SetMinimumLevel(LogLevel.Trace);
});
- 测试效果
- 项目根目录底下会生成 log目录-log20250812.txt

{"Timestamp":"2025-08-12T13:25:41.2995937+08:00","Level":"Debug","MessageTemplate":"开始调试...logDebug","Properties":{"SourceContext":"ConsoleAppLogSys12.TestLogger"}}
{"Timestamp":"2025-08-12T13:25:41.3691525+08:00","Level":"Warning","MessageTemplate":"开始调试...logWarning","Properties":{"SourceContext":"ConsoleAppLogSys12.TestLogger"}}
{"Timestamp":"2025-08-12T13:25:41.3694702+08:00","Level":"Error","MessageTemplate":"开始调试...logError","Properties":{"SourceContext":"ConsoleAppLogSys12.TestLogger"}}
{"Timestamp":"2025-08-12T13:25:41.4135421+08:00","Level":"Debug","MessageTemplate":"注册了一个{@person}","Properties":{"person":{"Name":"Jim Green","Email":"xxxx@google.com","_typeTag":"User"},"SourceContext":"ConsoleAppLogSys12.TestLogger"}}
{"Timestamp":"2025-08-12T13:25:41.4843319+08:00","Level":"Error","MessageTemplate":"读取文件失败!!!","Exception":"System.IO.FileNotFoundException: Could not find file 'D:\\123.txt'.\r\nFile name: 'D:\\123.txt'\r\n   at System.IO.FileStream.ValidateFileHandle(SafeFileHandle fileHandle)\r\n   at System.IO.FileStream.CreateFileOpenHandle(FileMode mode, FileShare share, FileOptions options)\r\n   at System.IO.FileStream..ctor(String path, FileMode mode, FileAccess access, FileShare share, Int32 bufferSize, FileOptions options)\r\n   at System.IO.StreamReader.ValidateArgsAndOpenPath(String path, Encoding encoding, Int32 bufferSize)\r\n   at System.IO.StreamReader..ctor(String path, Encoding encoding, Boolean detectEncodingFromByteOrderMarks)\r\n   at System.IO.File.InternalReadAllText(String path, Encoding encoding)\r\n   at System.IO.File.ReadAllText(String path)\r\n   at ConsoleAppLogSys12.TestLogger.TestProgramLog() in D:\\VS2019\\Projects\\Demo\\ConsoleAppLogSys12\\TestLogger.cs:line 32","Properties":{"SourceContext":"ConsoleAppLogSys12.TestLogger"}}
{"Timestamp":"2025-08-12T13:25:41.5504778+08:00","Level":"Debug","MessageTemplate":"开始调试...logDebug2","Properties":{"SourceContext":"SystemServers.TestLogger2"}}
{"Timestamp":"2025-08-12T13:25:41.5506034+08:00","Level":"Warning","MessageTemplate":"开始调试...logWarning2","Properties":{"SourceContext":"SystemServers.TestLogger2"}}
{"Timestamp":"2025-08-12T13:25:41.5506785+08:00","Level":"Error","MessageTemplate":"开始调试...logError2","Properties":{"SourceContext":"SystemServers.TestLogger2"}}
{"Timestamp":"2025-08-12T13:25:41.5910288+08:00","Level":"Error","MessageTemplate":"读取文件失败222!!!","Exception":"System.IO.FileNotFoundException: Could not find file 'D:\\456.txt'.\r\nFile name: 'D:\\456.txt'\r\n   at System.IO.FileStream.ValidateFileHandle(SafeFileHandle fileHandle)\r\n   at System.IO.FileStream.CreateFileOpenHandle(FileMode mode, FileShare share, FileOptions options)\r\n   at System.IO.FileStream..ctor(String path, FileMode mode, FileAccess access, FileShare share, Int32 bufferSize, FileOptions options)\r\n   at System.IO.StreamReader.ValidateArgsAndOpenPath(String path, Encoding encoding, Int32 bufferSize)\r\n   at System.IO.StreamReader..ctor(String path, Encoding encoding, Boolean detectEncodingFromByteOrderMarks)\r\n   at System.IO.File.InternalReadAllText(String path, Encoding encoding)\r\n   at System.IO.File.ReadAllText(String path)\r\n   at SystemServers.TestLogger2.TestProgramLog2() in D:\\VS2019\\Projects\\Demo\\ConsoleAppLogSys12\\TestLogger2.cs:line 30","Properties":{"SourceContext":"SystemServers.TestLogger2"}}
- 注意事项: 如果注释掉
formatter参数,则输出非JSON格式的日志
operties":{"SourceContext":"SystemServers.TestLogger2"}}
2025-08-12 13:28:34.976 +08:00 [DBG] 开始调试...logDebug
2025-08-12 13:28:35.045 +08:00 [WRN] 开始调试...logWarning
2025-08-12 13:28:35.045 +08:00 [ERR] 开始调试...logError
2025-08-12 13:28:35.060 +08:00 [DBG] 注册了一个{"Name":"Jim Green","Email":"xxxx@google.com","$type":"User"}
2025-08-12 13:28:35.131 +08:00 [ERR] 读取文件失败!!!
System.IO.FileNotFoundException: Could not find file 'D:\123.txt'.
File name: 'D:\123.txt'
   at System.IO.FileStream.ValidateFileHandle(SafeFileHandle fileHandle)
   at System.IO.FileStream.CreateFileOpenHandle(FileMode mode, FileShare share, FileOptions options)
   at System.IO.FileStream..ctor(String path, FileMode mode, FileAccess access, FileShare share, Int32 bufferSize, FileOptions options)
   at System.IO.StreamReader.ValidateArgsAndOpenPath(String path, Encoding encoding, Int32 bufferSize)
   at System.IO.StreamReader..ctor(String path, Encoding encoding, Boolean detectEncodingFromByteOrderMarks)
   at System.IO.File.InternalReadAllText(String path, Encoding encoding)
   at System.IO.File.ReadAllText(String path)
   at ConsoleAppLogSys12.TestLogger.TestProgramLog() in D:\VS2019\Projects\Demo\ConsoleAppLogSys12\TestLogger.cs:line 32
2025-08-12 13:28:35.193 +08:00 [DBG] 开始调试...logDebug2
2025-08-12 13:28:35.193 +08:00 [WRN] 开始调试...logWarning2
2025-08-12 13:28:35.193 +08:00 [ERR] 开始调试...logError2
2025-08-12 13:28:35.217 +08:00 [ERR] 读取文件失败222!!!
System.IO.FileNotFoundException: Could not find file 'D:\456.txt'.
File name: 'D:\456.txt'
   at System.IO.FileStream.ValidateFileHandle(SafeFileHandle fileHandle)
   at System.IO.FileStream.CreateFileOpenHandle(FileMode mode, FileShare share, FileOptions options)
   at System.IO.FileStream..ctor(String path, FileMode mode, FileAccess access, FileShare share, Int32 bufferSize, FileOptions options)
   at System.IO.StreamReader.ValidateArgsAndOpenPath(String path, Encoding encoding, Int32 bufferSize)
   at System.IO.StreamReader..ctor(String path, Encoding encoding, Boolean detectEncodingFromByteOrderMarks)
   at System.IO.File.InternalReadAllText(String path, Encoding encoding)
   at System.IO.File.ReadAllText(String path)
   at SystemServers.TestLogger2.TestProgramLog2() in D:\VS2019\Projects\Demo\ConsoleAppLogSys12\TestLogger2.cs:line 30

 浙公网安备 33010602011771号