

使用 bootchart 和 perfetto 分析 Android 开机性能
使用 bootchart 和 perfetto 分析 Android 开机性能
注意:本文基于 Android 14 撰写
Qidi 2025.06.24
0. 需求
项目 bringup 阶段,通常有缩短开机时间的要求。因此,就需要检查开机时的所有进程的整体状态,以及个别关键进程的启动时机。bootchart 和 perfetto 给我们提供了这样的能力。
1. 使用 bootchart
bootchart 是一款 Linux 下的开机性能分析和可视化工具。更多信息请参考 此页面。
Android 采用 Linux 内核,因此也适配了 bootchart 用于抓取开机报告。
1.1 抓取开机 trace 生成报告
通过创建/删除文件来控制是否抓取开机 trace。命令:
adb shell "touch /data/bootchart/enabled"
然后重启系统,就能在相同目录下看到开机 trace 文件了。如下:
xxxx:/data/bootchart # ls -lh
total 12M
-rw-rw-rw- 1 root root    0 2020-01-01 03:16 enabled
-rw-rw-rw- 1 root root 1.2K 1970-01-01 08:00 header
-rw-rw-rw- 1 root root 896K 2020-01-01 03:18 proc_diskstats.log
-rw-rw-rw- 1 root root  23M 2020-01-01 03:18 proc_ps.log
-rw-rw-rw- 1 root root 344K 2020-01-01 03:18 proc_stat.log
如果你的开发环境是 Linux,那么可以使用 AOSP 代码仓中的 $ANDROID_BUILD_TOP/system/core/init/grab-bootchart.sh 脚本来自动拉取、解析 trace 文件并以图片形式生成开机报告。要使用该脚本,需要先部署、配置 pybootchartgui:
$ git clone https://github.com/xrmx/bootchart.git
$ cd bootchart/pybootchartgui
$ mv main.py.in main.py
如果你的开发环境是 Windows,那么你可以仿照上述 shell 脚本内容自己手敲命令,或使用我编写的 bat 脚本进行自动配置、处理:
::::::::::::::::::::::::::::::::::::::::::::::::::::::::::
::
:: This script is a Windows equivalent version of
:: $ANDROID_BUILD_TOP/system/core/init/grab-bootchart.sh
::
:: Besides, if you didn't setup pybootchartgui environment,
:: then this script automatically preparing it for you.
::
:: Author : huang_qi_di@hotmail.com
:: Date   : 06/24/2025
::
::::::::::::::::::::::::::::::::::::::::::::::::::::::::::
@echo off

setlocal EnableDelayedExpansion

where adb 1>nul 2>nul
if !errorlevel! neq 0 (
  echo ERROR: adb command not found, please install.
  echo.
  goto end
)

set WORKDIR=%CD%
set TMPDIR=.\tmp\android-bootchart
rmdir /q /s %TMPDIR% 1>nul 2>nul
mkdir %TMPDIR%

set LOGROOT=/data/bootchart
set FILES="header proc_stat.log proc_ps.log proc_diskstats.log"
set TARBALL=bootchart.tgz
set WATCHEDPROCESS=com.gwm.app.launcher

echo Waiting for ADB connection...
adb wait-for-device

if "%1"=="-c" (
  adb shell rm /data/bootchart/* 1>nul 2>nul
  echo INFO: on-device cached bootchart trace cleared.
  echo.
)

adb shell ls /data/bootchart/enabled 1>nul 2>nul
if !errorlevel! neq 0 (
  set /p ENABLE=INFO: bootchart is disabled. Enable function and reboot? [y/n]
  if "!ENABLE!"=="y" (
    echo Enabling bootchart function...
    adb shell touch /data/bootchart/enabled
    echo Rebooting device...
    adb reboot
  )
  goto end
)

set ADBFILES=!FILES!
:loop
for /f "tokens=1,*" %%i in (!ADBFILES!) do (
::  echo process: %%i		remaining: %%j
  adb pull %LOGROOT%/%%i %TMPDIR%\%%i
  set ADBFILES="%%j"
)
if !ADBFILES!=="" (
  echo.
) else (
  goto loop
)

where tar 1>nul 2>nul
if !errorlevel! neq 0 (
  echo ERROR: tar command not found, please install.
  echo.
  goto end
)
cd %TMPDIR%
set FILES=%FILES:~1,-1%
tar -czf %TARBALL% !FILES!

python --version | findstr "Python" 1>nul 2>nul
if !errorlevel! neq 0 (
  echo ERROR: python command not found, please install.
  echo.
  goto end
)
pip list | findstr /i "cairo" 1>nul 2>nul
if !errorlevel! neq 0 (
  echo INFO: pycairo not found, try fixing...
  echo.
  pip install pycairo
)
pip list | findstr /i "cairo" 1>nul 2>nul
if !errorlevel! neq 0 (
  echo ERROR: pycairo not found, please install.
  echo.
  goto end
)

cd %WORKDIR%

if not exist .\bootchart\pybootchartgui.py (
  echo INFO: pybootchartgui not found, try fixing...
  echo.
  where curl 1>nul 2>nul
  if !errorlevel! equ 0 (
    curl https://codeload.github.com/xrmx/bootchart/zip/refs/heads/master --output bootchart-master.zip
    tar -xzvf .\bootchart-master.zip
    if !errorlevel! equ 0 (
      rename bootchart-master bootchart
      copy bootchart\pybootchartgui\main.py.in bootchart\pybootchartgui\main.py
    ) else (
      del .\bootchart-master.zip
    )
  )
)
if not exist .\bootchart\pybootchartgui.py (
  echo FAILED: unable to fix, please download pybootchartgui manually from https://github.com/xrmx/bootchart
  echo.
  goto end
)

python .\bootchart\pybootchartgui.py --show-pid --annotate=%WATCHEDPROCESS% --annotate-file=.\%WATCHEDPROCESS%.description %TMPDIR%\%TARBALL%

echo Clean up %TMPDIR%\ and .\%TARBALL:~0,-4%.png when done

:end
生成的开机报告是一张名为 bootchart.png 的图片。
注意,只要设备上 /data/bootchart/enabled 文件存在,那么每次开机时系统都会抓取 trace。如果不需要抓取了,请手动删除 enabled 文件。
1.2 分析开机报告
bootchart 开机报告的时间线是从 init 进程启动开始计算的,所以不包括驱动模块的加载时间;也无法从图中得知 init 进程的启动时机。
bootchart.png 看起来类似下图:

从 bootchart.png 图中我们可以看出以下信息:
- 各主要系统进程是否及时启动;
- CPU 和 磁盘 在开机过程中的整体负载情况;
- 某进程的启动时机是否晚于预期;
- 某进程启动时的 CPU 消耗、忙闲情况;
- 某进程在开机过程中是否存在崩溃、重启;
- 如果进程A的功能依赖于进程B,进程B是否及时启动;
- launcher 进程的启动时机(意味着用户可以触屏操作)。
2. 使用 perfetto
Android 13 及以上的版本支持抓取 perfetto 格式的开机 trace。抓取方法在 官方页面 上详细的说明。概括起来为以下几步:
- 根据需求创建你自己的
boottrace.pbtxt配置文件; - 将配置文件 push 到设备的
/data/misc/perfetto-configs/路径下; setprop persist.debug.perfetto.boottrace 1设置属性值启用 trace 抓取功能;- 重启设备,抓取开机 trace,等待配置文件中
duration_ms设置项所设置的时长; - 将设备上的
/data/misc/perfetto-traces/boottrace.perfetto-trace文件 pull 到本地; - 从 ui.perfetto.dev 页面导入 trace 文件,然后就可以开始分析开机过程的状态了。
官方页面上给出的 boottrace.pbtxt 参考配置文件如下:
# One buffer allocated within the central tracing binary for the entire trace,
# shared by the two data sources below.
buffers {
  size_kb: 32768
  fill_policy: DISCARD
}

# Ftrace data from the kernel, mainly the process scheduling events.
data_sources {
  config {
    name: "linux.ftrace"
    target_buffer: 0
    ftrace_config {
      ftrace_events: "sched_switch"
      ftrace_events: "sched_waking"
      ftrace_events: "sched_wakeup_new"

      ftrace_events: "task_newtask"
      ftrace_events: "task_rename"

      ftrace_events: "sched_process_exec"
      ftrace_events: "sched_process_exit"
      ftrace_events: "sched_process_fork"
      ftrace_events: "sched_process_free"
      ftrace_events: "sched_process_hang"
      ftrace_events: "sched_process_wait"
    }
  }
}

# Resolve process commandlines and parent/child relationships, to better
# interpret the ftrace events, which are in terms of pids.
data_sources {
  config {
    name: "linux.process_stats"
    target_buffer: 0
  }
}

# 10s trace, but can be stopped prematurely via `adb shell pkill -u perfetto`.
duration_ms: 10000
在 perfetto 页面打开 boottrace.perfetto-trace 文件的效果如下图:
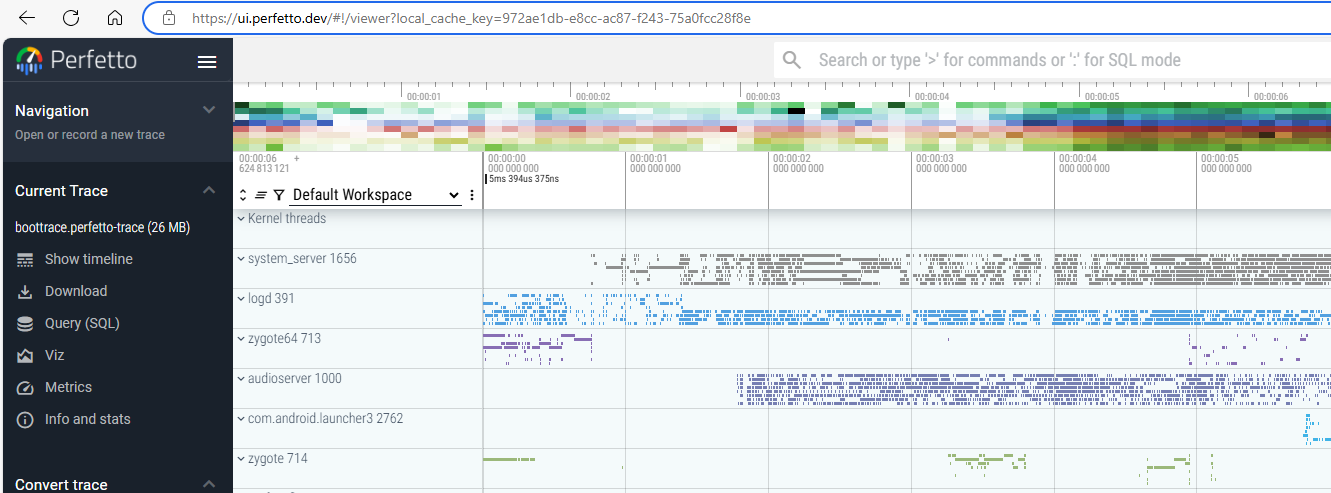
使用 perfetto 分析过系统运行时性能问题的朋友,应该对这个画风比较熟悉。
2.1. 【附】使用 perfetto 抓取系统运行状态命令
setprop persist.traced.enable 1
setenforce 0
perfetto -o /data/trace_file.perfetto-trace -t 40s -b 1024mb sched freq idle am binder_driver binder_lock aidl hal audio
3. 优化系统启动时间的方法
AHAL 开发工作中碰到的启动耗时问题,可能与以下因素有关:
*.rc文件中的关键/非关键进程启动顺序设置不合理;file_contexts的正则表达式不精确;
对应的优化方法,自然是去调整 *.rc 和 file_contexts 文件内容。
更多因素和优化方法,请参考 官方文档。
本文来自博客园,作者:Qidi_Huang,转载请注明原文链接:https://www.cnblogs.com/qidi-huang/p/18950680

 浙公网安备 33010602011771号