Vue2 --- 脚手架编程 -- 基础语法
0. ref 属性
1. 普通标签绑定ref属性,用来获取Dom元素
<template>
  <div class="hello">
    <!-- 1. 使用 ref 绑定标签 -->
    <h1 ref="title">{{ msg }}</h1>
    <button @click="showDom">点我输出上面的Dom元素</button>
  </div>
</template>

<script>
export default {
  name: 'school-info',
  data() {
    return {
      msg: "你好"
    }
  },
  methods: {
    showDom() {
      // 2. 所有被ref绑定Dom元素都被存储在了$refs里
      console.log(this.$refs.title);
    }
  }
}
</script>
1. 父向子传递数据
1. 子组件接收数据
1. 简单声明接收数据
R
StudentInfo.vue
<template>
    <div>
        <h1>{{title}}</h1>
        <h2>学生姓名: {{name}}</h2>
        <h2>学生性别: {{sex}}</h2>
        <h2>学生年龄: {{age}}</h2>
    </div>
</template>

<script>
    export default {
        name: "Student-info",
        data(){
            return {
                title: "这是学生信息页面"
            }
        },
        // 声明这个页面需要向外部接收的数据
        props:["name","sex","age"]
    }
</script>

<style scoped>

</style>
2. 对参数做限制
1. 可以限制传递的参数类型
如果接收的数据类型错误,会在控制台报错,需要的是什么类型,传过来的是什么类型
<template>
    <div>
        <h1>{{title}}</h1>
        <h2>学生姓名: {{name}}</h2>
        <h2>学生性别: {{sex}}</h2>
        <h2>学生年龄: {{age+1}}</h2>
    </div>
</template>

<script>
    export default {
        name: "Student-info",
        data() {
            return {
                title: "这是学生信息页面"
            }
        },
        // 声明这个页面需要向外部接收的数据,并限制传进来的类型
        props: {
            name:String,
            age:Number,
            sex:String
        }
    }
</script>

<style scoped>

</style>
2. 更多限制条件
<template>
    <div>
        <h1>{{title}}</h1>
        <h2>学生姓名: {{name}}</h2>
        <h2>学生性别: {{sex}}</h2>
        <h2>学生年龄: {{age+1}}</h2>
    </div>
</template>

<script>
    export default {
        name: "Student-info",
        data() {
            return {
                title: "这是学生信息页面"
            }
        },
        // 声明这个页面需要向外部接收的数据,并限制传进来的类型
        props: {
            name: {
                type: String,   // 声明参数类型
                require: true,  // 声明此参数为必传参数
            },
            age: {
                type: Number,
                default: 99,   // 设置如果没有传此参数的默认值
            },
            sex: {
                type: String,
                require: true,
            }
        }
    }
</script>

<style scoped>

</style>
3. 修改接收的参数
默认情况下子组件内接收到的参数是不允许修改的,但是有的时候可能需要对这个参数进行修改,prop的优先级比data中的参数高,如果data中定义的参数和prop冲突,那么优先使用prop中的参数
<template>
    <div>
        <h1>{{title}}</h1>
        <h2>学生姓名: {{name}}</h2>
        <h2>学生性别: {{sex}}</h2>
        <h2>学生年龄: {{myAge}}</h2>  <!-- 2.读数据为 data 中定义的 -->
        <button @click="updateAge">修改学生年龄</button>
    </div>
</template>

<script>
    export default {
        name: "Student-info",
        data() {
            return {
                title: "这是学生信息页面",
                myAge: this.age   // 1. 定义要修改的数据,数据来源于prop中的age
            }
        },
        methods:{
            updateAge(){
                this.myAge++  // 3. 调用方法修改data中的数据
            }
        },
        props: {
            name: {
                type: String,
                require: true,
            },
            age: {
                type: Number,
                default: 99,
            },
            sex: {
                type: String,
                require: true,
            }
        }
    }
</script>

<style scoped>

</style>
2. 父组件传递数据
SchoolInfo.vue
<template>
    <div>
        <!-- 使用自定义属性向子组件传递 name,sex,age 参数,不允许自定义Vue内置的一些属性 -->
        <student-info name="小明" sex="男" age="18"/>
    </div>
</template>

<script>
    import StudentInfo from "@/components/StudentInfo";
    export default {
        name: "schoolInfo",
        components: {StudentInfo},
        comments:{
            StudentInfo
        }
    }
</script>

<style scoped>

</style>
3. 参数的类型
1. 传递字符串类型
<template>
    <div>
        <!-- age="18" 传的是字符串类型 -->
        <student-info name="小明" sex="男" age="18"/>
    </div>
</template>
2. 传递数值类型
<template>
    <div>
        <!-- :age="18" 前面加了冒号: ,传的是数值类型 -->
        <student-info name="小明" sex="男" :age="18"/>
    </div>
</template>
2. 子向父传递数据
1. 自定义函数携带数据
1. 父组件中定义一个函数,并将此函数传递到子组件中
App.vue
<template>
    <div id="app">
        <div class="todo-container">
            <div class="todo-warp">
                <Header :receiveTodos="receiveTodos"/>
            </div>
        </div>
    </div>
</template>

<script>

    import Header from "@/components/TodoHeader";

    export default {
        name: 'App',
        components: {
            Header
        },
        data() {
            return {
                // 1. 定义事件列表
                todos: [
                    {id: "1", title: "吃饭", done: false},
                    {id: "2", title: "睡觉", done: true},
                    {id: "3", title: "打豆豆", done: false},
                ]
            }
        },
        methods:{
            receiveTodos(todoObj){
                console.log("我是App组件,我接受到了来自子组件的参数: ",todoObj)
            }
        }
    }
</script>

<style>
</style>
Header.vue
<template>
    <div class="todo-header">
        <!-- 1. 绑定回车键按下再抬起的事件,并将input中输入的值和title双向绑定 -->
        <input type="text" placeholder="请输入你的任务名称,按回车确认" v-model="title" @keyup.enter="addTodo">
    </div>
</template>

<script>
    // 3.2 导入nanoid包,用来生成唯一随机字符串
    import {nanoid} from 'nanoid'

    export default {
        name: "HeaderInfo",
        props:["receiveTodos"],  // 1. 声明接收来自App组件的参数名
        data() {
            return {
                title: ""
            }
        },
        methods: {
            addTodo() {
                console.log(this.title)
                const todoObj = {id: nanoid(), title: this.title, done: false}
                // 2. 调用receiveTodos(todObj), 并将用户生成的todo对象传到receiveTodos(todObj)函数中
                // 控制台可以看到父组件App接收到了子组件传递过来的参数
                this.receiveTodos(todoObj)
            }
        }
    }
</script>

<style scoped>
</style>
2. 自定义事件传递参数
自定义事件是只给组件来使用的
1. 定义自定义事件
App.vue
<template>
    <div id="app">
        <h1>这里是APP: </h1>
        <!-- 1. 用 v-on:事件名="函数名" / @事件名="函数名" 定义一个自定义事件,如果时间被触发了就调用 getStudentName()函数-->
        <student-info @getName="getStudentName"/>
    </div>
</template>

<script>
    import SchoolInfo from "@/components/SchoolInfo";
    import StudentInfo from "@/components/StudentInfo";

    export default {
        name: 'App',
        components: {
            SchoolInfo,
            StudentInfo
        },
        methods:{
            // ...options 接收其他参数,是个数组
            getStudentName(name,...options){
                console.log("App 组件的getStudentName被调用了",name)
            }
        }
    }
</script>

<style>
    #app {
        font-family: Avenir, Helvetica, Arial, sans-serif;
        -webkit-font-smoothing: antialiased;
        -moz-osx-font-smoothing: grayscale;
        text-align: center;
        color: #2c3e50;
        margin-top: 60px;
    }
    h1 {
        background-color: red;
    }
</style>
2. 触发自定义事件
Student.vue
<template>
    <div class="student">
        <h2>学生姓名: {{name}}</h2>
        <h2>学生年龄: {{age}}</h2>
        <button @click="sendStudentName">点击发送学生姓名</button>
    </div>
</template>

<script>
    export default {
        name: "Student-info",
        data() {
            return {
                name: "小明",
                age: 18
            }
        },
        methods:{
            sendStudentName(){
                // 使用this.$emit(事件名,参数)触发Student组件实例对象上的getName事件,并传递学生姓名参数
                this.$emit("getName",this.name)
            }
        }
    }
</script>

<style scoped>
    .student{
        background-color: aqua;
    }
</style>
3. ref 标识子组件,并绑定自定义事件
子组件标签绑定 ref 属性,用来获取子组件实例对象,是组件间通信的基础
用 id 绑定组件标签只会获得组件的Dom结构,无法获得组件实例对象
App.vue
<template>
    <div id="app">
        <h1>这里是APP: </h1>
        <!-- 1. 使用ref 获取子组件实例对象的名称-->
        <student-info ref="student"/>
    </div>
</template>

<script>
    import StudentInfo from "@/components/StudentInfo";

    export default {
        name: 'App',
        components: {
            StudentInfo
        },
        // 2. 声明 mouted() 函数给子组件绑定自定义事件
        mounted() {
            // this.$refs.student,获取到子组件实例对象
            // .$on("getName",this.getStudentName) 给子组件实例对象绑定 getName事件,当这个getName事件被触发的时候执行回调函数getStudentName()
            this.$refs.student.$on("getName",this.getStudentName)
        },
        methods: {
            getStudentName(name,...options) {
                console.log("App 组件的getStudentName被调用了", name)
            }
        },
    }
</script>

<style>
    #app {
        font-family: Avenir, Helvetica, Arial, sans-serif;
        -webkit-font-smoothing: antialiased;
        -moz-osx-font-smoothing: grayscale;
        text-align: center;
        color: #2c3e50;
        margin-top: 60px;
    }

    h1 {
        background-color: red;
    }
</style>
Student.vue
<template>
    <div class="student">
        <h2>学生姓名: {{name}}</h2>
        <h2>学生年龄: {{age}}</h2>
        <button @click="sendStudentName">点击发送学生姓名</button>
    </div>
</template>

<script>
    export default {
        name: "Student-info",
        data() {
            return {
                name: "小明",
                age: 18
            }
        },
        methods:{
            sendStudentName(){
                // 1. 触发Student组件实例对象上的getName事件,并传递学生姓名参数
                this.$emit("getName",this.name)
            }
        }
    }
</script>

<style scoped>
    .student{
        background-color: aqua;
    }
</style>
4. ref 的优势
这种方法更灵活,比如我要在App挂载后等ajax请求发送得到结果后,再给Student组件实例对象绑定自定义事件
App.vue
<template>
    <div id="app">
        <h1>这里是APP: </h1>
        <!-- 1. 使用ref 获取子组件实例对象的名称-->
        <student-info ref="student"/>
    </div>
</template>

<script>
    import StudentInfo from "@/components/StudentInfo";

    export default {
        name: 'App',
        components: {
            StudentInfo
        },
        mounted() {
            // 3秒后再绑定点击事件,这里模拟ajax请求的网络延迟
            setTimeout(() => {
                this.$refs.student.$on("getName", this.getStudentName)
            }, 3000)
        },
        methods: {
            getStudentName(name,...options) {
                console.log("App 组件的getStudentName被调用了", name)
            }
        },
    }
</script>

<style>
    #app {
        font-family: Avenir, Helvetica, Arial, sans-serif;
        -webkit-font-smoothing: antialiased;
        -moz-osx-font-smoothing: grayscale;
        text-align: center;
        color: #2c3e50;
        margin-top: 60px;
    }

    h1 {
        background-color: red;
    }
</style>
5. 自定义事件也可以用事件修饰符
设置自定义事件只触发一次
App.vue
<template>
    <div id="app">
        <h1>这里是APP,学生姓名是: {{studentName}} </h1>
        <student-info ref="student"/>
    </div>
</template>

<script>
    import StudentInfo from "@/components/StudentInfo";

    export default {
        name: 'App',
        components: {
            StudentInfo
        },

        mounted() {
            // 1. 使用$once() 控制只触发一次
            this.$refs.student.$once("getName", this.getStudentName)
        },
        methods: {
            getStudentName(name,...options) {
                console.log("App 组件的getStudentName被调用了", name)
            }
        },
    }
</script>

<style>
    #app {
        font-family: Avenir, Helvetica, Arial, sans-serif;
        -webkit-font-smoothing: antialiased;
        -moz-osx-font-smoothing: grayscale;
        text-align: center;
        color: #2c3e50;
        margin-top: 60px;
    }

    h1 {
        background-color: red;
    }
</style>
6. 解绑自定义事件
Student.vue
<template>
    <div class="student">
        <h2>学生姓名: {{name}}</h2>
        <h2>学生年龄: {{age}}</h2>
        <button @click="sendStudentInfo">点击发送学生信息</button>
        <button @click="unbind">解绑一个自定义事件</button>
        <button @click="unbinds">解绑多个自定义事件</button>
        <button @click="unbindAll">解绑所有自定义事件</button>

    </div>
</template>

<script>
    export default {
        name: "Student-info",
        data() {
            return {
                name: "小明",
                age: 18
            }
        },
        methods: {
            sendStudentInfo() {
                this.$emit("getName", this.name)
                this.$emit("getAge", this.age)
            },
            unbind() {
                // 解绑一个自定义事件
                this.$off("getName")
            },
            unbinds() {
                // 解绑多个自定义事件
                this.$off(["getName","getAge"])
            },
            unbindAll(){
                // 解绑所有的自定义事件
                this.$off()
            }
        }
    }
</script>

<style scoped>
    .student {
        background-color: aqua;
    }
</style>
如果当前组件或者Vue实例对象被销毁了,其所绑定的自定义事件也会被销毁
7. 自定义事件的回调
谁触发的这个自定义事件,自定义事件中的回调就是谁,methods中定义的函数中的this永远是当前组件的实例对象
App.vue
<template>
    <div id="app">
        <h1>这里是APP,学生姓名是 {{studentName}}</h1>
        <student-info ref="student"/>
    </div>
</template>

<script>
    import StudentInfo from "@/components/StudentInfo";

    export default {
        name: 'App',
        components: {
            StudentInfo
        },
        data() {
            return {
                studentName: ""
            }
        },
        mounted() {
            // 1. 正常使用回调,在getStudentName中赋值this.studentName(可以)
            // this.$refs.student.$on("getName", this.getStudentName)

            // 2.直接在这里赋值,这里的this是触发getName这个自定义事件的实例对象(不可以)
            // this.$refs.student.$on("getName", function (name) {
            //     console.log(this)
            //     this.studentName = name
            // })
            // 3. 修改上面的问题,将函数改为剪头函数,箭头函数是没有自己的this,会找外部的mouted()的this
            // 这个this就是app组件实例对象,即可赋值他的studentName
            this.$refs.student.$on("getName", name =>{
                console.log(this)
                this.studentName = name
            })
        },
        methods: {
            getStudentName(name) {
                console.log("App 组件的getStudentName被调用了", name)
                this.studentName = name
            },
        },
    }
</script>

<style>
    #app {
        font-family: Avenir, Helvetica, Arial, sans-serif;
        -webkit-font-smoothing: antialiased;
        -moz-osx-font-smoothing: grayscale;
        text-align: center;
        color: #2c3e50;
        margin-top: 60px;
    }

    h1 {
        background-color: red;
    }
</style>
8. 组件绑定原生 DOM 事件
方法一: 子组件内触发原生DOM事件
App.vue
<template>
    <div id="app">
        <h1>这里是APP</h1>
        <!-- 绑定原生click 原生Dom事件 -->
        <student-info @click="show"/>
    </div>
</template>

<script>
    import StudentInfo from "@/components/StudentInfo";

    export default {
        name: 'App',
        components: {
            StudentInfo
        },
        methods: {
            show(){
                alert(12345)
            }
        },
    }
</script>

<style>
    #app {
        font-family: Avenir, Helvetica, Arial, sans-serif;
        -webkit-font-smoothing: antialiased;
        -moz-osx-font-smoothing: grayscale;
        text-align: center;
        color: #2c3e50;
        margin-top: 60px;
    }

    h1 {
        background-color: red;
    }
</style>
Student.vue
<template>
    <div class="student">
        <h2>学生姓名: {{name}}</h2>
        <h2>学生年龄: {{age}}</h2>
        <button @click="sendStudentInfo">点击发送学生信息</button>
    </div>
</template>

<script>
    export default {
        name: "Student-info",
        data() {
            return {
                name: "小明",
                age: 18
            }
        },
        methods: {
            sendStudentInfo() {
                // 必须在子组件中触发这个原生DOM事件
                this.$emit("click")
            }
        }
    }
</script>

<style scoped>
    .student {
        background-color: aqua;
    }
</style>
方法二: 用修饰符指定组件绑定的事件为原生事件
App.vue
<template>
    <div id="app">
        <h1>这里是APP</h1>
        <!-- 使用native事件修饰符来表明当前事件为原生DOM事件,事件绑定在子组件的最外层div标签上 -->
        <student-info @click.native="show"/>
    </div>
</template>

<script>
    import StudentInfo from "@/components/StudentInfo";

    export default {
        name: 'App',
        components: {
            StudentInfo
        },
        methods: {
            show(){
                alert(12345)
            }
        },
    }
</script>

<style>
    #app {
        font-family: Avenir, Helvetica, Arial, sans-serif;
        -webkit-font-smoothing: antialiased;
        -moz-osx-font-smoothing: grayscale;
        text-align: center;
        color: #2c3e50;
        margin-top: 60px;
    }

    h1 {
        background-color: red;
    }
</style>
Student.vue 中不用再触发DOM事件
<template>
    <div class="student">
        <h2>学生姓名: {{name}}</h2>
        <h2>学生年龄: {{age}}</h2>
        <button @click="sendStudentInfo">点击发送学生信息</button>
    </div>
</template>

<script>
    export default {
        name: "Student-info",
        data() {
            return {
                name: "小明",
                age: 18
            }
        },
        methods: {
            sendStudentInfo() {
                console.log(this.name)
            }
        }
    }
</script>

<style scoped>
    .student {
        background-color: aqua;
    }
</style>
3. 全局事件总线(任意组件传递)
任意组件之间的通信,更适用于爷爷和孙子之间传递数据
1. 实现思路
**流程: **
在A组件中给X绑定一个自定义事件demo,并将回调函数定义在A组件中,B组件想给A组件传数据,B组件触发X上的自定义事件demo,并将数据传到X,X所对应的回调就要执行,就将数据以参数的形式传给A组件中定义的回调函数参数中

**思路: **
- 必须要求X被所有的组件看到: Vue的原型对象上
main.js
import Vue from 'vue'
import App from './App.vue'

Vue.config.productionTip = false
Vue.prototype.x = {a:1,b:2}

new Vue({
  render: h => h(App),
}).$mount('#app')
- 必须能调用到
$on $off $emit函数: Vue的实例对象(vm)或VueComponent的实例对象(vc)
import Vue from 'vue'
import App from './App.vue'

Vue.config.productionTip = false

new Vue({
    render: h => h(App),
    beforeCreate() {
        Vue.prototype.$bus = this;   // 安装全局事件总线,$bus就是当前应用的vm
    }
}).$mount('#app')
2. 案例
main.js 安装全局事件总线
import Vue from 'vue'
import App from './App.vue'

Vue.config.productionTip = false

new Vue({
    render: h => h(App),
    beforeCreate() {
        Vue.prototype.$bus = this  // 安装全局事件总线,$bus就是当前应用的vm
    }
}).$mount('#app')
App.vue 接收数据方绑定自定义事件和回调函数
<template>
    <div id="app">
        <h1>这里是APP,接收到来自Student组件的学生姓名: {{studentName}}</h1>
        <student-info/>
    </div>
</template>

<script>
    import StudentInfo from "@/components/StudentInfo";

    export default {
        name: 'App',
        components: {
            StudentInfo
        },
        data() {
            return {
                studentName: ""
            }
        },
        mounted() {
            // 1. 给全局事件总线绑定 getName自定义事件,并指定回调函数,如果是直接写在绑定自定义事件的$on()里,必须用剪头函数 =>
            this.$bus.$on("getName", (name) => this.studentName = name)
        },
        beforeDestroy() {
            this.$bus.off("getName")  // 2. 记得解绑自定义事件,事件总线上的自定义事件越来越多
        }
    }
</script>

<style>
    h1 {
        background-color: red;
    }
</style>
Student.vue 发送数据方触发自定义事件并传递参数
<template>
    <div class="student">
        <h2>学生姓名: {{name}}</h2>
        <h2>学生年龄: {{age}}</h2>
        <button @click="sendStudentInfo">点击发送学生信息</button>
    </div>
</template>

<script>
    export default {
        name: "Student-info",
        data() {
            return {
                name: "小明",
                age: 18
            }
        },
        methods:{
            sendStudentInfo(){
                // 触发全局事件总线上绑定的getName,并执行对其绑定getName自定义事件的回调函数
                this.$bus.$emit("getName",this.name)
            }
        }
    }
</script>

<style scoped>
    .student {
        background-color: aqua;
    }
</style>
4. 消息订阅与发布
任意组件之间通信,推荐使用事件总线
1. 实现思路
- 需要数据的组件订阅消息(定义回调函数)
- 传递数据的组件发布消息(执行函数)
2. 下载三方库
npm i pubsub-js
3. 使用
App.vue
<template>
    <div id="app">
        <h1>这里是APP,接收到来自Student组件的学生姓名: {{studentName}}</h1>
        <student-info/>
    </div>
</template>

<script>
    import StudentInfo from "@/components/StudentInfo";
    // 1. 引入pubsubjs
    import pubsub from 'pubsub-js'

    export default {
        name: 'App',
        components: {
            StudentInfo
        },
        data() {
            return {
                studentName: ""
            }
        },
        // 2. 在mounted中订阅消息,消息名为:getName
        mounted() {
            // msgName为消息名,如果msgName不需要用到,可以用_占位,data是携带的数据,并将返回的消息ID设置在vm身上,将来要取消订阅
            // 2.1 这里的函数如果是自定义函数,this是undefind,要改成箭头函数
            this.pubID = pubsub.subscribe("getName", (msgName, data) => {
                this.studentName = data
            })
            // 2.2 或者将回调函数体写在methods中
            this.pubID = pubsub.subscribe("getName", this.getStudentName)
        },
        // 3. 在 beforeDestroy 中取消订阅
        beforeDestroy() {
            pubsub.unsubscribe(this.pubID)
        },
        methods:{
            // 如果msgName不需要用到,可以用_占位
            getStudentName(msgName, name){
                this.studentName = name
            }
        }
    }
</script>

<style>
    h1 {
        background-color: red;
    }
</style>
Student.vue
<template>
    <div class="student">
        <h2>学生姓名: {{name}}</h2>
        <h2>学生年龄: {{age}}</h2>
        <button @click="sendStudentInfo">点击发送学生信息</button>
    </div>
</template>

<script>
    // 1. 引入pubsubjs
    import pubsub from 'pubsub-js'

    export default {
        name: "Student-info",
        data() {
            return {
                name: "小明",
                age: 18
            }
        },
        methods:{
            // 2. 在点击事件的回调函数中发布消息
            sendStudentInfo(){
                pubsub.publish("getName",this.name)
            }
        }
    }
</script>

<style scoped>
    .student {
        background-color: aqua;
    }
</style>
5. slot 插槽
也是一种组件间通信的方式,只不过父组件向子组件传递的不是数据,而是html结构,而子组件向父组件传递的是数据,不能单独使用,必须搭配使用,不能向之前的那些一样值传递数据
1. 不使用插槽
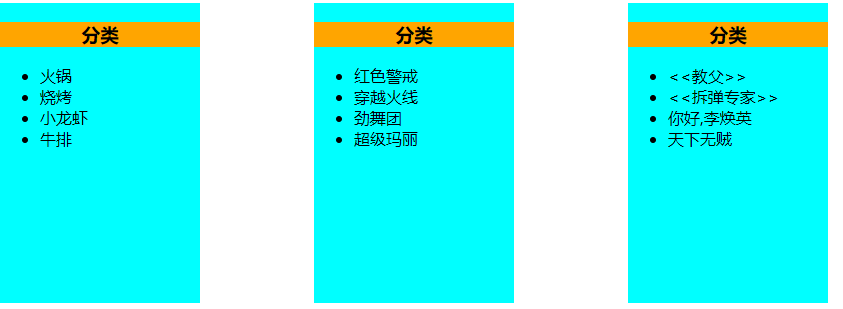
App.vue
<template>
  <div id="app" class="container">
    <Category :title="'美食'" :listData="foods"/>
    <Category :title="'游戏'" :listData="games"/>
    <Category :title="'电影'" :listData="films"/>
  </div>
</template>

<script>
import Category from "@/components/Category.vue";

export default {
  name: 'App',
  components: {
    Category
  },
  data() {
    return {
      foods:["火锅","烧烤","小龙虾","牛排"],
      games:["红色警戒","穿越火线","劲舞团","超级玛丽"],
      films:["<<教父>>","<<拆弹专家>>","你好,李焕英","天下无贼"],
    }
  }
}
</script>

<style>
.container {
  display: flex;
  justify-content: space-around;
}
</style>
Category.vue
<template>
  <div class="category">
    <h3>{{ title }}分类</h3>
    <ul>
      <li v-for="(item,index) in listData" :key="index">{{item}}</li>
    </ul>
  </div>
</template>
<script>
export default {
  // eslint-disable-next-line vue/multi-word-component-names
  name: "Category",
  props:["listData","title"]
}
</script>
<style scoped>
.category {
  background-color: aqua;
  width: 200px;
  height: 300px;
}

h3 {
  text-align: center;
  background-color: orange;
}
</style>
2. 需求
只在其中一个或两个组件中展示一张图片
<template>
  <div class="category">
    <h3>{{ title }}分类</h3>
    <ul>
      <li v-for="(item,index) in listData" :key="index">{{ item }}</li>
    </ul>
    <img v-show="title === '美食'" src="https://q5.itc.cn/q_70/images03/20240313/135f344687dd4387a15fe35dc5a3bfae.jpeg" alt="">
  </div>
</template>
<script>
export default {
  // eslint-disable-next-line vue/multi-word-component-names
  name: "Category",
  props: ["listData", "title"]
}
</script>
<style scoped>
.category {
  background-color: aqua;
  width: 200px;
  height: 300px;
}

h3 {
  text-align: center;
  background-color: orange;
}

img {
  width: 100%;
}
</style>
假如将来不同的不见不同的需求,那么要判断的条件就越来越多,比较混乱
3. 默认插槽
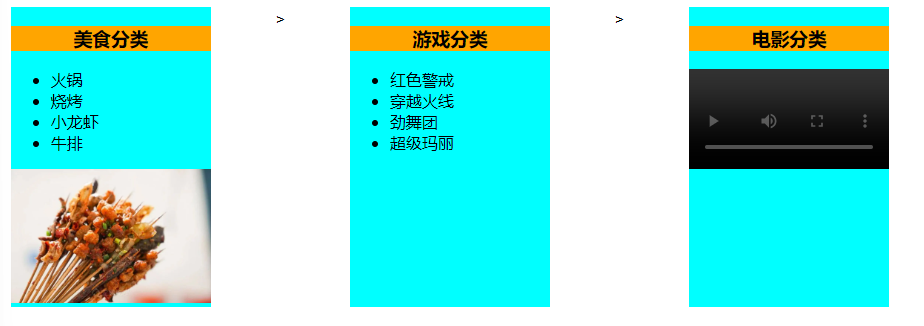
App.vue 将想向子组件中放的标签,放在父组件的子组件标签体中,在App组件中完成解析后再塞入Category组件中,如果样式写在App组件中,就是解析完后带着样式塞进Category,如果样式写在Category中,就是解析完后,再Category中控制样式
<template>
<div id="app" class="container">
<Category :title="'美食'">
<!-- 声明向这个子组件中放的标签 -->
<ul>
<li v-for="(item,index) in foods" :key="index">{{ item }}</li>
</ul>
<img src="https://q5.itc.cn/q_70/images03/20240313/135f344687dd4387a15fe35dc5a3bfae.jpeg" alt="">
</Category>>
<Category :title="'游戏'">
<!-- 声明向这个子组件中放的标签 -->
<ul>
<li v-for="(item,index) in games" :key="index">{{ item }}</li>
</ul>
</Category>>
<Category :title="'电影'">
<!-- 声明向这个子组件中放的标签 -->
<!-- 加controls属性才能有点击播放的按钮 -->
<video controls src="https://ksv-video-picture.cdn.bcebos.com/f0dbb327492e5a72a2862105d86ca8b5c0b016da.jpg?x-bce-process=image%2Fquality%2Cq_80""></video>
</Category>
</div>
</template>
<script>
import Category from "@/components/Category.vue";
export default {
name: 'App',
components: {
Category
},
data() {
return {
foods:["火锅","烧烤","小龙虾","牛排"],
games:["红色警戒","穿越火线","劲舞团","超级玛丽"],
films:["<<教父>>","<<拆弹专家>>","你好,李焕英","天下无贼"],
}
}
}
</script>
<style>
.container {
display: flex;
justify-content: space-around;
}
</style>
Category.vue
<template>
  <div class="category">
    <h3>{{ title }}分类</h3>
 	<!-- 使用slot标签占位,vue渲染的时候会将父组件中在子组件标签体中定义好的标签放在这里,可以设置默认值 -->
    <slot>我是默认值,当父组件没有传递标签结构时,我会出现</slot>
  </div>
</template>
<script>
export default {
  name: "Category",
  props: ["title"]
}
</script>
<style scoped>
.category {
  background-color: aqua;
  width: 200px;
  height: 300px;
}

h3 {
  text-align: center;
  background-color: orange;
}
video{
  width: 100%;
}
img {
  width: 100%;
}
</style>
4. 具名插槽
具有名字的插槽,当Category组件中出现多个插槽,并且位置有序,就需要有名字了
App.vue
<template>
<div id="app" class="container">
<Category :title="'美食'">
<!-- 声明这个标签放在 slotHeader 插槽的位置 -->
<ul slot="slotHeader">
<li v-for="(item,index) in foods" :key="index">{{ item }}</li>
</ul>
<!-- 声明这个标签放在 slotFooter 插槽的位置 -->
<img slot="slotFooter" src="https://q5.itc.cn/q_70/images03/20240313/135f344687dd4387a15fe35dc5a3bfae.jpeg" alt="">
</Category>>
<Category :title="'游戏'">
<!-- 声明这个标签放在 slotHeader 插槽的位置 -->
<ul slot="slotHeader">
<li v-for="(item,index) in games" :key="index">{{ item }}</li>
</ul>
</Category>>
<Category :title="'电影'">
<!-- 声明这个标签放在 slotFooter 插槽的位置 -->
<video slot="slotFooter" controls src="https://ksv-video-picture.cdn.bcebos.com/f0dbb327492e5a72a2862105d86ca8b5c0b016da.jpg?x-bce-process=image%2Fquality%2Cq_80""></video>
</Category>
</div>
</template>
<script>
import Category from "@/components/Category.vue";
export default {
name: 'App',
components: {
Category
},
data() {
return {
foods:["火锅","烧烤","小龙虾","牛排"],
games:["红色警戒","穿越火线","劲舞团","超级玛丽"],
films:["<<教父>>","<<拆弹专家>>","你好,李焕英","天下无贼"],
}
}
}
</script>
<style>
.container {
display: flex;
justify-content: space-around;
}
video{
width: 100%;
}
</style>
Category.vue
<template>
  <div class="category">
    <h3>{{ title }}分类</h3>
    <!-- 定义两个具名插槽 -->
    <slot name="slotHeader">我是默认值,当父组件没有传递标签结构时,我会出现</slot>
    <slot name="slotFooter">我是默认值,当父组件没有传递标签结构时,我会出现</slot>
  </div>
</template>
<script>
export default {
  name: "Category",
  props: ["title"]
}
</script>
<style scoped>
.category {
  background-color: aqua;
  width: 200px;
  height: 300px;
}

h3 {
  text-align: center;
  background-color: orange;
}
video{
  width: 100%;
}
img {
  width: 100%;
}
</style>
根据声明的标签,和插槽的位置匹配插入结构,没有插入结构的出现默认值

如果外层是用template标签包裹的,可以有第二种写法
<template>
<div id="app" class="container">
<Category :title="'美食'">
<ul slot="slotHeader">
<li v-for="(item,index) in foods" :key="index">{{ item }}</li>
</ul>
<img slot="slotFooter" src="https://q5.itc.cn/q_70/images03/20240313/135f344687dd4387a15fe35dc5a3bfae.jpeg"
alt="">
</Category>
<Category :title="'游戏'">
<ul slot="slotHeader">
<li v-for="(item,index) in games" :key="index">{{ item }}</li>
</ul>
</Category>
<Category :title="'电影'">
<video slot="slotHeader" controls
src="https://ksv-video-picture.cdn.bcebos.com/f0dbb327492e5a72a2862105d86ca8b5c0b016da.jpg?x-bce-process=image%2Fquality%2Cq_80""></video>
<!-- 只有 template 标签包裹的标签,可以使用 v-slot:插槽名 指定插槽 -->
<template v-slot:slotFooter>
<div class="foot">
<a href="">推荐</a>
<a href="">经典</a>
<a href="">热门</a>
</div>
<h4> 欢迎观影! </h4>
</template>
</Category>
</div>
</template>
<script>
import Category from "@/components/Category.vue";
export default {
name: 'App',
components: {
Category
},
data() {
return {
foods: ["火锅", "烧烤", "小龙虾", "牛排"],
games: ["红色警戒", "穿越火线", "劲舞团", "超级玛丽"],
films: ["<<教父>>", "<<拆弹专家>>", "你好,李焕英", "天下无贼"],
}
}
}
</script>
<style>
.container {
display: flex;
justify-content: space-around;
}
video {
width: 100%;
}
.foot{
display: flex;
justify-content: space-around;
}
</style>
5. 作用域插槽
需求: 页面中有三个游戏分类,数据也是一样的,但是要生成里面结构的时候,一个是无需列表,一个是有序列表,一个全是h4 标题
App.vue 使用Category组件,App组件中定义Category组件中的结构
<template>
  <div id="app" class="container">
    <Category :title="'游戏'">
        <!-- 1. 外侧必须包裹 template 标签,用scope属性起个名字 -->
      <template scope="name1">
        <ul>
          <!-- 取数据时,使用上面scope定义的名字.games.即name1.games -->
          <li v-for="(item,index) in name1.games" :key="index">{{ item }}</li>
        </ul>
      </template>
    </Category>
    <Category :title="'游戏'">
        <!-- 可以不起名字,使用解构赋值语法 -->
      <template scope="{games}">
        <ol>
          <li v-for="(item,index) in games" :key="index">{{ item }}</li>
        </ol>
      </template>
    </Category>
    <Category :title="'游戏'">
        <!-- 可以使用 slot-scope 属性,跟scope是一样的 -->
      <template slot-scope="name3">

        <h4 v-for="(item,index) in name3.games" :key="index">{{ item }}</h4>
      </template>
    </Category>

  </div>
</template>

<script>
import Category from "@/components/Category.vue";

export default {
  name: 'App',
  components: {
    Category
  },
}
</script>

<style>
.container {
  display: flex;
  justify-content: space-around;
}

video {
  width: 100%;
}

.foot {
  display: flex;
  justify-content: space-around;
}
</style>
Category.vue 将数据传给插槽的使用者App组件
<template>
  <div class="category">
    <h3>{{ title }}分类</h3>
    <!-- 将 Category 组件中的数据传递给插槽的使用者 App 组件,让其可以循环这个games,可以传多个,用名字.msg即可取到 -->
    <slot :games="games" msg="hello">我是默认值,当父组件没有传递标签结构时,我会出现</slot>
  </div>
</template>
<script>
export default {
  name: "Category",
  props: ["title"],
  data() {
    return {
      games: ["红色警戒", "穿越火线", "劲舞团", "超级玛丽"],
    }
  }
}
</script>
<style scoped>
.category {
  background-color: aqua;
  width: 200px;
  height: 300px;
}

h3 {
  text-align: center;
  background-color: orange;
}
video{
  width: 100%;
}
img {
  width: 100%;
}
</style>
6. Vuex
1. 是什么
专门在Vue中实现集中式状态(数据)管理的一个Vue插件,对vue应用中多个组件的共享状态进行集中式的管理(读/写).也是一种组件间通信的方式,且适用于任何组件间通信
2. 什么时候使用Vuex
- 多个组件依赖于同一个状态(数据)
- 来自不同组件的行为需要变更同一状态(数据)
3. 对比
1. 全局事件总线

2. Vuex
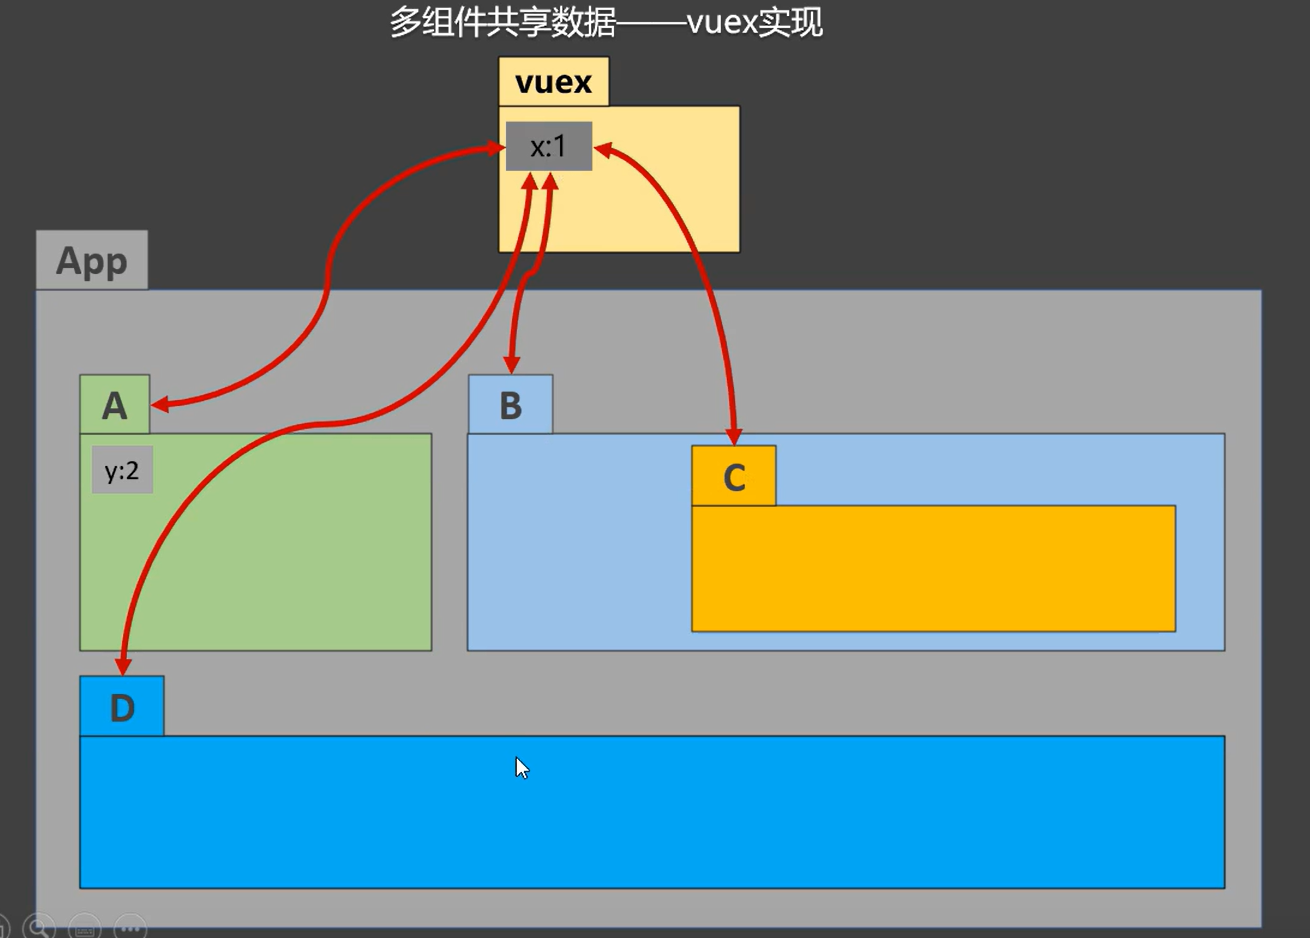
4. 工作原理图

Actions --- 存储数据操作函数的一个对象,同时可以发送ajax请求到其他的后端服务器,得到一些数据然后将函数和数据commit给Mutations进行加工,如果不发送ajax请求,可以省略这一步,直接commit给Mutations
Mutations --- 存储着数据操作函数和存储数据的State的一个对象
State --- vuex用来存储数据的一个对象
Store --- 管理所有的vuex组件
Dispatch --- store提供的方法,用来提交数据操作函数和参数
Commit ---store提供的方法,用来将数据操作函数和参数,提交给Mutations
5. 环境搭建
1. 安装Vuex
# vue2必须指定vuex的3版本
npm install vuex@3
2. 引入Vuex
main.js
import Vue from 'vue'
import App from './App.vue'
// 1. 导入Vuex
import Vuex from 'vuex'

Vue.config.productionTip = false

// 2. 使用Vuex插件
Vue.use(Vuex)

new Vue({
  render: h => h(App),
}).$mount('#app')
3. 创建store
src目录下创建store/index.js
src/store/index.js
// 该文件用于创建Vuex中最为核心的store
// 1. 导入Vue
import Vue from 'vue'
// 2. 导入Vuex
import Vuex from 'vuex'
// 3. 应用Vuex插件
Vue.use(Vuex)

// 准备actions对象,用于响应组件中的动作
const actions = {}

// 准备mutations对象,用于操作数据
const mutations = {}

// 准备state对象,用于存储数据
const state = {}


// 创建并暴露store
export default  new Vuex.Store({
    // 配置项
    actions,
    mutations,
    state,
})
4. 配置store
main.js
import Vue from 'vue'
import App from './App.vue'

// 1. 引入store,默认引入index.js 可以省略
import store from './store'

Vue.config.productionTip = false

new Vue({
  render: h => h(App),
  // 2. 配置store,Vux在store中引入及使用了
  store: store
}).$mount('#app')
6. 案例
src/store/index.js
import Vue from 'vue'
import Vuex from 'vuex'

Vue.use(Vuex)

const actions = {
    // 2. 定义操作sum的方法,context为上下文对象,其中保存着所有的数据及操作函数
    add: function (context, value) {
        // 2. 提交给mutations操作数据
        context.commit("ADD", value)
    },
    sub: function (context, value) {
        context.commit("SUB", value)
    },
    // 当sum值为奇数时再加
    addOdd:function (context,value){
      if (context.state.sum % 2){
          context.commit("ADD",value)
      }
    },
    // 在actions中调用ajax请求,这里使用定时器模拟
    addWait:function (context,value){
      setTimeout(()=>{
          context.commit('ADD',value)
      },500)
    }
}

// 一般mutations中的函数大写,用来区分和actions中的函数
// 只定义真实操作数据的逻辑,没有业务逻辑
const mutations = {
    ADD: function (state, value) {
        state.sum += value
    },
    SUB: function (state, value) {
        state.sum -= value
    }
}

const state = {
    // 1. 定义数据
    sum: 0
}

export default new Vuex.Store({
    actions,
    mutations,
    state,
})
App.vue
<template>
  <div id="app" class="container">

    <h3>求和结果为:{{ sum }}</h3>
    <h3>放大十倍结果为:{{ bigSum }}</h3>
    <div class="warpper">
      <Add/>
      <Sub/>
    </div>

  </div>
</template>

<script>
import Add from "@/components/Add.vue";
import Sub from "@/components/Sub.vue";

export default {
  name: 'App',
  components: {
    Add,
    Sub
  },
  computed: {
    sum() {
      // 1. 展示数据,数据是存在Vuex中的state中的,使用$store.state调用
      return this.$store.state.sum
    },
    bigSum() {
      return this.$store.getters.bigSum
    },
  }
}
</script>

<style>
.warpper {
  display: flex;
}
</style>
Add.vue
<template>
  <div class="category">
    <button @click="increment">+</button>
    <button @click="incrementWait">延时+</button>
    <button @click="incrementOdd">奇数+</button>
  </div>
</template>
<script>
export default {
  name: "Add",
  methods:{
    increment(){
      // 1. 提交sum的操作函数名
      // this.$store.dispatch('add',1)
      // 如果没有复杂的业务逻辑,很直接的操作数据,也可以直接调用mutations中定义的ADD
      this.$store.commit("ADD",1)
    },
    // 模拟网络请求后得到数据后再具体操作
    incrementWait(){
      this.$store.dispatch('addWait',1)
    },
    incrementOdd(){
      this.$store.dispatch("addOdd",1)
    },
  }
}
</script>
<style scoped>
button{
  margin-left: 30px;
}
</style>
Sub.vue
<template>
  <button @click="decrement">-</button>
</template>

<script>
export default {
  // eslint-disable-next-line vue/multi-word-component-names
  name: "Sub",
  methods:{
    decrement(){
      // 1. 提交sum的操作函数名
      // this.$store.dispatch("sub",1)
      // 2. 如果没有复杂的业务逻辑,很直接的操作数据,也可以直接调用mutations中定义的SUB
      this.$store.commit("SUB",1)
    }
  }
}
</script>
<style scoped>
button{
  margin-left: 20px;
}
</style>
7. getters
src/store/index.js
import Vue from 'vue'
import Vuex from 'vuex'

Vue.use(Vuex)

const actions = {
    add: function (context, value) {
        context.commit("ADD", value)
    },
    sub: function (context, value) {
        context.commit("SUB", value)
    },
    addOdd:function (context,value){
      if (context.state.sum % 2){
          context.commit("ADD",value)
      }
    },
    addWait:function (context,value){
      setTimeout(()=>{
          context.commit('ADD',value)
      },500)
    }
}

const mutations = {
    ADD: function (state, value) {
        state.sum += value
    },
    SUB: function (state, value) {
        state.sum -= value
    }
}

const state = {
    sum: 0
}

// 选用:对数据的进一步加工
const getters = {
    // 用于将state中的数据加工
    bigSum(state){
        return state.sum * 10
    }
}

export default new Vuex.Store({
    actions,
    mutations,
    state,
    getters    // 配置getters
})
App.vue
<template>
  <div id="app" class="container">
    <h3>求和结果为:{{ sum }}</h3>
    <!-- 使用计算属性获得bigSum的值 -->
    <h3>放大十倍结果为:{{ bigSum }}</h3>
    <div class="warpper">
      <Add/>
      <Sub/>
    </div>

  </div>
</template>

<script>
import Add from "@/components/Add.vue";
import Sub from "@/components/Sub.vue";

export default {
  name: 'App',
  components: {
    Add,
    Sub
  },
  computed: {
    sum() {
      return this.$store.state.sum
    },
    // 取getters中对数据进一步加工后的值
    bigSum() {
      return this.$store.getters.bigSum
    },
  }
}
</script>

<style>
.warpper {
  display: flex;
}
</style>
8. mapState
如果有多个state中定义的数据,使用mapState可以很简单的生成多个计算属性的函数
App.vue
<template>
  <div id="app" class="container">
    <!-- 1. 展示数据,数据是存在Vuex中的state中的,使用$store.state调用 -->
    <h3>求和结果为:{{ he }}</h3>
    <h3>放大十倍结果为:{{ bigSum }}</h3>
    <h3>学校:{{ xuexiao }}</h3>
    <h3>地址:{{ dizhi }}</h3>
    <div class="warpper">
      <Add/>
      <Sub/>
    </div>

  </div>
</template>

<script>
import Add from "@/components/Add.vue";
import Sub from "@/components/Sub.vue";
// 1. 导入mapState
import {mapState} from "vuex";

export default {
  name: 'App',
  components: {
    Add,
    Sub
  },
  computed: {
     // 原生写法
    sum() {
      return this.$store.state.sum
    },
    school(){
      return this.$store.state.school
    },
    address(){
      return this.$store.state.address
    },

    // 两种写法
    // 借助 mapState 生成多个计算属性,从state中获取数据
    // 对象写法,生成的计算属性的函数名和$state.state中定义的变量名根据对象中的key-value生成
    ...mapState({he:"sum",xuexiao:"school",dizhi:"address"}),

    // 借助 mapState 生成多个计算属性,从state中获取数据
    // 数组简写方法,生成的计算属性的函数名和变量名根据数组中的元素生成,函数名和$state.state中定义的变量名相同
    ...mapState(["sum","school","address"]),
  }
}
</script>

<style>
.warpper {
  display: flex;
}
</style>
9. mapGetters
<template>
  <div id="app" class="container">
    <!-- 1. 展示数据,数据是存在Vuex中的state中的,使用$store.state调用 -->
    <h3>求和结果为:{{ he }}</h3>
    <h3>放大十倍结果为:{{ bigSum }}</h3>
    <h3>学校:{{ xuexiao }}</h3>
    <h3>地址:{{ dizhi }}</h3>
    <div class="warpper">
      <Add/>
      <Sub/>
    </div>

  </div>
</template>

<script>
import Add from "@/components/Add.vue";
import Sub from "@/components/Sub.vue";
// 1. 导入mapGetters
import {mapState,mapGetters} from "vuex";

export default {
  name: 'App',
  components: {
    Add,
    Sub
  },
  computed: {
    ...mapState(["sum","school","address"]),

	// 两种写法
    // 借助 mapState 生成多个计算属性,从getters中获取数据
    // 对象写法,生成的计算属性的函数名和$state.getters中定义的变量名根据对象中的key-value生成
    ...mapGetters({bigSum:"bigSum"})

    // 借助 mapState 生成多个计算属性,从getters中获取数据
    // 数组简写方法,生成的计算属性的函数名和变量名根据数组中的元素生成,函数名和$state.getters中定义的变量名相同
    ...mapGetters(["bigSum"])
  }
}
</script>

<style>
.warpper {
  display: flex;
}
</style>
10. mapActions
Add.vue
<template>
  <div class="category">
    <button @click="increment(1)">+</button>
    <!-- 2. 手动将想要Add的value参数传到incrementWait中 -->
    <button @click="incrementWait(1)">延时+</button>
    <button @click="incrementOdd(1)">奇数+</button>
  </div>
</template>
<script>
// 1. 导入mapActions
import {mapActions,mapMutations} from "vuex";

export default {
  name: "Add",
  methods:{
    // mapMutations的原生写法
    increment(){
      this.$store.commit("ADD",1)
    },

    ...mapMutations({increment:"increment"})

    ...mapMutations(["increment"])

    // mapActions的原生写法
    incrementWait(){
      this.$store.dispatch('addWait',1)
    },
    incrementOdd(){
      this.$store.dispatch("addOdd",1)
    }

    // 两种写法
    // 3. 借助 mapState 生成多个方式,调用$store.dispatch(),对象写法
    ...mapActions({incrementWait:"incrementWait",incrementOdd:"incrementOdd"})

    // 3. 借助 mapState 生成多个方式,调用$store.dispatch(),如果事件回调函数和actions中定义的方法名相同,数组写法
    ...mapActions(["increment",incrementOdd])
  }
}
</script>
<style scoped>
button{
  margin-left: 30px;
}
</style>
11. mapMutations
Add.vue
<template>
  <div class="category">
    <!-- 2. 手动将想要Add的value参数传到increment中 -->
    <button @click="increment(1)">+</button>
    <button @click="incrementWait">延时+</button>
    <button @click="incrementOdd">奇数+</button>
  </div>
</template>
<script>
// 1. 导入mapMutations
import {mapMutations} from "vuex";

export default {
  name: "Add",
  methods:{
    increment(){
      this.$store.commit("ADD",1)
    },
    // 两种写法
    // 3. 借助 mapState 生成多个方式,调用$store.commit(),对象写法
    ...mapMutations({increment:"increment"})

    // 3. 借助 mapState 生成多个方式,调用$store.commit(),如果事件回调函数和mutations中定义的方法名相同,数组写法
    ...mapMutations(["increment"])
  }
}
</script>
<style scoped>
button{
  margin-left: 30px;
}
</style>
或者手动调用函数传参数
<template>
  <div class="category">
    <button @click="increment">+</button>
    <button @click="incrementWait">延时+</button>
    <button @click="incrementOdd">奇数+</button>
  </div>
</template>
<script>
export default {
  name: "Add",
  methods:{
    // 1. 手动调用函数传递参数
    increment(){
      this.incrementFunc(1)
    },
    // 借助 mapState 生成多个方式,调用$store.commit()
    ...mapMutations({incrementFunc:"increment"})

    incrementWait(){
      this.$store.dispatch('addWait',1)
    },
    incrementOdd(){
      this.$store.dispatch("addOdd",1)
    }
  }
}
</script>
<style scoped>
button{
  margin-left: 30px;
}
</style>
12. 模块化拆分
src/store/index.js
import Vue from 'vue'
import Vuex from 'vuex'

Vue.use(Vuex)

// 求和相关的配置
const countOptions = {
    namespaced:true,  // 加命名空间
    actions: {
        add: function (context, value) {
            context.commit("ADD", value)
        },
        sub: function (context, value) {
            context.commit("SUB", value)
        },
        addOdd: function (context, value) {
            if (context.state.sum % 2) {
                context.commit("ADD", value)
            }
        },
        addWait: function (context, value) {
            setTimeout(() => {
                context.commit('ADD', value)
            }, 500)
        }
    },
    mutations: {
        ADD: function (state, value) {
            state.sum += value
        },
        SUB: function (state, value) {
            state.sum -= value
        }
    },
    state: {
        sum: 0,
        school: "一中",
        address: "北京"
    },
    getters: {
        bigSum(state) {
            return state.sum * 10
        }
    }
}


// 人员相关的配置
const personOptions = {
    namespaced:true,    // 加命名空间
    actions: {
        add: function (context, value) {
            context.commit("ADD", value)
        },
        sub: function (context, value) {
            context.commit("SUB", value)
        },
        addOdd: function (context, value) {
            if (context.state.sum % 2) {
                context.commit("ADD", value)
            }
        },
        addWait: function (context, value) {
            setTimeout(() => {
                context.commit('ADD', value)
            }, 500)
        }
    },
    mutations: {
        ADD: function (state, value) {
            state.sum += value
        },
        SUB: function (state, value) {
            state.sum -= value
        }
    },
    state: {
        sum: 0,
        school: "一中",
        address: "北京"
    },
    getters: {
        bigSum(state) {
            return state.sum * 10
        }
    }
}

export default new Vuex.Store({
    modules:{
        countOptions,   // 求和相关的配置
        personOptions   // 人员相关的配置
    }
})
调用
// 原生调用
this.$store.state.countOptions.sum       	// 读取countOptions中的state数据
this.$store.getters["countOptions/bigSum"]  // 读取countOptions中的getters数据
this.$store.dispath("countOptions/incrementWait",1)
this.$store.commit("countOptions/incrementWait",1)

// 借助map
...mapState("countOptions",["sum","school","address"]),  // 读取 countOptions中state中的sum school address
...mapState("personOptions",["personList"]),  			// 读取 personOptions

...mapGetters("countOptions",["bigSum"]),  				// 读取 countOptions中getters中的bigSum
...mapGetters("personOptions",["personName"]),  		// personOptions的

...mapActions("countOptions",["incrementWait","incrementOdd"]),  // 调用 countOptions的actions中的incrementWait
...mapActions("personOptions",["personNameAdd"]),  			    // 调用 personOptions的

...mapMutations("countOptions",["increment"]),  			// 调用 countOptions的mutations中的incrementWait
...mapMutations("personOptions",["personList"]),  			// 调用 personOptions的
13. 文件拆分
src/store/count.js
// 求和相关的配置
export default {
    actions: {
        // 2. 定义操作sum的方法,context为上下文对象,其中保存着所有的数据及操作函数
        add: function (context, value) {
            // 2. 提交给mutations操作数据
            context.commit("ADD", value)
        },
        sub: function (context, value) {
            context.commit("SUB", value)
        },
        // 当sum值为奇数时再加
        addOdd: function (context, value) {
            if (context.state.sum % 2) {
                context.commit("ADD", value)
            }
        },
        // 在actions中调用ajax请求,这里使用定时器模拟
        addWait: function (context, value) {
            setTimeout(() => {
                context.commit('ADD', value)
            }, 500)
        }
    },
    // 一般mutations中的函数大写,用来区分和actions中的函数
    mutations: {
        // 3. 定义真正操作sum的方法
        ADD: function (state, value) {
            state.sum += value
        },
        SUB: function (state, value) {
            state.sum -= value
        }
    },
    state: {
        // 1. 定义数据
        sum: 0,
        school: "一中",
        address: "北京"
    },
    getters: {
        bigSum(state) {
            return state.sum * 10
        }
    }
}
src/store/person.js
// 人员相关的配置
export default {
    actions: {
        // 2. 定义操作sum的方法,context为上下文对象,其中保存着所有的数据及操作函数
        add: function (context, value) {
            // 2. 提交给mutations操作数据
            context.commit("ADD", value)
        },
        sub: function (context, value) {
            context.commit("SUB", value)
        },
        // 当sum值为奇数时再加
        addOdd: function (context, value) {
            if (context.state.sum % 2) {
                context.commit("ADD", value)
            }
        },
        // 在actions中调用ajax请求,这里使用定时器模拟
        addWait: function (context, value) {
            setTimeout(() => {
                context.commit('ADD', value)
            }, 500)
        }
    },
    // 一般mutations中的函数大写,用来区分和actions中的函数
    mutations: {
        // 3. 定义真正操作sum的方法
        ADD: function (state, value) {
            state.sum += value
        },
        SUB: function (state, value) {
            state.sum -= value
        }
    },
    state: {
        // 1. 定义数据
        sum: 0,
        school: "一中",
        address: "北京"
    },
    getters: {
        bigSum(state) {
            return state.sum * 10
        }
    }
}
src/store/index.js
import Vue from 'vue'
import Vuex from 'vuex'

Vue.use(Vuex)

import countOptions from "@/store/count";
import personOptions from "@/store/person";

export default new Vuex.Store({
    modules:{
        countOptions,   // 求和相关的配置
        personOptions   // 人员相关的配置
    }
})

 浙公网安备 33010602011771号