

linxu系统安装nginx并将项目进行热备部署
首先说明我用的是redhat7.5进行部署的。
下载地址:http://nginx.org/en/download.html
网盘中包含nginx安装包和安装部署文档
链接:https://pan.baidu.com/s/19PAwdhsSJh4BzEr-FdnINQ
提取码:1234
可以参考链接:https://blog.csdn.net/qq_42815754/article/details/82980326
更换yum源参考链接:https://blog.csdn.net/chenyu940415/article/details/107335985
vi替换字符串命令参考链接:https://blog.csdn.net/londa/article/details/91125654
wget无法解析主机地址参考链接:https://blog.csdn.net/weixin_38061311/article/details/100576198
整个安装过程基本参考了以上链接,接下来说一说我的具体安装过程吧。
首先下载nginx,参考上边的链接即可。
下载完成后,将文件上传到linux
先准备一下环境,安装gcc、pcre、pcre-devel、zlib、zlib-devel,安装目的想看的看一下,不想看可以直接忽略,反正我第一次安装的时候没有细看,现在写博客再详细看看。
安装gcc的目的:编译依赖 gcc 环境
安装pcre和pcre-devle的目的:Nginx的Rewrite模块和HTTP核心模块会使用到PCRE正则表达式语法,这里需要安装两个安装包pcre和pcre-devel。第一个安装包提供编译版本的库,而第二个提供开发阶段的头文件和编译项目的源代码
安装zlib和zlib-devel的目的:zlib库提供了开发人员的压缩算法,在Nginx的各种模块中需要使用gzip压缩。
命令如下,请依次执行:
yum install gcc-c++
yum install -y pcre pcre-devel
yum install -y zlib zlib-devel
这里敲黑板了啊!!!因为安装的是redhat,yum源是需要注册收费的,所以悲催的我们需要更换yum源。这也是我开头就写了更换yum源参考连接的原因了。我想要在不联网的情况下更换yum源,因为如果去现场部署,一般都不会给你连外网的机会的,但是我查了很久很久,最终没有安装成功,于是只能屈服了,联网更换yum源吧,也许客户那里yum源可以直接使用呢。
那么配置一下网络吧,先将vmvare中redhat的网络适配器改为桥接模式
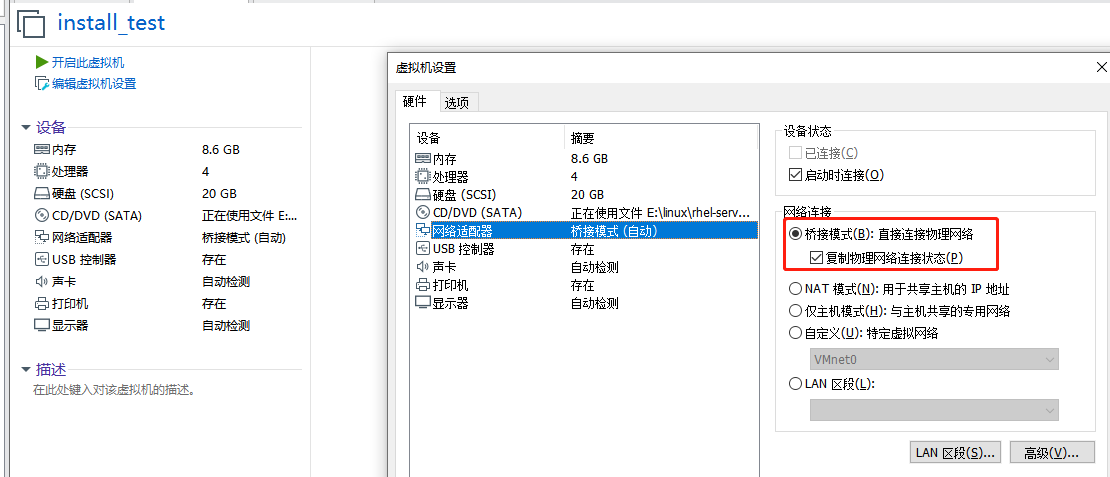
然后查看自己本机的IP地址(能访问到互联网的

linux中进入/etc/sysconfig/network-scripts/这个目录,并配置ip,跟上图中网段要保持一致,并且一定要设置gateway,不然无法连接互联网的。

[root@localhost ~]# cd /etc/sysconfig/network-scripts/
[root@localhost network-scripts]# vi ifcfg-ens33
TYPE=Ethernet
BOOTPROTO=static
DEVICE=ens33
ONBOOT=yes
IPADDR=192.168.199.131
GATEWAY=192.168.199.1
NETMASK=255.255.255.0
重启服务
service network restart
确认可以连接互联网,然后就可以进行更新换yum源了。
首先查询之前安装的yum源,命令如下
sudo rpm -qa|grep yum
卸载
rpm -qa|grep yum|xargs rpm -e --nodeps
然后就是下载新的yum源了,建议建立一个rpm文件夹,依次执行以下五个文件
sudo wget http://vault.centos.org/7.5.1804/os/x86_64/Packages/yum-3.4.3-158.el7.centos.noarch.rpm
sudo wget http://vault.centos.org/7.5.1804/os/x86_64/Packages/yum-metadata-parser-1.1.4-10.el7.x86_64.rpm
sudo wget http://vault.centos.org/7.5.1804/os/x86_64/Packages/yum-plugin-fastestmirror-1.1.31-45.el7.noarch.rpm
sudo wget http://vault.centos.org/7.5.1804/os/x86_64/Packages/python-iniparse-0.4-9.el7.noarch.rpm
sudo wget http://vault.centos.org/7.5.1804/os/x86_64/Packages/python-urlgrabber-3.10-8.el7.noarch.rpm
成功下载之后进行安装,依次执行以下命令:
rpm -ivh python-iniparse-0.4-9.el7.noarch.rpm
rpm -ivh python-urlgrabber-3.10-8.el7.noarch.rpm
rpm -ivh yum-metadata-parser-1.1.4-10.el7.x86_64.rpm
rpm -ivh yum-plugin-fastestmirror-1.1.31-45.el7.noarch.rpm  yum-3.4.3-158.el7.centos.noarch.rpm
安装完成之后就可以验证一下版本了
yum -v
确认没有问题,下载repo模板,命令如下:
wget -O /etc/yum.repos.d/CentOS-Base.repo http://mirrors.aliyun.com/repo/Centos-7.repo
然后修改这个文件,将文件中所有的$releasever 改为 7,命令如下:
vim /etc/yum.repos.d/CentOS-Base.repo
这个是后又要提一嘴了,这里面需要替换的还是很多的,那么怎么一次全都替换呢,博客开头有参考链接的,不过也在这里提一下,命令如下
:%s/$releasever/7
又要敲黑板了啊,上边这个替换命令,是在vim的命令模式下执行的,不要多敲一个i,进入编辑模式。
其实不下载repo文件,直接创建文件,复制一下内容即可,都已经替换好了。
# CentOS-Base.repo
#
# The mirror system uses the connecting IP address of the client and the
# update status of each mirror to pick mirrors that are updated to and
# geographically close to the client.  You should use this for CentOS updates
# unless you are manually picking other mirrors.
#
# If the mirrorlist= does not work for you, as a fall back you can try the
# remarked out baseurl= line instead.
#
#

[base]
name=CentOS-7 - Base - mirrors.aliyun.com
failovermethod=priority
baseurl=http://mirrors.aliyun.com/centos/7/os/$basearch/
        http://mirrors.aliyuncs.com/centos/7/os/$basearch/
        http://mirrors.cloud.aliyuncs.com/centos/7/os/$basearch/
gpgcheck=1
gpgkey=http://mirrors.aliyun.com/centos/RPM-GPG-KEY-CentOS-7

#released updates
[updates]
name=CentOS-7 - Updates - mirrors.aliyun.com
failovermethod=priority
baseurl=http://mirrors.aliyun.com/centos/7/updates/$basearch/
        http://mirrors.aliyuncs.com/centos/7/updates/$basearch/
        http://mirrors.cloud.aliyuncs.com/centos/7/updates/$basearch/
gpgcheck=1
gpgkey=http://mirrors.aliyun.com/centos/RPM-GPG-KEY-CentOS-7

#additional packages that may be useful
[extras]
name=CentOS-7 - Extras - mirrors.aliyun.com
failovermethod=priority
baseurl=http://mirrors.aliyun.com/centos/7/extras/$basearch/
        http://mirrors.aliyuncs.com/centos/7/extras/$basearch/
        http://mirrors.cloud.aliyuncs.com/centos/7/extras/$basearch/
gpgcheck=1
gpgkey=http://mirrors.aliyun.com/centos/RPM-GPG-KEY-CentOS-7

#additional packages that extend functionality of existing packages
[centosplus]
name=CentOS-7 - Plus - mirrors.aliyun.com
failovermethod=priority
baseurl=http://mirrors.aliyun.com/centos/7/centosplus/$basearch/
        http://mirrors.aliyuncs.com/centos/7/centosplus/$basearch/
        http://mirrors.cloud.aliyuncs.com/centos/7/centosplus/$basearch/
gpgcheck=1
enabled=0
gpgkey=http://mirrors.aliyun.com/centos/RPM-GPG-KEY-CentOS-7

#contrib - packages by Centos Users
[contrib]
name=CentOS-7 - Contrib - mirrors.aliyun.com
failovermethod=priority
baseurl=http://mirrors.aliyun.com/centos/7/contrib/$basearch/
        http://mirrors.aliyuncs.com/centos/7/contrib/$basearch/
        http://mirrors.cloud.aliyuncs.com/centos/7/contrib/$basearch/
gpgcheck=1
enabled=0
gpgkey=http://mirrors.aliyun.com/centos/RPM-GPG-KEY-CentOS-7
然后就是更新yum源操作,命令如下
sudo yum clean all
yum makecache
上边这两个命令执行的时候可能还会报错,提示wget无法解析注解地址,这就涉及到开头提到的参考链接了,需要修改一下DNS,这个dns不一定非得设置我说的这个,这个只是个参考,也可以设置成114.114.114.114
登入root
进入/etc/resolv.conf
vim /etc/resolv.conf
修改内容为下(将DNS地址改为google域名服务器)
nameserver 8.8.8.8
nameserver 8.8.4.4
yum源更换好了,再次执行开头准备环境的三个安装,安装好就可以继续安装nginx了。
进入nginx的上传目录,解压
tar -zxvf nginx-1.10.1.tar.gz
解压完成,进入该文件目录
cd nginx-1.10.1
进行初始化
./configure
编译nginx,如果出错,检查开头安装的三个环境准备是否安装成功
make
安装nginx
make install
nginx默认安装在/usr/local/这个目录下,想要启动配置需要进入该目录
cd /usr/local/nginx/sbin
启动nginx
./nginx
关闭nginx
./nginx -s stop 或者 ./nginx -s quit
重启nginx
./nginx -s reload
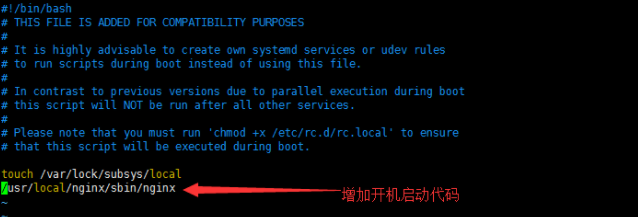
设置nginx开机启动,只需在rc.local增加启动代码即可。
vim /etc/rc.local
然后在底部增加/usr/local/nginx/sbin/nginx
进入/usr/local/nginx/conf目录可修改nginx的配置文件
vim nginx.conf
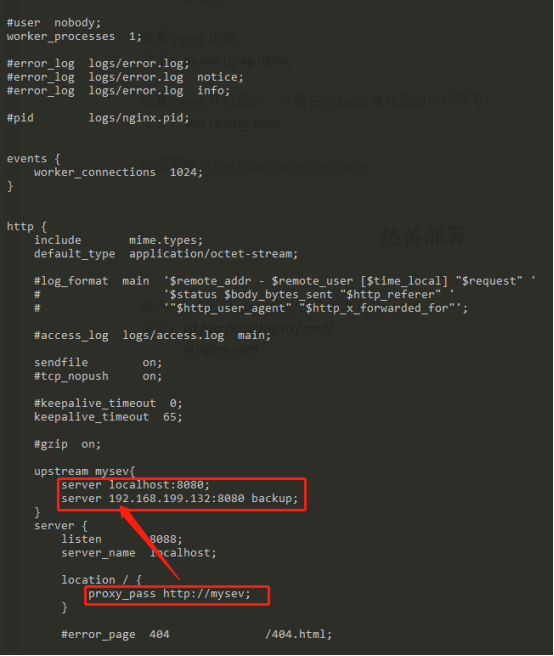
接下来就是热备部署了,以下是主要修改,忽略了一部分代码,进行修改,主要添加修改以下标红位置,没有全部拿过来,可以看下面的图片,配置完成后访问192.168.131:8088,就可以直接访问项目,并且在192.168.131这台服务器上的系统挂掉之后,就可以直接访问192.168.132这个备用服务器上部署的项目
events {
    worker_connections  1024;
}
http {
    upstream mysev{
        server localhost:8080;     #这里是主机服务器访问地址
        server 192.168.199.132:8080 backup;  #这里是备机服务器访问地址
    }
    server {
        listen       8088;    #这里是配置的访问端口
        server_name  localhost;

        location / {
            proxy_pass http://mysev;     #这里是代理 这个mysev对应上边设置的mysev,可以自己任意修改,只要能够对应上即可
        }
}
对了忘了说一个事,测试时不用一个一个去配置两个linux系统,系统部署安装调整好一个之后,直接再克隆一个,然后将克隆的系统ip重新设置一下就可以用了。
以上就是这次安装nginx以及进行热备部署的全过程。仅作记录。

 浙公网安备 33010602011771号