

WPF中的布局控件
WPF中使用Panel进行页面布局,Panel是一个抽象类,它作为所有Panel面板控件的基类。Panel并不是继承自Control类,而是直接从FrameworkElement继承。看Panel的继承关系:
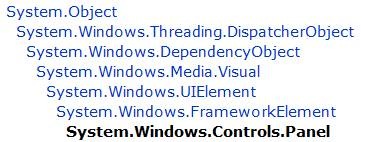
Panel主要有以下这么几个派生类:Canvas、DockPanel、Grid、StackPanel、VirtualizingStackPanel、WrapPanel。下面分别对这几个面板控件进行描述:
一、Canvas
在Canvas区域中,通过指定相对于其的坐标来指定子控件的位置。总共可以设置四个位置的坐标:Left、Right、Top、Bottom。
1) Xaml中指定
在Xaml中,Canvas子元素是通过使用Canvas的附加属性进行设置的。看下面的代码:
<Canvas Name=”MyCanvas”>
<Button Name="Left10Top10" Canvas.Left="10" Canvas.Top="10" Width="110" Height="30">Left10Top10</Button>
<Button Name="Left10Bottom10" Canvas.Left="10" Canvas.Bottom="10" Width="110" Height="30">Left10Bottom10</Button>
<Button Name="Right10Top10" Canvas.Right="10" Canvas.Top="10" Width="110" Height="30">Right10Top10</Button>
<Button Name="Right10Bottom10" Canvas.Right="10" Canvas.Bottom="10" Width="110" Height="30">Right10Bottom10</Button>
</Canvas>
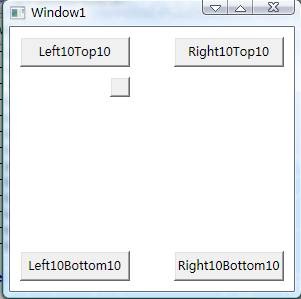
当Button元素中同时存在Canvas.Left和Canvas.Right时,按照Canvas.Left进行设置;同理,Canvas.Top和Canvas.Bottom同时存在时,按照Canvas.Top进行设置。
2) 在代码中设置
Button button = new Button();
button.Width = 20;
button.Height = 20;
this.MyCanvas.Children.Add(button);
Canvas.SetLeft(button, 20);
Canvas.SetTop(button, 20);
3) 最终效果图
二、DockPanel
DockPanel用于设置其子元素如何停靠。停靠的方式有以下四种:左边停靠(DockPanel.Left)、右边停靠(DockPanel.Right)、上面停靠(DockPanel.Top)、下边停靠(DockPanel.Bottom)。
1) 在Xaml中指定
在子元素中通过指定DockPanel.Dock属性来定位,这是一个附加属性。
<DockPanel Name="MyDockPanel">
<Button Name="btnTop" Width="50" Height="30" Content="Top" DockPanel.Dock="Top"></Button>
<Button Name="btnLeft" Width="50" Height="30" Content="Left" DockPanel.Dock="Left"></Button>
<Button Name="btnRight" Width="50" Height="30" Content="Right" DockPanel.Dock="Right"></Button>
<Button Name="btnBottom" Width="50" Height="30" Content="Bottom" DockPanel.Dock="Bottom"></Button>
</DockPanel>
2) 在代码中指定
//创建一个Button
Button button = new Button();
button.Width = 1;
button.Height = 1;
this.MyDockPanel.Children.Add(button);
//指定停靠位置
System.Windows.Controls.DockPanel.SetDock(button, Dock.Bottom);
其中SetDock就是用于设置子元素停靠在DockPanel中哪个位置的,它是一个静态方法。这个方法中虽然没有指定应该停靠到哪个DockPanel中,但是button按钮所在的DockPanel却是固定的,所以它会根据这一层关系去确定。
3) 最终效果图

三、Grid
Grid是通过自己定义行和列来绘制出一个表格。子元素可以通过指定显示在哪个行列单元格内来展现界面布局。
1) 在Xaml中指定
在Xaml中通过<RowDefinition>来定义多少行,通过<ColumnDefinition>来定义多少列。同时在子元素中通过指定Grid.Row和Grid.Column来表示其应该显示在第几行和第几列,这两个属性都是附加属性,并是从0开始计数。
<Grid Name="MyGrid">
<Grid.RowDefinitions>
<RowDefinition></RowDefinition>
<RowDefinition></RowDefinition>
<RowDefinition></RowDefinition>
</Grid.RowDefinitions>
<Grid.ColumnDefinitions>
<ColumnDefinition></ColumnDefinition>
<ColumnDefinition></ColumnDefinition>
</Grid.ColumnDefinitions>
<Button Name="btn1" Width="100" Height="30" Grid.Row="0" Grid.Column="0" Content="第一行第一列"></Button>
<Button Name="btn2" Width="100" Height="30" Grid.Row="0" Grid.Column="1" Content="第一行第二列"></Button>
<Button Name="btn3" Width="100" Height="30" Grid.Row="1" Grid.Column="0" Content="第二行第一列"></Button>
<Button Name="btn4" Width="100" Height="30" Grid.Row="1" Grid.Column="1" Content="第二行第二列"></Button>
</Grid>
2) 在代码中指定
Button btn5 = new Button();
btn5.Width = 100;
btn5.Height = 30;
btn5.Content = "第三行";
this.MyGrid.Children.Add(btn5);
System.Windows.Controls.Grid.SetRow(btn5, 2);
System.Windows.Controls.Grid.SetColumn(btn5, 0);
System.Windows.Controls.Grid.SetColumnSpan(btn5, 2);
代码中的SetRow用于设置子元素定位在Grid中的行,SetColumn用于设置子元素定位在Grid中的列。
同时还有一个SetColumnSpan,它用于干嘛呢?设置列的跨度,在这个列子中,本来它是显示在第三行第一列的,现在多了一个跨度,就好像把第三行中的两列合并为一列显示了。SetRowSpan也是这个道理,这里就不在描述了。
四、 StackPanel
StackPanel用于设置其子元素如何排列,是垂直排列还是水平排列,其是按直线方式排列。StackPanel的排列方式有两种:Vertical(默认)和Horizontal。
1) 在Xaml中指定
StackPanel的默认排列方式为Vertical(垂直),但是如果你想指定为水平Horizontal,那么你可以使用属性Orientation。
<Window.Resources>
<Style x:Key="border" TargetType="{x:Type Border}">
<Setter Property="Background" Value="DarkGreen"></Setter>
<Setter Property="BorderBrush" Value="White"></Setter>
<Setter Property="BorderThickness" Value="2"></Setter>
</Style>
<Style x:Key="textblock" TargetType="{x:Type TextBlock}">
<Setter Property="Foreground" Value="White"></Setter>
</Style>
</Window.Resources>
<StackPanel>
<Border Style="{StaticResource border}">
<TextBlock Text="A" Style="{StaticResource textblock}"></TextBlock>
</Border>
<Border Style="{StaticResource border}">
<TextBlock Text="B" Style="{StaticResource textblock}"></TextBlock>
</Border>
</StackPanel>
2) 在代码中指定
Border border = new Border();
border.Background = Brushes.DarkGreen;
border.BorderBrush = Brushes.White;
border.BorderThickness = new Thickness(2);
this.myStackPanel.Children.Add(border);
TextBlock textBlock = new TextBlock();
textBlock.Foreground = Brushes.White;
textBlock.Text = "C";
border.Child = textBlock;
3) 最终效果图

五、 VirtualizingStackPanel
VirtualizingStackPanel在普通StackPanel的基础上,提供了”虚拟化”的功能。那什么是”虚拟化”呢?先来看一个场景,如果你有一堆基于项的数据,并且你只需要让其中一部分显示在界面上,但是如果你针对里面所有的数据创建界面元素,并显示你需要的元素,那么这将是及其耗时的。”虚拟化”就是用于解决这个问题,它可以只创建你需要显示的数据的界面元素。
VirtualizingStackPanel中的项只有在数据绑定的状态下,才提供”虚拟化”,否则和普通的StackPanel没有区别。
1) 在Xaml中指定(刚刚测试成功,补上代码,但仍有纳闷之事)
对于我测试的2000个项来说,使用<VirtualizingStackPanel>响应是毫秒级的,但是默认的方式至少要3秒中,提升比较明显。
<StackPanel Orientation="Horizontal">
<ComboBox Height="23" Name="personList" Width="120">
<ComboBox.ItemsPanel>
<ItemsPanelTemplate>
<VirtualizingStackPanel>
</VirtualizingStackPanel>
</ItemsPanelTemplate>
</ComboBox.ItemsPanel>
<ComboBox.ItemTemplate>
<DataTemplate>
<TextBlock Text="{Binding Path=Name}"></TextBlock>
</DataTemplate>
</ComboBox.ItemTemplate>
</ComboBox>
<Button Height="23" Name="button1" Width="75" Click="button1_Click">加载成员</Button>
</StackPanel>
这里的关键点是在<ItemPanel>里把ComboBox的默认的<StackPanel>换成<VirtualizingStackPanel>。
但是,如果我通过VirtualizingStackPanel.IsVirtualizing="True"去设定的话,确没有任何效果。如果哪位知道原因,请告知。
后台代码中需要先创建一个类Person,只有一个属性Name。太简单了,代码就不贴了。
在Window窗口的后台代码中,创建一个List<Person>,用于保存临时成员,然后把它赋给ComboBox。
List<Person> persons = new List<Person>();
for (int i = 0; i < 2000; i++)
{
Person person = new Person();
person.Name = i.ToString();
this.persons.Add(person);
}
this.personList.ItemsSource = persons;
六、 WrapPanel
WrapPanel用于在对平方向或垂直方向顺序定位子元素,当到达边缘时,则换行从新开始。
1) 在Xaml中指定
WrapPanel的默认方向就是水平的,其实这边可以不填写。如果你要使用垂直,那就要指定为Orientation="Vertical"。水平方向是根据Width来换行的,垂直方向就是根据Height来换行。
<WrapPanel Name="myWrapPanel" Width="200" Orientation="Horizontal">
<Button Width="50" Height="25">宽度50</Button>
<Button Width="150" Height="25">宽度150</Button>
<Button Width="100" Height="25">宽度100</Button>
<Button Width="101" Height="25">宽度101</Button>
</WrapPanel>
2) 在代码中指定
Button button1 = new Button();
button1.Width = 50;
this.myWrapPanel.Children.Add(button1);
3) 最终效果图


 浙公网安备 33010602011771号