一、Spring基本概念

    1.spring是一个分层的JavaSE/EE full-stack 轻量级的开源框架。
        轻量级:依赖的资源少,消耗的资源也少。
        分层:web层、service层、dao层

    2.spring的核心是:控制反转(IoC)和切面编程(AOP).

    3.可以理解为,spring就是一个大工厂(容器),可以将所有对象创建和依赖关系维护,交给spring管理。spring工厂是用于生产bean;

    4.体系结构:四个核心容器:core、beans、context、expression
二、IoC
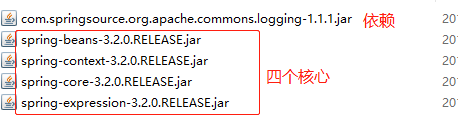
1.导入jar包,需要4个核心+1个依赖
![]()
    2.之前的开发中,直接使用new一个对象即可,现在开始,将由spring创建对象实例,即IoC控制反转。
      以后需要实例对象是,从spring工厂(容器中)获取,需要将实现类的全限定名称配置到xml文件。

    3.配置文件
        (1)位置:任意 ,通常开发中在classpath下(src)
        (2)名称:任意,开发中通常是在applicationContext.xml
        (3)内容:添加schema约束
     (4)约束文件 位置:\spring-framework-4.2.4.RELEASE\docs\spring-framework-reference\html\xsd-configuration.html
<?xml version="1.0" encoding="UTF-8"?>
<beans xmlns="http://www.springframework.org/schema/beans"
       xmlns:xsi="http://www.w3.org/2001/XMLSchema-instance"
       xsi:schemaLocation="
                            http://www.springframework.org/schema/beans
                            http://www.springframework.org/schema/beans/spring-beans.xsd">

    <!--
        配置service
        <bean>配置需要创建的对象
            id:用于之后从spring容器获得实例
            class:需要创建实例的全限定类名
    -->
    <bean id="userServiceId" class="spring_day01.a_ioc.UserServiceImpl"></bean>

</beans>
4.测试
@Test
    public void demo1(){

        //1 获得容器
        String xmlPath = "spring_day01/a_ioc/beans.xml";
        ApplicationContext applicationContext = new ClassPathXmlApplicationContext(xmlPath);
        //2获得内容
        UserService userService = (UserService) applicationContext.getBean("userServiceId");
        userService.addUser();

    }
三、DI(Dependency Injection)

    依赖:一个对象需要使用另一个对象
    注入:通过setter方法进行另一个对象实例设置
    spring配置:
        <property>用于进行属性注入
            name:bean属性名,通过set方法获得。如:setBookDao-->BookDao-->bookDao
            ref:另一个bean的id值的引用
<?xml version="1.0" encoding="UTF-8"?>
<beans xmlns="http://www.springframework.org/schema/beans"
       xmlns:xsi="http://www.w3.org/2001/XMLSchema-instance"
       xsi:schemaLocation="
                            http://www.springframework.org/schema/beans
                            http://www.springframework.org/schema/beans/spring-beans.xsd">

   <!--Service-->
    <bean id="bookServiceId" class="spring_day01.b_di.BookServiceImpl">
        <property name="bookDao" ref="bookDaoId"></property>
    </bean>
    <!--dao-->
    <bean id="bookDaoId" class="spring_day01.b_di.BookDaoImpl"></bean>
</beans>
四、装配基于XML的bean

    1、实例化方式
        1)默认构造函数
            <bean id="" class="">   ---》默认构造函数是一定存在的

        2)静态工厂
            常用于spring整合其他框架;用于生成实例对象,所有的方法都必须是静态的
            spring配置:class="" :确定静态工厂的全限定类名
                        factory-method="":确定静态方法名
<?xml version="1.0" encoding="UTF-8"?>
<beans xmlns="http://www.springframework.org/schema/beans"
       xmlns:xsi="http://www.w3.org/2001/XMLSchema-instance"
       xsi:schemaLocation="
                            http://www.springframework.org/schema/beans
                            http://www.springframework.org/schema/beans/spring-beans.xsd">


    <bean id="userServiceId" class="spring_day01.c_inject.b_static_factory.MyBeanFactory" factory-method="createService"></bean>
</beans>
        3)实例工厂
            必须先有工厂实例对象,通过实例对象创建对象。提供的所有方法都是“非静态”的
            spring配置:factory-bean:确定工厂实例
                        factory-method:确定普通方法
<?xml version="1.0" encoding="UTF-8"?>
<beans xmlns="http://www.springframework.org/schema/beans"
       xmlns:xsi="http://www.w3.org/2001/XMLSchema-instance"
       xsi:schemaLocation="
                            http://www.springframework.org/schema/beans
                            http://www.springframework.org/schema/beans/spring-beans.xsd">


    <bean id="myBeanFactoryId" class="spring_day01.c_inject.c_factory.MyBeanFactory"></bean>
    <bean id="userServiceId" factory-bean="myBeanFactoryId" factory-method="createService"></bean>
</beans>
    2.bean种类
        普通bean:spring直接创建实例,并返回
        FactoryBean:是一个特殊的bean,具有工厂生产对象的能力,只能生成特定的对象
        bean必须使用factoryBean接口,次接口提供的getObject方法用于获取特定的bean
        注:BeanFactory,工厂,用来生产任意bean
            FactoryBean,特殊的bean,用来生产另一个特定的bean

     3.作用域
        用于确定spring创建bean实例个数
         (1)singleton:在Spring IoC容器中仅存在一个Bean实例,Bean以单例方式存在,默认值
         (2)prototype:每次从容器中调用Bean时,都返回一个新的实例,即每次调用getBean()时 ,相当于执行new XxxBean。多例。
         (3)request:每次HTTP请求都会创建一个新的Bean,该作用域仅适用于WebApplicationContext环境
         (4)session:同一个HTTP Session 共享一个Bean,不同Session使用不同Bean,仅适用于WebApplicationContext 环境
         (5)globalSession:一般用于Portlet应用环境,该作用域仅适用于WebApplicationContext 环境
          spring配置:
            <bean id="" class="" scope="prototype">

     4.生命周期
        (1)销毁和初始化
            目标执行前后,将进行初始化和销毁
            <bean id="" class="" init-method="初始化方法名" destroy-method="销毁方法名"></bean>
            注意 :容器必须关闭才会执行销毁方法。
                applicationContext.getClass().getMethod("close").invoke(applicationContext);或者 applicationContext.close();

        (2)BeanPostProcessor 后处理bean
            spring提供一种机制,只要实现此接口BeanPostProcessor,并将实现类提供给spring容器,spring容器将自动执行,在初始化方法前执行before,在初始化方法后执行after.
import org.springframework.beans.BeansException;
import org.springframework.beans.factory.config.BeanPostProcessor;

import java.lang.reflect.InvocationHandler;
import java.lang.reflect.Method;
import java.lang.reflect.Proxy;

public class MyBeanPostProcessor implements BeanPostProcessor {
    @Override
    public Object postProcessBeforeInitialization(Object o, String s) throws BeansException {

        System.out.println("前方法");
        return o;
    }

    @Override
    public Object postProcessAfterInitialization(Object bean, String beanName) throws BeansException {
        System.out.println("后方法");
        return Proxy.newProxyInstance(MyBeanPostProcessor.class.getClassLoader(), bean.getClass().getInterfaces(), new InvocationHandler() {
            @Override
            public Object invoke(Object proxy, Method method, Object[] args) throws Throwable {
                System.out.println("========开启事务=========");
                Object object = method.invoke(bean, args);
                System.out.println("========关闭事务=========");
                return object;
            }
        });
    }
}
<?xml version="1.0" encoding="UTF-8"?>
<beans xmlns="http://www.springframework.org/schema/beans"
       xmlns:xsi="http://www.w3.org/2001/XMLSchema-instance"
       xsi:schemaLocation="
                            http://www.springframework.org/schema/beans
                            http://www.springframework.org/schema/beans/spring-beans.xsd">


    <bean id="userServiceId" class="spring_day01.c_inject.e_lifecycle.UserServiceImpl" init-method="MyInit" destroy-method="MyDestory"></bean>
    <bean class="spring_day01.c_inject.e_lifecycle.MyBeanPostProcessor"></bean>
</beans>
(3)配置
![]()
![]()
/**
 * 构造方法
 * 目标类
 */
public class User {
    private int uid;
    private String username;
    private int age;

    public User(int uid, String username) {
        this.uid = uid;
        this.username = username;
    }

    public User(String username, int age) {
        this.username = username;
        this.age = age;
    }

    public int getUid() {
        return uid;
    }

    public void setUid(int uid) {
        this.uid = uid;
    }

    public String getUsername() {
        return username;
    }

    public void setUsername(String username) {
        this.username = username;
    }

    public int getAge() {
        return age;
    }

    public void setAge(int age) {
        this.age = age;
    }

    @Override
    public String toString() {
        return "User{" +
                "uid=" + uid +
                ", username='" + username + '\'' +
                ", age=" + age +
                '}';
    }
}
View Code![]()
![]()
<?xml version="1.0" encoding="UTF-8"?>
<beans xmlns="http://www.springframework.org/schema/beans"
       xmlns:xsi="http://www.w3.org/2001/XMLSchema-instance"
       xsi:schemaLocation="
                            http://www.springframework.org/schema/beans
                            http://www.springframework.org/schema/beans/spring-beans.xsd">

<!--构造方法 spring配置-->

    <bean  id="userId" class="spring_day01.c_inject.f_xml.a_constructor.User">
        <constructor-arg index="0" type="java.lang.String" value="tom"></constructor-arg>
        <constructor-arg index="1" type="int" value="22"></constructor-arg>
    </bean>
</beans>
View Code
<?xml version="1.0" encoding="UTF-8"?>
<beans xmlns="http://www.springframework.org/schema/beans"
       xmlns:xsi="http://www.w3.org/2001/XMLSchema-instance"

       xsi:schemaLocation="
                            http://www.springframework.org/schema/beans
                            http://www.springframework.org/schema/beans/spring-beans.xsd">


    <bean  id="userId" class="spring_day01.c_inject.f_xml.b_setter.Person">
        <property name="pname" value="张三"></property>
        <property name="age" value="12"></property>
        <property name="homeAddr" ref="homeAddressId"></property>
        <property name="companyAddr" ref="companyAddressId"></property>
    </bean>

    <bean id="homeAddressId" class="spring_day01.c_inject.f_xml.b_setter.Address">
        <property name="addr" value="沈阳"></property>
        <property name="tel" value="110"></property>
    </bean>

    <bean id="companyAddressId" class="spring_day01.c_inject.f_xml.b_setter.Address">
        <property name="addr" value="大连"></property>
        <property name="tel" value="111"></property>
    </bean>
</beans>
     5.属性依赖注入
        (1)依赖注入方式:手动装配和自动装配
        (2)手动装配:一般进行配置信息都采用手动方式
            1)基于xml装配:构造方法、setter方法
            2)基于注释装配
        (3)自动装配:struts和spring整合可以自动装配
            byType:按类型装配
            byName:按名称装配
            constructor构造装配,
            auto: 不确定装配。


 浙公网安备 33010602011771号