Docker(44)- 初识 Dockerfile
Dockerfile
- Dockerfile 是 Docker 中用于定义镜像自动化构建流程的配置文件
- 在 Dockerfile 中,包含了构建镜像过程中需要执行的命令和其他操作
- 它可以明确设定 Docker 镜像的制作过程,帮助我们在容器体系下能够完成自动构构建
使用 Dockerfile 构建镜像的步骤
- 编写一个 dockerfile 文件
- docker build 构建成为一个镜像
- docker run 运行镜像
- docker push 发布镜像(DockerHub 、阿里云仓库)
为什么要用 Dockerfile
- Dockerfile 是面向开发的,以后要发布项目,做镜像,就需要编写 dockerfile 文件
- Docker 镜像逐渐成企业交付的标准,必须要掌握!
- DockerFile 构建镜像文件,定义了一切的步骤,源代码
- Dockerfile 的体积小,容易进行快速迁移部署
- 环境构建流程记录在 Dockerfile 中,能够直观的看到镜像构建的顺序和逻辑
- Docker Images 通过 DockerFile 构建生成的镜像,最终发布和运行产品
- Docker 容器,镜像运行起来提供服务
Dockerfile 构建过程
- 每个保留关键字(指令)都是必须是大写字母
- 执行从上到下顺序
- #表示注释
- 每一个指令都会创建提交一个新的镜像层,并提交
简单的 Dockerfile 栗子
编写 dockerfile 文件
在任意目录创建一个 dockerfile 文件,输入以下命令
# 构建一个基于ubuntu的docker定制镜像
# 基础镜像
FROM ubuntu

# 镜像作者
MAINTAINER my_name polotest@domain.com

# 执行命令
## 换成国内的软件源
RUN sed -i 's/archive.ubuntu.com/mirrors.ustc.edu.cn/g' /etc/apt/sources.list
RUN sed -i 's/security.ubuntu.com/mirrors.ustc.edu.cn/g' /etc/apt/sources.list

## 安装nginx
RUN apt update >/dev/null 2>&1
RUN apt install nginx -y >/dev/null 2>&1

# 暴露对外端口
EXPOSE 80
执行 docker build
docker build --network=host -t ubuntu-nginx:v1 .
镜像的构建过程
[user@centos8 nginx]$ docker build --network=host -t ubuntu-nginx:v1 .
# 将上下文求发送给Docker引擎
Sending build context to Docker daemon   2.56kB
# 下载依赖的镜像
Step 1/7 : FROM ubuntu
latest: Pulling from library/ubuntu
d51af753c3d3: Pull complete
fc878cd0a91c: Pull complete
6154df8ff988: Pull complete
fee5db0ff82f: Pull complete
Digest: sha256:747d2dbbaaee995098c9792d99bd333c6783ce56150d1b11e333bbceed5c54d7
Status: Downloaded newer image for ubuntu:latest
# 生成镜像 1d622ef86b13
 ---> 1d622ef86b13
Step 2/7 : MAINTAINER my_name myemail@domain.com
# 运行容器 4eec6e3094f0,在容器内运行上面的这个命令,标记维护者信息
 ---> Running in 4eec6e3094f0
# 移除临时容器 4eec6e3094f0
Removing intermediate container 4eec6e3094f0
# 生成镜像 6679d1c204e3
 ---> 6679d1c204e3
Step 3/7 : RUN sed -i 's/archive.ubuntu.com/mirrors.ustc.edu.cn/g' /etc/apt/sources.list
# 运行容器84d38c20d8c4,在容器内运行上面的这个命令,更换软件源记录
 ---> Running in 84d38c20d8c4
# 移除临时容器 84d38c20d8c4
Removing intermediate container 84d38c20d8c4
# 生成镜像 83f29f7b055a
 ---> 83f29f7b055a
Step 4/7 : RUN sed -i 's/security.ubuntu.com/mirrors.ustc.edu.cn/g' /etc/apt/sources.list
# 运行容器 763e4493d93f, 在容器内运行上面的这个命令,更换软件源记录
 ---> Running in 763e4493d93f
# 移除临时容器 763e4493d93f
Removing intermediate container 763e4493d93f
# 生成镜像 6297f20605d9
 ---> 6297f20605d9
Step 5/7 : RUN apt update >/dev/null 2>&1
# 运行容器 2665a7e5a2e9,在容器内运行上面的这个命令, 更新软件源缓存
 ---> Running in 2665a7e5a2e9
# 移除临时容器 2665a7e5a2e9
Removing intermediate container 2665a7e5a2e9
# 生成镜像 fdfed940ca4d
 ---> fdfed940ca4d
Step 6/7 : RUN apt install nginx -y >/dev/null 2>&1
# 运行 容器 722a9a544643,在容器内运行上面的这个命令, 安装nginx
 ---> Running in 722a9a544643
# 移除临时容器 722a9a544643
Removing intermediate container 722a9a544643
# 生成镜像 6ee76f7df9e5
 ---> 6ee76f7df9e5
Step 7/7 : EXPOSE 80
# 运行容器 a12ed3216ee0,在容器内运行上面的这个命令, 暴露80端口
 ---> Running in a12ed3216ee0
# 移除临时容器 a12ed3216ee0
Removing intermediate container a12ed3216ee0
# 生成最终的镜像 7cf64279ba98
 ---> 7cf64279ba98
Successfully built 7cf64279ba98
# 将这个镜像标记命名 ubuntu-nginx 版本号v1
Successfully tagged ubuntu-nginx:v1
Dockerfile 就是将在文件中书写的构建指令,一层一层从 FROM 指定的基础镜像使用临时容器过渡,逐层叠加起来最终生成目标镜像
使用 docker history 查看镜像历史
[user@centos8 nginx]$ docker history ubuntu-nginx:v1
IMAGE               CREATED             CREATED BY                                      SIZE                COMMENT
7cf64279ba98        21 minutes ago      /bin/sh -c #(nop)  EXPOSE 80                    0B
6ee76f7df9e5        21 minutes ago      /bin/sh -c apt install nginx -y >/dev/null 2…   59.2MB
fdfed940ca4d        21 minutes ago      /bin/sh -c apt update >/dev/null 2>&1           21.4MB
6297f20605d9        21 minutes ago      /bin/sh -c sed -i 's/security.ubuntu.com/mir…   2.76kB
83f29f7b055a        21 minutes ago      /bin/sh -c sed -i 's/archive.ubuntu.com/mirr…   2.76kB
6679d1c204e3        21 minutes ago      /bin/sh -c #(nop)  MAINTAINER my_name myemai…   0B
1d622ef86b13        2 weeks ago         /bin/sh -c #(nop)  CMD ["/bin/bash"]            0B
<missing>           2 weeks ago         /bin/sh -c mkdir -p /run/systemd && echo 'do…   7B
<missing>           2 weeks ago         /bin/sh -c set -xe   && echo '#!/bin/sh' > /…   811B
<missing>           2 weeks ago         /bin/sh -c [ -z "$(apt-get indextargets)" ]     1.01MB
<missing>           2 weeks ago         /bin/sh -c #(nop) ADD file:a58c8b447951f9e30…   72.8MB
Dockerfile 的结构
Dockerfile 主要包含四部分内容:
- 基础镜像信息
- 维护者信息
- 镜像操作指令
- 容器启动时指令
可以将 Dockerfile 理解为一个由上往下执行指令的脚本文件
当调用构建命令,通过 Dockerfile 构建镜像时,Docker 会按照指令顺序进行对应的操作
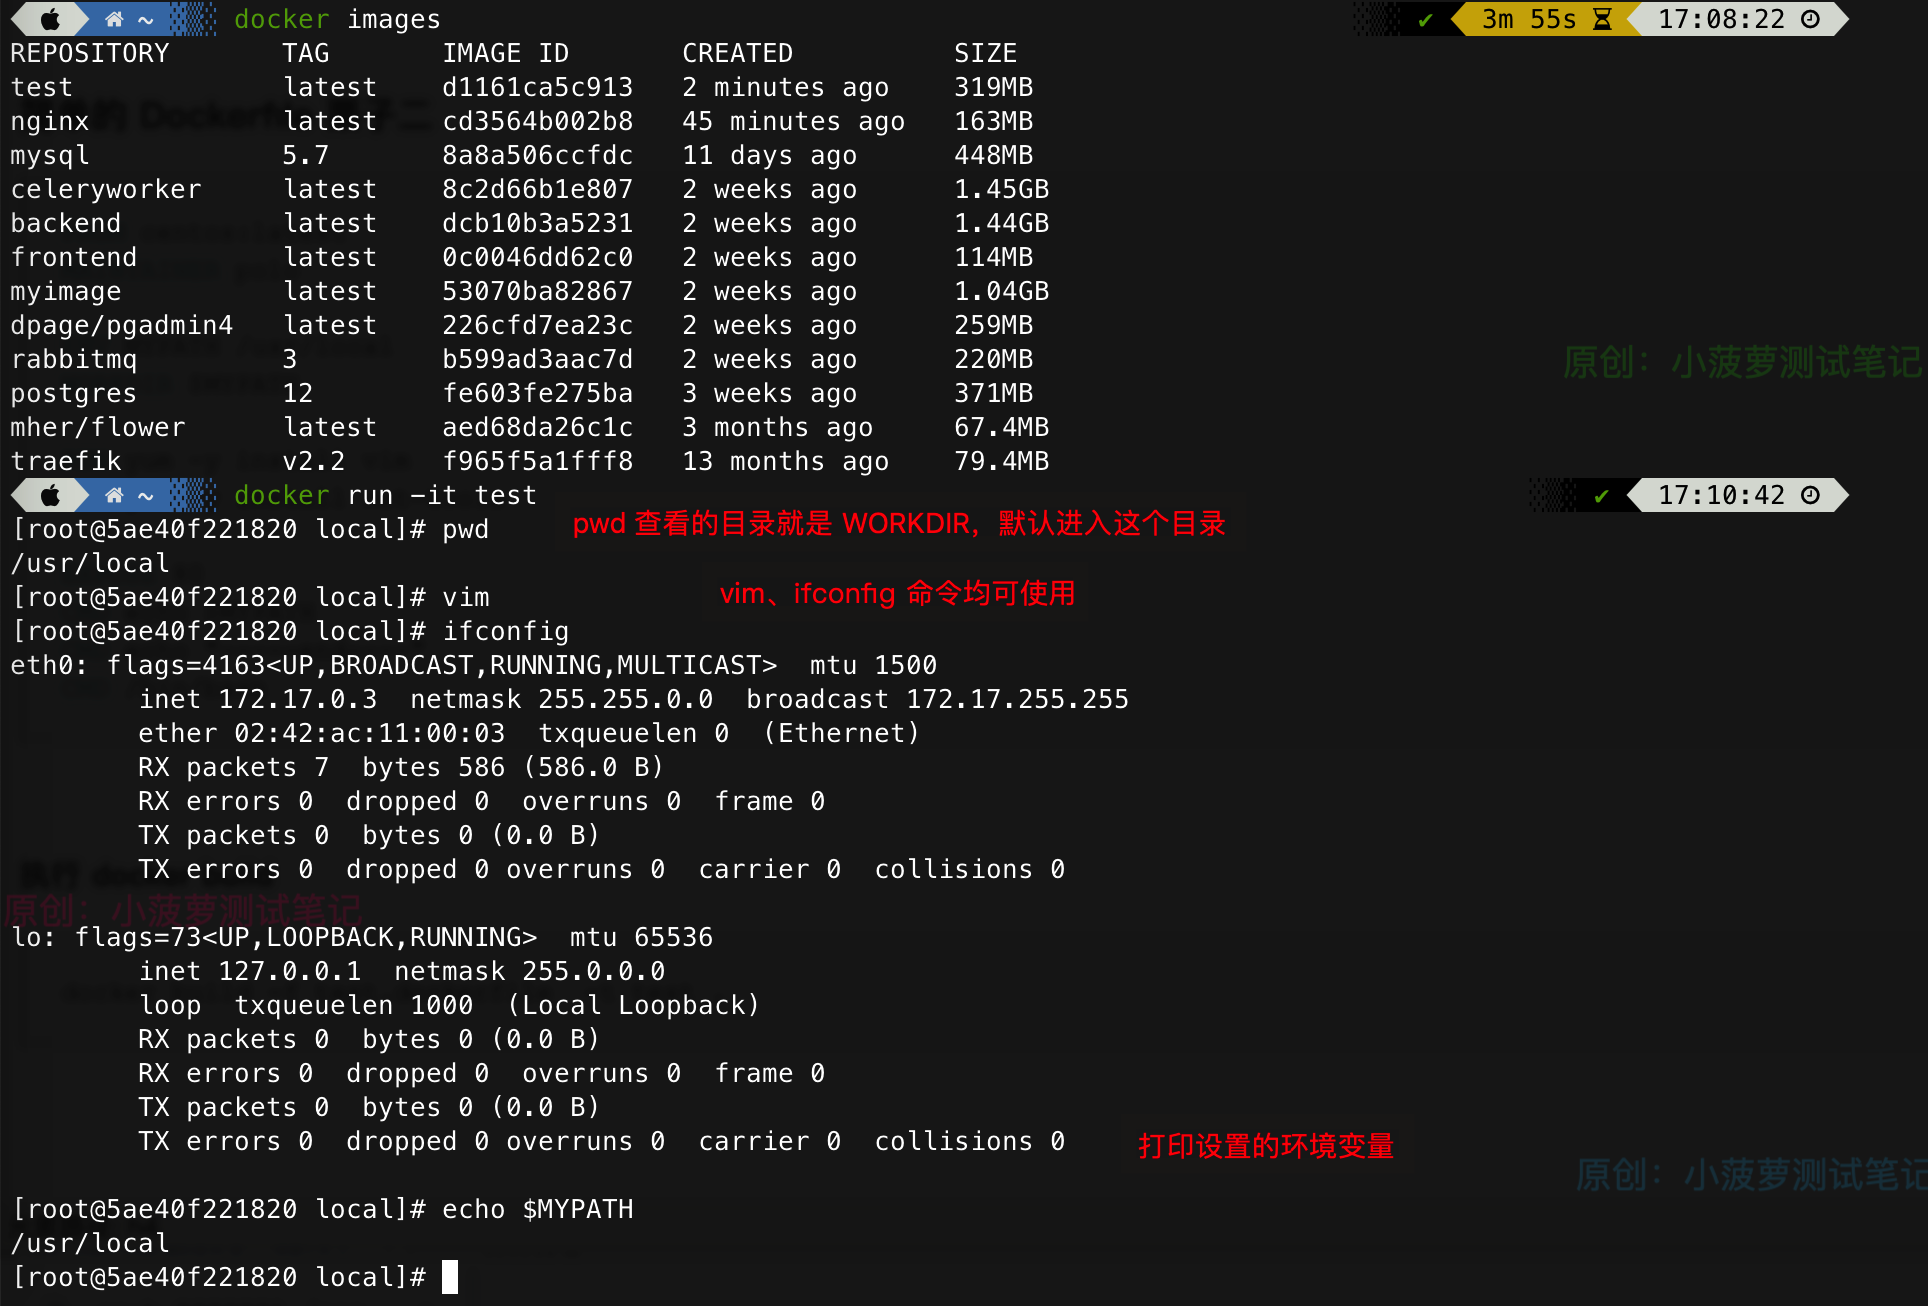
简单的 Dockerfile 栗子二
FROM centos:latest
MAINTAINER polo

ENV MYPATH /usr/local
WORKDIR $MYPATH

RUN yum -y install vim
RUN yum -y install net-tools

EXPOSE 80
CMD echo $MYPATH
CMD echo "-----end----"
CMD /bin/bash
执行 docker build
docker build -f test.dockerfile -t test .
查看镜像和容器
docker build 命令详解
https://www.cnblogs.com/poloyy/p/15455828.html

 浙公网安备 33010602011771号