
1 配置
1.1 创建项目
composer create-project --prefer-dist laravel/laravel zhihuapp '5.8'
1.2 配置数据库
.env
DB_DATABASE=zhihu
DB_USERNAME=root
DB_PASSWORD=123456
1.3 配置站点
test.zhihu.test
nginx配置


server {
    # 监听 HTTP 协议默认的 [80] 端口。
    listen 80;
    # 绑定主机名 [example.com]。
    server_name test.zhihu.dev;
    # 服务器站点根目录 [/example.com/public]。
    root D:/Entrust/zhihuapp/public;

    # 添加几条有关安全的响应头;与 Google+ 的配置类似,详情参见文末。
    add_header X-Frame-Options "SAMEORIGIN";
    add_header X-XSS-Protection "1; mode=block";
    add_header X-Content-Type-Options "nosniff";

    # 站点默认页面;可指定多个,将顺序查找。
    # 例如,访问 http://example.com/ Nginx 将首先尝试「站点根目录/index.html」是否存在,不存在则继续尝试「站点根目录/index.htm」,以此类推...
    index index.html index.htm index.php;

    # 指定字符集为 UTF-8
    charset utf-8;

    # Laravel 默认重写规则;删除将导致 Laravel 路由失效且 Nginx 响应 404。

    location / {
     index index.html index.htm index.php;
    try_files $uri $uri/ /index.php?$query_string;
    }


    # 关闭 [/favicon.ico] 和 [/robots.txt] 的访问日志。
    # 并且即使它们不存在,也不写入错误日志。
    location = /favicon.ico { access_log off; log_not_found off; }
    location = /robots.txt  { access_log off; log_not_found off; }

    # 将 [404] 错误交给 [/index.php] 处理,表示由 Laravel 渲染美观的错误页面。
    error_page 404 /index.php;

    # URI 符合正则表达式 [\.php$] 的请求将进入此段配置
    location ~ \.php$ {
        # 配置 FastCGI 服务地址,可以为 IP:端口,也可以为 Unix socket。
        # fastcgi_pass unix:/var/run/php/php7.2-fpm.sock;
    fastcgi_pass 127.0.0.1:9000;
        # 配置 FastCGI 的主页为 index.php。
        fastcgi_index index.php;
        # 配置 FastCGI 参数 SCRIPT_FILENAME 为 $realpath_root$fastcgi_script_name。
        fastcgi_param SCRIPT_FILENAME $realpath_root$fastcgi_script_name;
        # 引用更多默认的 FastCGI 参数。
        include fastcgi_params;
    }
    # 通俗地说,以上配置将所有 URI 以 .php 结尾的请求,全部交给 PHP-FPM 处理。

    # 除符合正则表达式 [/\.(?!well-known).*] 之外的 URI,全部拒绝访问
    # 也就是说,拒绝公开以 [.] 开头的目录,[.well-known] 除外
    location ~ /\.(?!well-known).* {
        deny all;
    }
}
1.4 配置用户表
\zhihuapp\database\migrations\2014_10_12_000000_create_users_table.php
添加字段
    public function up()
    {
        Schema::create('users', function (Blueprint $table) {
            $table->bigIncrements('id');
            $table->string('name')->unique();
            $table->string('email')->unique();
            $table->timestamp('email_verified_at')->nullable();
            $table->string('password');
            $table->string('activation_token', 40);
            $table->smallInteger('activated')->default(0);
            $table->string('avatar');
            $table->integer('questions_count')->default(0);
            $table->integer('answers_count')->default(0);
            $table->integer('comments_count')->default(0);
            $table->integer('favorites_count')->default(0);
            $table->integer('likes_count')->default(0);
            $table->integer('followers_count')->default(0);
            $table->integer('followings_count')->default(0);
            $table->json('settings')->nullable();
            $table->rememberToken();
            $table->timestamps();
        });
    }
php artisan migrate
2 发生激活邮件
2.1 安装auth组件
composer require laravel/ui '1.*'
php artisan ui:auth
2.2 安装 sendcloud组件
composer require naux/sendcloud
composer require guzzlehttp/guzzle '6.5.5'
2.3 sendcloud服务 发送邮件
2.3.1 注册邮件服务
注册地址
https://www.sendcloud.net/doc/product_email/quickin/
后台配置
https://www.sendcloud.net/email/
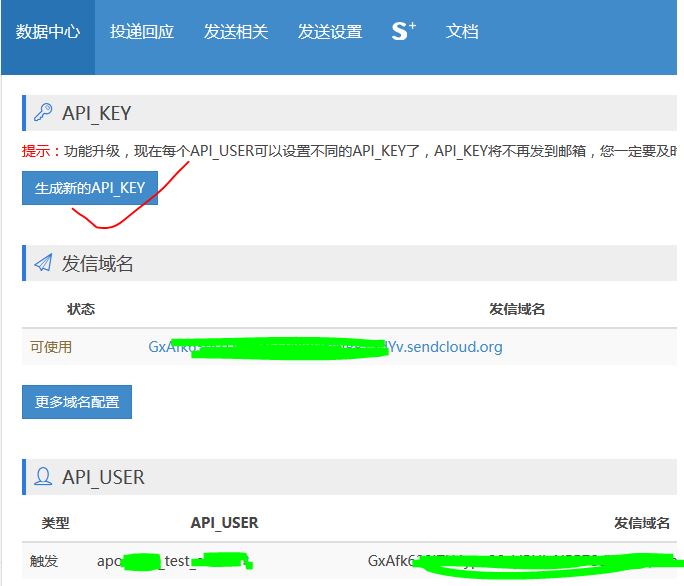
点击 生成API_KEY ,会发送到注册的邮箱
发送测试邮件
https://www.sendcloud.net/email/#/sendAround/sendTest
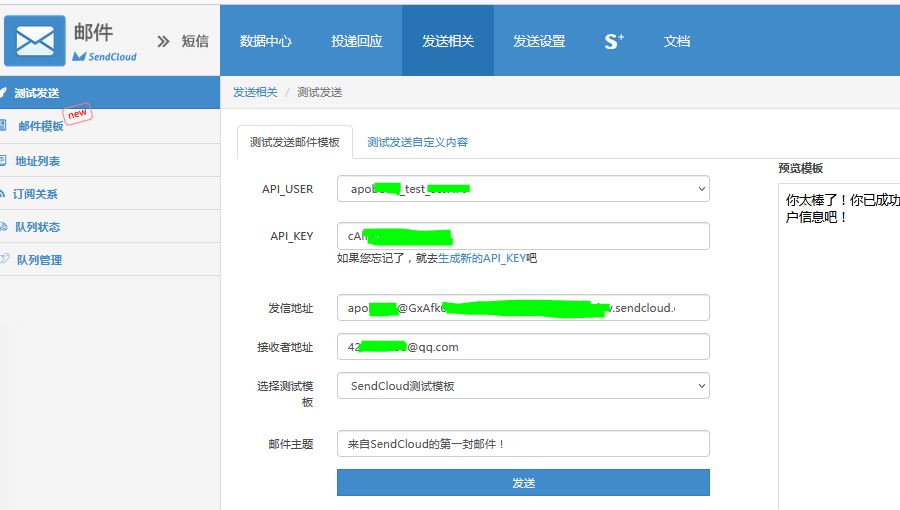
打开你的邮箱 看看是不是收到了。注意,不要发太多次,免费帐号每天发送有限制
2.3.2 项目配置
参考资料
https://gitee.com/mirrors/Laravel-SendCloud
1 .env
修改
MAIL_DRIVER=sendcloud
新增2行
SEND_CLOUD_USER=apoxxx_test_xxxx
SEND_CLOUD_KEY=cAnxxxxxxxxx(key会发送到你的邮箱)
2 config/app.php
'providers' => [
    // 添加这行
    Naux\Mail\ SendCloudServiceProvider::class,
];
3 \routes\web.php
Route::get('/email/verify/{token}',[
  'as'=>'email.verify',
  'uses'=>'EmailController@verify'
]);
4 \app\Http\Controllers\Auth\RegisterController.php
use Illuminate\Support\Facades\Mail;
use Naux\Mail\SendCloudTemplate;
    protected function create(array $data)
    {
        $user = User::create([
          'name' => $data['name'],
          'email' => $data['email'],
          'avatar' => '/image/avatars/default.jpg',
            //这里其实不需要再设置activation_token的值,也不需要再在验证后设置activated=1 采用Laravel提供的新功能验证用户邮箱即可 默认带一个email_verified_at字段,且更加完善具有过期时间戳和签名
          'activation_token' => str_random(40),//通过composer require laravel/helpers安装扩展包
          'password' => Hash::make($data['password']),
        ]);
        $this->sendVerifyEmailTo($user);
        return $user;
    }
    private function sendVerifyEmailTo($user)
    {
        //模板地址
        //https://www.sendcloud.net/email/#/sendAround/template
        $data = [
          'url'=>route('email.verify',['token'=>$user->activation_token]),
          'name'=>$user->name
        ];
        //test_template 邮件模板
        $template = new SendCloudTemplate('test_template_active',$data);
        Mail::raw($template,function ($message) use ($user){
            $message->from('apoxxxx@Gxxxxxxxxxyccccc.sendcloud.org','知乎管理员');
            $message->to($user->email);
        });
    }
5 \app\Http\Controllers\EmailController.php
php artisan make:controller EmailController
<?php

namespace App\Http\Controllers;

use Illuminate\Http\Request;
use App\User;
use Illuminate\Support\Facades\Auth;

class EmailController extends Controller
{
    //
    public function verify($token)
    {
        $user = User::where('activation_token',$token)->first();
        if(is_null($user)){
            return redirect('/');
        }
        $user->activated = 1;
        $user->activation_token = str_random(40);
        $user->save();
        Auth::login($user);
        return redirect('/home');
    }
}
6 \app\User.php
protected $fillable = [
        'name', 'email', 'password', 'avatar','activation_token'
    ];
2.3.3 测试
http://test.zhihu.test/register
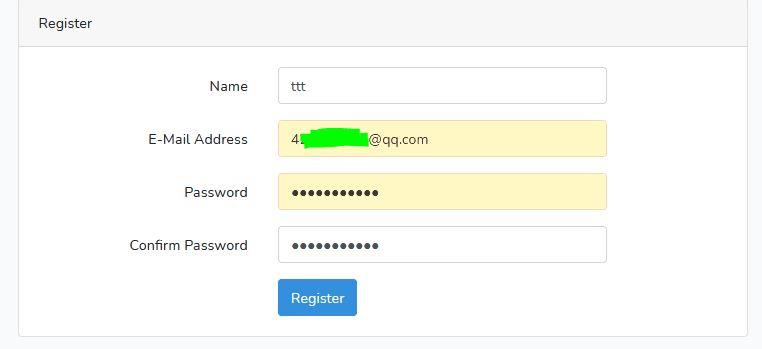
注册以后查看数据表users

查看邮件

点击立即激活后 再次查看数据表

3 参考资料
别人的笔记
https://blog.csdn.net/sinat_37390744/article/details/88738493
https://www.cnblogs.com/dzkjz/p/12370169.html
视频教程
https://www.codecasts.com/series/build-a-zhihu-website-with-laravel
https://www.bilibili.com/video/BV174411X7AS?p=2
4 上传代码
git tag v1.0
git push origin --tags
https://github.com/guainttt/laravel-zhihu/tags

 浙公网安备 33010602011771号