CentOS6使用piranha配置负载均衡
在centos6环境,使用piranha部署web的LB集群:
角色 IP
pip 172.16.0.111
sip 172.16.0.112
web1 172.16.0.121
web2 172.16.0.122
tomcat1 172.16.0.131
tomcat2 172.16.0.132
同步时间
主机名,/etc/hosts
[root@6pip ~]# tail -6 /etc/hosts
172.16.0.111 6pip.up.com 6pip
172.16.0.112 6sip.up.com 6sip
172.16.0.121 6web1.up.com 6web1
172.16.0.122 6web2.up.com 6web2
172.16.0.131 6tomcat1.up.com 6tomcat1
172.16.0.132 6tomcat2.up.com 6tomcat2
----------------------------
1. 配置apache
[root@6web1 ~]# yum install -y httpd
[root@6web2 ~]# yum install -y httpd
[root@6web1 ~]# echo 172.16.0.121 > /var/www/html/index.html
[root@6web1 ~]# /etc/init.d/httpd start
[root@6web1 ~]# chkconfig httpd on
[root@6web2 ~]# echo 172.16.0.122 > /var/www/html/index.html
[root@6web2 ~]# /etc/init.d/httpd start
[root@6web2 ~]# chkconfig httpd on
服务开机自启动
2. 配置pip 和 sip
开启包转发:
[root@6pip ~]# vim /etc/sysctl.conf
net.ipv4.ip_forward = 1
[root@6pip ~]# sysctl -p
[root@6sip ~]# vim /etc/sysctl.conf
net.ipv4.ip_forward = 1
[root@6sip ~]# sysctl -p
[root@6pip ~]# yum install -y piranha
[root@6sip ~]# yum install -y piranha
[root@6pip ~]# piranha-passwd
New Password:
Verify:
Adding password for user piranha
设置登录密码
[root@6pip ~]# /etc/init.d/piranha-gui start
启动操作界面的服务
浏览器访问:
http://172.16.0.111:3636/
用户名:piranha
密码:自定义的
1)

填写pip地址,默认方式direct可更改为NAT,TUNE,ACCEPT即可
2)
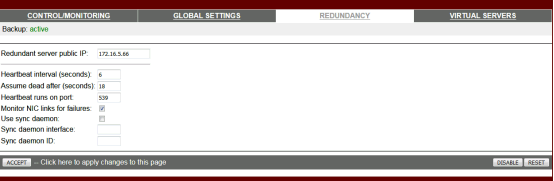
构建高可用,填写sip地址,完成ACCEPT
3)
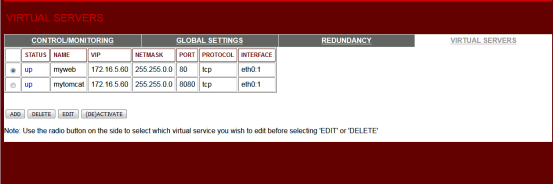
ADD进行添加
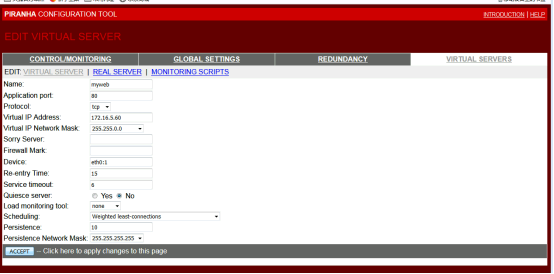
填写Name,Application port,VIP,VIP的掩码,注意Device 名字由本机网卡名决定
Scheduling 算法选择 Persistence连接的最大时间,Persistence Network Mask进行广播隔离

填写realserver,名字,地址,端口,权重

4)
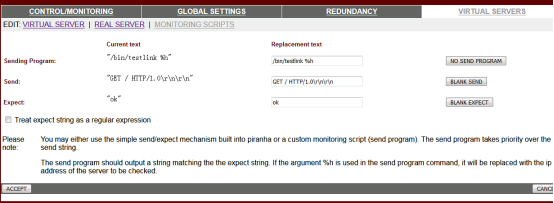
健康检查脚本存放位置 %h 为后面的要检查的ip
ok为脚本返回的标识
[root@6pip ~]# vim testlink
#!/bin/bash
# apache的健康检查脚本
/usr/bin/links -dump 1 $1 &> /dev/null
# $1为脚本后的第一个参数
if [ $? -eq 0 ]
then
echo ok
else
echo fail
fi
[root@6pip ~]# chmod +x testlink
[root@6pip ~]# ./testlink 172.16.0.121
ok
[root@6pip ~]# ./testlink 172.16.0.122
ok
[root@6pip ~]# ln testlink /bin/
[root@6pip ~]# scp testlink 172.16.0.112:/bin/
# 做链接或者写入/bin/用来直接调用
[root@6sip ~]# testlink 172.16.0.121
ok
[root@6sip ~]# testlink 172.16.0.122
ok
生成的配置文件:(图形界面自动生成)
[root@6pip ~]# cd /etc/sysconfig/ha/
[root@6pip /etc/sysconfig/ha]# ls
conf logs lvs.cf modules web
[root@6pip /etc/sysconfig/ha]# vim lvs.cf
[root@6pip /etc/sysconfig/ha]# scp lvs.cf 172.16.0.112:/etc/sysconfig/ha/
[root@6pip ~]# /etc/init.d/pulse start (启动LVS)
[root@6pip ~]# chkconfig pulse on
[root@6sip ~]# /etc/init.d/pulse start
[root@6sip ~]# chkconfig pulse on
在web节点,配置arp防火墙和VIP(防火墙规则为脚本写入直接用)
[root@6web1 ~]# yum install -y arptables_jf
[root@6web2 ~]# yum install -y arptables_jf
lftp 172.16.0.99:/scripts> get realip-arptables.sh
[root@6web1 ~]# vim realip-arptables.sh (更改VIP与RIP)
#!/bin/bash
VIP=172.16.0.110
RIP=172.16.0.121
[root@6web2 ~]# vim realip-arptables.sh
#!/bin/bash
VIP=172.16.0.110
RIP=172.16.0.122
[root@6web1 ~]# chmod +x realip-arptables.sh
[root@6web1 ~]# ./realip-arptables.sh
[root@6web1 ~]# echo "/root/realip-arptables.sh" >> /etc/rc.local(开机自动执行)
[root@6web2 ~]# chmod +x realip-arptables.sh
[root@6web2 ~]# ./realip-arptables.sh
[root@6web2 ~]# echo "/root/realip-arptables.sh" >> /etc/rc.local
# ifconfig
# arptables -L
----------------------------------
第二组virtual-server
2个tomcat
配置arptables和VIP
[root@6tomcat1 ~]# yum install -y arptables_jf
[root@6tomcat2 ~]# yum install -y arptables_jf
[root@6web1 ~]# scp realip-arptables.sh 172.16.0.131:/root/
[root@6web1 ~]# scp realip-arptables.sh 172.16.0.132:/root/
[root@6tomcat1 ~]# vim realip-arptables.sh
#!/bin/bash
VIP=172.16.0.250
RIP=172.16.0.131
[root@6tomcat1 ~]# ./realip-arptables.sh
[root@6tomcat1 ~]# echo "/root/realip-arptables.sh" >> /etc/rc.local
[root@6tomcat2 ~]# vim realip-arptables.sh
#!/bin/bash
VIP=172.16.0.250
RIP=172.16.0.132
[root@6tomcat2 ~]# ./realip-arptables.sh
[root@6tomcat2 ~]# echo "/root/realip-arptables.sh" >> /etc/rc.local
[root@6pip ~]# vim testlink_tomcat
#!/bin/bash
# tomcat的健康检查脚本
/usr/bin/links -dump 1 $1:8080 &> /dev/null
if [ $? -eq 0 ]
then
echo ok
else
echo fail
fi
[root@6pip ~]# ./testlink_tomcat 172.16.0.131
ok
[root@6pip ~]# ./testlink_tomcat 172.16.0.132
ok
[root@6pip ~]# ln testlink_tomcat /bin/
[root@6pip ~]# scp testlink_tomcat 172.16.0.112:/bin/
[root@6sip ~]# testlink_tomcat 172.16.0.131
ok
[root@6sip ~]# testlink_tomcat 172.16.0.132
ok
-------------------------------------------------------------
CentOS6与CentOS7 LVS对比
-------------------------------------------------------------
lvs:
分发机 pip sip -- HA
rip -- LB
pip如何确认rip是可以访问的?
centos7 测试页的md5校验和
centos6 直接访问
如果pip有问题,sip做什么?
sip 探测pip的状态。
----------------------------------
rip上:
绑定VIP
centos7
lo:0
centos6
ifconfig 绑定虚拟网卡
拦截到达VIP的请求包
抑制arp广播
centos7
编写的内核参数配置文件 /etc/sysctl.conf
centos6
编写arptables的规则
----------------------------------
编辑配置文件:
centos7 keepalive
上半截,与HA的keepalived一样
下半截,lvs的配置
centos6 piranha
浏览器界面

 浙公网安备 33010602011771号