【HttpRunner v3.x】笔记 ——4. 测试用例-结构解析
一、官方首推pytest格式
上篇文章我们知道了,httprunner可以支持三种格式的用例,分别是pytest、yaml和json。yaml和json是以前的版本所使用的用例格式,但是在3.x版本上,官方强烈建议使用的是pytest格式的用例。
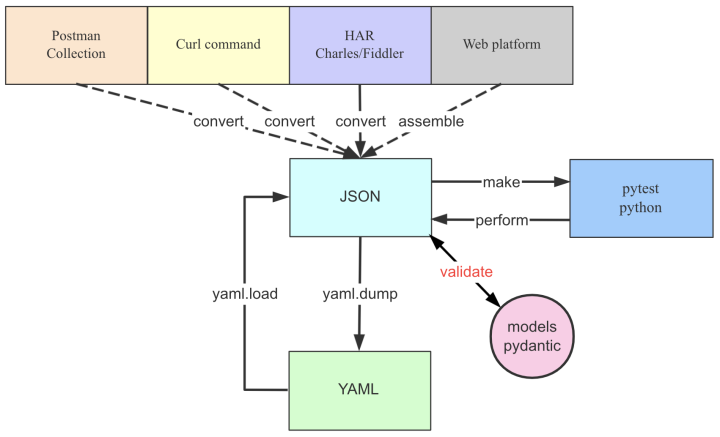
上图是来自官方的用例格式关系图,可以看出来,httprunner再对于第三方导出的har文件进行了转换处理,有的人喜欢转换成json,有的人喜欢转换成yaml。但是最终,还是通过解析json格式的文件,生成pytest的python文件。
既然最后都是要生成pytest,那何不一步到位呢?哈哈,我想这就是官方推荐pytest格式的原因吧。
我还是挺喜欢的,因为我对于pytest使用的较多,那么接下来也是基于pytest格式的用例进行解析。
二、用例结构解析
录制生成的case很便捷,但是这并不是说,不需要我们做任何的改动了。在实践的过程中,我们仍然会根据我们实际项目的不同需求来对case作进一步的调整,所以彻底的了解case的构造尤为重要。
首先,我录制了一个百度搜索“httprunner”的一个请求,转换成pytest文件后如下:
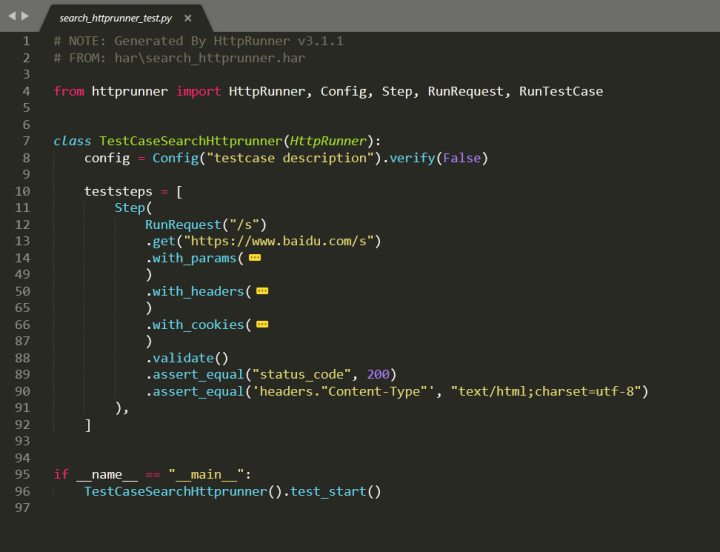
可以看到:
- 每个testcase都是HttpRunner的子类
- 必须有两个类属性:config和teststeps。
- 单个teststeps列表中的单个Step内部通过链式调用(RunRequest().get().with_params().with_header().with_cookies().validate().assert_equal())
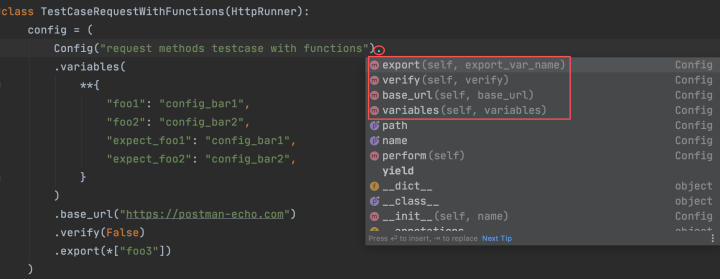
- config:配置测试用例级设置,包括基础url、验证、变量、导出。
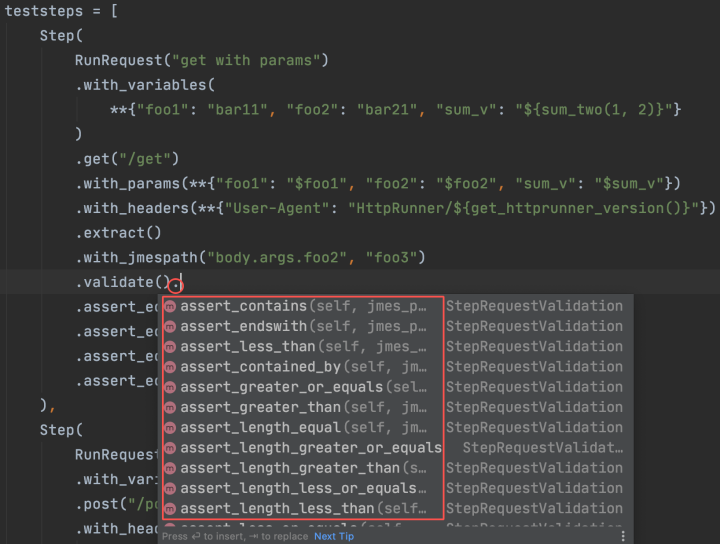
- teststeps:teststep的列表(list[Step]),每个步骤对应于一个API请求,也可以调用另一个testcase。此外,还支持variables/extract/validate/hooks机制来创建极其复杂的测试场景。
- 链调用:可以看到一个case的请求,经过了各个环节的调用,这也是httprunner 3.x版本一大亮点。现在的ide编辑器越来越强大,比如你使用pycharm的话,都不用你怎么记忆用例的格式,顺手就...(点)出来了,这或许也是官方推荐使用pytest的另一个原因吧,哈哈。
三、httprunner的用例结构与我自己的用例
补一个官方完整的一个demo代码,并说说httprunner中的用例与我自己编写的测试用例之间的联系。
from httprunner import HttpRunner, Config, Step, RunRequest, RunTestCase


class TestCaseRequestWithFunctions(HttpRunner):
    config = (
        Config("request methods testcase with functions")
        .variables(
            **{
                "foo1": "config_bar1",
                "foo2": "config_bar2",
                "expect_foo1": "config_bar1",
                "expect_foo2": "config_bar2",
            }
        )
        .base_url("http://demo.qa.com")
        .verify(False)
        .export(*["foo3"])
    )

    teststeps = [
        Step(
            RunRequest("get with params")
            .with_variables(
                **{"foo1": "bar11", "foo2": "bar21", "sum_v": "${sum_two(1, 2)}"}
            )
            .get("/get")
            .with_params(**{"foo1": "$foo1", "foo2": "$foo2", "sum_v": "$sum_v"})
            .with_headers(**{"User-Agent": "HttpRunner/${get_httprunner_version()}"})
            .extract()
            .with_jmespath("body.args.foo2", "foo3")
            .validate()
            .assert_equal("status_code", 200)
            .assert_equal("body.args.foo1", "bar11")
            .assert_equal("body.args.sum_v", "3")
            .assert_equal("body.args.foo2", "bar21")
        ),
        Step(
            RunRequest("post form data")
            .with_variables(**{"foo2": "bar23"})
            .post("/post")
            .with_headers(
                **{
                    "User-Agent": "HttpRunner/${get_httprunner_version()}",
                    "Content-Type": "application/x-www-form-urlencoded",
                }
            )
            .with_data("foo1=$foo1&foo2=$foo2&foo3=$foo3")
            .validate()
            .assert_equal("status_code", 200)
            .assert_equal("body.form.foo1", "$expect_foo1")
            .assert_equal("body.form.foo2", "bar23")
            .assert_equal("body.form.foo3", "bar21")
        ),
    ]


if __name__ == "__main__":
    TestCaseRequestWithFunctions().test_start()
- httprunner中的testcase,其实说的就是上面的这一整个Python文件。
- teststeps列表中的Step,其实就是我自己编写case时候的一个个def test_xxx():pass。
- 而每一个Step内部,依然是按照 传参——调用接口——断言,这样的过程来的。
万变不离其宗,httprunner框架目前看起来,确实可以让编写更加的便捷、简洁,但是这只是目前从demo的过程中得到的结论,后面还需要落地实战才可以。
--不要用肉体的勤奋,去掩盖思考的懒惰--

 浙公网安备 33010602011771号