
自定义组件创建npm包,发布到公司服务器,使用Verdaccio
一、创建对应的npm组件安装包
1. 初始化项目
使用 Vite 创建 Vue 3 项目
npm create vite@latest my-vue-components --template vue
cd my-vue-components
npm install
调整项目结构(适用于组件库)
my-vue-components/
├── src/
│   ├── components/      # 存放所有组件
│   │   ├── Button.vue   # 示例组件
│   │   └── index.js     # 组件导出入口
├── vite.config.js       # Vite 打包配置
├── package.json         # 修改为 npm 包配置
└── ...
2. 配置组件库
(1) 编写示例组件 src/components/Button.vue
<template>
  <button class="my-button">
    <slot></slot>
  </button>
</template>

<script>
export default {
  name: "MyButton",
};
</script>

<style scoped>
.my-button {
  background: #42b983;
  color: white;
  border: none;
  padding: 8px 16px;
  border-radius: 4px;
}
</style>
(2) 创建组件库入口 src/components/index.js
import Button from "./Button.vue";

// 全局注册组件(可选)
const install = (app) => {
  app.component("MyButton", Button);
};

// 按需导出
export { Button };

// 默认导出(全局注册)
export default install;
3. 配置 Vite 打包
修改 vite.config.js(支持库模式)
import { defineConfig } from "vite";
import vue from "@vitejs/plugin-vue";
import { resolve } from "path";

export default defineConfig({
  plugins: [vue()],
  build: {
    lib: {
      entry: resolve(__dirname, "src/components/index.js"), // 组件库入口
      name: "MyVueComponents", // UMD 模式全局变量名
      fileName: (format) => `my-vue-components.${format}.js`, // 输出文件名
    },
    rollupOptions: {
      // 确保外部化 Vue,避免打包进组件库
      external: ["vue"],
      output: {
        globals: {
          vue: "Vue", // UMD 模式全局变量名
        },
      },
    },
  },
});
4. 修改 package.json(关键配置)
{
  "name": "my-vue-components",                  // 包的名
  "version": "1.0.0",                           // 包的版本信息
  "main": "dist/my-vue-components.umd.js",      // CommonJS 入口
  "module": "dist/my-vue-components.es.js",     // ESM 入口
  "types": "dist/index.d.ts",                   // 类型声明(如果支持 TS)
  "files": ["dist"],                            // 发布到 npm 的目录
  "peerDependencies": {
    "vue": "^3.0.0"                             // 避免重复打包 Vue
  },
  "scripts": {
    "dev": "vite",                              // 开发模式
    "build": "vite build",                      // 打包组件库
    "prepublishOnly": "npm run build"           // 发布前自动构建
  },
 ……
}
5. 构建组件库
npm run build
构建完成后,dist/ 目录会生成:
-
my-vue-components.es.js(ES Module) -
my-vue-components.umd.js(UMD 格式)
二、发布到服务器
1、环境准备
-
机器A:运行 Verdaccio 服务器(IP:
192.168.1.105) - 机器B:开发自定义包和 Vue3 项目
2、具体步骤
步骤1:在机器A启动 Verdaccio
(1)在机器A上安装依赖
- npm install -g verdaccio
(2)启动服务
- 运行:verdaccio
出现以下截图代表安装成功
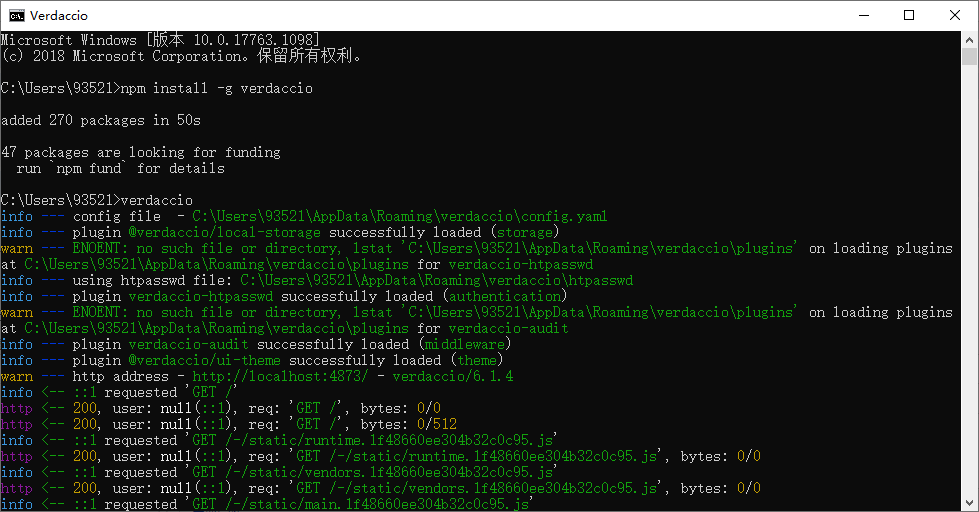
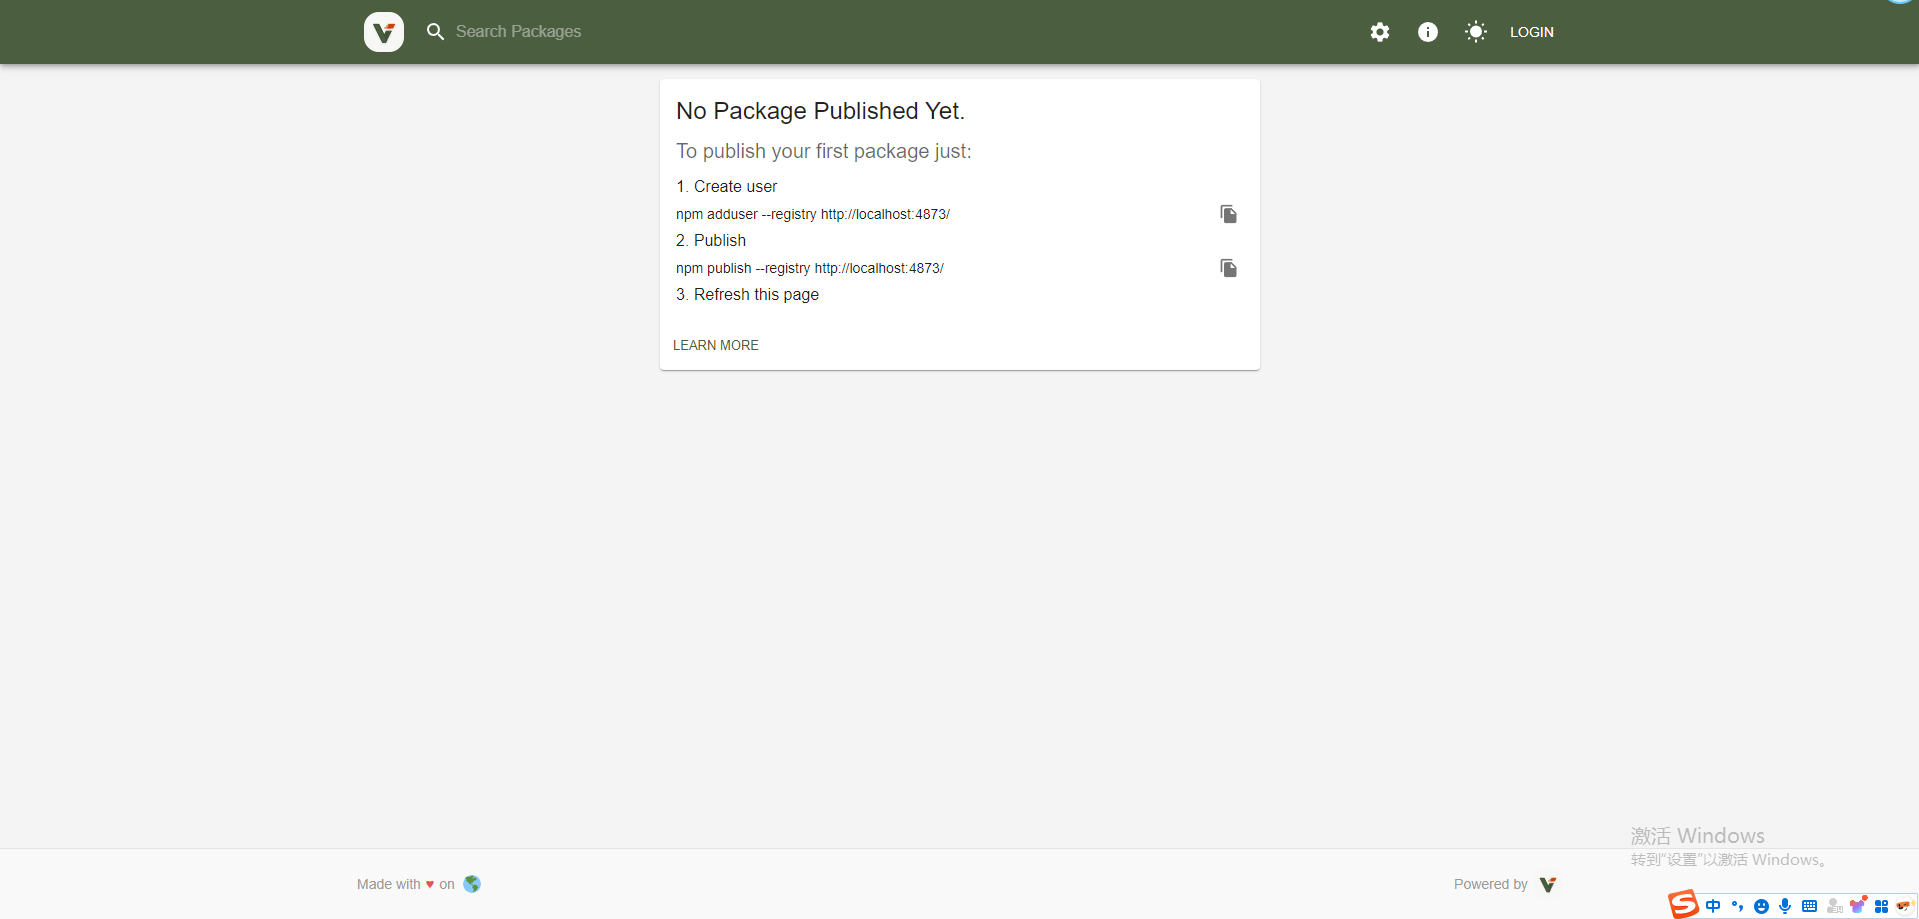
4873表示默认的本地端口,可以通过修改配置文件来修改端口,此时在浏览器输入http://localhost:4873/可打开以下界面
(3)修改配置,支持所有可通过ip地址访问,配置文件为
C:\Users\93521\AppData\Roaming\verdaccio\config.yaml
修改配置,开放局域网访问,增加 listen: 0.0.0.0:4873,
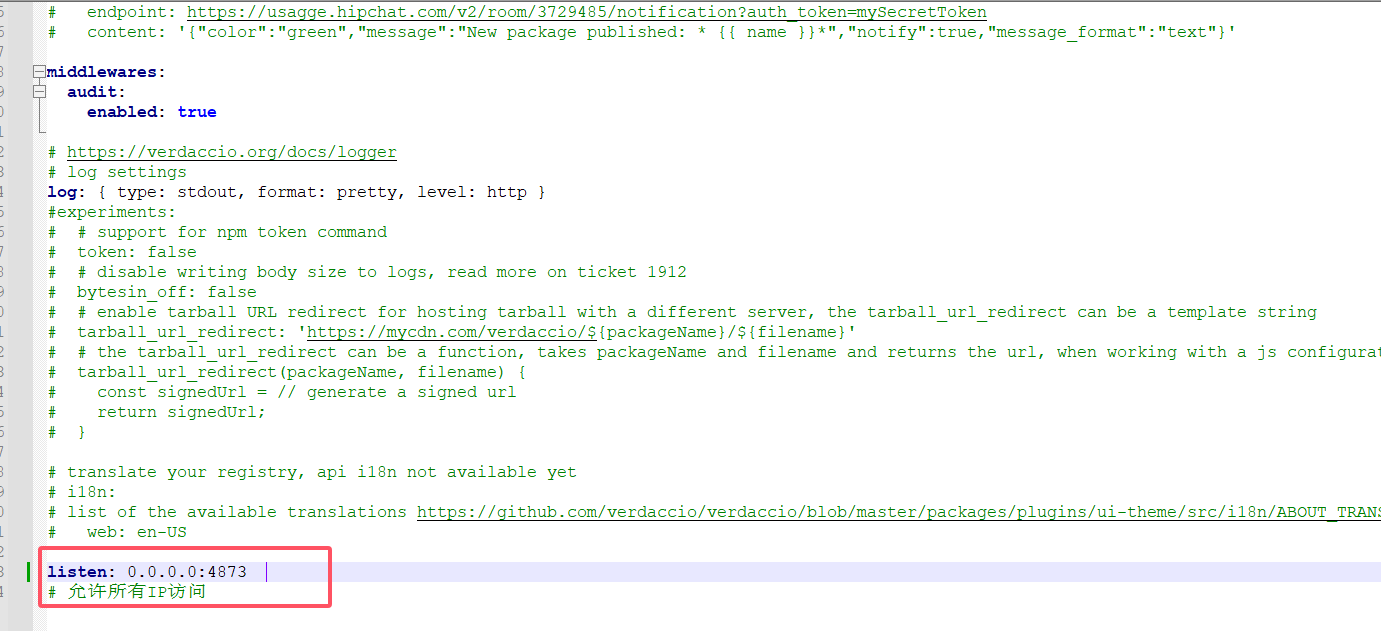
重启服务:verdaccio --listen 0.0.0.0:4873
可以看到已经支持本机ip进行访问了:比如,192.168.1.105:4873,然后打开下面服务界面,可发现,已经推荐使用ip进行访问地址了

(4)创建用户
运行:npm adduser --registry http://192.168.1.105:4873/
输入对应的用户名,密码,邮箱,即可。

步骤2:在机器B进行发布
(1)运行vscode,npm源切换到公司服务器 npm config set registry http://192.168.1.105:4873/,
(2)npm login:登录npm,输入用户名密码
(3)npm publish:将第一步开发的包进行发布到npm服务器上
以上或者使用:npm publish --registry=http://192.168.1.105:4873 运行发布到公司服务器上
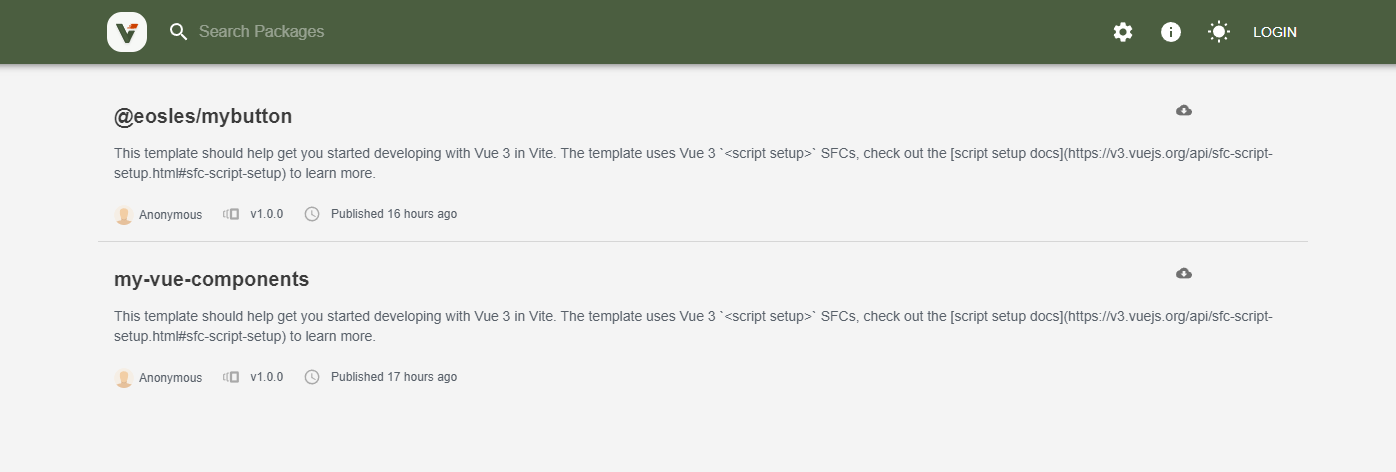
发布成功后,即可在http://192.168.1.105:4873/看到发布的包的信息,如下图:
三、使用发布包
1、安装发布的包
由于自己本地创建的项目,有可能要引用公司的发布的包,也可能要引用npm外部包,例如element等,这两个源是不一致的,解决方案如下:
方案1:使用 npm config 临时切换源(推荐)
适合 偶尔安装私有包 的场景,通过 --registry 参数临时指定私有源:比如,安装以上包,执行:
npm install my-vue-components --registry=http://192.168.1.105:4873
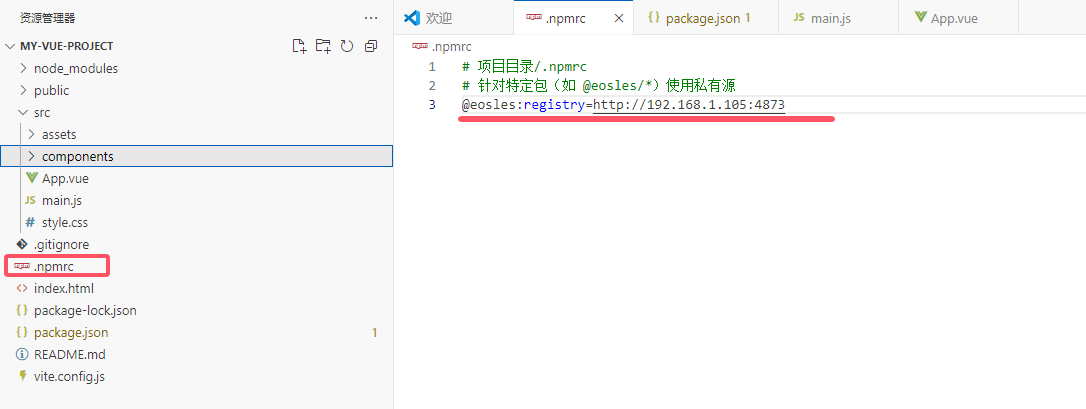
方案2:全局设置私有源 + npmrc 覆盖(常用)
适合 频繁使用私有包 的场景,通过项目级 .npmrc 文件配置优先级。
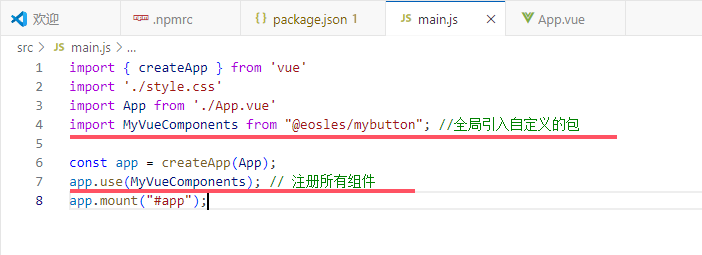
2、在main.js进行全局引用
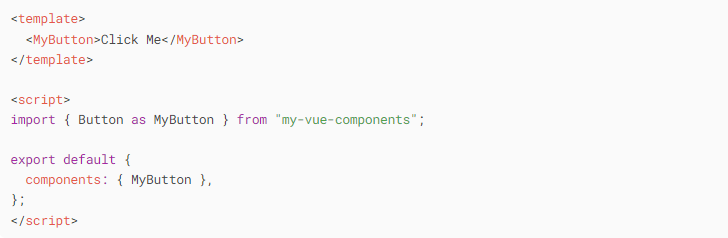
3、或者在vue组件中进行按需引入
四、遇到的一些问题
1、安装包遇到如下错误:
npm ERR! code EPRIVATE
npm ERR! This package has been marked as private
npm ERR! Remove the 'private' field from the package.json to publish it.
解决方案:这个错误是因为你的 package.json 中设置了 "private": true,而 npm 不允许发布私有包(除非你使用付费的私有仓库)。要解决这个问题,只需移除或修改 package.json 中的 private 字段即可
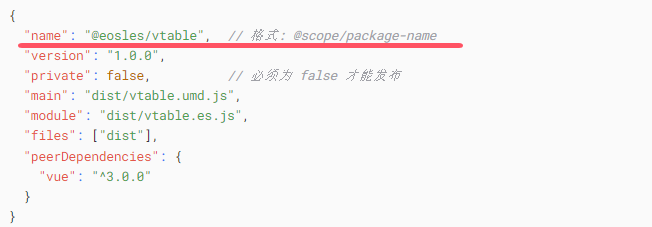
2、如何让包名带前缀,比如 @eosles/vtable这样的包名
解决方案:修改 package.json 中的包名即可
3、发布的包,在安装后,发现全局注册用不了
解决方案:使用<script setup></script>创建的组件,没有默认的组件名称,需要显示的导出
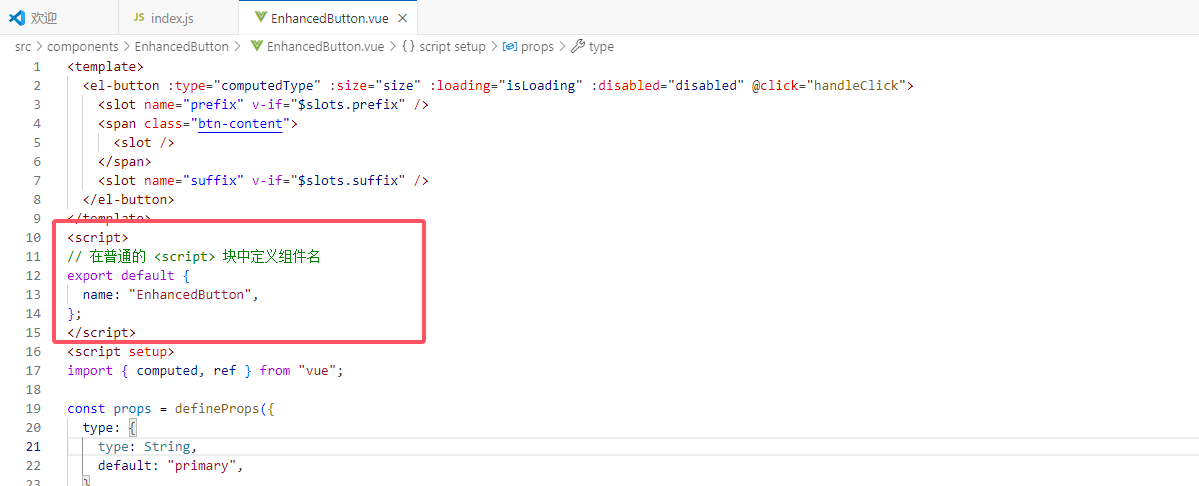
或者,在全局index.js里面,使用明确的名字导出:以下框出来的,第一种,需要上面显式的输出组件名称,因为使用了components.name,第二种,不需要显式的输入组件名称


 浙公网安备 33010602011771号