Backstage架构介绍
本文介绍如何基于Backstage搭建工程项目。
一、Backstage
Backstage是一个用于构建开发人员门户的开放平台。在集中式软件目录的支持下,Backstage 可以恢复您的微服务和基础架构的秩序,并使您的产品团队能够快速交付高质量的代码——而不会影响自主性。
Backstage 统一了您所有的基础架构工具、服务和文档,以创建一个端到端的简化开发环境。
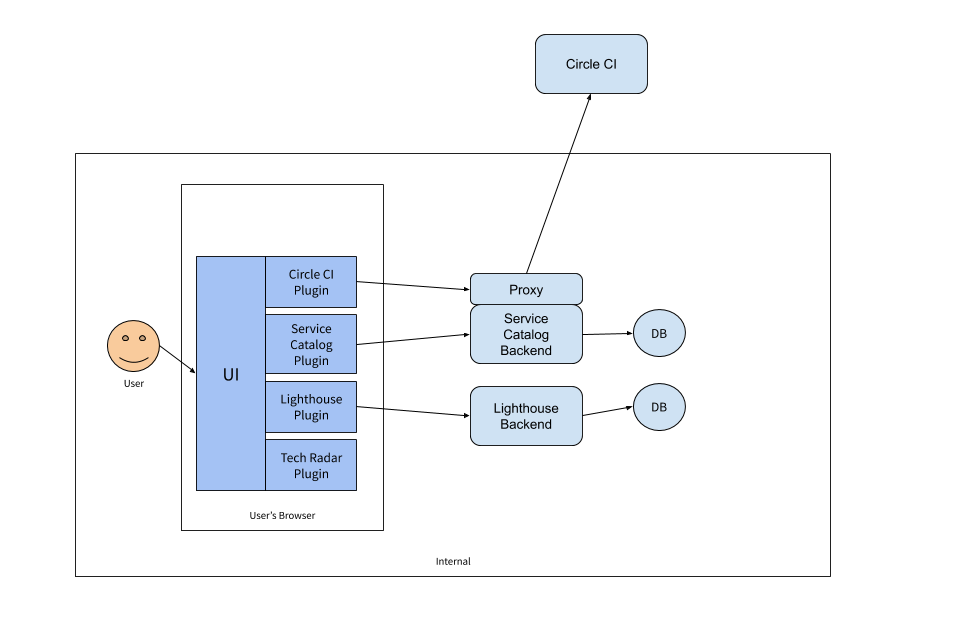
Backstage架构由三部分构成:
- 核心 - 由核心开发人员在开源项目中构建的基本功能。
- 应用程序 - 该应用程序是部署和调整的 Backstage 应用程序的一个实例。该应用程序将核心功能与附加插件联系在一起。应用程序由应用程序开发人员构建和维护,通常是公司内的生产力团队。
- 插件 - 使您的 Backstage 应用程序对您的公司有用的附加功能。插件可以是特定于公司的,也可以是开源的和可重用的。
该架构中有 3 个主要组件:
- 核心后台 UI
- UI 插件及其支持服务
3.数据库(Knex)
架构图例子:
一、创建Backstage应用
1、创建应用的前预装的依赖
- 安装window版本的python39
- yarn配置连接python的应用路径
yarn config set python C:\Users\xuchunyang\AppData\Local\Programs\Python\Python39
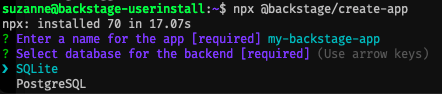
2、创建backstage-app应用
(1)输入创建命令:
npx @backstage/create-app
(2)填写应用名称和选择数据库(SQLite、PostgreSQL)
(3)运行工程app
cd my-backstage-app
yarn dev
会自动打开 http://localhost:3000 查看工程
2、工程目录结构
app
├── app-config.yaml
├── catalog-info.yaml
├── lerna.json
├── package.json
└── packages
    ├── app
    └── backend
└── plugins
    └── plugin
(1)app-config.yaml-项目的配置文件,核心文件
主要是前端工程app、后端工程backend和插件plugin的配置文件,详细配置见文档:https://backstage.io/docs/conf/
可配置不同环境的yaml,例如:app-config.production.yaml,只配置生产信息覆盖启动:
yarn start --config ../../app-config.yaml --config ../../app-config.production.yaml
通过框架提供的api项目中获取配置的方法:
import { useApi, configApiRef } from '@backstage/core-plugin-api';
const configApi: any = useApi(configApiRef);
(2)catalog-info.yaml——当前工程的配置文件
- 工程默认实体类型:Component、Template、API、Group、User、Resource、System、Domain、Location
对应类型配置规范参考:https://backstage.io/docs/features/software-catalog/descriptor-format
2.可自定义创建增加实体类,自定义配置文件的字段,参考文档:https://backstage.io/docs/features/software-catalog/extending-the-model
(3)lerna.json——管理包工具配置文件
lerna:是一个管理工具,用于管理包含多个软件包(package)的 JavaScript 项目
(4)package.json——工程配置文件
管理工程依赖包,可执行命令更新backstage相关依赖到最新版本:
yarn backstage-cli versions:bump
(5)packages/app——前端工程react框架
- 以typescript+react的前端架子工程项目
- 组件库使用框架原生组件库@backstage/core-components,该组件库是在material-ui做封装,所以底层是material-ui组件库,项目中可以直接使用material-ui
- 项目样式使用material-ui的CSS-in-JS方案,详细介绍见:https://mui.com/zh/styles/basics/
- 可切换主体风格
(6)packages/backend——后端工程express框架
参考express API参考文档:https://www.expressjs.com.cn/4x/api.html
(7)plugins——backstage的插件
- 可接入官方提供的插件:https://backstage.io/plugins
- 接入自定义创建插件
二、插件
Backstage 是由一组插件组成的单页应用程序。
官方对插件的定义是:对插件生态系统的目标是插件的定义足够灵活,允许您将几乎任何类型的基础设施或软件开发工具作为 Backstage 中的插件公开。通过遵循强大的 设计指南,我们确保插件之间的整体用户体验保持一致。
(1)官方提供插件plugins,
引入方案参考每个插件的接入文档
(2)创建前端插件
根目录下执行命令:
yarn create-plugin
创建会提示输入插件名,输入名称后框架会自动生成插件,下载依赖包,自动引入到app工程内,执行命令:
cd plugins/my-plugin
yarn start  or  yarn dev
自动启动:http://localhost:3000/my-plugin 可在网页查看插件
(3)创建后端插件
根目录下执行命令:
yarn create-plugin --backend
创建会提示输入插件名,输入名称后框架会自动生成插件,下载依赖包,自动引入到backend工程内,执行命令:
cd plugins/carmen-backend
yarn start  or  yarn dev
curl localhost:7007/carmen/health
在backend的插件中可以定义接口和查询数据库等后端功能
三、API
1、backstage的插件力求自成一体,尽可能多的功能驻留在插件本身及其后端API中。然而,插件总是需要在其边界之外与其他插件和应用程序本身进行通信。
2、使用API
import React from 'react';
import { useApi, errorApiRef } from '@backstage/core-plugin-api';

export const MyComponent = () => {
  const errorApi = useApi(errorApiRef);

  // Signal to the app that something went wrong, and display the error to the user.
  const handleError = error => {
    errorApi.post(error);
  };

  // the rest of the component ...
};
3、官方提供了很多API能力,详细见文档https://backstage.io/docs/reference/
四、Auth
Backstage 中的身份验证可识别用户,并为插件提供一种方式来代表用户向第三方服务发出请求。Backstage 可以有零个(来宾访问)、一个或多个身份验证提供程序。默认 @backstage/create-app模板使用访客访问来轻松启动。
官方提供了几种登录方式:
例如接入Gitlab:
- gitlab配置
- Name: 名称
- Redirect URI: http://localhost:7007/api/auth/gitlab/handler/frame
- Scopes: read_user
app-config.yaml文件配置
auth:
  environment: development
  providers:
    gitlab:
      development:
        clientId: ${AUTH_GITLAB_CLIENT_ID}
        clientSecret: ${AUTH_GITLAB_CLIENT_SECRET}
        ## uncomment if using self-hosted GitLab
        # audience: https://gitlab.company.com
src/app.tsx文件引入
import { githubAuthApiRef } from '@backstage/core-plugin-api';
import { SignInProviderConfig, SignInPage } from '@backstage/core-components';

const githubProvider: SignInProviderConfig = {
  id: 'github-auth-provider',
  title: 'GitHub',
  message: 'Sign in using GitHub',
  apiRef: githubAuthApiRef,
};

const app = createApp({
  apis,
  components: {
    SignInPage: props => (
      <SignInPage
        {...props}
        auto
        provider={githubProvider}
      />
    ),
  },
  bindRoutes({ bind }) {
五、接口文档
参考页面显示样式:
- http://backstage.test.swifer.co/catalog/default/api/backstage-app-apis/definition
- https://demo.backstage.io/api-docs?filters[kind]=api&filters[user]=all
参考接口文档定义:
六、技术文档
使用TechDocs插件,可以与代码一起存在的 Markdown 文件中编写的文档。
接入文档:https://backstage.io/docs/features/techdocs/getting-started
工程的Dockerfile增加命令:
RUN apt-get update && apt-get install -y python3 python3-pip
RUN pip3 install mkdocs-techdocs-core==0.2.1
本地运行文档可以装python3和mkdocs-techdocs-core:
pip3 install mkdocs-techdocs-core==0.2.1
官方示例:https://demo.backstage.io/docs/default/component/backstage
七、搜索能力
Backstage Search 可让您在 Backstage 生态系统中找到您正在寻找的正确信息。
支持:
- Lunr ✅
- ElasticSearch ✅
- Postgres ✅
支持工程实体搜索和技术文档关键字搜索(目前支持英文搜索)
接入文档:
https://backstage.io/docs/features/search/how-to-guides
packages/backend/src/plugins/search.ts增加文档引入:
import { DefaultTechDocsCollator } from '@backstage/plugin-techdocs-backend';
indexBuilder.addCollator({
  defaultRefreshIntervalSeconds: 600,
  collator: DefaultTechDocsCollator.fromConfig(config, {
    discovery,
    logger,
    tokenManager,
  }),
});
packages/app/src/components/search/SearchPage.tsx增加搜索类型:
<Paper className={classes.filters}>
  <SearchType
    values={['techdocs', 'software-catalog']}
    name="type"
    defaultValue="software-catalog"
  />
  ...
</Paper>
八、发布
1、packages/backend/Dockerfile
增加配置:
# This dockerfile builds an image for the backend package.
# It should be executed with the root of the repo as docker context.
#
# Before building this image, be sure to have run the following commands in the repo root:
#
# yarn install
# yarn tsc
# yarn build
#
# Once the commands have been run, you can build the image using `yarn build-image`

FROM docker.repo.swifer.co/sp_library/node:14-buster-python-b02

RUN yarn config set python /usr/bin/python3
#   && npm config set registry https://repo.swifer.co/artifactory/api/npm/npm-repo

WORKDIR /app
COPY .npmrc .npmrc
# Copy repo skeleton first, to avoid unnecessary docker cache invalidation.
# The skeleton contains the package.json of each package in the monorepo,
# and along with yarn.lock and the root package.json, that's enough to run yarn install.
COPY yarn.lock package.json packages/backend/dist/skeleton.tar.gz ./
RUN tar xzf skeleton.tar.gz && rm skeleton.tar.gz

RUN yarn install --frozen-lockfile --production --verbose --network-timeout 300000 && rm -rf "$(yarn cache dir)"
# RUN yarn install --production --network-timeout 300000 && rm -rf "$(yarn cache dir)"

# Then copy the rest of the backend bundle, along with any other files we might want.
COPY packages/backend/dist/bundle.tar.gz app-config.yaml app-config.production.yaml ./
RUN tar xzf bundle.tar.gz && rm bundle.tar.gz

CMD ["node", "packages/backend", "--config", "app-config.yaml", "--config", "app-config.production.yaml"]
2、使用命令打包:
yarn tsc
yarn build
使用jenkins打包,使用kubernetes发到docker容器中启动项目
相关文档:
官方示例网站:https://demo.backstage.io/
官方组件文档:https://backstage.io/storybook/
react:https://react.docschina.org/
material-ui文档:https://mui.com/zh/getting-started/usage/
Knex:https://knexjs.org/
sqlite3:https://www.sqlite.org/index.html
PostgreSQL:https://www.postgresql.org/
lerna:https://www.lernajs.cn/
express:https://www.expressjs.com.cn/4x/api.html
jenkins:https://www.jenkins.io/
docker:https://www.docker.com/
kubernetes:https://kubernetes.io/
Docker和K8S: https://zhuanlan.zhihu.com/p/53260098 、
https://www.cnblogs.com/caojiaxin/p/14065610.html

 浙公网安备 33010602011771号