vue3+vite2+typescript+mock 移动端框架搭建
本文介绍用vite脚手架搭建vue3移动端框架,项目中的工程化配置、兼容适配以及mock模拟接口数据介绍。
一、Vite
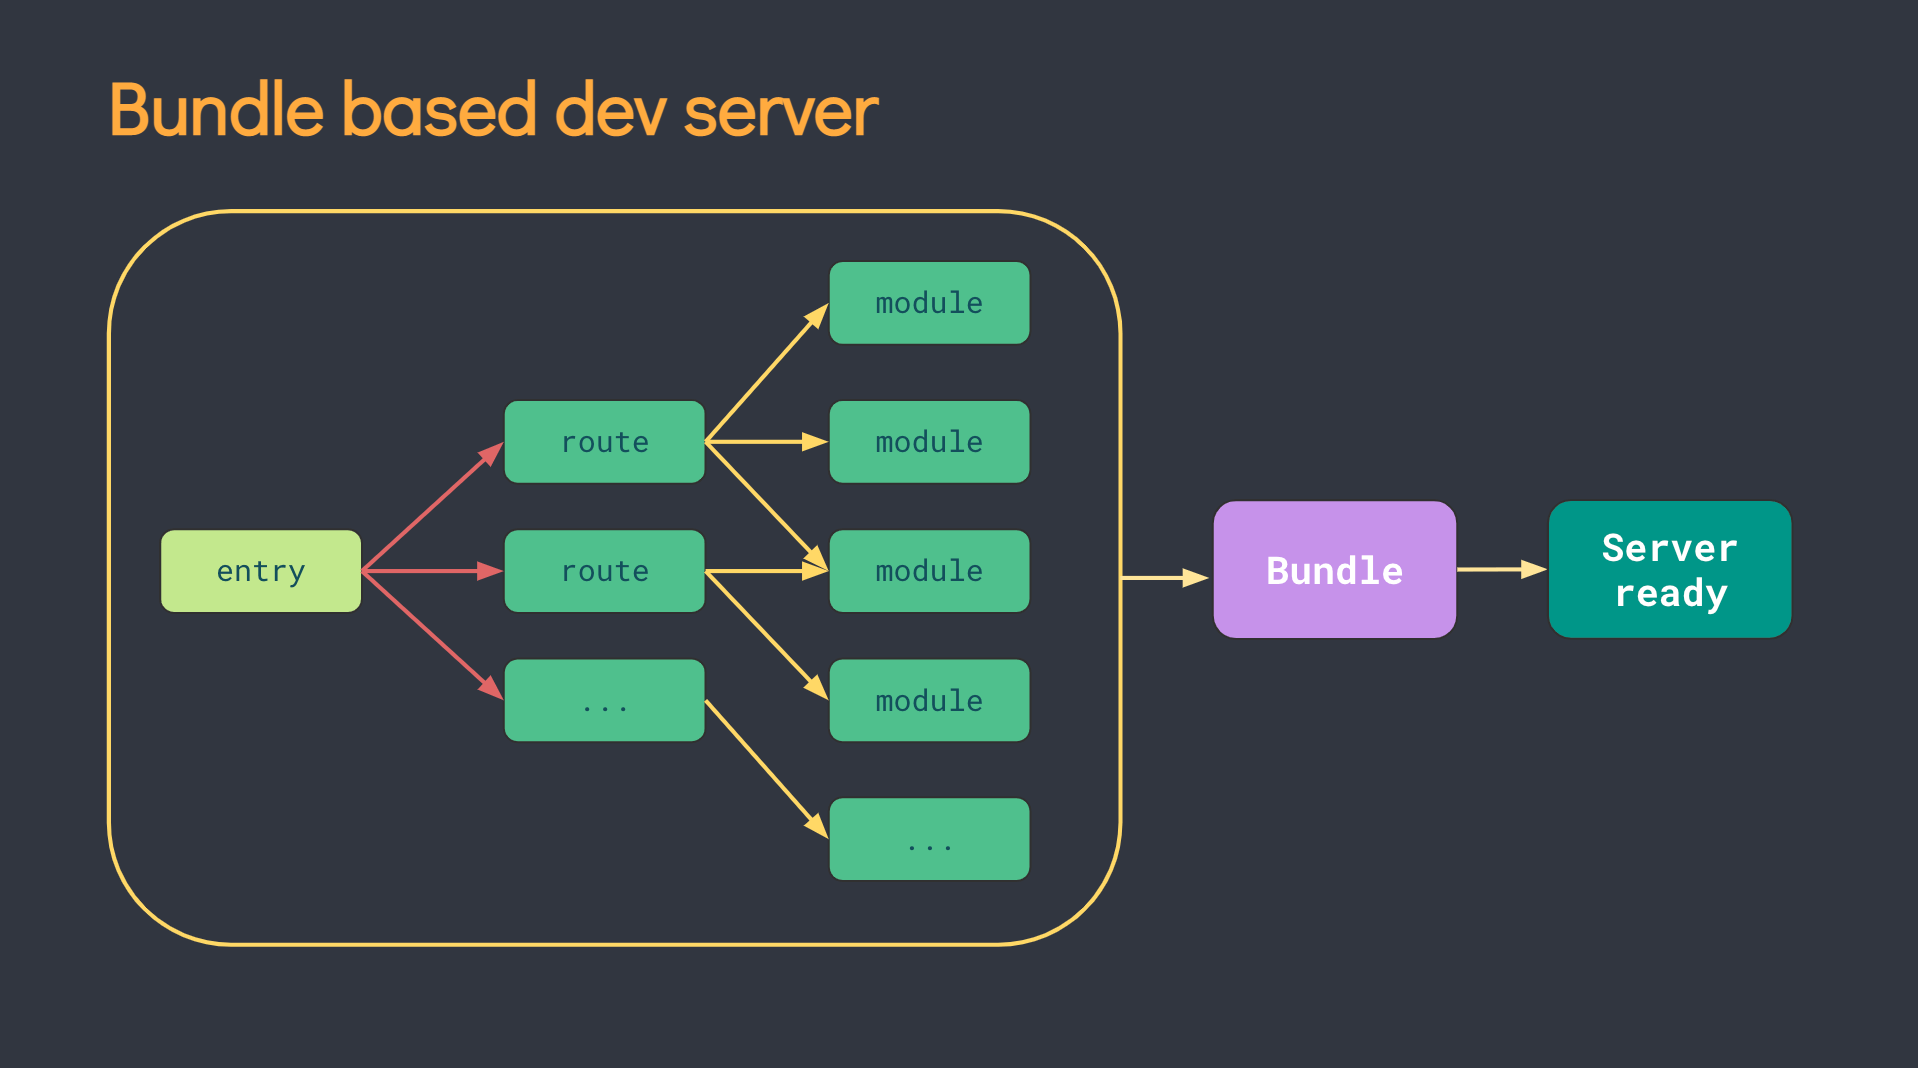
Vite (法语意为 "快速的",发音 /vit/) 是一种新型前端构建工具,能够显著提升前端开发体验。它主要由两部分组成:
- 一个开发服务器,它基于 原生 ES 模块 提供了 丰富的内建功能,如速度快到惊人的 模块热更新(HMR)。
2.一套构建指令,它使用 Rollup 打包你的代码,并且它是预配置的,可输出用于生产环境的高度优化过的静态资源。
1、为什么选 Vite
官方文档介绍:https://cn.vitejs.dev/guide/why.html#the-problems
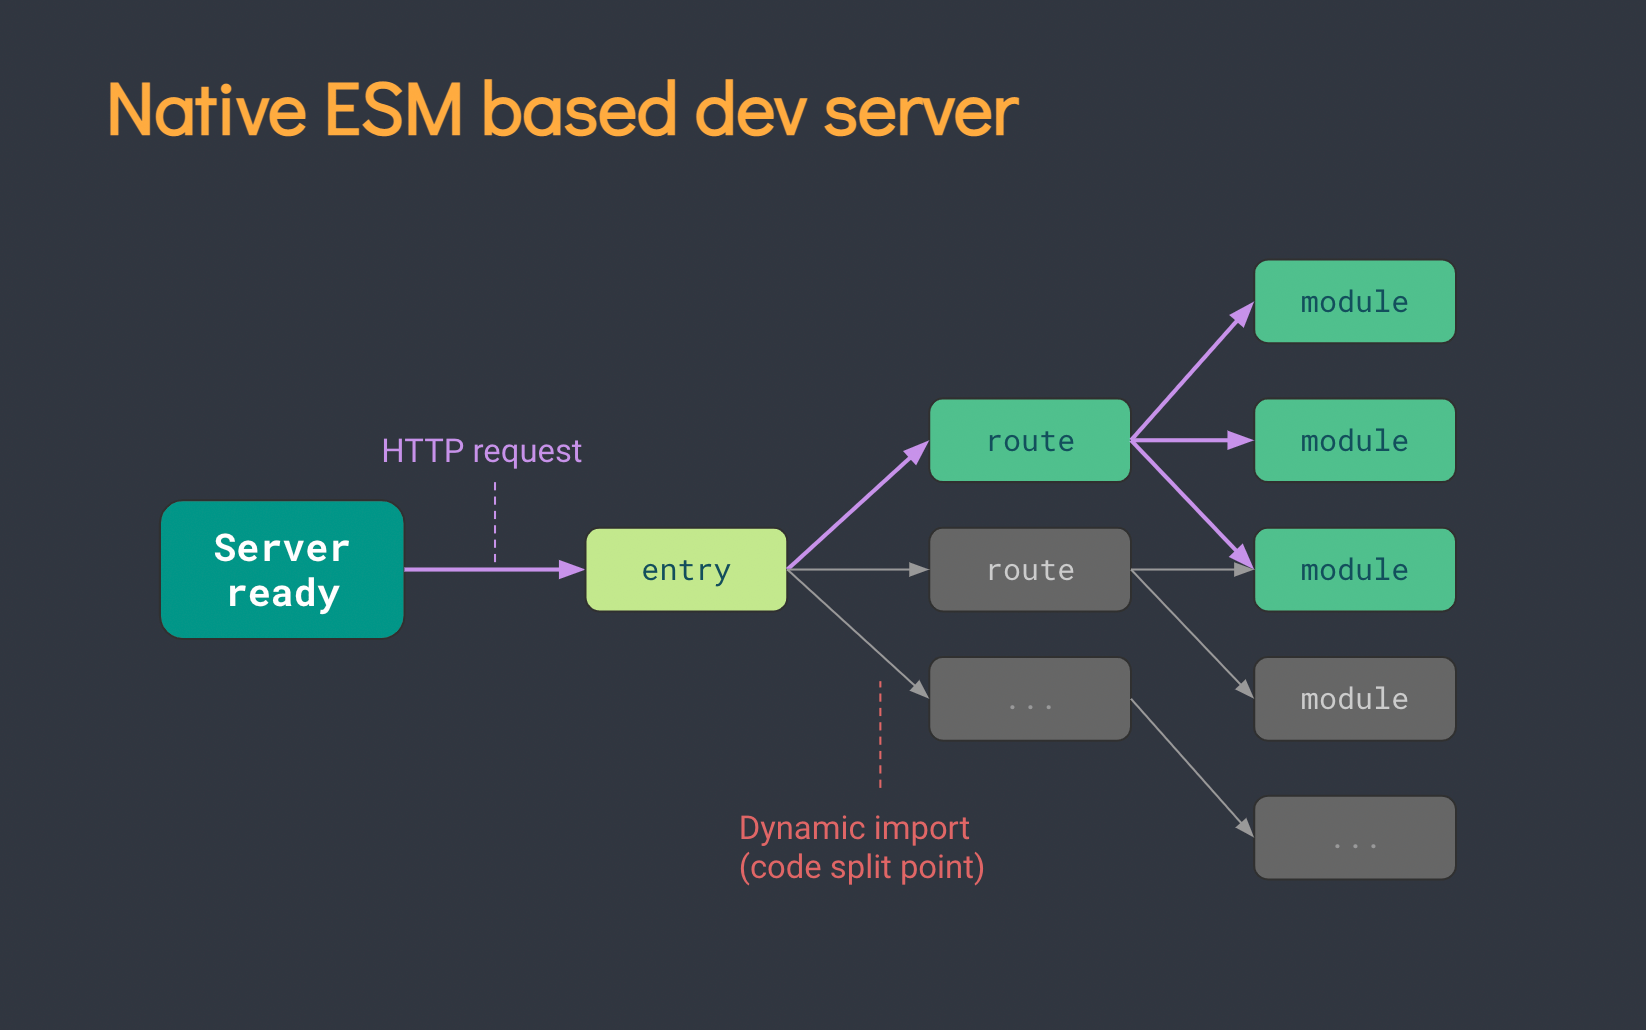
【节选】Vite 以 原生 ESM 方式提供源码。这实际上是让浏览器接管了打包程序的部分工作:Vite 只需要在浏览器请求源码时进行转换并按需提供源码。根据情景动态导入代码,即只在当前屏幕上实际使用时才会被处理。
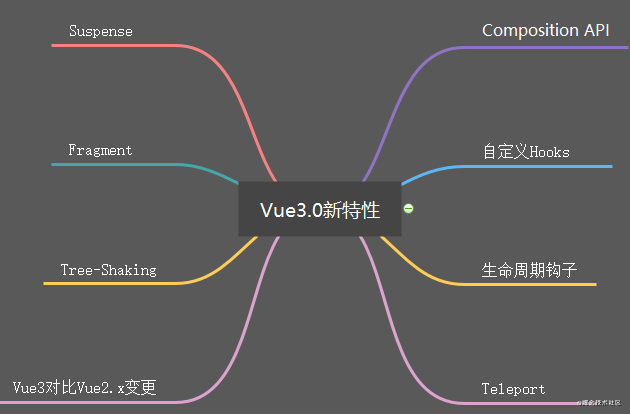
二、vue3的新特性
官方文档介绍:https://vue3js.cn/docs/zh/guide/migration/introduction.html
三、工程规范化
兼容性注意:Vite 需要 Node.js 版本 >= 12.0.0。
1、项目初始化
# npm 6.x
npm init @vitejs/app
# yarn
yarn create @vitejs/app
填写项目名称 => 选择模板(这里选择vue3+typescript模板)

2、vite.config配置
官方文档介绍:https://cn.vitejs.dev/config/
import { defineConfig } from "vite";
import vue from "@vitejs/plugin-vue";
import { resolve } from "path";
import viteCompression from "vite-plugin-compression";
import visualizer from "rollup-plugin-visualizer";

const plugins = [];
// 打包生产环境才引入的插件
if (process.env.NODE_ENV === "production") {
    // 打包依赖包大小展示
    plugins.push(
        visualizer({
            open: true,
            gzipSize: true,
            brotliSize: true,
        })
    );
}

// https://vitejs.dev/config/
export default defineConfig({
    base: "/wft/", // 设置基础目录 './'
    envDir: "env", // 加载 .env 文件的目录
    css: {
        preprocessorOptions: {
            // less配置
            less: {
                modifyvars: {},
                javascriptEnabled: true,
            },
        },
    },
    // rollup插件
    plugins: [
        vue(),
        // gizp压缩
        viteCompression({
            verbose: true,
            disable: false,
            threshold: 10240,
            algorithm: "gzip",
            ext: ".gz",
        }),
        ...plugins,
    ],
    // 别名
    resolve: {
        alias: {
            "@": resolve(__dirname, "src"), // 设置 `@` 指向 `src` 目录
            // 解决vue-i18n警告You are running the esm-bundler build of vue-i18n. It is recommended to configure your bundler to explicitly replace feature flag globals with boolean literals to get proper tree-shaking in the final bundle.
            "vue-i18n": "vue-i18n/dist/vue-i18n.cjs.js",
        },
    },
    build: {
        target: "modules", //指定es版本,浏览器的兼容性 'es2020'
        outDir: "wft", //指定打包输出路径
        assetsDir: "assets", //指定静态资源存放路径
        cssCodeSplit: true, //css代码拆分,禁用则所有样式保存在一个css里面
        sourcemap: false, //是否构建source map 文件
        terserOptions: {
            // 生产环境移除console
            compress: {
                drop_console: true,
                drop_debugger: true,
            },
        },
    },
    // 本地代理
    server: {
        host: "0.0.0.0",
        port: 8098, // 设置服务启动端口号
        open: true, // 设置服务启动时是否自动打开浏览器
        cors: true, // 允许跨域
        // 设置代理,根据项目实际情况配置
        proxy: {
            "/api": {
                target: "http://www.api.com/api/v1",
                changeOrigin: true,
                secure: false,
                rewrite: (path) => path.replace("/api/", "/"),
            },
        },
    },
});
3、代码规范
代码规范 vscode 需要安装的相关插件 Eslint Prettier Stylelint 三个即可
(1)安装Eslint适配Typescript的相关依赖
npm i eslint typescript @typescript-eslint/parser @typescript-eslint/eslint-plugin eslint-plugin-vue eslint-define-config -D
根目录下创建 .eslintrc.js 文件,配置参考eslint官方配置文档
const { defineConfig } = require('eslint-define-config'); // 配置提示插件
module.exports = defineConfig({
  root: true,
  // 一个环境定义了一组预定义的全局变量
  env: {
    browser: true,
    node: true,
    es6: true
  },
  // ESLint 默认使用 Espree 作为其解析器,你可以在配置文件中指定一个不同的解析器,只要该解析器符合下列要求:
  // 1.它必须是一个 Node 模块,可以从它出现的配置文件中加载。通常,这意味着应该使用 npm 单独安装解析器包。
  // 2.它必须符合 parser interface。
  parser: 'vue-eslint-parser',
  // ESLint 允许你指定你想要支持的 JavaScript 语言选项。默认情况下,ESLint 支持 ECMAScript 5 语法。你可以覆盖该设置,以启用对 ECMAScript 其它版本和 JSX 的支持
  parserOptions: {
    parser: '@typescript-eslint/parser',
    ecmaVersion: 2020,
    sourceType: 'module',
    jsxPragma: 'React',
    ecmaFeatures: {
      jsx: true
    }
  },
  // ESLint 支持使用第三方插件。在使用插件之前,你必须使用 npm 安装它
  plugins: [
    "vue",
    "@typescript-eslint"
  ],
  // 一个配置文件可以被基础配置中的已启用的规则继承
  extends: [
    'plugin:vue/vue3-recommended',
    'plugin:@typescript-eslint/recommended',
    'prettier',
    'plugin:prettier/recommended'
  ],
  // ESLint 附带有大量的规则。你可以使用注释或配置文件修改你项目中要使用的规则
  rules: {
    ...
  }
})
安装 node 环境的类型检,例如识别环境变量:process.env.NODE_ENV === "production"
npm i @types/node -D
(2)安装Prettier相关依赖
代码格式化,有了 Prettier 之后,它能去掉原始的代码风格,确保团队的代码使用统一相同的格式,用官网的原话是"Building and enforcing a style guide"。
npm i prettier eslint-config-prettier eslint-plugin-prettier pretty-quick -D
根目录下创建 .prettierrc.js 文件,配置参考prettier官方配置文档
module.exports = {
    "tabWidth": 4,
    "printWidth": 300,
    "trailingComma": "es5",
    "bracketSpacing": true,
    "overrides": [
        {
            "files": ["*.ts", "*.vue", "*.less", "*.js"],
            "options": {
                "tabWidth": 4
            }
        }
    ],
    "endOfLine": "crlf"
}
(3)安装Stylelint+Standard相关依赖
作用:
- 了解最新的 CSS 语法
- 从 HTML,markdown 和 CSS-in-JS 对象和模板文字中提取嵌入式样式
- 解析类似于 CSS 的语法,例如 SCSS,Sass,Less 和 SugarSS
- 拥有 170 多个内置规则,可捕获错误,应用限制并强制执行样式规则
- 支持插件,因此您可以创建自己的规则或使用社区编写的插件
- 自动修复大多数样式违规
- 支持可扩展或创建的可共享配置
npm i stylelint stylelint-config-rational-order stylelint-config-standard stylelint-order -D
根目录下创建 .stylelintrc.js 文件,配置参考stylelint官方配置文档
module.exports = {
    extends: ["stylelint-config-standard", "stylelint-config-rational-order"],
    plugins: ["stylelint-order"],
    rules: {
        "selector-pseudo-class-no-unknown": null,
        "no-descending-specificity": null,
        "at-rule-no-unknown": null,
        "font-family-no-missing-generic-family-keyword": null,
        "selector-type-no-unknown": null,
        "declaration-block-trailing-semicolon": null,
        "declaration-block-single-line-max-declarations": null,
        indentation: null,
    },
};
4、Git Hooks
使用 git 钩子,在 commit 前校验代码,并格式化代码
husky 是一个 Git Hook 工具
lint-staged 是一个在 git 暂存文件上(也就是被 git add 的文件)运行已配置的 eslint(或其他)任务。lint-staged 将所有暂存文件的列表传递给任务。
安装依赖:
npm i husky lint-staged -D
.husky目录新增配置文件:

commit-msg
#!/bin/sh

# shellcheck source=./_/husky.sh
. "$(dirname "$0")/_/husky.sh"

#--no-install 参数表示强制npx使用项目中node_modules目录中的commitlint包
npx --no-install commitlint --edit "$1"
common.sh
#!/bin/sh
command_exists () {
  command -v "$1" >/dev/null 2>&1
}

# Workaround for Windows 10, Git Bash and Yarn
if command_exists winpty && test -t 1; then
  exec < /dev/tty
fi
lintstagedrc.js
module.exports = {
  '*.{js,jsx,ts,tsx}': ['eslint --fix', 'prettier --write'],
  '{!(package)*.json,*.code-snippets,.!(browserslist)*rc}': ['prettier --write--parser json'],
  'package.json': ['prettier --write'],
  '*.vue': ['eslint --fix', 'prettier --write', 'stylelint --fix'],
  '*.{scss,less,styl,html}': ['stylelint --fix', 'prettier --write'],
  '*.md': ['prettier --write']
}
pre-commit
#!/bin/sh
. "$(dirname "$0")/_/husky.sh"
. "$(dirname "$0")/common.sh"

[ -n "$CI" ] && exit 0

# Format and submit code according to lintstagedrc.js configuration
npm run lint:lint-staged

npm run lint:pretty
提交规范
- 是一个撰写符合上面 Commit Message 标准的一款工具
- 制定提交规范
安装commitlint相关依赖
npm i @commitlint/cli @commitlint/config-conventional commitizen cz-conventional-changelog -D
根目录新增.commitlintrc.js文件,配置:
module.exports = {
  extends: ['@commitlint/config-conventional'],
  rules: {
    'subject-case': [0, 'never'],
    'type-enum': [
      2,
      'always',
      [
        'build', //对构建系统或者外部依赖项进行了修改
        'ci', //ci配置,脚本文件等更新
        'chore', //改变构建流程、或者增加依赖库、工具等
        'docs', //仅仅修改了文档,比如README,CHANGELOG,CONTRIBUTE等等
        'feat', //增加新功能
        'fix', //修复问题/BUG
        'perf', //优化相关,比如提升性能、体验
        'refactor', //代码重构,没有加新功能或者修复bug
        'revert', //回滚到上一个版本
        'style', //仅修改了空格、格式缩进、逗号等等,不改变代码逻辑
        'test', //测试用例,包括单元测试、集成测试等
        'workflow', //工作流改进
        'types', //类型定义文件更改
        'wip' //开发中
      ]
    ]
  }
}
pageage.json中增加配置
{
    "scripts": {
            "format": "prettier --write ./src",
            "lint": "eslint ./src --ext .vue,.js,.ts,.tsx",
            "lint-fix": "eslint --fix ./src --ext .vue,.js,.ts,.tsx",
            "lint:eslint": "eslint \"{src,mock}/**/*.{vue,ts,tsx}\" --fix",
            "lint:prettier": "prettier --write --loglevel warn \"src/**/*.{js,json,tsx,css,less,scss,vue,html,md}\"",
            "lint:stylelint": "stylelint --fix \"**/*.{vue,less,postcss,css,scss}\" --cache --cache-location node_modules/.cache/stylelint/",
            "lint:lint-staged": "lint-staged -c ./.husky/lintstagedrc.js",
            "lint:pretty": "pretty-quick --staged",
            "commit": "git-cz",
            "prepare": "husky install"
    },
    "lint-staged": {
        "src/**/*.{js,ts,tsx,vue}": [
            "npm run lint-fix"
        ],
        "src/**/*.{vue,htm,html,css,sass,less,scss}": [
            "npm run lint:stylelint"
        ]
    },
    "config": {
        "commitizen": {
            "path": "./node_modules/cz-conventional-changelog"
        }
    },
}
prepare脚本会在npm install(不带参数)之后自动执行。也就是说当我们执行npm install安装完项目依赖后会执行 husky install命令,该命令会创建.husky/目录并指定该目录为git hooks所在的目录。
pretty-quick --staged
一般常用的选项是 --staged , --staged 是转为 git 服务的。
通过这个选项, pretty-quick 会只格式化 git add . 暂存之后的文件,并且会在格式化完成后,再次进行 git add .,将格式化的文件再次暂存。
详细解说见文章:https://zhuanlan.zhihu.com/p/366786798
项目提交规范示例:
git add .
npm run commit // 填提交信息,代码规范校验
git push
四、vue全家桶
根据需要安装vue-router、vuex,新建router和store文件
src/router/index.ts
import { createRouter, createWebHistory, RouteRecordRaw } from "vue-router";

const routes: Array<RouteRecordRaw> = [
    {
        path: "/",
        redirect: "/home",
    },
    {
        path: "/home",
        name: "Home",
        meta: {
            title: "首页"
        },
        component: () => import("../views/Home/index.vue"),
    }
];
const router = createRouter({
    history: createWebHistory(import.meta.env.BASE_URL),
    routes,
});

console.log(router, "router");
// 路由前置钩子
router.beforeEach((to, from, next) => {
    ...
    next();
});

router.afterEach((to, from) => {
    console.log(to, "to", from, "from");
});

// 路由配置上定义 路由独享的守卫
// beforeEnter: (to, from) => {
//   // reject the navigation
//   return false
// },

export default router;
五、兼容适配
1、移动端适配
使用postcss-px-to-viewport插件px转成vw单位,autoprefixer自动添加前缀,使用less预处理器
npm i postcss-aspect-ratio-mini postcss-cssnext postcss-import postcss-viewport-units postcss-px-to-viewport postcss-url postcss-write-svg autoprefixer less -D
根目录下新增postcss.config.js文件
// postcss.config.js
// 用 vite 创建项目,配置 postcss 需要使用 postcss.config.js,之前使用的 .postcssrc.js 已经被抛弃
module.exports = {
    plugins: {
        "postcss-import": {},
        "postcss-url": {},
        // 用来处理元素容器宽高比。
        "postcss-aspect-ratio-mini": {},
        // 用来处理移动端1px的解决方案。
        "postcss-write-svg": { utf8: false },
        "postcss-cssnext": {},
        "postcss-px-to-viewport": {
            /** 视窗的宽度,对应的是我们设计稿的宽度,一般是750 */
            viewportWidth: 750,
            /** 视窗的高度,根据750设备的宽度来指定,一般指定1334,也可以不配置 */
            viewportHeight: 1334,
            /** 指定`px`转换为视窗单位值的小数位数(很多时候无法整除) */
            unitPrecision: 3,
            /** 指定需要转换成的视窗单位,建议使用vw */
            viewportUnit: "vw",
            /** 指定不转换为视窗单位的类,可以自定义,可以无限添加,建议定义一至两个通用的类名 */
            selectorBlackList: [".ignore", ".hairlines"],
            /** 小于或等于`1px`不转换为视窗单位,你也可以设置为你想要的值 */
            minPixelValue: 1,
            /** 允许在媒体查询中转换`px` */
            mediaQuery: false,
            /** 排除不编译的目录 */
            exclude: /(\/|\\)(node_modules)(\/|\\)/,
        },
        "postcss-viewport-units": {},
    },
};
2、移动端组件库适配
安装使用vant,无需配置按需引入配置,vite默认就是按需加载
npm i vant
main.ts引入样式
import "vant/lib/index.css";
3、国际化适配
安装vue-i18n和js-cookie
npm i vue-i18n js-cookie
src下新建locale目录,新建对应语言包,通过识别cookies或者浏览器设置的语言信息区分
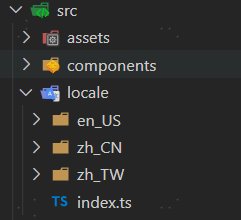
src/locale/en_US/index.ts
const en_US = {
    home: {
        title: "Home",
    },
    example: {
        title: "Test",
    },
};

export default en_US;
src/locale/index.ts
/**
 * 多语言配置入口
 */
import { createI18n } from "vue-i18n";
import { getLanguage } from "../utils/cookies";

// Vant built-in lang
import { Locale } from "vant";
import enUS from "vant/es/locale/lang/en-US";
import zhCN from "vant/es/locale/lang/zh-CN";
import zhTW from "vant/es/locale/lang/zh-TW";

// User defined lang
import enUsLocale from "./en_US";
import zhCnLocale from "./zh_CN";
import zhTwLocale from "./zh_TW";

const messages: any = {
    "zh-CN": {
        ...zhCN,
        ...zhCnLocale,
    },
    "zh-TW": {
        ...zhTW,
        ...zhTwLocale,
    },
    "en-US": {
        ...enUS,
        ...enUsLocale,
    },
};

// 获取本地语言
export const getLocale = () => {
    // 优先从cookies取语言
    const cookieLanguage = getLanguage();
    if (cookieLanguage) {
        document.documentElement.lang = cookieLanguage;
        return cookieLanguage;
    }

    // 从浏览器对象取语言
    const language = navigator.language.toLowerCase();
    const locales = Object.keys(messages);
    for (const locale of locales) {
        if (language.indexOf(locale) > -1) {
            document.documentElement.lang = locale;
            return locale;
        }
    }

    // 默认中文 en-US zh-CN zh-TW
    return "zh-CN";
};

const CURRENT_LANG = getLocale();
// first entry
Locale.use(CURRENT_LANG, messages[CURRENT_LANG]);

const i18n = createI18n({
    locale: CURRENT_LANG,
    messages,
});

const langMsg = messages[CURRENT_LANG];

export { i18n, langMsg, messages };
src/utils/cookies.ts
import Cookies from "js-cookie";

// App
const languageKey = "language";
export const getLanguage = () => Cookies.get(languageKey);
export const setLanguage = (language: string) => Cookies.set(languageKey, language);
src/main.ts
import { createApp } from "vue";
import App from "./App.vue";
import { i18n } from "./locale/index";

createApp(App).use(i18n).mount("#app");
src/router/index.ts配置对应title
import { createRouter, createWebHistory, RouteRecordRaw } from "vue-router";
import { langMsg } from "../locale/index";

const routes: Array<RouteRecordRaw> = [
    {
        path: "/",
        redirect: "/home",
    },
    {
        path: "/home",
        name: "Home",
        meta: {
            title: "首页",
            i18Title: langMsg?.home?.title,
        },
        component: () => import("../views/Home/index.vue"),
    }
];
const router = createRouter({
    history: createWebHistory(import.meta.env.BASE_URL),
    routes,
});

console.log(router, "router");
// 路由前置钩子
router.beforeEach((to, from, next) => {
    const title = to.meta && (to.meta.i18Title as string);
    if (title) {
        document.title = title;
    }
    next();
});

router.afterEach((to, from) => {
    console.log(to, "to", from, "from");
});

// 路由配置上定义 路由独享的守卫
// beforeEnter: (to, from) => {
//   // reject the navigation
//   return false
// },

export default router;
4、自定义环境变量适配
vite.config.ts配置环境变量目录
export default defineConfig({
    envDir: "env", // 加载 .env 文件的目录
})
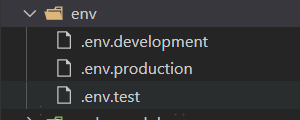
根目录下新建env文件夹
env/.env.development
# .env.development
# 读取 console.log(import.meta.env.VITE_API_URL); // 以VITE_前缀的变量才会暴露给经过VITE_处理的代码
# 读取 console.log(import.meta.env.MAP_KEY); // 不暴露
MAP_KEY = xxxxxxxxxxxxxxx
VITE_API_URL = http://dev.api.com
VITE_ENV = development
以VITE_前缀的变量才会暴露给经过VITE_处理的代码
package.json文件增加脚本,匹配对应env配置文件
"scripts": {
        "build:dev": "vue-tsc --noEmit && vite build --mode development",
        "build:test": "vue-tsc --noEmit && vite build --mode test",
        "build": "vue-tsc --noEmit && vite build --mode production",
}
5、调试工具vconsole
npm i vconsole
src/main.ts引入
import Vconsole from 'vconsole';
// 非正式环境打开调试
const isProd = process.env.NODE_ENV === "production"
// const isProd = import.meta.env.VITE_ENV === 'production'
!isProd && new Vconsole()
六、mock.js
1、安装vite-plugin-mock
npm i axios mockjs -S
npm i cross-env vite-plugin-mock -D
2、新建mock文件夹,存放本地mock文件
user.ts
export default [
  {
    url: '/api/createUser',
    method: 'post',
    response: ({ body }) => {
      return {
        code: 0,
        message: 'ok',
        data: null,
      }
    },
  },
]
3、mock下创建mockProdServer.ts文件
import { createProdMockServer } from 'vite-plugin-mock/es/createProdMockServer'
import userMock from '../mock/user'

export function setupProdMockServer() {
  createProdMockServer([ ...userMock])
}
4、vite.config.js文件配置
import { defineConfig } from "vite";
import { viteMockServe } from "vite-plugin-mock";
export default defineConfig({
    plugins: [
        viteMockServe({
            mockPath: "mock",
            localEnabled: true,
            prodEnabled: false,
            injectCode: `
                    import { setupProdMockServer } from './mock/mockProdServer';
                    setupProdMockServer();
                `,
        })
    ],
})
相关文档:
TypeScript4: https://www.typescriptlang.org/zh/
Vite2: https://cn.vitejs.dev/
Vue3: https://v3.cn.vuejs.org/
VueRouter4: https://next.router.vuejs.org/zh/index.html
Vuex4: https://next.vuex.vuejs.org/
Axios: https://axios-http.com/
vant3: https://vant-contrib.gitee.io/vant/v3/#/zh-CN
Less: http://lesscss.cn/
husky: https://typicode.github.io/husky/#/
lint-staged: lint-staged
ESLint: https://eslint.org/
Prettier: https://prettier.io/
Stylelint: http://stylelint.docschina.org/
Commitizen: http://commitizen.github.io/cz-cli/
Commitlint: https://commitlint.js.org/#/

 浙公网安备 33010602011771号