python 模块
模块py文件
#!/usr/bin/env python3      #第1行注释可以让这个hello.py文件直接在Unix/Linux/Mac上运行
# -*- coding: utf-8 -*-     #第2行注释表示.py文件本身使用标准UTF-8编码

' a test module '           #第4行是一个字符串,表示模块的文档注释,任何模块代码的第一个字符串都被视为模块的文档注释;

__author__ = 'Michael Liao'     #第6行使用__author__变量把作者写进去
                                #以上就是Python模块的标准文件模板,当然也可以全部删掉不写,但是,按标准办事肯定没错。
import sys

def test():             #导入sys模块,sys模块有一个argv变量,用list存储了命令行的所有参数。
                        # argv至少有一个元素,因为第一个参数永远是该.py文件的名称,例如:
                        # 运行python3 hello.py获得的sys.argv就是['hello.py'];
                        # 运行python3 hello.py Michael获得的sys.argv就是['hello.py', 'Michael]。
    args = sys.argv
    if len(args)==1:
        print('Hello, world!')
    elif len(args)==2:
        print('Hello, %s!' % args[1])
    else:
        print('Too many arguments!')

if __name__=='__main__':
    #这个语句的意思是,当我们在命令行运行hello模块文件时,Python解释器把一个特殊变量__name__置为__main__,
    # 而如果在其他地方导入该hello模块时,if判断将失败,
    # 因此,这种if测试可以让一个模块通过命令行运行时执行一些额外的代码,
    # 最常见的就是运行测试。直接在命令行中输入python hello.py或者python hello.py  perfey 就行了(当然当前路径要在hello.py路径下),如果在pycharm中运行的话,需要先导入hello模块,然后执行hello.test()函数
    test()
引用模块
from day14 import hello   # day14 是hello.py 所在的文件夹(这个文件夹中包含__init__.py)
hello.test()
'''
模块:包含了python定义和声明的文件,一个py文件就是一个模块
1,内置模块 python解释器自带的模块
2,扩展模块 前辈大牛编写的模块,需要下载使用
3,自定义模块 自己写的模块
*****序列化模块   json   pickle   shelve
json可用于不同语言的数据类型序列化为字符串,支持str,list,dict,bool这些数据类型
pickle只可用于python语言,支持所有python数据类型序列化为字符串,我们可以把对象也当做数据类型是所属类的数据类型
shelve也只可用于python,类似字典的操作,可将数据类型作为字典的键保存到文件中
'''

# json  dumps()/loads()    dump()/load()
# dumps(数据类型如字典)/loads(序列化的字符串)   dump(数据类型,文件句柄)/load(文件句柄)
import json
dic = {"name":"alex","age":18}
ret = json.dumps(dic,ensure_ascii=False)   # 将字典转化为序列化的字符串,增加ensure_ascii参数可以使字符串中的中文显示
dic2 = json.loads(ret)  # 将序列化的字符串转化回原数据类型


import json
dic = {"name":"alex","age":18}
with open("json_file",encoding='utf-8',mode='w') as f1:
    json.dump(dic,f1)     # 将字典转化为序列化的字符串并保存在文件中
with open("json_file",encoding='utf-8') as f2:
    print(json.load(f2))    # 将序列化的字符串转化回原数据类型
# 注意json.dump/load 只能对一个数据进行读取操作,如果有多个字典是不能都写进文件中的,不过我们可以通过其他手段实现
# 多个数据保存到一个文件


import json
dic1 = {"name":"alex1","age":18}
dic2 = {"name":"alex2","age":18}
dic3 = {"name":"alex3","age":18}
with open("json_files",encoding='utf-8',mode='w') as f1:
    s1 = json.dumps(dic1)
    s2 = json.dumps(dic2)
    s3 = json.dumps(dic3)   # 先使用dumps()将字典序列化为字符串
    f1.write(s1+'\n'+s2+'\n'+s3+'\n')   # 换行保存字符串
with open("json_files",encoding='utf-8') as f2:
    while True:
        try:
            for line in f2:
                print(json.loads(line))   # 这里不必处理strip '\n', loads会自动忽略
        except EOFError:    # 当把文件中的序列化字符串读完后会抛出EOFError错误,这里我们使用 try ...except...处理异常\
            break           # 遇到即 break ,怎么知道我们会遇到什么错误呢,一个个都记住是不大可能的,可以特意产生这个错误,\
                            # 然后找到python解释器报错的语句就可以了

# {'name': 'alex1', 'age': 18}
# {'name': 'alex2', 'age': 18}
# {'name': 'alex3', 'age': 18}
import json
s = 'alex'
print(s,repr(s),type(s))
print(json.dumps(s),repr(json.dumps(s)),type(json.dumps(s)))
# alex 'alex' <class 'str'>
# "alex" '"alex"' <class 'str'>
dic = {'name':'alex','age':18}
print(str(dic),repr(str(dic)),type(str(dic)))
print(json.dumps(dic),repr(json.dumps(dic)),type(json.dumps(dic)))
# {'name': 'alex', 'age': 18} "{'name': 'alex', 'age': 18}" <class 'str'>
# {"name": "alex", "age": 18} '{"name": "alex", "age": 18}' <class 'str'>
# 可以这样理解,从内而外,python的字符串优先使用单引号,其次使用双引号 而 json序列化的字符串优先使用双引号,其次使用单引号,但是json字符串的字符串的最外边一定是单引号
# 当我们知道了json序列化的规则了之后,就可以根据这种规则自己写json的序列化字符串(里面的字符串使用双引号,最外面使用单引号),然后再反序列化回来
s1 = '{"name":["alex","sylar"]}'
print(json.loads(s1))
# {'name': ['alex', 'sylar']}
# pickle的用法和json基本一样,也是dumps(数据类型)/loads(序列化的字符串)   dump(数据类型,文件句柄)/load(文件句柄)
# 有一点不同的是pickle的dump()/load()可以读取多个序列化字符串
import pickle
dic1 = {"name":"alex1","age":18}
dic2 = {"name":"alex2","age":18}
dic3 = {"name":"alex3","age":18}
with open("pickle_files",mode='wb') as f1: # pickle 无论是dumps还是dump序列化的字符串都是bytes类型的,读写文件只能使用 wb,rb模式,且不能有编码模式
    pickle.dump(dic1,f1)
    pickle.dump(dic2,f1)
    pickle.dump(dic3,f1)
with open("pickle_files",mode='rb') as f2:
    while True:
        try:
            print(pickle.load(f2))      # 直接读就好了,它会自动一个一个读
        except EOFError:
            break

# 使用pickle保存类的对象
# 1,首先在文件中写入对象
import pickle
class A:
    def __init__(self,name,age):
        self.name = name
        self.age = age
    def work(self):
        print('%s正在敲代码'% self.name)
a1 = A('alex',18)
a2 = A('sylar',20)
with open('pickle_obj',mode='wb') as f1:
    pickle.dump(a1,f1)
    pickle.dump(a2,f1)
# 现在我们的文件pick_obj已经保存了A的对象a1,a2,但是因为是我们自己定义的类,对象不能脱离类的定义单独存在,\
# 所以下面使用文件中的对象有两种方法,一种是在当前文件中保留类 A 的定义,一种是把类 A 的定义放到其他py文件中,\
# 通过引用该py文件作为模块,这样就有类的定义了

# ***对象的使用,方法一
import pickle
class A:
    def __init__(self,name,age):
        self.name = name
        self.age = age
    def work(self):
        print('%s正在敲代码'% self.name)

li = []
with open('pickle_obj',mode='rb') as f2:
    while True:
        try:
            li.append(pickle.load(f2))
        except EOFError:
            break
for i in li:
    print(i.name,i.age)
# alex 18
# sylar 20

# ***对象的使用,方法二
import pickle
from guo123 import A        # 把类A 的定义放到guo123.py文件中
li = []
with open('pickle_obj',mode='rb') as f2:
    while True:
        try:
            li.append(pickle.load(f2))
        except EOFError:
            break
for i in li:
    print(i.name,i.age)
# alex 18
# sylar 20

#  ***shelve***
# shelve给我们提供一个open方法,是用key来访问的,使用起来和字典类似
import shelve
dic = {'int':10, 'float':9.5, 'string':'Sample data'}
f = shelve.open('shelve_file')
f['key1'] = dic
f.close()

import shelve
f1 = shelve.open('shelve_file')
get_dic = f1['key1']
print(get_dic)
# {'int': 10, 'float': 9.5, 'string': 'Sample data'}

# 这时默认是不可以对我们取出来的键值对进行修改或者新增的,如果我们想要\
# 修改或者新增的话需要加一个参数  writeback=True
f2 = shelve.open('shelve_file',writeback=True)
print(f2['key1'])   # {'int': 10, 'float': 9.5, 'string': 'Sample data'}
f2['key1']['new_value'] = 'this was not here before'
print(f2['key1'])   # {'int': 10, 'float': 9.5, 'string': 'Sample data', 'new_value': 'this was not here before'}

f2.close()
# *******************************************摘要算法******************************
import hashlib

md5 = hashlib.md5()
md5.update('how to use md5 in python hashlib?'.encode('utf-8'))
print(md5.hexdigest())

# 如果数据量很大,可以分块多次调用update(),最后计算的结果是一样的
md5 = hashlib.md5()
md5.update('how to use md5 in '.encode('utf-8'))
md5.update('python hashlib?'.encode('utf-8'))
print(md5.hexdigest())     加盐    hashlib.md5("salt".encode("utf8"))
import hashlib
sha1 = hashlib.sha1()
sha1.update('how to use sha1 in '.encode('utf-8'))
sha1.update('python hashlib?'.encode('utf-8'))
print(sha1.hexdigest())
# 2c76b57293ce30acef38d98f6046927161b46a44 40位16进制 即40*4=160bit字节
# **************对配置文件的操作***************
# 我这里写的不是很详细:推荐博客http://www.cnblogs.com/Eva-J/articles/7228075.html#_label12
import configparser
config = configparser.ConfigParser()
config['DEFAULT'] = {
'ServerAliveInterval':'45',
'Compression':'yes',
'CompressionLeval':'9',
'ForwardX11':'yes'
}
config['bitbucket.org'] = {'User':'hg'}
config['topsecret.server.com'] = {'Host Port':'50022','ForwardX11':'no'}
with open('example.ini', 'w') as configfile:
config.write(configfile)
import configparser
config = configparser.ConfigParser()
print(config.sections()) # []
config.read('example.ini')
print(config.sections()) # ['bitbucket.org', 'topsecret.server.com'] DEFAULT是个特殊的节,相当于是全局的,这里不显示
print('bytebong.com' in config) # False
print('bitbucket.org' in config) # True
print(config['bitbucket.org']) # <Section: bitbucket.org> 表明这是一个可迭代对象
print(config['bitbucket.org']['user']) # hg
print(config['topsecret.server.com']['ForwardX11']) # no
for key in config['bitbucket.org']:
print(key)
# user
# serveraliveinterval
# compression
# compressionleval
# forwardx11 # 因为'DEFAULT'可以看做全局的,迭代的'bitbucket.org'会有'DEFAULT'的键
print(config.options('bitbucket.org')) # 同for循环,找到所有键
# ['user', 'serveraliveinterval', 'compression', 'compressionleval', 'forwardx11']
print(config.items('bitbucket.org')) # 找到所有键值对
# [('serveraliveinterval', '45'), ('compression', 'yes'), ('compressionleval', '9'), ('forwardx11', 'yes'), ('user', 'hg')]
print(config.get('bitbucket.org','compression')) # yes 找到key对应的键值
# 增删改操作
import configparser
config = configparser.ConfigParser()
config.read('example.ini')
config.add_section('yuan')
config.remove_section('bitbucket.org')
config.remove_option('topsecret.server.com',"forwardx11")
config.set('topsecret.server.com','k1','11111')
config.set('yuan','k2','22222')
config.write(open('new2.ini', "w")) # 把操作后的配置文件写到新的内容
# ***************************************日志**************************************
import logging
logging.debug('debug message')
logging.info('info message')
logging.warning('warning message')
logging.error('error message')
logging.critical('critical message')
# 默认情况下Python的logging模块将日志打印到了标准输出中,且只显示了大于等于WARNING级别的日志,\
# 这说明默认的日志级别设置为WARNING(日志级别等级CRITICAL > ERROR > WARNING > INFO > DEBUG),\
# 默认的日志格式为日志级别:Logger名称:用户输出消息
import logging
logging.basicConfig(level=logging.DEBUG,
format='%(asctime)s %(filename)s[line:%(lineno)d] %(levelname)s %(message)s',
# Fri, 06 Jul 2018 11:19:59 try.py [line:90] DEBUG debug message
datefmt='%a, %d %b %Y %H:%M:%S',
filename='test.log',
filemode='w')
logging.debug('debug message')
logging.info('info message')
logging.warning('warning message')
logging.error('error message')
logging.critical('critica l message')
# 相对于上面的方法,下面这种写日志的方法可以同时将日志输出到控制台并保存到字典中
import logging
logger = logging.getLogger() # 创建logger对象
# 创建一个handler(相当于文件句柄),用于写入日志文件
fh = logging.FileHandler('test.log',encoding='utf-8')
# 再创建一个handler,用于输出到控制台
ch = logging.StreamHandler()
formatter = logging.Formatter('%(asctime)s - %(name)s - %(levelname)s - %(message)s')
logger.setLevel(logging.DEBUG) # 如果对logger对象设置了日志等级,那么文件和控制台的日志等级都改变,不设置的话默认是WARNING,\
# 而且想单独设置fh 或者ch日志级别时,也要首先设置logger级别,且这个级别应该低于fh或ch的级别,不首先设置的话,只能在默认值WARNING\
# 的更高级(ERROR,CRITICAL)中进行设置
fh.setLevel(logging.DEBUG)
fh.setFormatter(formatter)
ch.setFormatter(formatter)
logger.addHandler(fh) #logger对象可以添加多个fh和ch对象
logger.addHandler(ch)
logger.debug('logger debug message')
logger.info('logger info message')
logger.warning('logger warning message')
logger.error('logger error message')
logger.critical('logger critical message')
# ***************collections包含很多模块的集合,这些模块是新的数据类型****************
from collections import namedtuple
Point = namedtuple('point1',['x','y']) # 使用nametuple创建了一个Point类,可以这样理解 'point1'是静态变量(名字应该使用point,这里我为了区分,使用point1),'x','y'是__init__里的参数
p = Point(1,2) # 使用 Point() 类创建了一个 p 对象,传入了参数 'x' , 'y' 均为 p 的属性 p=(x=1,y=2) namedtuple 命名元组
print(p.x)
Circle = namedtuple('Circle',['x','y','r'])
c = Circle(1,2,3)
print(c.x)
# deque是为了高效实现插入和删除操作的双向列表,适合用于队列和栈
from collections import deque
q = deque(['a','b','c'])
q.append('x')
q.appendleft('y')
print(q) # deque(['y', 'a', 'b', 'c', 'x'])
q.pop()
q.popleft()
print(q) # deque(['a', 'b', 'c'])
# OrderedDict 有序字典
from collections import OrderedDict
d = dict([('a',1),('b',2),('c',3)])
print(d) # {'a': 1, 'b': 2, 'c': 3}
od = OrderedDict([('a',1),('b',2),('c',3)])
print(od) # OrderedDict([('a', 1), ('b', 2), ('c', 3)])
od['z'] = 1
od['y'] = 2
od['x'] = 3
print(od.keys()) # 按插入的Key的顺序返回
# odict_keys(['a', 'b', 'c', 'z', 'y', 'x'])
# 有如下值集合 [11,22,33,44,55,66,77,88,99,90...],\
# 将所有大于 66 的值保存至字典的第一个key中,将小于 66 的值保存至第二个key的值中
# **原生字典的解决方法**
li = [11,22,33,44,55,77,88,99,90]
result = {}
for row in li:
if row > 66:
if 'key1' not in result:
result['key1'] = []
result['key1'].append(row)
else:
if 'key2' not in result:
result['key2'] = []
result['key2'].append(row)
print(result)
# **使用defaultdict模块**
from collections import defaultdict
values = [11, 22, 33,44,55,66,77,88,99,90]
my_dict = defaultdict(list)
for value in values:
if value>66:
my_dict['k1'].append(value)
else:
my_dict['k2'].append(value)
# 使用dict时,如果引用的Key不存在,就会抛出KeyError。如果希望key不存在时,返回一个默认值,就可以用defaultdict
from collections import defaultdict
dd = defaultdict(lambda : 'N/A')
dd['key1'] = 'abc'
print(dd['key1']) # abc
dd['key2']
print(dd['key2']) # N/A
# Counter类的目的是用来跟踪值出现的次数,返回一个字典
from collections import Counter
c = Counter('ab bsa *')
print(c)
# Counter({'a': 2, 'b': 2, ' ': 2, 's': 1, '*': 1})
# ***********************************时间模块*********************************
import time
# time.sleep(2) # 线程)推迟指定的时间运行。单位为秒
# ret = time.time() # 获取当前的时间戳,相对于1970年1月1日00:00:00开始按秒计算的偏移量
# 表示时间的三种方式;时间戳、元组(struct_time)、格式化的时间字符串
# 1,时间戳表示的是从1970年1月1日00:00:00开始按秒计算的偏移量。我们运行“type(time.time())”,返回的是float类型
# 2,格式化的时间字符串(Format String): ‘1999-12-06'
'''
%y 两位数的年份表示(00-99)
%Y 四位数的年份表示(000-9999)
%m 月份(01-12)
%d 月内中的一天(0-31)
%H 24小时制小时数(0-23)
%I 12小时制小时数(01-12)
%M 分钟数(00=59)
%S 秒(00-59)
%a 本地简化星期名称
%A 本地完整星期名称
%b 本地简化的月份名称
%B 本地完整的月份名称
%c 本地相应的日期表示和时间表示
%j 年内的一天(001-366)
%p 本地A.M.或P.M.的等价符
%U 一年中的星期数(00-53)星期天为星期的开始
%w 星期(0-6),星期天为星期的开始
%W 一年中的星期数(00-53)星期一为星期的开始
%x 本地相应的日期表示
%X 本地相应的时间表示
%Z 当前时区的名称
%% %号本身
'''
print(time.strftime('%Y-%m-%d %X'))
# 2018-07-09 11:17:20
print(time.strftime('%Y-%m-%d %H-%M-%S'))
# 2018-07-09 11-18-36
# 3,元组(struct_time) :struct_time元组共有9个元素共九个元素:(年,月,日,时,分,秒,一年中第几周,一年中第几天等)
'''
索引(Index) 属性(Attribute) 值(Values)
0 tm_year(年) 比如2011
1 tm_mon(月) 1 - 12
2 tm_mday(日) 1 - 31
3 tm_hour(时) 0 - 23
4 tm_min(分) 0 - 59
5 tm_sec(秒) 0 - 60
6 tm_wday(weekday) 0 - 6(0表示周一)
7 tm_yday(一年中的第几天) 1 - 366
8 tm_isdst(是否是夏令时) 默认为0
'''
# 时间元组:localtime将一个时间戳转换为当前时区的struct_time
print(time.localtime())
# time.struct_time(tm_year=2018, tm_mon=7, tm_mday=9, tm_hour=11, tm_min=29, tm_sec=19, tm_wday=0, tm_yday=190, tm_isdst=0)
# **时间戳是计算机能够识别的时间;时间字符串是人能够看懂的时间;元组则是用来操作时间的
# ***几种格式之间的转换***
![]()
'''
Timestamp(时间戳)--- localtime()/gmtime()------> struct_time(命名元组nametuple)
# localtime() 当地时间,北京时间 gmtime() UTC时间,英国伦敦当地时间
t1 = time.time()
print(t1) # 1531107920.2590685
print(time.localtime(t1)) # time.struct_time(tm_year=2018, tm_mon=7, tm_mday=9, tm_hour=11, tm_min=45, tm_sec=20, tm_wday=0, tm_yday=190, tm_isdst=0)
struct_time(元组,即结构化时间) ---- mktime() ----> Timestamp(时间戳)
t2 = time.localtime() # time.struct_time(tm_year=2018, tm_mon=7, tm_mday=9, tm_hour=11, tm_min=47, tm_sec=56, tm_wday=0, tm_yday=190, tm_isdst=0)
print(time.mktime(t2)) # 1531108076.0
Format string(格式化字符串) ---- strptime() -----> struct_time(元组)
t3 = time.strftime('%a %b %d %H:%M:%S %Y') # 因为要转化成元组形式,所以要写全
print(t3) # Mon Jul 09 11:52:14 2018
print(time.strptime(t3)) # time.struct_time(tm_year=2018, tm_mon=7, tm_mday=9, tm_hour=11, tm_min=52, tm_sec=14, tm_wday=0, tm_yday=190, tm_isdst=-1)
print(time.strptime("2017-03-16",'%Y-%m-%d')) # time.struct_time(tm_year=2017, tm_mon=3, tm_mday=16, tm_hour=0, tm_min=0, tm_sec=0, tm_wday=3, tm_yday=75, tm_isdst=-1)
print(time.strptime("07/24/2017",'%m/%d/%Y')) # time.struct_time(tm_year=2017, tm_mon=7, tm_mday=24, tm_hour=0, tm_min=0, tm_sec=0, tm_wday=0, tm_yday=205, tm_isdst=-1)
struct_time(元组) ------ strftime() ----> Format string(格式化字符串)
t4 = time.localtime()
print(t4) # time.struct_time(tm_year=2018, tm_mon=7, tm_mday=9, tm_hour=13, tm_min=18, tm_sec=12, tm_wday=0, tm_yday=190, tm_isdst=0)
print(time.strftime('%Y-%m-%d %X',t4)) # 2018-07-09 13:18:12 按照方法的形参传参数,t4这个参数如果不传,认为是当前时间
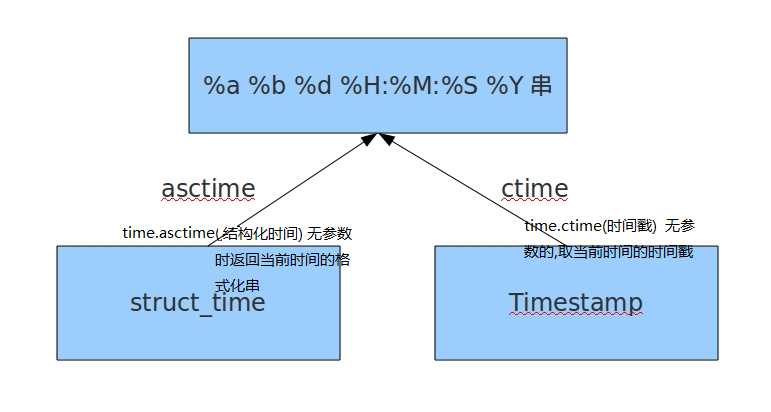
![]() struct_time ---asctime()----> %a %b %d %H:%M:%S %Y 串
# time.asctime(结构化时间) 如果不传参数,直接返回当前时间的格式化串
print(time.asctime()) # Mon Jul 9 13:43:14 2018
print(time.asctime(time.localtime())) # Mon Jul 9 13:44:50 2018
Timestamp ----ctime()-----> %a %b %d %H:%M:%S %Y 串
# time.ctime(时间戳) 如果不传参数,直接返回当前时间的格式化串
print(time.ctime()) # Mon Jul 9 13:47:21 2018
print(time.ctime(1500000000)) # Fri Jul 14 10:40:00 2017
'''
# 计算时间差,只有时间戳可以进行运算,所以计算时间差时先要把其他的时间形式转化为时间戳
import time
true_time=time.mktime(time.strptime('2017-09-11 08:30:00','%Y-%m-%d %H:%M:%S')) # 格式化字符串 --> 结构化时间 --->时间戳
time_now=time.mktime(time.strptime('2017-09-12 11:00:00','%Y-%m-%d %H:%M:%S'))
dif_time=time_now - true_time
struct_time=time.gmtime(dif_time) # 时间戳 ---> 结构化时间 这里只能用gmtime,因为时间戳是现对于英格兰时区的1970年1月1日
print(struct_time) # time.struct_time(tm_year=1970, tm_mon=1, tm_mday=2, tm_hour=2, tm_min=30, tm_sec=0, tm_wday=4, tm_yday=2, tm_isdst=0) 时间戳是相对于1970年1月1日00:00:00的,所以年要减去1970,月和日各减去1
print('过去了%d年%d月%d天%d小时%d分钟%d秒'%(struct_time.tm_year-1970,struct_time.tm_mon-1,struct_time.tm_mday-1,struct_time.tm_hour,struct_time.tm_min,struct_time.tm_sec))
struct_time ---asctime()----> %a %b %d %H:%M:%S %Y 串
# time.asctime(结构化时间) 如果不传参数,直接返回当前时间的格式化串
print(time.asctime()) # Mon Jul 9 13:43:14 2018
print(time.asctime(time.localtime())) # Mon Jul 9 13:44:50 2018
Timestamp ----ctime()-----> %a %b %d %H:%M:%S %Y 串
# time.ctime(时间戳) 如果不传参数,直接返回当前时间的格式化串
print(time.ctime()) # Mon Jul 9 13:47:21 2018
print(time.ctime(1500000000)) # Fri Jul 14 10:40:00 2017
'''
# 计算时间差,只有时间戳可以进行运算,所以计算时间差时先要把其他的时间形式转化为时间戳
import time
true_time=time.mktime(time.strptime('2017-09-11 08:30:00','%Y-%m-%d %H:%M:%S')) # 格式化字符串 --> 结构化时间 --->时间戳
time_now=time.mktime(time.strptime('2017-09-12 11:00:00','%Y-%m-%d %H:%M:%S'))
dif_time=time_now - true_time
struct_time=time.gmtime(dif_time) # 时间戳 ---> 结构化时间 这里只能用gmtime,因为时间戳是现对于英格兰时区的1970年1月1日
print(struct_time) # time.struct_time(tm_year=1970, tm_mon=1, tm_mday=2, tm_hour=2, tm_min=30, tm_sec=0, tm_wday=4, tm_yday=2, tm_isdst=0) 时间戳是相对于1970年1月1日00:00:00的,所以年要减去1970,月和日各减去1
print('过去了%d年%d月%d天%d小时%d分钟%d秒'%(struct_time.tm_year-1970,struct_time.tm_mon-1,struct_time.tm_mday-1,struct_time.tm_hour,struct_time.tm_min,struct_time.tm_sec))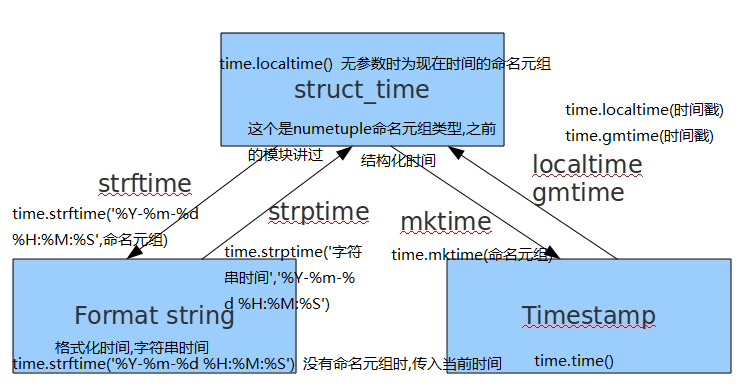
 struct_time ---asctime()----> %a %b %d %H:%M:%S %Y 串
# time.asctime(结构化时间) 如果不传参数,直接返回当前时间的格式化串
print(time.asctime()) # Mon Jul 9 13:43:14 2018
print(time.asctime(time.localtime())) # Mon Jul 9 13:44:50 2018
Timestamp ----ctime()-----> %a %b %d %H:%M:%S %Y 串
# time.ctime(时间戳) 如果不传参数,直接返回当前时间的格式化串
print(time.ctime()) # Mon Jul 9 13:47:21 2018
print(time.ctime(1500000000)) # Fri Jul 14 10:40:00 2017
'''
# 计算时间差,只有时间戳可以进行运算,所以计算时间差时先要把其他的时间形式转化为时间戳
import
struct_time ---asctime()----> %a %b %d %H:%M:%S %Y 串
# time.asctime(结构化时间) 如果不传参数,直接返回当前时间的格式化串
print(time.asctime()) # Mon Jul 9 13:43:14 2018
print(time.asctime(time.localtime())) # Mon Jul 9 13:44:50 2018
Timestamp ----ctime()-----> %a %b %d %H:%M:%S %Y 串
# time.ctime(时间戳) 如果不传参数,直接返回当前时间的格式化串
print(time.ctime()) # Mon Jul 9 13:47:21 2018
print(time.ctime(1500000000)) # Fri Jul 14 10:40:00 2017
'''
# 计算时间差,只有时间戳可以进行运算,所以计算时间差时先要把其他的时间形式转化为时间戳
import字符串时间中中文的问题 strftime str(字符串) f(format格式化) time(时间)
import time print(time.strftime('%Yy%mm%dd %X').replace('y','年').replace('m','月').replace('d','日')) # 2018年07月10日 16:17:11 ret = time.strftime('%Y{}%m{}%d{} %X').format('年','月','日') # strftime()参数不能有中文,但是这个返回一个字符串,可以对这个字符串进行格式化输出 print(ret) # 2018年07月10日 16:22:03
# **************************************random模块**************************************
import random
print(random.random())  # 大于0且小于1之间的小数
# 0.3625582293980316
print(random.uniform(1,3))  # 大于1小于3的小数
# 1.1991910261870011
print(random.randint(1,5))  # 大于等于1且小于等于5之间的整数
# 4
print(random.randrange(1,10,2)) # 加了步长,大于等于1且小于10之间的奇数(顾首不顾尾)
# 7
print(random.choice([1,'23',[4,5]]) )   # 随机选择一个返回,1或者23或者[4,5]
# [4, 5]
print(random.sample([1,'23',[4,5]],2))  # #随机选择多个返回,返回的个数为函数的第二个参数,这里是返回两个参数
# [1, '23']
# 打乱列表顺序
item = [1,3,5,7,9]
random.shuffle(item)
print(item)     # [7, 1, 5, 9, 3]

# 验证码小程序
import random
def v_code():
    code = ''
    for i in range(5):
        num=random.randint(0,9)
        alf=chr(random.randint(65,90))  # 大写字母ASCII码65-90 小写字母97-122,通过chr把数字转化为ASCII码对应的字母
        add=random.choice([num,alf])
        code="".join([code,str(add)])
    return code
print(v_code())
# E60LX
# *************************************os模块******************************
# os模块是与操作系统交互的一个接口
import os
print(os.getcwd())      # 获取当前工作目录,即当前python脚本工作的目录路径
# D:\desk\python\project\day25 模块2
os.chdir("d:/download")    # 改变当前脚本工作目录;相当于shell下cd
print(os.getcwd())
# d:\download

import os
os.curdir   # 返回当前目录: ('.') 即返回所在文件夹
os.pardir   # 获取当前目录的父目录字符串名:('..') 即返回所在文件夹的上一层文件夹
os.makedirs('dirname1/dirname2')   # 可生成多层递归目录
os.removedirs('dirname1/dirname2/dirname3')   # 若目录为空,则删除,并递归到上一级目录,如若也为空,则删除,依此类推
os.mkdir('dirname')    # 生成单级目录;相当于shell中mkdir dirname
os.rmdir('dirname')    # 删除单级空目录,若目录不为空则无法删除,报错;相当于shell中rmdir dirname
os.listdir('dirname')   #  列出指定目录下的所有文件和子目录,包括隐藏文件,并以列表方式打印
os.remove()     #  删除一个文件
os.rename("oldname","newname")      # 重命名文件/目录
os.stat('path/filename')    # 获取文件/目录信息
os.sep      # 输出操作系统特定的路径分隔符,win下为"\\",Linux下为"/"
os.linesep    # 输出当前平台使用的行终止符,win下为"\r\n",Linux下为"\n"
os.pathsep    # 输出用于分割文件路径的字符串 win下为;,Linux下为:
os.name       # 输出字符串指示当前使用平台。win->'nt'; Linux->'posix'
os.system("dir")   # 运行shell命令,直接显示,没有返回值 类似于exec()
ret = os.popen("dir").read()  # 运行shell命令,获取执行结果,并返回,类似于 eval()
print(ret)
os.environ      # 获取系统环境变量

os.path
##### os.path.abspath('try.py')   # 返回path规范化的绝对路径
print(repr(os.path.abspath('try.py')))
# 'D:\\desk\\python\\project\\day27 time os sys\\try.py' 没有repr的话,只会显示一个斜杠
##### os.path.split('try.py')     # 将path分割成目录和文件名二元组返回
print(os.path.split('D:\\desk\\python\\project\\day27 time os sys\\try.py'))
# ('D:\\desk\\python\\project\\day27 time os sys', 'try.py')
###### os.path.dirname('path')   # 返回path的目录。其实就是os.path.split(path)的第一个元素
print(os.path.dirname('D:\desk\python\project\day27 time os sys\\try.py'))
# D:\desk\python\project\day27 time os sys
##### os.path.basename('path')  # 返回path最后的文件名。如何path以/或\结尾,那么就会返回空值.即os.path.split(path)的第二个元素
print(os.path.basename('D:\desk\python\project\day27 time os sys\\try.py'))
# try.py
##### os.path.exists('path')    # 如果path存在,返回True;如果path不存在,返回False
print(os.path.exists('D:\desk\python\project\day27 time os sys'))   # True  从根目录开始的路径
print(os.path.exists('day27 time os sys'))  # False     单独中间的文件名是不识别的
print(os.path.exists('try.py')) # True   最终的文件名
##### os.path.isabs('path')     # 如果path是绝对路径,返回True
print(os.path.isabs('D:\desk\python\project\day27 time os sys\\try.py'))    # True
print(os.path.isabs('D:\desk\python\project\day27 time os sys'))    # True
print(os.path.isabs('try.py'))    # False
##### os.path.isfile('path')    # 如果path是一个存在的文件,返回True。否则返回False
print(os.path.isfile('try.py'))     # True
print(os.path.isfile('try2.py'))     # False
##### os.path.isdir('path')     # 如果path是一个存在的目录,则返回True。否则返回False
print(os.path.isdir('D:\desk\python\project\day27 time os sys\\try.py'))    # False  try.py文件是存在的,,可能这个函数认为的路径是不包含最终文件的路径吧
print(os.path.isdir('D:\desk\python\project\day27 time os sys'))    # True
#####os.path.join(path1[, path2[, ...]])     # 将多个路径组合后返回,第一个绝对路径之前的参数将被忽略
print(os.path.join('D:\desk\python\project','day27 time os sys','try.py'))
# D:\desk\python\project\day27 time os sys\try.py
#####os.path.getatime(path)  # 返回path所指向的文件或者目录的最后访问时间
print(os.path.getatime('try.py'))
# 1531271471.2475593 返回时间戳
#####os.path.getmtime(path)  # 返回path所指向的文件或者目录的最后修改时间
print(os.path.getmtime('try.py'))
# 1531271573.5754516 返回时间戳
#####os.path.getsize(path) # 返回path的大小
print(os.path.getsize('try.py'))
# 19714 这里的单位是bytes 字节
import os
print(os.path.splitext('day27 time os sys\\try.py'))   # splitext() 可以得到文件扩展名
# ('day27 time os sys\\try', '.py')
# 这些合并、拆分路径的函数并不要求目录和文件要真实存在,它们只对字符串进行操作
# os模块中没有复制文件的函数,因为复制文件并不是操作系统提供的系统调用,当然我们可以通过StringIO或者文件操作完成,\
# 只不过要写很多的代码,幸运的是shutil模块提供了copyfile()函数,shutil模块中还有很多实用函数,它们可以看做是os模块的补充
li = [x for x in os.listdir('.') if os.path.isdir(x)]   # 列出当前目录下的所有目录
print(li)   # ['day25']
li = [x for x in os.listdir('.') if os.path.isfile(x) and os.path.splitext(x)[1]=='.py']    # # 列出当前目录下的所有py文件
print(li)   # ['try.py', '补充.py']
 for root,dirs,files in os.walk('.'):  # os.walk() ==>((root,dirs,files),(root,dirs,files),(root,dirs,files),...)
     print(root,dirs,files)
import sys
sys.argv         #  命令行参数List,第一个元素是程序本身路径,在命令行中输入 python  try.py  alex  123 则运行文件try.py,\
# 同时给列表argv传入三个参数   argv[0] 是程序本身路径,argv[1]是'alex',argv[2]是123,在数据库中通过类似这种方式来验证用户名密码
# print(sys.argv)  # ['D:/desk/python/project/day25 模块2/try.py']
# sys.exit(n)      # 退出程序,正常退出时exit(0),错误退出sys.exit(1)
print(sys.version)  # 获得python解释器的版本信息
# 3.6.5 (v3.6.5:f59c0932b4, Mar 28 2018, 17:00:18) [MSC v.1900 64 bit (AMD64)]
print(sys.path)     # 返回模块的搜索路径,初始化时使用PYTHONPATH环境变量的值
# ['D:\\desk\\python\\project\\day25 模块2', 'D:\\desk\\python\\project', 'C:\\Python36\\python36.zip', 'C:\\Python36\\DLLs', 'C:\\Python36\\lib', 'C:\\Python36', 'C:\\Python36\\lib\\site-packages', 'D:\\Program Files (x86)\\pycharm\\PyCharm 2018.1.3\\helpers\\pycharm_matplotlib_backend']
print(sys.platform)    # 返回操作平台名称,注意这里的win32,不是32位
# win32
#文件、文件夹的移动、复制、删除、重命名

#导入shutil模块和os模块
import shutil,os

#复制单个文件
shutil.copy("C:\\a\\1.txt","C:\\b")
#复制并重命名新文件
shutil.copy("C:\\a\\2.txt","C:\\b\\121.txt")
#复制整个目录(备份)
shutil.copytree("C:\\a","C:\\b\\new_a")

#删除文件
os.unlink("C:\\b\\1.txt")
os.unlink("C:\\b\\121.txt")
#删除空文件夹
try:
    os.rmdir("C:\\b\\new_a")
except Exception as ex:
    print("错误信息:"+str(ex))#提示:错误信息,目录不是空的
#删除文件夹及内容
shutil.rmtree("C:\\b\\new_a")

#移动文件
shutil.move("C:\\a\\1.txt","C:\\b")
#移动文件夹
shutil.move("C:\\a\\c","C:\\b")

#重命名文件
shutil.move("C:\\a\\2.txt","C:\\a\\new2.txt")
#重命名文件夹
shutil.move("C:\\a\\d","C:\\a\\new_d")
# 将文件夹打包成zip文件
import os, zipfile
#打包目录为zip文件(未压缩)
def make_zip(source_dir, output_filename):  # 记得压缩的文件后缀名为zip
  zipf = zipfile.ZipFile(output_filename, 'w')
  # zipf = zipfile.ZipFile(output_filename, 'w',zipfile.ZIP_DEFLATED) #这是如果要压缩的话
  pre_len = len(os.path.dirname(source_dir))    # 路径字符串的长度  os.path.dirname(source_dir) 拿到source_dir的上层目录
  for parent, dirnames, filenames in os.walk(source_dir):
    for filename in filenames:
      pathfile = os.path.join(parent, filename)
      arcname = pathfile[pre_len:].strip(os.path.sep)   # 相对路径 pathfile[pre_len:] 取绝对路径相对输入路径的相对路径  strip(os.path.sep) 去掉相对路径两端的路径分隔符
      zipf.write(pathfile, arcname)  # 以绝对路径读入zip文件,以相对路径形式保存,如果没有arcname就会以绝对路径保存
  zipf.close() # write方法如果只有一个参数filename的话,表示把你filename所带的路径全部压缩到zip文件中。如果带两个参数,表示把filename路径中的那个file压缩一下并且存放到file_url中,中间没有增加任何的文件夹。

import zipfile
# 这个函数也是压缩文件夹,比较简单,没有处理绝对路径的问题,ZIP_DEFLATED:表示压缩,还有一个参数:ZIP_STORE:表示只打包,不压缩。这个Linux中的gz跟tar格式有点类似.
def make_zip(source_dir, output_filename):
    f = zipfile.ZipFile(output_filename,'w',zipfile.ZIP_DEFLATED)
    for dirpath, dirnames, filenames in os.walk(source_dir):
        for filename in filenames:
            f.write(os.path.join(dirpath,filename))
    f.close()

import zipfile
# 解压zip文件夹,不传解压后路径默认在当前文件夹解压
def un_zip(file_name,output_dir='.'):   # file_name 是zip文件,output_dir 是解压后保存路径
    zip_file = zipfile.ZipFile(file_name)
    os.chdir(output_dir)
    for names in zip_file.namelist():
        zip_file.extract(names,output_dir)
    zip_file.close()
-----------------------------------------------------------------------------------------------------------------------------------------------------------------------------------------------------------------------
# ****第三方模块 PIL,操作图像,可以通过简单的代码完成复杂的图像处理
from PIL import Image
# 打开一个jpg图像文件,注意是当前路径:
im = Image.open('test.jpg')
# 获得图像尺寸:
w,h = im.size
print('Original image size: %sx%s' % (w,h))
# 缩放到50%:
im.thumbnail((w//2,h//2))
print('Resize image to: %sx%s' % (w//2,h//2))
# 把缩放后的图像用jpeg格式保存
im.save('thumbnail.jpg','jpeg')

from PIL import Image, ImageFilter

# 打开一个jpg图像文件,注意是当前路径:
im = Image.open('test.jpg')
# 应用模糊滤镜:
im2 = im.filter(ImageFilter.BLUR)
im2.save('blur.jpg', 'jpeg')

# 生成字母验证码图片
from PIL import Image, ImageDraw, ImageFont, ImageFilter

import random

# 随机大写字母:
def rndChar():
    return chr(random.randint(65, 90))

# 随机颜色1:
def rndColor():
    return (random.randint(64, 255), random.randint(64, 255), random.randint(64, 255))

# 随机颜色2:
def rndColor2():
    return (random.randint(32, 127), random.randint(32, 127), random.randint(32, 127))

# 240 x 60:
width = 60 * 4
height = 60
image = Image.new('RGB', (width, height), (255, 255, 255))
# 创建Font对象:
font = ImageFont.truetype('C:\Windows\Fonts\Arial.ttf', 36)
# 创建Draw对象:
draw = ImageDraw.Draw(image)
# 填充每个像素:
for x in range(width):
    for y in range(height):
        draw.point((x, y), fill=rndColor())
# 输出文字:
for t in range(4):
    draw.text((60 * t + 10, 10), rndChar(), font=font, fill=rndColor2())
# 模糊:
image = image.filter(ImageFilter.BLUR)
image.save('code.jpg', 'jpeg')


 浙公网安备 33010602011771号