
Spring 中的发布-订阅模式
发布订阅模式是怎样的?
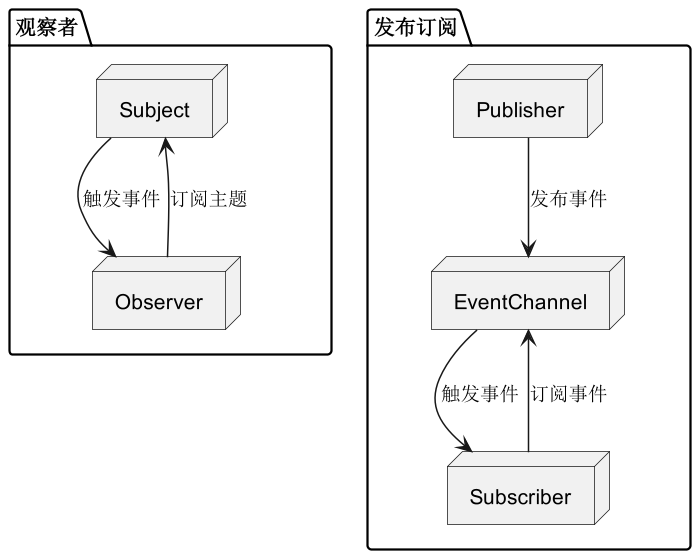
现在市面上流行的很多消息中间件就是采用的该种模式,这种模式 在实际业务中 将 事件发布者(Publisher) 与 事件订阅者 (Subscriber)通过额外的事件通道(Event Channel)来解耦,其基本原理与先前提到的观察者模式有些许类似,但发布订阅模式额外存在了Event Channel 的概念,也因此解决了 主题(Subject)和 Observer(观察者)之间的耦合,发布者和订阅者就交互细节上不再需要相互关联,下图可以看到两种模式之间的区别。
在 Spring 中的实际应用
在Spring框架中,发布-订阅模式是通过事件驱动的方式实现的,用于解耦应用程序中的组件。Spring的事件机制允许应用程序中的各个部分以松散耦合的方式进行通信,这种方式在日常编码中最适合应对一些需要状态机的业务模型, 下面就来讲下 在 Spring 中的发布订阅涉及到的概念
- 事件(Event):事件是应用程序中的状态变化或动作,对应于某个特定的行为或状态。在Spring中,事件通常是一个POJO(Plain Old Java Object)类,它包含了与该事件相关的信息。
- 事件发布者(Event Publisher):事件发布者是负责发布事件的组件。在Spring中,ApplicationContext(应用程序上下文)充当了事件发布者的角色。通过ApplicationContext,应用程序可以发布事件,并将其传递给已注册的事件监听器。
- 事件订阅者(Event Subscriber):事件订阅者是负责处理特定类型事件的组件。在Spring中,事件订阅者通常是实现了ApplicationListener接口的类,用于监听并处理发布的事件。
- 事件推送(ApplicationEventPublisher):事件推送是指通过ApplicationEventPublisher接口在Spring中发布事件的过程。这个接口可以在ApplicationContext中使用,用于向已注册的监听器广播事件的发生。
设计步骤
- 定义事件类:首先,定义应用中的各种事件,这些事件可以是任何与应用状态变化或行为相关的事情。事件通常是简单的POJO类。
- 定义发布者:创建事件发布者(Publisher)组件,它负责发布事件。在Spring中,你可以使用ApplicationEventPublisher接口或者直接在Bean方法上标注@EventListener注解来实现。
- 定义订阅者:创建事件订阅者(Subscriber)组件,它负责订阅感兴趣的事件并对事件做出响应。在Spring中,你可以定义实现ApplicationListener接口的类来作为事件监听器,或者使用@EventListener注解在方法上订阅事件。
- 触发事件:在适当的时候,通过发布者发布事件。一旦事件被发布,所有已经注册的订阅者将会收到事件通知并执行相应的逻辑。
这里会以简单的 用户注册的场景来介绍下 Spring ApplicationEventPublisher 的使用方式
定义事件类UserRegisteredEvent
import org.springframework.context.ApplicationEvent;

public class UserRegisteredEvent extends ApplicationEvent {
    private final String username;

    public UserRegisteredEvent(Object source, String username) {
        super(source);
        this.username = username;
    }

    public String getUsername() {
        return username;
    }
}
创建UserRegistrationService服务,负责注册新用户并发布事件
import org.springframework.beans.factory.annotation.Autowired;
import org.springframework.context.ApplicationEventPublisher;
import org.springframework.stereotype.Service;

@Service
public class UserRegistrationService {

    @Autowired
    private ApplicationEventPublisher eventPublisher;

    public void registerUser(String username) {
        // 注册新用户逻辑
        // ...

        // 发布用户注册事件,这里使用 eventPublisher 将 预先定义好的事件交由 Spring 的Event Channel 管理
        eventPublisher.publishEvent(new UserRegisteredEvent(this, username));
    }
}
创建UserNotificationService服务,订阅UserRegisteredEvent事件并发送通知
@Service
public class UserNotificationService {

    @EventListener
    public void handleUserRegisteredEvent(UserRegisteredEvent event) {
        // 处理用户注册事件,例如发送通知
        String username = event.getUsername();
        System.out.println("Notification sent for user: " + username);
    }
}
创建 Spring 启动类
@SpringBootApplication
@RequiredArgsConstructor
public class Application implements CommandLineRunner {

    private  final UserRegistrationService userRegistrationService;

    public static void main(String[] args) {
        SpringApplication app = new SpringApplication(Application.class);
        app.setWebApplicationType(WebApplicationType.NONE);
        app.run(args);
    }

    @Override
    public void run(String... args) {
        // 在启动时注册新用户
        userRegistrationService.registerUser("peng");
    }
}
最后程序的输出结果 如下所示:
Notification sent for user: peng
案例中的代码已发布在 github仓库 , 路径为package com.github.meeting.demo.pattern.pubsub;.

 浙公网安备 33010602011771号