


前端jQuery学习(二)
操作元素(属性,css,文档处理)
1.属性操作
常用的包括下面几类:
--------------------------属性
$("").attr();
$("").removeAttr();
$("").prop();
$("").removeProp();
--------------------------CSS类
$("").addClass(class|fn)
$("").removeClass([class|fn])
--------------------------HTML代码/文本/值
$("").html([val|fn])
$("").text([val|fn])
$("").val([val|fn|arr])
---------------------------
$("").css("color","red")
下面是一段html示例:


<!DOCTYPE html>
<html lang="en">
<head>
    <meta charset="UTF-8">
    <title>Title</title>
</head>
<body>
<div class="div1" con="c1"></div>
<input type="checkbox" checked="checked">是否可见
<input type="checkbox">是否可见

<input type="text" value="123">
<div value="456"></div>

<div id="id1">
    uuuuu
    <p>ppppp</p>
</div>
</body>
</html>
我们添加js代码,看看都是什么效果:
<script>
   console.log($("div").hasClass("div11"));
</script>
结果打印是:false,说明这个hasClass是用来判断div标签是否存在传入的属性,返回的是一个布尔值,这个很像我们python类里面的hasattr方法。
console.log($("div").attr("con"));
结果打印是:c1,可见attr可以用来获取传入属性对应的值。
$("div").attr("con","c2");
console.log($("div").attr("con"));
结果打印是:c2,可见attr还可以用来修改传入属性的值,主要参数的顺序,第一个是属性,第二个是新的值。
   console.log($(":checkbox:first").attr("checked"));
   console.log($(":checkbox:last").attr("checked"));
   console.log($(":checkbox:first").prop("checked"));
   console.log($(":checkbox:last").prop("checked"));
结果打印如下图:

这里就要注意了:
<script>

//对于HTML元素本身就带有的固有属性,在处理时,使用prop方法。
//对于HTML元素我们自己自定义的DOM属性,在处理时,使用attr方法。
//像checkbox,radio和select这样的元素,选中属性对应“checked”和“selected”,这些也属于固有属性,因此
//需要使用prop方法去操作才能获得正确的结果。


//    $("#chk1").attr("checked")
//    undefined
//    $("#chk1").prop("checked")
//    false

//  ---------手动选中的时候attr()获得到没有意义的undefined-----------
//    $("#chk1").attr("checked")
//    undefined
//    $("#chk1").prop("checked")
//    true

   console.log($(":checkbox:first").attr("checked")); checked
   console.log($(":checkbox:last").attr("checked"));undefined
   console.log($(":checkbox:first").prop("checked"));true
   console.log($(":checkbox:last").prop("checked"));false
</script>
我们再试一下prop获取自定义的属性会怎样:
console.log($("div").prop("con"));
console.log($("div").prop("class"));
打印的结果是:undefined和div1,所以自定义的属性我们还是要用attr。下面再看一下HTML代码/文本/值:
console.log($("#id1").html());
console.log($("#id1").text());
html()和text()的区别和js里面一样,打印的分别是uuuuu <p>ppppp</p> 、uuuuu ppppp。而val()是用来获取固有属性的:
console.log($(":text").val());
打印的结果是123,也可以传入参数:$(":text").val("789")
利用上面的这个特点,我们可以实现一个简单的正反选和模态对话框:
<!DOCTYPE html>
<html lang="en">
<head>
    <meta charset="UTF-8">
    <title>Title</title>
</head>
<body>
<button class="bt1" onclick="choose()">全选</button>
<button class="bt2" onclick="cancel()">取消</button>
<button class="bt3" onclick="fanxuan()">反选</button>
<table border="1px">
    <tr>
        <td><input class="c1" type="checkbox"></td>
        <td>666</td>
        <td>666</td>
        <td>666</td>
    </tr>
    <tr>
        <td><input class="c1" type="checkbox"></td>
        <td>666</td>
        <td>666</td>
        <td>666</td>
    </tr>
    <tr>
        <td><input class="c1" type="checkbox"></td>
        <td>666</td>
        <td>666</td>
        <td>666</td>
    </tr>
</table>

<script src="jquery-3.4.0.js"></script>
<script>
    function choose() {
        $(':checkbox').each(function () {
            $(this).prop('checked',true)
        })
    }

    function cancel() {
        $(':checkbox').each(function () {
            $(this).prop('checked',false)
        })
    }

    function fanxuan() {
        $(':checkbox').each(function () {
            if($(this).prop('checked')){
                $(this).prop('checked',false)
            }else{
                $(this).prop('checked',true)
            }
        })

    }

</script>
</body>
</html>
<!DOCTYPE html>
<html lang="en">
<head>
    <meta charset="UTF-8">
    <title>Title</title>
    <style>
        .back{
            background-color: rebeccapurple;
            height: 2000px;
        }

        .shade{
            position: fixed;
            top: 0;
            bottom: 0;
            left:0;
            right: 0;
            background-color: coral;
            opacity: 0.4;
        }

        .hide{
            display: none;
        }

        .models{
            position: fixed;
            top: 50%;
            left: 50%;
            margin-left: -100px;
            margin-top: -100px;
            height: 200px;
            width: 200px;
            background-color: gold;

        }
    </style>
</head>
<body>
<div class="back">
    <input id="ID1" type="button" value="click" onclick="action1(this)">
</div>

<div class="shade hide"></div>
<div class="models hide">
    <input id="ID2" type="button" value="cancel" onclick="action2(this)">
</div>


<script src="jquery-3.4.0.js"></script>
<script>
    function action2(self) {

          $(self).parent().addClass("hide").prev().addClass("hide");

//        $(self).parent().prev().addClass("hide")
        //$(self).parent().parent().children(".models,.shade").addClass("hide")

    }

    function action1(self){
        $(self).parent().siblings().removeClass("hide");

    }
//    function action2(self){
//        $(self).parent().parent().children(".models,.shade").addClass("hide")
//
//    }
</script>
</body>
</html>
2.文档处理
下面是jQuery对于HTML文档的处理,首先写一段简单的HTML示例:
<!DOCTYPE html>
<html lang="en">
<head>
    <meta charset="UTF-8">
    <title>Title</title>
</head>
<body>


<div class="c1">
    <p>PPP</p>

</div>

<button>add</button>
<script src="jquery-3.4.0.js"></script>
<script>
        $("button").click(function () {

            var $ele=$("<h1></h1>");
            $ele.html("HELLO WORLD!");
            $ele.css("color","red");
        })
</script>
</body>
</html>
目的是点击按钮,能操作我们定义的h1标签,接下来,就是各种文档操作,也就是增删改:
1.内部插入
//$(".c1").append($ele);
//$ele.appendTo(".c1");
//$(".c1").prepend($ele);
$ele.prependTo(".c1");
这四种都是内部插入的方法,前面两个是在标签下面下入,后面两个是在标签上面插入。
2.外部插入
 $(".c1").after($ele);
 $ele.insertAfter(".c1");
 $(".c1").before($ele);
 $ele.insertBefore(".c1");
这四种是外部插入的方法,看结果和内部插入一样,但是看HTML源码的差别:


两个h1标签的位置不同,左边是外部插入,右边的是内部插入。
3.替换
$("p").replaceWith($ele)
上面说的都是增加,改也很简单,直接把p标签替换成我们的h1就是这样。
4.删除与清空
$(".c1").empty()
$(".c1").remove()
这两个也是一样,看结果也是一样,还是要从html代码去分析:

左边是remove,直接把c1也删除了,右边是empty,还保留着div标签。
5.复制
var $ele2= $(".c1").clone();
$(".c1").after($ele2)
把div标签复制后,外部插入到下边,这样简单地插入会成倍的增加div标签的数量。
<!DOCTYPE html>
<html lang="en">
<head>
    <meta charset="UTF-8">
    <title>Title</title>

</head>
<body>
<div class="outer">
    <div class="item">
        <button onclick="add(this)">+</button>
        <input type="text">
    </div>
</div>


<script src="jquery-3.4.0.js"></script>
<script>
    // 不加this,复制的是所有的class名字一样的,所以会越来越多
    // function add(self) {
    //     var $clone_obj =$(self).parent().clone();
    //     $('.outer').append($clone_obj);
    // }
    function add(self) {
             var $clone_obj =$(self).parent().clone();
             $clone_obj.children('button').text('-').attr('onclick','remove_obj(this)');
             $('.outer').append($clone_obj);
    }
    function remove_obj(self) {
        $(self).parent().remove()

    }
</script>
</body>
</html>
3.CSS操作
CSS
        $("").css(name|pro|[,val|fn])
    位置
        $("").offset([coordinates])
        $("").position()
        $("").scrollTop([val])
        $("").scrollLeft([val])
    尺寸
        $("").height([val|fn])
        $("").width([val|fn])
        $("").innerHeight()
        $("").innerWidth()
        $("").outerHeight([soptions])
        $("").outerWidth([options])
1.offset
offset()是相对于视口的偏移量,下面在一段HTML代码中具体体现。
<!DOCTYPE html>
<html lang="en">
<head>
    <meta charset="UTF-8">
    <title>Title</title>

    <style>
        *{
            margin: 0px;
            padding: 0px;
        }
        .div1,.div2{
            width: 200px;
            height: 100px;
        }
        .div1{
            border: 5px solid rebeccapurple;
            padding: 20px;
            margin: 5px 10px;
            background-color: antiquewhite;
        }
        .div2{
            background-color: rebeccapurple;
        }

        /*.outer{*/
            /*position: relative;*/
        /*}*/
    </style>
</head>
<body>

<div class="div1"></div>

<div class="outer">
<div class="div2"></div>
</div>

</body>
</html>
添加下面这段js代码:
     console.log($(".div1").offset().top);
     console.log($(".div1").offset().left);

     console.log($(".div2").offset().top);
     console.log($(".div2").offset().left);
结果分别是:5、10、160、0,所以可以很清晰的理解是offset()相对于视口的左上角的像素值。
2.position
同样,在上面HTML实例的基础上,添加下面这段js代码:
     console.log($(".div1").position().top);
     console.log($(".div1").position().left);

     console.log($(".div2").position().top);
     console.log($(".div2").position().left);
结果是0、0、160、0,看看下面这个图就明白了:
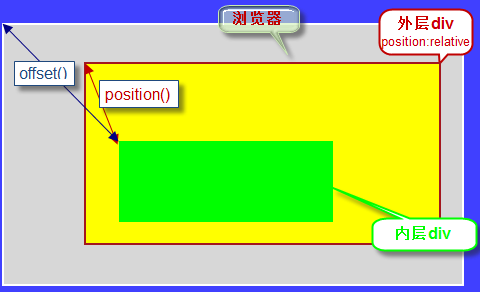
position()获取相对于它最近的具有相对位置(position:relative)的父级元素的距离,如果找不到这样的元素,则返回相对于浏览器的距离。
offset()始终返回相对于浏览器文档的距离,它会忽略外层元素。
所以,我们把outer的css样式添加position: relative;最后的结果就变成了0、0、0、0。
3.尺寸
添加如下js代码:
     //console.log($(".div1").height("300px"));
     console.log($(".div1").innerHeight());
     console.log($(".div1").outerHeight());
     console.log($(".div1").outerHeight(true));
结果分别是,140、150、160,区别就在于要不要加上margin和padding。
4.scrollTop
<!DOCTYPE html>
<html lang="en">
<head>
    <meta charset="UTF-8">
    <title>Title</title>
    <style>
        *{
            margin-left: 0;
            margin-top: 0;
        }
        .div1,.div2{
            height: 1000px;
            width: 100%;
        }
        .div1{
            background-color: #84a42b;
        }
        .div2{
            background-color: #ccdcef;
        }
        .div3{
            position: fixed;
            bottom: 20px;
            right: 10px;
            width: 100px;
            height: 50px;
            background-color: #2459a2;
            color: crimson;
            line-height: 50px;
            text-align: center;
        }
        .hide{
            display: none;
        }
    </style>
</head>
<body>

<div class="div1"></div>
<div class="div2"></div>
<div class="div3 hide" onclick="gotop()">返回顶部</div>

<script src="jquery-3.4.0.js"></script>
<script>
    //监听滚动条
        window.onscroll=function(){
            console.log($(window).scrollTop());
            if($(window).scrollTop()>300){
                $(".div3").removeClass("hide");
             }
            else {
            $(".div3").addClass("hide");
             }
        };

     function gotop() {
         $(window).scrollTop(0)

     };
</script>

</body>
</html>

 浙公网安备 33010602011771号