


Python爬虫-scrapy-redis框架
前言
持续的学习,是为了让视野更开阔,让心灵更充实,从而以更好的视角来理解世界,以更积极的姿态去面对生活。让学习成为一种生活方式,才能收货人生的累累硕果。
⚠️声明:本文所涉及的爬虫技术及代码仅用于学习、交流与技术研究目的,禁止用于任何商业用途或违反相关法律法规的行为。若因不当使用造成法律责任,概与作者无关。请尊重目标网站的
robots.txt协议及相关服务条款,共同维护良好的网络环境。
1.scrapy-redis
1.1简介
scrapy-redis 是 Scrapy 框架的一个扩展组件,它将 Scrapy 的调度队列(Scheduler)和去重(DupeFilter)替换为 Redis 存储,从而支持分布式爬虫。
Scrapy-Redis 的核心功能
-
共享任务队列:所有 Scrapy 爬虫实例(分布式部署)从 Redis 读取 URL 任务,避免重复爬取。
-
去重(防止重复爬取):通过 Redis 进行全局去重,而不是本地
dupefilter。 -
支持增量爬取:只存储新的 URL,不会重复爬取已爬取的数据。
-
分布式爬虫:适用于多个爬虫实例同时运行,提高爬取效率。
Scrapy-Redis 的工作原理
- 调度器(Scheduler)
- 默认 Scrapy 调度器改为基于 Redis 的
scrapy_redis.scheduler.Scheduler。 - URL 任务存入 Redis 的
redis_key:start_urls列表(lpush推送)。 - 爬虫从 Redis 队列获取任务,避免多实例重复爬取。
- 默认 Scrapy 调度器改为基于 Redis 的
- 去重组件(DupeFilter)
- Scrapy 默认使用本地
seen集合去重,scrapy-redis让 Redis 进行去重。 - 通过
scrapy_redis.dupefilter.RFPDupeFilter进行 URL 过滤,存储到 Redis 的dupefilter集合。
- Scrapy 默认使用本地
1.2作用
实现分布式爬虫:任务队列存储在 Redis 中,多台爬虫可以共享任务,避免重复抓取。
去重功能:使用 Redis 作为去重存储,保证多个爬虫不会爬取相同的 URL。
任务持久化:爬取任务存储在 Redis,即使爬虫中断,任务仍然保留,下次启动可继续爬取。
数据存储:通过 Redis 存储爬取到的数据,可供其他系统(如数据分析、数据库存储)使用。
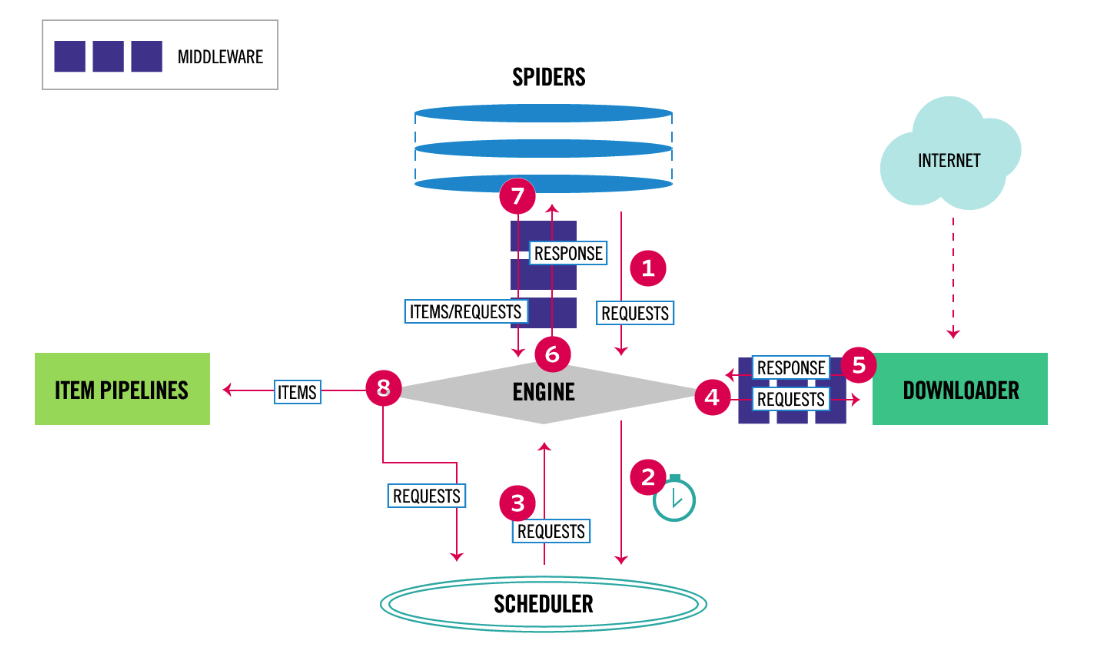
1.3工作流程
scrapy的流程
scrapy-redis实现分布式图解
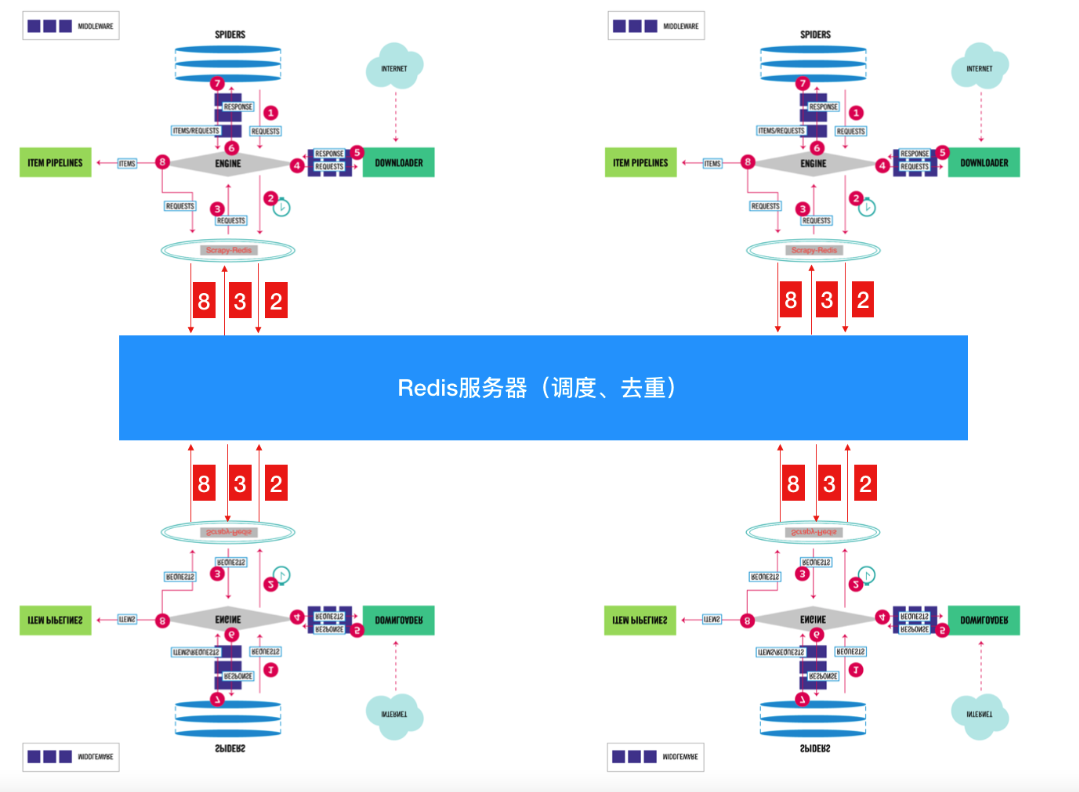
1️⃣ 爬虫启动,Redis 中存放种子 URL
- 爬虫从 Redis 读取
start_urls,并将 URL 放入调度器(Scheduler)。 - 如果 Redis 队列为空,爬虫会等待新的 URL 任务。
2️⃣ 调度器(Scheduler)从 Redis 任务队列中取出 URL
scrapy-redis使用 Redis 作为调度队列,多个爬虫可以共享任务。- URL 进入
Scheduler后,会经过 去重器(DupeFilter) 进行去重,防止重复爬取。
3️⃣ Scrapy 下载器(Downloader)请求 URL 并获取数据
- Scrapy 从调度器获取 URL 进行 HTTP 请求,下载网页内容。
4️⃣ 解析页面数据(Spider 解析逻辑)
-
爬虫 (
Spider) 解析网页,并:- 提取需要存储的数据(交给
Pipeline)。 - 提取新的 URL,放入 Redis 任务队列,等待其他爬虫爬取。
- 提取需要存储的数据(交给
5️⃣ 数据存储(Pipeline)
- 解析出的数据通过
scrapy-redis的RedisPipeline存入 Redis。 - 后续可以用数据库(如 MySQL、MongoDB)消费这些数据。
6️⃣ 爬虫继续运行,直到任务队列为空
scrapy-redis支持 断点续爬,Redis 任务队列非空时,爬虫可随时恢复。- 当任务队列为空时,爬虫等待新任务,不会自动结束,以便动态添加 URL。
1.2安装
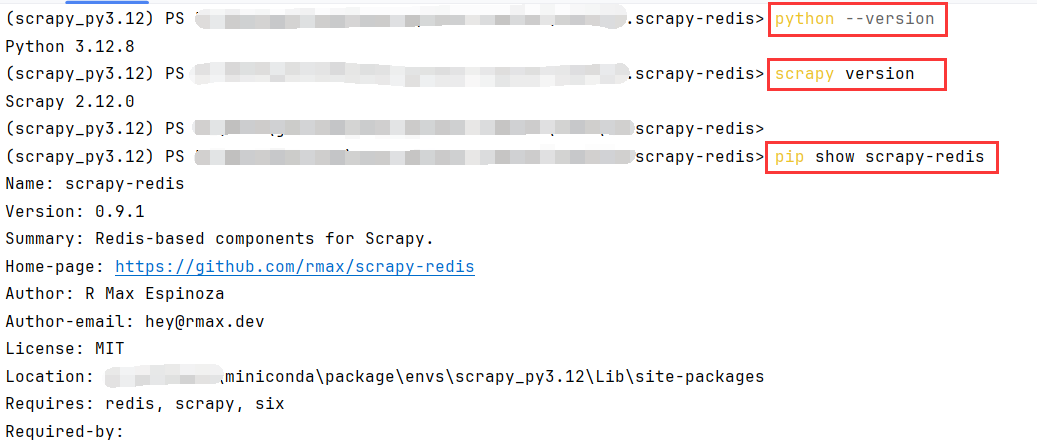
Scrapy 和 Python 版本兼容性
- Scrapy 2.8.0 支持 Python 3.6 及更高版本。虽然它支持 Python 3.6+,但是在 Python 3.8 中,Scrapy 的表现和兼容性非常好,尤其是在与 scrapy-redis 配合使用时。
- Python 3.8 版本已经经过广泛的测试和验证,且社区对其支持较好,能够保证一些细节特性(如 asyncio 等)运行正常。
Scrapy 2.8.x 版本和 Scrapy-Redis 兼容性更好,尤其是在和 Scrapy-Redis v0.9.1 配合使用时。
Scrapy 2.8.x vs Scrapy 2.10.x
- Scrapy 2.8.x 版本与 Scrapy-Redis 之间的兼容性最为稳定,这两个版本的配合通常不会出现较大的问题。
- Scrapy 2.10.0 开始引入了一些内部调度器机制的更改,虽然
Scrapy-Redis v0.9.1已经尝试适配这些变化,但某些小问题仍可能存在。 - Scrapy 2.11.x 及更高版本在调度器和去重机制的更改上会带来更多兼容性挑战。
因此,如果您不需要 Scrapy 2.10.0 及更高版本 中的新特性,使用 Scrapy 2.8.x 是更安全、更稳定的选择。
这里一开始安装python3.8和 scrapy 2.8.0,一直安装不上Scrapy-Redis v0.9.1
后来我直接安装最新的
# 创建 Scrapy 环境
conda create -n scrapy_py3.12 python=3.12

# 激活环境
conda activate scrapy_py3.12

# 安装scrapy
pip install scrapy

# 安装scrapy-redis
pip install scrapy-redis

# 查看版本
python --version
scrapy version
pip show scrapy-redis
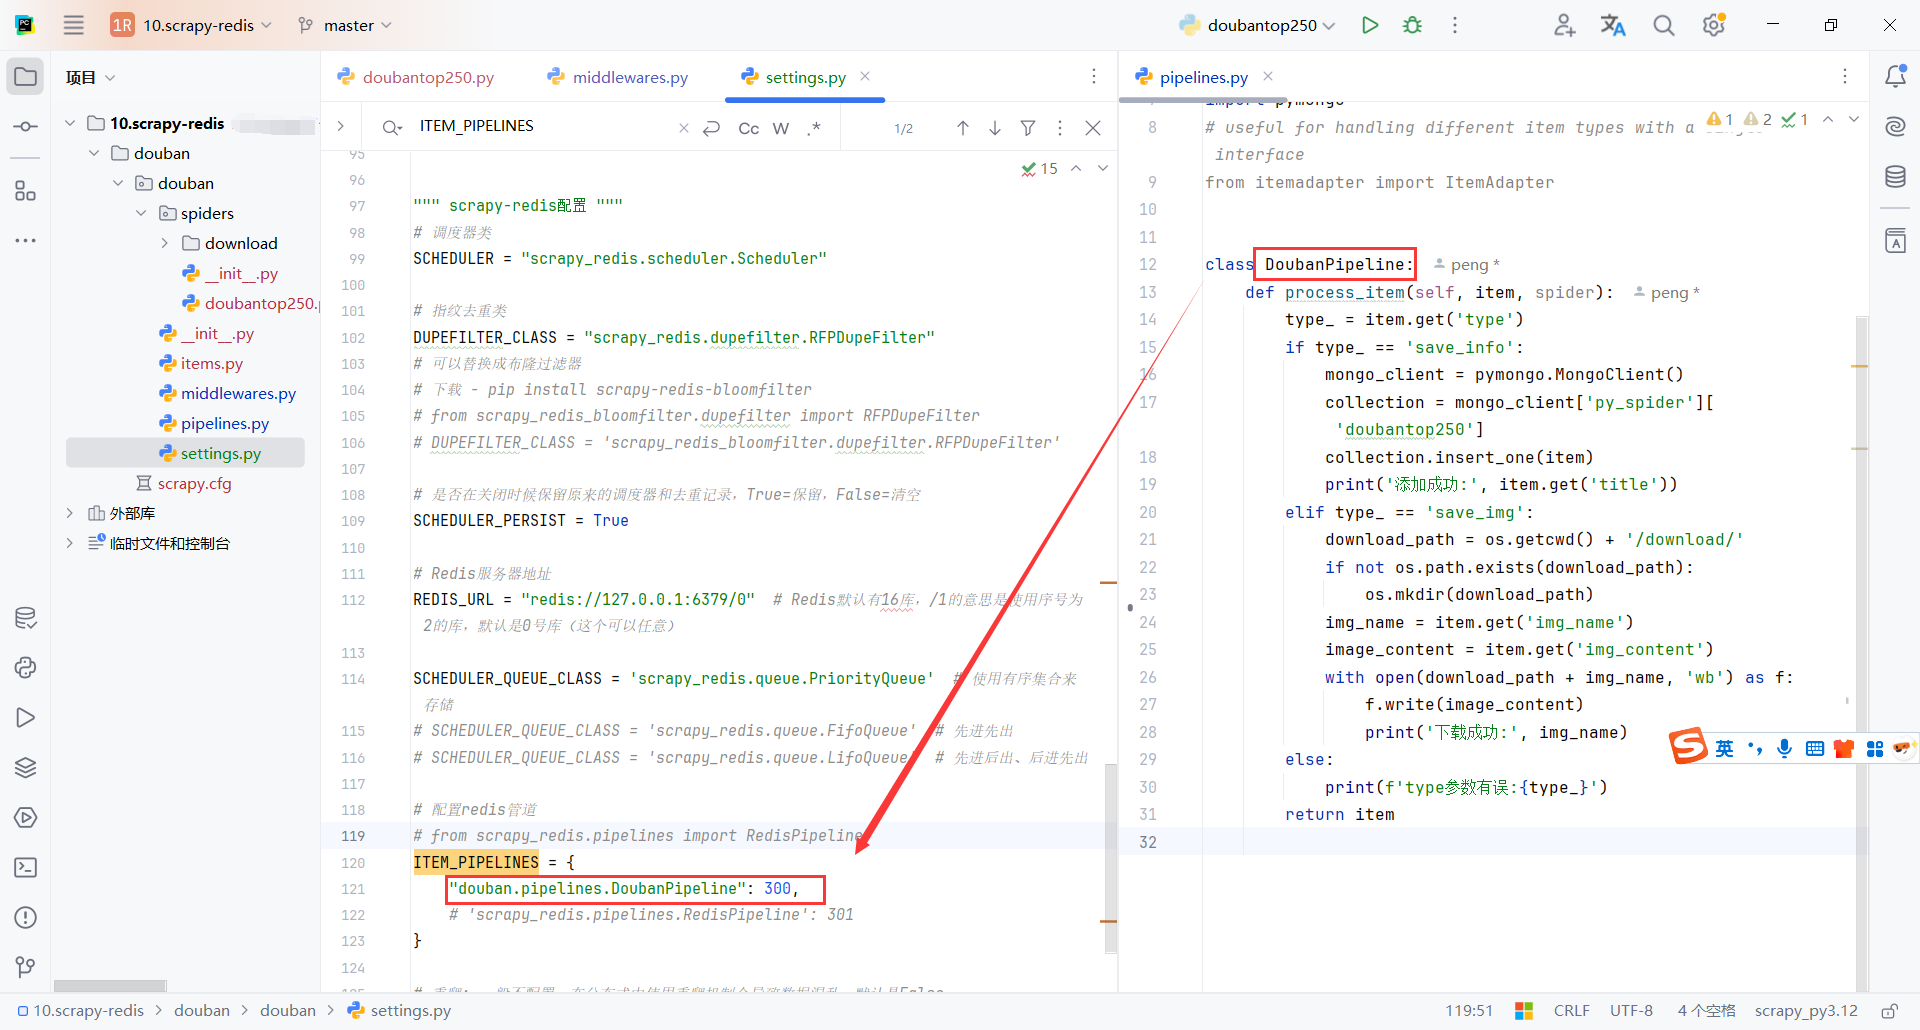
1.3配置
""" scrapy-redis配置 """
# 调度器类
SCHEDULER = "scrapy_redis.scheduler.Scheduler"

# 指纹去重类
DUPEFILTER_CLASS = "scrapy_redis.dupefilter.RFPDupeFilter"
# 可以替换成布隆过滤器
# 下载 - pip install scrapy-redis-bloomfilter
# from scrapy_redis_bloomfilter.dupefilter import RFPDupeFilter
# DUPEFILTER_CLASS = 'scrapy_redis_bloomfilter.dupefilter.RFPDupeFilter'

# 是否在关闭时候保留原来的调度器和去重记录,True=保留,False=清空
SCHEDULER_PERSIST = True

# Redis服务器地址
REDIS_URL = "redis://127.0.0.1:6379/0"  # Redis默认有16库,/1的意思是使用序号为2的库,默认是0号库(这个可以任意)

SCHEDULER_QUEUE_CLASS = 'scrapy_redis.queue.PriorityQueue'  # 使用有序集合来存储
# SCHEDULER_QUEUE_CLASS = 'scrapy_redis.queue.FifoQueue'  # 先进先出
# SCHEDULER_QUEUE_CLASS = 'scrapy_redis.queue.LifoQueue'  # 先进后出、后进先出

# 配置redis管道
# from scrapy_redis.pipelines import RedisPipeline
ITEM_PIPELINES = {
    "douban.pipelines.DoubanPipeline": 300,
    'scrapy_redis.pipelines.RedisPipeline': 301
}

# 重爬: 一般不配置,在分布式中使用重爬机制会导致数据混乱,默认是False
# SCHEDULER_FLUSH_ON_START = True
2.豆瓣电影250增量爬虫
2.1创建项目
命令
# 创建项目
scrapy startproject douban

# 打开项目目录
cd douban

# 创建爬虫脚本
scrapy genspider doubantop250 "https://movie.douban.com/top250?start=0&filter="

2.2增量爬虫
scrapy-redis配置
Scrapy 在使用 scrapy-redis 时,回调函数的确不能直接用 staticmethod 或 classmethod。在 scrapy-redis 中,所有的回调函数都必须是类的实例方法,而不是静态方法。错误发生的原因是在用 scrapy-redis 时,Scrapy 试图将请求的回调函数序列化到 Redis 队列中,但如果回调是静态方法或类方法,就会无法正确序列化。
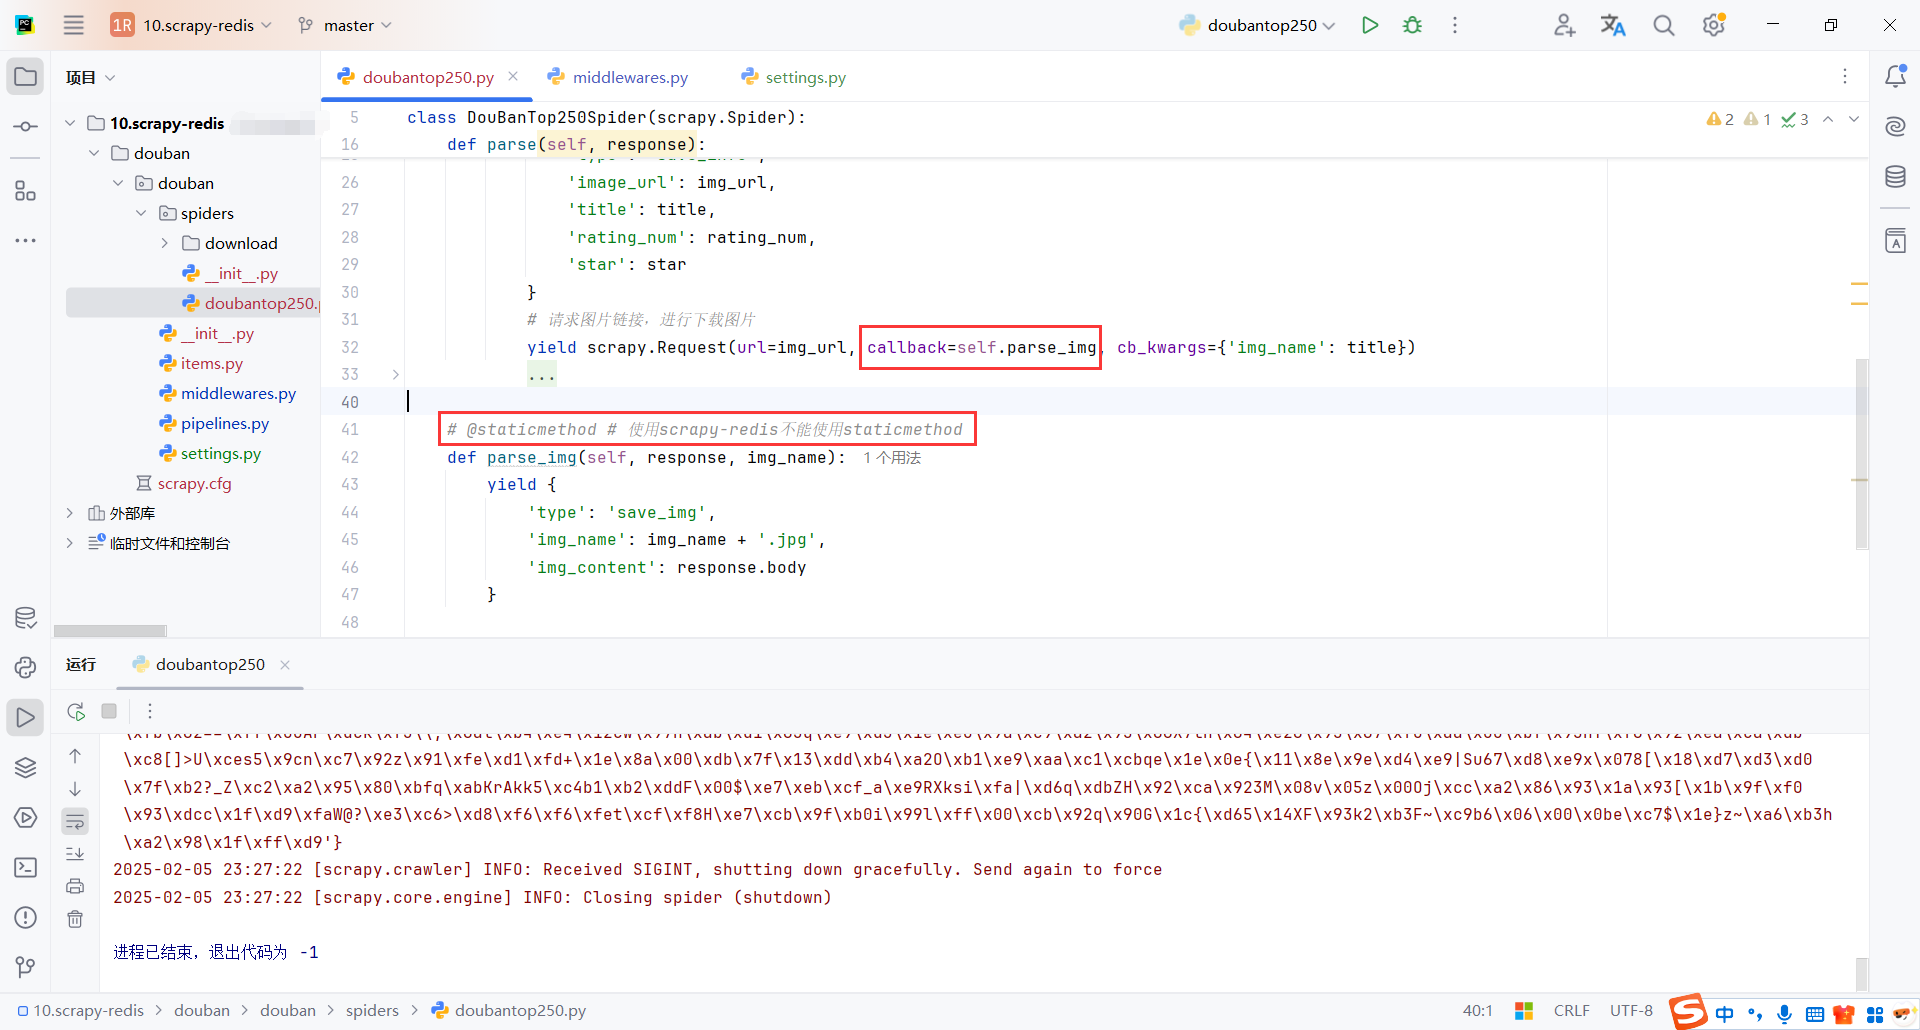
启动爬虫,redis会生成2个队列
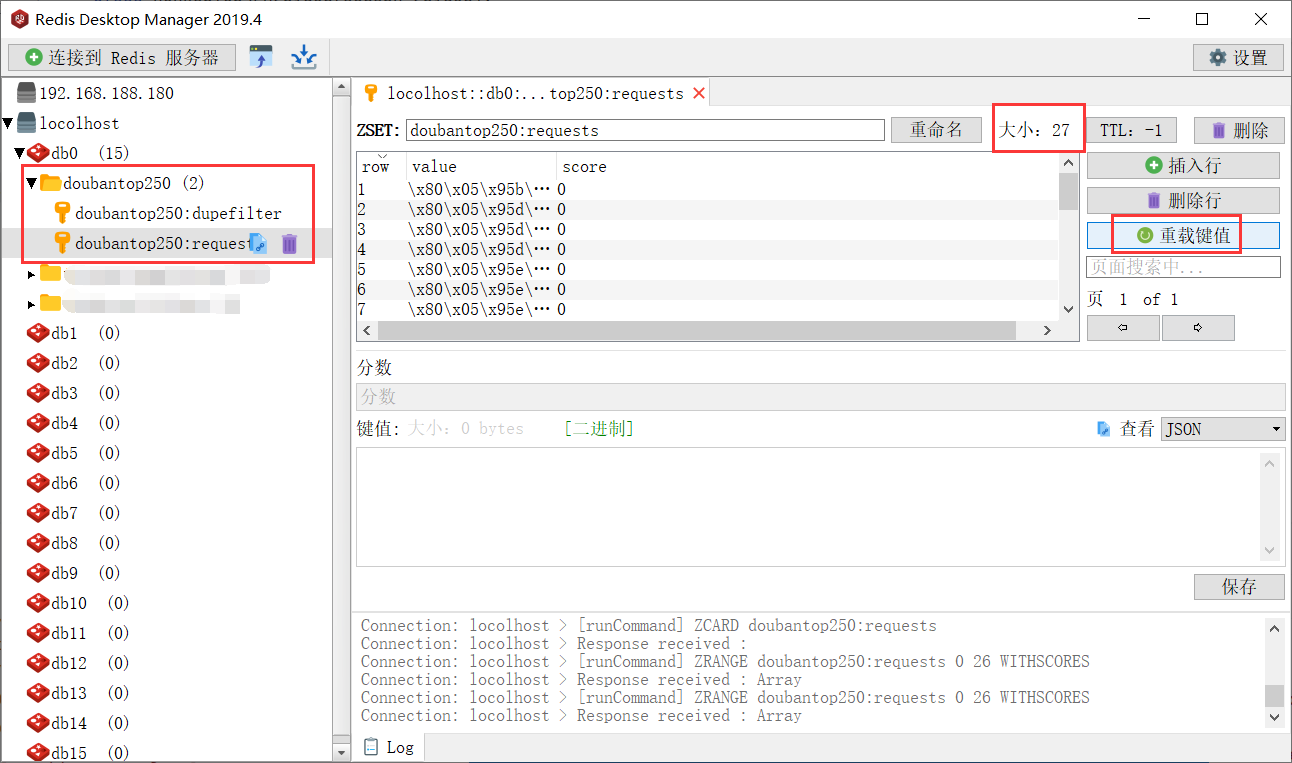
-
doubantop250:dupefilter是用来存储请求地址的,防止重复请求 -
doubantop250:requests是用来存储发送的请求(request),每次请求会从队列里获取。爬虫运行的过程中会发现这个队列会不断减少,就是请求不断被程序处理了
doubantop250:dupefilter:
- 这个队列主要用于存储已经处理过的请求链接的哈希值,以避免重复爬取相同的页面。其作用类似于 Scrapy 默认的去重机制(
DUPEFILTER_CLASS),但是它会将这些信息存储到 Redis 中,使得你在分布式环境下的多个爬虫实例之间也能共享去重信息。 - 当 Scrapy 爬虫发送请求时,它会先查看请求的 URL 是否已经存在于
doubantop250:dupefilter队列中。如果存在,说明这个请求已经被处理过,不会再次发送;如果不存在,它就会将请求添加到队列中,确保该请求不再重复。
doubantop250:requests:
- 这个队列用于存储需要处理的请求。每当一个请求被发送到 Redis 队列时,它会被存储在
doubantop250:requests中。爬虫在运行时会从这个队列中拉取请求并进行处理。当一个请求被处理完后,它会从队列中移除。 - 该队列实现了分布式爬取的功能。如果你有多个爬虫实例在不同机器上运行,它们会从同一个队列中获取请求,因此请求的处理是分布式的。
- 爬虫请求的减少意味着请求正在被逐一处理,直到队列为空,爬虫任务才会结束。
每次启动记得删除存储的url和request,要不然程序会认为该地址已经被爬取过,不会再爬取
增量爬虫,使用以下命令启动和恢复爬虫
使用ctrl+c停止爬虫后再次使用该命令恢复,ctrl+c使用一次即可
scrapy crawl doubantop250
spider的代码之前写过,这里主要是使用scrapy-redis
import scrapy
from scrapy import cmdline
class DouBanTop250Spider(scrapy.Spider):
name = "doubantop250"
allowed_domains = ["movie.douban.com", 'doubanio.com']
start_urls = ["https://movie.douban.com/top250?start=0&filter="]
# 分页
def start_requests(self):
for page in range(0, 3):
url = f'https://movie.douban.com/top250?start={page * 25}&filter='
yield scrapy.Request(url)
def parse(self, response):
li_list = response.xpath("//ol[@class='grid_view']/li")
for li in li_list:
img_url = li.xpath(".//img/@src").extract_first()
title = li.xpath(".//span[@class='title'][1]/text()").extract_first()
rating_num = li.xpath(".//span[@class='rating_num']/text()").extract_first()
star = li.xpath(".//div[@class='star']/span[4]/text()").extract_first()
# 数据保存
yield {
'type': 'save_info',
'image_url': img_url,
'title': title,
'rating_num': rating_num,
'star': star
}
# 请求图片链接,进行下载图片
yield scrapy.Request(url=img_url, callback=self.parse_img, cb_kwargs={'img_name': title})
# 翻页
# if response.xpath("//span[@class='next']/a/@href"):
# next_url = response.urljoin(response.xpath("//span[@class='next']/a/@href").extract_first())
# print('开始抓取下一页:', next_url)
# yield scrapy.Request(url=next_url, callback=self.parse)
# else:
# print('爬取成功...')
def parse_img(self, response, img_name):
yield {
'type': 'save_img',
'img_name': img_name + '.jpg',
'img_content': response.body
}
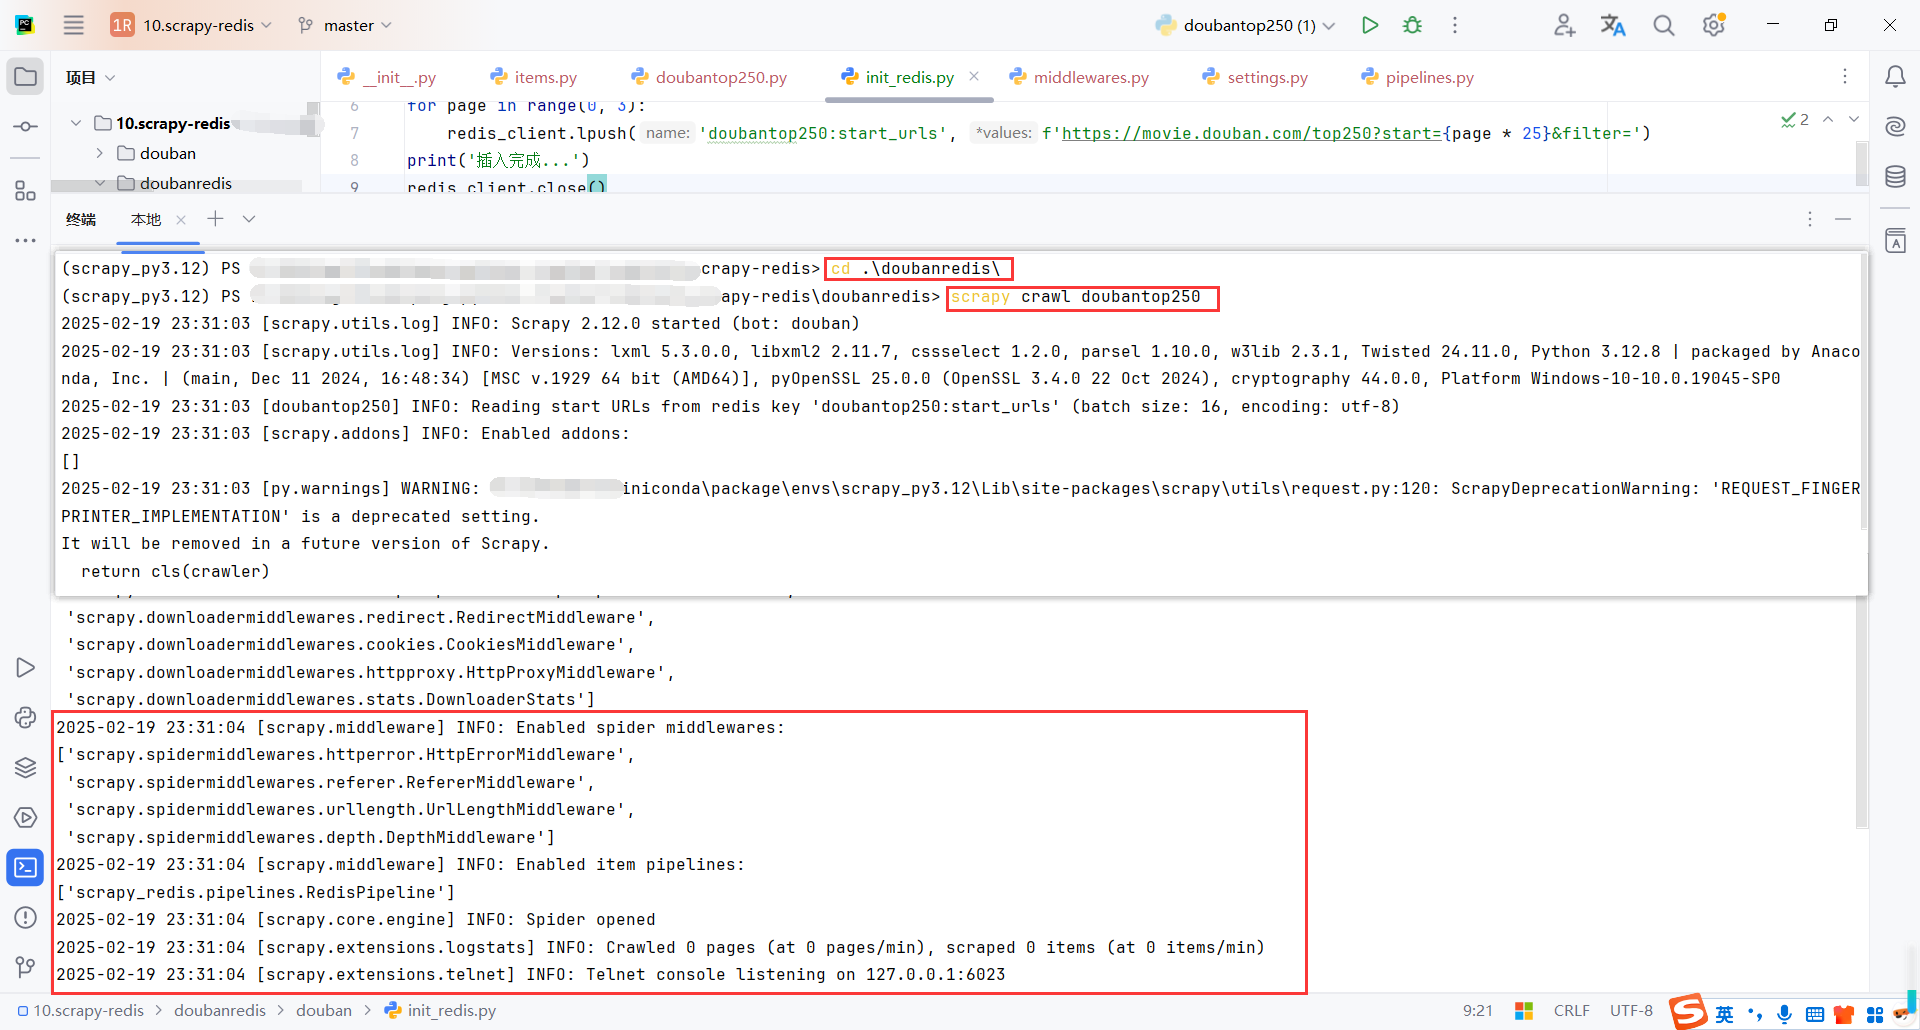
if __name__ == '__main__':
cmdline.execute('scrapy crawl doubantop250'.split())
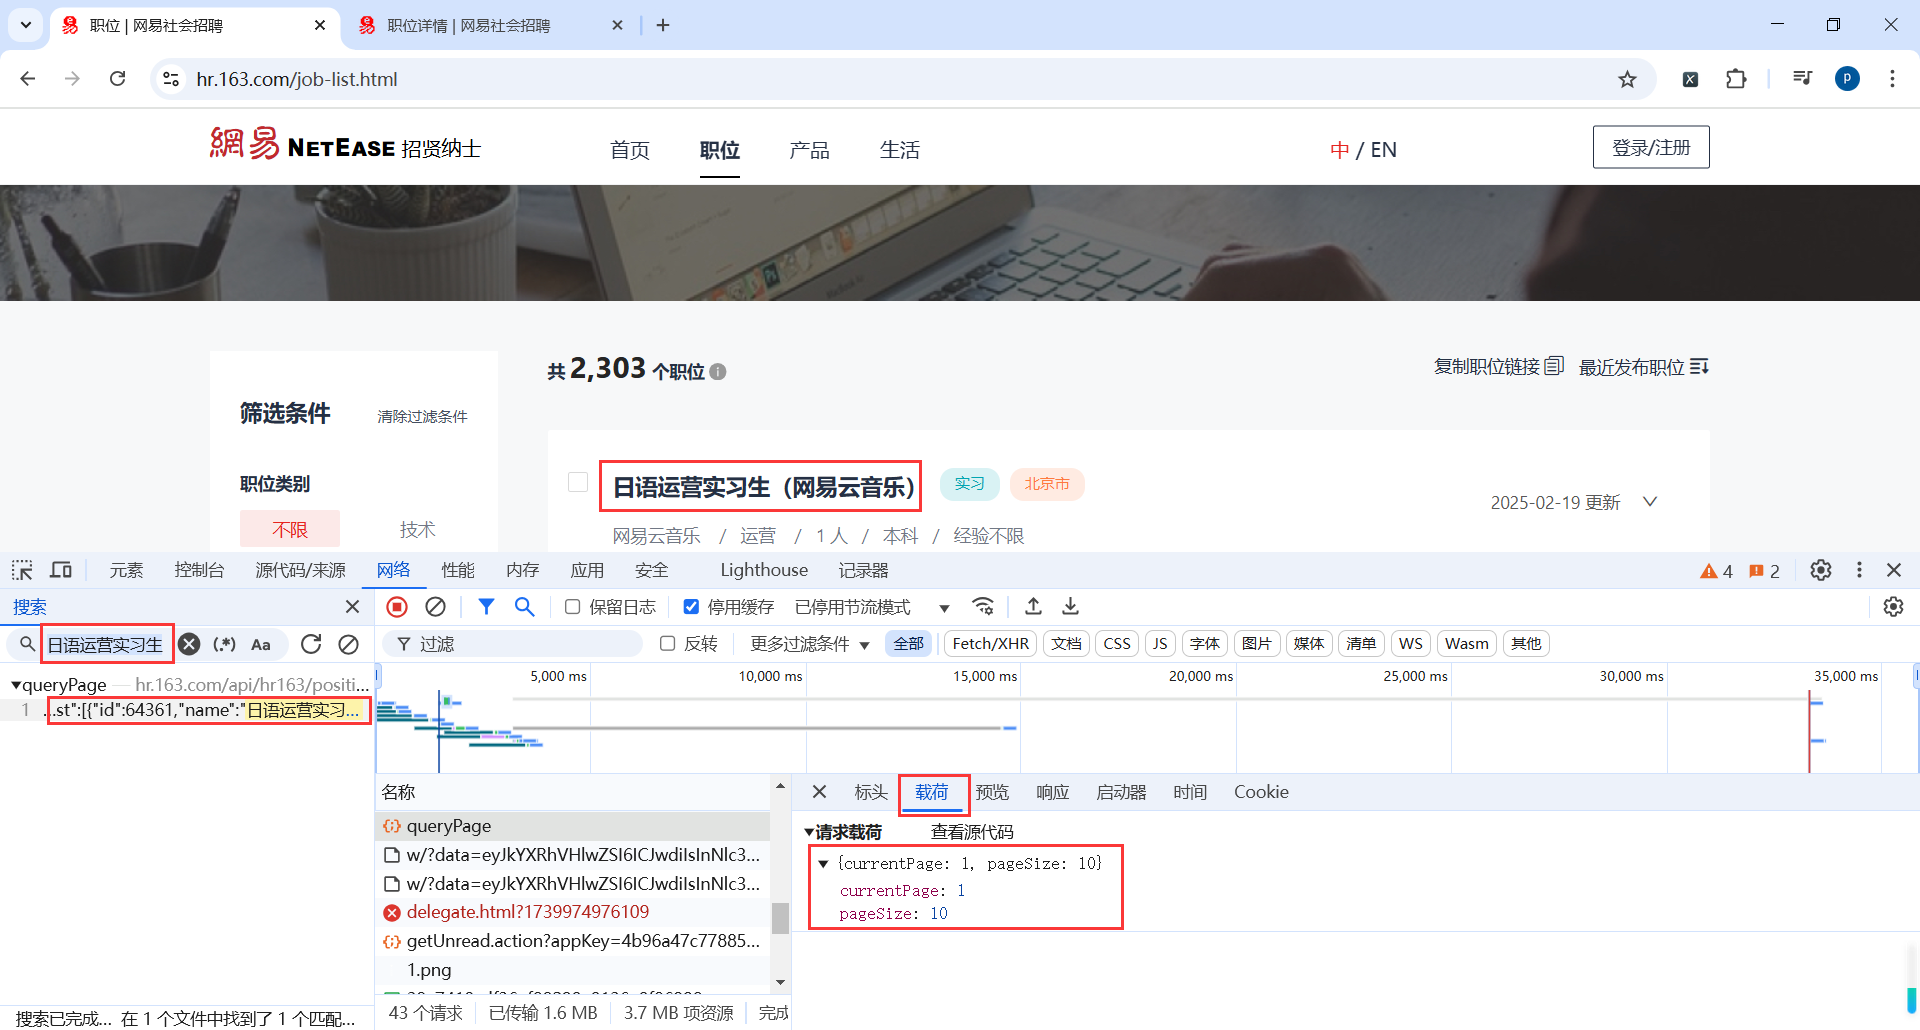
3.网易招聘爬虫
我们发现网易招聘的页面渲染是动态请求接口,并且是Post请求
地址:https://hr.163.com/job-list.html
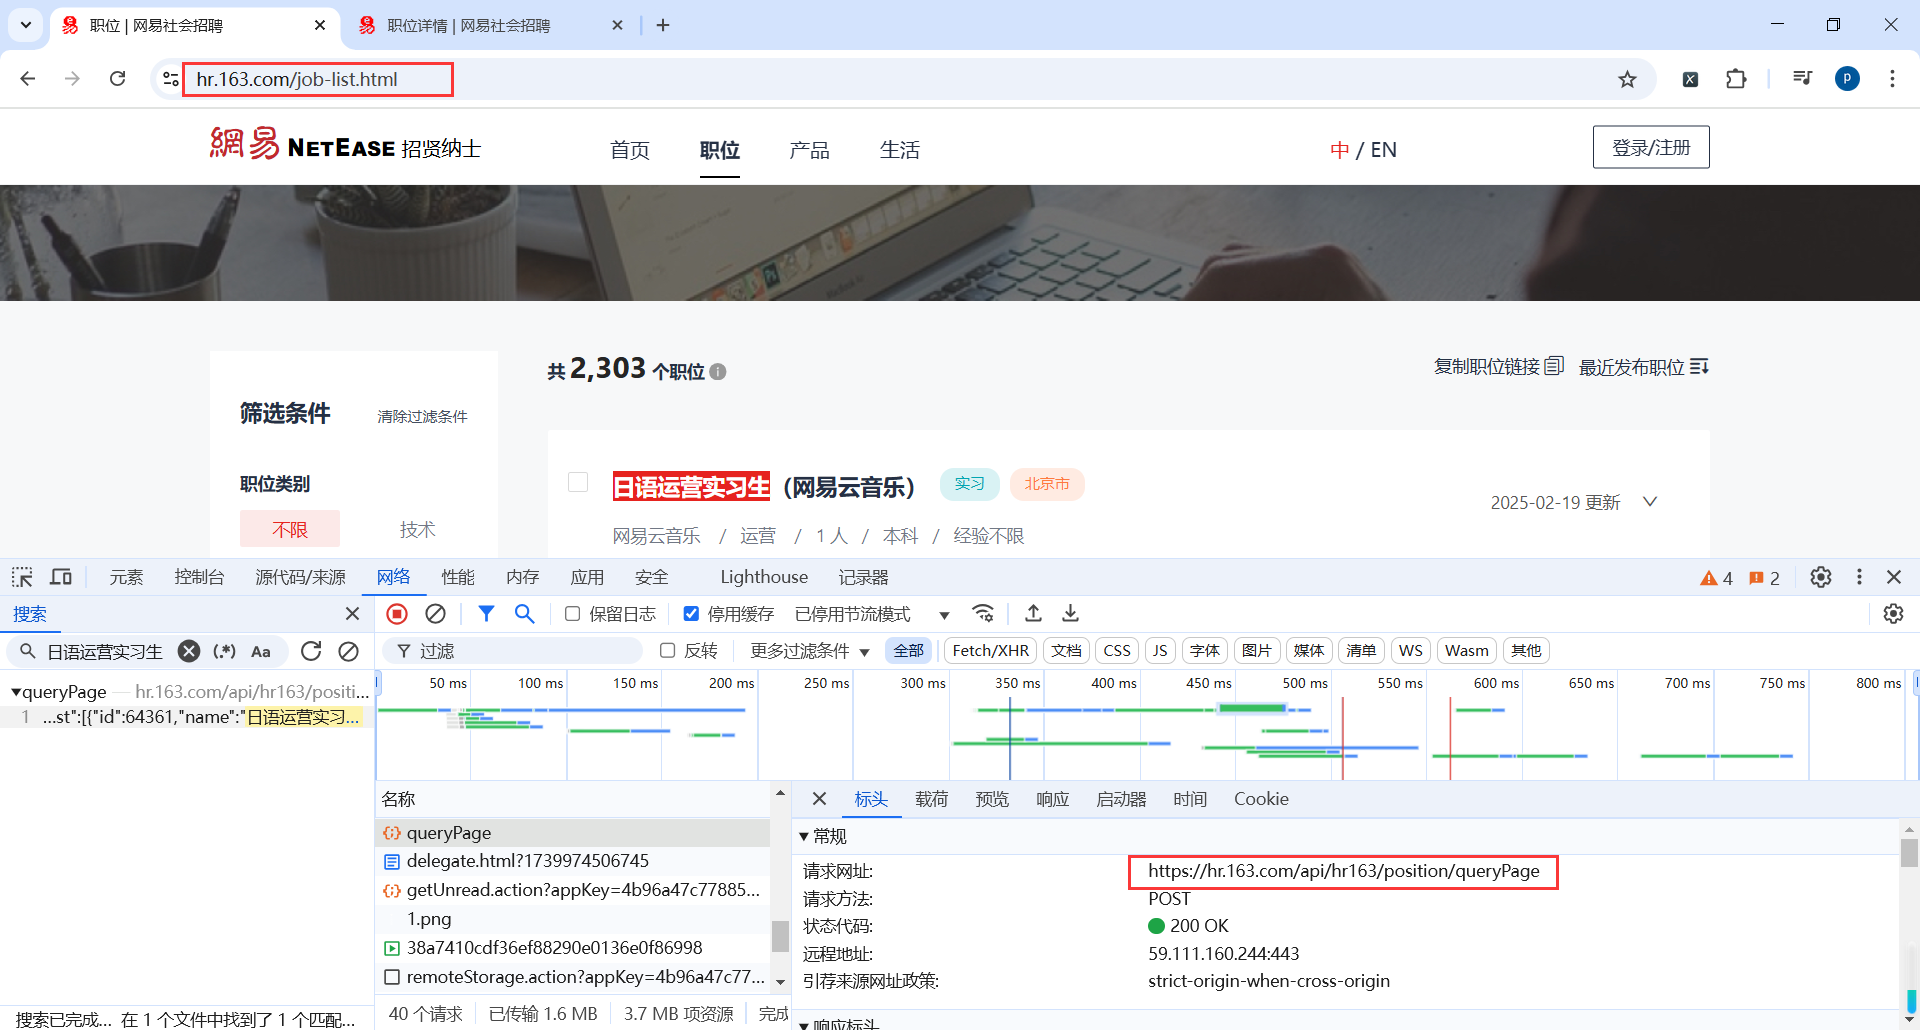
查看Post请求参数
3.1创建项目
# 创建项目
scrapy startproject hr163

# 打开项目目录
cd hr163

# 创建爬虫脚本
scrapy genspider hr163joblist "https://hr.163.com/job-list.html"

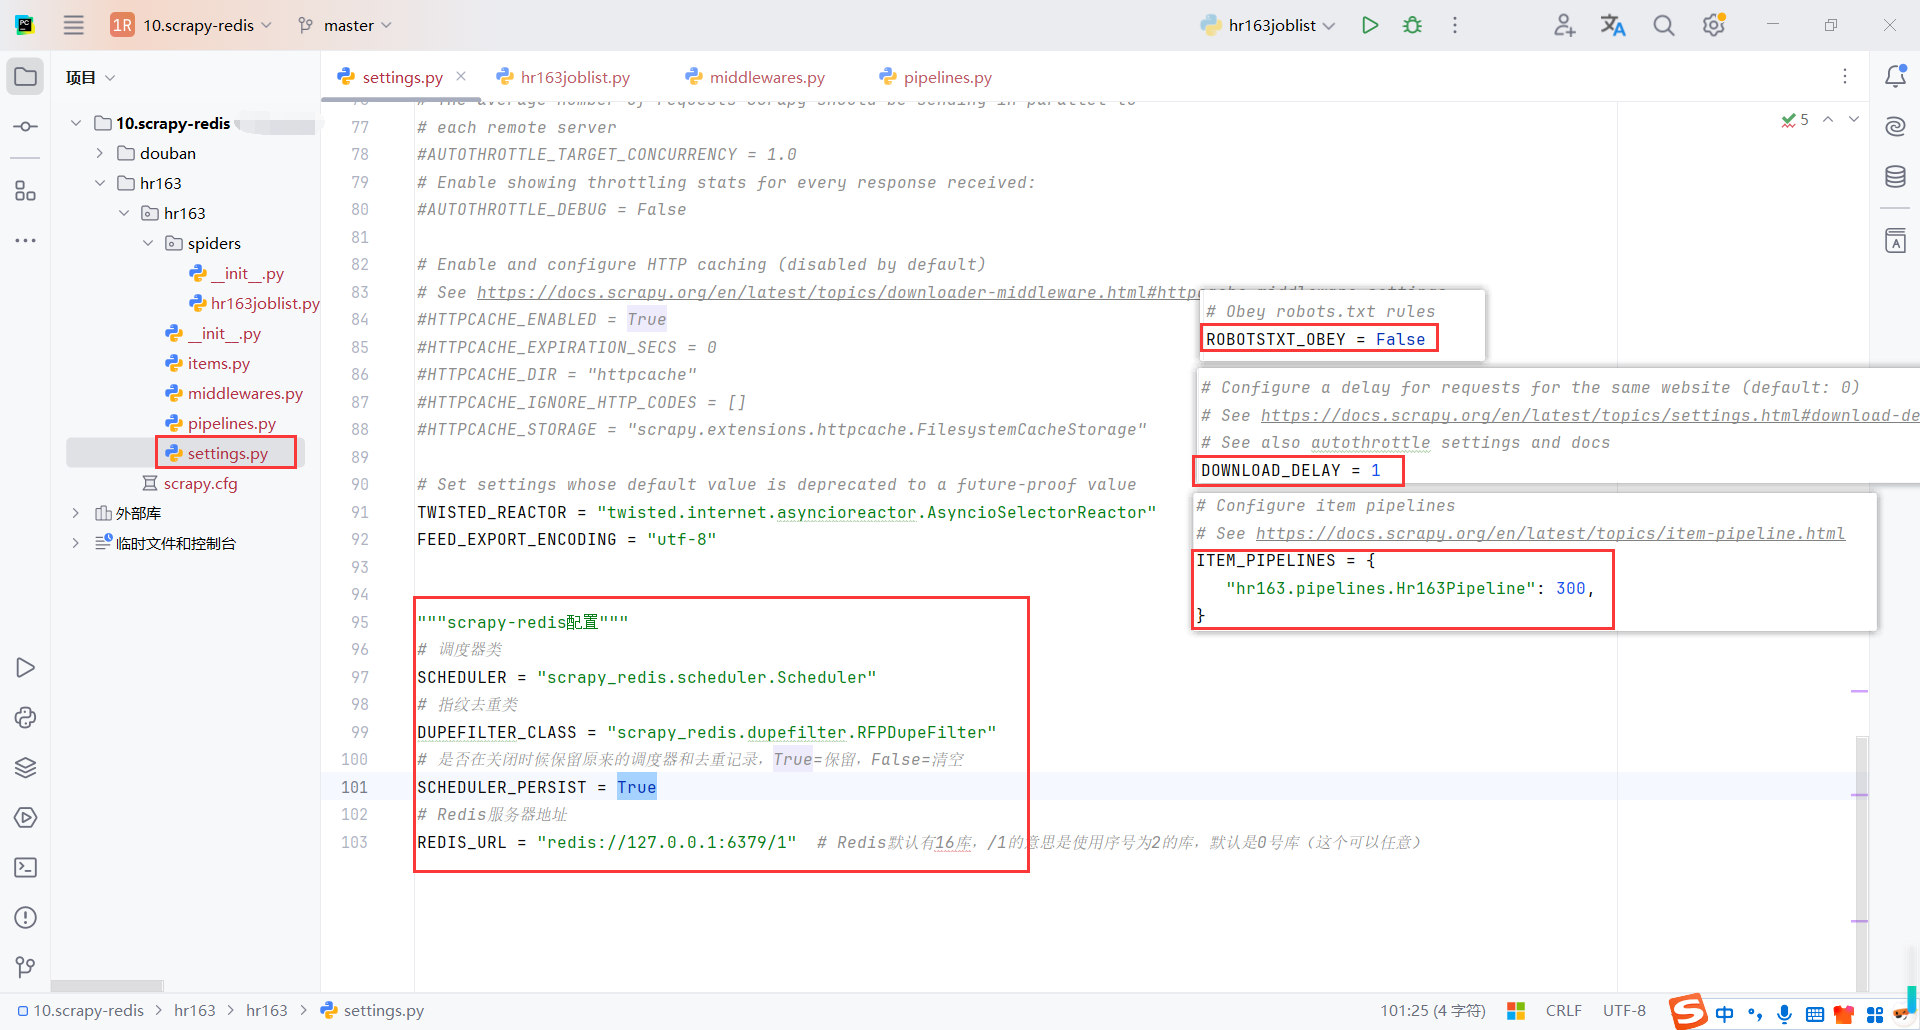
3.2配置
配置robots协议、请求延时、管道、redis
"""scrapy-redis配置"""
# 调度器类
SCHEDULER = "scrapy_redis.scheduler.Scheduler"
# 指纹去重类
DUPEFILTER_CLASS = "scrapy_redis.dupefilter.RFPDupeFilter"
# 是否在关闭时候保留原来的调度器和去重记录,True=保留,False=清空
SCHEDULER_PERSIST = True
# Redis服务器地址
REDIS_URL = "redis://127.0.0.1:6379/1"  # Redis默认有16库,/1的意思是使用序号为2的库,默认是0号库(这个可以任意)
3.3代码
代码部分很简单,主要是Post请求接口
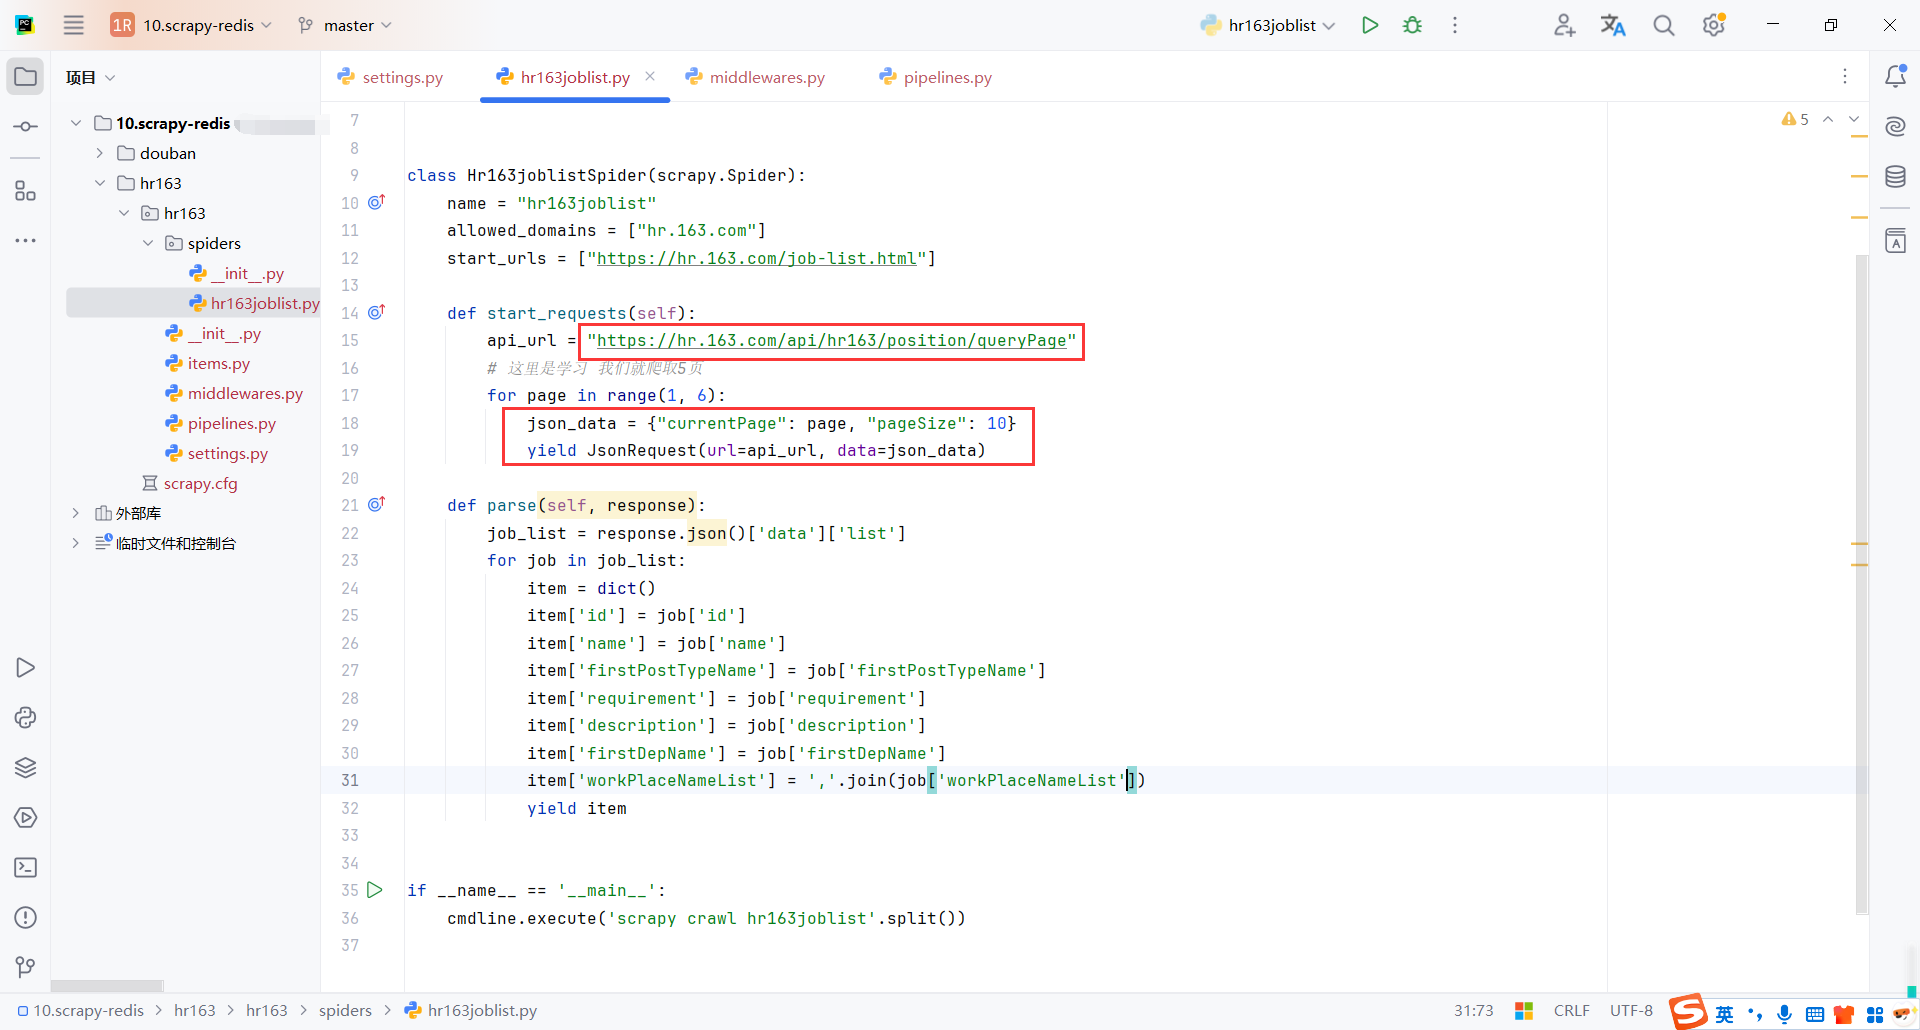
然后通过管道保存数据

hr163joblist.py
from typing import Iterable

import requests
import scrapy
from scrapy import Request, cmdline
from scrapy.http import JsonRequest

class Hr163joblistSpider(scrapy.Spider):
    name = "hr163joblist"
    allowed_domains = ["hr.163.com"]
    start_urls = ["https://hr.163.com/job-list.html"]

    def start_requests(self):
        api_url = "https://hr.163.com/api/hr163/position/queryPage"
        # 这里是学习 我们就爬取5页
        for page in range(1, 6):
            json_data = {"currentPage": page, "pageSize": 10}
            yield JsonRequest(url=api_url, data=json_data)

    def parse(self, response):
        job_list = response.json()['data']['list']
        for job in job_list:
            item = dict()
            item['id'] = job['id']
            item['name'] = job['name']
            item['firstPostTypeName'] = job['firstPostTypeName']
            item['requirement'] = job['requirement']
            item['description'] = job['description']
            item['firstDepName'] = job['firstDepName']
            item['workPlaceNameList'] = ','.join(job['workPlaceNameList'])
            yield item


if __name__ == '__main__':
    cmdline.execute('scrapy crawl hr163joblist'.split())
pipelines.py
class Hr163Pipeline:
    # 爬虫启动 初始化Mongodb
    def open_spider(self, spider):
        self.mongo_client = pymongo.MongoClient()
        self.collection = self.mongo_client['py_spider']['hr163job']

    # 保存数据
    def process_item(self, item, spider):
        self.collection.insert_one(item)
        print(f"保存成功:{item}")

    # 关闭爬虫 释放Mongodb
    def close_spider(self, spider):
        self.mongo_client.close()
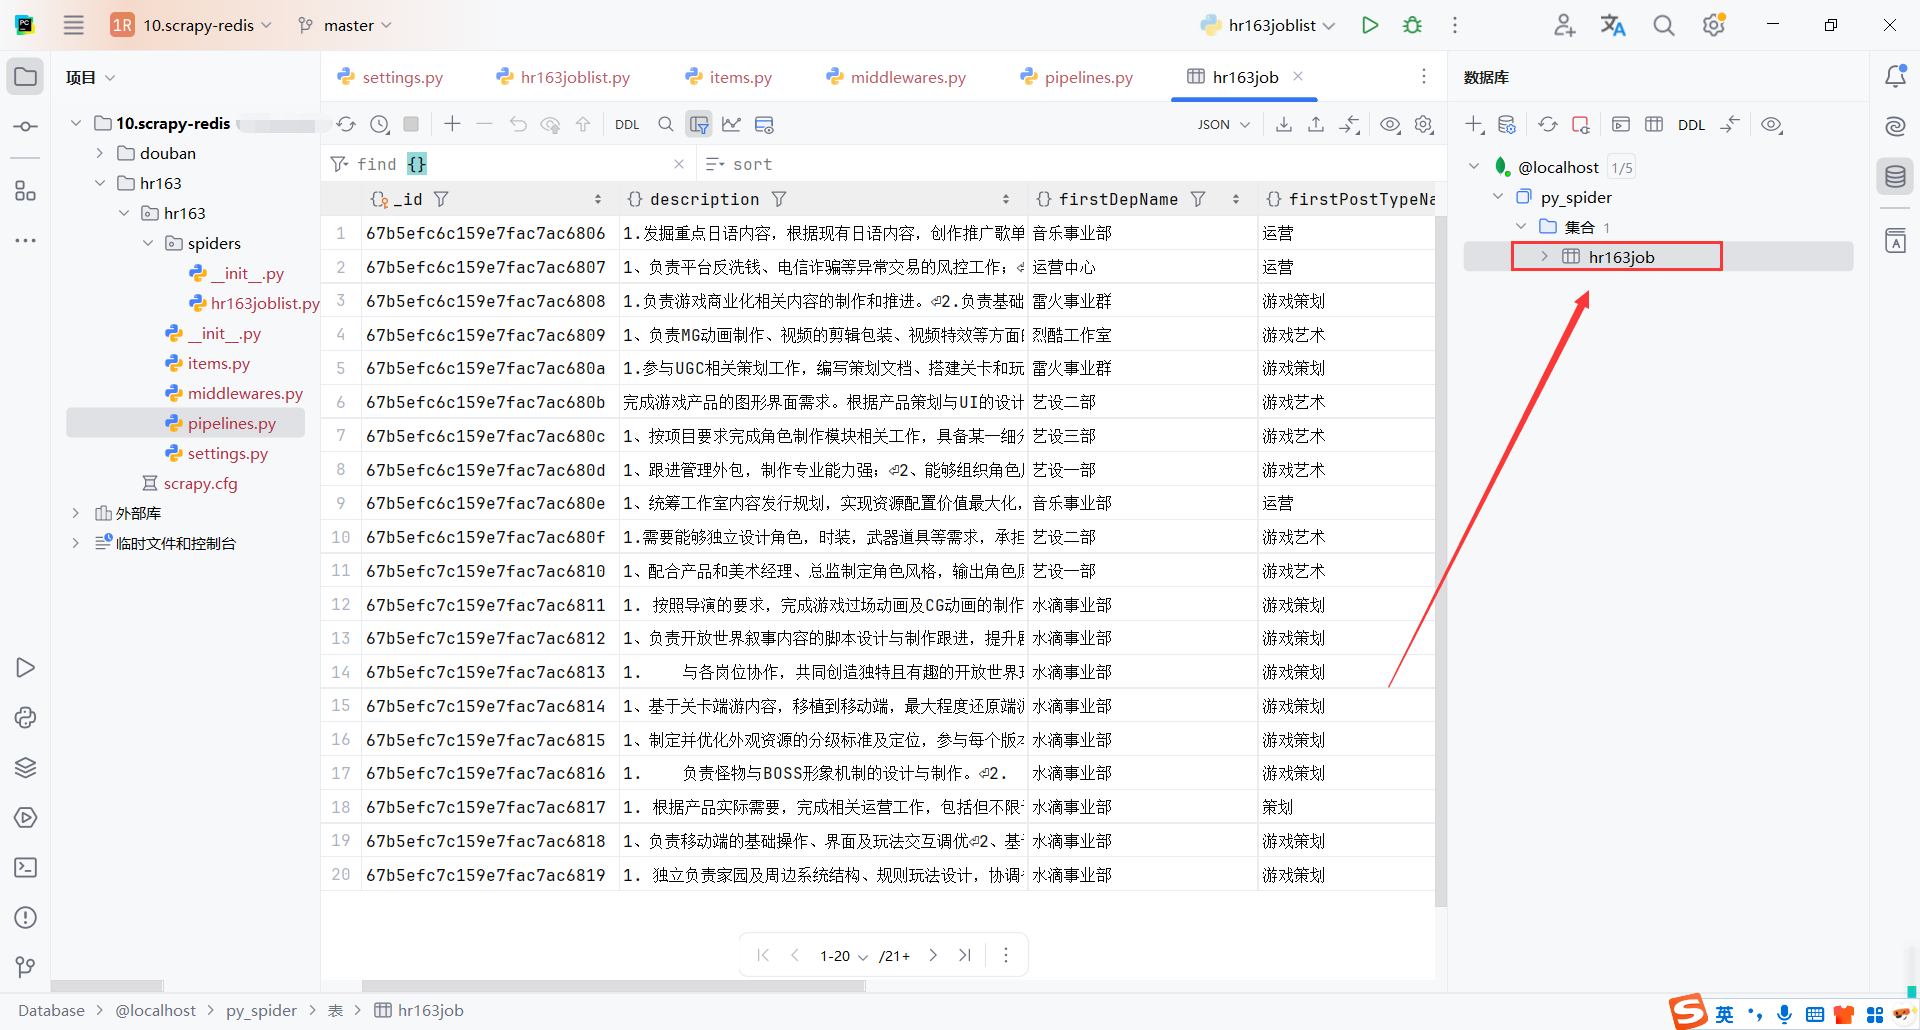
查看mongodb保存的数据
4.豆瓣电影250爬虫(scrapy-redis)
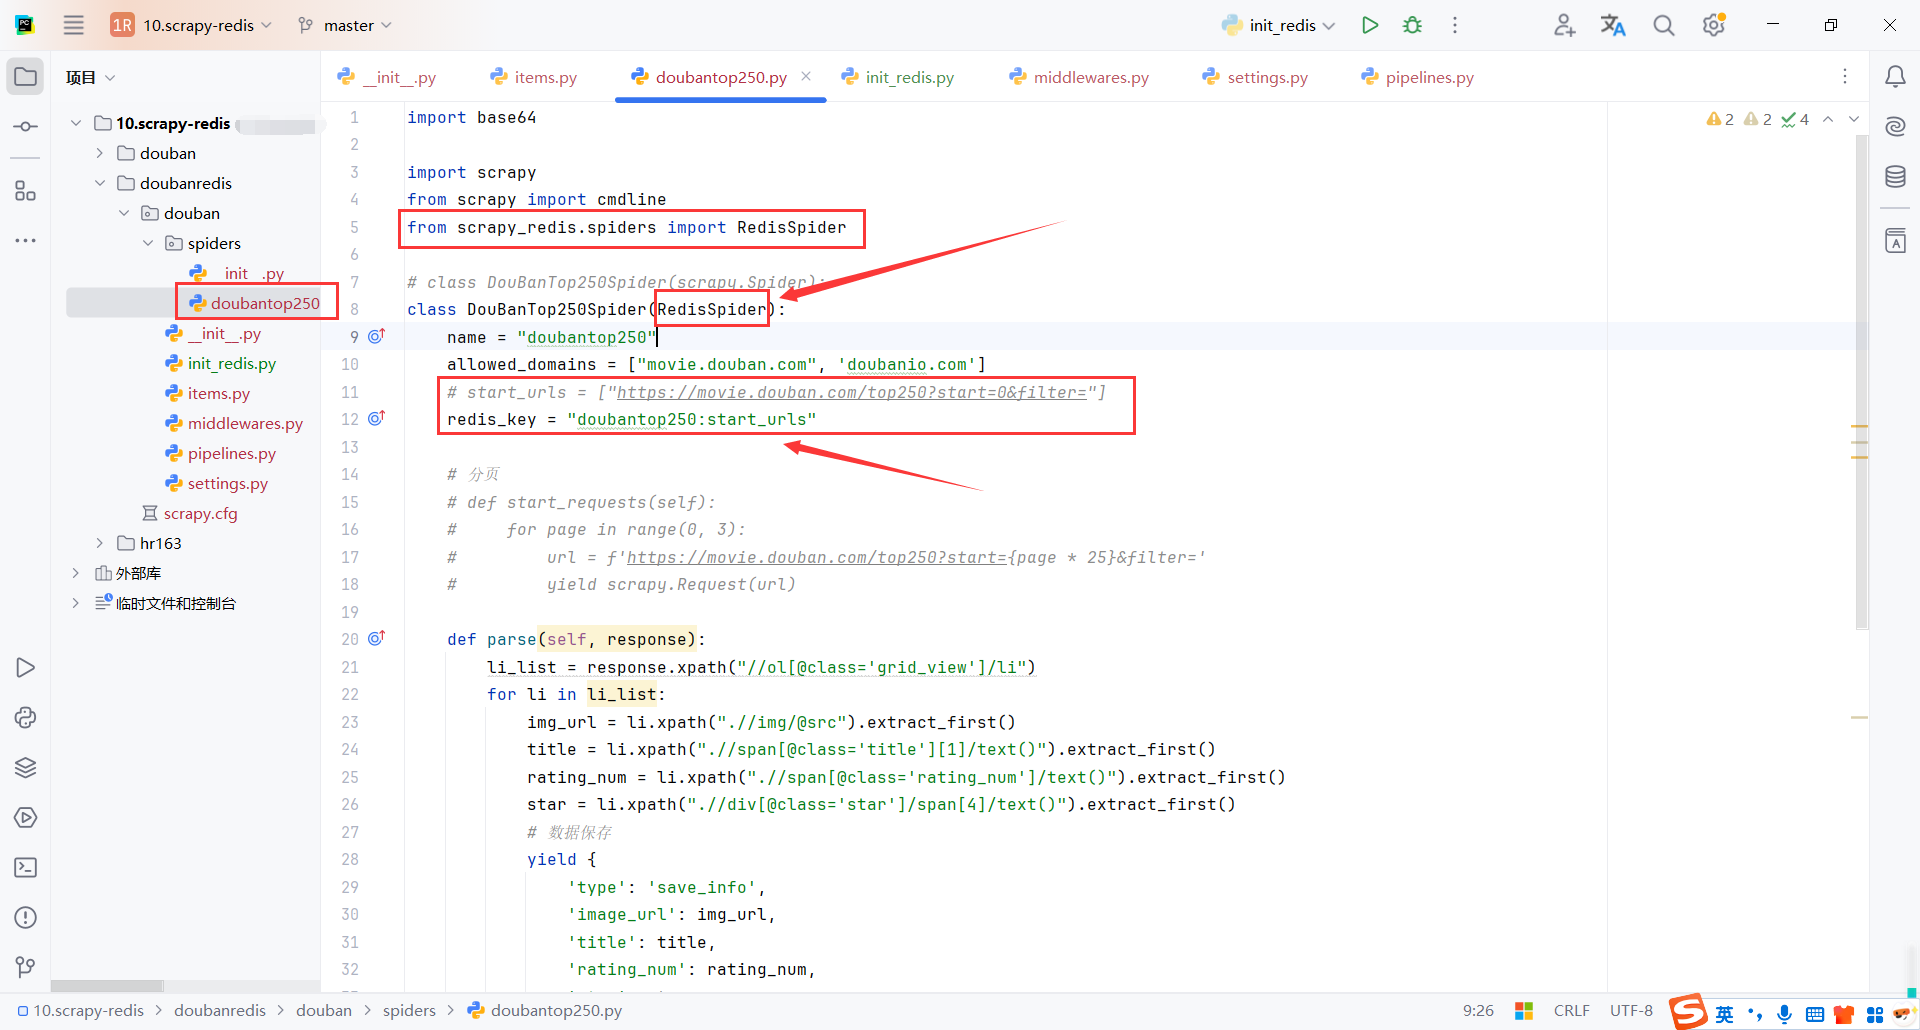
4.1RedisSpider
Scrapy-Redis是一个用于支持分布式爬取的库,其中RedisSpider是一个重要的组件,用于从Redis队列中获取请求。
redis_key 是Redis中存储起始请求的键名(需与 Redis 中的 Redis 一致)
我们需要从Reids中获取请求,而不是从内存中,所以不能使用start_urls,并且需要设置存储请求的键名
将scrapy.Spider改为scrapy.Spider,并且设置redis_key
4.2保存图片base64
redis不支持保存图片,需要转换为base64字符串,再保存到redis
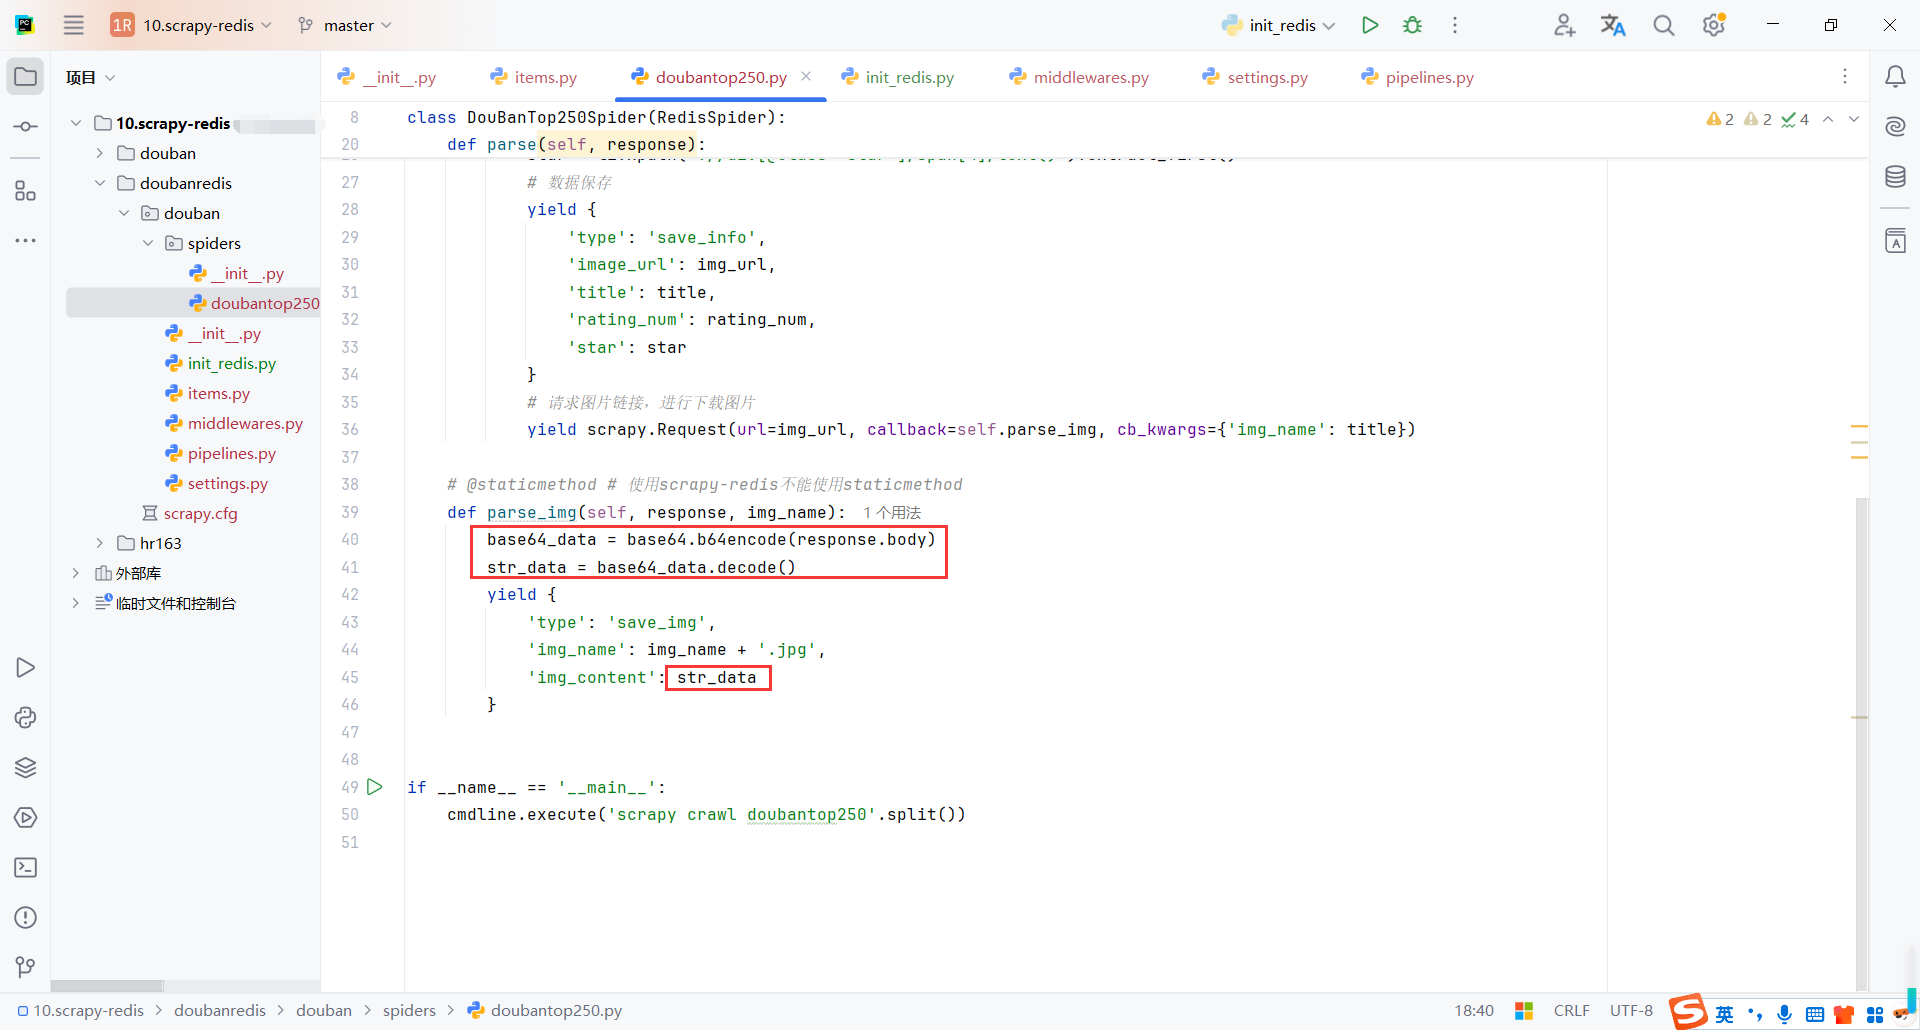
    def parse_img(self, response, img_name):
        base64_data = base64.b64encode(response.body)
        str_data = base64_data.decode()
        yield {
            'type': 'save_img',
            'img_name': img_name + '.jpg',
            'img_content': str_data
        }
保存图片的base64到redis中
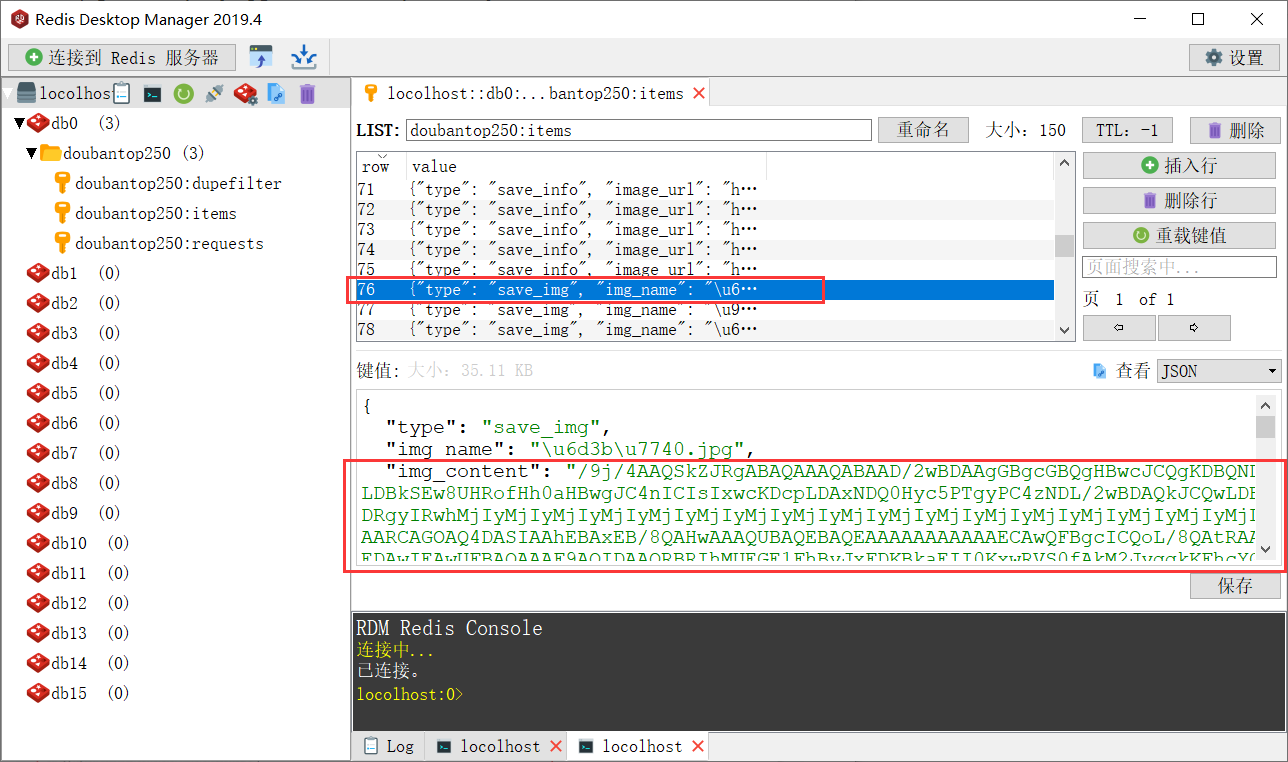
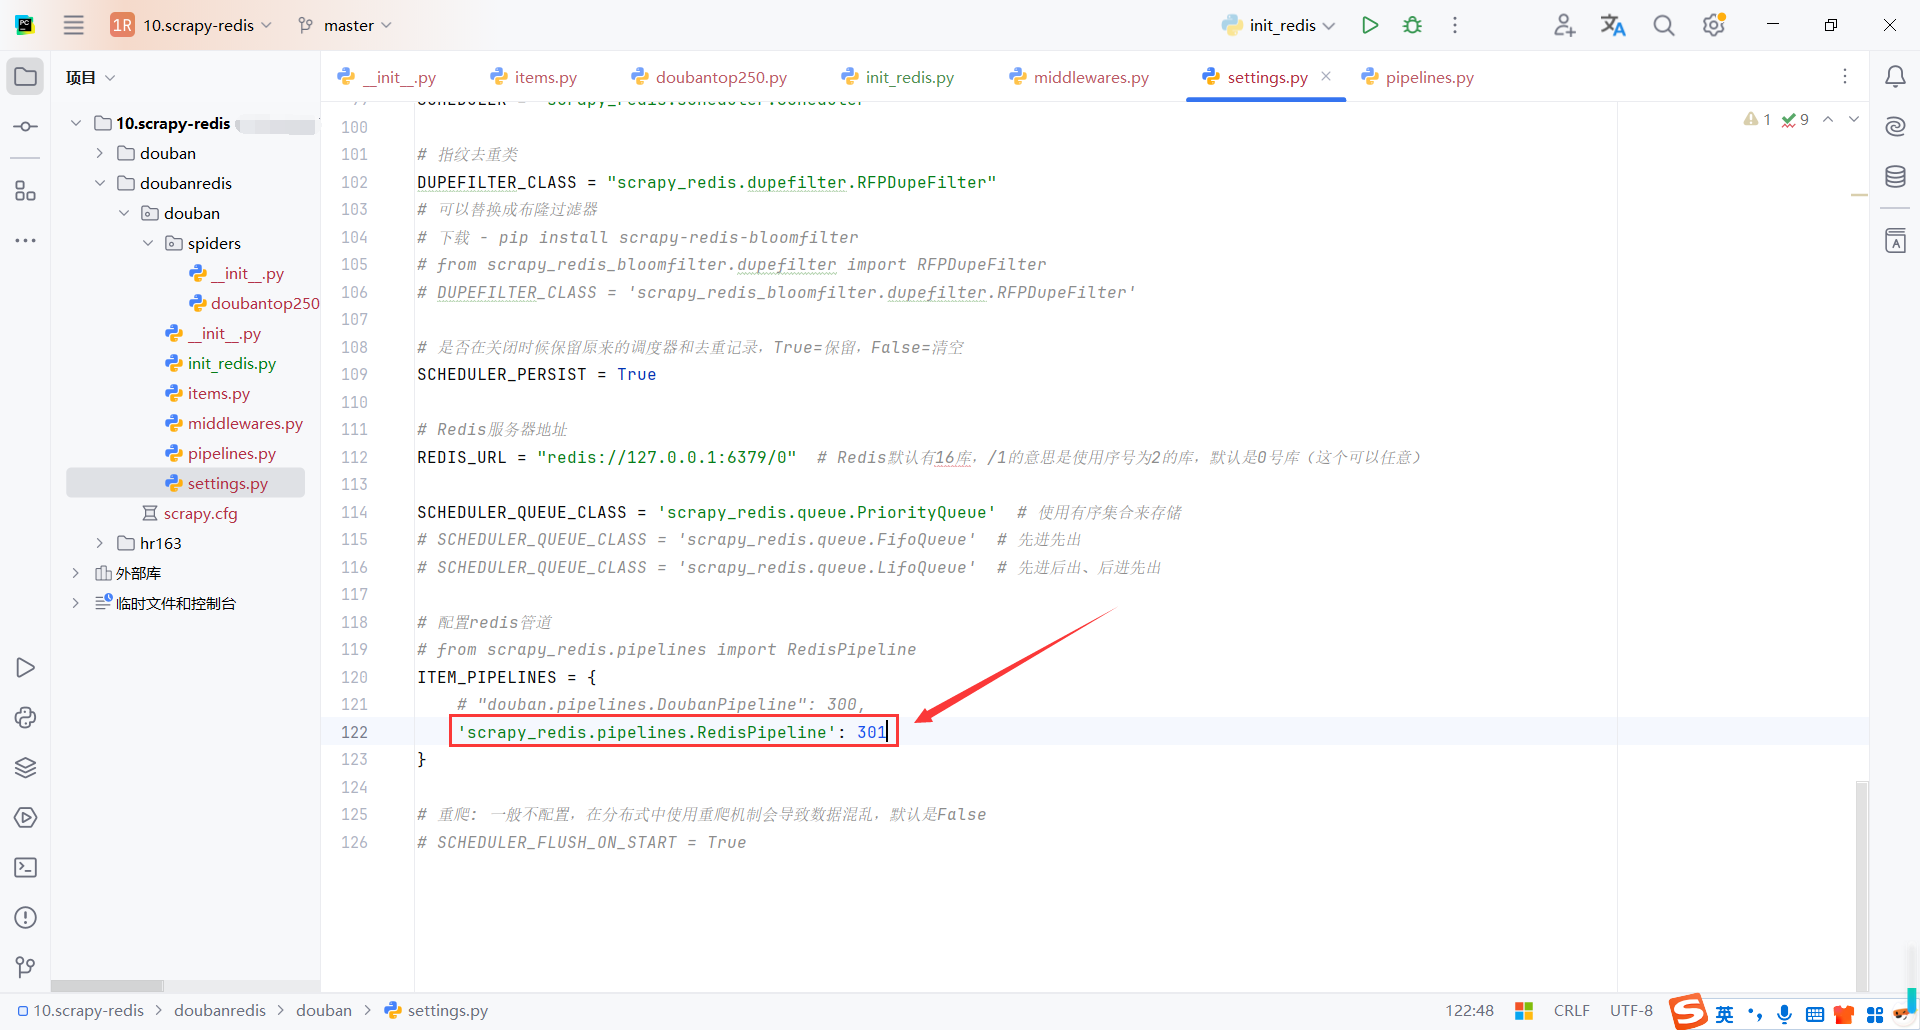
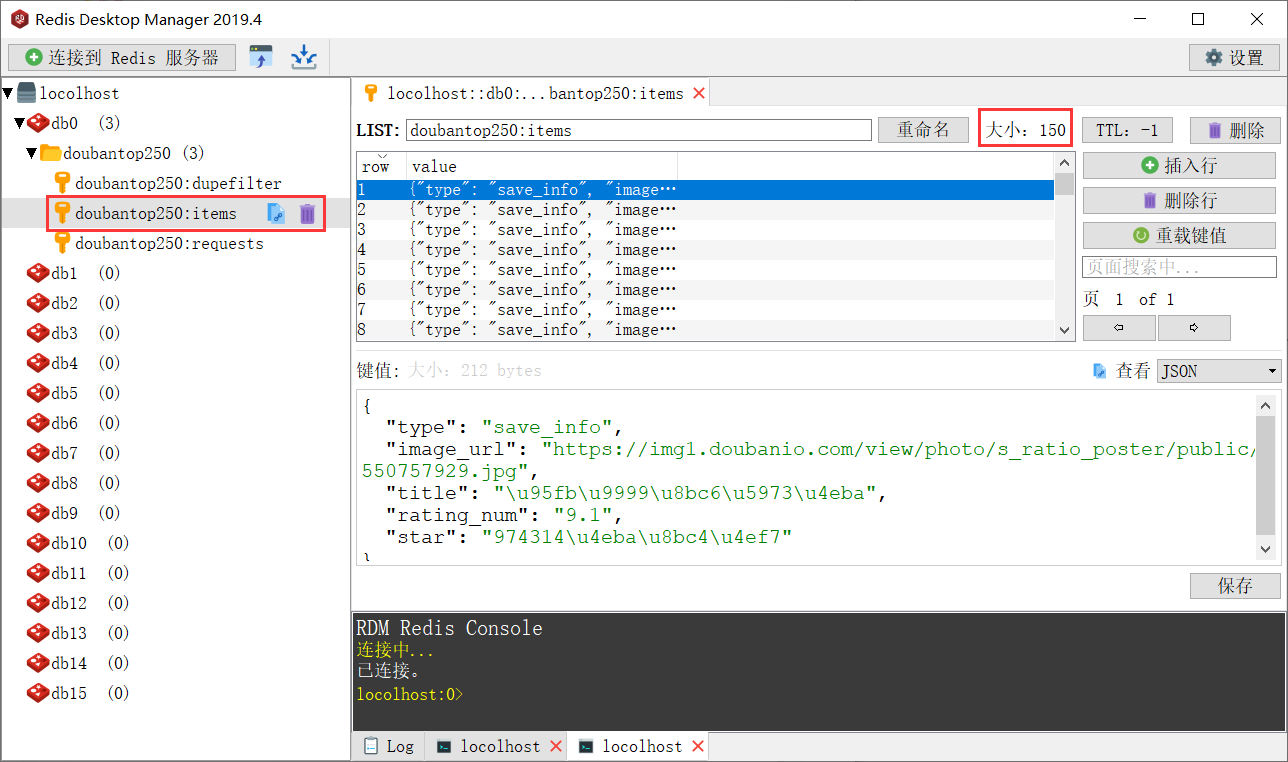
4.3RedisPipeline
scrapy_redis.pipelines.RedisPipeline 是 Scrapy-Redis 提供的一个内置管道,用于将爬取到的数据存储到 Redis 中。它通常用于分布式爬虫场景,方便多个爬虫实例共享数据。
RedisPipeline是Scrapy-Redis提供的一个简单易用的管道,用于将数据存储到Redis中。- 默认情况下,数据会存储到
{spider_name}:items列表中。 - 可以通过继承
RedisPipeline自定义存储逻辑。
查看doubantop250:items
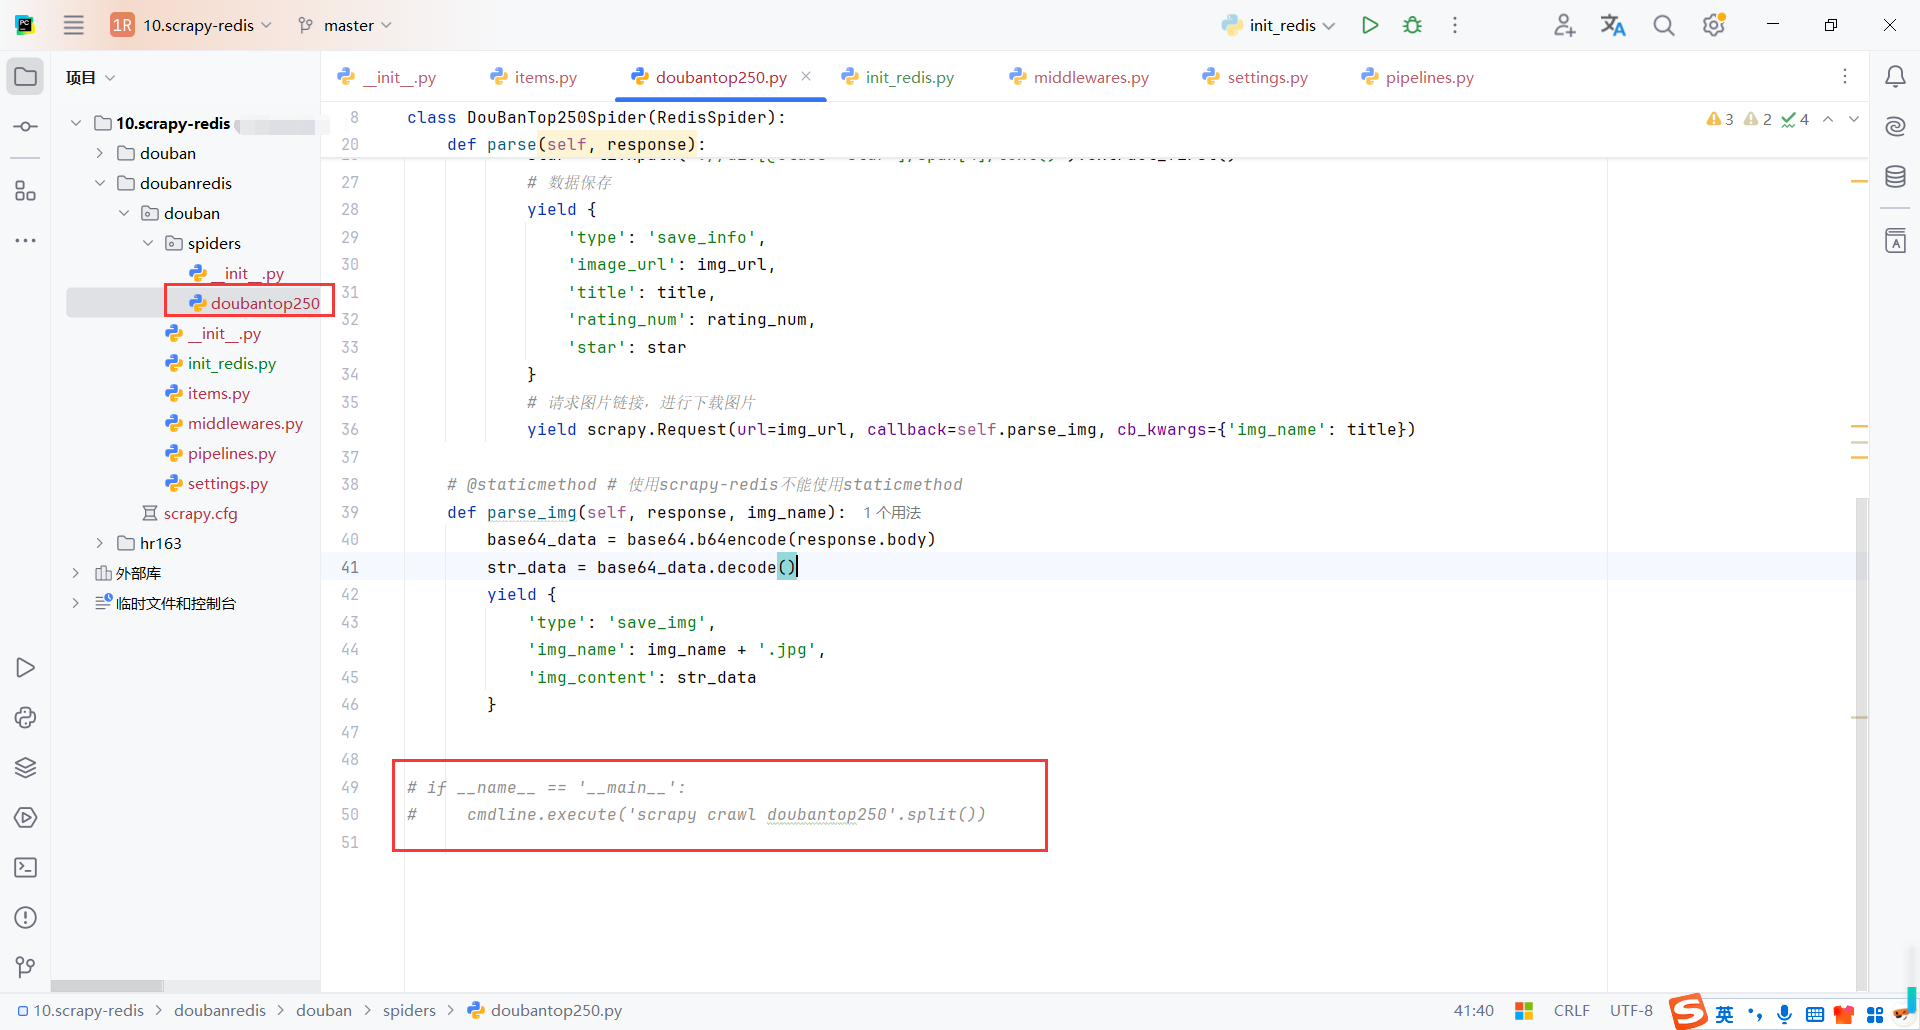
4.4使用脚本启动爬虫
尽量使用命令启动爬虫,因为正式环境也是通过脚本执行爬虫,要不然会出现莫名其妙的问题,比如不支持相对路径,找不到包等等
cd .\doubanredis\
scrapy crawl doubantop250
4.5初始化redis请求列表
我们需要把爬取的请求存储到redis中,这里写了脚本模拟存储请求
import redis

redis_client = redis.Redis()
# 分布式需要提前把请求地址保存到reids 再由不同的爬虫客户端不请求
# 这里就一个客户端 就爬取3页 保存3页地址
for page in range(0, 3):
    redis_client.lpush('doubantop250:start_urls', f'https://movie.douban.com/top250?start={page * 25}&filter=')
print('插入完成...')
redis_client.close()

启动爬虫后,会一直等待redis中存入地址
这里我们可以先启动爬虫,然后在执行初始化请求的脚本
然后发现等待的爬虫获取到请求后开始爬取数据
redis中的队列爬取完成后,爬虫会一直等待队列中新的请求push后再执行

5.当当网爬虫(scrapy-redis)
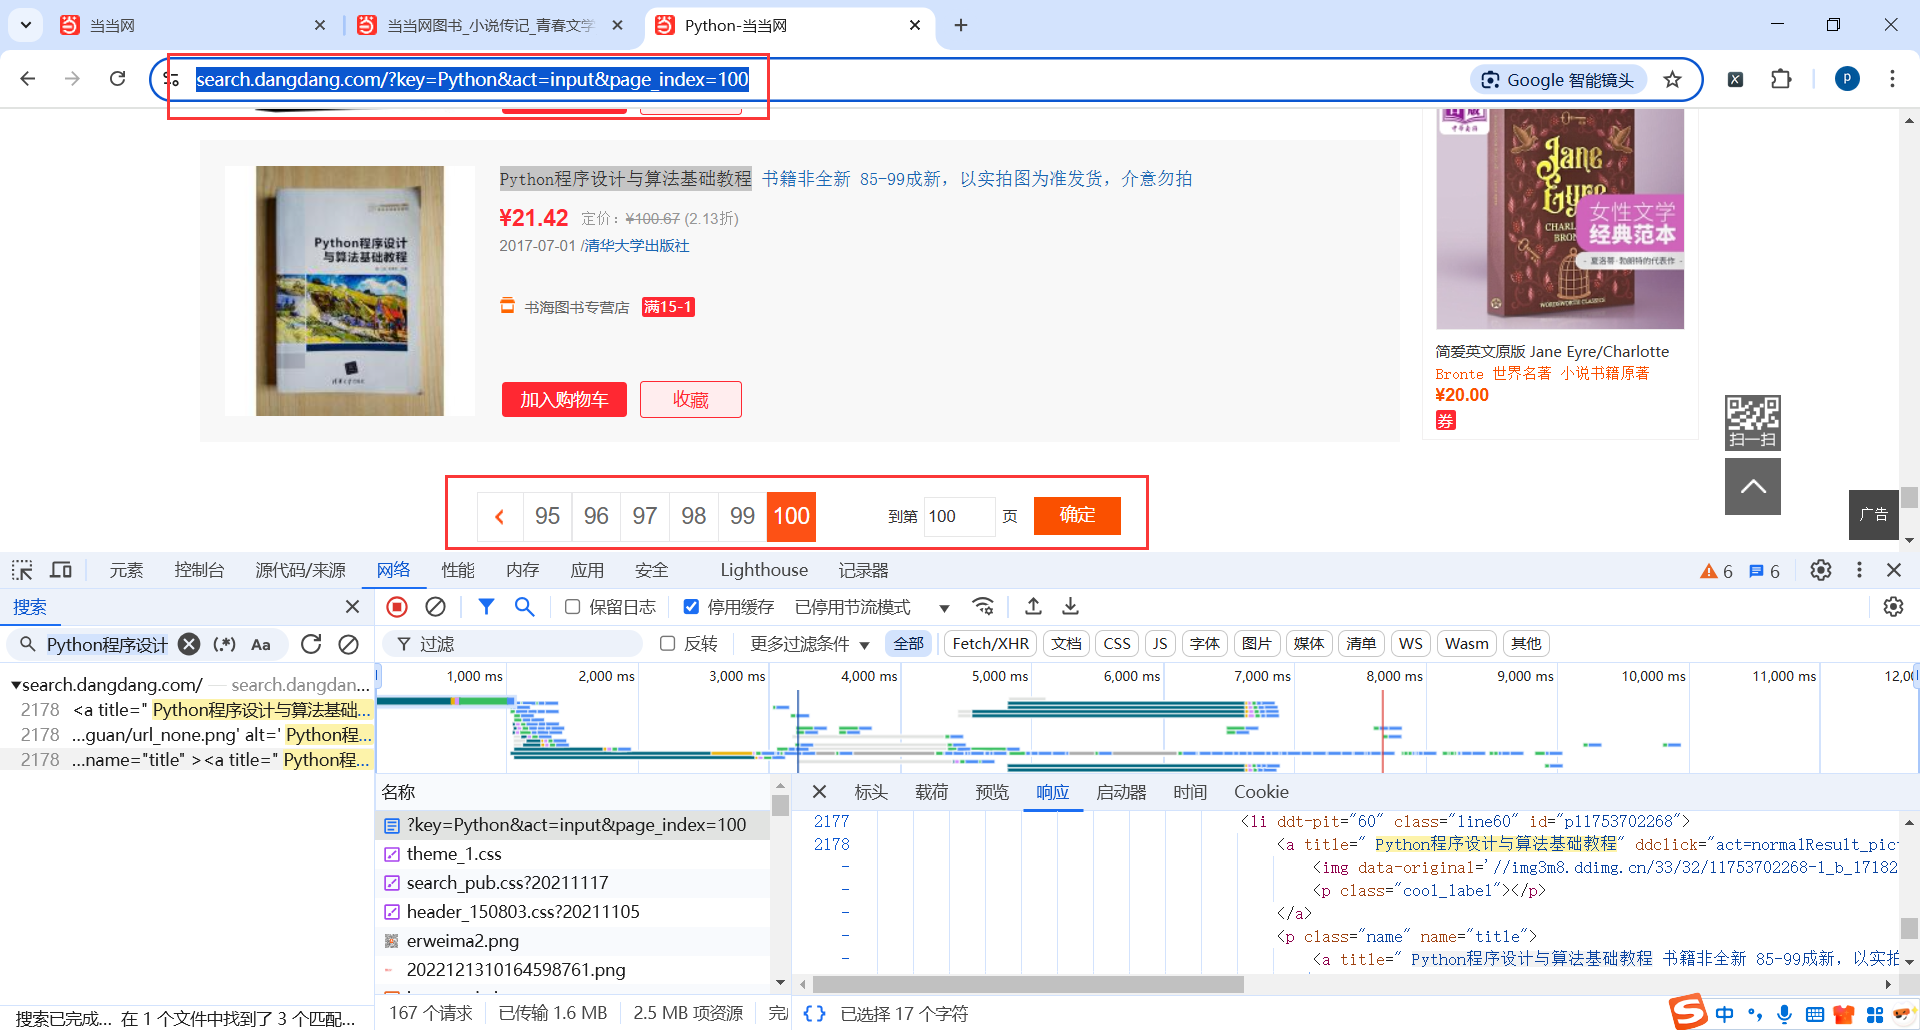
地址:https://search.dangdang.com/?key=Python&act=input&page_index=100
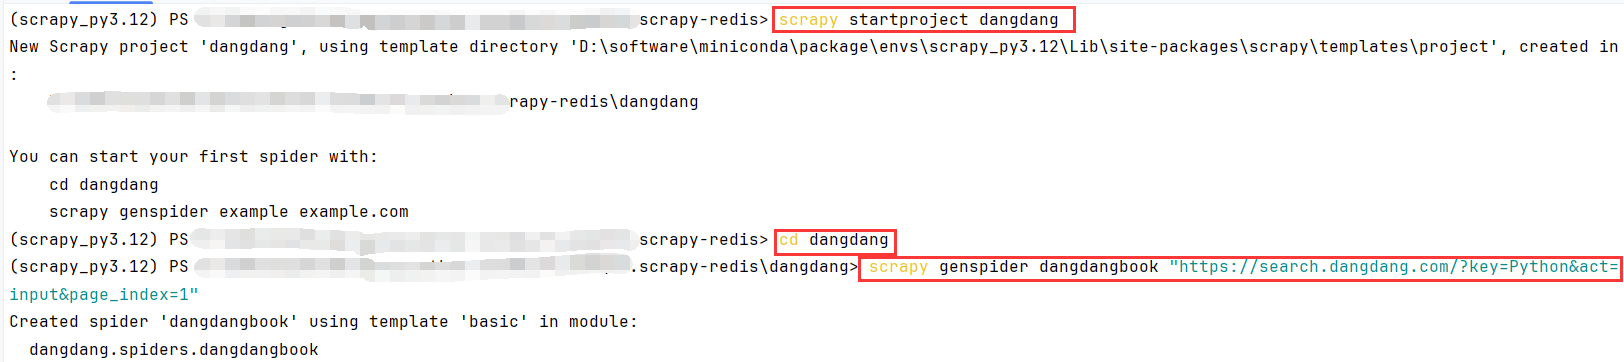
5.1创建项目
创建命令
# 创建项目
scrapy startproject dangdang

# 打开项目目录
cd dangdang

# 创建爬虫脚本
scrapy genspider dangdangbook "https://search.dangdang.com/?key=Python&act=input&page_index=1"
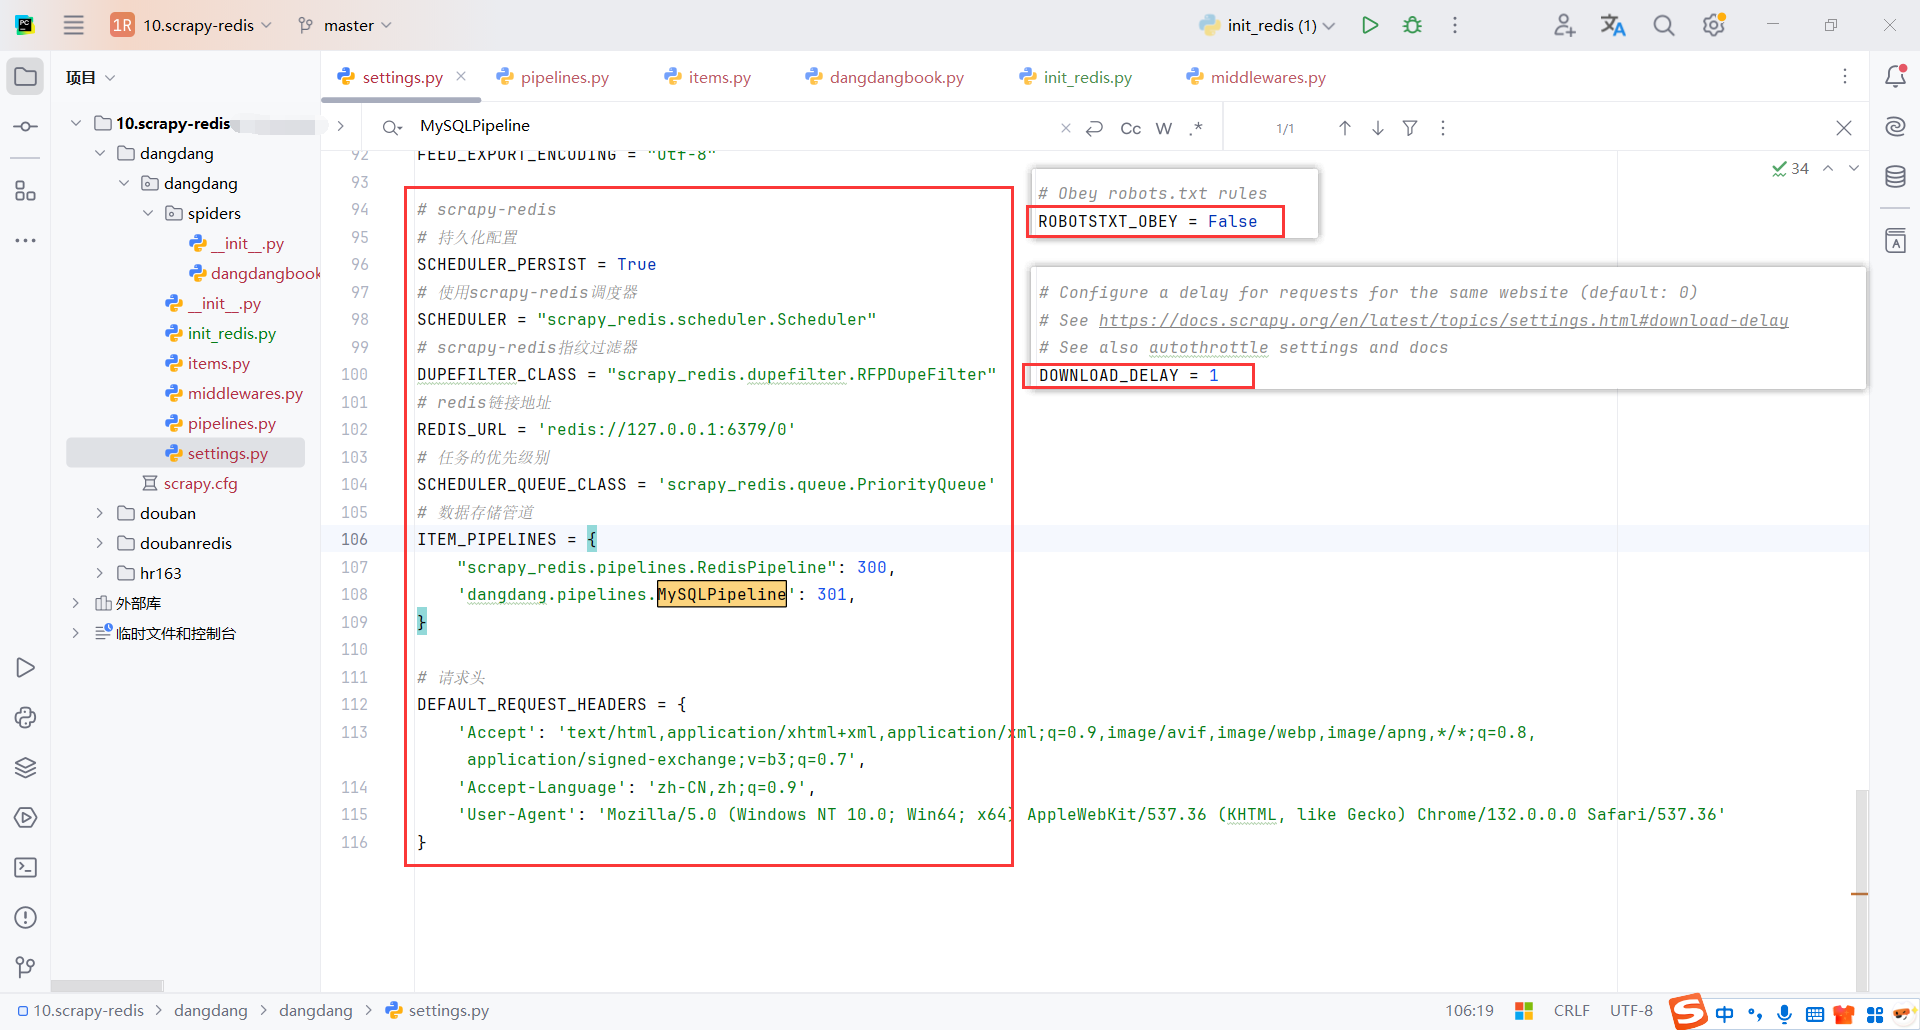
5.2scrapy-redis配置
确保redis服务的配置正确
scrapy_redis.pipelines.RedisPipeline:配置默认的redis管道,把数据存在redis中
dangdang.pipelines.MySQLPipeline:自定义管道,把数据保存在mysql
DEFAULT_REQUEST_HEADERS:这里统一配置了请求头。也可以通过实现middware随机请求头
ROBOTSTXT_OBEY = False:取消robots协议
DOWNLOAD_DELAY = 1:请求延迟,建议不要太快,之前ip被封有心阴影了
# scrapy-redis
# 持久化配置
SCHEDULER_PERSIST = True
# 使用scrapy-redis调度器
SCHEDULER = "scrapy_redis.scheduler.Scheduler"
# scrapy-redis指纹过滤器
DUPEFILTER_CLASS = "scrapy_redis.dupefilter.RFPDupeFilter"
# redis链接地址
REDIS_URL = 'redis://127.0.0.1:6379/0'
# 任务的优先级别
SCHEDULER_QUEUE_CLASS = 'scrapy_redis.queue.PriorityQueue'
# 数据存储管道
ITEM_PIPELINES = {
    "scrapy_redis.pipelines.RedisPipeline": 300,
    'dangdang.pipelines.MySQLPipeline': 301,
}

# 请求头
DEFAULT_REQUEST_HEADERS = {
    'Accept': 'text/html,application/xhtml+xml,application/xml;q=0.9,image/avif,image/webp,image/apng,*/*;q=0.8,application/signed-exchange;v=b3;q=0.7',
    'Accept-Language': 'zh-CN,zh;q=0.9',
    'User-Agent': 'Mozilla/5.0 (Windows NT 10.0; Win64; x64) AppleWebKit/537.36 (KHTML, like Gecko) Chrome/132.0.0.0 Safari/537.36'
}
5.3爬虫脚本(DangdangbookSpider)
这里需要使用scrapy_redis.spiders import RedisSpider
配置redis_key存储请求的url
我这里测试只爬取3页,实际这里可以注释掉
分页实现逻辑是爬取页面的下一页按钮,获取下一页按钮的链接并拼接地址,构造一个新的request
import scrapy
from urllib.parse import urlparse, parse_qs
from scrapy_redis.spiders import RedisSpider
from ..items import DangDangBookItem


# class DangdangbookSpider(scrapy.Spider):
class DangdangbookSpider(RedisSpider):
    name = "dangdangbook"
    allowed_domains = ["search.dangdang.com"]
    # start_urls = ["https://search.dangdang.com/?key=Python&act=input&page_index=1"]
    redis_key = 'dangdangbook:start_url'

    def parse(self, response):
        # 提取当前页码(通过 URL 参数 page_index)
        page_index = self.get_page_index(response.url)
        # 我这里是学习 爬取3页数据没问题就停止
        # 如果已经到第4页 停止爬取
        if page_index >= 4:
            return

        # 爬取数据
        li_list = response.xpath("//ul[@class='bigimg']/li")
        for li in li_list:
            item = DangDangBookItem()
            item['title'] = li.xpath('./a/@title').extract_first() or ''
            item['now_price'] = li.xpath(
                './p[@class="price"]/span[@class="search_now_price"]/text()').extract_first() or ''
            item['pre_price'] = li.xpath(
                './p[@class="price"]/span[@class="search_pre_price"]/text()').extract_first() or ''
            item['discount'] = li.xpath(
                './p[@class="price"]/span[@class="search_discount"]/text()').extract_first() or ''
            item['author'] = li.xpath('./p[@class="search_book_author"]/span[1]/a/text()').extract_first() or ''
            item['author_date'] = li.xpath('./p[@class="search_book_author"]/span[2]/text()').extract_first() or ''
            item['author_cbs'] = li.xpath('./p[@class="search_book_author"]/span[3]/a/text()').extract_first() or ''
            item['star'] = li.xpath('./p[@class="search_star_line"]/span[1]/span/@style').extract_first() or ''
            item['comment'] = li.xpath(
                './p[@class="search_star_line"]/a[@class="search_comment_num"]/text()').extract_first() or ''
            item['lable'] = ' '.join(
                li.xpath('./div[@class="lable_label"]//span[contains(@class,"new_lable")]//text()')).strip() or ''
            item['detail'] = li.xpath('./p[@class="detail"]/text()').extract_first() or ''
            yield item
        print(f"爬取完成:{response.url}")

        # 当前页爬取完后 获取界面下一页的链接 使用urljoin拼接
        if response.xpath('//ul[@name="Fy"]/li[@class="next"]/a/@href').extract_first() is not None:
            next_url = response.urljoin(response.xpath('//ul[@name="Fy"]/li[@class="next"]/a/@href').extract_first())
            print(f"next_url:{next_url}")
            yield scrapy.Request(url=next_url, callback=self.parse)

    def get_page_index(self, url):
        """
        从 URL 中提取当前的页码。通过 urlparse 和 parse_qs 解析 URL 参数
        urlparse(url) 解析 URL,得到各个部分(路径、查询参数等)。
        parse_qs(parsed_url.query) 解析 URL 中的查询参数,返回一个字典。
        query_params.get('page_index', [1])[0] 通过查询参数字典提取 page_index,如果没有该参数,则默认返回 1(第一页)。
        """
        parsed_url = urlparse(url)
        query_params = parse_qs(parsed_url.query)
        return int(query_params.get('page_index', [1])[0])
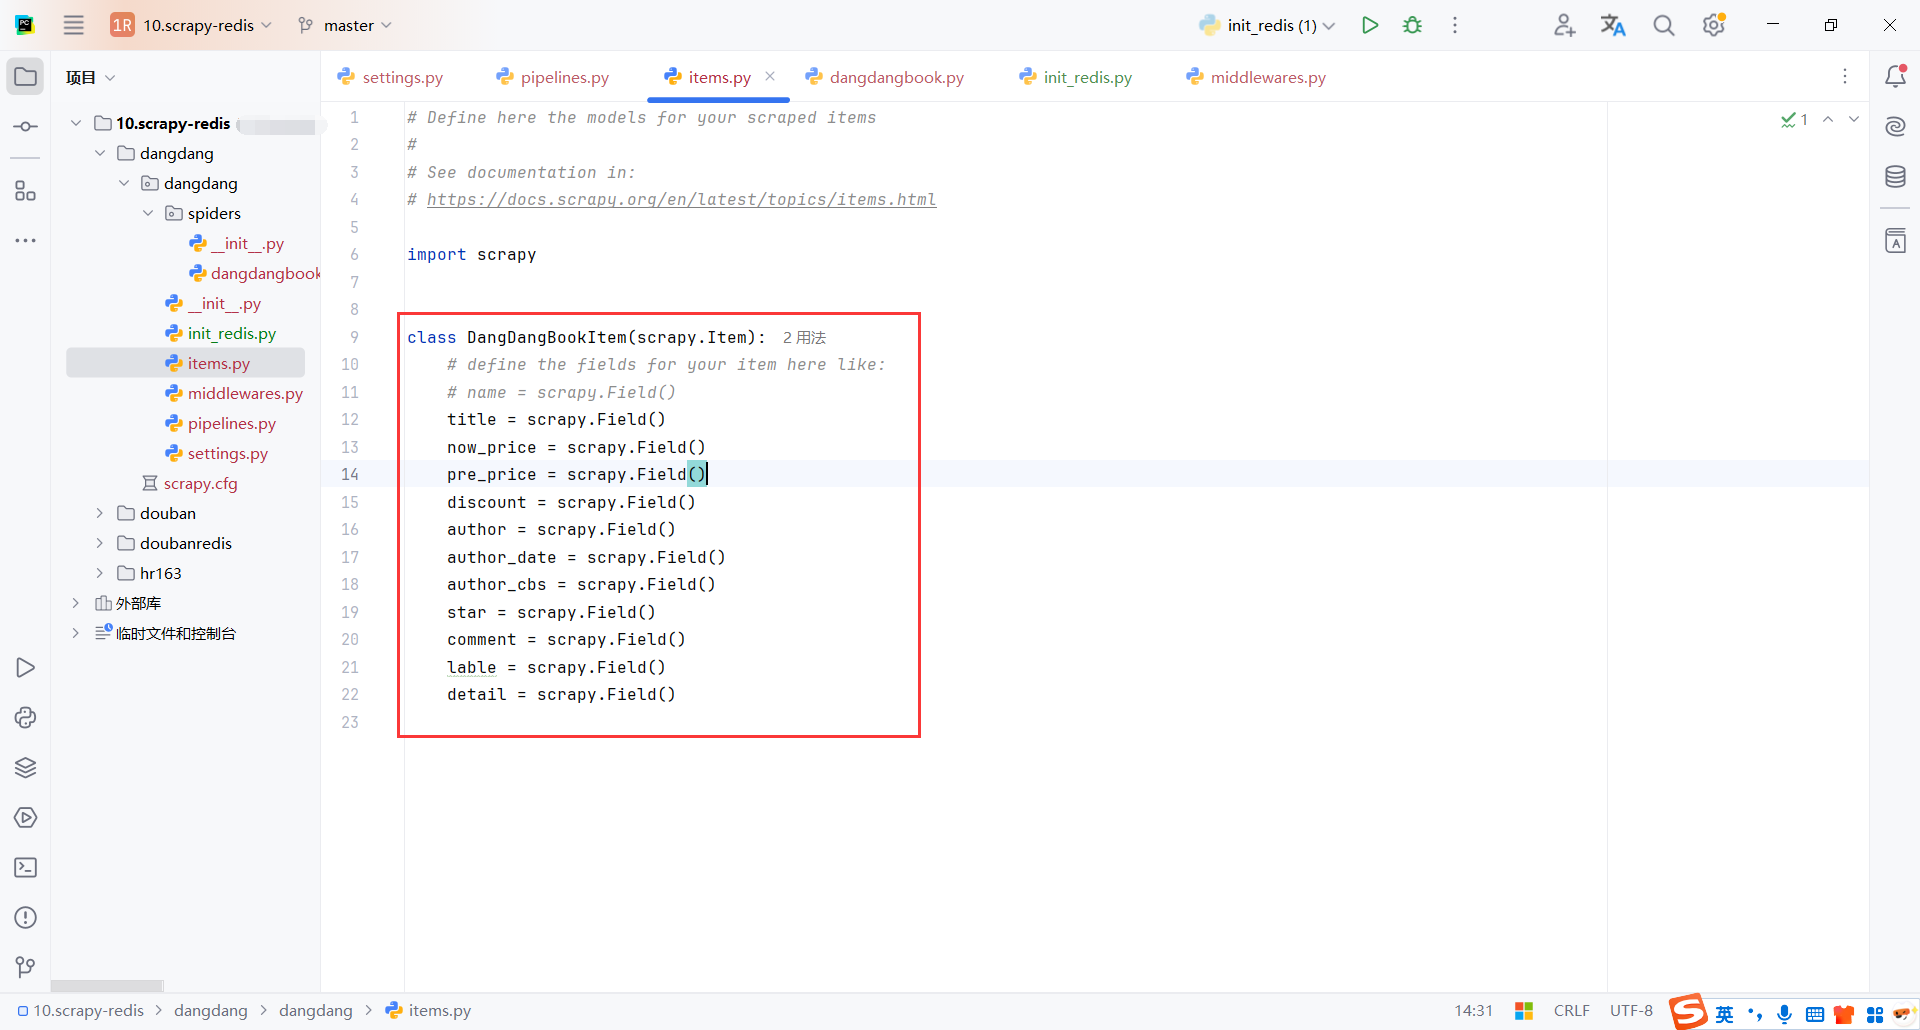
5.4数据模型(DangDangBookItem)
用于存储爬取到的数据,是一个容器。通常使用 Python 的字典或者 scrapy.Item 类来表示。
5.5管道(MySQLPipeline)
这个管道主要是为了将数据保存到mysql
在open_spider初始化mysql,在process_item保存数据,在close_spider释放资源
每个方法根据spider.name区分不同的爬虫
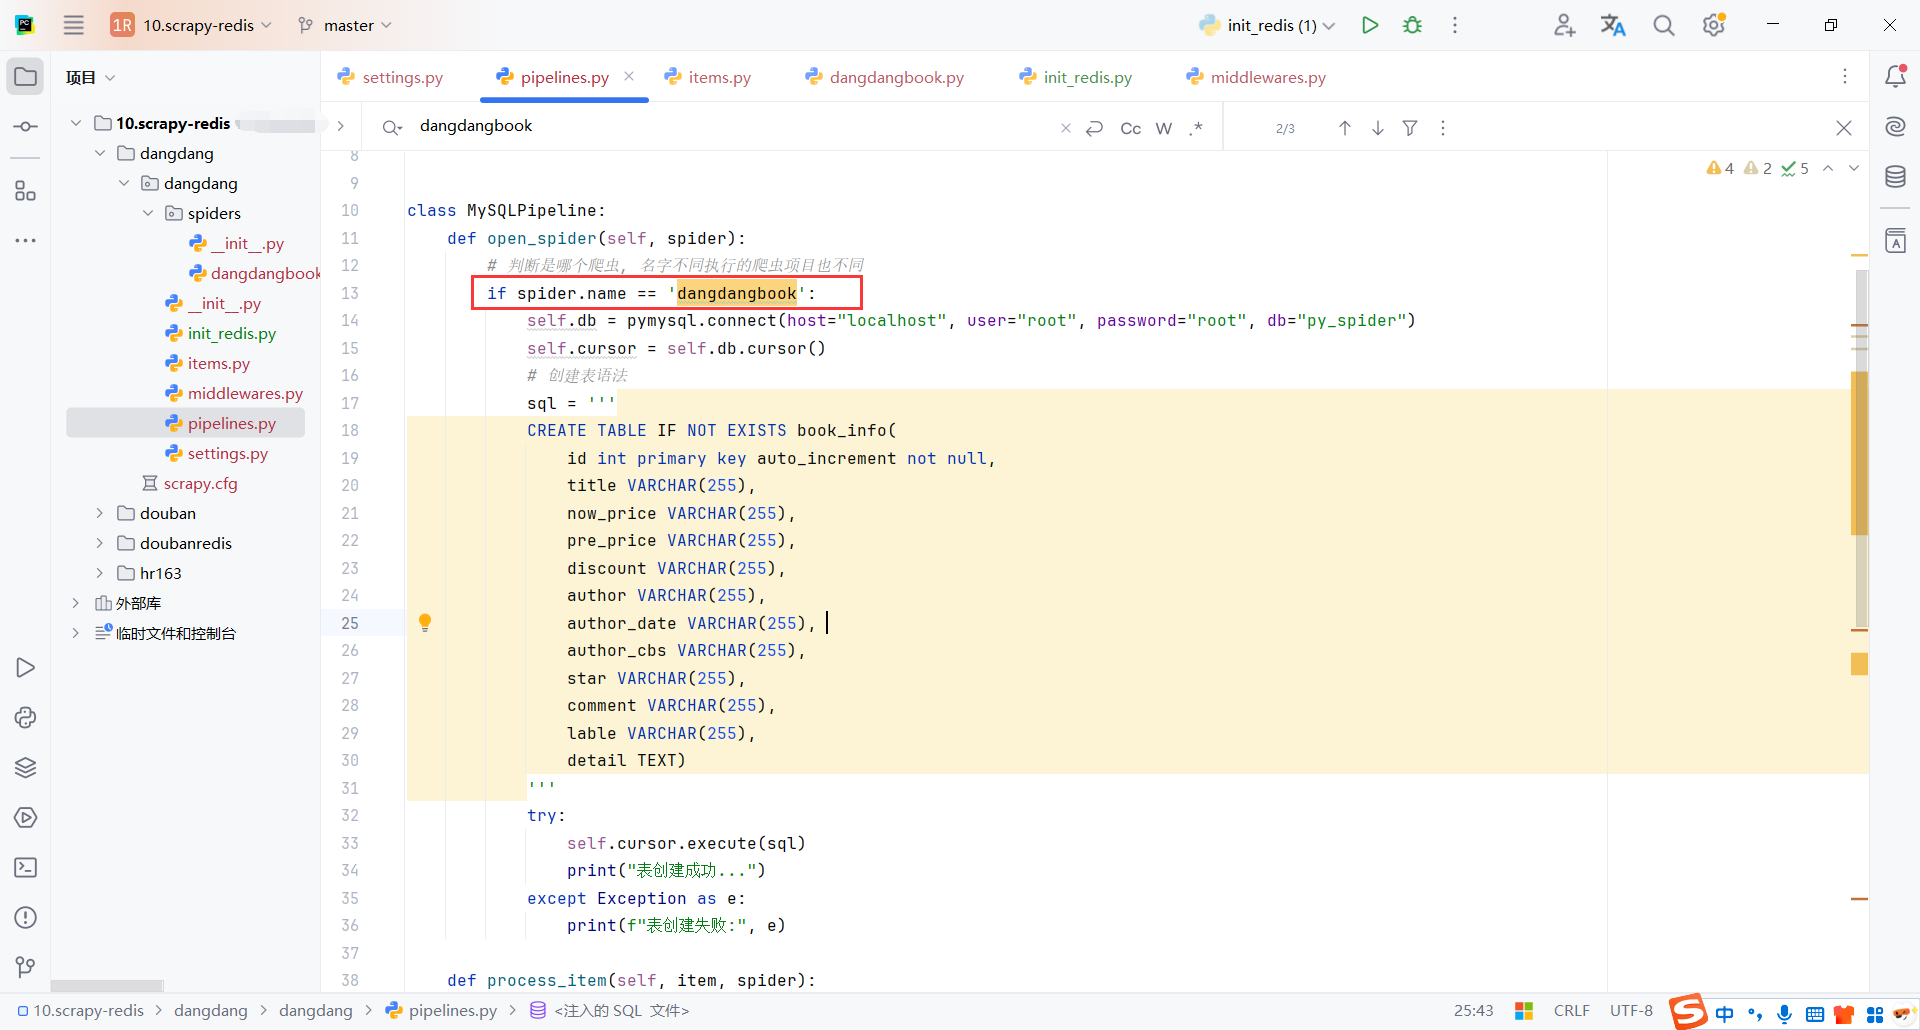
class MySQLPipeline:
    def open_spider(self, spider):
        # 判断是哪个爬虫, 名字不同执行的爬虫项目也不同
        if spider.name == 'dangdangbook':
            self.db = pymysql.connect(host="localhost", user="root", password="root", db="py_spider")
            self.cursor = self.db.cursor()
            # 创建表语法
            sql = '''
            CREATE TABLE IF NOT EXISTS book_info(
                id int primary key auto_increment not null,
                title VARCHAR(255),
                now_price VARCHAR(255),
                pre_price VARCHAR(255),
                discount VARCHAR(255),
                author VARCHAR(255),
                author_date VARCHAR(255),
                author_cbs VARCHAR(255),
                star VARCHAR(255),
                comment VARCHAR(255),
                lable VARCHAR(255),
                detail TEXT)
            '''
            try:
                self.cursor.execute(sql)
                print("表创建成功...")
            except Exception as e:
                print(f"表创建失败:", e)

    def process_item(self, item, spider):
        if spider.name == 'dangdangbook':
            # SQL 插入语句
            sql = """INSERT INTO book_info(id, title, now_price, pre_price, discount, author, author_date, author_cbs, star, comment, lable, detail)
            values (%s, %s, %s, %s, %s, %s, %s, %s, %s, %s, %s, %s)"""
            # 执行 SQL 语句
            try:
                self.cursor.execute(sql, (
                    0, item['title'], item['now_price'], item['pre_price'], item['discount'], item['author'], item['author_date'],
                    item['author_cbs'], item['star'], item['comment'], item['lable'], item['detail']))
                # 提交到数据库执行
                self.db.commit()
                print('数据插入成功:', (
                    0, item['title'], item['now_price'], item['pre_price'], item['discount'], item['author'], item['author_date'],
                    item['author_cbs'], item['star'], item['comment'], item['lable'], item['detail']))
            except Exception as e:
                print(f'数据插入失败: {e}')
                # 如果发生错误就回滚
                self.db.rollback()
            return item  # 将数据提交给redis管道

    def close_spider(self, spider):
        # 关闭数据库连接
        if spider.name == 'dangdangbook':
            self.db.close()
5.6初始化请求
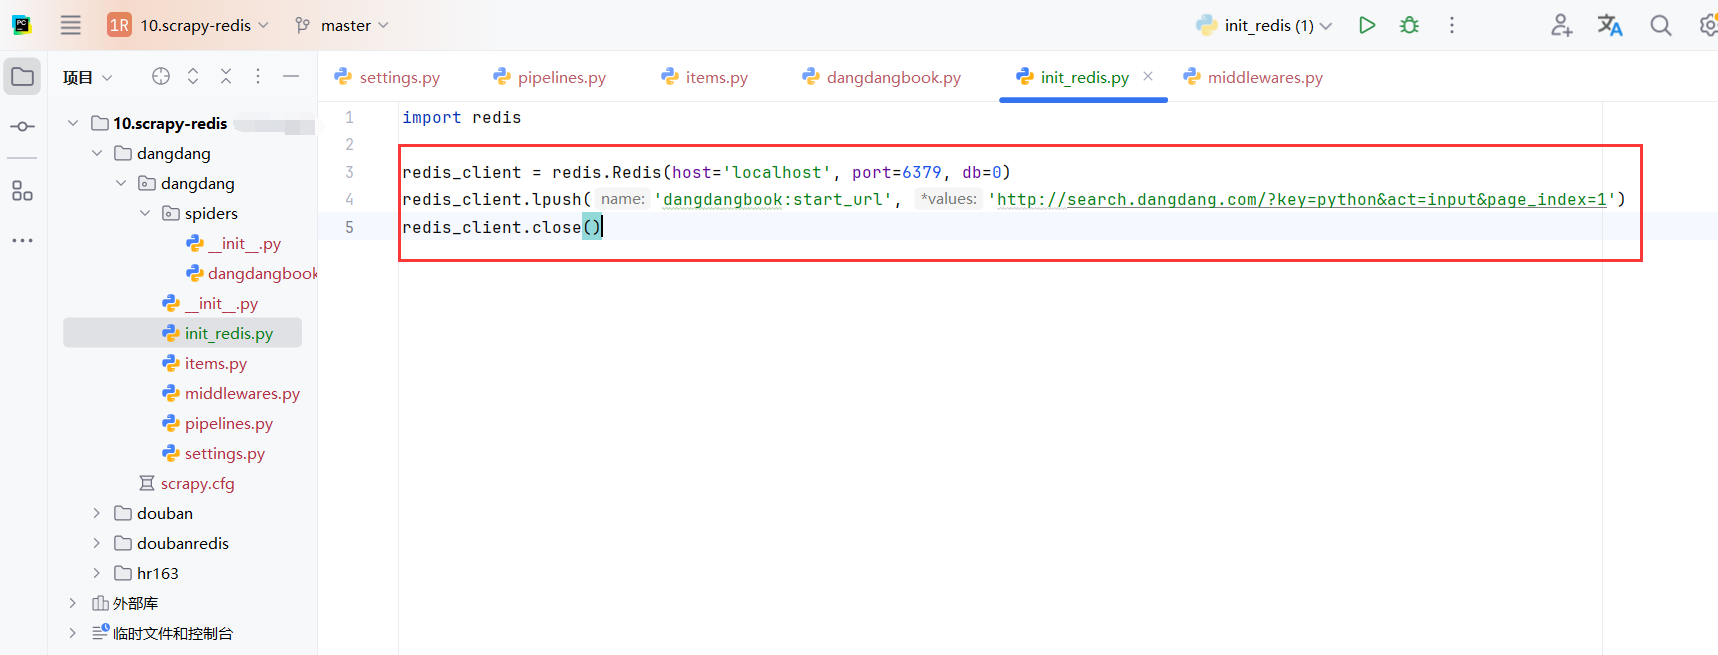
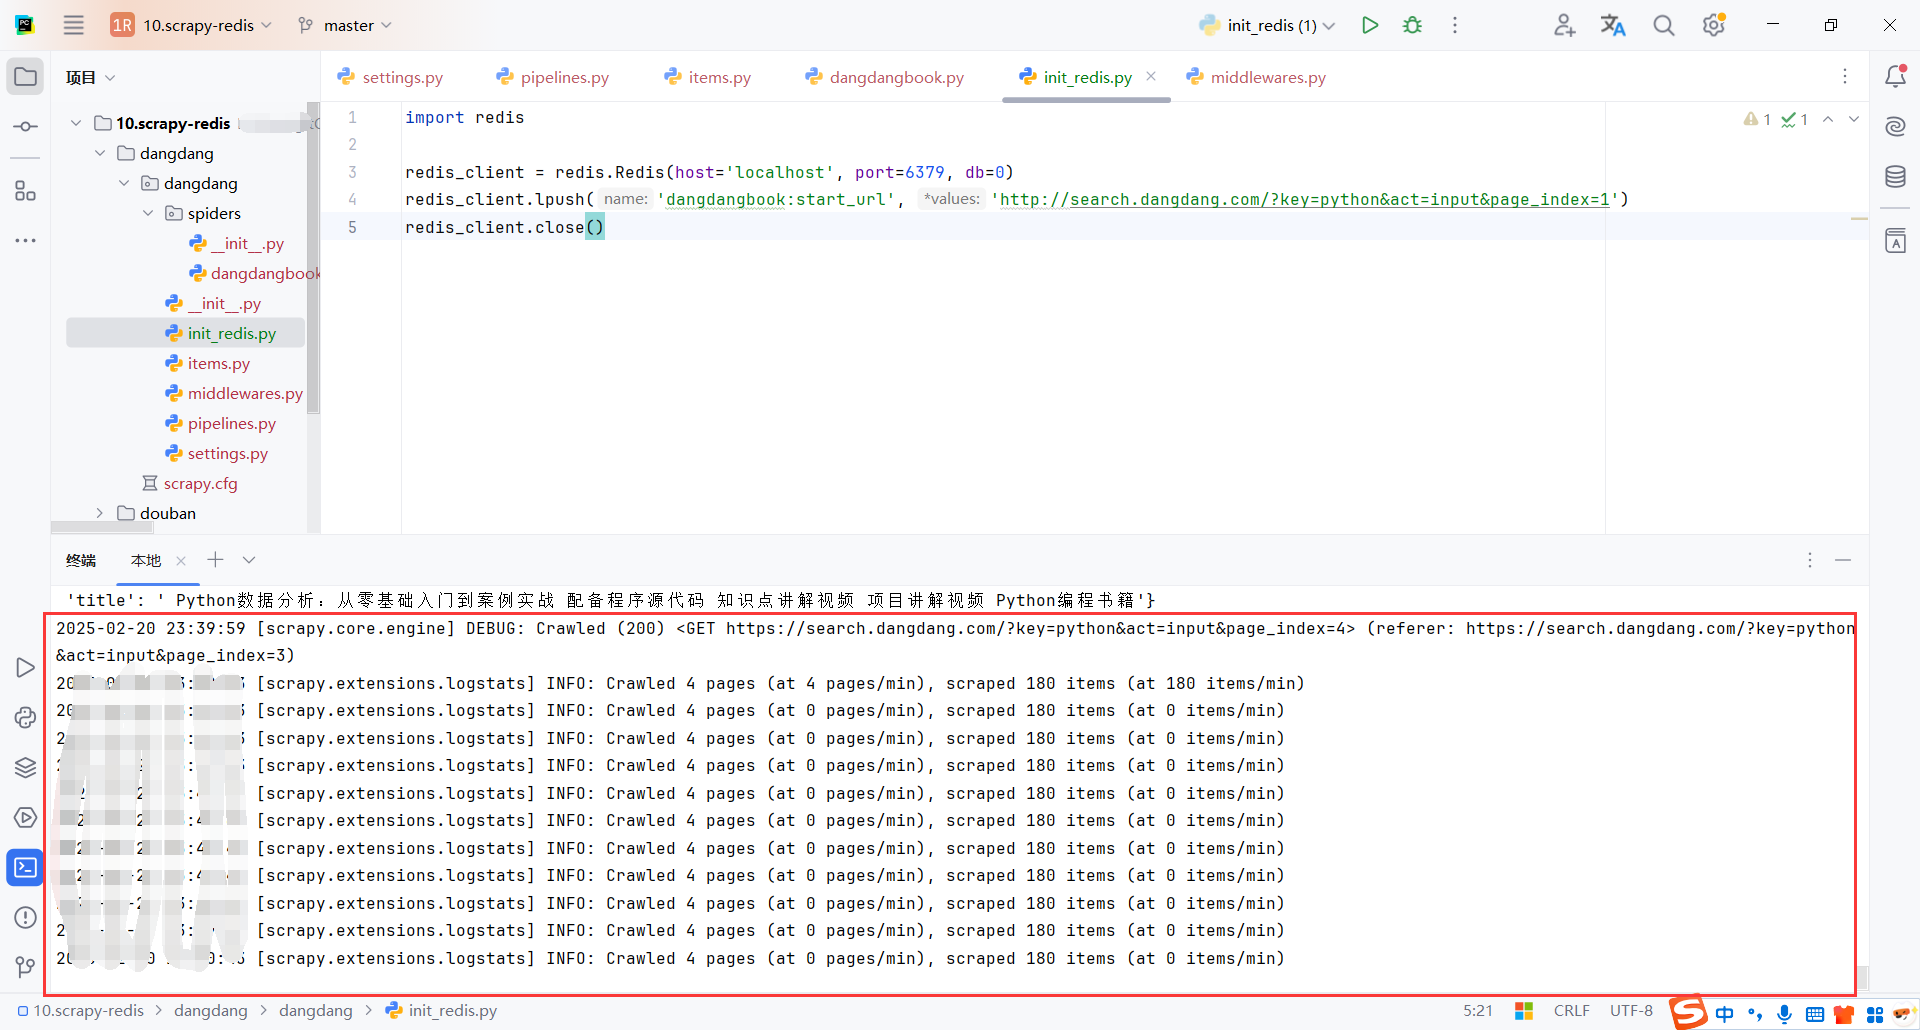
我们需要把首次请求(这里也就是第一页请求)存放到redis中,由不同的爬虫客户端从redis队列中获取请求链接进行处理(这里只有一个爬虫,由这个爬虫处理分页链接,所以只放了一个请求,没有考虑分布式)
import redis

redis_client = redis.Redis(host='localhost', port=6379, db=0)
redis_client.lpush('dangdangbook:start_url', 'http://search.dangdang.com/?key=python&act=input&page_index=1')
redis_client.close()
5.7启动爬虫
启动爬虫,如果reids队列中没有请求,爬虫会一直等待
scrapy crawl dangdangbook
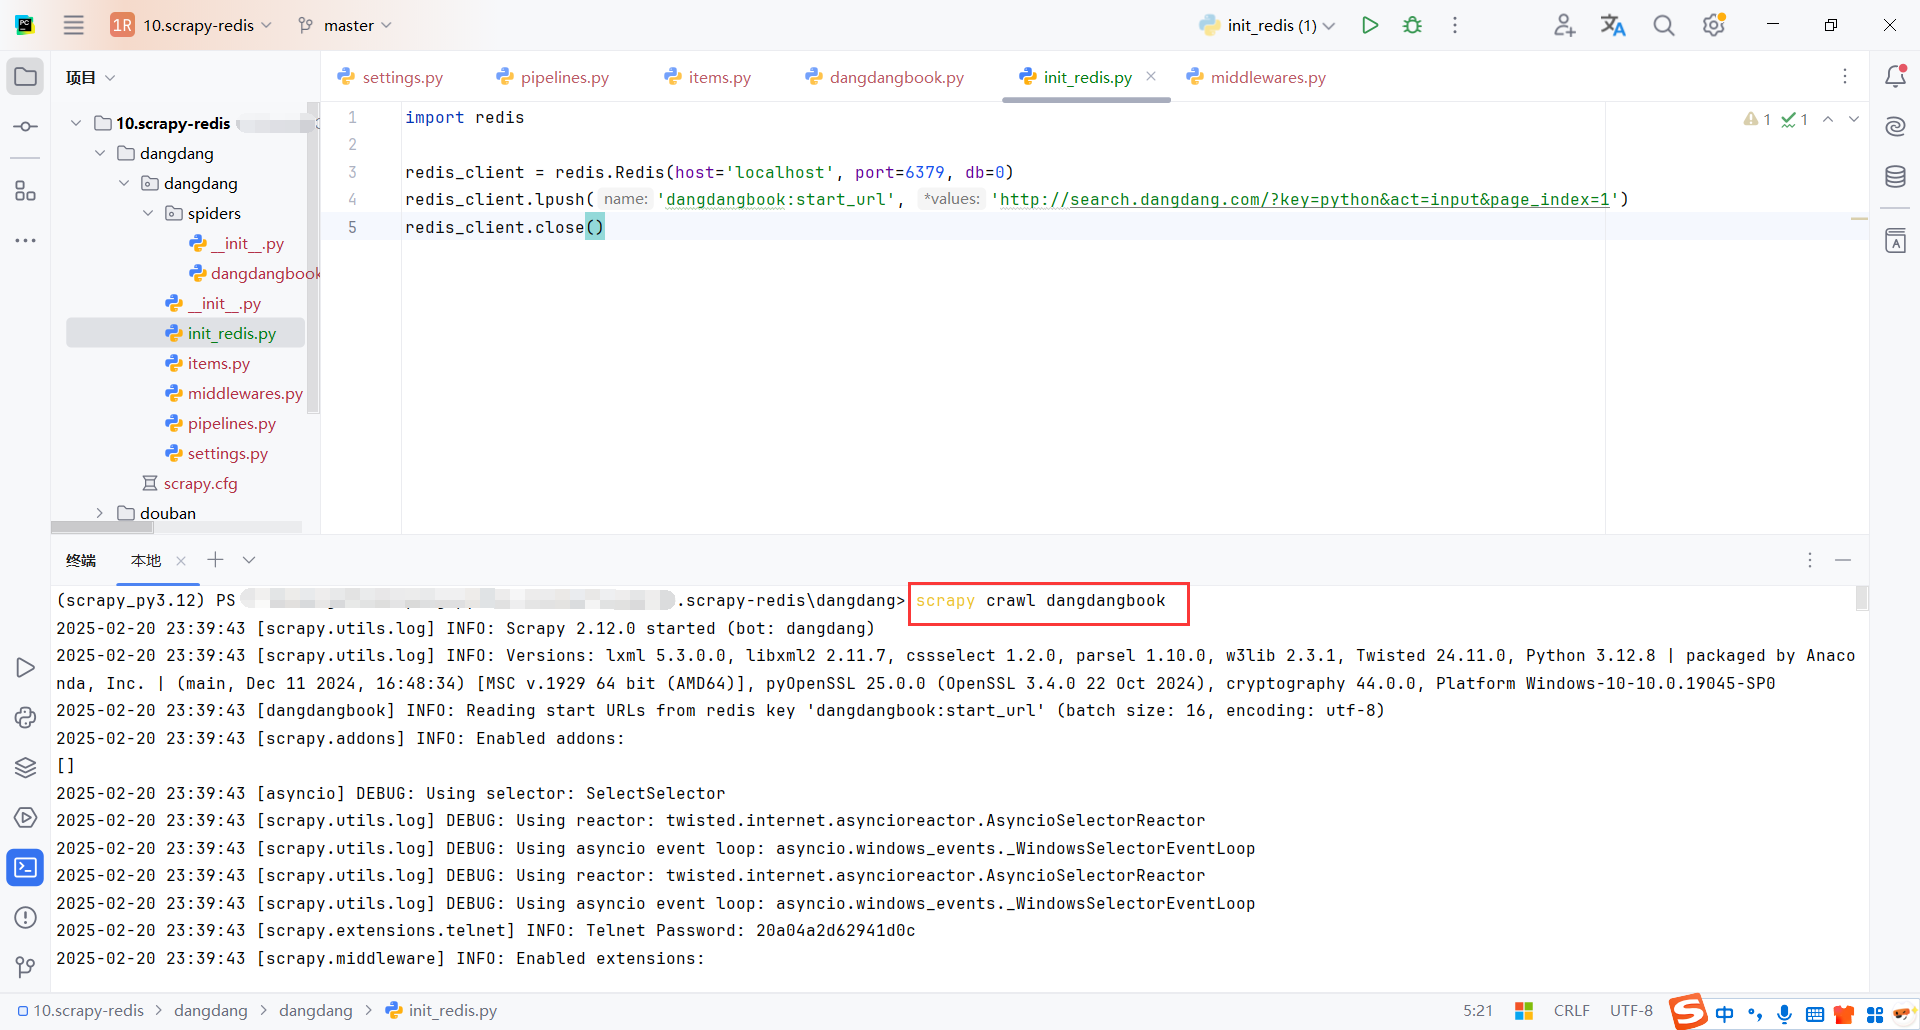
然后执行脚本初始化一个链接
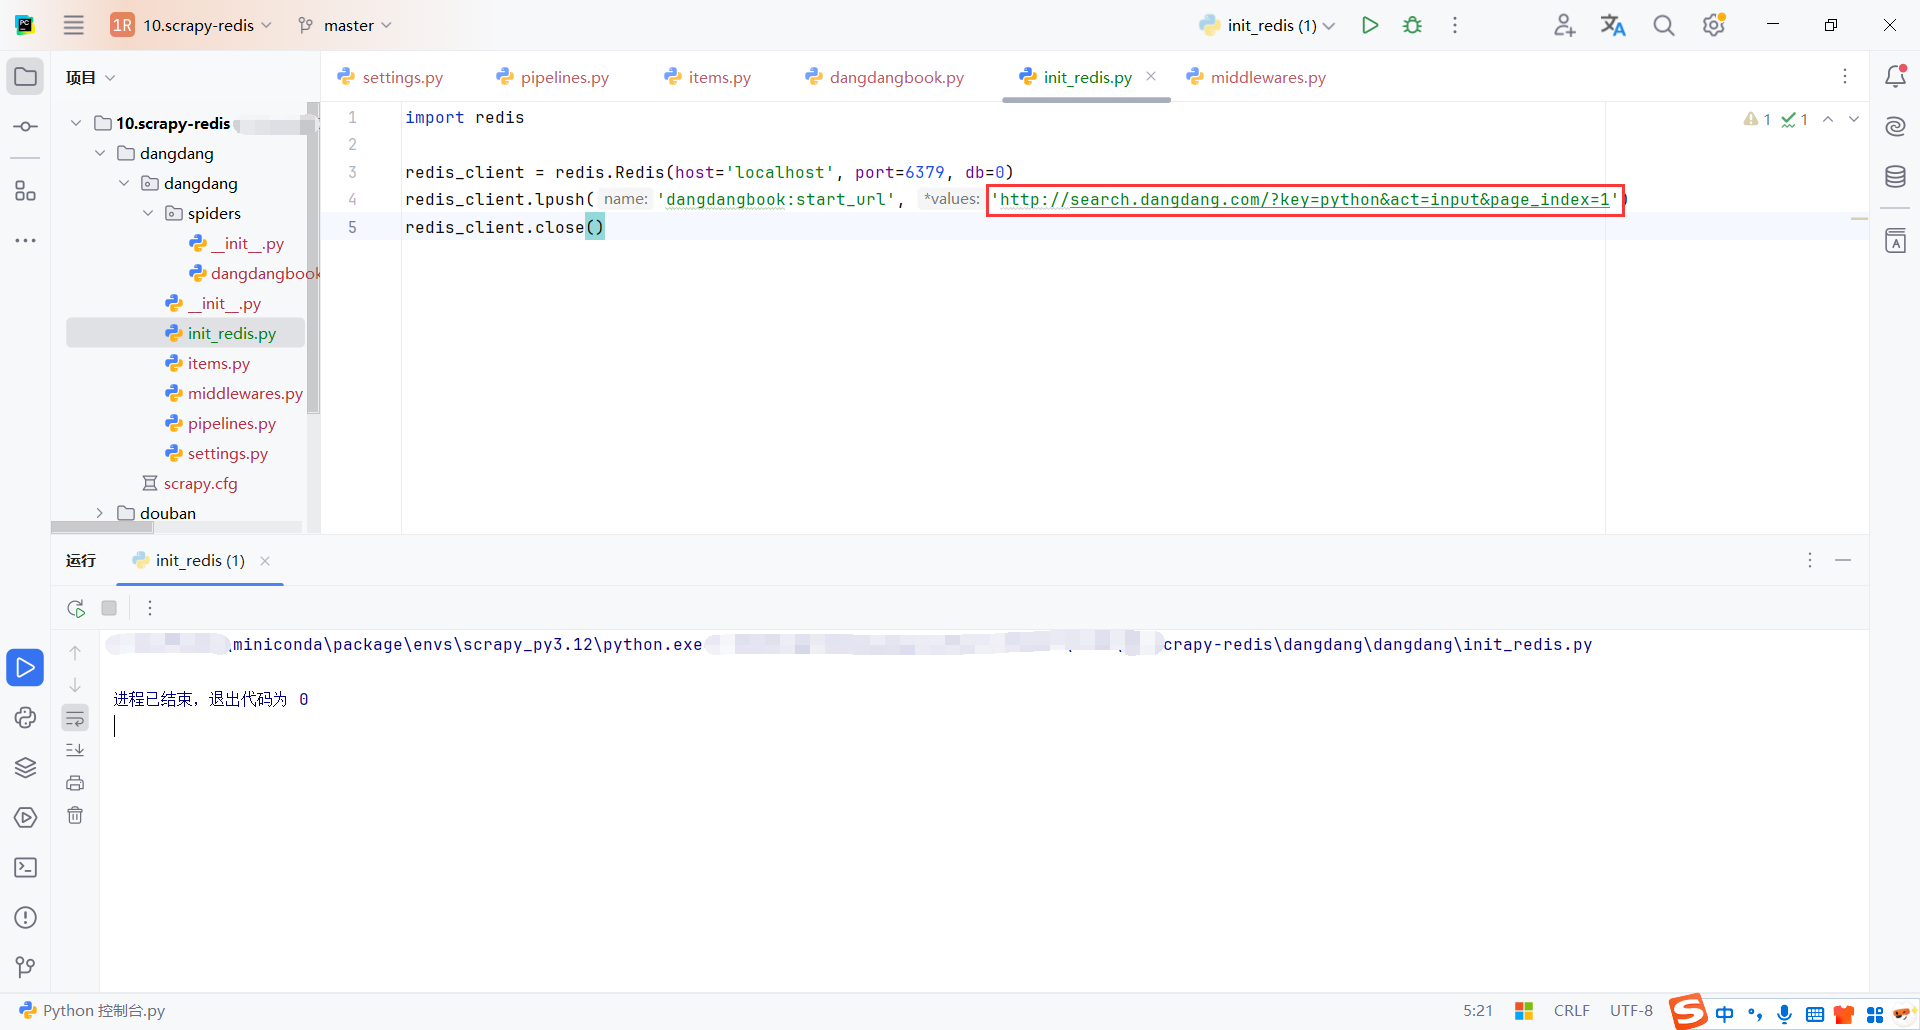
爬虫获取到链接就会开始处理

爬取完成后,爬虫客户端会一直等待,直到redis队列中有新的链接
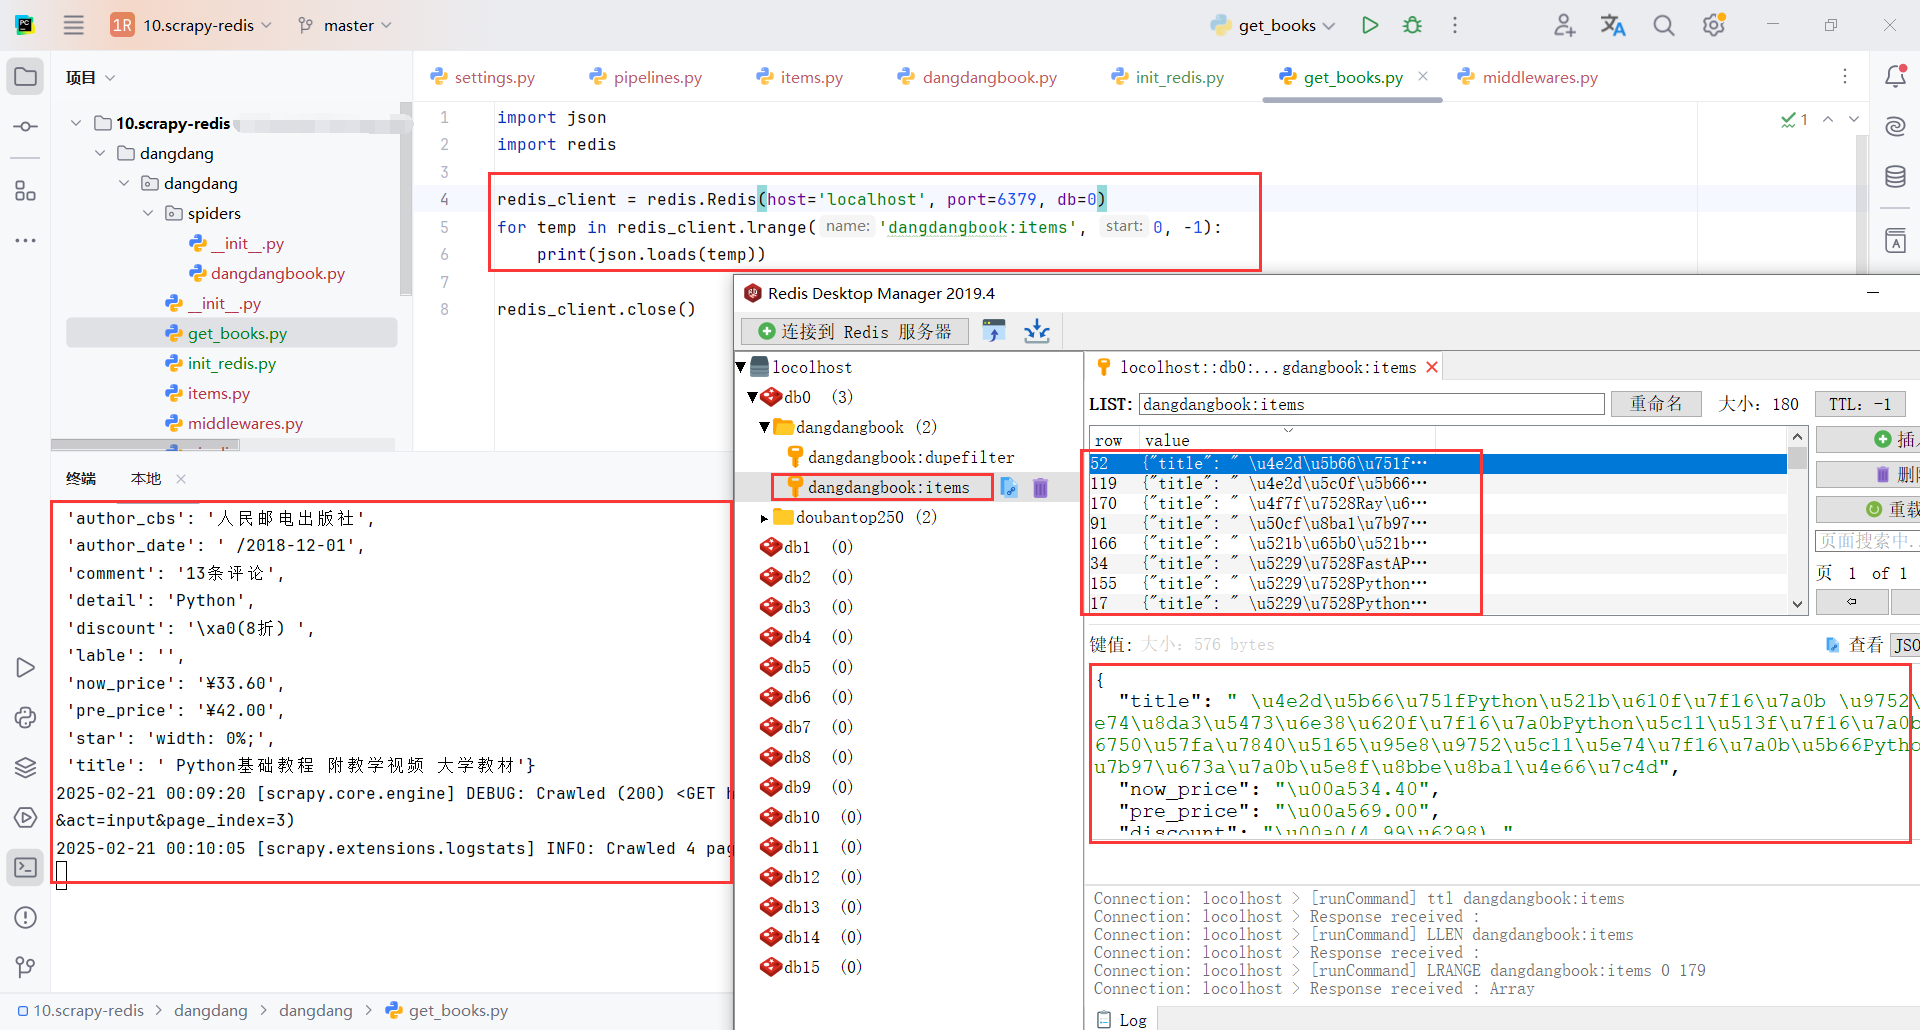
5.8从redis中获取数据
默认情况下,数据会存储到 {spider_name}:items 列表中。spider_name就是DangdangbookSpider的name
import json
import redis

redis_client = redis.Redis(host='localhost', port=6379, db=0)
for temp in redis_client.lrange('dangdangbook:items', 0, -1):
    print(json.loads(temp))

redis_client.close()
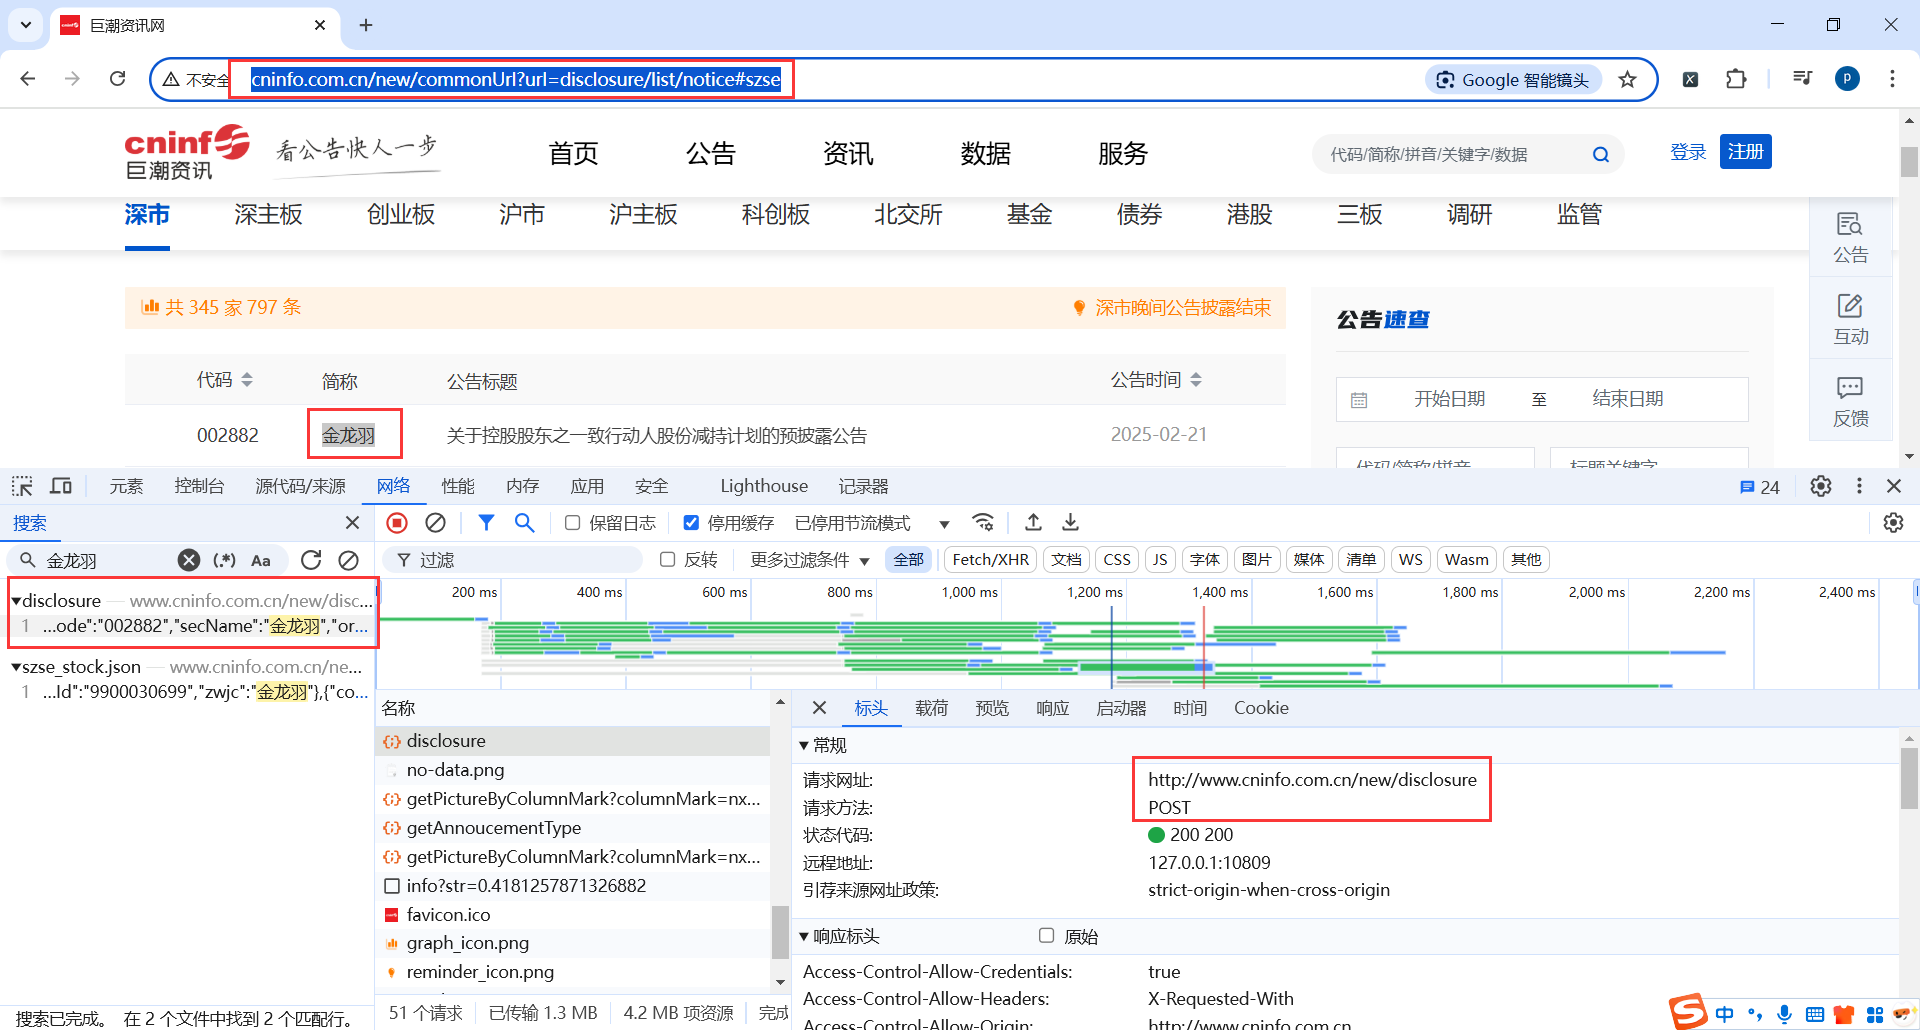
6.巨潮资讯网(scrapy-redis form)
地址:http://www.cninfo.com.cn/new/commonUrl?url=disclosure/list/notice#szse
6.1创建项目
# 创建项目
scrapy startproject cninfo

# 打开项目目录
cd cninfo

# 创建爬虫脚本
scrapy genspider cninfoss "http://www.cninfo.com.cn/new/disclosure"

6.2爬虫(CninfossSpider)
CninfossSpider 继承自 RedisSpider,并从 Redis 中获取启动 URL 列表 (redis_key = "cninfoss:start_urls")。通过 make_request_from_data 方法从 Redis 获取的数据,并使用 FormRequest 向指定 URL 发送表单数据请求。
# class CninfossSpider(scrapy.Spider):
class CninfossSpider(RedisSpider):
    name = "cninfoss"
    allowed_domains = ["www.cninfo.com.cn"]
    # start_urls = ["http://www.cninfo.com.cn/new/disclosure"]
    redis_key = "cninfoss:start_urls"

    def make_request_from_data(self, data):
        """
        :param data: data参数是从redis中获取到的列表 - [url, form_data, meta]
        :return:
         """
        url = 'http://www.cninfo.com.cn/new/disclosure'
        data = json.loads(data)
        form_data = data.get('form_data')
        print(form_data)

        headers = {
            'User-Agent': 'Mozilla/5.0 (Macintosh; Intel Mac OS X 10_15_7) AppleWebKit/537.36 (KHTML, like Gecko) Chrome/120.0.0.0 Safari/537.36'
        }

        return FormRequest(url=url, headers=headers, formdata=form_data, callback=self.parse)

    def parse(self, response):
        print(f"返回信息:{response.json()}")
6.3scrapy-redis配置
基本的redis配置
"""scrapy-redis配置"""
# 调度器类
SCHEDULER = "scrapy_redis.scheduler.Scheduler"
# 指纹去重类
DUPEFILTER_CLASS = "scrapy_redis.dupefilter.RFPDupeFilter"
# 是否在关闭时候保留原来的调度器和去重记录,True=保留,False=清空
SCHEDULER_PERSIST = True
# Redis服务器地址
REDIS_URL = "redis://127.0.0.1:6379/0"
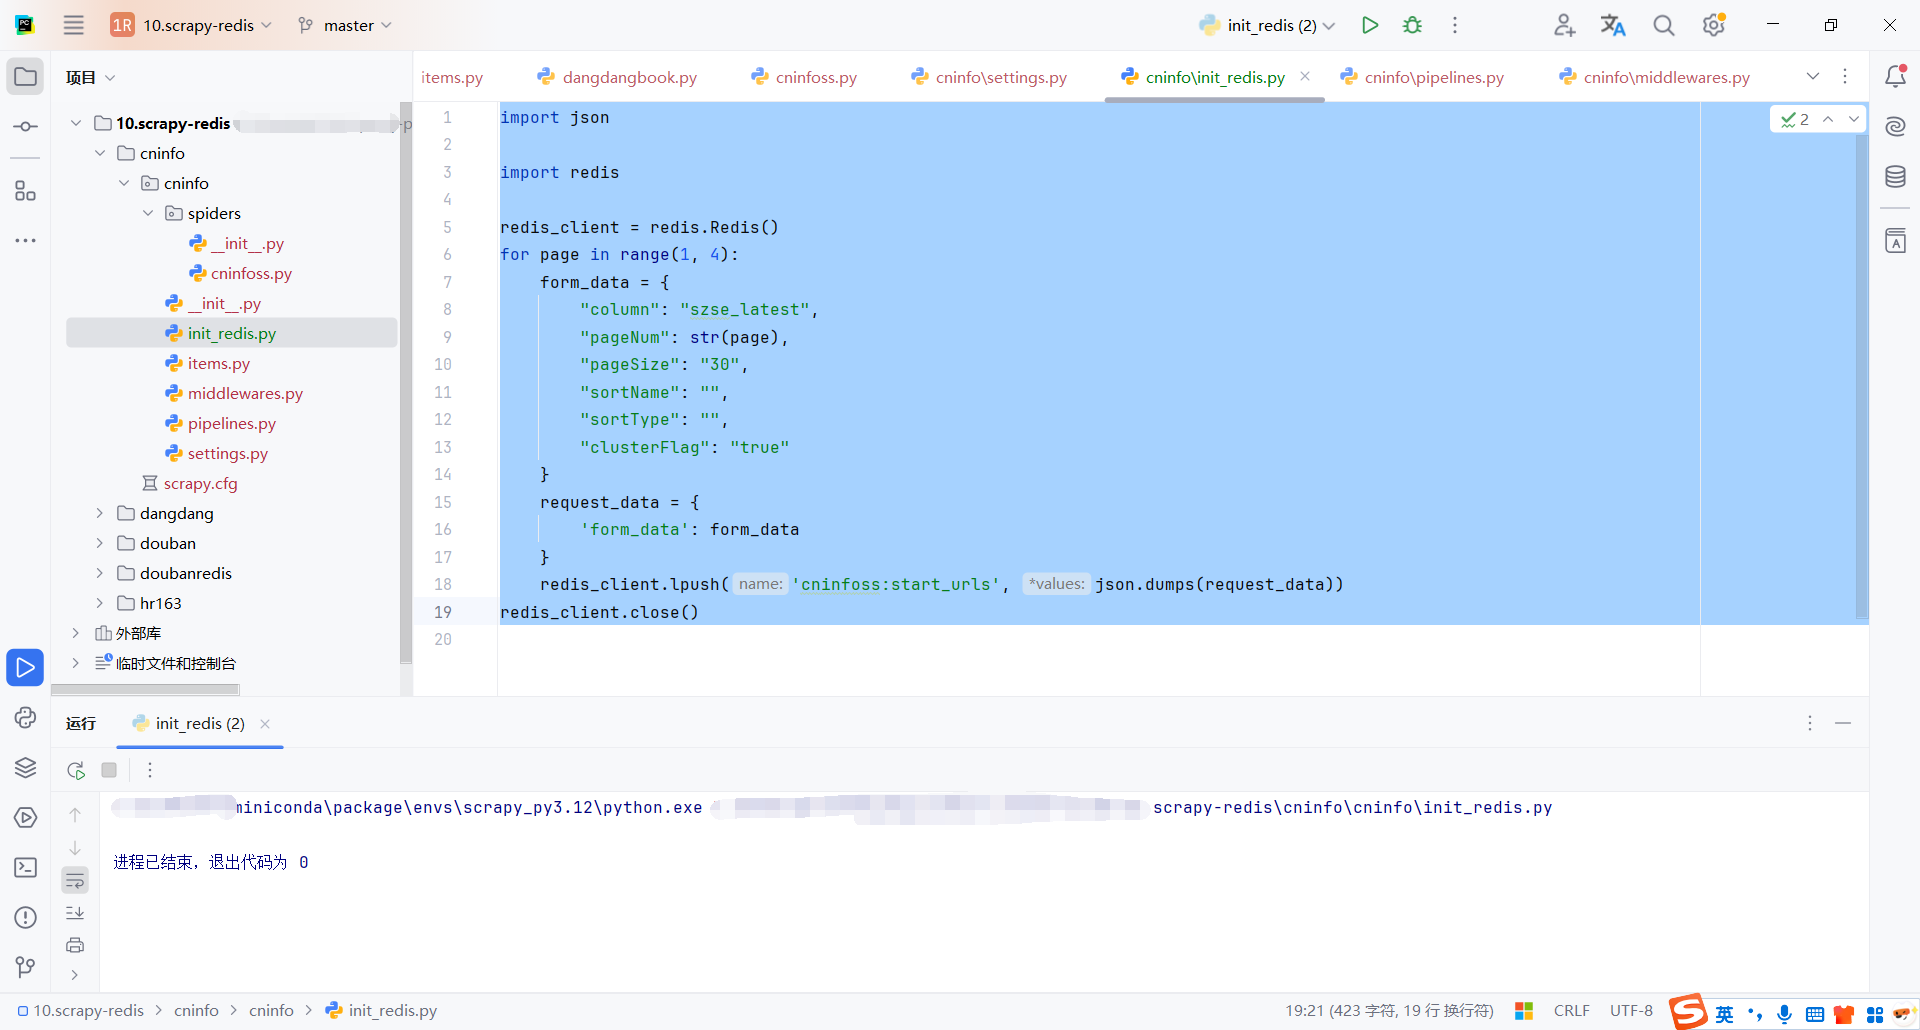
6.4初始化请求
将需要请求的表单参数存储到redis中
import json
import redis
redis_client = redis.Redis()
for page in range(1, 4):
form_data = {
"column": "szse_latest",
"pageNum": str(page),
"pageSize": "30",
"sortName": "",
"sortType": "",
"clusterFlag": "true"
}
request_data = {
'form_data': form_data
}
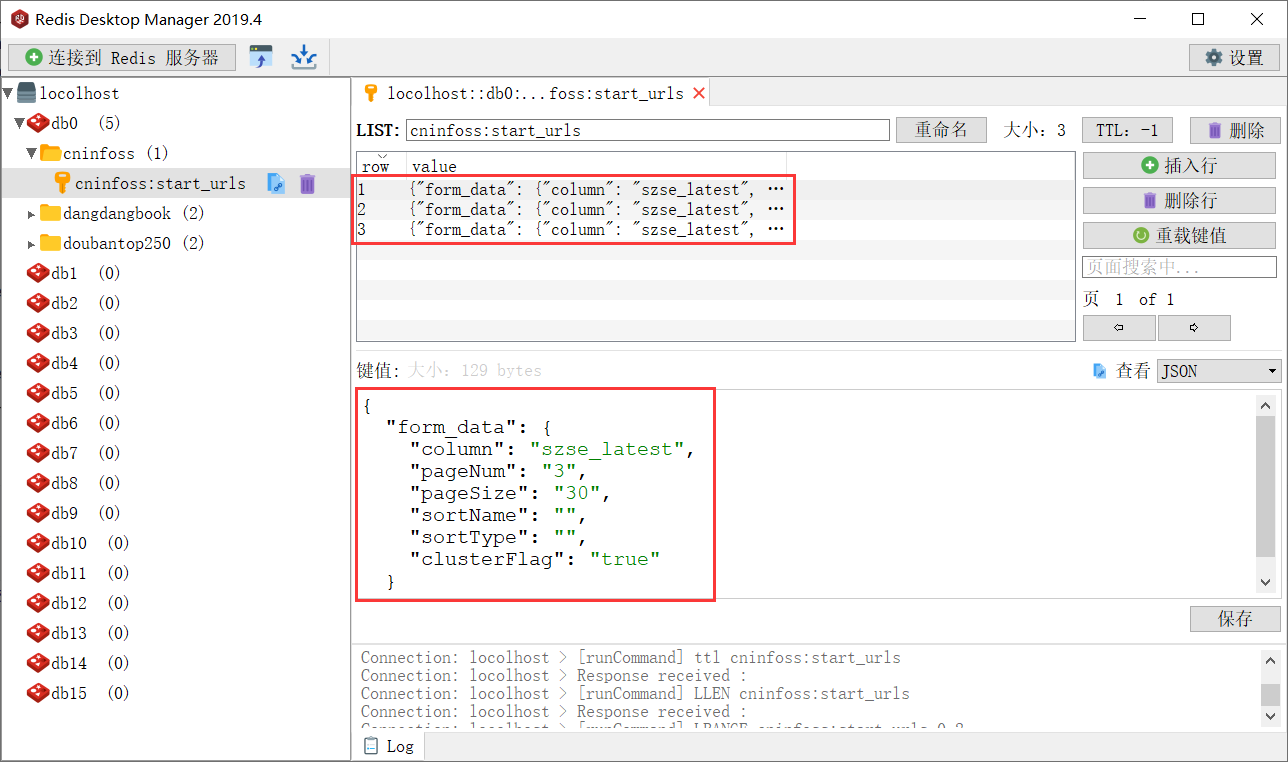
redis_client.lpush('cninfoss:start_urls', json.dumps(request_data))
redis_client.close()
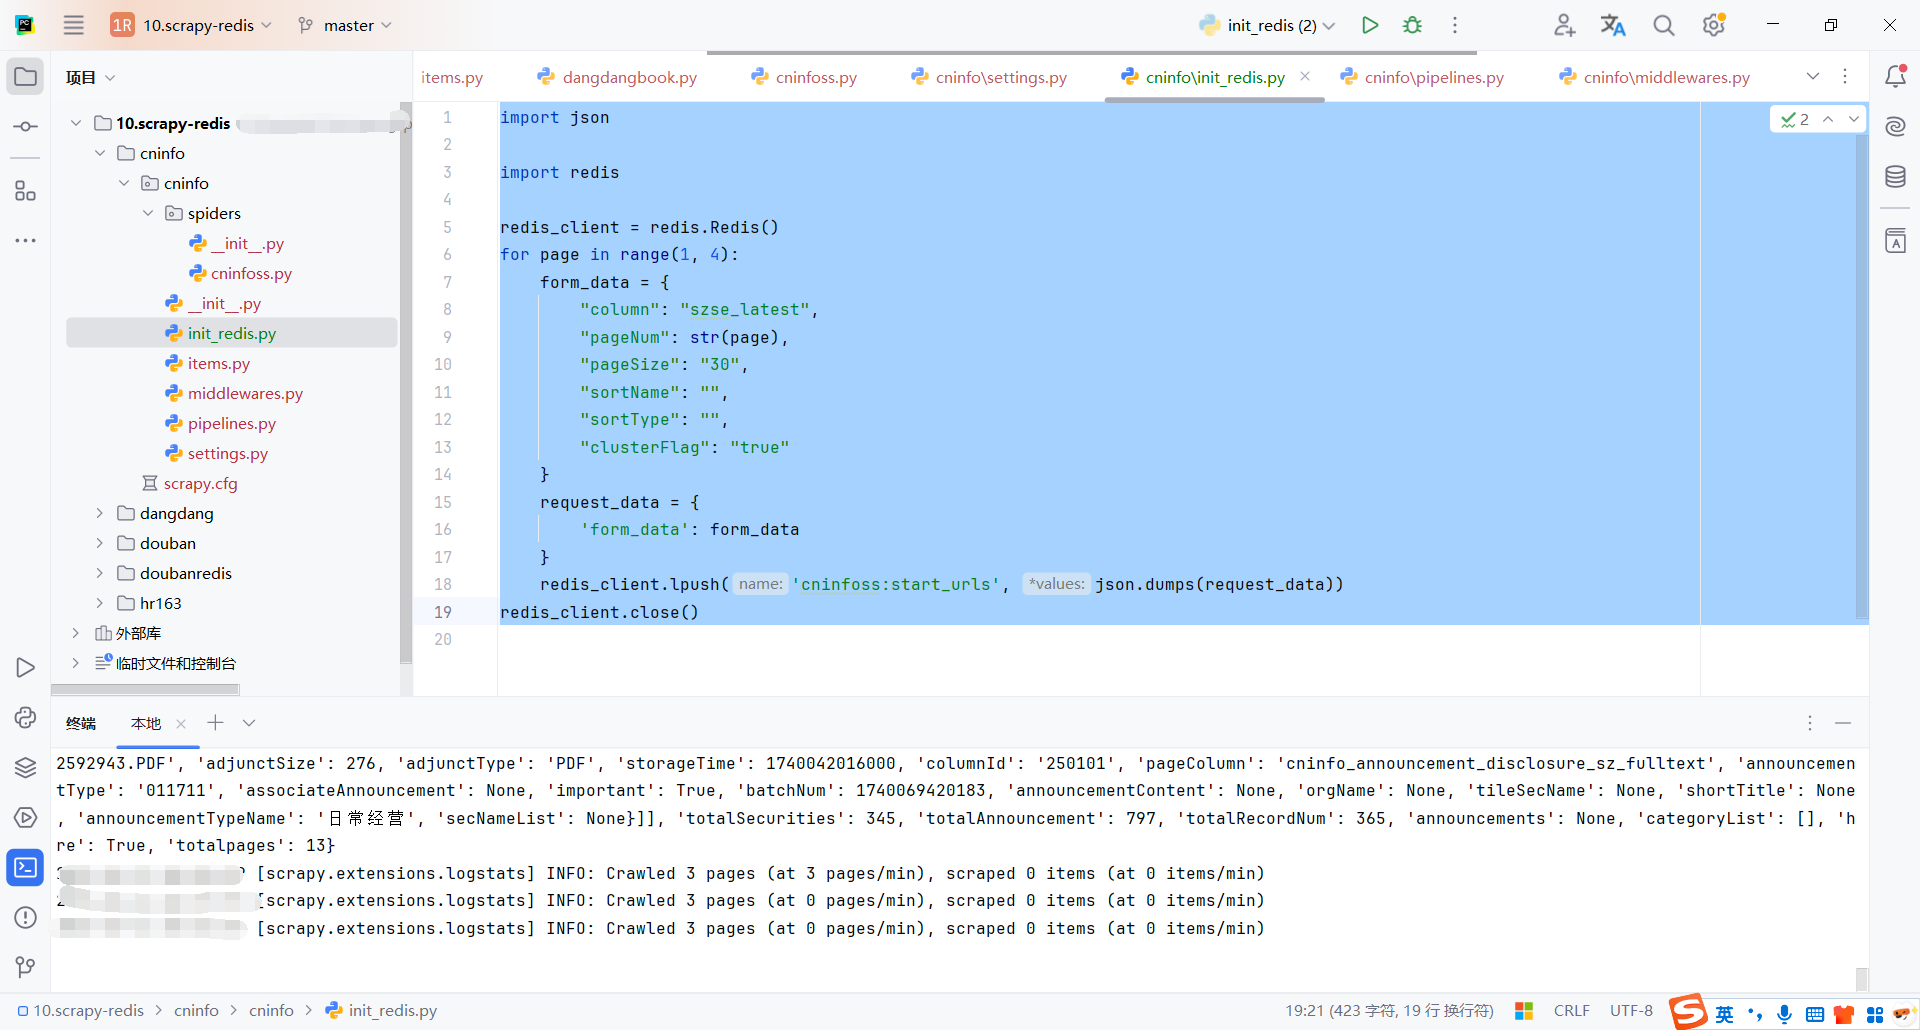
6.5启动爬虫
启动命令,启动完成后会发现爬虫会一直等待
scrapy crawl cninfoss
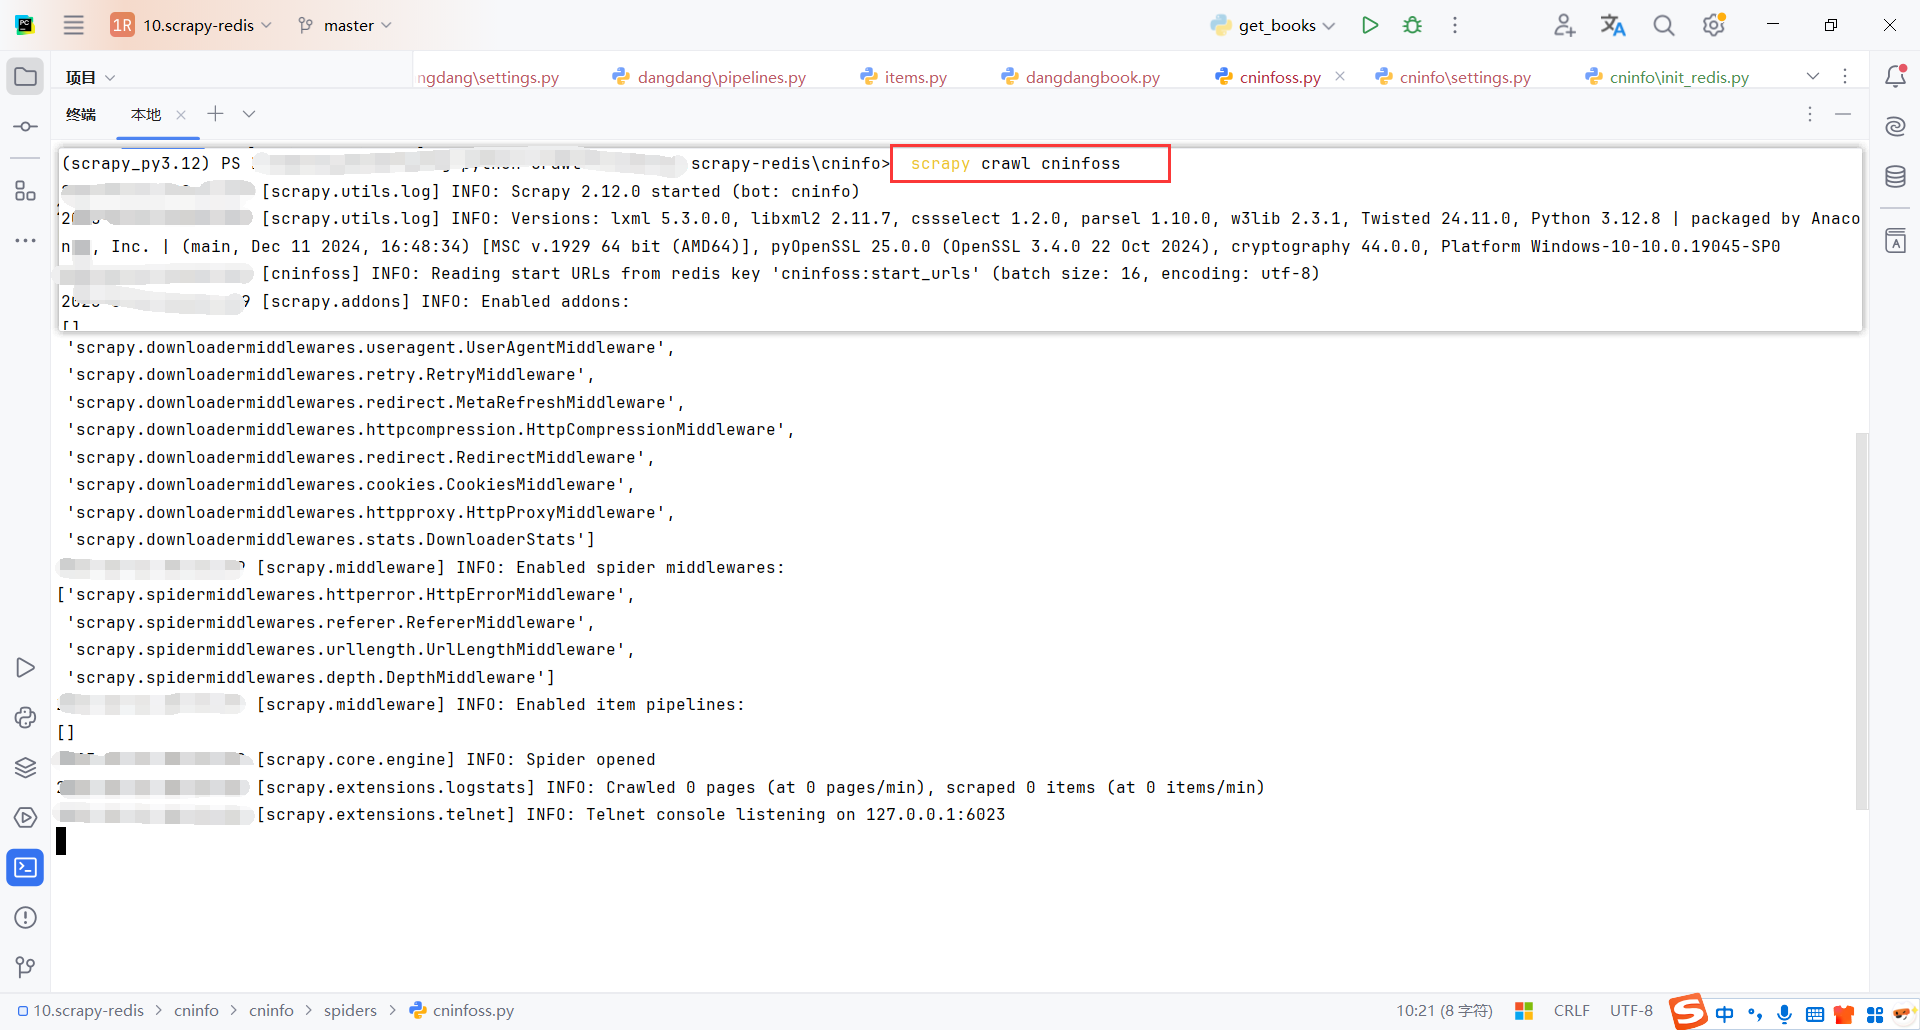
执行初始化请求脚本
这里测试只爬取3页,存储3页的表单数据
爬虫执行完请求后,会继续等待,直到新的请求进入队列
📌 创作不易,感谢支持!
每一篇内容都凝聚了心血与热情,如果我的内容对您有帮助,欢迎请我喝杯咖啡☕,您的支持是我持续分享的最大动力!


 浙公网安备 33010602011771号