


pytest 1.简单介绍一,安装和如何运行
一、pytest介绍:
1.是一个非常成熟的python接口测试框架,试用版起来比较轻便灵活容易上手。
2.pytest可以和selenium,requests,appium结合实现web自动化,接口自动化,APP自动化 。
3.pytest可以实现测试用例的跳过以及rerun失败用例重试。
4.pytest可以和allure生成非常美观的测试报告。
5.pytest、可以和jenkins持续集成。
6.pytest有很多非常强大的插件,可是实现很多实用的操作。
pytest-html (生成thml格式的自动化测试报告)
pytest-xdist 测试用例分布式执行,多cpu分发,多线程运行的插件。
pytest-ordering 用于改变测试用例的执行顺序
pytest-rerunfailures 用例失败后重新跑
allure-pytest 用于生成美观的测试报告。
首先来介绍他的安装:
新建一个requirements.txt,
通过 pip install -r requirements.txt
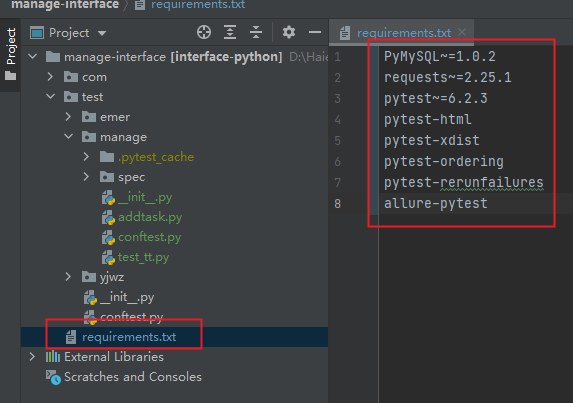
或者直接使用命令 : pip install -U pytest,一个一个去安装,这样比较麻烦。
通过命令 :pytest --version 来查看版本信息
二、首先来创建第一个简单的demo,可以在pycharm里面创建,并且运行,运行只需要配置一下就可以
规则及基础应用:
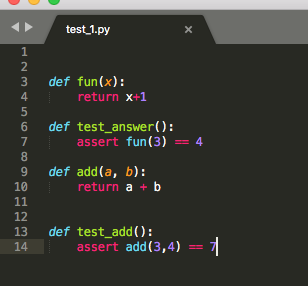
1.模块名必须以test_开头_test结尾,文件名字是 test_*.py or *_test.py
2.测试类必须以Test开头,并且不能有init方法。
3.测试方法必须以test_开头
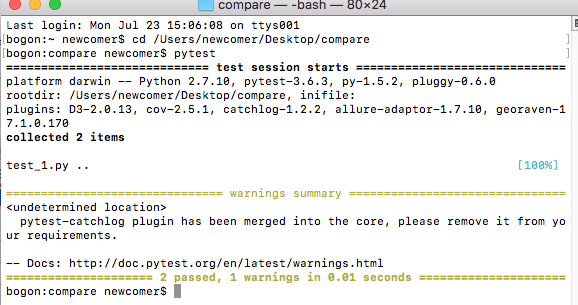
# content of test_1.py
def func(x):
    return x + 1

def test_answer():
    assert func(3) == 5
![]()
三种运行方式:
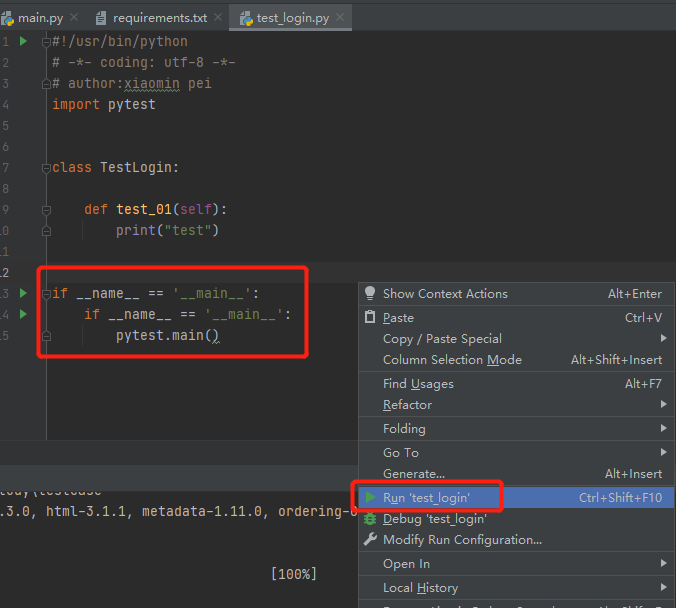
1.主函数模式
(1)运行所有:pytest.main()
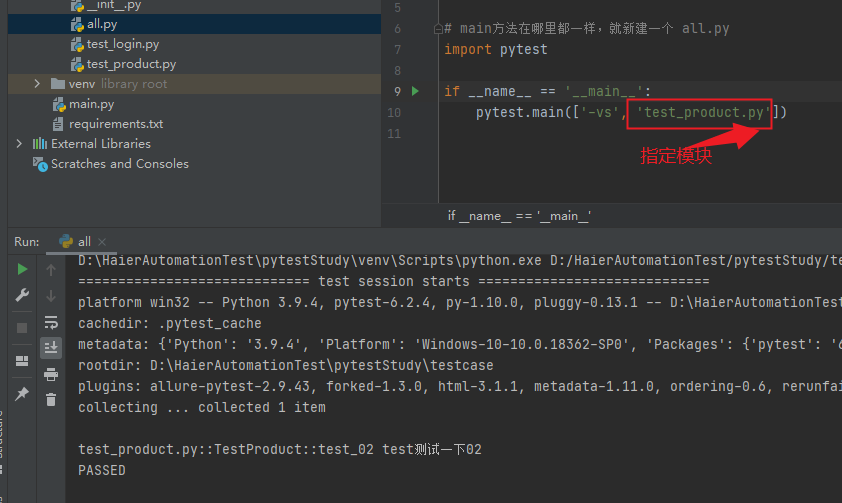
(2)指定模块:pytest.main('-vs','test_***.py')
发现结果没有把print里面的内容打印出来,那是因为给主函数没有增加参数。(最下面介绍参数)
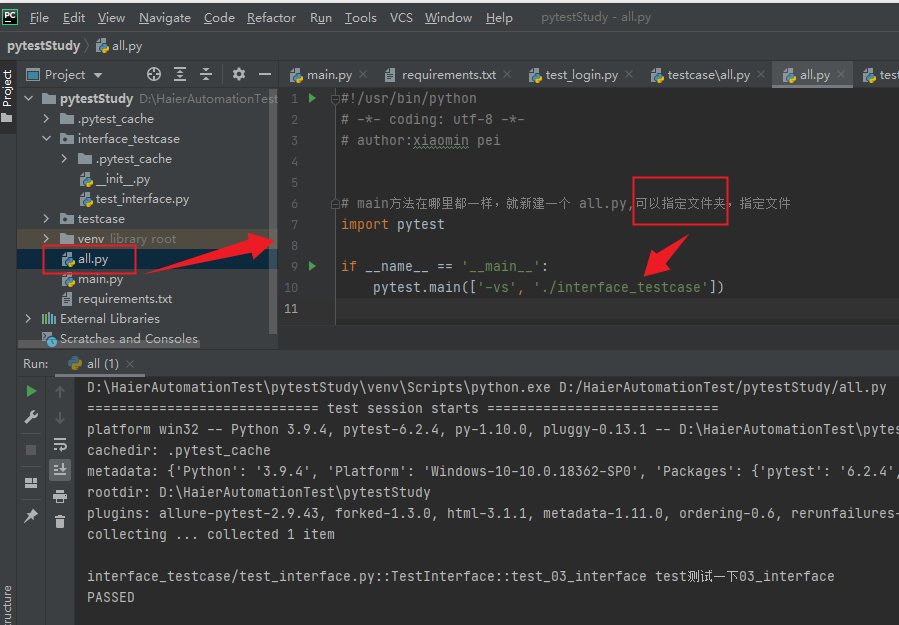
(3)指定目录去执行:pytest.main(['-vs', './interface_testcase'])
执行文件夹下的case:
![]()
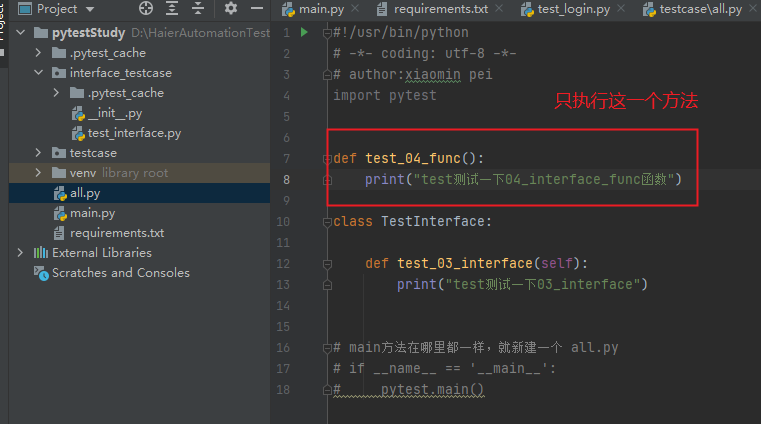
(4)通过nodeid指定用例执行:nodeid有模块名,分隔符,类名,方法名,函数名组成。pytest.main(['-vs', './interface_testcase/test_interface.py::test_04_func']),
如果想执行类里面的test_03_interface方法的话,需要执行这个命令:pytest.main(['-vs', './interface_testcase/test_interface.py::TestInterface::test_03_interface'])
![]()
2.命令行模式
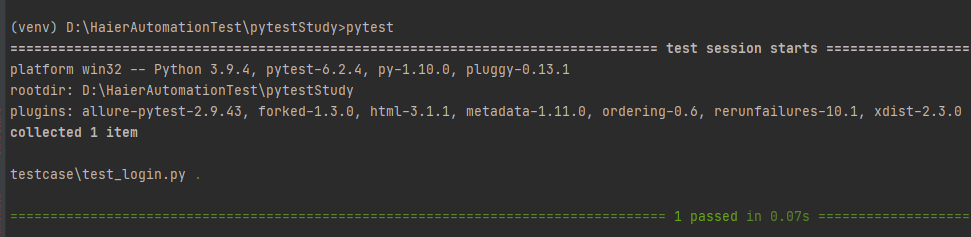
   (1)运行所有:pytest
  (2)指定模块:pytest -vs test_***.py
  (3)指定目录:pytest -vs ./interface_testcase
  (4)通过nodeid制定用例执行:pytest -vs ./interface_testcase/test_interface.py::test_04_func
                 pytest -vs ./interface_testcase/test_interface.py::TestInterface::test_03_interface
![]()
![]()
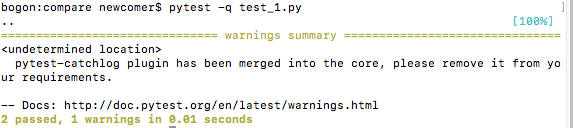
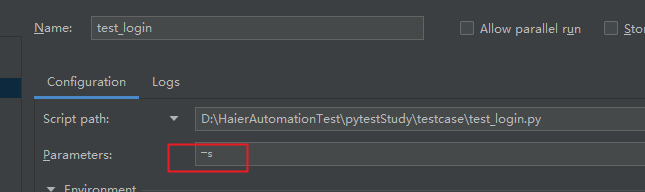
2(1)、进入到文件当前目录,然后输入命令pytest 就会执行所有的文件,也可以指定要执行的文件:pytest -q test_??.py

指定执行的文件名字
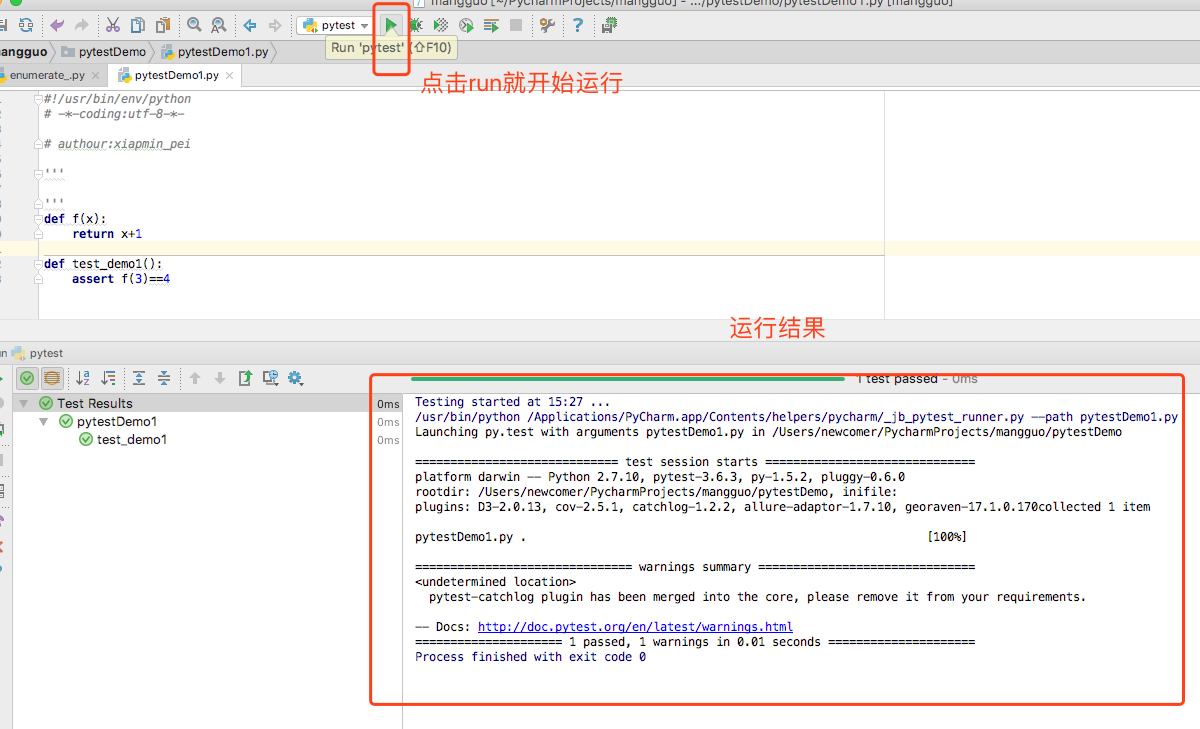
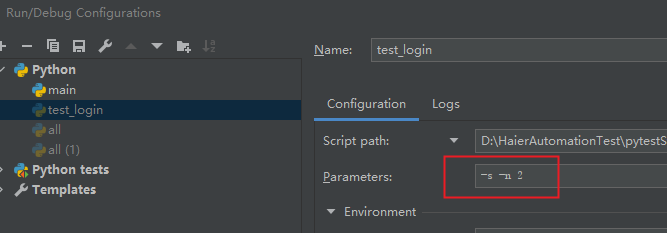
2(2)、在pycharm里面配置如下:
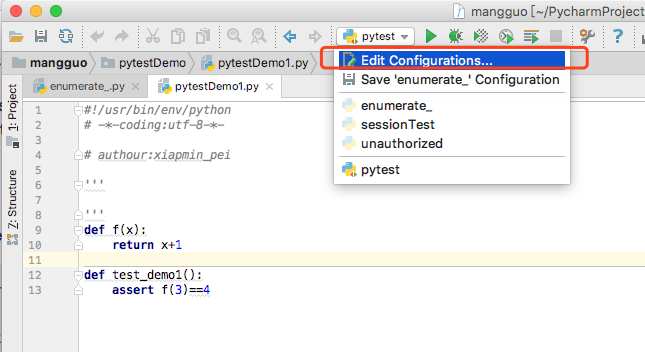
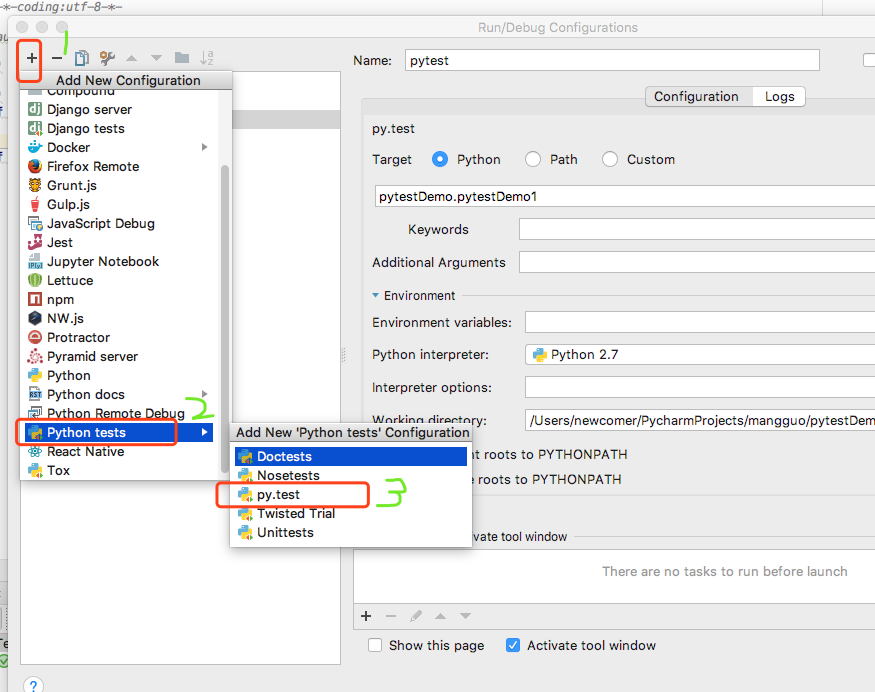
Name随便起一个名字,我起名为pytest

以下是运行结果:
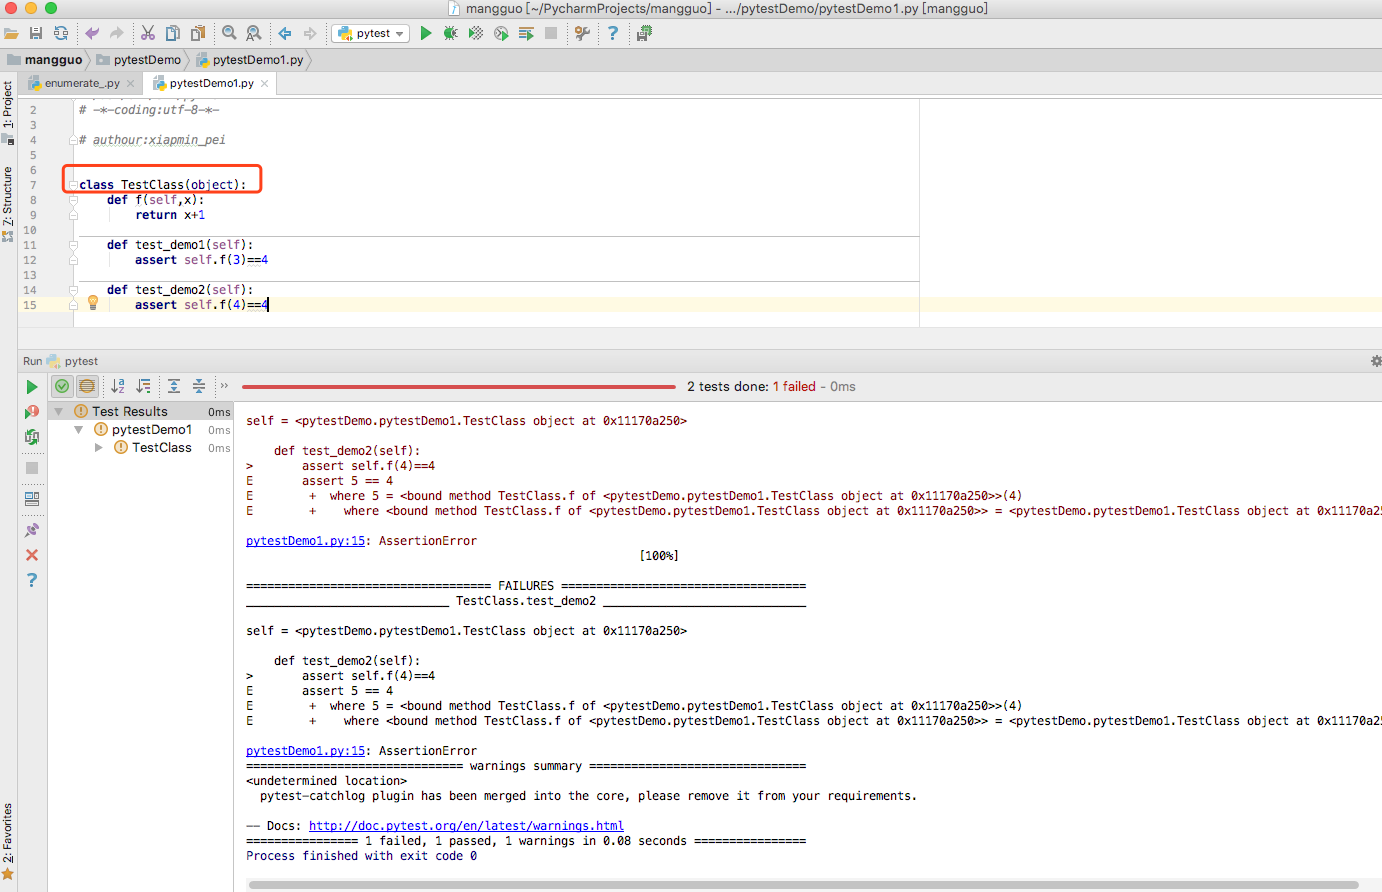
换成类也是一样的,多个测试方法在同一个类中:
3.通过读取pytest.ini文件运行(一般都用这个方法)
pytest.ini文件是pytest单元框架的核心配置文件。
(1)位置放在根目录下,名称必须是pytest.ini
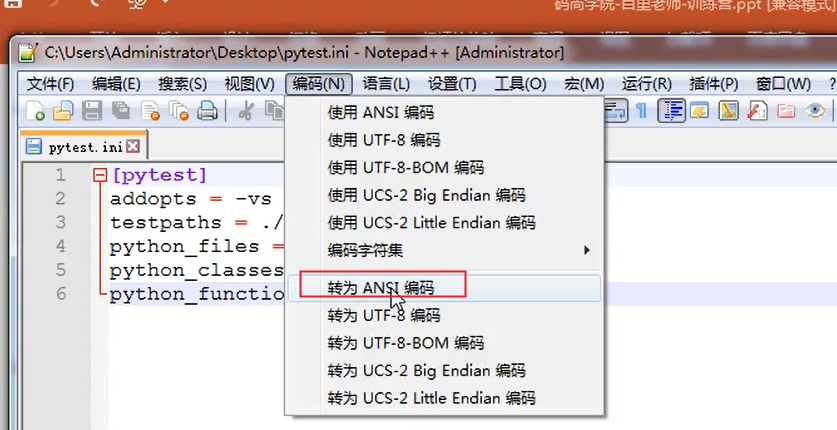
(2)编码:必须是ansi,可以使用notpad++修改编码格式,当有中文的时候,可能要改变编码格式为GB2312
(3)作用:改变pytest默认的行为,也就是默认的测试用例规则。
(4)运行规则:不管是主函数的模式运行,还是命令行模式运行,都会去读取这个配置文件。
在项目里面,要把所有的中文注释全部去掉,不然编码不支持,下面是ini文件的内容。,如果报错,第一部删掉里面的中文注释,第二步复制在notepad++里面修改了编码格式为ansi格式
![]()
[pytest] #命令行参数,用空格分隔,这样main函数或者命令行里面,不需要在输入-vs addopts = -vs #测试用例文件夹,可自己配置,测试用例的路径 testpaths = ./testcase #配置测试搜索的文件名称,模块名的规则 python_files = test_*.py #配置测试搜索的测试类名,类名规则,只测试某个开头的 python_classes = Test* #配置测试搜索的测试函数名,方法名的规则 python_functions = test_*
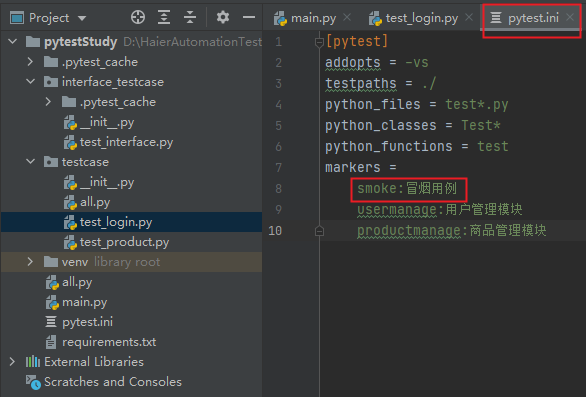
# 标记,测试用例分组执行,比如有冒烟的,有非冒烟的,有流程的业务的,有各种莫夸的等等
markets =
smoke:冒烟用例
product:商品管理
donate:捐赠管理模块
参数详解:
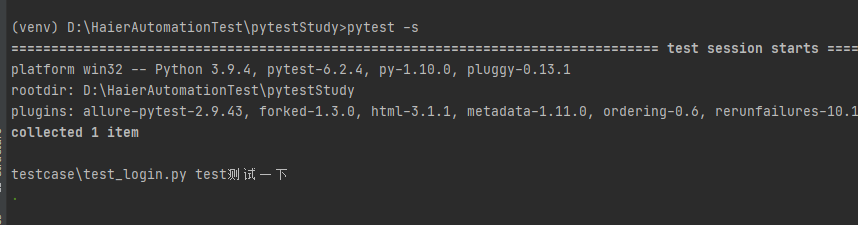
-s:表示输出调试信息,包括print打印的信息
-v:表示输出详细的信息,但是没有打印信息
-vs:综合以上2个,详细的+打印的信息都输出
-n: 支持多线程去运行
--reruns=num 失败的用例重新跑num次,总共跑num+1次
(-n)比如以下代码:
![]()
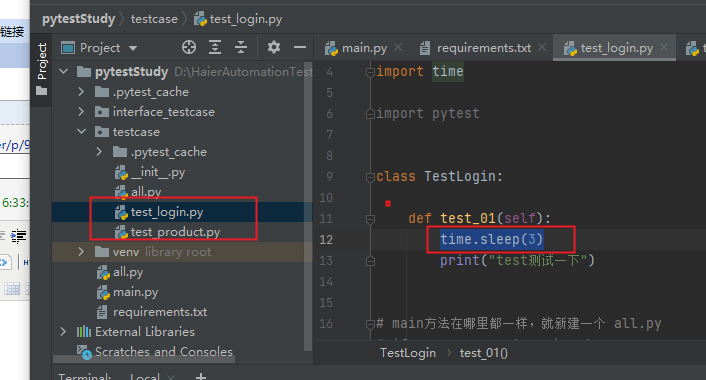
#!/usr/bin/python
# -*- coding: utf-8 -*-
# author:xiaomin pei
import time

import pytest

class TestLogin:

    def test_01(self):
        time.sleep(3)
        print("test测试一下")
# author:xiaomin pei
import time
import pytest

class TestProduct:

    def test_02(self):
        time.sleep(3)
        print("test测试一下02")
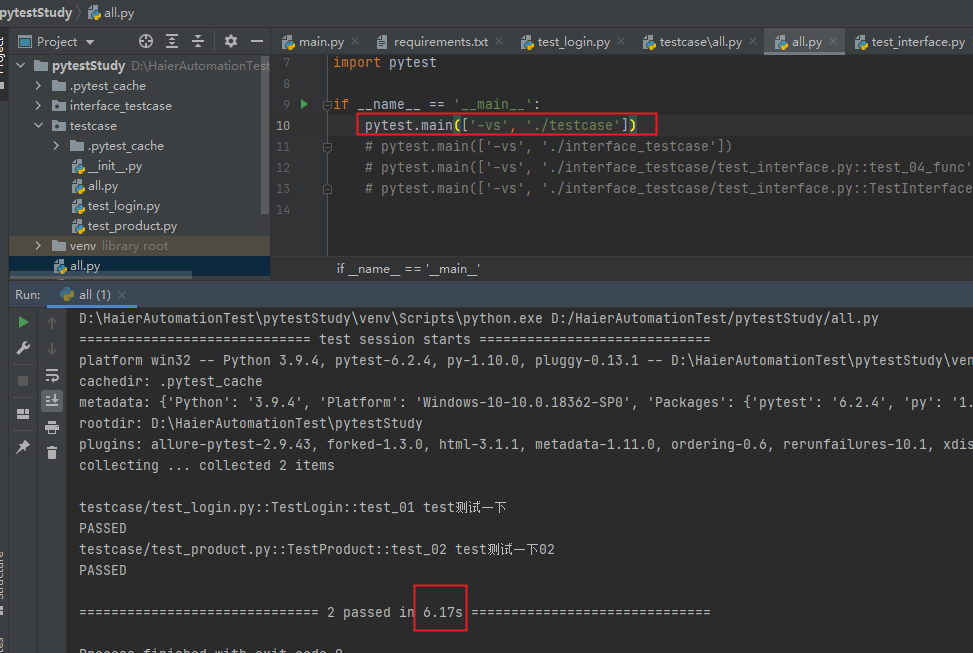
#!/usr/bin/python
# -*- coding: utf-8 -*-
# author:xiaomin pei

# main方法在哪里都一样,就新建一个 all.py,可以指定文件夹,指定文件
import pytest

if __name__ == '__main__':
    pytest.main(['-vs', './interface_testcase'])
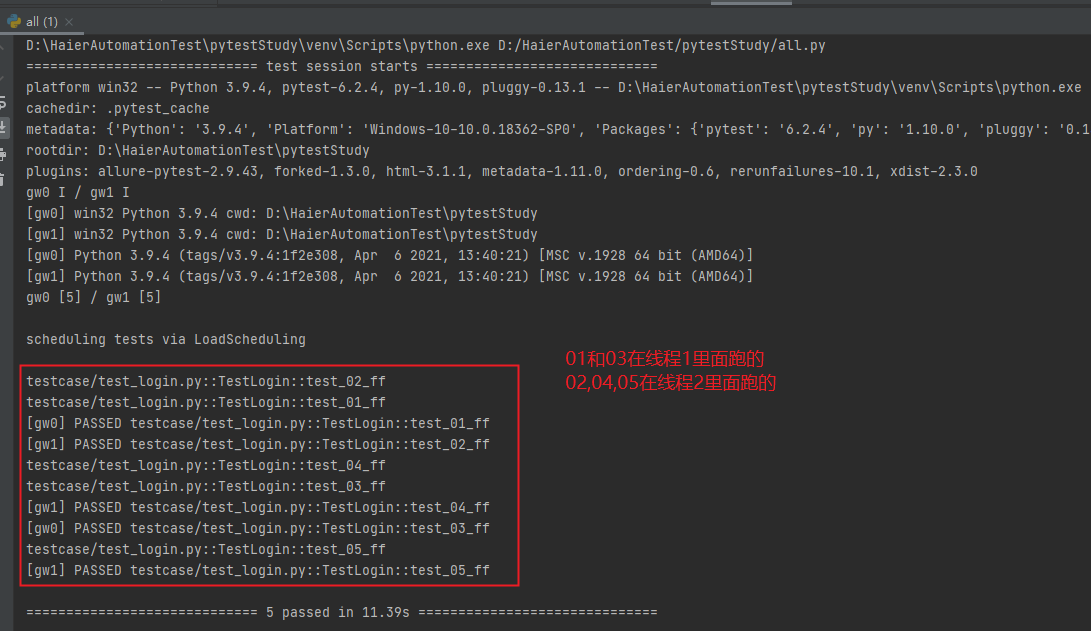
all.py 点击执行,时间是6s。但是用多线程-n 2(开2个线程跑),是大约3s。
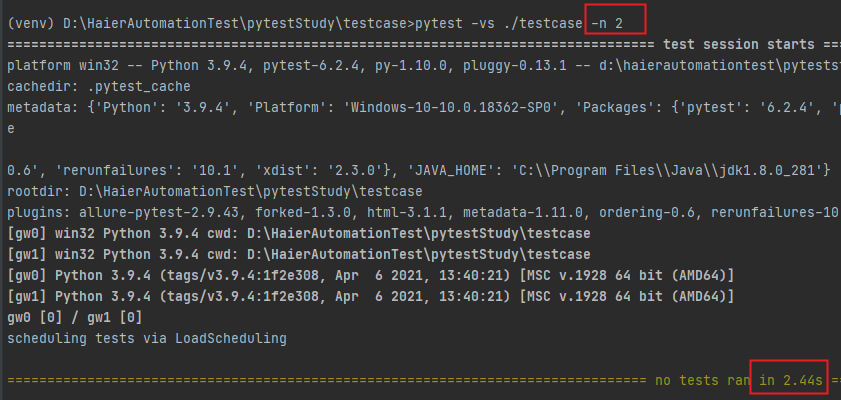
-n 在一个模块中的执行顺序:
#!/usr/bin/python
# -*- coding: utf-8 -*-
# author:xiaomin pei
import time

import pytest


class TestLogin:

    def test_01_ff(self):
        time.sleep(3)
        print("test测试一下01")

    def test_02_ff(self):
        time.sleep(3)
        print("test测试一下02")

    def test_03_ff(self):
        time.sleep(3)
        print("test测试一下03")

    def test_04_ff(self):
        time.sleep(3)
        print("test测试一下04")

    def test_05_ff(self):
        time.sleep(3)
        print("test测试一下05")
#!/usr/bin/python
# -*- coding: utf-8 -*-
# author:xiaomin pei


# main方法在哪里都一样,就新建一个 all.py,可以指定文件夹,指定文件
import pytest

if __name__ == '__main__':
    pytest.main(['-vs', './testcase/test_login.py', '-n=2'])
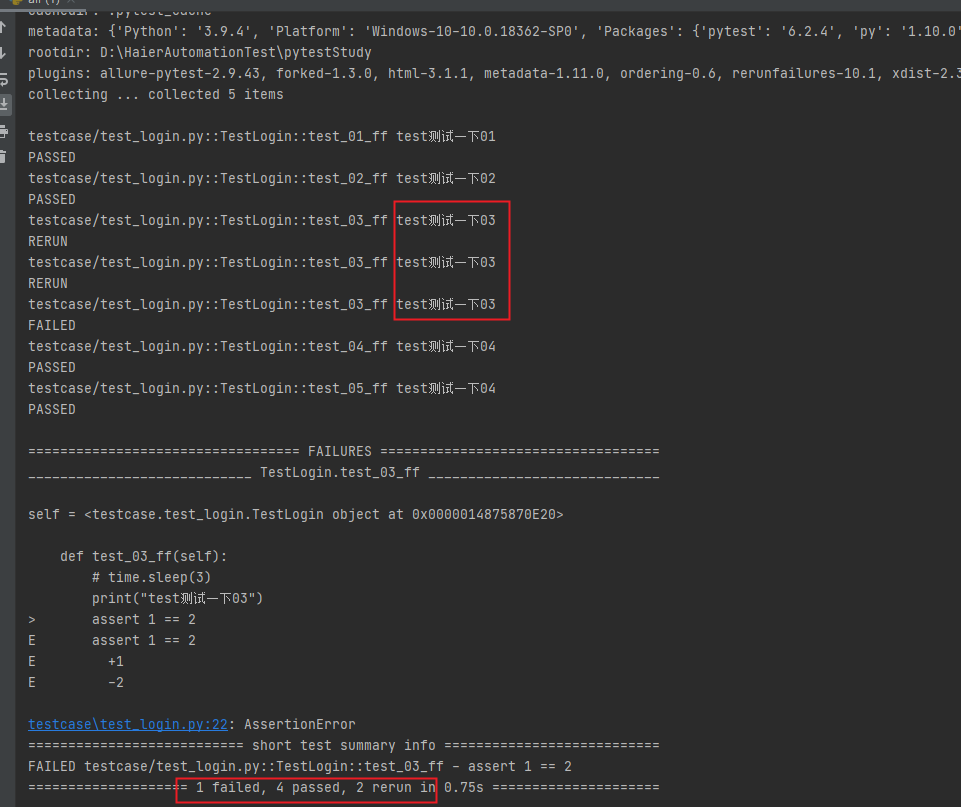
--reruns=num:失败的重新跑num次
#!/usr/bin/python
# -*- coding: utf-8 -*-
# author:xiaomin pei
import time
import pytest


class TestLogin:

    def test_01_ff(self):
        print("test测试一下01")

    def test_02_ff(self):
        print("test测试一下02")

    def test_03_ff(self):
        print("test测试一下03")
        assert 1 == 2

    def test_04_ff(self):
        print("test测试一下04")

    def test_05_ff(self):
        print("test测试一下05")
#!/usr/bin/python
# -*- coding: utf-8 -*-
# author:xiaomin pei


# --reruns=2  失败的用例重新跑2次,总共是跑了三次
import pytest

if __name__ == '__main__':
    pytest.main(['-vs', './testcase/test_login.py', '--reruns=2'])
运行的一些命令:
pytest test_mod.py 运行一个具体的模块
  pytest testing/       运行一个路径下的所有case
  pytest -vs -k "02 or 03"    运行一个方法名字包含某个字段的case,一般用在分模块运行的时候  pytest -vs -k "02"
pytest -vs -k "MyClass and not method" 运行包含MYClass类中的case,但是不包含名字为“method”这个case pytest -vs ./testcase -k "name" 只运行名字包含name的测试用例
pytest test_mod.py::test_func 运行模块中的方法
pytest test_mod.py::TestClass::test_method 运行模块中的类中的方法
pytest -m slow,多个就是pytest -m "slow or A or B" 将会运行所有被装饰器装饰过的方法,比如 @pytest.mark.slow
pytest --pyargs pkg.testing 运行testing包中的case
pytest -x # stop after first failure 在第一个case失败以后就停止 如:pytest -vs -x
pytest --maxfail=2 # stop after two failures 在第二个case失败以后就停止 如:pytest -vs --maxfail=2
pytest -vs 打印出所有的调试信息,包括print函数里面的,-v是详细信息
pytest --reruns num 失败的用例重新再跑num次,总共跑了num+1次
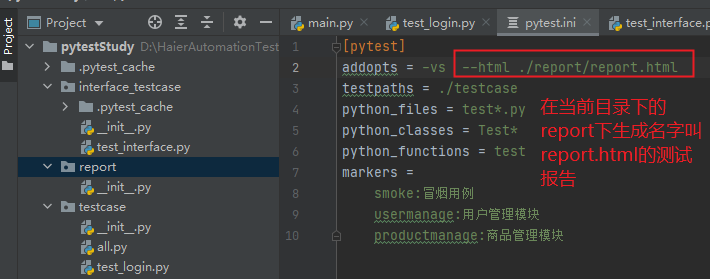
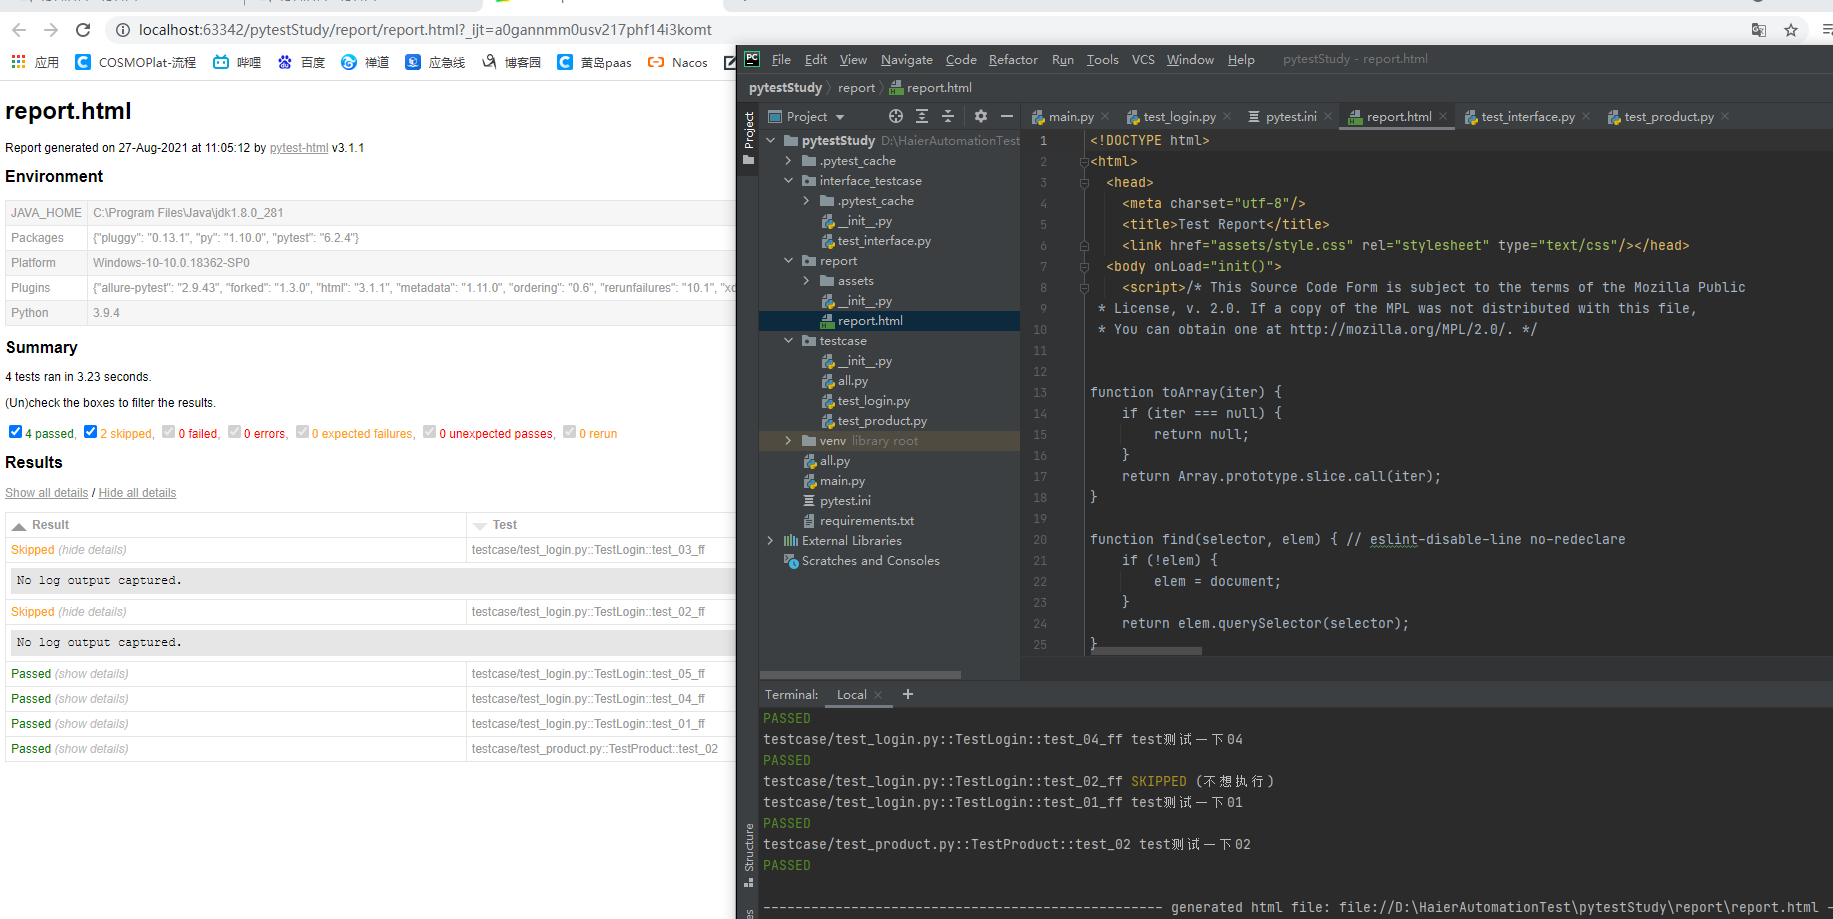
pytest --html ./report/report.html 生成html的测试报告在文件夹report下 (前提是安装插件:pytest-html)
执行完命令的一些code的含义:
| Exit code 0: | All tests were collected and passed successfully,所有的用例都被收集完成而且执行成功 |
|---|---|
| Exit code 1: | Tests were collected and run but some of the tests failed 所有的用例都被收集完成,但是失败了一些 |
| Exit code 2: | Test execution was interrupted by the user 执行过程中被执行者终止 |
| Exit code 3: | Internal error happened while executing tests 执行过程中内部发生错误 |
| Exit code 4: | pytest command line usage error pytest命令有错误 |
| Exit code 5: | No tests were collected 没有用例被收集 |
三、pytest执行测试用例的顺序是怎样的?
  unittest:根据ascii码打大小来运行的
  pytest:根绝顺序从上到下,默认的执行顺序,想要改变,需要用到一个装饰器  @pytest.mark.run(order=num)
#!/usr/bin/python
# -*- coding: utf-8 -*-
# author:xiaomin pei
import time

import pytest


class TestLogin:

    def test_01_ff(self):
        print("test测试一下01")

    def test_02_ff(self):
        print("test测试一下02")

    @pytest.mark.run(order=1)
    def test_03_ff(self):
        print("test测试一下03")

    @pytest.mark.run(order=3)
    def test_04_ff(self):
        # time.sleep(3)
        print("test测试一下04")

    @pytest.mark.run(order=2)
    def test_05_ff(self):
        # time.sleep(3)
        print("test测试一下05")
#!/usr/bin/python
# -*- coding: utf-8 -*-
# author:xiaomin pei


import pytest

if __name__ == '__main__':
    pytest.main(['-vs', './testcase/test_login.py'])
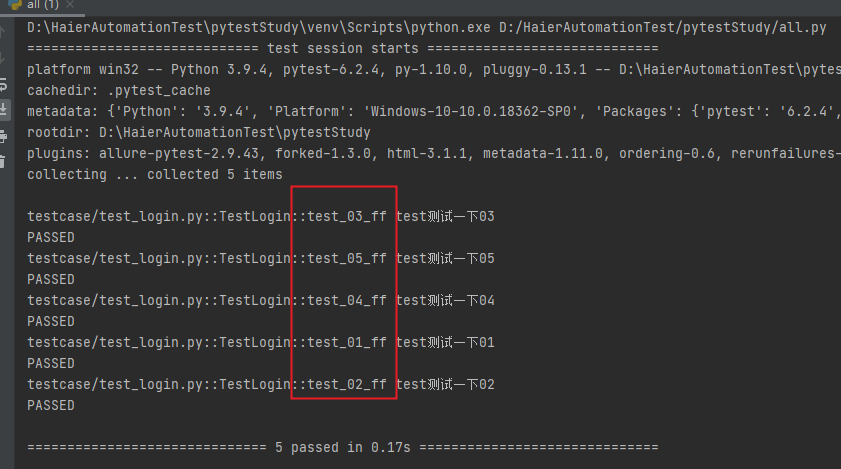 由此看到,顺序变了。没有被标记的,还是按照之前的默认顺序从上到下依次执行。
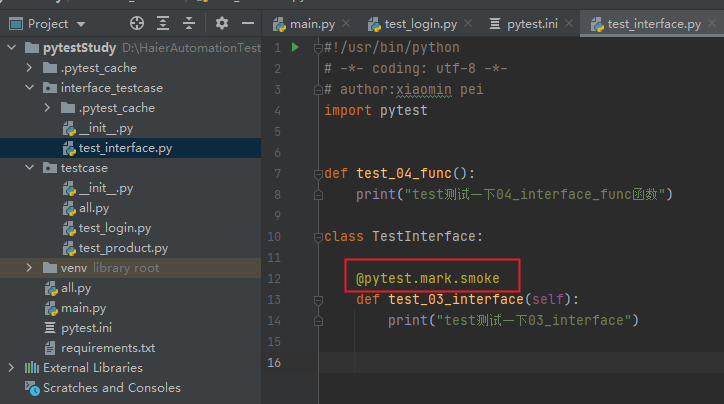
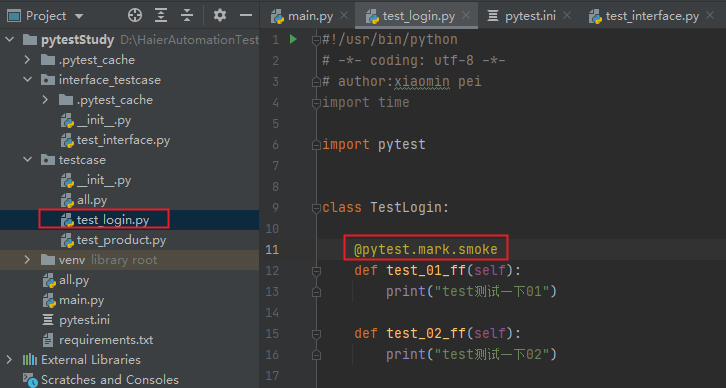
四、如何分组执行?(冒烟,分模块执行,分接口和web执行)
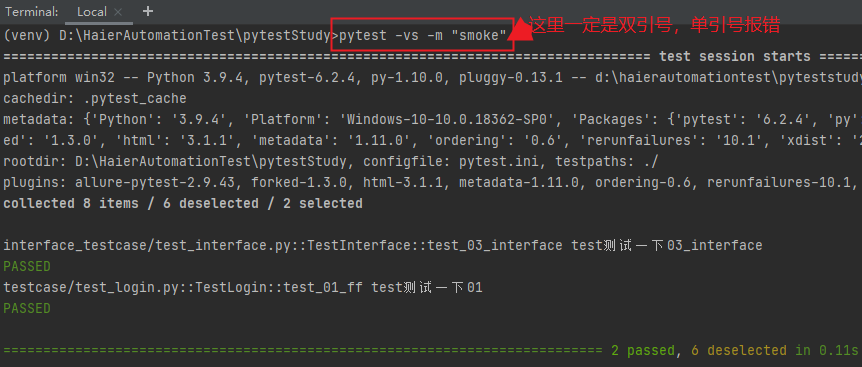
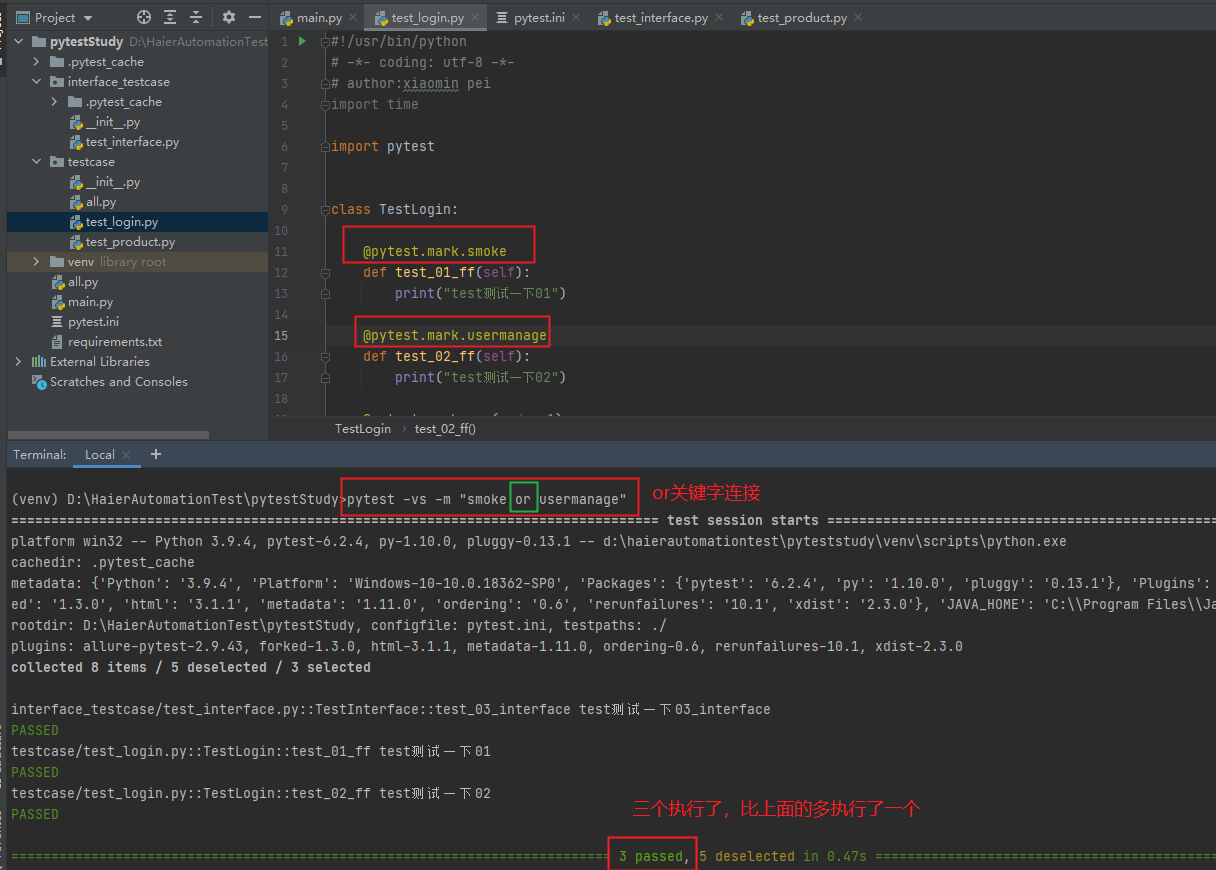
  smoke:冒烟用例,分布在各个模块里面。@pytest.mark.smoke,执行的时候,用命令去执行:pytest -vs -m "分组里面的名字,比如smoke,usermanage"
  如果是pytest.ini里面的,addopts = -vs -m "somke or username"
(1)执行冒烟的:
![]()
![]()
![]()
![]()
(2)执行用户管理模块和smoke都想执行 : pytest -vs -m "smoke or usermanage",如果想执行多个,往后面加or就可以
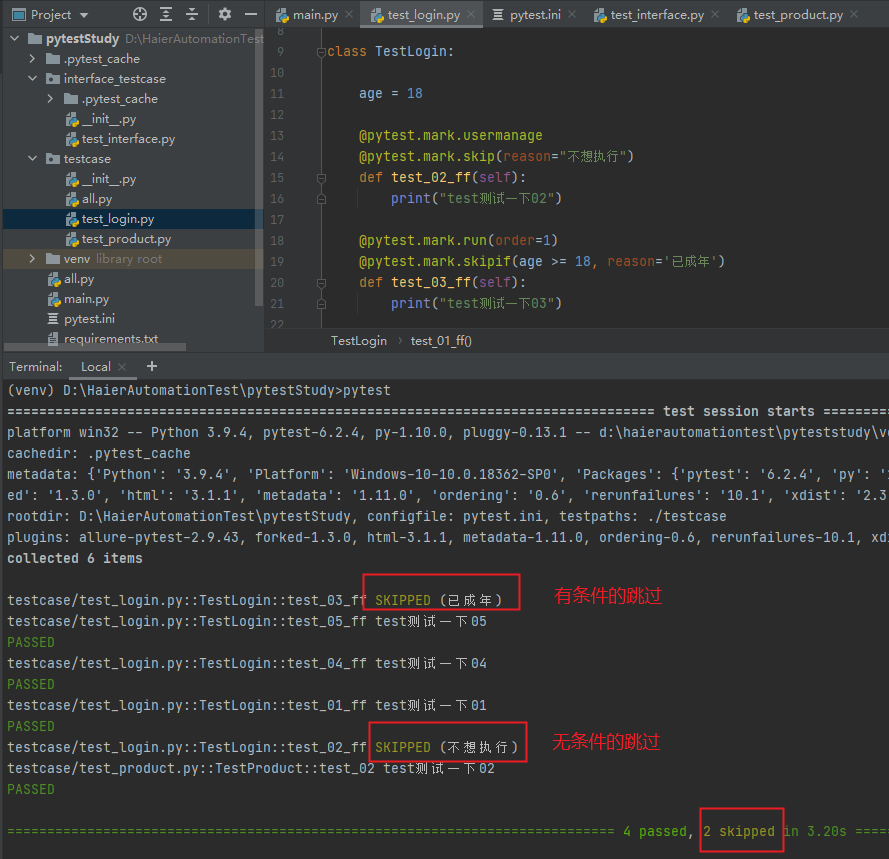
五、pytest跳过测试用例
(1)无条件跳过 pytest.mark.skip(reason="不想执行")
(2)有条件跳过 pytest.mask.skipif(age<18,reason='还未成年') 条件成立就跳过
六、生成测试报告:

 浙公网安备 33010602011771号