
aws codepipeline 配置 fargate 平台蓝绿部署
aws codepipeline 配置 fargate 平台蓝绿部署
之前已经介绍过codepipeline在ec2平台上对ecs服务进行蓝绿部署,本文同样是蓝绿部署但是平台为fargate
本次部署全部源配置都存储在codedcommit中,使用codepipeline完成ecs fargate服务的蓝绿部署
创建新的codecommit仓库,并配置以下文件
cat > server.js << EOF
'use strict'

const greeting = "Hi there is hello-servre blue green !"  // Change this line to change your greeting

const port = (typeof process.env.PORT !== 'undefined')
  ? process.env.PORT
  : '80'

const express = require('express')
const bodyParser = require('body-parser')

const app = express()
app.use(bodyParser.json())
app.use(bodyParser.urlencoded({extended: true}))

// Constants
const host = '0.0.0.0';

function format(o, pretty) {
  return (pretty)
    ? JSON.stringify(o, null, 2) + '\n'
    : JSON.stringify(o);
}

app.get('/hello/:name', (req, res) => {
  var name = req.params.name
  let timestamp = Date.now()
  res.send(greeting + " " + name + "<br>\n<i>" + timestamp + "</i>\n")
})
app.get('/', (req, res) => {
  res.send("ok")
})

const server = app.listen(port, host);
console.log(`Service running on http://${host}:${port}`)

process.on('SIGTERM', () => {
  console.info('SIGTERM signal received.');
  console.log('Closing http server.');
  server.close(() => {
    console.log('Http server closed.');
    process.exit(0);
  })
})
EOF
cat > package.json << EOF
{
  "name": "hello-server",
  "version": "1.0.0",
  "description": "Simple server that says hello to a named person",
  "author": "Mike Rizzo <michariz@amazon.co.uk>",
  "license": "MIT",
  "main": "server.js",
  "scripts": {
    "start": "node server.js"
  },
  "dependencies": {
    "body-parser": "^1.19.0",
    "express": "^4.17.1"
  }
}
EOF
cat > Dockerfile << EOF
FROM node:buster-slim
WORKDIR /usr/src/app
COPY package*.json ./
RUN npm install
COPY . .
EXPOSE 80
CMD ["node", "server.js"]
EOF
创建任务定义,并启动一个服务,注意
requiresCompatibilities需要指定为fargate- 随便指定一个image即可(这里指定为nginx),之后会通过pipeline进行替换
- 创建名为
/ecs/test-fargate-bluegreen的cw日志组 - 注册为任务定义,https://docs.aws.amazon.com/cli/latest/reference/ecs/register-task-definition.html
cat > test-fargate-bluegreen.json << EOF
{
  "family": "test-fargate-bluegreen",
  "networkMode": "awsvpc",
  "cpu": "256",
  "memory": "512",
  "requiresCompatibilities": [
    "FARGATE"
  ],
  "executionRoleArn": "arn:aws-cn:iam::xxxxxxxxxxxx:role/ecsTaskExecutionRole",
  "containerDefinitions": [
    {
      "name": "node-server",
      "image": "public.ecr.aws/nginx/nginx:1-alpine-perl",
      "logConfiguration": {
        "logDriver": "awslogs",
        "options": {
          "awslogs-group": "/ecs/test-fargate-bluegreen",
          "awslogs-region": "cn-north-1",
          "awslogs-stream-prefix": "ecs"
        }
      },
      "portMappings": [
        {
          "containerPort": 80,
          "protocol": "tcp"
        }
      ],
      "essential": true
    }
  ]
}
EOF
aws ecs register-task-definition --cli-input-json file://test-fargate-bluegreen.json
由于fargate必须使用awsvpc网络模式,因此需要创建类型为ip的目标组
[外链图片转存失败,源站可能有防盗链机制,建议将图片保存下来直接上传(img-SJh928M6-1680190774749)(assets/image-20230330225159742.png)]
创建ecs服务,引用上面的任务定义
https://awscli.amazonaws.com/v2/documentation/api/latest/reference/ecs/create-service.html
- 创建fargate服务时必须指定网络配置
cat > test-fargate-bluegreen-svc.json << EOF
{
    "serviceName": "test-fargate-bluegreen-pipeline",
    "taskDefinition": "test-fargate-bluegreen:1",
    "cluster": "workfargate",
    "loadBalancers": [
        {
            "targetGroupArn": "arn:aws-cn:elasticloadbalancing:cn-north-1:xxxxxxxxxxxx:targetgroup/test-deploy-fargate-blue/e0b60115f67642a9",
            "containerName": "node-server",
            "containerPort": 80
        }
    ],
    "desiredCount": 1,
    "launchType": "FARGATE",
    "schedulingStrategy": "REPLICA",
    "deploymentController": {
        "type": "CODE_DEPLOY"
    },
    "healthCheckGracePeriodSeconds": 10,
    "networkConfiguration": {
        "awsvpcConfiguration":{
            "subnets":["subnet-02702xxxx760acdd","subnet-0dxxxx8480d1"],
            "securityGroups": ["sg-096dxxxxb9a6d7e9"],
            "assignPublicIp" : "ENABLED"
        }
    }
}

EOF
aws ecs create-service --cli-input-json file://test-fargate-bluegreen-svc.json
创建需要在deploy中使用到的任务定义
$ cat taskdef-prod.json
{
  "family": "test-fargate-bluegreen",
  "networkMode": "awsvpc",
  "cpu": "256",
  "memory": "512",
  "requiresCompatibilities": [
    "FARGATE"
  ],
  "executionRoleArn": "arn:aws-cn:iam::xxxxxxxxxxxx:role/ecsTaskExecutionRole",
  "containerDefinitions": [
    {
      "name": "node-server",
      "image": "<IMAGE_NAME>",
      "logConfiguration": {
        "logDriver": "awslogs",
        "options": {
          "awslogs-group": "/ecs/test-fargate-bluegreen",
          "awslogs-region": "cn-north-1",
          "awslogs-stream-prefix": "ecs"
        }
      },
      "portMappings": [
        {
          "containerPort": 80,
          "protocol": "tcp"
        }
      ],
      "essential": true
    }
  ]
}
创建buildspec.yml
cat > buildspec.yml << EOF
version: 0.2
env:
  exported-variables:
    - AWS_DEFAULT_REGION
phases:
  # install:
  #   runtime-versions:
  #     docker: 18
  pre_build:
    commands:
      - echo Logging in to Amazon ECR...
      - aws --version
      - $(aws ecr get-login --region $AWS_DEFAULT_REGION --no-include-email)
      - REPOSITORY_URI=xxxxxxxxxxxx.dkr.ecr.cn-north-1.amazonaws.com.cn/test-fargate-bluegreen-pipeline
      - COMMIT_HASH=$(echo $CODEBUILD_RESOLVED_SOURCE_VERSION | cut -c 1-7)
      - IMAGE_TAG=${COMMIT_HASH:=latest}
  build:
    commands:
      - echo Build started on `date`
      - echo Building the Docker image...
      - docker build -t $REPOSITORY_URI:latest .
      - docker tag $REPOSITORY_URI:latest $REPOSITORY_URI:$IMAGE_TAG
  post_build:
    commands:
      - echo Build completed on `date`
      - echo Pushing the Docker images...
      - docker push $REPOSITORY_URI:latest
      - docker push $REPOSITORY_URI:$IMAGE_TAG
      - echo Writing image definitions file...
      - printf '{"ImageURI":"%s"}' $REPOSITORY_URI:$IMAGE_TAG > imageDetail.json
      - cat imagedefinitions.json
      - cat imageDetail.json
artifacts:
  files:
    - imageDetail.json
    - appspec.yaml
    - taskdef-prod.json
EOF
创建三阶段的pipeline,做如下配置

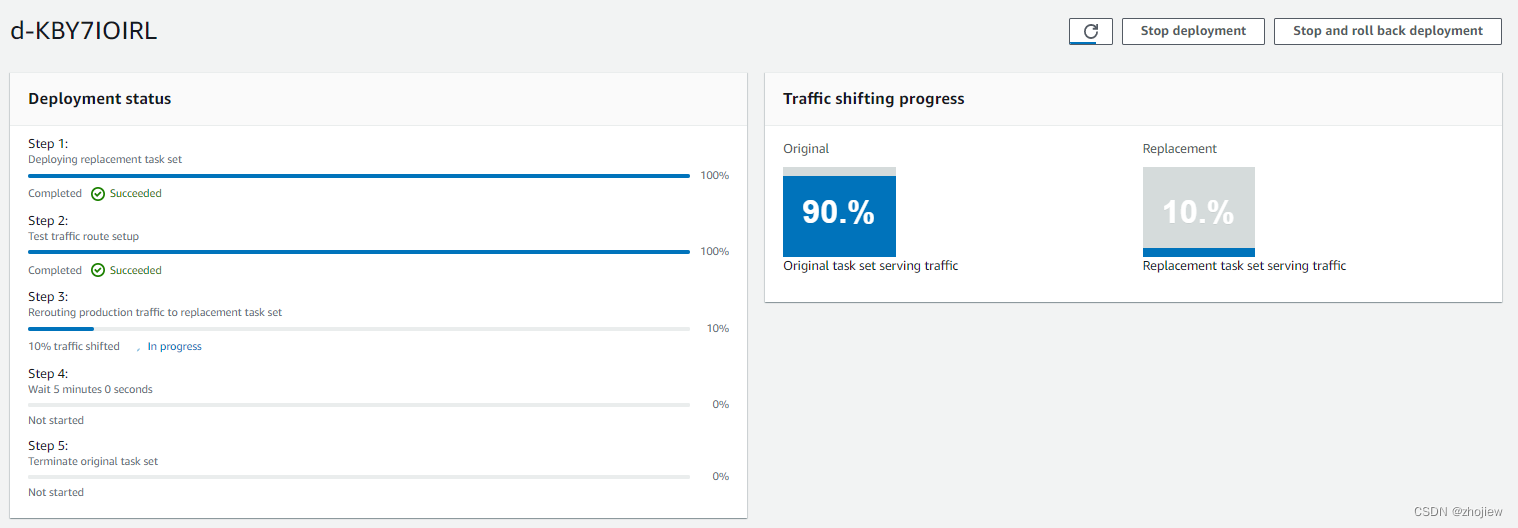
之后触发部署即可,在控制台看到fargate通过新的任务定义启动新版本任务,并完成流量切换

 浙公网安备 33010602011771号