Python快速入门教程【转】
第一章 Python基础知识
1.1 介绍
1.1.1 特点
Python是一种面向对象、解释型计算机程序设计语言。语法简洁清晰,强制用空白符作为语句缩进。
Python具有丰富和强大的库,又被称为胶水语言。能把其他语言(主要C/C++)写的模块很轻松的结合在一起。
1.1.2 应用领域
Web网站:有很多优秀的开源Web框架,比如Django(最流行)、Tornado(轻量级、异步)、Flask(微型)、Web.py(简单)等。
数据采集:有好用的http库,比如urllib2、requests等。还有高级的屏幕爬取及网页采集框架scrapy。并对网页解析也有很多库,比如lxml、xpath、BeautifulSoup等。
大数据分析:常用模块有Numpy、Pandas。并支持写MapReduce、PySpark处理Spark RDD(弹性分布式数据集)。
运维自动化:编写脚本、Web平台,自动化日常工作。
科学计算:在科学计算也应用越来越广泛,常用的模块有Numpy、SciPy。
等等...可见Python是一门通用语言!
1.1.3 为什么选择Python?
运维的目的呢,主要还是学习Python用来实现运维自动化了。大多数人除了shell脚本外有其他语言基础的应该占少数。
我们以Python作为第一门语言是很好的选择。为什么呢?
1) 语法简洁,易于学习。
2) 广泛的标准库,适合快速开发,不就追求极快处理速度。
3) 跨平台,基本所有的所有的操作系统都能运行。
4) 运维领域Python最流行。
1.2 安装Python
操作系统采用CentOS6.5,默认安装了Python2.6.6,那我们升级到Python2.7最新版Python2.7.12
1. 安装Python2.7
# wget https://www.python.org/ftp/python/2.7.12/Python-2.7.12.tgz
# tar zxvf Python-2.7.12.tgz
# cd Python-2.7.12
# ./configure
# make && make install
# mv /usr/bin/python /usr/bin/python2.6.6
# ln -s /usr/local/bin/python2.7 /usr/bin/python
# python -V
Python 2.7.12
注意:软链接指向Python2.7版本后,yum将不能正常工作,因为yum不兼容2.7的,所有需要指定下yum命令里默认Python版本为2.6.6版本
# sed -i '1s/$/2.6.6/' /usr/bin/yum
2. 安装setuptools
# yum install python-devel zlib-devel openssl-devel -y
# wget https://pypi.python.org/packages/32/3c/e853a68b703f347f5ed86585c2dd2828a83252e1216c1201fa6f81270578/setuptools-26.1.1.tar.gz
# tar zxvf setuptools-26.1.1.tar.gz
# cd setuptools-26.1.1
# python setup.py install
......
"Compression requires the (missing) zlib module"
RuntimeError: Compression requires the (missing) zlib module
解决方法,进入刚解压的Python2.7目录重新编译安装:
# cd ../Python-2.7.12
# make && make install
# python setup.py install
3. 安装pip2.7
# wget https://pypi.python.org/packages/e7/a8/7556133689add8d1a54c0b14aeff0acb03c64707ce100ecd53934da1aa13/pip-8.1.2.tar.gz
# tar zxvf pip-8.1.2.tar.gz
# cd pip-8.1.2
# python setup.py install
1.3 解释器
1.3.1 Python解释器几种实现版本
1) CPython
当我们装完Python后,其默认解释就是CPython,也是官方默认解释器。CPython是C语言写的,当执行代码时会将代码转化成字节码(ByteCode)。
2) IPython
基于CPython之上的一个交互式解释器,相当于默认解释器的一个增强版,最显著的功能就是自动补全,挺好用的。
3) PyPy
PyPy本身是由Python编写的,使用了JIT编译器(即时编译器)技术,当执行代码时JIT编译器将代码翻译成机器码。性能相比CPython要好。JAVA也采用了JIT编译器。
4) Jython
Jython是由JAVA编写的一个解释器,可以把JAVA模块加载到Python的模块中使用,也可以把Python代码打包成JAR包,意味着允许用Python写JAVA程序了。当执行代码时会将代码转化成JAVA字节码,然后使用JRE执行。
5) IronPython
在.NET平台上工作的Python语言。
1.3.2 Python代码执行过程
大致流程:源代码编译成字节码(.pyc文件)--> Python虚拟机 --> 执行编译好的字节码 --> Python虚拟机将字节码翻译成对应的机器指令(机器码)
运行Python程序时,先编译成字节码并保存到内存中,当程序运行结束后,Python解释器将内存中字节码对象写到.pyc文件中。
第二次再运行此程序时,先回从硬盘中寻找.pyc文件,如果找到,则直接载入,否则就重复上面的过程。
这样好处是,不重复编译,提供执行效率。
1) 字节码
字节码是一种包含执行程序、由一序列op代码/数据对组成的二进制文件。字节码是一种中间码,比机器码更抽象。
2) 机器码
机器码是一种指令集,让CPU可直接解读的数据。也称为原生码。
1.4 代码风格
1.4.1 代码风格有毛用?
个人觉得有以下几个作用:
1) 团队协作
在企业中,一个团队开发一个项目很正常不过了,刚入职是不是会先让你熟悉本公司的编码规范文档呢,作为纯开发来说,我相信大多数公司都会这么做,其中目的是让团队中的每个成员,写代码时能够统一,避免项目中出现几个编码风格版本,不利用后期维护和交接。
2) 有利于解决问题
草泥马,又出问题了,代码运行不起来了,怎么办?百度、谷歌无解...是时候求助大神了,来看看我的代码吧!大神一看,琢磨了一会,你想多了,不是再想你的问题,而是在梳理你的代码实现的功能和逻辑关系。结果发现,多了括号。擦,我怎么就没看到呢!~
3) 未雨绸缪
功能终于实现了,发布到线上运行也挺正常,过了半年后,突然跑不起来了,赶紧排查问题,代码看着看着自己就懵逼了,这还是自己写的代码嘛,长的这么不像我,是亲生的嘛!
小结:只要人人都献出一点爱,世界将会变成美好的人间。
1.4.2 编写代码怎么能更规范化?
1) 缩进
Python以空白符作为语句缩进,意味着语句没有结尾符,给往往因为少写个fi的人带来了福利,在Python中最好以4个空格作为缩进符。
2) 代码注释
据说优质的代码,注释说明要比代码量多,详细的代码说明不管对自己后期维护还是开源,都是有必要的。就像一个流行的软件,如果没有丰富的使用文档,你认为会有多少耐心的人去花大把的时间研究它呢!
3) 空格使用
在操作符两边,以及逗号后面,加1个空格。但是在括号左右不加空格。
在函数、类、以及某些功能代码块,空出一行,来分隔它们。
4) 命名
模块:自己写的模块,文件名全部小写,长名字单词以下划线分隔。
类:大/小驼峰命名。我一般采用大驼峰命名,也就是每个单词首字母大写。类中私有属性、私有方法,以双下划线作为前缀。
函数:首单词小写,其余首字母大写。
变量:都小写,单词以下划线分隔。
提醒:所有的命名必须能简要说明此代码意义。
5) 代码换行
按照语法规则去换行,比如一个很长的表达式,可以在其中某个小表达式两边进行换行,而不是将小表达式拆分,这样更容易阅读。
1.5 交互式解释器
直接执行Python命令就启动默认的CPython解释器:
# python
Python 2.7.12 (default, Sep 3 2016, 21:51:00)
[GCC 4.4.7 20120313 (Red Hat 4.4.7-17)] on linux2
Type "help", "copyright", "credits" or "license" for more information.
>>> print "Hello World"
Hello World
配置自动补全:
# pip2.7 install readline
# pip2.7 install rlcompleter2
>>> import readline, rlcompleter
>>> readline.parse_and_bind("tab: complete")
1.6 运算操作符
|
运算符
|
描述
|
示例
|
|
+
|
加法
|
1 + 1 = 2
|
|
-
|
减法
|
3 - 1 = 2
|
|
*
|
乘法
|
2 * 1 = 2
|
|
/
|
除法
|
2 / 1 = 2
|
|
%
|
取余/模
|
2 % 1 = 2
|
|
**
|
指数/幂
|
2 ** 1 = 2
|
1.7 赋值操作符
|
操作符
|
描述
|
示例
|
|
=
|
变量赋值
|
a = b + c
|
|
+=
|
加法
|
a += b 等同于 a = a + b
|
|
-=
|
减法
|
a -= b 等同于 a = a - b
|
|
*=
|
乘法
|
a *= b 等同于 a = a * b
|
|
/=
|
除法
|
a /= b 等同于 a = a / b
|
|
%=
|
模
|
a %= b 等同于 a = a % b
|
|
**=
|
指数/幂
|
a **= b 等同于 a = a ** b
|
赋值操作符,操作符左边运算右边,然后将结果赋值给操作符左边。
博客地址:http://lizhenliang.blog.51cto.com and https://yq.aliyun.com/u/lizhenliang
QQ群:323779636(Shell/Python运维开发群)
QQ群:323779636(Shell/Python运维开发群)
1.8 变量
1.8.1 变量赋值
>>> xxoo = 2
>>> print xxoo
>>> 2
说明:等号左边是变量名,等号右边是值
# 多重赋值
>>> xx, oo = 1, 2
>>> print xx
1
>>> print oo
2
>>> xx = oo = 2
>>> print xx
2
>>> print oo
2
1. 8.2 变量引用
上面打印时就是在引用变量了,可见Python引用变量不用加$什么特殊字符,不像Shell、PHP那样,还要加$。
的确,直接用变量名即是引用,下面说一种常用的字符串格式输出时引用变量的方法。
>>> xxoo = 2
>>> print "xxoo: %d" % xxoo
xxoo: 2
>>> xxoo = "xo"
>>> print "xxoo: %s" % xxoo
xxoo: xo
>>> x = "abc"
>>> o = 123
>>> print "str: %s, int: %d" %(x, o)
str: abc, int: 123
说明:双引号里面%操作符算是占位符吧,d代表数字,s代表字符串。双引号外面%加上后面的变量名对应里面的第一个%。
下面同时引用了两个变量,外面%()里变量名位置对应双引号里面的%位置。
1.8.3 局部变量
>>> xxoo = 2
>>> print xxoo
2
1.8.4 全局变量
>>> global xxoo # 声明为全局变量
>>> print xxoo
2
说明:从上面并不能看出什么区别,后续在函数章节中会讲解局部变量和全局变量的区别和使用。
1.9 转义字符(列出一些常用的)
|
符号
|
描述
|
|
\
|
字符串太长,换一行接着输入
|
|
\' \"
|
单引号和双引号
|
|
\r
|
光标
|
|
\t
|
横向制表符(tab键)
|
|
\v
|
纵向制表符
|
|
\n
|
换行符,打印到下一行
|
示例:
>>> print "Hello \
... World"
Hello World
>>> print "Hello \"World!"
Hello "World!
>>> print "Hello \rWorld!"
World!
>>> print "Hello\tWorld!"
Hello World!
>>> print "Hello \vWorld!"
Hello
World!
>>> print "Hello \nWorld!"
Hello
World!
如果不想让转义字符生效,可以用r指定显示原始字符串:
>>> print r"Hello \nWorld!"
Hello \nWorld!
>>> print "Hello \nWorld!"
Hello
World!
1.10 获取用户输入
1.10.1 raw_input()
>>> name = raw_input("My name is: ")
My name is: xiaoming
>>> print name
xiaoming
1.10.2 input()
>>> name = input("My name is: ")
My name is: xiaoming
Traceback (most recent call last):
File "<stdin>", line 1, in <module>
File "<string>", line 1, in <module>
NameError: name 'xiaoming' is not defined
>>> name = input("My name is: ")
My name is: "xiaoming"
>>> print name
xiaoming
>>> name = input("My name is: ")
My name is: 1 + 2
>>>
>>> print name
3
1.10.3 raw_input()与input()函数区别
可以看到两个函数用同样的方式输入,结果input()报错!
原因是因为raw_input()把任何输入的都转成字符串存储。
而input()接受输入的是一个表达式,否则就报错。
1.11 运行第一个程序
# vi test.py
#!/usr/bin/env python # 说明用什么可执行程序运行它,env会自动寻找python解释器的绝对路径
print "Hello World!"
# python test.py
Hello World!
easy!打印Hello world已经没什么难度了,那改进下刚学接受用户输入。
# vi test.py
#!/usr/bin/env python
name = raw_input("My name is: ")
print name
# python test.py
My name is: xiaoming
xiaoming
1.12 注释
单行注释:井号("#")开头
多行注释:三单引号或三双引号
#!/usr/bin/env python
# -*- coding: utf-8 -*- # 设置解释器默认编码,下一章会讲到
# 单行注释
'''
多行注释
多行注释
'''
"""
多行注释
多行注释
第二章 字符串处理与编码不再发愁
2.1 字符串
2.1.1 字符串转换
>>> a = 123
>>> b = 1.23
>>> type(a)
<type 'int'>
>>> type(b)
<type 'float'>
>>> type(str(a))
<type 'str'>
>>> type(str(b))
<type 'str'>
说明:先定义个整数和浮点数,再查看类型,用str()函数将对象转成字符串。
这里的用到了type()函数,用于查看对象类型。这个type()在以后学习中很用的,刚开始学习时候,往往因为对象类型不对,导致程序运行报错,这时可以用它来排查问题。
2.1.2 字符串连接
# 加号字符将同类型字符连接到一起
>>> hw = "Hello" + "World!"
>>> print hw
HelloWorld!
# 两个相邻的字符串自动连接一起
>>> hw = "Hello""World!"
>>> print hw
HelloWorld!
# 如果字符串内包括单引号或双引号,要用\转义,否则报错,上一章也讲过。
>>> hw = "Hello \"World!\""
>>> print hw
Hello "World!"
# 不同字符串类型拼接
>>> a = "abc"
>>> b = 1
>>> print a + b
Traceback (most recent call last):
File "<stdin>", line 1, in <module>
TypeError: cannot concatenate 'str' and 'int' objects
说明:不同字符串类型不允许连接,想要连接可以下面这么做。
方法1:
>>> c = "%s%d" %(a,b)
>>> print c
abc1
方法2:
>>> c = a + str(b)
>>> print c
abc1
2.1.3 格式化输出
|
操作符号
|
说明
|
|
%s
|
字符串(str())
|
|
%r
|
字符串(repr())
|
|
%d
|
整数
|
|
%f
|
浮点数,可指定小数点后的精度
|
|
?
|
|
1) 字符串格式输出三种方法
>>> xxoo = "string"
>>> print "%s" %xxoo
string
>>> print "%r" %xxoo
'string'
>>> print `xxoo`
'string'
说明:%s采用str()函数显示,%r采用repr()函数显示。repr()和反撇号把字符串转为Python表达式。
2) 保留小数点数
>>> '%.1f' %(float(100)/1024)
'0.1'
2.1.4 字符串处理
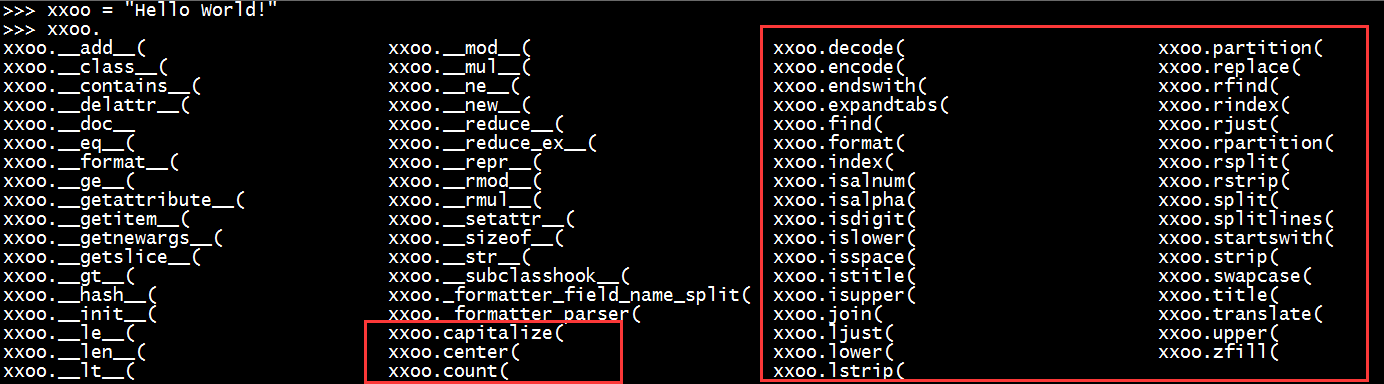
上图是字符串处理的方法,红色框框中大概有一半经常用的,我们就拿一部分常用的来举例说明。
#!/usr/bin/env python
# -*- coding: utf-8 -*-
xxoo = "Hello world!"
print "字符串长度: %s" % len(xxoo)
print "首字母大写: %s" % xxoo.capitalize()
print "字符l出现次数: %s" % xxoo.count('l')
print "感叹号是否结尾: %s" % xxoo.endswith('!')
print "w字符是否是开头: %s" % xxoo.startswith('w')
print "w字符索引位置: %s" % xxoo.find('w') # xxoo.index('W')
print "格式化字符串: Hello{0} world!".format(',')
print "是否都是小写: %s" % xxoo.islower()
print "是否都是大写: %s" % xxoo.isupper()
print "所有字母转为小写: %s" % xxoo.lower()
print "所有字母转为大写: %s" % xxoo.upper()
print "感叹号替换为句号: %s" % xxoo.replace('!','.')
print "以空格分隔切分成列表: %s" % xxoo.split(' ')
print "转换为一个列表: %s" % xxoo.splitlines()
print "去除两边空格: %s" % xxoo.strip()
print "大小写互换: %s" % xxoo.swapcase()
print "只要Hello字符串: %s" % xxoo[0:5]
print "去掉倒数第一个字符: %s" % xxoo[0:-1]
# python test.py
字符串长度: 12
首字母大写: Hello world!
字符l出现次数: 3
感叹号是否结尾: True
w字符是否是开头: False
w字符索引位置: 6
格式化字符串: Hello, world!
是否都是小写: False
是否都是大写: False
所有字母转为小写: hello world!
所有字母转为大写: HELLO WORLD!
感叹号替换为句号: Hello world.
以空格分隔切分成列表: ['Hello', 'world!']
转换为一个列表: ['Hello world!']
去除两边空格: Hello world!
大小写互换: hELLO WORLD!
只要Hello字符串: Hello
去掉倒数第一个字符: Hello world
博客地址:http://lizhenliang.blog.51cto.com and https://yq.aliyun.com/u/lizhenliang
QQ群:323779636(Shell/Python运维开发群)
QQ群:323779636(Shell/Python运维开发群)
2.2 编码
2.2.1 常见字符编码类型
ASCII:美国信息交换标准码,是目前计算机中最广泛使用的字符集编码。每个ASCII码以1个字节存储,例如数字字符0的ASCII码是0110000,十进制表示为48。
Unicode:为解决世界上上百种语言带来混合、冲突,各国有各国的标准,显示很容易出现乱码。Unicode就出现了,它把所有语言的字符都统一到一套Unicode编码中,并定义每个语言字符的标准,所以Unicode又称统一码,万国码。大部分编程语言都支持Unicode,Python内部编码也支持Unicode。
GB2312:中国国家标准总局发布处理汉字的标准编码。
GBK:GB2312的扩展,向下兼容GB2312。
UTF-8:针对Unicode的可变长度字符编码,又称万国码。支持中文简体繁体及其它语言(如英文,日文,韩文)。
2.2.3 decode()
decode()函数作用是将其他编码(比如ACSII、Byte String)的字符串解码成Unicode。
2.2.4 encode()
encode()函数作用是将Unicode编码成终端软件能是识别的编码,就能正常显示了,比如UTF-8、GBK。
2.2.5 Python编码处理
#!/usr/bin/env python
c = "中文"
print c
# python test.py
File "test.py", line 2
SyntaxError:
Non-ASCII character '\xe4' in file test.py on line 3, but no encoding
declared; see http://www.python.org/peps/pep-0263.html for details
说明:在程序里面直接打印中文,会报语法错误,这是因为Python默认编码是ASCII,无法处理其他编码。
如果想打印中文,需要声明编码为utf-8,上面也有写过:
#!/usr/bin/env python
# -*- coding: utf-8 -*-
c = "中文"
print c
print type(c)
# python test.py
中文
<type 'str'>
可以正常输出中文了,类型是字符串,这个字符串是经过Python unicode编码后字节组成的。
虽然可以正常输入中文,并不意味的就万事大吉了,如果终端编码不是utf-8或其他软件也不确定编码还会出现乱码情况。所以还是要明白Python处理编码逻辑关系,才能更好的应对编码问题。
切换到交互式解释器:
>>> c = "中文"
>>> c.encode('utf-8')
Traceback (most recent call last):
File "<stdin>", line 1, in <module>
UnicodeDecodeError: 'ascii' codec can't decode byte 0xe4 in position 0: ordinal not in range(128)
如果直接转成utf-8是不允许的,报错Unicode解码错误,大概意思是说ascii码不能解码字节字符串。
上面讲到encode()函数作用是将Unicode码解码,而现在的c变量并非是Unicode码,而是字节字符串,算是Unicode的一种吧?。
故此,不能使用encode(),而是先使用decode()先解码陈Unicode再用encode()编码成utf-8。
>>> c.decode('utf-8')
u'\u4e2d\u6587' # 4e2d对应unicode值是"中",6587对应unicdoe值是"文"
>>> type(c.decode('utf-8'))
<type 'unicode'>
>>> print c.decode('utf-8') ?
中文
>>> print c.decode('utf-8').encode('utf-8')
中文
如果是Unicode字符串可直接通过encode()函数转码其他编码。
>>> c = u'中文'
>>> c.encode('utf-8')
'\xe4\xb8\xad\xe6\x96\x87'
>>> print c.encode('utf-8')
中文
看下字节字符串和unicode字符串区别:
>>> c = '中文'
>>> u = u'中文'
>>> c
'\xe4\xb8\xad\xe6\x96\x87'
>>> u
u'\u4e2d\u6587'
>>> len(c)
6
>>> len(u)
2
字节字符串长度要比unicode长的多,而unicode长度就是字符长度。
总结下:Python处理编码流程大致是这样的,ascii --> decode() --> unicode --> encode() --> 终端是能识别的编码,unicode算是一个中间码,有着承上启下的作用。
第三章 Python丰富的数据类型
什么是数据类型?
前两章里面包含的字符串、布尔类型、整数、浮点数都是数据类型。数据类型在一个编程语言中必不可少,也是使用最多的。
而且数据类型的数据都是存放在内存中的,我们一般操作都是在对内存里对象操作。
什么是数组?
数组也是一种数据类型,为了方便处理数据,把一些同类数据放到一起就是数组,是一组数据的集合,数组内的数据称为元素,每个元素都有一个下标(索引),从0开始。
在Python中,内建数据结构有列表(list)、元组(tuple)、字典(dict)、集合(set)。
3.1 列表[List]
3.1.1 定义列表
>>> lst = ['a','b','c',1,2,3]
用中括号括起来,元素以逗号分隔,字符串用单引号引起来,整数不用。
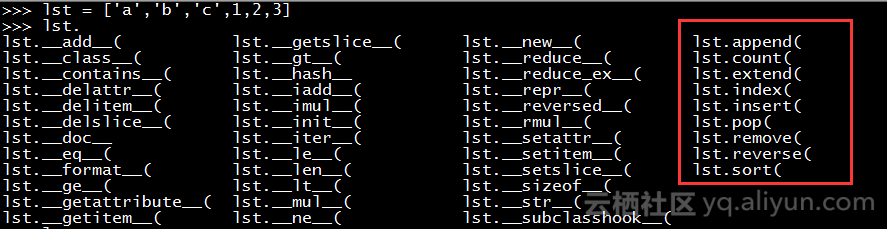
3.1.2 基本操作
# 追加一个元素
>>> lst.append(4)
>>> lst
['a', 'b', 'c', 1, 2, 3, 4]
# 统计列表中a字符出现的次数
>>> lst.count('a')
1
# 将一个列表作为元素添加到lst列表中
>>> a = [5,6]
>>> lst.extend(a)
>>> lst
['a', 'b', 'c', 1, 2, 3, 4, 5, 6]
# 查找元素3的索引位置
>>> lst.index(1)
3
# 在第3个索引位置插入一个元素
>>> lst.insert(3, 0)
>>> lst
['a', 'b', 'c', 0, 1, 2, 3, 4, 5, 6]
# 删除最后一个元素和第3个下标元素
>>> lst.pop()
6
>>> lst.pop(3)
0
>>> lst
['a', 'b', 'c', 1, 2, 3, 4, 5]
# 删除元素是5,如果没有会返回错误
>>> lst.remove("5")
>>> lst
['a', 'b', 'c', 1, 2, 3, 4]
# 倒序排列元素
>>> lst.reverse()
>>> lst
[4, 3, 2, 1, 'c', 'b', 'a']
# 正向排序元素
>>> lst.sort()
>>> lst
[1, 2, 3, 4, 'a', 'b', 'c']
# 列表连接
>>> a = [1,2,3]
>>> b = ['a','b','c']
>>> a + b
[1, 2, 3, 'a', 'b', 'c']
3.1.3 学习新函数对列表排序
# reversed()函数倒序排列
使用此函数会创建一个迭代器,遍历打印才能输出:
>>> lst = ['a', 'b', 'c', 1, 2, 3, 4, 5]
>>> type(reversed(lst))
<type 'listreverseiterator'>
>>> lst2 = []
>>> for i in reversed(lst):
... lst2.append(i)
...
>>> lst2
[5, 4, 3, 2, 1, 'c', 'b', 'a']
# sorted()函数正向排列
>>> lst2 = []
>>> for i in sorted(lst):
... lst2.append(i)
...
>>> lst2
[1, 2, 3, 4, 5, 'a', 'b', 'c']
这里在讲解一个序列生成器range()函数,生成的是一个列表:
>>> type(range(5))
<type 'list'>
>>> for i in range(1,5):
... print i
...
1
2
3
4
当然也可以用上面的排序函数来排序这个生成的序列了:
>>> for i in reversed(range(1,10,3)):
... print i
...
7
4
1
range()函数用法:range(start,end,step)
说明:是不是和列表内置方法结果一样!区别是内置函数不改动原有序列。
3.1.4 切片
>>> lst
[1, 2, 3, 4, 'a', 'b', 'c']
# 返回第一个元素
>>> lst[0]
1
# 返回倒数第一个元素
>>> lst[-1]
'c'
# 取出倒数第一个元素
>>> lst[0:-1]
[1, 2, 3, 4, 'a', 'b']
# 返回第一个至第四个元素
>>> lst[0:4]
[1, 2, 3, 4]
3.1.5 清空列表
方法1:
>>> lst = [1, 2, 3, 4, 'a', 'b', 'c']
>>> lst = []
>>> lst
[]
方法2:
>>> lst = [1, 2, 3, 4, 'a', 'b', 'c']
>>> del lst[:]
>>> lst
[]
# 删除列表
>>> lst = [1, 2, 3, 4, 'a', 'b', 'c']
>>> del lst
>>> lst
Traceback (most recent call last):
File "<stdin>", line 1, in <module>
NameError: name 'lst' is not defined
3.1.6 del语句
del语句也可以删除一个下标范围的元素
>>> lst = [1, 2, 3, 4, 'a', 'b', 'c']
>>> del lst[0:4]
>>> lst
['a', 'b', 'c']
3.1.7 列表推导式
利用其它列表推导出新的列表。
# 通过迭代对象方法
方法1:
>>> lst = []
>>> for i in range(5):
... lst.append(i)
...
>>> lst
[0, 1, 2, 3, 4]
方法2:
>>> lst = []
>>> lst = [i for i in range(5)]
>>> lst
[0, 1, 2, 3, 4]
说明:方法1和方法2,实现方式是一样的,只是方法2用简洁的写法。for循环在下一章会讲。
# 通过已有的列表生成新列表
>>> lst
[0, 1, 2, 3, 4]
>>> lst2 = [i for i in lst if i > 2]
>>> lst2
[3, 4]
3.1.8 遍历列表
如果既要遍历索引又要遍历元素,可以这样写。
方法1:
>>> lst = ['a','b','c',1,2,3]
>>> for i in range(len(lst)):
... print i,lst[i]
...
0 a
1 b
2 c
3 1
4 2
5 3
方法2:
>>> for index, value in enumerate(lst):
... print index,value
...
0 a
1 b
2 c
3 1
4 2
5 3
又学了一个新函数enumrate(),可遍历列表、字符串的下标和元素。
3.2 元组(Tuple)
元组与列表类型,不同之处在于元素的元素不可修改。
2.1 定义元组
t = ('a','b','c',1,2,3)
用小括号括起来,元素以逗号分隔,字符串用单引号引起来,整数不用。
2.2 基本操作
count()和index()方法和切片使用方法与列表使用一样,这里不再讲解。
3.3 集合(set)
集合是一个无序不重复元素的序列,主要功能用于删除重复元素和关系测试。
集合对象还支持联合(union),交集(intersection),差集(difference)和对称差集(sysmmetric difference)数学运算。
需要注意的是,集合对象不支持索引,因此不可以被切片。
3.3.1 定义集合
>>> s = set()
>>> s
set([])
使用set()函数创建集合。
3.3.2 基本操作
# 添加元素
>>> s.add('a')
>>> s
set(['a'])
>>> s.add('b')
>>> s
set(['a', 'b'])
>>> s.add('c')
>>> s
set(['a', 'c', 'b'])
>>> s.add('c')
>>> s
set(['a', 'c', 'b'])
说明:可以看到,添加的元素是无序的,并且不重复的。
# update方法事把传入的元素拆分为个体传入到集合中。与直接set('1234')效果一样。
>>> s.update('1234')
>>> s
set(['a', 'c', 'b', '1', '3', '2', '4'])
# 删除元素
>>> s.remove('4')
>>> s
set(['a', 'c', 'b', '1', '3', '2'])
# 删除元素,没有也不会报错,而remove会报错
>>> s.discard('4')
>>> s
set(['a', 'c', 'b', '1', '3', '2'])
# 删除第一个元素
>>> s.pop()
'a'
>>> s
set(['c', 'b', '1', '3', '2'])
# 清空元素
>>> s.clear()
>>> s
set([])
# 列表转集合,同时去重
>>> lst = ['a','b','c',1,2,3,1,2,3]
>>> s = set(lst)
>>> s
set(['a', 1, 'c', 'b', 2, 3])
3.3.3 关系测试
|
符号
|
描述
|
|
-
|
差集
|
|
&
|
交集
|
|
|
|
合集、并集
|
|
!=
|
不等于
|
|
==
|
等于
|
|
in
|
是成员为真
|
|
not in
|
不是成员为真
|
示例:
# 返回差集
>>> a - b
set(['1', '3', '2'])
>>> b - a
set(['9', '8', '7'])
# 返回交集
>>> a & b
set(['5', '4', '6'])
# 返回合集
>>> a | b
set(['1', '3', '2', '5', '4', '7', '6', '9', '8'])
# 不等于
>>> a != b
True
# 等于
>>> a == b
False
# 存在为真
>>> '1' in a
True
# 不存在为真
>>> '7' not in a
True
博客地址:http://lizhenliang.blog.51cto.com and https://yq.aliyun.com/u/lizhenliang
QQ群:323779636(Shell/Python运维开发群)
QQ群:323779636(Shell/Python运维开发群)
3.4 字典{Dict}
序列是以连续的整数位索引,与字典不同的是,字典以关键字为索引,关键字可以是任意不可变对象(不可修改),通常是字符串或数值。
字典是一个无序键:值(Key:Value)集合,在一字典中键必须是互不相同的,
3.4.1 定义字典
>>> d = {'a':1, 'b':2, 'c':3}
用大括号括起来,一个键对应一个值,冒号分隔,多个键值逗号分隔。
3.4.2 基本操作
# 返回所有键值
>>> d.items()
[('a', 1), ('c', 3), ('b', 2)]
# 返回所有键
>>> d.keys()
['a', 'c', 'b']
# 查看所有值
>>> d.values()
[1, 3, 2]
# 添加键值
>>> d['e'] = 4
>>> d
{'a': 1, 'c': 3, 'b': 2, 'e': 4}
# 获取单个键的值,如果这个键不存在就会抛出KeyError错误
>>> d['a']
>>> 1
# 获取单个键的值,如果有这个键就返回对应的值,否则返回自定义的值no
>>> d.get('a','no')
1
>>> d.get('f','no')
no
# 删除第一个键值
>>> d.popitem()
('a', 1)
>>> d
{'c': 3, 'b': 2, 'e': 4}
# 删除指定键
>>> d.pop('b')
2
>>> d
{'c': 3, 'e': 4}
# 添加其他字典键值到本字典
>>> d
{'c': 3, 'e': 4}
>>> d2 = {'a':1}
>>> d.update(d2)
>>> d
{'a': 1, 'c': 3, 'e': 4}
# 拷贝为一个新字典
>>> d
{'a': 1, 'c': 3, 'e': 4}
>>> dd = d.copy()
>>> dd
{'a': 1, 'c': 3, 'e': 4}
>>> d
{'a': 1, 'c': 3, 'e': 4}
# 判断键是否在字典
>>> d.has_key('a')
True
>>> d.has_key('b')
False
3.4.3 可迭代对象
字典提供了几个获取键值的迭代器,方便我们在写程序时处理,就是下面以iter开头的方法。
d.iteritems() # 获取所有键值,很常用
d.iterkeys() # 获取所有键
d.itervalues() # 获取所有值
# 遍历iteritems()迭代器
>>> for i in d.iteritems():
... print i
...
('a', 1)
('c', 3)
('b', 2)
说明:以元组的形式打印出了键值
如果我们只想得到键或者值呢,就可以通过元组下标来分别获取键值:
>>> for i in d.iteritems():
... print "%s:%s" %(i[0],i[1])
...
a:1
c:3
b:2
有比上面更好的方法实现:
>>> for k, v in d.iteritems():
... print "%s: %s" %(k, v)
...
a: 1
c: 3
b: 2
这样就可以很方面处理键值了!
# 遍历其他两个迭代器也是同样的方法
>>> for i in d.iterkeys():
... print i
...
a
c
b
>>> for i in d.itervalues():
... print i
...
1
3
2
说明:上面用到了for循环来遍历迭代器,for循环的用法在下一章会详细讲解。
3.4.4 一个键多个值
一个键对应一个值,有些情况无法满足需求,字典允许一个键多个值,也就是嵌入其他数组,包括字典本身。
# 嵌入列表
>>> d = {'a':[1,2,3], 'b':2, 'c':3}
>>> d['a']
[1, 2, 3]
>>> d['a'][0] # 获取值
1
>>> d['a'].append(4) # 追加元素
>>> d
{'a': [1, 2, 3, 4], 'c': 3, 'b': 2}
# 嵌入元组
>>> d = {'a':(1,2,3), 'b':2, 'c':3}
>>> d['a'][1]
2
# 嵌入字典
>>> d = {'a':{'d':4,'e':5}, 'b':2, 'c':3}
>>> d['a']
{'e': 5, 'd': 4}
>>> d['a']['d'] # 获取值
4
>>> d['a']['e'] = 6 # 修改值
>>> d
{'a': {'e': 6, 'd': 4}, 'c': 3, 'b': 2}
3.5 额外的数据类型
colloctions()函数在内置数据类型基础上,又增加了几个额外的功能,替代内建的字典、列表、集合、元组及其他数据类型。
3.5.1 namedtuple
namedtuple函数功能是使用名字来访问元组元素。
语法:namedtuple("名称", [名字列表])
>>> from collections import namedtuple
>>> nt = namedtuple('point', ['a', 'b', 'c'])
>>> p = nt(1,2,3)
>>> p.a
1
>>> p.b
2
>>> p.c
3
namedtuple函数规定了tuple元素的个数,并定义的名字个数与其对应。
3.5.2 deque
当list数据量大时,插入和删除元素会很慢,deque的作用就是为了快速实现插入和删除元素的双向列表。
>>> from collections import deque
>>> q = deque(['a', 'b', 'c'])
>>> q.append('d')
>>> q
deque(['a', 'b', 'c', 'd'])
>>> q.appendleft(0)
>>> q
deque([0, 'a', 'b', 'c', 'd'])
>>> q.pop()
'd'
>>> q.popleft()
0
实现了插入和删除头部和尾部元素。比较适合做队列。
3.5.3 Counter
顾名思义,计数器,用来计数。
例如,统计字符出现的个数:
>>> from collections import Counter
>>> c = Counter()
>>> for i in "Hello world!":
... c[i] += 1
...
>>> c
Counter({'l': 3, 'o': 2, '!': 1, ' ': 1, 'e': 1, 'd': 1, 'H': 1, 'r': 1, 'w': 1})
结果是以字典的形式存储,实际Counter是dict的一个子类。
3.5.4 OrderedDict
内置dict是无序的,OrderedDict函数功能就是生成有序的字典。
例如,根据前后插入顺序排列:
>>> d = {'a':1, 'b':2, 'c':3}
>>> d # 默认dict是无序的
{'a': 1, 'c': 3, 'b': 2}
>>> from collections import OrderedDict
>>> od = OrderedDict()
>>> od['a'] = 1
>>> od['b'] = 2
>>> od['c'] = 3
>>> od
OrderedDict([('a', 1), ('b', 2), ('c', 3)])
# 转为字典
>>> import json
>>> json.dumps(od)
'{"a": 1, "b": 2, "c": 3}'
OrderedDict输出的结果是列表,元组为元素,如果想返回字典格式,可以通过json模块进行转化。
3.6 数据类型转换
3.6.1 常见数据类型转换
# 转整数
>>> i = '1'
>>> type(i)
<type 'str'>
>>> type(int(i))
<type 'int'>
# 转浮点数
>>> f = 1
>>> type(f)
<type 'int'>
>>> type(float(f))
<type 'float'>
# 转字符串
>>> i = 1
>>> type(i)
<type 'int'>
>>> type(int(1))
<type 'int'>
# 字符串转列表
方式1:
>>> s = 'abc'
>>> lst = list(s)
>>> lst
['a', 'b', 'c']
方式2:
>>> s = 'abc 123'
>>> s.split()
['abc', '123']
# 列表转字符串
>>> s = ""
>>> s = ''.join(lst)
>>> s
'abc'
# 元组转列表
>>> lst
['a', 'b', 'c']
>>> t = tuple(lst)
>>> t
('a', 'b', 'c')
# 列表转元组
>>> lst = list(t)
>>> lst
['a', 'b', 'c']
# 字典格式字符串转字典
方法1:
>>> s = '{"a": 1, "b": 2, "c": 3}'
>>> type(s)
<type 'str'>
>>> d = eval(s)
>>> d
{'a': 1, 'c': 3, 'b': 2}
>>> type(d)
<type 'dict'>
方法2:
>>> import json
>>> s = '{"a": 1, "b": 2, "c": 3}'
>>> json.loads(s)
{u'a': 1, u'c': 3, u'b': 2}
>>> d = json.loads(s)
>>> d
{u'a': 1, u'c': 3, u'b': 2}
>>> type(d)
<type 'dict'>
3.6.2 学习两个新内建函数
1) join()
join()函数是字符串操作函数,用于字符串连接。
# 字符串时,每个字符作为单个体
>>> s = "ttt"
>>> ".".join(s)
't.t.t'
# 以逗号连接元组元素,生成字符串,与上面的列表用法一样。
>>> t = ('a', 'b', 'c')
>>> s = ",".join(t)
>>> s
'a,b,c'
# 字典
>>> d = {'a':1, 'b':2, 'c':3}
>>> ",".join(d)
'a,c,b'
2) eval()
eval()函数将字符串当成Python表达式来处理。
>>> s = "abc"
>>> eval('s')
'abc'
>>> a = 1
>>> eval('a + 1')
2
>>> eval('1 + 1')
2
第四章 Python运算符和流程控制
在第一章的时候讲解了运算操作符和赋值操作符,这章来学习下其他常用操作符。
4.1 基本运算符
4.1.1 比较操作符
|
操作符
|
描述
|
示例
|
|
==
|
相等
|
>>> 1 == 1 True
|
|
!=
|
不相等
|
>>> 1 != 1 False
|
|
>
|
大于
|
>>> 2 > 1 True
|
|
<
|
小于
|
>>> 2 < 1 False
|
|
>=
|
大于等于
|
>>> 1 >= 1 True
|
|
<=
|
小于等于
|
>>> 1 <= 1 True
|
4.1.2 逻辑运算符
逻辑运算符常用于表达式判断。
|
操作符
|
描述
|
|
and
|
与
|
|
or
|
或
|
|
not
|
非
|
示例:
>>> a = "a"
>>> b = "b"
>>> a and b
'b'
>>> a or b
'a'
>>> a = ""
>>> b = "b"
>>> a and b
''
>>> a or b
'b'
and操作符判断表达式,如果a和b都为真,返回b的值,否则返回a的值。
or操作符也是判断表达式,如果a和b都为真,返回a的值,否则返回b的值。
类似于shell里的&&和||:[ 'a' == 'b' ] && echo no || echo yes
>>> a = ""
>>> if not a:
... print "yes"
... else:
... print "no"
...
yes
>>> a = "a"
>>> if not a:
... print "yes"
... else:
... print "no"
...
no
not操作符用于布尔值(true和false)判断不为真,与if语句连用。上面是不为真用not,那为真时怎么弄呢?
>>> a = "a"
>>> if a:
... print "yes"
... else:
... print "no"
...
yes
>>> a = ""
>>> if a:
... print "yes"
... else:
... print "no"
...
no
4.1.3 成员运算符
|
操作符
|
描述
|
|
in
|
在对象里
|
|
not in
|
不在对象里
|
示例:
>>> 'a' in 'abc'
True
>>> 'd' in 'abc'
False
>>> lst = ['a','b','c']
>>> 'a' in lst
True
>>> 'd' in lst
False
>>> 'a' not in 'abc'
False
>>> 'd' not in 'abc'
True
>>> 'd' not in lst
True
4.1.4 标识运算符
|
操作符
|
描述
|
|
is
|
内存地址相等
|
|
is not
|
内存地址不相等
|
示例:
>>> a = []
>>> b = []
>>> id(a)
139741563903296
>>> id(b)
139741563902144
>>> a is b
False
>>> a is not b
True
这里用到了id()函数,用于获取对象在内存的地址。
4.2 条件判断
4.2.1 单分支
>>> a = 20
>>> if a < 18:
... print "no"
... else:
... print "yes"
...
yes
有时候一个简单的判断语句,感觉这样写麻烦,有没有一条命令搞定的。
有的,简写if语句:
>>> a = 20
>>> result = ("yes" if a == 20 else "no")
>>> result
'yes'
>>> type(result)
<type 'str'>
# 有时会看到别人代码用中括号,意思把结果存储为一个列表
>>> result = ["yes" if a == 20 else "no"]
>>> result
['yes']
>>> type(result)
<type 'list'>
4.2.2 多分支
>>> a = 20
>>> if a < 18:
... print "no"
... elif a == 20:
... print "yes"
... else:
... print "other"
...
yes
4.2.3 pass语句
>>> a = 20
>>> if a < 18:
... print "no"
... elif a == 20:
... pass
... else:
... print "other"
...
pass语句作用是不执行当前代码块,与shell中的冒号做作用一样。
博客地址:http://lizhenliang.blog.51cto.com and https://yq.aliyun.com/u/lizhenliang
QQ群:323779636(Shell/Python运维开发群)
QQ群:323779636(Shell/Python运维开发群)
4.3 循环语句
4.3.1 for
1)迭代对象
遍历字符串,每个字符当做单个遍历:
>>> for i in "abc":
... print i
...
a
b
c
使用range()函数生成一个数字序列列表,并遍历:
>>> for i in range(1,5):
... print i
...
1
2
3
4
回顾下第三章讲的遍历字典:
>>> d = {'a':1, 'b':2, 'c':3}
>>> for i in d.iteritems():
... print "%s:%s" %(i[0],i[1])
...
a:1
c:3
b:2
2)嵌套循环
逐个循环判断外层列表里元素是否存在内层列表:
>>> for i in range(1,6):
... for x in range(3,8):
... if i == x:
... print i
...
3
4
5
3)简写语句
简写for语句:
>>> result = (x for x in range(5))
>>> result
<generator object <genexpr> at 0x030A4FD0>
>>> type(result)
<type 'generator'>
说明:在这里用小括号,会生成一个生成器,在这里知道下就可以了,不过多讲解,后面会专门生成器用途。
# 同样用中括号会以列表存储
>>> result = [ x for x in range(5)]
>>> type(result)
<type 'list'>
>>> result
[0, 1, 2, 3, 4]
for和if语句写一行:
>>> result = [ x for x in range(5) if x % 2 == 0]
>>> result
[0, 2, 4]
4.3.2 while
语法:
while 表达式:
执行语句...
1)输出序列
当条件满足时,停止循环:
>>> while count < 5:
... print count
... count += 1
...
0
1
2
3
4
2)死循环
>>> import time
>>> i = 1
>>> while True:
... print i
... i += 1
... time.sleep(0.5)
...
1
2
3
...... # 会一直循环,直到海枯石烂,天荒地老...
注意:当表达式值为true或者非零时,都会一直循环。
4.3.3 continue和break语句
continue当满足条件时,跳出本次循环。
break当满足条件时,跳出所有循环。
for和while用法一样。
1)基本使用
满足条件跳出当前循环:
#!/usr/bin/env python
for i in range(1,6):
if i == 3:
continue
else:
print i
# python test.py
1
2
4
5
#!/usr/bin/env python
count = 0
while count < 5:
count += 1
if count == 3:
continue
else:
print count
# python test.py
1
2
4
5
满足条件终止循环:
#!/usr/bin/env python
for i in range(1,6):
if i == 3:
break
else:
print i
# python test.py
1
2
#!/usr/bin/env python
count = 0
while count < 5:
count += 1
if count == 3:
break
else:
print count
# python test.py
1
2
2)输入错误次数超过三次退出
例如:提示用户输入名字,如果名字是xiaoming输入正确退出,否则一直提示重新输入,直到三次退出。
#!/usr/bin/env python
count = 0
while 1:
if count < 3:
name = raw_input("Please input your name: ").strip() # .strip()去除首尾空格
if len(name) == 0:
print "Input can not be empty!"
count += 1
continue
elif name == "xiaoming":
print "OK."
break
else:
print "Name input error, please input again!"
count += 1
else:
print "Error three times, Exit!"
break
4.3.4 else语句
else语句会在循环正常执行完才执行。在for循环用法也一样。
>>> count = 0
>>> while count < 5:
... print count
... count += 1
... else:
... print "end"
...
0
1
2
3
4
end
>>> count = 0
>>> while count < 5:
... print count
... break
... else:
... print "end"
...
0
第五章 Python函数你知多少
函数作用:把一些复杂的代码封装起来,函数一般都是一个功能,用的时候才调用,提高重复利用率和简化程序结构。
5.1 语法
def functionName(parms1, parms2, ...):
code block
return expression
函数以def关键字开头,空格后跟函数名,括号里面是参数,用于传参,函数代码段里面引用。
5.2 函数定义与调用
# 定义函数
>>> def func():
... print "Hello world!"
... return "Hello world!"
...
# 调用函数
>>> func()
Hello world!
'Hello world!'
当我们定义好函数,是不执行的,没有任何输出。当输入函数名后跟双小括号才会执行函数里写的代码。
顺便说下print和return区别:
有没有点奇怪!为什么print和return输出一样呢,return就加个单引号,貌似也没啥明显区别啊!其实在解释器下所有的结果都会输出的。
先了解下return作用:结束函数,并返回一个值。如果不跟表达式,会返回一个None。
好,那么我们深入了解下他们区别,举个例子,写个py程序:
#!/usr/bin/env python
def func():
print "1: Hello world!"
return "2: Hello world!"
func()
# python test.py
1: Hello world!
明白点了嘛?print是打印对象的值,而return是返回对象的值。也就是说你return默认是将对象值存储起来,要想知道里面的值,可以用print可以打印。
#!/usr/bin/env python
def func():
print "1: Hello world!"
return "2: Hello world!"
print func()
# python test.py
1: Hello world!
2: Hello world!
为什么函数里面不用print就在这里,往往我们定义一个函数是不需要打印的,而是交给其他代码去处理这个函数返回值。当然,print在调试函数代码时会起到很好的帮助。
5.3 函数参数
5.3.1 接受参数
>>> def func(a, b):
... print a + b
...
>>> func(1, 2)
3
>>> func(1, 2, 3)
Traceback (most recent call last):
File "<stdin>", line 1, in <module>
TypeError: func() takes exactly 2 arguments (3 given)
a和b可以理解为是个变量,可由里面代码块引用。调用函数时,小括号里面的表达式数量要对应函数参数数量,并且按传参按位置赋予函数参数位置。如果数量不对应,会抛出TypeError错误。
当然,函数参数也可以是数组:
>>> def func(a):
... print a
...
>>> func([1,2,3])
[1, 2, 3]
>>> func({'a':1,'b':2})
{'a': 1, 'b': 2}
如果不想一一对应传参,可以指定参数值:
>>> def func(a,b):
... print a + b
...
>>> func(b=2,a=1)
3
5.3.2 函数参数默认值
参数默认值是预先定义好,如果调用函数时传入了这个值,那么将以传入的为实际值,否则是默认值。
>>> def func(a, b=2):
... print a + b
...
>>> func(1)
3
>>> func(1, 3)
4
5.3.3 接受任意数量参数
上面方式固定了参数多个,当不知道多少参数时候可以用以下方式。
单个星号使用:
>>> def func(*a):
... print a
...
>>> func(1,2,3)
(1, 2, 3)
单个星号存储为一个元组。
两个星号使用:
>>> def func(**a):
... print a
...
>>> func(a=1, b=2, c=3)
{'a': 1, 'c': 3, 'b': 2}
两个星号存储为一个字典。可见它们都是以数组的形式传入。
你也许在查资料的时候,会看到这样写的函数参数(*args, **kwargs),与上面只是名字不一样罢了 :
>>> def func(*args, **kwargs):
... print args
... print kwargs
...
>>> func(1,2,3,a=1,b=2,c=3)
(1, 2, 3)
{'a': 1, 'c': 3, 'b': 2}
与普通参数一起使用:
>>> def func(a, b, *c):
... print a + b
... print c
...
>>> func(1,2,3,5,6)
3
(3, 5, 6)
>>> def func(a, b, **c):
... print a + b
... print c
...
>>> func(1,2,a=1,b=2,c=3)
Traceback (most recent call last):
File "<stdin>", line 1, in <module>
TypeError: func() got multiple values for keyword argument 'a'
>>> func(1,2,c=3,d=4,e=5)
3
{'c': 3, 'e': 5, 'd': 4}
抛出异常,是因为传入的第一个参数1,和第三个参数a=1,都认为是传入函数参数a了。请注意下这点。
5.4 作用域
作用域听着挺新鲜,其实很简单,就是限制一个变量或一段代码可用范围,不在这个范围就不可用。提高了程序逻辑的局部性,减少名字冲突。
作用域范围一般是:全局(global)->局部(local)->内置(build-in)
先看看全局和局部变量:
>>> a = 2
>>> def func():
... b = 3
...
>>> a
2
>>> b
Traceback (most recent call last):
File "<stdin>", line 1, in <module>
NameError: name 'b' is not defined
a变量的作用域是整个代码中有效,称为全局变量,也就是说一段代码最开始定义的变量。
b变量的作用域在函数内部,也就是局部变量,在函数外是不可引用的。
这么一来,全局变量与局部变量即使名字一样也不冲突。
如果函数内部的变量也能在全局引用,需要使用global声明:
>>> def func():
... global b
... b = 3
...
>>> b
Traceback (most recent call last):
File "<stdin>", line 1, in <module>
NameError: name 'b' is not defined
>>> func()
>>> b
3
抛出异常,说明一个问题,当函数没引用使用,里面的代码块是没有解释的。
使用global声明变量后外部是可以调用函数内部的变量的。
5.5 嵌套函数
# 不带参数
>>> def func():
... x = 2
... def func2():
... return x
... return func2 # 返回func2函数
...
>>> func()()
2
>>> func2()
Traceback (most recent call last):
File "<stdin>", line 1, in <module>
NameError: name 'func2' is not defined
>>> def func():
... x = 2
... global func2
... def func2():
... return x
... return func2
...
>>> func()()
2
>>> func2()
2
内层函数可以访问外层函数的作用域。内嵌函数只能被外层函数调用,但也可以使用global声明全局作用域。
调用内部函数的另一种用法:
# 带参数
>>> def func(a):
... def func2(b):
... return a * b
... return func2
...
>>> f = func(2) # 变量指向函数。是的,变量可以指向函数。
>>> f(5)
10
>>> func(2)(5)
10
内层函数可以访问外层函数的作用域 。但变量不能重新赋值,举例说明:
>>> def func():
... x = 2
... def func2():
... x = 3
... func2()
... return x
...
>>> func()
2
>>> def func():
... x = 2
... def func2():
... x += 1
... func2()
... return x
...
>>> func()
Traceback (most recent call last):
File "<stdin>", line 1, in <module>
File "<stdin>", line 5, in func
File "<stdin>", line 4, in func2
UnboundLocalError: local variable 'x' referenced before assignment
5.6 闭包
“官方”的解释是:所谓“闭包”,指的是一个拥有许多变量和绑定了这些变量的环境的表达式(通常是一个函数),因而这些变量也是该表达式的一部分。
其实,上面嵌套函数就是闭包一种方式:
>>> def func(a):
... def func2(b):
... return a * b
... return func2
...
>>> f = func(2) # 变量指向函数。是的,变量可以指向函数。
>>> f(5)
10
func是一个函数,里面又嵌套了一个函数func2,外部函数传过来的a参数,这个变量会绑定到函数func2。func函数以内层函数func2作为返回值,然后把func函数存储到f变量中。当外层函数调用内层函数时,内层函数才会执行(func()()),就创建了一个闭包。
5.7 高阶函数
高阶函数是至少满足这两个任意中的一个条件:
1) 能接受一个或多个函数作为输入。
2)输出一个函数。
abs、map、reduce都是高阶函数,后面会讲解。
其实,上面所讲的嵌套函数也是高阶函数。
举例说明下高阶函数:
>>> def f(x):
... return x * x
...
>>> def f2(func, y):
... return func(y)
...
>>> f2(f, 2)
4
这里的f2就是一个高阶函数,因为它的第一个参数是一个函数,满足了第一个条件。
博客地址:http://lizhenliang.blog.51cto.com and https://yq.aliyun.com/u/lizhenliang
QQ群:323779636(Shell/Python运维开发群)
QQ群:323779636(Shell/Python运维开发群)
5.8 函数装饰器
装饰器(decorator)本身是一个函数,包装另一个函数或类,它可以让其他函数在不需要改动代码情况下动态增加功能,装饰器返回的也是一个函数对象。
先举一个例子,说明下装饰器的效果,定义两个函数,分别传参计算乘积:
#!/usr/bin/python
# -*- coding: utf-8 -*-
def f1(a, b):
print "f1 result: " + str(a * b)
def f2(a, b):
print "f2 result: " + str(a * b)
f1(1, 2)
f2(2, 2)
# python test.py
f1 result: 2
f2 result: 4
跟预期的那样,打印出了乘积。
如果我想给这两个函数加一个打印传入的参数,怎么办,应该这样:
#!/usr/bin/python
# -*- coding: utf-8 -*-
def f1(a, b):
print "f1 parameter: %d %d" %(a, b)
print "f1 result: " + str(a * b)
def f2(a, b):
print "f2 parameter: %d %d" %(a, b)
print "f2 result: " + str(a * b)
f1(1, 2)
f2(2, 2)
# python test.py
f1 parameter: 1 2
f1 result: 2
f2 parameter: 2 2
f2 result: 4
按照所想的打印了传入的参数,有没有方法能更简洁点呢,来看看装饰器后的效果。
#!/usr/bin/python
# -*- coding: utf-8 -*-
def deco(func):
def f(a, b):
print "%s parameter: %d %d" %(func.__name__, a, b)
return func(a, b)
return f
@deco
def f1(a, b):
print "f1 result: " + str(a * b)
@deco
def f2(a, b):
print "f2 result: " + str(a * b)
f1(1, 2)
f2(2, 2)
# python test.py
f1 parameter: 1 2
f1 result: 2
f2 parameter: 2 2
f2 result: 4
可见用装饰器也实现了上面方法,给要装饰的函数添加了装饰器定义的功能,这种方式显得是不是更简洁呢!
好,那么我们继续深入学习装饰器用法。
5.8.1 无参数装饰器
方式1:函装饰器函数装饰函数
#!/usr/bin/python
# -*- coding: utf-8 -*-
def deco(func):
return func
def f1():
print "Hello world!"
myfunc = deco(f1)
myfunc()
# python test.py
Hello world!
方式2:使用语法糖"@"来装饰函数
#!/usr/bin/python
# -*- coding: utf-8 -*-
def deco(func):
return func
@deco
def f1():
print "Hello world!"
f1()
# python test.py
Hello world!
方式1是将一个函数作为参数传给装饰器函数。
方式2使用了语法糖,也实现同样效果。
其实两种方式结果一样,方式1需要每次使用装饰器时要先变量赋值下,而方式2使用装饰器时直接用语法糖"@"引用,会显得更方便些,实际代码中一般也都是用语法糖。
5.8.2 带参数装饰器
#!/usr/bin/python
# -*- coding: utf-8 -*-
def deco(func):
def f(a, b):
print "function name: %s" % func.__name__ # __name__属性是获取函数名,为了说明执行了这个函数
return func(a, b) # 用接受过来的func函数来处理传过来的参数
return f
@deco
def f1(a, b):
print "Hello world!"
print a + b
f1(2, 2)
# python test.py
function name: f1
Hello world!
4
3)不固定参数
#!/usr/bin/python
# -*- coding: utf-8 -*-
def log(func):
def deco(*args, **kwargs):
print "function name: %s" % func.__name__
return func(*args, **kwargs)
return deco
@log
def f1(a, b):
print "f1() run."
print a + b
f1(1,2)
# python test.py
function name: f1
f1() run.
3
4)装饰器加参数
#!/usr/bin/python
# -*- coding: utf-8 -*-
# 三层函数,调用log函数返回deco函数,再调用返回的函数deco,则返回值是_deco函数
def log(arg):
def deco(func):
def _deco(*args, **kwargs):
print "%s - function name: %s" % (arg, func.__name__)
return func(*args, **kwargs)
return _deco
return deco
@log("info")
def f1(a, b):
print "f1() run."
print a + b
f1(1,2)
# python test.py
info - function name: f1
f1() run.
3
再举一个例子,给函数输出字符串带颜色:
#!/usr/bin/python
# -*- coding: utf-8 -*-
def fontColor(color):
begin = "\033["
end = "\033[0m"
d = {
'red':'31m',
'green':'32m',
'yellow':'33m',
'blue':'34m'
}
def deco(func):
print begin + d[color] + func() + end
return deco
@fontColor("red")
def f():
return "Hello world!"
@fontColor("green")
def f2():
return "Hello world!"
可以看出装饰器处理方式满足了高阶函数的条件,所以装饰器也是一种高阶函数。
装饰器优点:灵活给装饰器增加功能,而不修改函数,提高代码可重复利用性,增加可读性。
5.9 匿名函数
匿名函数:定义函数的一种形式,无需定义函数名和语句块,因此代码逻辑会受到局限,同时也减少代码量,增加可读性。
在Python中匿名函数是lambda。
举例子说明def关键字与lambda函数定义函数区别:
# 普通函数
>>> def func():
... return "Hello world!"
...
>>> func()
>>> def func(a, b):
... return a * b
...
>>> func(2, 2)
4
# 匿名函数
>>> f = lambda:"Hello world!"
>>> f()
'Hello world!'
>>> f = lambda a, b: a * b # 冒号左边是函数参数,右边是返回值
>>> f(2, 2)
4
lambda函数一行就写成一个函数功能,省去定义函数过程,让代码更加精简。
5.10 内置高阶函数
5.10.1 map()
语法:map(function, sequence[, sequence, ...]) -> list
将序列中的元素通过函数处理返回一个新列表。
例如:
>>> lst = [1,2,3,4,5]
>>> map(lambda x:str(x)+".txt", lst)
['1.txt', '2.txt', '3.txt', '4.txt', '5.txt']
5.10.2 filter()
语法:filter(function or None, sequence) -> list, tuple, or string
将序列中的元素通过函数处理返回一个新列表、元组或字符串。
例如:过滤列表中的奇数
>>> lst = [1,2,3,4,5]
>>> filter(lambda x:x%2==0, lst)
[2, 4]
5.10.3 reduce()
语法:reduce(function, sequence[, initial]) -> value
reduce()是一个二元运算函数,所以只接受二元操作函数。
例如:计算列表总和
>>> lst = [1,2,3,4,5]
>>> reduce(lambda x,y:x+y, lst)
15
先将前两个元素相加等于3,再把结果与第三个元素相加等于6,以此类推。这就是reduce()函数功能。
第六章 Python类(面向对象编程)
什么是面向对象编程?
面向对象编程(Object Oriented Programming,OOP,面向对象程序设计)是一种计算机编程架构。Python就是这种编程语言。
面向对象程序设计中的概念主要包括:对象、类、继承、动态绑定、封装、多态性、消息传递、方法。
1)对象:类的实体,比如一个人。
2)类:一个共享相同结构和行为的对象的集合。通俗的讲就是分类,比如人是一类,动物是一类。
3)继承:类之间的关系,比如猫狗是一类,他们都有四条腿,狗继承了这个四条腿,拥有了这个属性。
4)动态绑定:在不修改源码情况下,动态绑定方法来给实例增加功能。
5)封装:把相同功能的类方法、属性封装到类中,比如人两条腿走路,狗有四条腿走路,两个不能封装到一个类中。
6)多态性:一个功能可以表示不同类的对象,任何对象可以有不同的方式操作。比如一个狗会走路、会跑。
7)消息传递:一个对象调用了另一个对象的方法。
8)方法:类里面的函数,也称为成员函数。
对象=属性+方法。
属性:变量。
方法:函数。
实例化:创建一个类的具体实例对象。比如一条泰迪。
什么是类?
类是对对象的抽象,对象是类的实体,是一种数据类型。它不存在内存中,不能被直接操作,只有被实例化对象时,才会变的可操作。
类是对现实生活中一类具有共同特征的事物的抽象描述。
6.1 类和类方法语法
# 类
class ClassName():
pass
# 类中的方法
def funcName(self):
pass
self代表类本身。类中的所有的函数的第一个参数必须是self。
6.2 类定义与调用
#!/usr/bin/python
# -*- coding: utf-8 -*-
class MyClass():
x = 100
def func(self, name):
return "Hello %s!" % name
def func2(self):
return self.x
mc = MyClass() # 类实例化,绑定到变量mc
print mc.x # 类属性引用
print mc.func("xiaoming") # 调用类方法
print mc.func2()
# python test.py
100
Hello xiaoming!
100
上面示例中,x变量称为类属性,类属性又分为类属性和实例属性:
1)类属性属于类本身,通过类名访问,一般作为全局变量。比如mc.x
2)如果类方法想调用类属性,需要使用self关键字调用。比如self.x
3)实例属性是实例化后对象的方法和属性,通过实例访问,一般作为局部变量。下面会讲到。
4)当实例化后可以动态类属性,下面会讲到。
类方法调用:
1)类方法之间调用:self.<方法名>(参数),参数不需要加self
2)外部调用:<实例名>.<方法名>
6.3 类的说明
给类添加注释,提高可阅读性,可通过下面方式查看。
方法1:
>>> class MyClass:
... """
... 这是一个测试类.
... """
... pass
...
>>> print MyClass.__doc__
这是一个测试类.
>>>
方法2:
>>> help(MyClass)
Help on class MyClass in module __main__:
class MyClass
| 这是一个测试类.
6.4 类内置方法
|
内置方法
|
描述
|
|
__init__(self, ...)
|
初始化对象,在创建新对象时调用 |
|
__del__(self)
|
释放对象,在对象被删除之前调用
|
|
__new__(cls, *args, **kwd)
|
实例的生成操作,在__init__(self)之前调用 |
|
__str__(self)
|
在使用print语句时被调用,返回一个字符串
|
|
__getitem__(self, key)
|
获取序列的索引key对应的值,等价于seq[key]
|
|
__len__(self)
|
在调用内建函数len()时被调用
|
|
__cmp__(str, dst)
|
比较两个对象src和dst
|
|
__getattr__(s, name)
|
获取属性的值
|
|
__setattr__(s, name, value)
|
设置属性的值
|
|
__delattr__(s, name)
|
删除属性
|
|
__gt__(self, other)
|
判断self对象是否大于other对象
|
|
__lt__(self, other)
|
判断self对象是否小于other对象
|
|
__ge__(self, other)
|
判断self对象是否大于或等于other对象
|
|
__le__(self, other)
|
判断self对象是否小于或等于other对象
|
|
__eq__(self, other)
|
判断self对象是否等于other对象
|
|
__call__(self, *args)
|
把实例对象作为函数调用 |
6.5 初始化实例属性
很多类一般都有初始状态的,常常定义对象的共同特性,也可以用来定义一些你希望的初始值。
Python类中定义了一个构造函数__init__,对类中的实例定义一个初始化对象,常用于初始化类变量。当类被实例化,第二步自动调用的函数,第一步是__new__函数。
__init__构造函数也可以让类传参,类似于函数的参数。
__init__构造函数使用:
#!/usr/bin/python
# -*- coding: utf-8 -*-
class MyClass():
def __init__(self):
self.name = "xiaoming"
def func(self):
return self.name
mc = MyClass()
print mc.func()
# python test.py
xiaoming
__init__函数定义到类的开头.self.name变量是一个实例属性,只能在类方法中使用,引用时也要这样self.name。
类传参:
#!/usr/bin/python
# -*- coding: utf-8 -*-
class MyClass():
def __init__(self, name):
self.name = name
def func(self, age):
return "name: %s,age: %s" %(self.name, age)
mc = MyClass('xiaoming') # 第一个参数是默认定义好的传入到了__init__函数
print mc.func('22')
# python test.py
Name: xiaoming, Age: 22
6.6 类私有化(私有属性)
6.6.1 单下划线
实现模块级别的私有化,以单下划线开头的变量和函数只能类或子类才能访问。当from modulename import * 时将不会引入以单下划线卡头的变量和函数。
#!/usr/bin/python
# -*- coding: utf-8 -*-
class MyClass():
_age = 21
def __init__(self, name=None):
self._name = name
def func(self, age):
return "Name: %s, Age: %s" %(self._name, age)
mc = MyClass('xiaoming')
print mc.func('22')
print mc._name
print mc._age
# python test.py
Name: xiaoming, Age: 22
xiaoming
21
_age和self._name变量其实就是做了个声明,说明这是个内部变量,外部不要去引用它。
6.6.2 双下划线
以双下划线开头的变量,表示私有变量,受保护的,只能类本身能访问,连子类也不能访问。避免子类与父类同名属性冲突。
#!/usr/bin/python
# -*- coding: utf-8 -*-
class MyClass():
__age = 21
def __init__(self, name=None):
self.__name = name
def func(self, age):
return "Name: %s, Age: %s" %(self.__name, age)
mc = MyClass('xiaoming')
print mc.func('22')
print mc.__name
print mc.__age
# python test.py
Name: xiaoming, Age: 22
Traceback (most recent call last):
File "test.py", line 12, in <module>
print mc.__name
AttributeError: MyClass instance has no attribute '__name'
可见,在单下划线基础上又加了一个下划线,同样方式类属性引用,出现报错。说明双下划线变量只能本身能用。
如果想访问私有变量,可以这样:
#!/usr/bin/python
# -*- coding: utf-8 -*-
class MyClass():
__age = 21
def __init__(self, name=None):
self.__name = name
def func(self, age):
return "Name: %s, Age: %s" %(self.__name, age)
mc = MyClass('xiaoming')
print mc.func('22')
print mc._MyClass__name
print mc._MyClass__age
# python test.py
Name: xiaoming, Age: 22
xiaoming
21
self.__name变量编译成了self._MyClass__name,以达到不能被外部访问的目的,并没有真正意义上的私有。
6.6.3 特殊属性(首尾双下划线)
一般保存对象的元数据,比如__doc__、__module__、__name__:
>>> class MyClass:
"""
这是一个测试类说明的类。
"""
pass
# dic()返回对象内变量、方法
>>> dir(MyClass)
['__doc__', '__module__']
>>> MyClass.__doc__
'\n\t\xd5\xe2\xca\xc7\xd2\xbb\xb8\xf6\xb2\xe2\xca\xd4\xc0\xe0\xcb\xb5\xc3\xf7\xb5\xc4\xc0\xe0\xa1\xa3\n\t'
>>> MyClass.__module__
'__main__'
>>> MyClass.__name__
'MyClass'
这里用到了一个新内置函数dir(),不带参数时,返回当前范围内的变量、方法的列表。带参数时,返回参数的属性、方法的列表。
Python自己调用的,而不是用户来调用。像__init__ ,你可以重写。
6.7 类的继承
子类继承父类,子类将继承父类的所有方法和属性,提高代码重用。
1)简单继承
#!/usr/bin/python
# -*- coding: utf-8 -*-
class Parent():
def __init__(self, name=None):
self.name = name
def func(self, age):
return "Name: %s, Age: %s" %(self.name, age)
class Child(Parent):
pass
mc = Child('xiaoming')
print mc.func('22')
print mc.name
# python test.py
Name: xiaoming, Age: 22
xiaoming
2)子类实例初始化
如果子类重写了构造函数,那么父类的构造函数将不会执行:
#!/usr/bin/python
# -*- coding: utf-8 -*-
class Parent():
def __init__(self):
self.name_a = "xiaoming"
def funcA(self):
return "function A: %s" % self.name_a
class Child(Parent):
def __init__(self):
self.name_b = "zhangsan"
def funcB(self):
return "function B: %s" % self.name_b
mc = Child()
print mc.name_b
print mc.funcB()
print mc.funcA()
# python test.py
zhangsan
function B: zhangsan
Traceback (most recent call last):
File "test2.py", line 17, in <module>
print mc.funcA()
File "test2.py", line 7, in funcA
return "function A: %s" % self.name_a
AttributeError: Child instance has no attribute 'name_a'
抛出错误,提示调用funcA()函数时,没有找到name_a属性,也就说明了父类的构造函数并没有执行。
如果想解决这个问题,可通过下面两种方法:
方法1:调用父类构造函数
#!/usr/bin/python
# -*- coding: utf-8 -*-
class Parent():
def __init__(self):
self.name_a = "xiaoming"
def funcA(self):
return "function A: %s" % self.name_a
class Child(Parent):
def __init__(self):
Parent.__init__(self)
self.name_b = "zhangsan"
def funcB(self):
return "function B: %s" % self.name_b
mc = Child()
print mc.name_b
print mc.funcB()
print mc.funcA()
# python test.py
zhangsan
function B: zhangsan
function A: xiaoming
方法2:使用supper()函数继承
#!/usr/bin/python
# -*- coding: utf-8 -*-
class Parent(object):
def __init__(self):
self.name_a = "xiaoming"
def funcA(self):
return "function A: %s" % self.name_a
class Child(Parent):
def __init__(self):
super(Child, self).__init__()
self.name_b = "zhangsan"
def funcB(self):
return "function B: %s" % self.name_b
mc = Child()
print mc.name_b
print mc.funcB()
print mc.funcA()
# python test.py
zhangsan
function B: zhangsan
function A: xiaoming
6.8 多重继承
每个类可以拥有多个父类,如果调用的属性或方法在子类中没有,就会从父类中查找。多重继承中,是依次按顺序执行。
类简单的继承:
#!/usr/bin/python
# -*- coding: utf-8 -*-
class A:
def __init__(self):
self.var1 = "var1"
self.var2 = "var2"
def a(self):
print "a..."
class B:
def b(self):
print "b..."
class C(A,B):
pass
c = C()
c.a()
c.b()
print c.var1
print c.var2
# python test.py
a...
b...
var1
var2
类C继承了A和B的属性和方法,就可以像使用父类一样使用它。
子类扩展方法,直接在子类中定义即可:
#!/usr/bin/python
# -*- coding: utf-8 -*-
class A:
def __init__(self):
self.var1 = "var1"
self.var2 = "var2"
def a(self):
print "a..."
class B:
def b(self):
print "b..."
class C(A,B):
def test(self):
print "test..."
c = C()
c.a()
c.b()
c.test()
print c.var1
print c.var2
# python test.py
a...
b...
test...
var1
var2
在这说明下经典类和新式类。
经典类:默认没有父类,也就是没继承类。
新式类:有继承的类,如果没有,可以继承object。在Python3中已经默认继承object类。
经典类在多重继承时,采用从左到右深度优先原则匹配,而新式类是采用C3算法(不同于广度优先)进行匹配。两者主要区别在于遍历父类算法不同,具体些请在网上查资料。
6.9 方法重载
直接定义和父类同名的方法,子类就修改了父类的动作。
#!/usr/bin/python
# -*- coding: utf-8 -*-
class Parent():
def __init__(self, name='xiaoming'):
self.name = name
def func(self, age):
return "Name: %s, Age: %s" %(self.name, age)
class Child(Parent):
def func(self, age=22):
return "Name: %s, Age: %s" %(self.name, age)
mc = Child()
print mc.func()
# python test.py
Name: xiaoming, Age: 22
6.10 修改父类方法
在方法重载中调用父类的方法,实现添加功能。
#!/usr/bin/python
# -*- coding: utf-8 -*-
class Parent():
def __init__(self, name='xiaoming'):
self.name = name
def func(self, age):
return "Name: %s, Age: %s" %(self.name, age)
class Child(Parent):
def func(self, age):
print "------"
print Parent.func(self, age) # 调用父类方法
print "------"
mc = Child()
mc.func('22')
# python test.py
------
Name: xiaoming, Age: 22
------
还有一种方式通过super函数调用父类方法:
#!/usr/bin/python
# -*- coding: utf-8 -*-
class Parent():
def __init__(self, name='xiaoming'):
self.name = name
def func(self, age):
return "Name: %s, Age: %s" %(self.name, age)
class Child(Parent):
def func(self, age):
print "------"
print super(Child, self).func(age)
print "------"
mc = Child()
mc.func('22')
# python test.py
------
Traceback (most recent call last):
File "test2.py", line 15, in <module>
mc.func('22')
File "test2.py", line 11, in func
print super(Child, self).func(age)
TypeError: must be type, not classobj
抛出错误,因为super继承只能用于新式类,用于经典类就会报错。
那我们就让父类继承object就可以使用super函数了:
#!/usr/bin/python
# -*- coding: utf-8 -*-
class Parent(object):
def __init__(self, name='xiaoming'):
self.name = name
def func(self, age):
return "Name: %s, Age: %s" %(self.name, age)
class Child(Parent):
def func(self, age):
print "------"
print super(Child, self).func(age) # 调用父类方法。在Python3中super参数可不用写。
print "------"
mc = Child()
mc.func('22')
# python test.py
------
Name: xiaoming, Age: 22
------
6.11 属性访问的特殊方法
有四个可对类对象增删改查的内建函数,分别是getattr()、hasattr()、setattr()、delattr()。
6.11.1 getattr()
返回一个对象属性或方法。
>>> class A:
... def __init__(self):
... self.name = 'xiaoming'
... def method(self):
... print "method..."
...
>>> c = A()
>>> getattr(c, 'name', 'Not find name!')
'xiaoming'
>>> getattr(c, 'namea', 'Not find name!')
>>> getattr(c, 'method', 'Not find method!')
<bound method A.method of <__main__.A instance at 0x93fa70>>
>>> getattr(c, 'methoda', 'Not find method!')
'Not find method!'
6.11.2 hasattr()
判断一个对象是否具有属性或方法。返回一个布尔值。
>>> hasattr(c, 'name')
True
>>> hasattr(c, 'namea')
False
>>> hasattr(c, 'method')
True
>>> hasattr(c, 'methoda')
False
6.11.3 setattr()
给对象属性重新赋值或添加。如果属性不存在则添加,否则重新赋值。
>>> hasattr(c, 'age')
False
>>> setattr(c, 'age', 22)
>>> c.age
22
>>> hasattr(c, 'age')
True
6.11.4 delattr()
删除对象属性。
>>> delattr(c, 'age')
>>> hasattr(c, 'age')
False
6.12 类装饰器
与函数装饰器类似,不同的是类要当做函数一样调用:
#!/usr/bin/python
# -*- coding: utf-8 -*-
class Deco:
def __init__(self, func):
self._func = func
self._func_name = func.__name__
def __call__(self):
return self._func(), self._func_name
@Deco
def f1():
return "Hello world!"
print f1()
# python test.py
('Hello world!', 'f1')
6.13 类内置装饰器
下面介绍类函数装饰器,在实际开发中,感觉不是很常用。
6.10.1 @property
@property属性装饰器的基本功能是把类中的方法当做属性来访问。
在没使用属性装饰器时,类方法是这样被调用的:
>>> class A:
... def __init__(self, a, b):
... self.a = a
... self.b = b
... def func(self):
... print self.a + self.b
...
>>> c = A(2,2)
>>> c.func()
4
>>> c.func
<bound method A.func of <__main__.A instance at 0x7f6d962b1878>>
使用属性装饰器就可以像属性那样访问了:
>>> class A:
... def __init__(self, a, b):
... self.a = a
... self.b = b
... @property
... def func(self):
... print self.a + self.b
...
>>> c = A(2,2)
>>> c.func
4
>>> c.func()
4
Traceback (most recent call last):
File "<stdin>", line 1, in <module>
TypeError: 'NoneType' object is not callable
6.10.2 @staticmethod
@staticmethod是静态方法装饰器,可以通过类对象访问,也可以通过实例化后类对象实例访问。
实例方法的第一个参数是self,表示是该类的一个实例,称为类对象实例。
而使用静态方法装饰器,第一个参数就不用传入实例本身(self),那么这个方法当做类对象,由Python自身处理。
看看普通方法的用法:
>>> class A:
... def staticMethod(self):
... print "not static method..."
...
>>> c = A()
>>> c.staticMethod()
not static method...
使用静态方法则是这么用:
>>> class A:
... @staticmethod
... def staticMethod():
... print "static method..."
...
>>> A.staticMethod() # 可以通过类调用静态方法
static method...
>>> c = A()
>>> c.staticMethod() # 还可以使用普通方法调用
static method...
静态方法和普通的非类方法作用一样,只不过命名空间是在类里面,必须通过类来调用。一般与类相关的操作使用静态方法。
6.10.3 @classmethod
@classmethod是类方法装饰器,与静态方法装饰器类似,也可以通过类对象访问。主要区别在于类方法的第一个参数要传入类对象(cls)。
>>> class A:
... @classmethod
... def classMethod(cls):
... print "class method..."
... print cls.__name__
...
>>> A.classMethod()
class method...
A
6.14 __call__方法
可以让类中的方法像函数一样调用。
>>> class A:
... def __call__(self, x):
... print "call..."
... print x
...
>>> c = A()
>>> c(123)
call...
123
>>> class A:
... def __call__(self, *args, **kwargs):
... print args
... print kwargs
...
>>> c = A()
>>> c(1,2,3,a=1,b=2,c=3)
(1, 2, 3)
{'a': 1, 'c': 3, 'b': 2}
第七章 Python异常处理
什么是异常?
顾名思义,异常就是程序因为某种原因无法正常工作了,比如缩进错误、缺少软件包、环境错误、连接超时等等都会引发异常。一个健壮的程序应该把所能预知的异常都应做相应的处理,应对一些简单的异常情况,使得更好的保证程序长时间运行。即使出了问题,也可让维护者一眼看出问题所在。因此本章节讲解的就是怎么处理异常,让你的程序更加健壮。
7.1 捕捉异常语法
try...except...
try:
expression
except [Except Type]:
expression
7.2 异常类型
常见的异常类型:
|
异常类型
|
用途
|
|
SyntaxError
|
语法错误
|
|
IndentationError
|
缩进错误
|
|
TypeError
|
对象类型与要求不符合
|
|
ImportError
|
模块或包导入错误;一般路径或名称错误
|
|
KeyError
|
字典里面不存在的键
|
|
NameError
|
变量不存在
|
|
IndexError
|
下标超出序列范围
|
|
IOError
|
输入/输出异常;一般是无法打开文件
|
|
AttributeError
|
对象里没有属性
|
|
KeyboardInterrupt
|
键盘接受到Ctrl+C
|
|
Exception
|
通用的异常类型;一般会捕捉所有异常
|
还有一些异常类型,可以通过dir查看:
>>> import exceptions
>>> dir(exceptions)
['ArithmeticError',
'AssertionError', 'AttributeError', 'BaseException', 'BufferError',
'BytesWarning', 'DeprecationWarning', 'EOFError', 'EnvironmentError',
'Exception', 'FloatingPointError', 'FutureWarning', 'GeneratorExit',
'IOError', 'ImportError', 'ImportWarning', 'IndentationError',
'IndexError', 'KeyError', 'KeyboardInterrupt', 'LookupError',
'MemoryError', 'NameError', 'NotImplementedError', 'OSError',
'OverflowError', 'PendingDeprecationWarning', 'ReferenceError',
'RuntimeError', 'RuntimeWarning', 'StandardError', 'StopIteration',
'SyntaxError', 'SyntaxWarning', 'SystemError', 'SystemExit', 'TabError',
'TypeError', 'UnboundLocalError', 'UnicodeDecodeError',
'UnicodeEncodeError', 'UnicodeError', 'UnicodeTranslateError',
'UnicodeWarning', 'UserWarning', 'ValueError', 'Warning',
'ZeroDivisionError', '__doc__', '__name__', '__package__']
博客地址:http://lizhenliang.blog.51cto.com and https://yq.aliyun.com/u/lizhenliang
QQ群:323779636(Shell/Python运维开发群)
7.3 异常处理
例如:打印一个没有定义的变量
>>> print a
Traceback (most recent call last):
File "<stdin>", line 1, in <module>
NameError: name 'a' is not defined
会抛出异常,提示名字没有定义。如果程序遇到这种情况,就会终止。
那我们可以这样,当没有这个变量的时候就变量赋值,否则继续操作。
>>> try:
... print a
... except NameError:
... a = ""
...
>>> a
''
这样就避免了异常的发生。在开发中往往不知道什么是什么异常类型,这时就可以使用Exception类型来捕捉所有的异常:
例如:打印一个类对象里面没有的属性
>>> class A:
... a = 1
... b = 2
...
>>> c = A()
>>> try:
... print c.c
... except Exception:
... print "Error..."
...
Error...
有时也想把异常信息也打印出来,怎么做呢?
可以把错误输出保存到一个变量中,根据上面例子来:
>>> try:
... print c.c
... except Exception, e:
... print "Error: " + str(e)
...
Error: A instance has no attribute 'c'
# 也可以使用as关键字将错误出输出保存到变量中
>>> try:
... print c.c
... except Exception as e:
... print "Error: " + str(e)
...
Error: A instance has no attribute 'c'
当出现的异常类型有几种可能性时,可以写多个except:
>>> try:
... print a
... except NameError, e:
... print "NameError: " + str(e)
... except KeyError, e:
... print "KeyError: " + str(e)
...
NameError: name 'a' is not defined
注意:except也可以不指定异常类型,那么会忽略所有的异常类,这样做有风险的,它同样会捕捉Ctrl+C、sys.exit等的操作。所以使用except Exception更好些。
7.4 else和finally语句
7.4.1 else语句
表示如果try中的代码没有引发异常,则会执行else。
继续按照上面定义的类举例:
>>> try:
... print c.a
... except Exception as e:
... print e
... else:
... print "else..."
...
1
else...
7.4.2 finally语句
表示无论是否异常,都会执行finally。
>>> try:
... print c.c
... except Exception as e:
... print e
... finally:
... print "finally..."
...
A instance has no attribute 'c'
finally...
一般用于清理工作,比如打开一个文件,不管是否文件是否操作成功,都应该关闭文件。
7.4.3 try...except...else...finally
这是一个完整的语句,当一起使用时,使异常处理更加灵活。
#!/usr/bin/python
# -*- coding: utf-8 -*-
try:
print a
except Exception as e:
print "Error: " + str(e)
else:
print "else..."
finally:
print "finally..."
# python test.py
python test.py
Error: name 'a' is not defined
finally...
需要注意的是:它们语句的顺序必须是try...except...else...finally,否则语法错误!里面else和finally是可选的。
7.5 自定义异常类
raise语句用来手动抛出一个异常,使用方法:
raise ExceptType(ExceptInfo)
例如:抛出一个指定的异常
>>> raise NameError('test except...')
Traceback (most recent call last):
File "<stdin>", line 1, in <module>
NameError: test except...
raise参数必须是一个异常的实例或Exception子类。
上面用的Exception子类,那么我定义一个异常的实例,需要继承Exception类:
>>> class MyError(Exception):
... def __init__(self, value):
... self.value = value
... def __str__(self):
... return self.value
...
>>> raise MyError("MyError...")
Traceback (most recent call last):
File "<stdin>", line 1, in <module>
__main__.MyError: MyError...
7.6 assert语句
assert语句用于检查条件表达式是否为真,不为真则触发异常。又称断言语句。
一般用在某个条件为真才能正常工作。
>>> assert 1==1
>>> assert 1!=1
Traceback (most recent call last):
File "<stdin>", line 1, in <module>
AssertionError
>>> assert range(4)==[0,1,2]
Traceback (most recent call last):
File "<stdin>", line 1, in <module>
AssertionError
# 添加异常描述信息
>>> assert 1!=1, "assert description..."
Traceback (most recent call last):
File "<stdin>", line 1, in <module>
AssertionError: assert description...
第八章 Python可迭代对象、迭代器和生成器
第八章 Python可迭代对象、迭代器和生成器
8.1 可迭代对象(Iterable)
大部分对象都是可迭代,只要实现了__iter__方法的对象就是可迭代的。
__iter__方法会返回迭代器(iterator)本身,例如:
>>> lst = [1,2,3]
>>> lst.__iter__()
<listiterator object at 0x7f97c549aa50>
Python提供一些语句和关键字用于访问可迭代对象的元素,比如for循环、列表解析、逻辑操作符等。
判断一个对象是否是可迭代对象:
>>> from collections import Iterable # 只导入Iterable方法
>>> isinstance('abc', Iterable)
True
>>> isinstance(1, Iterable)
False
>>> isinstance([], Iterable)
True
这里的isinstance()函数用于判断对象类型,后面会讲到。
可迭代对象一般都用for循环遍历元素,也就是能用for循环的对象都可称为可迭代对象。
例如,遍历列表:
>>> lst = [1, 2, 3]
>>> for i in lst:
... print i
...
1
2
3
博客地址:http://lizhenliang.blog.51cto.com and https://yq.aliyun.com/u/lizhenliang
QQ群:323779636(Shell/Python运维开发群)
8.2 迭代器(Iterator)
具有next方法的对象都是迭代器。在调用next方法时,迭代器会返回它的下一个值。如果next方法被调用,但迭代器没有值可以返回,就会引发一个StopIteration异常。
使用迭代器的好处:
1)如果使用列表,计算值时会一次获取所有值,那么就会占用更多的内存。而迭代器则是一个接一个计算。
2)使代码更通用、更简单。
8.2.1 迭代器规则
回忆下在Python数据类型章节讲解到字典迭代器方法,来举例说明下迭代器规则:
>>> d = {'a':1, 'b':2, 'c':3}
>>> d.iteritems()
<dictionary-itemiterator object at 0x7f97c3b1bcb0>
# 判断是否是迭代器
>>> from collections import Iterator
>>> isinstance(d, Iterator)
False
>>> isinstance(d.iteritems(), Iterator)
True
# 使用next方法。
>>> iter_items = d.iteritems()
>>> iter_items.next()
('a', 1)
>>> iter_items.next()
('c', 3)
>>> iter_items.next()
('b', 2)
由于字典是无序的,所以显示的是无序的,实际是按照顺序获取的下一个元素。
8.2.2 iter()函数
使用iter()函数转换成迭代器:
语法:
iter(collection) -> iterator
iter(callable, sentinel) -> iterator
>>> lst = [1, 2, 3]
>>> isinstance(lst, Iterator)
False
>>> lst.next() # 不是迭代器是不具备next()属性的
Traceback (most recent call last):
File "<stdin>", line 1, in <module>
AttributeError: 'list' object has no attribute 'next'
>>> iter_lst = iter(lst)
>>> isinstance(iter_lst, Iterator)
True
>>> iter_lst.next()
1
>>> iter_lst.next()
2
>>> iter_lst.next()
3
8.2.3 itertools模块
itertools模块是Python内建模块,提供可操作迭代对象的函数。可以生成迭代器,也可以生成无限的序列迭代器。
有下面几种生成无限序列的方法:
count([n]) --> n, n+1, n+2, ...
cycle(p) --> p0, p1, ... plast, p0, p1, ...
repeat(elem [,n]) --> elem, elem, elem, ... endlessly or up to n times
也有几个操作迭代器的方法:
islice(seq, [start,] stop [, step]) --> elements from
chain(p, q, ...) --> p0, p1, ... plast, q0, q1, ...
groupby(iterable[, keyfunc]) --> sub-iterators grouped by value of keyfunc(v)
imap(fun, p, q, ...) --> fun(p0, q0), fun(p1, q1), ...
ifilter(pred, seq) --> elements of seq where pred(elem) is True
1)count生成序列迭代器
>>> from itertools import * # 导入所有方法
# 用法 count(start=0, step=1) --> count object
>>> counter = count()
>>> counter.next()
0
>>> counter.next()
1
>>> counter.next()
2
......
可以使用start参数设置开始值,step设置步长。
2)cycle用可迭代对象生成迭代器
# 用法 cycle(iterable) --> cycle object
>>> i = cycle(['a', 'b', 'c'])
>>> i.next()
'a'
>>> i.next()
'b'
>>> i.next()
'c'
3)repeat用对象生成迭代器
# 用法 repeat(object [,times]) -> create an iterator which returns the object,就是任意对象
>>> i = repeat(1)
>>> i.next()
1
>>> i.next()
1
>>> i.next()
1
......
可使用无限次。
也可以指定次数:
>>> i = repeat(1, 2)
>>> i.next()
1
>>> i.next()
1
>>> i.next()
Traceback (most recent call last):
File "<stdin>", line 1, in <module>
StopIteration
4)islice用可迭代对象并设置结束位置
# 用法 islice(iterable, [start,] stop [, step]) --> islice object
>>> i = islice([1,2,3],2)
>>> i.next()
1
>>> i.next()
2
>>> i.next()
Traceback (most recent call last):
File "<stdin>", line 1, in <module>
StopIteration
正常的话也可以获取的3。
5)chain用多个可迭代对象生成迭代器
# 用法 chain(*iterables) --> chain object
>>> i = chain('a','b','c')
>>> i.next()
'a'
>>> i.next()
'b'
>>> i.next()
'c'
6)groupby将可迭代对象中重复的元素挑出来放到一个迭代器中
# 用法 groupby(iterable[, keyfunc]) -> create an iterator which returns
>>> for key,group in groupby('abcddCca'):
... print key,list(group)
...
a ['a']
b ['b']
c ['c']
d ['d', 'd']
C ['C']
c ['c']
a ['a']
groupby方法是区分大小写的,如果想把大小写的都放到一个迭代器中,可以定义函数处理下:
>>> for key,group in groupby('abcddCca', lambda c: c.upper()):
... print key, list(group)
...
A ['a']
B ['b']
C ['c']
D ['d', 'd']
C ['C', 'c']
A ['a']
7)imap用函数处理多个可迭代对象
# 用法 imap(func, *iterables) --> imap object
>>> a = imap(lambda x, y: x * y,[1,2,3],[4,5,6])
>>> a.next()
4
>>> a.next()
10
>>> a.next()
18
8)ifilter过滤序列
# 用法 ifilter(function or None, sequence) --> ifilter object
>>> i = ifilter(lambda x: x%2==0,[1,2,3,4,5])
>>> for i in i:
... print i
...
2
4
当使用for语句遍历迭代器时,步骤大致这样的,先调用迭代器对象的__iter__方法获取迭代器对象,再调用对象的__next__()方法获取下一个元素。最后引发StopIteration异常结束循环。
8.3 生成器(Generator)
什么是生成器?
1)任何包含yield语句的函数都称为生成器。
2)生成器都是一个迭代器,但迭代器不一定是生成器。
8.3.1 生成器函数
在函数定义中使用yield语句就创建了一个生成器函数,而不是普通的函数。
当调用生成器函数时,每次执行到yield语句,生成器的状态将被冻结起来,并将结果返回__next__调用者。冻结意思是局部的状态都会被保存起来,包括局部变量绑定、指令指针。确保下一次调用时能从上一次的状态继续。
以生成斐波那契数列举例说明yield使用:
斐波那契(Fibonacci)数列是一个简单的递归数列,任意一个数都可以由前两个数相加得到。
#!/usr/bin/python
# -*- coding: utf-8 -*-
def fab(max):
n, a, b = 0, 0, 1
while n < max:
print b
a, b = b, a + b
n += 1
fab(5)
# python test.py
1
1
2
3
5
使用yied语句,只需要把print b改成yield b即可:
#!/usr/bin/python
# -*- coding: utf-8 -*-
def fab(max):
n, a, b = 0, 0, 1
while n < max:
yield b
# print b
a, b = b, a + b
n += 1
print fab(5)
# python test.py
<generator object fab at 0x7f2369495820>
可见,调用fab函数不会执行fab函数,而是直接返回了一个生成器对象,上面说过生成器就是一个迭代器。那么就可以通过next方法来返回它下一个值。
>>> import test
>>> f = test.fab(5)
>>> f.next()
1
>>> f.next()
1
>>> f.next()
2
>>> f.next()
3
>>> f.next()
5
每次fab函数的next方法,就会执行fab函数,执行到yield b时,fab函数返回一个值,下一次执行next方法时,代码从yield b的吓一跳语句继续执行,直到再遇到yield。
8.3.2 生成器表达式
在第四章 Python运算符和流程控制章节讲过,简化for和if语句,使用小括号()返回一个生成器,中括号[]生成一个列表。
回顾下:
# 生成器表达式
>>> result = (x for x in range(5))
>>> result
<generator object <genexpr> at 0x030A4FD0>
>>> type(result)
<type 'generator'>
# 列表解析表达式
>>> result = [ x for x in range(5)]
>>> type(result)
<type 'list'>
>>> result
[0, 1, 2, 3, 4]
第一个就是生成器表达式,返回的是一个生成器,就可以使用next方法,来获取下一个元素:
>>> result.next()
0
>>> result.next()
1
>>> result.next()
2
......
第九章 Python自定义模块及导入方法
9.1 自定义模块
自定义模块你已经会了,平常写的代码放到一个文件里面就是啦!
例如,写个简单的函数,作为一个模块:
#!/usr/bin/python
# -*- coding: utf-8 -*-
def func(a, b):
return a * b
class MyClass:
def __init__(self, a, b):
self.a = a
self.b = b
def method(self):
return self.a * self.b
导入模块:
>>> import test
>>> test.func(2, 2)
4
>>> c = test.MyClass(2, 2)
>>> c.method()
4
是不是很简单!是的,没错,就是这样。
需要注意的是,test就是文件名。另外,模块名要能找到,我的是在当前目录下。
有时经常from...import...,这又是啥呢,来看看:
>>> from test import func, MyClass # 多个函数或类以逗号分隔
>>> test.func(2, 2)
Traceback (most recent call last):
File "<stdin>", line 1, in <module>
NameError: name 'test' is not defined
>>> func(2, 2)
4
>>> c = MyClass(2, 2)
>>> c.method()
4
看到了吧!如果你不想把模块里的函数都导入,就可以这样。一方面避免导入过多用不到的函数增加负载,另一方面引用时可不加模块名。
如果想调用不加模块名,也想导入所有模块,可以这样:
>>> from test import *
>>> func(2, 2)
4
>>> c = MyClass(2, 2)
>>> c.method()
4
使用个星号就代表了所有。
提醒:在模块之间引用也是同样的方式。
9.2 作为脚本来运行程序
所有的模块都有一个内置属性__name__,如果import一个模块,那么模块的__name__属性返回值一般是文件名。如果直接运行Python程序,__name__的值将是一个"__mian__"。
举例说明,根据上面程序做一个测试:
#!/usr/bin/python
# -*- coding: utf-8 -*-
def func(a, b):
return a * b
class MyClass:
def __init__(self, a, b):
self.a = a
self.b = b
def method(self):
return self.a * self.b
print __name__
# python test.py
__main__
与预期一样,打印出了“__main__”,再创建一个test2.py,导入这个模块:
#!/usr/bin/python
# -*- coding: utf-8 -*-
import test
# python test2.py
test
打印出了模块名,这个结果输出就是test.py中的print __name__。
所以,我们在test.py里面判断下__name__值等于__main__时说明在手动执行这个程序:
#!/usr/bin/python
# -*- coding: utf-8 -*-
def func(a, b):
return a * b
class MyClass:
def __init__(self, a, b):
self.a = a
self.b = b
def method(self):
return self.a * self.b
if __name__ == "__main__":
print "我在手动执行这个程序..."
# python test.py
我在手动执行这个程序...
此时再运行test2.py试试,是不是打印为空!明白了吧!
9.3 安装第三方模块
在Python中安装外部的模块有几种方式:
1)下载压缩包,通过setuptools工具安装,这个在第一章Python基础知识里面用到过。推荐下载地址:http://pypi.python.org
2)easy_install工具安装,也依赖setuptools。
3)pip工具安装。推荐使用这个方式。
4)直接将压缩包解压到Python模块目录。但常常会出现import失败,不推荐。
5)在Windows下,除了上面几种方式以外,可以直接下载exe文件点击一步步安装。
pip与easy_install安装方式类似,主要区别在于easy_install不支持卸载软件,而pip支持。
推荐使用pip命令安装,简单方便。如果安装失败可以按顺序这么尝试:方式1 --> 方式2 --> 方式4
以安装setuptools举例上面几种安装方式:
方式1:
#
wget
https://pypi.python.org/packages/32/3c/e853a68b703f347f5ed86585c2dd2828a83252e1216c1201fa6f81270578/setuptools-26.1.1.tar.gz
# tar zxvf setuptools-26.1.1.tar.gz
# cd setuptools-26.1.1
# python setup.py install
方式2:
# easy_install setuptools
方式3:
# pip install setuptools
# pip uninstall setuptools # 卸载
# pip search setuptools # 搜索
方式3:
cp -rf setuptools-26.1.1 /usr/local/lib/python2.7/dist-packages
9.4 查看模块帮助文档
前面几个章节已经使用几个内置模块了,比如collections、itertools等,导入与上面一样,这里不再过多说明了。
1)help()函数
当一个模块对其语法不了解时,可以查看帮助,以collections举例:
>>> import collections
>>> help(collections)
Help on module collections:
NAME
collections
FILE
/usr/lib/python2.7/collections.py
MODULE DOCS
http://docs.python.org/library/collections # 注意:这里是这个模块的帮助文档,很详细的哦!
CLASSES
__builtin__.dict(__builtin__.object)
Counter
OrderedDict
defaultdict
__builtin__.object
_abcoll.Callable
_abcoll.Container
......
使用help()就能查看这个模块的内部构造,包括类方法、属性等信息。
也可以再对某个方法查看其用法:
>>> help(collections.Counter())
Help on Counter in module collections object:
class Counter(__builtin__.dict)
| Dict subclass for counting hashable items. Sometimes called a bag
| or multiset. Elements are stored as dictionary keys and their counts
| are stored as dictionary values.
|
| >>> c = Counter('abcdeabcdabcaba') # count elements from a string
|
| >>> c.most_common(3) # three most common elements
| [('a', 5), ('b', 4), ('c', 3)]
| >>> sorted(c) # list all unique elements
| ['a', 'b', 'c', 'd', 'e']
| >>> ''.join(sorted(c.elements())) # list elements with repetitions
| 'aaaaabbbbcccdde'
| >>> sum(c.values()) # total of all counts
| 15
|
| >>> c['a'] # count of letter 'a'
......
一般里面都是举例说明,可快速帮助我们回忆使用方法。
2)dir()函数查看对象属性
这个在前面也用到过,能看到对象的方法、属性等信息:
>>> dir(collections)
['Callable', 'Container', 'Counter',
'Hashable', 'ItemsView', 'Iterable', 'Iterator', 'KeysView', 'Mapping',
'MappingView', 'MutableMapping', 'MutableSequence', 'MutableSet',
'OrderedDict', 'Sequence', 'Set', 'Sized', 'ValuesView', '__all__',
'__builtins__', '__doc__', '__file__', '__name__', '__package__',
'_abcoll', '_chain', '_class_template', '_eq', '_field_template',
'_get_ident', '_heapq', '_imap', '_iskeyword', '_itemgetter', '_repeat',
'_repr_template', '_starmap', '_sys', 'defaultdict', 'deque',
'namedtuple']
3)github上查看模块用法
Python官方模块下载地址http://pypi.python.org,所有的模块在这里都有。
打开网站后,在搜索框搜索你的模块名,在结果找到模块名点进去,会有一个 Home Page的连接,Python大多数模块都是托管在github上面,这个链接就是这个模块在github上面的地址,点击后跳转到github对应的模块页面,里面也有很详细模块使用方法。
9.5 导入模块新手容易出现的问题
还有一个新手经常犯的问题,写一个模块,比如使用itertools模块,为了说明这个测试文件是这个模块,就把文件名写成了这个模块名,于是就造成了下面错误:
#!/usr/bin/python
# -*- coding: utf-8 -*-
import collections
c = collections.Counter()
for i in "Hello world!":
c[i] += 1
print c
# python collections.py
Traceback (most recent call last):
File "collections.py", line 3, in <module>
import collections
File "/home/user/collections.py", line 4, in <module>
c = collections.Counter()
AttributeError: 'module' object has no attribute 'Counter'
抛出异常,明明在解释器里面可以正常导入使用啊,怎么会提示没Counter属性呢,问题就出现你的文件名与导入的模块名重名,导致程序import了这个文件,上面讲过文件名就是模块名。所以文件名不要与引用的模块名相同。
还有一个使用方法也说明下,使用as关键字设置模块别名,这样使用中就不用输入那么长的模块名了,按照上面的例子,把名字先改成collections1.py,做测试:
#!/usr/bin/python
# -*- coding: utf-8 -*-
import collections as cc
c = cc.Counter()
for i in "Hello world!":
c[i] += 1
print c
# python collections1.py
Counter({'l': 3, 'o': 2, '!': 1, ' ': 1, 'e': 1, 'd': 1, 'H': 1, 'r': 1, 'w': 1})
第十章 Python常用标准库/模块使用(必会)
10.1 sys
1)sys.argv
命令行参数。
argv[0] #代表本身名字
argv[1] #第一个参数
argv[2] #第二个参数
argv[3] #第三个参数
argv[N] #第N个参数
argv #参数以空格分隔存储到列表。
看看使用方法:
#!/usr/bin/python
# -*- coding: utf-8 -*-
import sys
print sys.argv[0]
print sys.argv[1]
print sys.argv[2]
print sys.argv[3]
print sys.argv
print len(sys.argv)
# python test.py
test.py
a
b
c
c
['test.py', 'a', 'b', 'c']
4
值得注意的是,argv既然是一个列表,那么可以通过len()函数获取这个列表的长度从而知道输入的参数数量。可以看到列表把自身文件名也写了进去,所以当我们统计的使用应该-1才是实际的参数数量,因此可以len(sys.argv[1:])获取参数长度。
2)sys.path
模块搜索路径。
>>> sys.path
['', '/usr/local/lib/python2.7/dist-packages/tornado-3.1-py2.7.egg', '/usr/lib/python2.7', '/usr/lib/python2.7/plat-x86_64-linux-gnu', '/usr/lib/python2.7/lib-tk', '/usr/lib/python2.7/lib-old', '/usr/lib/python2.7/lib-dynload', '/usr/local/lib/python2.7/dist-packages', '/usr/lib/python2.7/dist-packages']
输出的是一个列表,里面包含了当前Python解释器所能找到的模块目录。
如果想指定自己的模块目录,可以直接追加:
>>> sys.path.append('/opt/scripts')
>>> sys.path
['', '/usr/local/lib/python2.7/dist-packages/tornado-3.1-py2.7.egg', '/usr/lib/python2.7', '/usr/lib/python2.7/plat-x86_64-linux-gnu', '/usr/lib/python2.7/lib-tk', '/usr/lib/python2.7/lib-old', '/usr/lib/python2.7/lib-dynload', '/usr/local/lib/python2.7/dist-packages', '/usr/lib/python2.7/dist-packages', '/opt/scripts']
3)sys.platform
系统平台标识符。
| 系统 | 平台标识符 |
| Linux | linux |
| Windows | win32 |
| Windows/Cygwin | cygwin |
| Mac OS X |
darwin
|
>>> sys.platform
'linux2'
Python本身就是跨平台语言,但也不就意味着所有的模块都是在各种平台通用,所以可以使用这个方法判断当前平台,做相应的操作。
4)sys.subversion
在第一章讲过Python解释器有几种版本实现,而默认解释器是CPython,来看看是不是:
>>> sys.subversion
('CPython', '', '')5)sys.version
查看Python版本:
>>> sys.version
'2.7.6 (default, Jun 22 2015, 17:58:13) \n[GCC 4.8.2]'
6)sys.exit()
退出解释器:
#!/usr/bin/python
# -*- coding: utf-8 -*-import sys
print "Hello world!"
sys.exit()
print "Hello world!"
# python test.py
Hello world!
代码执行到sys.exit()就会终止程序。
7)sys.stdin、sys.stdout和sys.stderr
标准输入、标准输出和错误输出。
标准输入:一般是键盘。stdin对象为解释器提供输入字符流,一般使用raw_input()和input()函数。
例如:让用户输入信息
#!/usr/bin/python
# -*- coding: utf-8 -*-import sys
name = raw_input("Please input your name: ")
print name
# python test.py
Please input your name: xiaoming
xiaoming
import sys
print "Please enter your name: "
name = sys.stdin.readline()
print name
# python b.py
Please enter your name:
xiaoming
xiaoming
再例如,a.py文件标准输出作为b.py文件标准输入:
# cat a.py
import sys
sys.stdout.write("123456\n")
sys.stdout.flush()
# cat b.py
import sys
print sys.stdin.readlines()
# python a.py | python b.py
['123456\n']
sys.stdout.write()方法其实就是下面所讲的标准输出,print语句就是调用了这个方法。
标准输出:一般是屏幕。stdout对象接收到print语句产生的输出。
例如:打印一个字符串
#!/usr/bin/python
# -*- coding: utf-8 -*-import sys
print "Hello world!"
# python test.py
Hello world!
sys.stdout是有缓冲区的,比如:
import sys
import time
for i in range(5):
print i,
# sys.stdout.flush()
time.sleep(1)
# python test.py
0 1 2 3 4
本是每隔一秒输出一个数字,但现在是循环完才会打印所有结果。如果把sys.stdout.flush()去掉,就会没执行到print就会刷新stdout输出,这对实时输出信息的程序有帮助。
错误输出:一般是错误信息。stderr对象接收出错的信息。
例如:引发一个异常
>>> raise Exception, "raise..."
Traceback (most recent call last):File "<stdin>", line 1, in <module>
Exception: raise...
博客地址:http://lizhenliang.blog.51cto.com and https://yq.aliyun.com/u/lizhenliang
QQ群:323779636(Shell/Python运维开发群)
10.2 os
os模块主要对目录或文件操作。
| 方法 | 描述 | 示例 |
| os.name | 返回操作系统类型 | 返回值是"posix"代表linux,"nt"代表windows |
| os.extsep | 返回一个"."标识符 | |
| os.environ | 以字典形式返回系统变量 | |
| os.devnull | 返回/dev/null标识符 | |
| os.linesep | 返回一个换行符"\n" | >>> print "a" + os.linesep + "b" a b |
| os.sep | 返回一个路径分隔符正斜杠"/" | >>> "a" + os.sep + "b" 'a/b' |
| os.listdir(path) | 列表形式列出目录 | |
| os.getcwd() | 获取当前路径 | >>> os.getcwd() '/home/user' |
| os.chdir(path) | 改变当前工作目录到指定目录 | >>> os.chdir('/opt') >>> os.getcwd() '/opt' |
| os.mkdir(path [, mode=0777]) | 创建目录 | >>> os.mkdir('/home/user/test') |
| os.makedirs(path [, mode=0777]) | 递归创建目录 | >>> os.makedirs('/home/user/abc/abc') |
| os.rmdir(path) | 移除空目录 | >>> os.makedirs('/home/user/abc/abc') |
| os.remove(path) | 移除文件 | |
| os.rename(old, new) | 重命名文件或目录 | |
| os.stat(path) | 获取文件或目录属性 | |
| os.chown(path, uid, gid) | 改变文件或目录所有者 | |
| os.chmod(path, mode) | 改变文件访问权限 | >>> os.chmod('/home/user/c/a.tar.gz', 0777) |
| os.symlink(src, dst) | 创建软链接 | |
| os.unlink(path) | 移除软链接 | >>> os.unlink('/home/user/ddd') |
| urandom(n) | 返回随机字节,适合加密使用 | >>> os.urandom(2) '%\xec' |
| os.getuid() | 返回当前进程UID | |
| os.getlogin() | 返回登录用户名 | |
| os.getpid() | 返回当前进程ID | |
| os.kill(pid, sig) | 发送一个信号给进程 | |
| os.walk(path) | 目录树生成器,返回格式:(dirpath, [dirnames], [filenames]) | >>> for root, dir, file in os.walk('/home/user/abc'): ... print root ... print dir ... print file |
| os.statvfs(path) | ||
| os.system(command) | 执行shell命令,不能存储结果 | |
| popen(command [, mode='r' [, bufsize]]) | 打开管道来自shell命令,并返回一个文件对象 | >>> result = os.popen('ls')
>>> result.read()
|
os.path类用于获取文件属性。
| os.path.basename(path) | 返回最后一个文件或目录名 | >>> os.path.basename('/home/user/a.sh') 'a.sh' |
| os.path.dirname(path) | 返回最后一个文件前面目录 | >>> os.path.dirname('/home/user/a.sh') '/home/user' |
| os.path.abspath(path) | 返回一个绝对路径 | >>> os.path.abspath('a.sh') '/home/user/a.sh' |
| os.path.exists(path) | 判断路径是否存在,返回布尔值 | >>> os.path.exists('/home/user/abc') True |
| os.path.isdir(path) | 判断是否是目录 | |
| os.path.isfile(path) | 判断是否是文件 | |
| os.path.islink(path) | 判断是否是链接 | |
| os.path.ismount(path) | 判断是否挂载 | |
| os.path.getatime(filename) | 返回文件访问时间戳 | >>> os.path.getctime('a.sh') 1475240301.9892483 |
| os.path.getctime(filename) | 返回文件变化时间戳 | |
| os.path.getmtime(filename) | 返回文件修改时间戳 | |
| os.path.getsize(filename) | 返回文件大小,单位字节 | |
| os.path.join(a, *p) | 加入两个或两个以上路径,以正斜杠"/"分隔。常用于拼接路径 | >>> os.path.join('/home/user','test.py','a.py') '/home/user/test.py/a.py' |
| os.path.split( | 分隔路径名 | >>> os.path.split('/home/user/test.py') ('/home/user', 'test.py') |
| os.path.splitext( | 分隔扩展名 | >>> os.path.splitext('/home/user/test.py')
('/home/user/test', '.py')
|
10.3 glob
文件查找,支持通配符(*、?、[])
# 查找目录中所有以.sh为后缀的文件
>>> glob.glob('/home/user/*.sh')['/home/user/1.sh', '/home/user/b.sh', '/home/user/a.sh', '/home/user/sum.sh']
# 查找目录中出现单个字符并以.sh为后缀的文件
>>> glob.glob('/home/user/?.sh')
['/home/user/1.sh', '/home/user/b.sh', '/home/user/a.sh']
# 查找目录中出现a.sh或b.sh的文件
>>> glob.glob('/home/user/[a|b].sh')
['/home/user/b.sh', '/home/user/a.sh']
10.4 math
数字处理。
下面列出一些自己决定会用到的:
| 方法 | 描述 | 示例 |
| math.pi | 返回圆周率 | >>> math.pi 3.141592653589793 |
| math.ceil(x) | 返回x浮动的上限 |
>>> math.ceil(5.2) 6.0 |
| math.floor(x) | 返回x浮动的下限 |
>>> math.floor(5.2) 5.0 |
| math.trunc(x) | 将数字截尾取整 |
>>> math.trunc(5.2) 5 |
| math.fabs(x) | 返回x的绝对值 |
>>> math.fabs(-5.2) 5.2 |
| math.fmod(x,y) | 返回x%y(取余) |
>>> math.fmod(5,2) 1.0 |
| math.modf(x) | 返回x小数和整数 |
>>> math.modf(5.2) (0.20000000000000018, 5.0) |
| math.factorial(x) | 返回x的阶乘 |
>>> math.factorial(5) 120 |
| math.pow(x,y) | 返回x的y次方 | >>> math.pow(2,3) 8.0 |
| math.sprt(x) | 返回x的平方根 | >>> math.sqrt(5)
2.2360679774997898
|
10.5 random
生成随机数。
常用的方法:
| 方法 | 描述 | 示例 |
| random.randint(a,b) | 返回整数a和b范围内数字 | >>> random.randint(1,10) 6 |
| random.random() | 返回随机数,它在0和1范围内 | >>> random.random() 0.7373251914304791 |
| random.randrange(start, stop[, step]) | 返回整数范围的随机数,并可以设置只返回跳数 | >>> random.randrange(1,10,2) 5 |
| random.sample(array, x) | 从数组中返回随机x个元素 | >>> random.sample([1,2,3,4,5],2) [2, 4] |
10.6 platform
获取操作系统详细信息。
| 方法 | 描述 | 示例 |
| platform.platform() | 返回操作系统平台 | >>> platform.platform() 'Linux-3.13.0-32-generic-x86_64-with-Ubuntu-14.04-trusty' |
| platform.uname() | 返回操作系统信息 | >>> platform.uname() ('Linux', 'ubuntu', '3.13.0-32-generic', '#57-Ubuntu SMP Tue Jul 15 03:51:08 UTC 2014', 'x86_64', 'x86_64') |
| platform.system() | 返回操作系统平台 | >>> platform.system() 'Linux' |
| platform.version() | 返回操作系统版本 | >>> platform.version() '#57-Ubuntu SMP Tue Jul 15 03:51:08 UTC 2014' |
| platform.machine() | 返回计算机类型 | >>> platform.machine() 'x86_64' |
| platform.processor() | 返回计算机处理器类型 | >>> platform.processor() 'x86_64' |
| platform.node() | 返回计算机网络名 | >>> platform.node() 'ubuntu' |
| platform.python_version() | 返回Python版本号 | >>> platform.python_version()
'2.7.6'
|
10.7 pickle与cPickle
创建可移植的Python序列化对象,持久化存储到文件。
1)pickle
pickle库有两个常用的方法,dump()、load() 和dumps()、 loads(),下面看看它们的使用方法:
dump()方法是把对象保存到文件中。
格式:dump(obj, file, protocol=None)
load()方法是从文件中读数据,重构为原来的Python对象。
格式:load(file)
示例,将字典序列化到文件:
>>> import pickle
>>> dict = {'a':1, 'b':2, 'c':3}
>>> output = open('data.pkl', 'wb') # 二进制模式打开文件
>>> pickle.dump(dict, output) # 执行完导入操作,当前目录会生成data.pkl文件
>>> output.close() # 写入数据并关闭
看看pickle格式后的文件:
# cat data.pkl
(dp0
S'a'
p1
I1
sS'c'
p2
I3
sS'b'
p3
I2
s.
读取序列化文件:
>>> f = open('data.pkl')
>>> data = pickle.load(f)
>>> print data
{'a': 1, 'c': 3, 'b': 2}
用法挺简单的,就是先导入文件,再读取文件。
接下来看看序列化字符串操作:
dumps()返回一个pickle格式化的字符串
格式:dumps(obj, protocol=None)
load()解析pickle字符串为对象
示例:
>>> s = 'abc'
>>> pickle.dumps(s)
"S'abc'\np0\n."
>>> pkl = pickle.dumps(s)
>>> pkl
"S'abc'\np0\n."
>>> pickle.loads(pkl)
'abc'
需要注意的是,py2.x使用的是pickle2.0格式版本,如果用3.0、4.0版本的pickle导入会出错。可以通过pickle.format_version 查看版本。
2)cPickle
cPickle库是C语言实现,对pickle进行了优化,提升了性能,建议在写代码中使用。
cPicke提供了与pickle相同的dump()、load() 和dumps()、 loads()方法,用法一样,不再讲解。
10.8 subprocess
subprocess库会fork一个子进程去执行任务,连接到子进程的标准输入、输出、错误,并获得它们的返回代码。这个模块将取代os.system、os.spawn*、os.popen*、popen2.*和commands.*。
提供了以下常用方法帮助我们执行bash命令的相关操作:
subprocess.call():运行命令与参数。等待命令完成,返回执行状态码。
>>> import subprocess
>>> retcode = subprocess.call(["ls", "-l"])
total 504
-rw-r--r-- 1 root root 54 Nov 2 06:15 data.pkl
>>> retcode
0
>>> retcode = subprocess.call(["ls", "a"])
ls: cannot access a: No such file or directory
>>> retcode
2
# 也可以这样写
>>> subprocess.call('ls -l', shell=True)
subprocess.check_call():运行命令与参数。如果退出状态码非0,引发CalledProcessError异常,包含状态码。
>>> subprocess.check_call("ls a", shell=True)
ls: cannot access a: No such file or directory
Traceback (most recent call last):
File "<stdin>", line 1, in <module>
File "/usr/lib/python2.7/subprocess.py", line 540, in check_call
raise CalledProcessError(retcode, cmd)
subprocess.CalledProcessError: Command 'ls a' returned non-zero exit status 2
subprocess.Popen():这个类我们主要来使用的,参数较多。
|
参数
|
描述
|
|
args
|
命令,字符串或列表
|
|
bufsize
|
0代表无缓冲,1代表行缓冲,其他正值代表缓冲区大小,负值采用默认系统缓冲(一般是全缓冲)
|
|
executable
|
|
|
stdin
stdout
stderr
|
默认没有任何重定向,可以指定重定向到管道(PIPE)、文件对象、文件描述符(整数),stderr还可以设置为STDOUT
|
|
preexec_fn
|
钩子函数,在fork和exec之间执行 |
|
close_fds
|
|
|
shell
|
为True,表示用当前默认解释器执行。相当于args前面添加“/bin/sh”“-c或win下"cmd.exe /c "
|
|
cwd
|
指定工作目录 |
|
env
|
设置环境变量
|
|
universal_newlines
|
换行符统一处理成"\n"
|
|
startupinfo
|
在windows下的Win32 API 发送CreateProcess()创建进程
|
|
creationflags
|
在windows下的Win32 API 发送CREATE_NEW_CONSOLE()创建控制台窗口
|
subprocess.Popen()类又提供了以下些方法:
|
方法
|
描述
|
|
Popen.communicate(input=None)
|
与子进程交互。读取从stdout和stderr缓冲区内容,阻塞父进程,等待子进程结束
|
|
Popen. kill()
|
杀死子进程,在Posix系统上发送SIGKILL信号
|
|
Popen.pid
|
获取子进程PID
|
|
Popen.poll()
|
如果子进程终止返回状态码
|
|
Popen.returncode
|
返回子进程状态码
|
|
Popen.send_signal(signal)
|
发送信号到子进程
|
|
Popen.stderr
|
如果参数值是PIPE,那么这个属性是一个文件对象,提供子进程错误输出。否则为None
|
|
Popen.stdin
|
如果参数值是PIPE,那么这个属性是一个文件对象,提供子进程输入。否则为None
|
|
Popen.stdout
|
如果参数值是PIPE,那么这个属性是一个文件对象,提供子进程输出。否则为None
|
|
Popen.terminate()
|
终止子进程,在Posix系统上发送SIGTERM信号,在windows下的Win32 API发送TerminateProcess()到子进程
|
|
Popen.wait()
|
等待子进程终止,返回状态码
|
示例:
>>> p = subprocess.Popen('dmesg |grep eth0', stdout=subprocess.PIPE, stderr=subprocess.PIPE, shell=True)
>>> p.communicate()
...... # 元组形式返回结果
>>> p.pid
57039
>>> p.wait()
0
>>> p.returncode
0
subprocess.PIPE提供了一个缓冲区,将stdout、stderr放到这个缓冲区中,p.communicate()方法读取缓冲区数据。
缓冲区的stdout、stderr是分开的,可以以p.stdout.read()方式获得标准输出、错误输出的内容。
再举个例子,我们以标准输出作为下个Popen任务的标准输入:
>>> p1 = subprocess.Popen('ls', stdout=subprocess.PIPE, shell=True)
>>> p2 = subprocess.Popen('grep data', stdin=p1.stdout, stdout=subprocess.PIPE, shell=True)
>>> p1.stdout.close() # 调用后启动p2,为了获得SIGPIPE
>>> output = p2.communicate()[0]
>>> output
'data.pkl\n'
p1的标准输出作为p2的标准输入。这个p2的stdin、stdout也可以是个可读、可写的文件。
10.9 Queue
队列,数据存放在内存中,一般用于交换数据。
|
类
|
描述
|
|
Queue.Empty
|
当非阻塞get()或get_nowait()对象队列上为空引发异常
|
|
Queue.Full
|
当非阻塞put()或put_nowait()对象队列是一个满的队列引发异常
|
|
Queue.LifoQueue(maxsize=0)
|
构造函数为后进先出队列。maxsize设置队列最大上限项目数量。小于或等于0代表无限。
|
|
Queue.PriorityQueue(maxsize=0)
|
构造函数为一个优先队列。级别越高越先出。
|
|
Queue.Queue(maxsize=0)
|
构造函数为一个FIFO(先进先出)队列。maxsize设置队列最大上限项目数量。小于或等于0代表无限。
|
|
Queue.deque
|
双端队列。实现快速append()和popleft(),无需锁。
|
|
Queue.heapq
|
堆排序队列。
|
用到比较多的是Queue.Queue类,在这里主要了解下这个。
它提供了一些操作队列的方法:
|
方法
|
描述
|
|
Queue.empty()
|
如果队列为空返回True,否则返回False
|
|
Queue.full()
|
如果队列是满的返回True,否则返回False
|
|
Queue.get(block=True, timeout=None)
|
从队列中删除并返回一个项目。没有指定项目,因为是FIFO队列,如果队列为空会一直阻塞。timeout超时时间
|
|
Queue.get_nowait()
|
从队列中删除并返回一个项目,不阻塞。会抛出异常。
|
|
Queue.join()
|
等待队列为空,再执行别的操作
|
|
Queue.put(item, block=True, timeout=None)
|
写入项目到队列
|
|
Queue.put_nowait()
|
写入项目到队列,不阻塞。与get同理
|
|
Queue.qsize()
|
返回队列大小
|
|
Queue.task_done()
|
表示原队列的任务完成
|
示例:
>>> from Queue import Queue
>>> q = Queue.Queue()
>>> q.put('test')
>>> q.qsize()
1
>>> q.get()
'test'
>>> q.qsize()
0
>>> q.full()
False
>>> q.empty()
True
10.10 StringIO
StringIO库将字符串存储在内存中,像操作文件一样操作。主要提供了一个StringIO类。
|
方法
|
描述
|
|
StringIO.close()
|
关闭
|
|
StringIO.flush()
|
刷新缓冲区
|
|
StringIO.getvalue()
|
获取写入的数据
|
|
StringIO.isatty()
|
|
|
StringIO.next()
|
读取下一行,没有数据抛出异常
|
|
StringIO.read(n=-1)
|
默认读取所有内容。n指定读取多少字节
|
|
StringIO.readline(length=None)
|
默认读取下一行。length指定读取多少个字符
|
|
StringIO.readlines(sizehint=0)
|
默认读取所有内容,以列表返回。sizehint指定读取多少字节
|
|
StringIO.seek(pos, mode=0)
|
在文件中移动文件指针,从mode(0代表文件起始位置,默认。1代表当前位置。2代表文件末尾)偏移pos个字节
|
|
StringIO.tell()
|
返回当前在文件中的位置
|
|
StringIO.truncate()
|
截断文件大小 |
|
StringIO.write(str)
|
写字符串到文件
|
|
StringIO.writelines(iterable)
|
写入序列,必须是一个可迭代对象,一般是一个字符串列表
|
可以看到,StringIO方法与文件对象方法大部分都一样,从而也就能方面的操作内存对象。
示例:
>>> f = StringIO()
>>> f.write('hello')
>>> f.getvalue()
'hello'
像操作文件对象一样写入。
用一个字符串初始化StringIO,可以像读文件一样读取:
>>> f = StringIO('hello\nworld!')
>>> f.read()
'hello\nworld!'
>>> s = StringIO('hello world!')
>>> s.seek(5) # 指针移动到第五个字符,开始写入
>>> s.write('-')
>>> s.getvalue()
'hello-world!'
10.11 logging
记录日志库。
有几个主要的类:
|
logging.Logger
|
应用程序记录日志的接口
|
|
logging.Filter
|
过滤哪条日志不记录
|
|
logging.FileHandler
|
日志写到磁盘文件
|
|
logging.Formatter
|
定义最终日志格式
|
日志级别:
|
级别
|
数字值
|
描述
|
|
critical
|
50
|
危险
|
|
error
|
40
|
错误
|
|
warning
|
30
|
警告 |
|
info
|
20
|
普通信息
|
|
debug
|
10
|
调试
|
|
noset
|
0
|
不设置
|
Formatter类可以自定义日志格式,默认时间格式weight%Y-%m-%d %H:%M:%S,有以下这些属性:
|
%(name)s
|
日志的名称
|
|
%(levelno)s
|
数字日志级别
|
|
%(levelname)s
|
文本日志级别
|
|
%(pathname)s
|
调用logging的完整路径(如果可用)
|
|
%(filename)s
|
文件名的路径名
|
|
%(module)s
|
模块名 |
|
%(lineno)d
|
调用logging的源行号
|
|
%(funcName)s
|
函数名
|
|
%(created)f
|
创建时间,返回time.time()值
|
|
%(asctime)s
|
字符串表示创建时间
|
|
%(msecs)d
|
毫秒表示创建时间
|
|
%(relativeCreated)d
|
毫秒为单位表示创建时间,相对于logging模块被加载,通常应用程序启动。
|
|
%(thread)d
|
线程ID(如果可用)
|
|
%(threadName)s
|
线程名字(如果可用)
|
|
%(process)d
|
进程ID(如果可用)
|
|
%(message)s
|
输出的消息
|
示例:
#!/usr/bin/python
# -*- coding: utf-8 -*-
#--------------------------------------------------
# 日志格式
#--------------------------------------------------
# %(asctime)s 年-月-日 时-分-秒,毫秒 2013-04-26 20:10:43,745
# %(filename)s 文件名,不含目录
# %(pathname)s 目录名,完整路径
# %(funcName)s 函数名
# %(levelname)s 级别名
# %(lineno)d 行号
# %(module)s 模块名
# %(message)s 消息体
# %(name)s 日志模块名
# %(process)d 进程id
# %(processName)s 进程名
# %(thread)d 线程id
# %(threadName)s 线程名
import logging
format = logging.Formatter('%(asctime)s - %(levelname)s %(filename)s [line:%(lineno)d] %(message)s')
# 创建日志记录器
info_logger = logging.getLogger('info')
# 设置日志级别,小于INFO的日志忽略
info_logger.setLevel(logging.INFO)
# 日志记录到磁盘文件
info_file = logging.FileHandler("info.log")
# info_file.setLevel(logging.INFO)
# 设置日志格式
info_file.setFormatter(format)
info_logger.addHandler(info_file)
error_logger = logging.getLogger('error')
error_logger.setLevel(logging.ERROR)
error_file = logging.FileHandler("error.log")
error_file.setFormatter(format)
error_logger.addHandler(error_file)
# 输出控制台(stdout)
console = logging.StreamHandler()
console.setLevel(logging.DEBUG)
console.setFormatter(format)
info_logger.addHandler(console)
error_logger.addHandler(console)
if __name__ == "__main__":
# 写日志
info_logger.warning("info message.")
error_logger.error("error message!")
# python test.py
2016-07-02 06:52:25,624 - WARNING test.py [line:49] info message.
2016-07-02 06:52:25,631 - ERROR test.py [line:50] error message!
# cat info.log
2016-07-02 06:52:25,624 - WARNING test.py [line:49] info message.
# cat error.log
2016-07-02 06:52:25,631 - ERROR test.py [line:50] error message!
上面代码实现了简单记录日志功能。分别定义了info和error日志,将等于或高于日志级别的日志写到日志文件中。在小项目开发中把它单独写一个模块,很方面在其他代码中调用。
需要注意的是,在定义多个日志文件时,getLogger(name=None)类的name参数需要指定一个唯一的名字,如果没有指定,日志会返回到根记录器,也就是意味着他们日志都会记录到一起。
博客地址:http://lizhenliang.blog.51cto.com and https://yq.aliyun.com/u/lizhenliang
QQ群:323779636(Shell/Python运维开发群)
10.12 ConfigParser
配置文件解析。
这个库我们主要用到ConfigParser.ConfigParser()类,对ini格式文件增删改查。
ini文件固定结构:有多个部分块组成,每个部分有一个[标识],并有多个key,每个key对应每个值,以等号"="分隔。值的类型有三种:字符串、整数和布尔值。其中字符串可以不用双引号,布尔值为真用1表示,布尔值为假用0表示。注释以分号";"开头。
|
方法
|
描述
|
|
ConfigParser.add_section(section)
|
创建一个新的部分配置
|
|
ConfigParser.get(section, option, raw=False, vars=None)
|
获取部分中的选项值,返回字符串
|
|
ConfigParser.getboolean(section, option)
|
获取部分中的选项值,返回布尔值
|
|
ConfigParser.getfloat(section, option)
|
获取部分中的选项值,返回浮点数
|
|
ConfigParser.getint(section, option)
|
获取部分中的选项值,返回整数
|
|
ConfigParser.has_option(section, option)
|
检查部分中是否存在这个选项
|
|
ConfigParser.has_section(section)
|
检查部分是否在配置文件中
|
|
ConfigParser.items(section, raw=False, vars=None)
|
列表元组形式返回部分中的每一个选项
|
|
ConfigParser.options(section)
|
列表形式返回指定部分选项名称
|
|
ConfigParser.read(filenames)
|
读取ini格式的文件
|
|
ConfigParser.remove_option( section, option)
|
移除部分中的选项
|
|
ConfigParser.remove_section(section, option)
|
移除部分
|
|
ConfigParser.sections()
|
列表形式返回所有部分名称
|
|
ConfigParser.set(section, option, value)
|
设置选项值,存在则更新,否则添加
|
|
ConfigParser.write(fp)
|
写一个ini格式的配置文件
|
举例说明,写一个ini格式文件,对其操作:
# cat config.ini
[host1]
host = 192.168.1.1
port = 22
user = zhangsan
pass = 123
[host2]
host = 192.168.1.2
port = 22
user = lisi
pass = 456
[host3]
host = 192.168.1.3
port = 22
user = wangwu
pass = 789
1)获取部分中的键值
#!/usr/bin/python
# -*- coding: utf-8 -*-
from ConfigParser import ConfigParser
conf = ConfigParser()
conf.read("config.ini")
section = conf.sections()[0] # 获取随机的第一个部分标识
options = conf.options(section) # 获取部分中的所有键
key = options[2]
value = conf.get(section, options[2]) # 获取部分中键的值
print key, value
print type(value)
# python test.py
port 22
<type 'str'>
这里有意打出来了值的类型,来说明下get()方法获取的值都是字符串,如果有需要,可以getint()获取整数。测试发现,ConfigParser是从下向上读取的文件内容!
2)遍历文件中的每个部分的每个字段
#!/usr/bin/python
# -*- coding: utf-8 -*-
from ConfigParser import ConfigParser
conf = ConfigParser()
conf.read("config.ini")
sections = conf.sections() # 获取部分名称 ['host3', 'host2', 'host1']
for section in sections:
options = conf.options(section) # 获取部分名称中的键 ['user', 'host', 'port', 'pass']
for option in options:
value = conf.get(section, option) # 获取部分中的键值
print option + ": " + value
print "-------------"
# python test.py
user: wangwu
host: 192.168.1.3
port: 22
pass: 789
-------------
user: lisi
host: 192.168.1.2
port: 22
pass: 456
-------------
user: zhangsan
host: 192.168.1.1
port: 22
pass: 123
-------------
通过上面的例子,熟悉了sections()、options()和get(),能任意获取文件的内容了。
也可以使用items()获取部分中的每个选项:
from ConfigParser import ConfigParser
conf = ConfigParser()
conf.read("config.ini")
print conf.items('host1')
# python test.py
[('user', 'zhangsan'), ('host', '192.168.1.1'), ('port', '22'), ('pass', '123')]
3)更新或添加选项
from ConfigParser import ConfigParser
conf = ConfigParser()
conf.read("config.ini")
fp = open("config.ini", "w") # 写模式打开文件,供后面提交写的内容
conf.set("host1", "port", "2222") # 有这个选项就更新,否则添加
conf.write(fp) # 写入的操作必须执行这个方法
4)添加一部分,并添加选项
from ConfigParser import ConfigParser
conf = ConfigParser()
conf.read("config.ini")
fp = open("config.ini", "w")
conf.add_section("host4") # 添加[host4]
conf.set("host4", "host", "192.168.1.4")
conf.set("host4", "port", "22")
conf.set("host4", "user", "zhaoliu")
conf.set("host4", "pass", "123")
conf.write(fp)
5)删除一部分
from ConfigParser import ConfigParser
conf = ConfigParser()
conf.read("config.ini")
fp = open("config.ini", "w")
conf.remove_section('host4') # 删除[host4]
conf.remove_option('host3', 'pass') # 删除[host3]的pass选项
conf.write(fp)
10.13 urllib与urllib2
打开URL。urllib2是urllib的增强版,新增了一些功能,比如Request()用来修改Header信息。但是urllib2还去掉了一些好用的方法,比如urlencode()编码序列中的两个元素(元组或字典)为URL查询字符串。
一般情况下这两个库结合着用,那我们也结合着了解下。
|
类
|
描述
|
|
urllib.urlopen(url, data=None, proxies=None)
|
读取指定URL,创建类文件对象。data是随着URL提交的数据(POST)
|
|
urllib/urllib2.quote(s, safe='/')
|
将字符串中的特殊符号转十六进制表示。如:
quote('abc def') -> 'abc%20def'
|
|
urllib/urllib2.unquote(s)
|
与quote相反
|
|
urllib.urlencode(query, doseq=0)
|
将序列中的两个元素(元组或字典)转换为URL查询字符串
|
|
urllib.urlretrieve(url, filename=None, reporthook=None, data=None)
|
将返回结果保存到文件,filename是文件名
|
|
urllib2.Request(url, data=None, headers={}, origin_req_host=None, unverifiable=False)
|
一般访问URL用urllib.urlopen(),如果要修改header信息就会用到这个。
data是随着URL提交的数据,将会把HTTP请求GET改为POST。headers是一个字典,包含提交头的键值对应内容。
|
|
urllib2.urlopen(url, data=None, timeout=<object object>)
|
timeout 超时时间,单位秒
|
|
urllib2.build_opener(*handlers)
|
构造opener
|
|
urllib2.install_opener(opener)
|
把新构造的opener安装到默认的opener中,以后urlopen()会自动调用
|
|
urllib2.HTTPCookieProcessor(cookiejar=None)
|
Cookie处理器
|
|
urllib2.HTTPBasicAuthHandler
|
认证处理器
|
|
urllib2.ProxyHandler
|
代理处理器
|
urllib.urlopen()有几个常用的方法:
|
方法
|
描述
|
|
getcode()
|
获取HTTP状态码
|
|
geturl()
|
返回真实URL。有可能URL3xx跳转,那么这个将获得跳转后的URL
|
|
info()
|
返回服务器返回的header信息。可以通过它的方法获取相关值
|
|
next()
|
获取下一行,没有数据抛出异常
|
|
read(size=-1)
|
默认读取所有内容。size正整数指定读取多少字节
|
|
readline(size=-1)
|
默认读取下一行。size正整数指定读取多少字节
|
|
readlines(sizehint=0)
|
默认读取所有内容,以列表形式返回。sizehint正整数指定读取多少字节
|
示例:
1)请求URL
>>> import urllib, urllib2
>>> response = urllib.urlopen("http://www.baidu.com") # 获取的网站页面源码
>>> response.readline()
'<!DOCTYPE html>\n'
>>> response.getcode()
200
>>> response.geturl()
'http://www.baidu.com'
2)伪装chrome浏览器访问
>>> user_agent = "Mozilla/5.0 (Windows NT 10.0; WOW64) AppleWebKit/537.36 (KHTML, like Gecko) Chrome/44.0.2403.157 Safari/537.36"
>>> header = {"User-Agent": user_agent}
>>> request = urllib2.Request("http://www.baidu.com", headers=header)
>>> response = urllib2.urlopen(request)
>>> response.geturl()
'https://www.baidu.com/'
>>> print respose.info() # 查看服务器返回的header信息
Server: bfe/1.0.8.18
Date: Sat, 12 Nov 2016 06:34:54 GMT
Content-Type: text/html; charset=utf-8
Transfer-Encoding: chunked
Connection: close
Vary: Accept-Encoding
Set-Cookie:
BAIDUID=5979A74F742651531360C08F3BE06754:FG=1; expires=Thu, 31-Dec-37
23:55:55 GMT; max-age=2147483647; path=/; domain=.baidu.com
Set-Cookie:
BIDUPSID=5979A74F742651531360C08F3BE06754; expires=Thu, 31-Dec-37
23:55:55 GMT; max-age=2147483647; path=/; domain=.baidu.com
Set-Cookie: PSTM=1478932494; expires=Thu, 31-Dec-37 23:55:55 GMT; max-age=2147483647; path=/; domain=.baidu.com
Set-Cookie: BDSVRTM=0; path=/
Set-Cookie: BD_HOME=0; path=/
Set-Cookie: H_PS_PSSID=1426_18240_17945_21118_17001_21454_21408_21394_21377_21525_21192; path=/; domain=.baidu.com
P3P: CP=" OTI DSP COR IVA OUR IND COM "
Cache-Control: private
Cxy_all: baidu+a24af77d41154f5fc0d314a73fd4c48f
Expires: Sat, 12 Nov 2016 06:34:17 GMT
X-Powered-By: HPHP
X-UA-Compatible: IE=Edge,chrome=1
Strict-Transport-Security: max-age=604800
BDPAGETYPE: 1
BDQID: 0xf51e0c970000d938
BDUSERID: 0
Set-Cookie:
__bsi=12824513216883597638_00_24_N_N_3_0303_C02F_N_N_N_0; expires=Sat,
12-Nov-16 06:34:59 GMT; domain=www.baidu.com; path=/
3)提交用户表单
>>> post_data = {"loginform-username":"test","loginform-password":"123456"}
>>> response = urllib2.urlopen("http://home.51cto.com/index", data=(urllib.urlencode(post_data)))
>>> response.read() # 登录后网页内容
提交用户名和密码表单登录到51cto网站,键是表单元素的id。其中用到了urlencode()方法,上面讲过是用于转为字典格式为URL接受的编码格式。
例如:
>>> urllib.urlencode(post_data)
'loginform-password=123456&loginform-username=test'
4)保存cookie到变量中
#!/usr/bin/python
# -*- coding: utf-8 -*-
import urllib, urllib2
import cookielib
# 实例化CookieJar对象来保存cookie
cookie = cookielib.CookieJar()
# 创建cookie处理器
handler = urllib2.HTTPCookieProcessor(cookie)
# 通过handler构造opener
opener = urllib2.build_opener(handler)
response = opener.open("http://www.baidu.com")
for item in cookie:
print item.name, item.value
# python test.py
BAIDUID EB4BF619C95630EFD619B99C596744B0:FG=1
BIDUPSID EB4BF619C95630EFD619B99C596744B0
H_PS_PSSID 1437_20795_21099_21455_21408_21395_21377_21526_21190_21306
PSTM 1478936429
BDSVRTM 0
BD_HOME 0
urlopen()本身就是一个opener,无法满足对Cookie处理,所有就要新构造一个opener。这里用到了cookielib库,cookielib库是一个可存储cookie的对象。CookieJar类来捕获cookie。
cookie存储在客户端,用来跟踪浏览器用户身份的会话技术。
5)保存cookie到文件
#!/usr/bin/python
# -*- coding: utf-8 -*-
import urllib, urllib2
import cookielib
cookie_file = 'cookie.txt'
# 保存cookie到文件
cookie = cookielib.MozillaCookieJar(cookie_file)
# 创建cookie处理器
handler = urllib2.HTTPCookieProcessor(cookie)
# 通过handler构造opener
opener = urllib2.build_opener(handler)
response = opener.open("http://www.baidu.com")
# 保存
cookie.save(ignore_discard=True, ignore_expires=True) # ignore_discard默认是false,不保存将被丢失的。ignore_expires默认flase,如果cookie存在,则不写入。
# python test.py
# cat cookie.txt
# Netscape HTTP Cookie File
# http://curl.haxx.se/rfc/cookie_spec.html
# This is a generated file! Do not edit.
.baidu.com TRUE / FALSE 3626420835 BAIDUID 687544519EA906BD0DE5AE02FB25A5B3:FG=1
.baidu.com TRUE / FALSE 3626420835 BIDUPSID 687544519EA906BD0DE5AE02FB25A5B3
.baidu.com TRUE / FALSE H_PS_PSSID 1420_21450_21097_18560_21455_21408_21395_21377_21526_21192_20927
.baidu.com TRUE / FALSE 3626420835 PSTM 1478937189
www.baidu.com FALSE / FALSE BDSVRTM 0
www.baidu.com FALSE / FALSE BD_HOME 0
MozillaCookieJar()这个类用来保存cookie到文件。
6)使用cookie访问URL
#!/usr/bin/python
# -*- coding: utf-8 -*-
import urllib2
import cookielib
# 实例化对象
cookie = cookielib.MozillaCookieJar()
# 从文件中读取cookie
cookie.load("cookie.txt", ignore_discard=True, ignore_expires=True)
# 创建cookie处理器
handler = urllib2.HTTPCookieProcessor(cookie)
# 通过handler构造opener
opener = urllib2.build_opener(handler)
# request = urllib2.Request("http://www.baidu.com")
response = opener.open("http://www.baidu.com")
7)使用代理服务器访问URL
import urllib2
proxy_address = {"http": "http://218.17.252.34:3128"}
handler = urllib2.ProxyHandler(proxy_address)
opener = urllib2.build_opener(handler)
response = opener.open("http://www.baidu.com")
print response.read()
8)URL访问认证
import urllib2
auth = urllib2.HTTPBasicAuthHandler()
# (realm, uri, user, passwd)
auth.add_password(None, 'http://www.example.com','user','123456')
opener = urllib2.build_opener(auth)
response = opener.open('http://www.example.com/test.html')
10.14 json
JSON是一种轻量级数据交换格式,一般API返回的数据大多是JSON、XML,如果返回JSON的话,将获取的数据转换成字典,方面在程序中处理。
json库经常用的有两种方法dumps和loads():
# 将字典转换为JSON字符串
>>> dict = {'user':[{'user1': 123}, {'user2': 456}]}
>>> type(dict)
<type 'dict'>
>>> json_str = json.dumps(dict)
>>> type(json_str)
<type 'str'>
# 把JSON字符串转换为字典
>>> d = json.loads(json_str)
>>> type(d)
<type 'dict'>
JSON与Python解码后数据类型:
|
JSON
|
Python
|
|
object
|
dict
|
|
array
|
list
|
|
string
|
unicode
|
|
number(int)
|
init,long
|
|
number(real)
|
float
|
|
true
|
Ture
|
| false |
False
|
|
null
|
None
|
10.15 time
这个time库提供了各种操作时间值。
|
方法
|
描述
|
示例
|
|
time.asctime([tuple])
|
将一个时间元组转换成一个可读的24个时间字符串
|
>>> time.asctime(time.localtime())
'Sat Nov 12 01:19:00 2016'
|
|
time.ctime(seconds)
|
字符串类型返回当前时间
|
>>> time.ctime()
'Sat Nov 12 01:19:32 2016'
|
|
time.localtime([seconds])
|
默认将当前时间转换成一个(struct_timetm_year,tm_mon,tm_mday,tm_hour,tm_min,
tm_sec,tm_wday,tm_yday,tm_isdst)
|
>>> time.localtime()
time.struct_time(tm_year=2016, tm_mon=11, tm_mday=12, tm_hour=1, tm_min=19, tm_sec=56, tm_wday=5, tm_yday=317, tm_isdst=0)
|
|
time.mktime(tuple)
|
将一个struct_time转换成时间戳
|
>>> time.mktime(time.localtime())
1478942416.0
|
|
time.sleep(seconds)
|
延迟执行给定的秒数
|
>>> time.sleep(1.5)
|
|
time.strftime(format[, tuple])
|
将元组时间转换成指定格式。[tuple]不指定默认以当前时间
|
>>> time.strftime('%Y-%m-%d %H:%M:%S')
'2016-11-12 01:20:54'
|
|
time.time()
|
返回当前时间时间戳
|
>>> time.time()
1478942466.45977
|
strftime():
|
指令
|
描述
|
|
%a
|
简化星期名称,如Sat
|
|
%A
|
完整星期名称,如Saturday
|
|
%b
|
简化月份名称,如Nov
|
|
%B
|
完整月份名称,如November
|
|
%c
|
当前时区日期和时间
|
|
%d
|
天
|
|
%H
|
24小时制小时数(0-23)
|
|
%I
|
12小时制小时数(01-12)
|
|
%j
|
365天中第多少天
|
|
%m
|
月
|
|
%M
|
分钟
|
|
%p
|
AM或PM,AM表示上午,PM表示下午
|
|
%S
|
秒
|
|
%U
|
一年中第几个星期
|
|
%w
|
星期几 |
|
%W
|
一年中第几个星期
|
|
%x
|
本地日期,如'11/12/16'
|
|
%X
|
本地时间,如'17:46:20'
|
|
%y
|
简写年名称,如16
|
|
%Y
|
完整年名称,如2016 |
|
%Z
|
当前时区名称(PST:太平洋标准时间)
|
|
%%
|
代表一个%号本身
|
10.16 datetime
datetime库提供了以下几个类:
|
类
|
描述
|
|
datetime.date()
|
日期,年月日组成
|
|
datetime.datetime()
|
包括日期和时间
|
|
datetime.time()
|
时间,时分秒及微秒组成
|
|
datetime.timedelta()
|
时间间隔
|
|
datetime.tzinfo()
|
|
datetime.date()类:
|
方法
|
描述
|
描述
|
|
date.max
|
对象所能表示的最大日期
|
datetime.date(9999, 12, 31)
|
|
date.min
|
对象所能表示的最小日期
|
datetime.date(1, 1, 1)
|
|
date.strftime()
|
根据datetime自定义时间格式
|
>>> date.strftime(datetime.now(), '%Y-%m-%d %H:%M:%S')
'2016-11-12 07:24:15
|
|
date.today()
|
返回当前系统日期 |
>>> date.today()
datetime.date(2016, 11, 12)
|
|
date.isoformat()
|
返回ISO 8601格式时间(YYYY-MM-DD)
|
>>> date.isoformat(date.today())
'2016-11-12'
|
|
date.fromtimestamp()
|
根据时间戳返回日期
|
>>> date.fromtimestamp(time.time())
datetime.date(2016, 11, 12)
|
|
date.weekday()
|
根据日期返回星期几,周一是0,以此类推
|
>>> date.weekday(date.today())
5
|
|
date.isoweekday()
|
根据日期返回星期几,周一是1,以此类推
|
>>> date.isoweekday(date.today())
6
|
|
date.isocalendar()
|
根据日期返回日历(年,第几周,星期几)
|
>>> date.isocalendar(date.today())
(2016, 45, 6)
|
datetime.datetime()类:
|
方法
|
描述
|
示例
|
|
datetime.now()/datetime.today()
|
获取当前系统时间 |
>>> datetime.now()
datetime.datetime(2016, 11, 12, 7, 39, 35, 106385)
|
|
date.isoformat()
|
返回ISO 8601格式时间
|
>>> datetime.isoformat(datetime.now())
'2016-11-12T07:42:14.250440'
|
|
datetime.date()
|
返回时间日期对象,年月日
|
>>> datetime.date(datetime.now())
datetime.date(2016, 11, 12)
|
|
datetime.time()
|
返回时间对象,时分秒
|
>>> datetime.time(datetime.now())
datetime.time(7, 46, 2, 594397)
|
|
datetime.utcnow()
|
UTC时间,比中国时间快8个小时
|
>>> datetime.utcnow()
datetime.datetime(2016, 11, 12, 15, 47, 53, 514210)
|
datetime.time()类:
|
方法
|
描述
|
示例
|
|
time.max
|
所能表示的最大时间
|
>>> time.max
datetime.time(23, 59, 59, 999999)
|
|
time.min
|
所能表示的最小时间
|
>>> time.min
datetime.time(0, 0)
|
|
time.resolution
|
时间最小单位,1微妙
|
>>> time.resolution
datetime.timedelta(0, 0, 1)
|
datetime.timedelta()类:
# 获取昨天日期
>>> date.today() - timedelta(days=1)
datetime.date(2016, 11, 11)
>>> date.isoformat(date.today() - timedelta(days=1))
'2016-11-11'
# 获取明天日期
>>> date.today() + timedelta(days=1)
datetime.date(2016, 11, 13)
>>> date.isoformat(date.today() + timedelta(days=1))
'2016-11-13'
第十一章 Python常用内建函数
内建函数,可以直接使用,而不需要import。
在前面章节学过的sorded()、reversed()、range(),filter()、reduce()、map()等内建函数,下面再回顾下及学习一些新的内置函数。
|
函数
|
描述
|
示例
|
|
sorded(iterable, cmp=None, key=None, reverse=False)
|
正序排序可迭代对象,生成新的列表
|
>>> lst = [2,3,4,1,5]
>>> sorted(lst)
[1, 2, 3, 4, 5]
对字典value排序:
>>> dict = {'a':86, 'b':23, 'c':45}
>>> sorted(dict.iteritems(), key=lambda x:x[1], reverse=True)
[('a', 86), ('c', 45), ('b', 23)]
|
|
reversed(sequence)
|
反向排序序列,返回一个可迭代对象
|
>>> lst = [1,2,3,4,5]
>>> lst2 = []
>>> for i in reversed(lst):
... lst2.append(i)
...
>>> lst2
[5, 4, 3, 2, 1]
|
|
range(start, stop[, step])
|
生成整数列表
|
>>> range(0,5)
[0, 1, 2, 3, 4]
>>> range(0,5, 2)
[0, 2, 4]
|
|
xrange(start, stop[, step])
|
生成可迭代对象,比range节省内存资源
|
>>> type(xrange(0,5))
<type 'xrange'>
>>> for i in xrange(0,5):
... print i
...
0
1
2
3
4
|
|
filter(function or None, sequence)
|
将序列中的元素通过函数处理返回一个新列表、元组或字符串
|
例如:过滤列表中的奇数
>>> lst = [1,2,3,4,5]
>>> filter(lambda x:x%2==0, lst)
[2, 4]
|
|
reduce(function, sequence[, initial])
|
二元运算函数,所以只接受二元操作函数
|
例如:计算列表总和
>>> lst = [1,2,3,4,5]
>>> reduce(lambda x,y:x+y, lst)
15
先将前两个元素相加等于3,再把结果与第三个元素相加等于6,以此类推
|
|
map(function, sequence[, sequence, ...])
|
将序列中的元素通过函数处理返回一个新列表
|
>>> lst = [1,2,3,4,5]
>>> map(lambda x:str(x)+".txt", lst)
['1.txt', '2.txt', '3.txt', '4.txt', '5.txt']
|
|
len(object)
|
返回序列的数量
|
>>> len([1,2,3])
3
|
|
abs(number)
|
返回参数的绝对值
|
>>> abs(-2)
2
|
|
eval(source[, globals[, locals]])
|
把字符串当成Python表达式处理并返回计算结果
|
>>> a = '1 + 2'
>>> eval(a)
3
|
|
repr(object)
|
把象转为字符串表示
|
>>> repr(3)
'3'
>>> repr('1+2')
"'1+2'"
|
|
round(number[, ndigits])
|
number四舍五入计算,返回浮点数。ndigits是保留几位小数
|
>>> round(1.6)
2.0
|
|
min(iterable[, key=func])
min(a, b, c, ...[, key=func]
|
返回最小项。可以是可迭代对象,也可以是两个或两个以上参数。
|
>>> min([1,2,3])
1
>>> min('a', 'b', 'c')
'a'
|
|
max(iterable[, key=func])
max(a, b, c, ...[, key=func])
|
返回最大项。与min使用方法一样。
|
|
|
sum(sequence[, start])
|
返回序列合,start在计算结果上加的数
|
>>> sum([1,2,3])
6
|
|
isinstance(object, class-or-type-or-tuple)
|
判断object类型,返回布尔值
|
>>> isinstance([1,2,3],list)
True
>>> isinstance([1,2,3],tuple)
False
|
|
hex(number)
|
返回整数十六进制表示
|
>>> hex(18)
'0x12'
|
|
zip(seq1 [, seq2 [...]])
|
返回一个合并的列表元组,每个元组里面是每个seq对应的下标值,在长度最短的seq结束。
|
>>> zip(range(5),['a','b','c'])
[(0, 'a'), (1, 'b'), (2, 'c')]
|
|
cmp(x, y)
|
比较两个对象,x==y等于返回0,x>y返回整数,x<y返回负数
|
>>> cmp(1,1)
0
>>> cmp(1,2)
-1
>>> cmp(1,0)
1
|
|
locals()
|
返回当前局部变量字典
|
>>> a = 1
>>> b = 2
>>> locals()
{'a': 1, 'b': 2,......
|
内置函数还有很多,有兴趣可以参考一下:https://docs.python.org/2/library/functions.html
博客地址:http://lizhenliang.blog.51cto.com and https://yq.aliyun.com/u/lizhenliang

第十二章 Python文件操作
12.1 open()
open()函数作用是打开文件,返回一个文件对象。
用法格式:open(name[, mode[, buffering[,encoding]]]) -> file object
name 文件名
mode 模式,比如以只读方式打开
buffering 缓冲区
encoding 返回数据采用的什么编码,一般utf8或gbk
|
Mode
|
Description
|
|
r
|
只读,默认
|
|
w
|
只写,打开前清空文件内容
|
|
a
|
追加
|
|
a+
|
读写,写到文件末尾
|
|
w+
|
可读写,清空文件内容
|
|
r+
|
可读写,能写到文件任何位置
|
|
rb
|
二进制模式读
|
|
wb
|
二进制模式写,清空文件内容
|
例如:打开一个文件
>>> f = open('test.txt', 'r')
>>> f.
f.__class__( f.__new__( f.encoding f.readinto(
f.__delattr__( f.__reduce__( f.errors f.readline(
f.__doc__ f.__reduce_ex__( f.fileno( f.readlines(
f.__enter__( f.__repr__( f.flush( f.seek(
f.__exit__( f.__setattr__( f.isatty( f.softspace
f.__format__( f.__sizeof__( f.mode f.tell(
f.__getattribute__( f.__str__( f.name f.truncate(
f.__hash__( f.__subclasshook__( f.newlines f.write(
f.__init__( f.close( f.next( f.writelines(
f.__iter__( f.closed f.read( f.xreadlines(
open()函数打开文件返回一个文件对象,并赋予遍历f,f就拥有了这个文件对象的操作方法。
|
方法
|
描述
|
|
f.read([size])
|
读取size字节,当未指定或给负值时,读取剩余所有的字节,作为字符串返回
|
|
f.readline([size])
|
从文件中读取下一行,作为字符串返回。如果指定size则返回size字节
|
|
f.readlines([size])
|
读取size字节,当未指定或给负值时,读取剩余所有的字节,作为列表返回
|
|
f.write(str)
|
写字符串到文件
|
|
f.writelines(seq)
|
写序列到文件,seq必须是一个可迭代对象,而且要是一个字符串序列
|
|
f.seek(offset[, whence=0])
|
在文件中移动文件指针,从whence(0代表文件起始位置,默认。1代表当前位置。2代表文件末尾)偏移offset个字节
|
|
f.tell()
|
返回当前在文件中的位置
|
|
f.close()
|
关闭文件
|
|
f.flush
|
刷新缓冲区到磁盘
|
博客地址:http://lizhenliang.blog.51cto.com and https://yq.aliyun.com/u/lizhenliang
QQ群:323779636(Shell/Python运维开发群)
12.2 文件对象操作
写一个测试文件test.txt举例:
# cat test.txt
1.Python
2.Java
3.C++
4.Ruby
12.2.1 read()读取所有内容
>>> f = open('test.txt', 'r')
>>> f.read()
'1.Python\n2.Java\n3.C++\n4.Ruby\n'
# 获取指定字节
指定读取多少字节:
>>> f = open('test.txt', 'r')
>>> f.read(9)
'1.Python\n'
12.2.2 readline()读取下一行内容
>>> f = open('test.txt', 'r')
>>> f.readline()
'1.Python\n'
>>> f.readline()
'2.Java\n'
12.2.3 readlines()读取所有内容返回一个列表
>>> f = open('test.txt', 'r')
>>> f.readlines()
['1.Python\n', '2.Java\n', '3.C++\n', '4.Ruby\n']
12.2.4 wirte()写入字符串到文件
>>> f = open('test.txt', 'a') # 以追加方式打开文件
>>> f.write("5.Shell\n") # 这一步并没有真正写到文件
>>> f.flush() # 刷新到磁盘才写到文件
# cat test.txt
1.Python
2.Java
3.C++
4.Ruby
5.Shell
12.2.5 wirtelines()写入一个序列字符串到文件
>>> f = open('test.txt', 'a')
>>> f.writelines(['a','b','c'])
>>> f.flush()
# cat test.txt
1.Python
2.Java
3.C++
4.Ruby
5.Shell
abc
12.2.6 seek()从指定位置读取
>>> f = open('test.txt', 'r')
>>> f.tell()
0
>>> f.seek(9)
>>> f.tell()
9
>>> f.seek(5,1) # 1表示从当前位置开始
>>> f.tell()
14
12.2.7 tell()返回当前指针位置
>>> f = open('test.txt', 'r')
>>> f.tell()
0
>>> f.readline()
'1.Python\n'
>>> f.tell()
9
>>> f.readline()
'2.Java\n'
>>> f.tell()
16
>>> f.close() # 使用完后关闭文件
12.3 文件对象增删改查
在shell中,我们要想对文件指定行插入内容、替换等情况,使用sed工具很容易就实现。在本章节讲的open()函数并没有直接类似与sed工具的方法,要想实现这样的操作,变通的处理能到达此效果,主要思路是先读取内容修改,再写会文件,以下举几个常用的情况 。
12.3.1 在第一行增加一行
例如:在开头添加一个test字符串
#!/usr/bin/python
# -*- coding: utf-8 -*-
f = open('test.txt', 'r')
data = f.read()
data = "test\n" + data
f = open('test.txt', 'w')
f.write(data)
f.flush()
f.close()
# python test.py
# cat test.txt
test
1.Python
2.Java
3.C++
4.Ruby
先将数据读出来,然后把要添加的test字符串拼接到原有的数据,然后在写入这个文件。
12.3.2 在指定行添加一行
例如:在第二行添加一个test字符串
#!/usr/bin/python
# -*- coding: utf-8 -*-
f = open('test.txt', 'r')
data_list = f.readlines() # 经测试,此方法比下面迭代效率高
# data_list = []
# for line in f:
# data_list.append(line)
data_list.insert(1, 'test\n')
# data = ''.join(data)
f = open('test.txt', 'w')
# f.write(data)
f.writelines(data_list)
f.flush()
f.close
# python test.py
# cat test.txt
1.Python
test
2.Java
3.C++
4.Ruby
先将数据以列表存储,就可以根据下标插入到指定位置,也就是哪一行了。再通过join把列表拼接成字符串,最后写到文件。
12.3.3 在匹配行前一行或后一行添加test字符串
#!/usr/bin/python
# -*- coding: utf-8 -*-
f = open('test.txt', 'r')
data_list = f.readlines()
data_list.insert(2-1, 'test\n') # 在指定行减去一行就是上一行了,下一行插入同理
f = open('test.txt', 'w')
f.writelines(data_list)
f.flush()
f.close
12.3.4 删除指定行
例如:删除第三行,与在指定行添加同理
#!/usr/bin/python
# -*- coding: utf-8 -*-
f = open('test.txt', 'r')
data_list = f.readlines()
data_list.pop(2)
f = open('test.txt', 'w')
f.writelines(data_list)
f.flush()
f.close
例如:只保留第一行至第三行
#!/usr/bin/python
# -*- coding: utf-8 -*-
f = open('test.txt', 'r')
data_list = f.readlines()[0:2] # 列表切片
f = open('test.txt', 'w')
f.write(data_list)
f.flush()
f.close
12.3.5 删除匹配行
例如:删除匹配Py字符的行
#!/usr/bin/python
# -*- coding: utf-8 -*-
f = open('test.txt', 'r')
data = f.readlines()
# data_list = []
# for line in data:
# if line.find('Py') == -1: # 如果当前行不包含Py字符,会返回-1,否则返回下标
# data_list.append(line)
data_list = [line for line in data if line.find('Py') == -1]
f = open('test.txt', 'w')
f.writelines(data_list)
f.flush()
f.close
12.3.6 全局替换字符串
#!/usr/bin/python
# -*- coding: utf-8 -*-
f = open('test.txt', 'r')
data = f.read()
data.replace('old string', 'new string')
f = open('test.txt', 'w')
f.write(data)
f.flush()
f.close
12.3.7 在指定行替换字符串
例如:将C++改为C#
#!/usr/bin/python
# -*- coding: utf-8 -*-
f = open('test.txt', 'r')
data = f.readlines()
data_list = []
for line in data:
if data.index(line) == 2:
data_list.append(line.replace('++', '#'))
else:
data_list.append(line)
f = open('test.txt', 'w')
f.writelines(data_list)
f.flush()
f.close
12.3.8 处理大文件
在读取上G文件时,直接读取所有内容会导致内存占用过多,内存爆掉。要想提高处理效率,有以下两种方法:
方法1:open()打开文件返回的对象本身就是可迭代的,利用for循环迭代可提高处理性能
>>> f = open('test.txt')
>>> for line in f:
... print line # 每行后面会有一个换行符\n,所以会打印出来换行符,可以使用line.strip('\n')去除
...
1.Python
2.Java
3.C++
4.Ruby
方法2:每次只读取固定字节
#!/usr/bin/python
# -*- coding: utf-8 -*-
f = open('test.txt')
while True:
data = f.read(1024) # 每次只读取1024字节
if not data: break
12.3.9 下载文件
方法1:
import urllib
url = "http://nginx.org/download/nginx-1.10.1.tar.gz"
urllib.urlretrieve(url, "nginx-1.10.1.tar.gz")
方法2:
import urllib2
url = "http://nginx.org/download/nginx-1.10.1.tar.gz"
f = urllib2.urlopen(url).read()
with open("nginx-1.10.1.tar.gz", "wb") as data:
data.write(f)
12.4 fileinput
fileinput模块是Python内建模块,用于遍历文件,可对多文件操作。
|
方法
|
描述
|
|
fileinput.input([files[, inplace[, backup[, mode[, openhook]]]]])
|
files:文件路径,多文件这样写['1.txt,'2.txt'']
inplace:是否将标准输出写到原文件,默认是0,不写
backup:备份文件扩展名,比如.bak
mode:读写模式,默认r,只读
openhook:
|
|
fileinput.isfirstline()
|
检查当前行是否是文件的第一行 |
|
fileinput.lineno()
|
返回当前已经读取行的数量
|
|
fileinput.fileno()
|
返回当前文件数量
|
|
fileinput.filelineno()
|
返回当前读取行的行号
|
|
fileinput.filename()
|
返回当前文件名
|
12.4.1 遍历文件内容
#!/usr/bin/python
# -*- coding: utf-8 -*-
import fileinput
for line in fileinput.input('test.txt'):
print line
# python test.py
1.Python
2.Java
3.C++
4.Ruby
12.4.2 返回当前读取行的行号
#!/usr/bin/python
# -*- coding: utf-8 -*-
import fileinput
for line in fileinput.input('test.txt'):
print fileinput.filelineno()
print line, # 逗号忽略换行符
# python test.py
1
1.Python
2
2.Java
3
3.C++
4
4.Ruby
12.4.3 全局替换字符,修改原文件
#!/usr/bin/python
# -*- coding: utf-8 -*-
import fileinput
for line in fileinput.input('test.txt', backup='.bak', inplace=1):
line = line.replace('++','#')
print line,
先把要操作的文件备份一个以.bak的后缀文件,inplace=1是将标准输出写到原文件,也就是这个脚本如果没有标准输出,就会以空数据写到原文件。
12.4.4 对多文件操作
#!/usr/bin/python
# -*- coding: utf-8 -*-
import fileinput
for line in fileinput.input(['test.txt', 'test2.txt']):
print line,
12.4.5 实时读取文件新增内容,类似tail -f
#!/usr/bin/python
# -*- coding: utf-8 -*-
with open('access.log') as f:
f.seek(0,2) # 每次打开文件都将文件指针移动到末尾
while True:
line = f.readline()
if line:
print line,
这个死循环会一直执行下面的操作。很消耗性能。
我们可以加个休眠,每秒读取一次:
#!/usr/bin/python
# -*- coding: utf-8 -*-
import time
with open('access.log') as f:
f.seek(0,2)
while True:
line = f.readline()
if line:
print line,
else:
time.sleep(1)
12.5 shutil
shutil模块是Python内建模块,用于文件或目录拷贝,归档。
|
方法
|
描述
|
|
shutil.copyfile(src, dst)
|
复制文件
|
|
shutil.copytree(src, dst)
|
复制文件或目录
|
|
shutil.move(src, dst)
|
移动文件或目录
|
|
shutil.rmtree(path,ignore_errors=False, onerror=None)
|
递归删除目录。os.rmdir()不能删除有文件的目录,就可以用这个了
|
|
shutil.make_archive(base_name, format, root_dir=None, base_dir=None, verbose=0, dry_run=0, owner=None, group=None, logger=None)
|
Python2.7以后才有这个方法。
功能是创建zip或tar归档文件。
base_name:要创建归档文件名
format:归档文件格式,有zip、tar、bztar、gztar
root_dir:要压缩的目录
base_dir:?
用法:shutil.make_archive('wp','zip','/root/wordpress')
|
12.6 with语句
在处理一些事务时,可能会出现异常和后续的清理工作,比如读取失败,关闭文件等。这就用到了异常处理语句try...except,如下:
#!/usr/bin/python
# -*- coding: utf-8 -*-
f = open('test.txt')
try:
data = f.read()
finally:
f.close()
Python对于这种情况提供了一种更简单的处理方式,with语句。处理一个文件时,先获取一个文件句柄,再从文件中读取数据,最后关闭文件句柄。如下:
#!/usr/bin/python
# -*- coding: utf-8 -*-
with open('test.txt') as f:
data = f.read()
可见这种方式显得更简约,一些异常、清理工作都交给with处理了。
第十三章 Python数据库编程
本章节讲解Python操作数据库,完成简单的增删改查工作,以MySQL数据库为例。
Python的MySQL数据库操作模块叫MySQLdb,需要额外的安装下。
通过pip工具安装:pip install MySQLdb
MySQLdb模块,我们主要就用到连接数据库的方法MySQLdb.Connect(),连接上数据库后,再使用一些方法做相应的操作。
MySQLdb.Connect(parameters...)方法提供了以下一些常用的参数:
|
参数
|
描述
|
|
host
|
数据库地址 |
|
user
|
数据库用户名,
|
|
passwd
|
数据库密码,默认为空
|
|
db
|
数据库库名,没有默认库
|
|
port
|
数据库端口,默认3306
|
|
connect_timeout
|
连接超时时间,秒为单位
|
|
use_unicode
|
结果以unicode字符串返回
|
|
charset
|
插入数据库编码
|
连接对象返回的connect()函数:
|
commit()
|
提交事务。对支持事务的数据库和表,如果提交修改操作,不适用这个方法,则不会写到数据库中
|
|
rollback()
|
事务回滚。对支持事务的数据库和表,如果执行此方法,则回滚当前事务。在没有commit()前提下。
|
|
cursor([cursorclass])
|
创建一个游标对象。所有的sql语句的执行都要在游标对象下进行。MySQL本身不支持游标,MySQLdb模块对其游标进行了仿真。
|
游标对象也提供了几种方法:
|
close()
|
关闭游标 |
|
execute(sql)
|
执行sql语句
|
|
excutemany(sql)
|
执行多条sql语句
|
|
fetchone()
|
从执行结果中取第一条记录 |
|
fetchmany(n)
|
从执行结果中取n条记录
|
|
fetchall()
|
从执行结果中取所有记录
|
|
scroll(self, value, mode='relative')
|
游标滚动
|
博客地址:http://lizhenliang.blog.51cto.com and https://yq.aliyun.com/u/lizhenliang
QQ群:323779636(Shell/Python运维开发群)
13.1 数据库增删改查
13.1.1 在test库创建一张user表,并添加一条记录
>>> conn = MySQLdb.Connect(host='192.168.1.244',user='root',passwd='QHyCTajI',db='test',charset='utf8')
>>> cursor = conn.cursor()
>>> sql = "create table user(id int,name varchar(30),password varchar(30))"
>>> cursor.execute(sql) # 返回的数字是影响的行数
0L
>>> sql = "insert into user(id,name,password) values('1','xiaoming','123456')"
>>> cursor.execute(sql)
1L
>>> conn.commit() # 提交事务,写入到数据库
>>> cursor.execute('show tables') # 查看创建的表
1L
>>> cursor.fetchall() # 返回上一个游标执行的所有结果,默认是以元组形式返回
((u'user',),)
>>> cursor.execute('select * from user')
1L
>>> cursor.fetchall()
((1L, u'xiaoming', u'123456'),)
13.1.2 插入多条数据
>>> sql = 'insert into user(id,name,password) values(%s,%s,%s)'
>>> args = [('2','zhangsan','123456'), ('3','lisi','123456'),('4','wangwu','123456')]
>>> cursor.executemany(sql, args)
3L
>>> conn.commit()
>>> sql = 'select * from user'
>>> cursor.execute(sql)
4L
>>> cursor.fetchall()
((1L, u'xiaoming', u'123456'), (2L, u'zhangsan', u'123456'), (3L, u'lisi', u'123456'), (4L, u'wangwu', u'123456'))
args变量是一个包含多元组的列表,每个元组对应着每条记录。当查询多条记录时,使用此方法,可有效提高插入效率。
13.1.3 删除用户名xiaoming的记录
>>> sql = 'delete from user where name="xiaoming"'
>>> cursor.execute(sql)
1L
>>> conn.commit()
>>> sql = 'select * from user'
>>> cursor.execute(sql)
3L
>>> cursor.fetchall()
((2L, u'zhangsan', u'123456'), (3L, u'lisi', u'123456'), (4L, u'wangwu', u'123456'))
13.1.4 查询记录
>>> sql = 'select * from user'
>>> cursor.execute(sql)
3L
>>> cursor.fetchone() # 获取第一条记录
(2L, u'zhangsan', u'123456')
>>> sql = 'select * from user'
>>> cursor.execute(sql)
3L
>>> cursor.fetchmany(2) # 获取两条记录
((2L, u'zhangsan', u'123456'), (3L, u'lisi', u'123456'))
13.1.4 以字典形式返回结果
默认显示是元组形式,要想返回字典形式,使得更易处理,就用到cursor([cursorclass])中的cusorclass参数。
传入MySQLdb.cursors.DictCursor类:
>>> cursor = conn.cursor(MySQLdb.cursors.DictCursor)
>>> sql = 'select * from user'
>>> cursor.execute(sql)
3L
>>> cursor.fetchall()
({'password':
u'123456', 'id': 2L, 'name': u'zhangsan'}, {'password': u'123456', 'id':
3L, 'name': u'lisi'}, {'password': u'123456', 'id': 4L, 'name':
u'wangwu'})
13.2 遍历查询结果
#!/usr/bin/env python
# -*- coding: utf-8 -*-
import MySQLdb
try:
conn = MySQLdb.Connect(host='127.0.0.1', port=3306, user='root', passwd='123456', connect_timeout=3, charset='utf8')
cursor = conn.cursor()
sql = "select * from user"
cursor.execute(sql)
for i in cursor.fetchall():
print i
except Exception, e:
print ("Connection Error: " + str(e))
finally:
conn.close()
# python test.py
(2L, u'zhangsan', u'123456')
(3L, u'lisi', u'123456')
(4L, u'wangwu', u'123456')
使用for循环遍历查询结果,并增加了异常处理。
第十四章 Python发送邮件(常见四种邮件内容)
在写脚本时,放到后台运行,想知道执行情况,会通过邮件、SMS(短信)、飞信、微信等方式通知管理员,用的最多的是邮件。在linux下,Shell脚本发送邮件告警是件很简单的事,有现成的邮件服务软件或者调用运营商邮箱服务器。
对于Python来说,需要编写脚本调用邮件服务器来发送邮件,使用的协议是SMTP。接收邮件,使用的协议是POP3和IMAP。我想有必要说明下 ,POP3和IMAP的区别:POP3在客户端邮箱中所做的操作不会反馈到邮箱服务器,比如删除一封邮件,邮箱服务器并不会删除。IMAP则会反馈到邮箱服务器,会做相应的操作。
Python分别提供了收发邮件的库,smtplib、poplib和imaplib。
本章主要讲解如果使用smtplib库实现发送各种形式的邮件内容。在smtplib库中,主要主要用smtplib.SMTP()类,用于连接SMTP服务器,发送邮件。
这个类有几个常用的方法:
|
方法
|
描述
|
|
SMTP.set_debuglevel(level)
|
设置输出debug调试信息,默认不输出
|
|
SMTP.docmd(cmd[, argstring])
|
发送一个命令到SMTP服务器
|
|
SMTP.connect([host[, port]])
|
连接到指定的SMTP服务器 |
|
SMTP.helo([hostname])
|
使用helo指令向SMTP服务器确认你的身份
|
|
SMTP.ehlo(hostname)
|
使用ehlo指令像ESMTP(SMTP扩展)确认你的身份
|
|
SMTP.ehlo_or_helo_if_needed()
|
如果在以前的会话连接中没有提供ehlo或者helo指令,这个方法会调用ehlo()或helo()
|
|
SMTP.has_extn(name)
|
判断指定名称是否在SMTP服务器上
|
|
SMTP.verify(address)
|
判断邮件地址是否在SMTP服务器上
|
|
SMTP.starttls([keyfile[, certfile]])
|
使SMTP连接运行在TLS模式,所有的SMTP指令都会被加密
|
|
SMTP.login(user, password)
|
登录SMTP服务器
|
|
SMTP.sendmail(from_addr, to_addrs, msg, mail_options=[], rcpt_options=[])
|
发送邮件
from_addr:邮件发件人
to_addrs:邮件收件人
msg:发送消息
|
|
SMTP.quit()
|
关闭SMTP会话
|
|
SMTP.close()
|
关闭SMTP服务器连接
|
看下官方给的示例:
>>> import smtplib
>>> s=smtplib.SMTP("localhost")
>>> tolist=["one@one.org","two@two.org","three@three.org","four@four.org"]
>>> msg = '''\
... From: Me@my.org
... Subject: testin'...
...
... This is a test '''
>>> s.sendmail("me@my.org",tolist,msg)
{ "three@three.org" : ( 550 ,"User unknown" ) }
>>> s.quit()
我们根据示例给自己发一个邮件测试下:
我这里测试使用本地的SMTP服务器,也就是要装一个支持SMTP协议的服务,比如sendmail、postfix等。CentOS安装sendmail:yum install sendmail
>>> import smtplib
>>> s = smtplib.SMTP("localhost")
>>> tolist = ["xxx@qq.com", "xxx@163.com"]
>>> msg = '''\
... From: Me@my.org
... Subject: test
... This is a test '''
>>> s.sendmail("me@my.org", tolist, msg)
{}
进入腾讯和网易收件人邮箱,就能看到刚发的测试邮件,一般都被邮箱服务器过滤成垃圾邮件,所以收件箱没有,你要去垃圾箱看看。

可以看到,多个收件人可以放到一个列表中进行群发。msg对象里From表示发件人,Subject是邮件标题,换行后输入的是邮件内容。
上面是使用本地SMTP服务器发送的邮件,测试下用163服务器发送邮件看看效果:
>>> import smtplib
>>> s = smtplib.SMTP("smtp.163.com")
>>> s.login("baojingtongzhi@163.com", "xxx")
(235, 'Authentication successful')
>>> tolist = ["xxx@qq.com", "xxx@163.com"]
>>> msg = '''\
... From: baojingtongzhi@163.com
... Subject: test
... This is a test '''
>>> s.sendmail("baojingtongzhi@163.com", tolist, msg)
Traceback (most recent call last):
File "<stdin>", line 1, in <module>
File "/usr/lib64/python2.6/smtplib.py", line 725, in sendmail
raise SMTPDataError(code, resp)
smtplib.SMTPDataError: (554, 'DT:SPM 163 smtp10,DsCowAAXIdDIJAtYkZiTAA--.65425S2 1477125592,please see http://mail.163.com/help/help_spam_16.htm?ip=119.57.73.67&hostid=smtp10&time=1477125592')
访问给出的163网址,SMTP554错误是: "554 DT:SUM 信封发件人和信头发件人不匹配;"
大概已经明白啥意思,看上面再使用本地SMTP服务器时候,收件人位置是“undisclosed-recipients”,看这样163的SMTP服务器不给我们服务的原因就是这里收件人没指定。
重新修改下msg对象,添加上收件人:
>>> msg = '''\
... From: baojingtongzhi@163.com
... To: 962510244@qq.com ,zhenliang369@163.com
... Subject: test
...
... This is a test '''
>>> s.sendmail("baojingtongzhi@163.com", tolist, msg)
{}

好了,可以正常发送邮件了。msg这个格式是SMTP规定的,一定要遵守。
14.1 Python发送邮件并抄送
#!/usr/bin/python
# -*- coding: utf-8 -*-
import smtplib
def sendMail(body):
smtp_server = 'smtp.163.com'
from_mail = 'baojingtongzhi@163.com'
mail_pass = 'xxx'
to_mail = ['962510244@qq.com', 'zhenliang369@163.com']
cc_mail = ['lizhenliang@xxx.com']
from_name = 'monitor'
subject = u'监控'.encode('gbk') # 以gbk编码发送,一般邮件客户端都能识别
# msg = '''\
# From: %s <%s>
# To: %s
# Subject: %s
# %s''' %(from_name, from_mail, to_mail_str, subject, body) # 这种方式必须将邮件头信息靠左,也就是每行开头不能用空格,否则报SMTP 554
mail = [
"From: %s <%s>" % (from_name, from_mail),
"To: %s" % ','.join(to_mail), # 转成字符串,以逗号分隔元素
"Subject: %s" % subject,
"Cc: %s" % ','.join(cc_mail),
"",
body
]
msg = '\n'.join(mail) # 这种方式先将头信息放到列表中,然后用join拼接,并以换行符分隔元素,结果就是和上面注释一样了
try:
s = smtplib.SMTP()
s.connect(smtp_server, '25')
s.login(from_mail, mail_pass)
s.sendmail(from_mail, to_mail+cc_mail, msg)
s.quit()
except smtplib.SMTPException as e:
print "Error: %s" %e
if __name__ == "__main__":
sendMail("This is a test!")

s.sendmail(from_mail, to_mail+cc_mail, msg) 在这里注意下,收件人和抄送人为什么放一起发送呢?其实无论是收件人还是抄送人,它们收到的邮件都是一样的,SMTP都是认为收件人这样一封一封的发出。所以实际上并没有抄送这个概念,只是在邮件头加了抄送人的信息罢了!另外,如果不需要抄送人,直接把上面cc的信息去掉即可。
14.2 Python发送邮件带附件
由于SMTP.sendmail()方法不支持添加附件,所以可以使用email模块来满足需求。email模块是一个构造邮件和解析邮件的模块。
先看下如何用email库构造一个简单的邮件:
message = Message()
message['Subject'] = '邮件主题'
message['From'] = from_mail
message['To'] = to_mail
message['Cc'] = cc_mail
message.set_payload('邮件内容')
基本的格式就是这样的!
继续回到主题,发送邮件带附件:
#!/usr/bin/python
# -*- coding: utf-8 -*-
import smtplib
from email.mime.text import MIMEText
from email.mime.multipart import MIMEMultipart
from email.header import Header
from email import encoders
from email.mime.base import MIMEBase
from email.utils import parseaddr, formataddr
# 格式化邮件地址
def formatAddr(s):
name, addr = parseaddr(s)
return formataddr((Header(name, 'utf-8').encode(), addr))
def sendMail(body, attachment):
smtp_server = 'smtp.163.com'
from_mail = 'baojingtongzhi@163.com'
mail_pass = 'xxx'
to_mail = ['962510244@qq.com', 'zhenliang369@163.com']
# 构造一个MIMEMultipart对象代表邮件本身
msg = MIMEMultipart()
# Header对中文进行转码
msg['From'] = formatAddr('管理员 <%s>' % from_mail).encode()
msg['To'] = ','.join(to_mail)
msg['Subject'] = Header('监控', 'utf-8').encode()
# plain代表纯文本
msg.attach(MIMEText(body, 'plain', 'utf-8'))
# 二进制方式模式文件
with open(attachment, 'rb') as f:
# MIMEBase表示附件的对象
mime = MIMEBase('text', 'txt', filename=attachment)
# filename是显示附件名字
mime.add_header('Content-Disposition', 'attachment', filename=attachment)
# 获取附件内容
mime.set_payload(f.read())
encoders.encode_base64(mime)
# 作为附件添加到邮件
msg.attach(mime)
try:
s = smtplib.SMTP()
s.connect(smtp_server, "25")
s.login(from_mail, mail_pass)
s.sendmail(from_mail, to_mail, msg.as_string()) # as_string()把MIMEText对象变成str
s.quit()
except smtplib.SMTPException as e:
print "Error: %s" % e
if __name__ == "__main__":
sendMail('附件是测试数据, 请查收!', 'test.txt')

博客地址:http://lizhenliang.blog.51cto.com and https://yq.aliyun.com/u/lizhenliang
QQ群:323779636(Shell/Python运维开发群)
QQ群:323779636(Shell/Python运维开发群)
14.3 Python发送HTML邮件
#!/usr/bin/python
# -*- coding: utf-8 -*-
import smtplib
from email.mime.text import MIMEText
from email.mime.multipart import MIMEMultipart
from email.header import Header
from email.utils import parseaddr, formataddr
# 格式化邮件地址
def formatAddr(s):
name, addr = parseaddr(s)
return formataddr((Header(name, 'utf-8').encode(), addr))
def sendMail(body):
smtp_server = 'smtp.163.com'
from_mail = 'baojingtongzhi@163.com'
mail_pass = 'xxx'
to_mail = ['962510244@qq.com', 'zhenliang369@163.com']
# 构造一个MIMEMultipart对象代表邮件本身
msg = MIMEMultipart()
# Header对中文进行转码
msg['From'] = formatAddr('管理员 <%s>' % from_mail).encode()
msg['To'] = ','.join(to_mail)
msg['Subject'] = Header('监控', 'utf-8').encode()
msg.attach(MIMEText(body, 'html', 'utf-8'))
try:
s = smtplib.SMTP()
s.connect(smtp_server, "25")
s.login(from_mail, mail_pass)
s.sendmail(from_mail, to_mail, msg.as_string()) # as_string()把MIMEText对象变成str
s.quit()
except smtplib.SMTPException as e:
print "Error: %s" % e
if __name__ == "__main__":
body = """
<h1>测试邮件</h1>
<h2 style="color:red">This is a test</h1>
"""
sendMail(body)

14.4 Python发送图片邮件
#!/usr/bin/python
# -*- coding: utf-8 -*-
import smtplib
from email.mime.text import MIMEText
from email.mime.image import MIMEImage
from email.mime.multipart import MIMEMultipart
from email.header import Header
from email.utils import parseaddr, formataddr
# 格式化邮件地址
def formatAddr(s):
name, addr = parseaddr(s)
return formataddr((Header(name, 'utf-8').encode(), addr))
def sendMail(body, image):
smtp_server = 'smtp.163.com'
from_mail = 'baojingtongzhi@163.com'
mail_pass = 'xxx'
to_mail = ['962510244@qq.com', 'zhenliang369@163.com']
# 构造一个MIMEMultipart对象代表邮件本身
msg = MIMEMultipart()
# Header对中文进行转码
msg['From'] = formatAddr('管理员 <%s>' % from_mail).encode()
msg['To'] = ','.join(to_mail)
msg['Subject'] = Header('监控', 'utf-8').encode()
msg.attach(MIMEText(body, 'html', 'utf-8'))
# 二进制模式读取图片
with open(image, 'rb') as f:
msgImage = MIMEImage(f.read())
# 定义图片ID
msgImage.add_header('Content-ID', '<image1>')
msg.attach(msgImage)
try:
s = smtplib.SMTP()
s.connect(smtp_server, "25")
s.login(from_mail, mail_pass)
s.sendmail(from_mail, to_mail, msg.as_string()) # as_string()把MIMEText对象变成str
s.quit()
except smtplib.SMTPException as e:
print "Error: %s" % e
if __name__ == "__main__":
body = """
<h1>测试图片</h1>
<img src="cid:image1"/> # 引用图片
"""
sendMail(body, 'test.png')

上面发邮件的几种常见的发邮件方法基本满足日常需求了。
第十五章 Python多进程与多线程
15.1 multiprocessing
multiprocessing是多进程模块,多进程提供了任务并发性,能充分利用多核处理器。避免了GIL(全局解释锁)对资源的影响。
有以下常用类:
|
类
|
描述
|
|
Process(group=None, target=None, name=None, args=(), kwargs={})
|
派生一个进程对象,然后调用start()方法启动
|
|
Pool(processes=None, initializer=None, initargs=())
|
返回一个进程池对象,processes进程池进程数量
|
|
Pipe(duplex=True)
|
返回两个连接对象由管道连接
|
|
Queue(maxsize=0)
|
返回队列对象,操作方法跟Queue.Queue一样
|
|
multiprocessing.dummy
|
这个库是用于实现多线程
|
Process()类有以下些方法:
|
run()
|
|
|
start()
|
启动进程对象
|
|
join([timeout])
|
等待子进程终止,才返回结果。可选超时。
|
|
name
|
进程名字
|
|
is_alive()
|
返回进程是否存活
|
|
daemon
|
进程的守护标记,一个布尔值
|
|
pid
|
返回进程ID
|
|
exitcode
|
子进程退出状态码
|
|
terminate()
|
终止进程。在unix上使用SIGTERM信号,在windows上使用TerminateProcess()。
|
Pool()类有以下些方法:
|
apply(func, args=(), kwds={})
|
等效内建函数apply()
|
|
apply_async(func, args=(), kwds={}, callback=None)
|
异步,等效内建函数apply()
|
|
map(func, iterable, chunksize=None)
|
等效内建函数map()
|
|
map_async(func, iterable, chunksize=None, callback=None)
|
异步,等效内建函数map()
|
|
imap(func, iterable, chunksize=1)
|
等效内建函数itertools.imap()
|
|
imap_unordered(func, iterable, chunksize=1)
|
像imap()方法,但结果顺序是任意的
|
|
close()
|
关闭进程池 |
|
terminate()
|
终止工作进程,垃圾收集连接池对象
|
|
join()
|
等待工作进程退出。必须先调用close()或terminate()
|
Pool.apply_async()和Pool.map_aysnc()又提供了以下几个方法:
|
get([timeout])
|
获取结果对象里的结果。如果超时没有,则抛出TimeoutError异常
|
|
wait([timeout])
|
等待可用的结果或超时
|
|
ready()
|
返回调用是否已经完成
|
|
successful()
|
|
博客地址:http://lizhenliang.blog.51cto.com and https://yq.aliyun.com/u/lizhenliang
QQ群:323779636(Shell/Python运维开发群)
举例:
1)简单的例子,用子进程处理函数
from multiprocessing import Process
import os
def worker(name):
print name
print 'parent process id:', os.getppid()
print 'process id:', os.getpid()
if __name__ == '__main__':
p = Process(target=worker, args=('function worker.',))
p.start()
p.join()
print p.name
# python test.py
function worker.
parent process id: 9079
process id: 9080
Process-1
Process实例传入worker函数作为派生进程执行的任务,用start()方法启动这个实例。
2)加以说明join()方法
from multiprocessing import Process
import os
def worker(n):
print 'hello world', n
if __name__ == '__main__':
print 'parent process id:', os.getppid()
for n in range(5):
p = Process(target=worker, args=(n,))
p.start()
p.join()
print 'child process id:', p.pid
print 'child process name:', p.name
# python test.py
parent process id: 9041
hello world 0
child process id: 9132
child process name: Process-1
hello world 1
child process id: 9133
child process name: Process-2
hello world 2
child process id: 9134
child process name: Process-3
hello world 3
child process id: 9135
child process name: Process-4
hello world 4
child process id: 9136
child process name: Process-5
# 把p.join()注释掉再执行
# python test.py
parent process id: 9041
child process id: 9125
child process name: Process-1
child process id: 9126
child process name: Process-2
child process id: 9127
child process name: Process-3
child process id: 9128
child process name: Process-4
hello world 0
hello world 1
hello world 3
hello world 2
child process id: 9129
child process name: Process-5
hello world 4
可以看出,在使用join()方法时,输出的结果都是顺序排列的。相反是乱序的。因此join()方法是堵塞父进程,要等待当前子进程执行完后才会继续执行下一个子进程。否则会一直生成子进程去执行任务。
在要求输出的情况下使用join()可保证每个结果是完整的。
3)给子进程命名,方便管理
from multiprocessing import Process
import os, time
def worker1(n):
print 'hello world', n
def worker2():
print 'worker2...'
if __name__ == '__main__':
print 'parent process id:', os.getppid()
for n in range(3):
p1 = Process(name='worker1', target=worker1, args=(n,))
p1.start()
p1.join()
print 'child process id:', p1.pid
print 'child process name:', p1.name
p2 = Process(name='worker2', target=worker2)
p2.start()
p2.join()
print 'child process id:', p2.pid
print 'child process name:', p2.name
# python test.py
parent process id: 9041
hello world 0
child process id: 9248
child process name: worker1
hello world 1
child process id: 9249
child process name: worker1
hello world 2
child process id: 9250
child process name: worker1
worker2...
child process id: 9251
child process name: worker2
4)设置守护进程,父进程退出也不影响子进程运行
from multiprocessing import Process
def worker1(n):
print 'hello world', n
def worker2():
print 'worker2...'
if __name__ == '__main__':
for n in range(3):
p1 = Process(name='worker1', target=worker1, args=(n,))
p1.daemon = True
p1.start()
p1.join()
p2 = Process(target=worker2)
p2.daemon = False
p2.start()
p2.join()
5)使用进程池
#!/usr/bin/python
# -*- coding: utf-8 -*-
from multiprocessing import Pool, current_process
import os, time, sys
def worker(n):
print 'hello world', n
print 'process name:', current_process().name # 获取当前进程名字
time.sleep(1) # 休眠用于执行时有时间查看当前执行的进程
if __name__ == '__main__':
p = Pool(processes=3)
for i in range(8):
r = p.apply_async(worker, args=(i,))
r.get(timeout=5) # 获取结果中的数据
p.close()
# python test.py
hello world 0
process name: PoolWorker-1
hello world 1
process name: PoolWorker-2
hello world 2
process name: PoolWorker-3
hello world 3
process name: PoolWorker-1
hello world 4
process name: PoolWorker-2
hello world 5
process name: PoolWorker-3
hello world 6
process name: PoolWorker-1
hello world 7
process name: PoolWorker-2
进程池生成了3个子进程,通过循环执行8次worker函数,进程池会从子进程1开始去处理任务,当到达最大进程时,会继续从子进程1开始。
在运行此程序同时,再打开一个终端窗口会看到生成的子进程:
# ps -ef |grep python
root 40244 9041 4 16:43 pts/3 00:00:00 python test.py
root 40245 40244 0 16:43 pts/3 00:00:00 python test.py
root 40246 40244 0 16:43 pts/3 00:00:00 python test.py
root 40247 40244 0 16:43 pts/3 00:00:00 python test.py
6)进程池map()方法
map()方法是将序列中的元素通过函数处理返回新列表。
from multiprocessing import Pool
def worker(url):
return 'http://%s' % url
urls = ['www.baidu.com', 'www.jd.com']
p = Pool(processes=2)
r = p.map(worker, urls)
p.close()
print r
# python test.py
['http://www.baidu.com', 'http://www.jd.com']
7)Queue进程间通信
multiprocessing支持两种类型进程间通信:Queue和Pipe。
Queue库已经封装到multiprocessing库中,在第十章 Python常用标准库已经讲解到Queue库使用,有需要请查看以前博文。
例如:一个子进程向队列写数据,一个子进程读取队列数据
#!/usr/bin/python
# -*- coding: utf-8 -*-
from multiprocessing import Process, Queue
# 写数据到队列
def write(q):
for n in range(5):
q.put(n)
print 'Put %s to queue.' % n
# 从队列读数据
def read(q):
while True:
if not q.empty():
value = q.get()
print 'Get %s from queue.' % value
else:
break
if __name__ == '__main__':
q = Queue()
pw = Process(target=write, args=(q,))
pr = Process(target=read, args=(q,))
pw.start()
pw.join()
pr.start()
pr.join()
# python test.py
Put 0 to queue.
Put 1 to queue.
Put 2 to queue.
Put 3 to queue.
Put 4 to queue.
Get 0 from queue.
Get 1 from queue.
Get 2 from queue.
Get 3 from queue.
Get 4 from queue.
8)Pipe进程间通信
from multiprocessing import Process, Pipe
def f(conn):
conn.send([42, None, 'hello'])
conn.close()
if __name__ == '__main__':
parent_conn, child_conn = Pipe()
p = Process(target=f, args=(child_conn,))
p.start()
print parent_conn.recv()
p.join()
# python test.py
[42, None, 'hello']
Pipe()创建两个连接对象,每个链接对象都有send()和recv()方法,
9)进程间对象共享
Manager类返回一个管理对象,它控制服务端进程。提供一些共享方式:Value()、Array()、list()、dict()、Event()等
创建Manger对象存放资源,其他进程通过访问Manager获取。
from multiprocessing import Process, Manager
def f(v, a, l, d):
v.value = 100
a[0] = 123
l.append('Hello')
d['a'] = 1
mgr = Manager()
v = mgr.Value('v', 0)
a = mgr.Array('d', range(5))
l = mgr.list()
d = mgr.dict()
p = Process(target=f, args=(v, a, l, d))
p.start()
p.join()
print(v)
print(a)
print(l)
print(d)
# python test.py
Value('v', 100)
array('d', [123.0, 1.0, 2.0, 3.0, 4.0])
['Hello']
{'a': 1}
10)写一个多进程的例子
比如:多进程监控URL是否正常
from multiprocessing import Pool, current_process
import urllib2
urls = [
'http://www.baidu.com',
'http://www.jd.com',
'http://www.sina.com',
'http://www.163.com',
]
def status_code(url):
print 'process name:', current_process().name
try:
req = urllib2.urlopen(url, timeout=5)
return req.getcode()
except urllib2.URLError:
return
p = Pool(processes=4)
for url in urls:
r = p.apply_async(status_code, args=(url,))
if r.get(timeout=5) == 200:
print "%s OK" %url
else:
print "%s NO" %url
# python test.py
process name: PoolWorker-1
http://www.baidu.com OK
process name: PoolWorker-2
http://www.jd.com OK
process name: PoolWorker-3
http://www.sina.com OK
process name: PoolWorker-4
http://www.163.com OK
15.2 threading
threading模块类似于multiprocessing多进程模块,使用方法也基本一样。threading库是对thread库进行二次封装,我们主要用到Thread类,用Thread类派生线程对象。
1)使用Thread类实现多线程
from threading import Thread, current_thread
def worker(n):
print 'thread name:', current_thread().name
print 'hello world', n
for n in range(5):
t = Thread(target=worker, args=(n, ))
t.start()
t.join() # 等待主进程结束
# python test.py
thread name: Thread-1
hello world 0
thread name: Thread-2
hello world 1
thread name: Thread-3
hello world 2
thread name: Thread-4
hello world 3
thread name: Thread-5
hello world 4
2)还有一种方式继承Thread类实现多线程,子类可以重写__init__和run()方法实现功能逻辑。
#!/usr/bin/python
# -*- coding: utf-8 -*-
from threading import Thread, current_thread
class Test(Thread):
# 重写父类构造函数,那么父类构造函数将不会执行
def __init__(self, n):
Thread.__init__(self)
self.n = n
def run(self):
print 'thread name:', current_thread().name
print 'hello world', self.n
if __name__ == '__main__':
for n in range(5):
t = Test(n)
t.start()
t.join()
# python test.py
thread name: Thread-1
hello world 0
thread name: Thread-2
hello world 1
thread name: Thread-3
hello world 2
thread name: Thread-4
hello world 3
thread name: Thread-5
hello world 4
3)Lock
from threading import Thread, Lock, current_thread
lock = Lock()
class Test(Thread):
# 重写父类构造函数,那么父类构造函数将不会执行
def __init__(self, n):
Thread.__init__(self)
self.n = n
def run(self):
lock.acquire() # 获取锁
print 'thread name:', current_thread().name
print 'hello world', self.n
lock.release() # 释放锁
if __name__ == '__main__':
for n in range(5):
t = Test(n)
t.start()
t.join()
众所周知,Python多线程有GIL全局锁,意思是把每个线程执行代码时都上了锁,执行完成后会自动释放GIL锁,意味着同一时间只有一个线程在运行代码。由于所有线程共享父进程内存、变量、资源,很容易多个线程对其操作,导致内容混乱。
当你在写多线程程序的时候如果输出结果是混乱的,这时你应该考虑到在不使用锁的情况下,多个线程运行时可能会修改原有的变量,导致输出不一样。
由此看来Python多线程是不能利用多核CPU提高处理性能,但在IO密集情况下,还是能提高一定的并发性能。也不必担心,多核CPU情况可以使用多进程实现多核任务。Python多进程是复制父进程资源,互不影响,有各自独立的GIL锁,保证数据不会混乱。能用多进程就用吧!
第十六章 Python正则表达式
正则表达式在每种语言中都会有,目的就是匹配符合你预期要求的字符串。
Python正则表达式主要由re库提供,拥有了基本所有的表达式。
16.1 Python正则表达式
|
符号
|
描述
|
示例
|
|
.
|
匹配除换行符(\n)之外的任意单个字符
|
字符串123\n456,匹配123:1.3
|
|
^
|
匹配字符串开头
|
abc\nxyz,匹配以abc开头的行:^abc
|
|
$
|
匹配字符串结尾
|
abc\nxyz,匹配以xyz结束的行:xyz$
|
|
*
|
匹配多个
|
hello\nword,匹配以w开头d结尾的单词:w*d
|
|
+
|
匹配1个或多个
|
abc\nabcc\nadf,匹配abc和abcc:ab+
|
|
?
|
匹配0个或1个
|
abc\nac\nadd,匹配abc或ac:a?c
|
|
[.]
|
匹配中括号之中的任意一个字符
|
abcd\nadd\nbbb,匹配abcd和add:[abc]
|
|
[ .-.]
|
匹配中括号中范围内的任意一个字符
|
abcd\nadd\nbbb,匹配abcd和add:[a-c]
|
|
[^]
|
匹配[^字符]之外的任意一个字符
|
abc\n\abb\nddd,不匹配abc和abb:[^a-c]
|
|
{n}或{n,}
|
匹配花括号前面字符至少n个字符
|
1\n\12\n123\n1234,匹配123和1234:[0-9]{3}
|
|
{n,m}
|
匹配花括号前面字符至少n个字符,最多m个字符
|
1\n\12\n123\n1234\n12345,匹配123和1234 :[0-9]{3,4}
|
|
|
|
匹配竖杠两边的任意一个
|
abc\nabd\abe,匹配abc和abd:ab(c|d)
|
|
\
|
转义符,将特殊符号转成原有意义
|
1.2,匹配1.2:1\.2,否则112也会匹配到
|
|
特殊字符
|
描述
|
示例
|
|
\A
|
匹配字符串开始
|
与^区别是:当使用修饰符re.M匹配多行时,\A将所有字符串作为一整行处理。
abc123\nabc456,匹配abc123:\Aabc,^则都会匹配到
|
|
\Z
|
匹配字符串结束
|
与\A同理
|
|
\b
|
匹配字符串开始或结束(边界)
|
abc\nabcd,匹配a开头并且c结尾字符串:\babc\b
|
|
\B
|
与\b相反
|
|
|
\d
|
匹配任意十进制数,等效[0-9]
|
1\n123\nabc,匹配1和123:[0-9],包含单个数字的都会匹配到,如果只想匹配1:\b[0-9]\b
|
|
\D
|
匹配任意非数字字符,等效[^0-9]
|
1\n12\nabc,匹配abc:[^0-9]
|
|
\s
|
匹配任意空白字符,等效[\t\n\r\f\v]
|
1\n a,注意a前面有个空格,匹配a:\s
|
|
\S
|
匹配任意非空白字符,等效[^\t\n\r\f\v]
|
1\n a\n ,匹配1和a:\S
|
|
\w
|
匹配任意数字和字母,等效[a-zA-Z0-9_]
|
1\n a\n ,匹配1和a:\w
|
|
\W
|
与\w相反,等效[^a-zA-Z0-9_]
|
|
|
\n
|
反向引用,n是数字,从1开始编号,表示引用第n个分组匹配的内容
|
ff,匹配ff:(.)\1,即"ff"
|
|
扩展正则表达式
|
描述
|
|
( )
|
匹配小括号中正则表达式或字符。用上面\n特殊字符引用。
|
|
(?#...)
|
注释小括号内的内容
|
|
(?:...)
|
不保存匹配的分组
|
|
(?P<name>...)
|
命名分组,name是标识名称,默认是数字ID标识分组匹配
|
|
(?=...)
|
匹配后面能匹配表的达式...,称为正先行断言
|
|
(?!...)
|
匹配后面不能匹配的表达式...,称为负先行断言
|
|
(?<=...)
|
匹配前面能匹配的表达式...,称为正后发断言
|
|
(?<!...)
|
匹配前面不能匹配的表达式...,称为负后发断言
|
|
(?(id/name)Y/N)
|
如果分组提供的id或name存在,则使用Y表达式匹配,否则N表达式匹配
|
断言:断言就是一个条件,判断某个字符串前面或后面是否满足某种规律的字符串,不能引用。
博客地址:http://lizhenliang.blog.51cto.com and https://yq.aliyun.com/u/lizhenliang
QQ群:323779636(Shell/Python运维开发群)
博客地址:http://lizhenliang.blog.51cto.com and https://yq.aliyun.com/u/lizhenliang
QQ群:323779636(Shell/Python运维开发群)
16.2 re库
re模块有以下常用的方法:
|
方法
|
描述
|
|
re.compile(pattern, flags=0)
|
把正则表达式编译成一个对象
|
|
re.findall(pattern, string, flags=0)
|
以列表形式返回所有匹配的字符串 |
|
re.finditer(pattern, string, flags=0)
|
以迭代器形式返回所有匹配的字符串
|
|
re.match(pattern, string, flags=0)
|
匹配字符串开始,如果不匹配返回None
|
|
re.search(pattern, string, flags=0)
|
扫描字符串寻找匹配,如果符合返回一个匹配对象并终止匹配,否则返回None
|
|
re.split(pattern, string, maxsplit=0, flags=0)
|
以匹配模式作为分隔符,切分字符串为列表
|
|
re.sub(pattern, repl, string, count=0, flags=0)
|
字符串替换,repl替换匹配的字符串,repl可以是一个函数
|
|
re.purge()
|
清除正则表达式缓存
|
参数说明:
pattern 正则表达式
string 要匹配的字符串
flags 标志位的修饰符,用于控制表达式匹配模式
标志位的修饰符,有以下可选项:
|
修饰符
|
描述
|
|
re.DEBUG
|
显示关于编译正则的debug信息
|
|
re.I/re.IGNORECASE
|
忽略大小写
|
|
re.L/re.LOCALE
|
本地化匹配,影响\w,\w,\b,\B,\s和\S
|
|
re.M/re.MULTILINE
|
多行匹配,影响^和$
|
|
re.S/re.DOTAIL
|
匹配所有字符,包括换行符\n,如果没这个标志将匹配除了换行符
|
|
re.U/re.UNICODE
|
根据unicode字符集解析字符。影响影响\w,\w,\b,\B,\d,\D,\s和\S
|
|
re.X/re.VERBOSE
|
允许编写更好看、更可读的正则表达式,也可以在表达式添加注释,下面会讲到
|
16.2.1 re.compile()
把正则表达式编译成一个对象,方便再次调用:
>>> import re
prog = re.compile(pattern)
result = prog.match(string)
等效于
result = re.match(pattern, string)
例如:检查字符串是否匹配
>>> def displaymatch(match):
... if match is None:
... return None
... return '<Match: %r, group=%r>' % (match.group(), match.groups())
...
>>> valid = re.compile(r"^[a-c1-3]{3}$")
>>> displaymatch(valid.match("a1b")) # 可用
"<Match: 'a1b', group=()>"
>>> displaymatch(valid.match("a1b2")) # 不可用
>>> displaymatch(valid.match("bbb")) # 可用
"<Match: 'bbb', group=()>"
16.2.1 match()
例如:判断字符串开头是否匹配字符
>>> m = re.match(r'hello', 'hello world')
>>> print m # 匹配到字符串开头是hello
<_sre.SRE_Match object at 0x7f56d5634030>
>>> m = re.match(r'world', 'hello world')
>>> print m # 没有匹配到
None
正则对象匹配方法:
1)group([group1, ...])
>>> m = re.match(r'(\w+) (\w+)', 'hello world')
>>> m.group(0) # 全部组匹配
'hello world'
>>> m.group(1) # 第一个括号子组
'hello'
>>> m.group(2) # 第二个括号子组
'world'
>>> m.group(1, 2) # 多个参数返回一个元组
('hello', 'world')
通过分子重命名的名字来引用分组结果:
>>> m = re.match(r'(?P<first_name>\w+) (?P<last_name>\w+)', 'hello world')
>>> m.group('first_name')
'hello'
>>> m.group('last_name')
'world'
# 命名组也可以引用他们的索引
>>> m.group(1)
'hello'
>>> m.group(2)
'world'
如果一组匹配多次,只有最后一个匹配:
>>> m = re.match(r"(..)+", "a1b2c3")
>>> m.group(1)
'c3'
2)groups([default])
返回一个元组包含所有子组的匹配。
>>> m = re.match(r"(\d+)\.(\d+)", "24.1632")
>>> m.groups()
('24', '1632')
3)groupdict([default])
返回子组名字作为键,匹配结果作为值的字典。
>>> m = re.match(r"(?P<first_name>\w+) (?P<last_name>\w+)", "hello world")
>>> m.groupdict()
{'first_name': 'hello', 'last_name': 'world'}
4)start()和end()
例如:去掉邮件地址的某字符
>>> email = "tony@163_126.com"
>>> m = re.search(r"_126", email)
>>> email[:m.start()] + email[m.end():]
'tony@163.com'
5)span()
以列表形式返回匹配索引开始和结束值:
>>> email = "tony@163_126.com"
>>> m = re.search(r"_126", email)
>>> m.span()
(8, 12)
6)pos和endpos
返回字符串开始和结束索引值:
>>> email = "tony@163_126.com"
>>> m = re.search(r"_126", email)
>>> m.pos
0
>>> m.endpos
16
16.2.3 search()
search()方法也具备match()方法的正则对象匹配方法,区别是search()匹配到第一个后就返回并终止匹配。
例如:匹配第一个结果就返回
>>> m = re.search(r"c", "abcdefc")
>>> m.group()
'c'
>>> m.span()
(2, 3)
16.2.4 split()
例如:以数字作为分隔符拆分字符串
>>> m = re.split(r"\d+", "a1b2c3")
>>> m
['a', 'b', 'c', '']
16.2.4 sub()
例如:替换2016
>>> m = re.sub(r"\d+", "2017", "the year 2016")
>>> m
'the year 2017'
例如:repl作为一个函数
>>> def repl(m):
... return str(int(m.group('v')) * 2)
...
>>> re.sub(r'(?P<v>\d+)', repl, "123abc")
'246abc'
函数返回必须是一个字符串。
16.2.5 findall()和finditer()
例如:得到所有匹配的数字
>>> text = "a1b2c3"
>>> re.findall(r'\d+', text)
['1', '2', '3']
>>> for m in re.finditer(r'\d+', text):
... print m.group()
...
1
2
3
16.2.6 原始字符串符号"r"
上面所看到的(r"\d+")其中的r代表原始字符串,没有它,每个反斜杠'\'都必须再加一个反斜杠来转义它。
例如,下面两行代码功能上是相同的:
>>> m = re.match(r"\W(.)\1\W", " ff ")
>>> m.group()
' ff '
>>> m = re.match("\\W(.)\\1\\W", " ff ")
>>> m.group()
' ff '
>>> m = re.match("\W(.)\1\W", " ff ")
>>> m.group()
Traceback (most recent call last):
File "<stdin>", line 1, in <module>
AttributeError: 'NoneType' object has no attribute 'group'
\W匹配第一个和最后一个空字符,(.)匹配第一个f,\1引用前面(.)匹配的结果(还是f),即是r"ff"
16.3 贪婪和非贪婪匹配
贪婪模式:尽可能最多匹配
非贪婪模式,尽可能最少匹配,一般在量词(*、+)后面加个问号就是非贪婪模式。
# 贪婪匹配
>>>
re.findall(r"<div>.*</div>",
"<div>a</div><div>b</div><div>c</div>")
['<div>a</div><div>b</div><div>c</div>']
# 非贪婪匹配
>>>
re.findall(r"<div>.*?</div>",
"<div>a</div><div>b</div><div>c</div>")
['<div>a</div>', '<div>b</div>', '<div>c</div>']
>>> re.findall(r"a(\d+)", "a123b")
['123']
>>> re.findall(r"a(\d+?)", "a123b")
['1']
# 如果右边有限定,非贪婪失效
>>> re.findall(r"a(\d+)b", "a123b")
['123']
>>> re.findall(r"a(\d+?)b", "a123b")
['123']
贪婪匹配是尽可能的向右匹配,直到字符串结束。
非贪婪匹配是匹配满足后就结束。
16.3 了解扩展表达式
以一个字符串来学习断言的用法:"A regular expression "
1)(?=...)
正先行断言,匹配后面能匹配的表达式。
有两个re字符串,只想匹配regular中的:
>>> re.findall(r"..(?=gular)", "A regular expression")
['re']
# 再向后匹配几个字符说明匹配的regular中的。下面都会说明下,不再注释
>>> re.findall(r"(?=gular).{5}", "A regular expression")
['gular']
2)(?!...)
负先行断言,匹配后面不能匹配表达式。
只想匹配expression中的re字符串,排除掉regular单词:
>>> re.findall(r"re(?!g)", "A regular expression")
['re']
>>> re.findall(r"re(?!g).{5}", "A regular expression")
['ression']
3)(?<=...)
正向后行断言,匹配前面能匹配表达式。
只想匹配单词里的re,排除开头的re:
>>> re.findall(r"(?<=\w)re", "A regular expression")
['re']
>>> re.findall(r"(?<=\w)re.", "A regular expression")
['res']
在re前面有一个或多个字符,所以叫后行断言,正则匹配是从前向后,当遇到断言时,会再向字符串前端检测已扫描的字符,相对于扫描方向是向后的。
4)(?<!...)
负向后行断言,匹配前面不能匹配的表达式。
只想匹配开头的re:
>>> re.findall(r"(?<!\w)re", "A regular expression")
['re']
>>> re.findall(r"(?<!\w)re.", "A regular expression")
['reg']
16.4 修饰符
re.VERBOSE上面说明可能你还不太明白,怎么个更加可读呢,这就来看看,下面两个正则编译等效:
>>> a = re.compile(r"""\d + # the integral part
... \. # the decimal point
... \d * # some fractional digits""", re.X)
>>> b = re.compile(r"\d+\.\d*")
当你写的正则很长的时候,可以添加注释。
Python正则表达式参考:https://docs.python.org/2/library/re.html
第十七章 Python网络编程
Socket简介
在网络上的两个程序通过一个双向的通信连接实现数据的交换,这个链接的一端称为一个Socket(套接字),用于描述IP地址和端口。
建立网络通信连接至少要一对端口号(Socket),Socket本质是编程接口(API),对TCP/IP的封装,提供了网络通信能力。
每种服务都打开一个Socket,并绑定到端口上,不同的端口对应不同的服务,就像http对应80端口。
Socket是面向C/S(客户端/服务器)模型设计,客户端在本地随机申请一个唯一的Socket号,服务器拥有公开的socket,任何客户端都可以向它发送连接请求和信息请求。
比如:用手机打电话给10086客服,你的手机号就是客户端,10086客服是服务端。必须在知道对方电话号码前提下才能与对方通讯。
Socket数据处理流程如图:
17.1 socket
在Python中提供此服务的模块是socket和SocketServer,下面是socket常用的类、方法:
| 方法 | 描述 |
| socket.socket([family[, type[, proto]]]) | socket初始化函数,(地址族,socket类型,协议编号)协议编号默认0 |
| socket.AF_INET | IPV4协议通信 |
| socket.AF_INET6 | IPV6协议通信 |
| socket.SOCK_STREAM | socket类型,TCP |
| socket.SOCK_DGRAM | socket类型,UDP |
| socket.SOCK_RAW | 原始socket,可以处理普通socker无法处理的报文,比如ICMP |
| socket.SOCK_RDM | 更可靠的UDP类型,保证对方收到数据 |
| socket.SOCK_SEQPACKET | 可靠的连续数据包服务 |
socket.socket()对象有以下方法:
| accept() | 接受连接并返回(socket object, address info),address是客户端地址 |
| bind(address) | 绑定socket到本地地址,address是一个双元素元组(host,port) |
| listen(backlog) | 开始接收连接,backlog是最大连接数,默认1 |
| connect(address) | 连接socket到远程地址 |
| connect_ex(address) | 连接socket到远程地址,成功返回0,错误返回error值 |
| getpeername() | 返回远程端地址(hostaddr, port) |
| gettimeout() | 返回当前超时的值,单位秒,如果没有设置返回none |
| recv(buffersize[, flags]) | 接收来自socket的数据,buffersize是接收数据量 |
| send(data[, flags]) | 发送数据到socket,返回值是发送的字节数 |
| sendall(data[, flags]) | 发送所有数据到socket,成功返回none,失败抛出异常 |
| setblocking(flag) | 设置socket为阻塞(flag是true)或非阻塞(flag是flase) |
温习下TCP与UDP区别:
TCP和UDP是OSI七层模型中传输层提供的协议,提供可靠端到端的传输服务。
TCP(Transmission Control Protocol,传输控制协议),面向连接协议,双方先建立可靠的连接,再发送数据。适用于可靠性要求高的应用场景。
UDP(User Data Protocol,用户数据报协议),面向非连接协议,不与对方建立连接,直接将数据包发送给对方,因此相对TCP传输速度快 。适用于可靠性要求低的应用场景。
17.1.1 TCP编程
下面创建一个服务端TCP协议的Socket演示下。
先写一个服务端:
#!/usr/bin/python
# -*- coding: utf-8 -*-
import socket
HOST = '' # 为空代表所有可用的网卡
PORT = 50007 # 任意非特权端口
s = socket.socket(socket.AF_INET, socket.SOCK_STREAM)
s.bind((HOST, PORT))
s.listen(1) # 最大连接数
conn, addr = s.accept() # 返回客户端地址
print 'Connected by', addr
while 1:
data = conn.recv(1024) # 每次最大接收客户端发来数据1024字节
if not data: break # 当没有数据就退出死循环
print "Received: ", data # 打印接收的数据
conn.sendall(data) # 把接收的数据再发给客户端
conn.close()
再写一个客户端:
#!/usr/bin/python
# -*- coding: utf-8 -*-
import socket
HOST = '192.168.1.120' # 远程主机IP
PORT = 50007 # 远程主机端口
s = socket.socket(socket.AF_INET, socket.SOCK_STREAM)
s.connect((HOST, PORT))
s.sendall('Hello, world') # 发送数据
data = s.recv(1024) # 接收服务端发来的数据
s.close()
print 'Received: ', data
写好后,打开一个终端窗口执行:
# python socket-server.py
监听中...
# 直到客户端运行会接收到下面数据并退出
Connected by ('192.168.1.120', 37548)
Received: Hello, world
再打开一个终端窗口执行:
# 如果端口监听说明服务端运行正常
# netstat -antp |grep 50007
tcp 0 0 0.0.0.0:50007 0.0.0.0:* LISTEN 72878/python
# python socket-client.py
Received: Hello, world
通过实验了解搭到Socket服务端工作有以下几个步骤:
1)打开socket
2)绑定到一个地址和端口
3)监听进来的连接
4)接受连接
5)处理数据
17.1.2 UDP编程
服务端:
import socket
HOST = ''
PORT = 50007
s = socket.socket(socket.AF_INET, socket.SOCK_DGRAM)
s.bind((HOST, PORT))
while 1:
data, addr = s.recvfrom(1024)
print 'Connected by', addr
print "Received: ", data
s.sendto("Hello %s"% repr(addr), addr)
conn.close()
客户端:
import socket
HOST = '192.168.1.99'
PORT = 50007
s = socket.socket(socket.AF_INET, socket.SOCK_DGRAM)
s.sendto(data, (HOST, PORT))
data = s.recv(1024)
s.close()
print 'Received: ', data
运行方式与TCP编程一样。
使用UDP协议时,服务端就少了listen()和accept(),不需要建立连接就直接接收客户端的数据,也是把数据直接发送给客户端。
客户端少了connect(),同样直接通过sendto()给服务器发数据。
而TCP协议则前提先建立三次握手。
17.1.3 举一个更直观的socket通信例子
客户端发送bash命令,服务端接收到并执行,把返回结果回应给客户端。
服务端:
#!/usr/bin/python
# -*- coding: utf-8 -*-
import sys
import subprocess
import socket
HOST = ''
PORT = 50007
try:
s = socket.socket(socket.AF_INET, socket.SOCK_STREAM)
s.bind((HOST, PORT))
s.listen(1)
except socket.error as e:
s.close()
print e
sys.exit(1)
while 1:
conn, addr = s.accept()
print 'Connected by', addr
while 1:
# 每次读取1024字节
data = conn.recv(1024)
if not data: # 客户端关闭服务端会收到一个空数据
print repr(addr) + " close."
conn.close()
break
print "Received: ", data
cmd = subprocess.Popen(data, stdout=subprocess.PIPE, stderr=subprocess.PIPE, shell=True)
result_tuple = cmd.communicate()
if cmd.returncode != 0 or cmd.returncode == None:
result = result_tuple[1]
# result = cmd.stderr.read()
else:
result = result_tuple[0]
# result = cmd.stdout.read() # 读不到标准输出,不知道为啥,所以不用
if result:
conn.sendall(result)
else:
conn.sendall("return null")
s.close()
客户端:
#!/usr/bin/python
# -*- coding: utf-8 -*-
import sys
import socket
HOST = '192.168.1.120'
PORT = 50007
try:
s = socket.socket(socket.AF_INET, socket.SOCK_STREAM)
s.connect((HOST, PORT))
except socket.error as e:
s.close()
print e
sys.exit(1)
while 1:
cmd = raw_input("Please input command: ")
if not cmd: continue
s.sendall(cmd)
recv_data = s.recv(1024)
print 'Received: ', recv_data
s.close()
查看运行效果,先运行服务端,再运行客户端:
# python socket-server.py
Connected by ('192.168.1.120', 45620)
Received: ls
Received: touch a.txt
Received: ls
# python socket-client.py
Please input command: ls
Received:
socket-client.py
socket-server.py
Please input command: touch a.txt
Received: return null
Please input command: ls
Received:
a.txt
socket-client.py
socket-server.py
Please input command:
我想通过上面这个例子你已经大致掌握了socket的通信过程。
再举一个例子,通过socket获取本机网卡IP:
>>> socket.gethostname()
'ubuntu'
>>> socket.gethostbyname(socket.gethostname())
'127.0.1.1'
>>> s = socket.socket(socket.AF_INET, socket.SOCK_DGRAM)
>>> s.connect(('10.255.255.255', 0))
>>> s.getsockname()
('192.168.1.120', 35765)
>>> s.getsockname()[0]
'192.168.1.120'
博客地址:http://lizhenliang.blog.51cto.com and https://yq.aliyun.com/u/lizhenliang
QQ群:323779636(Shell/Python运维开发群)
QQ群:323779636(Shell/Python运维开发群)
17.2 SocketServer
ScoketServer是Socket服务端库,比socket库更高级,实现了多线程和多线程,并发处理多个客户端请求。
下面是几个常用的类:
SocketServer.TCPServer(server_address, RequestHandlerClass, bind_and_activate=True)
|
服务器类,TCP协议 |
SocketServer.UDPServer(server_address, RequestHandlerClass, bind_and_activate=True)
|
服务器类,UDP协议 |
SocketServer.BaseServer(server_address, RequestHandlerClass)
|
这个是所有服务器对象的超类。它定义了接口,不提供大多数方法,在子类中进行。 |
SocketServer.BaseRequestHandler
|
这个是所有请求处理对象的超类。它定义了接口,一个具体的请求处理程序子类必须定义一个新的handle()方法。 |
| SocketServer.StreamRequestHandler | 流式socket,根据socket生成读写socket用的两个文件对象,调用rfile和wfile读写 |
| SocketServer.DatagramRequestHandler | 数据报socket,同样生成rfile和wfile,但UDP不直接关联socket。这里rfile是由UDP中读取的数据生成,wfile则是新建一个StringIO,用于写数据 |
| SocketServer.ForkingMixIn/ThreadingMixIn | 多进程(分叉)/多线程实现异步。混合类,这个类不会直接实例化。用于实现处理多连接 |
SocketServer.BaseServer()对象有以下方法:
| fileno() | 返回一个整数文件描述符上服务器监听的套接字 |
| handle_request() | 处理一个请求 |
| serve_forever(poll_interval=0.5) | 处理,直至有明确要求shutdown()的请求。轮训关机每poll_interval秒 |
| shutdown() | 告诉serve_forever()循环停止并等待 |
| server_close() | 清理服务器 |
| address_family | 地址族 |
| server_address | 监听的地址 |
| RequestHandlerClass | 用户提供的请求处理类 |
| socket | socket对象上的服务器将监听传入的请求 |
| allow_reuse_address | 服务器是否允许地址的重用。默认False |
| request_queue_size | 请求队列的大小。 |
| socket_type | socket类型。socket.SOCK_STREAM或socket.SOCK_DGRAM |
| timeout | 超时时间,以秒为单位 |
| finish_request() | 实际处理通过实例请求RequestHandleClass并调用其handle()方法 |
| get_request() | 必须接受从socket的请求,并返回 |
| handle_error(request, client_address) | 如果这个函数被条用handle() |
| process_request(request, client_address) | |
| server_activate() | |
| server_bind() | 由服务器构造函数调用的套接字绑定到所需的地址 |
| verify_request(request, client_address) | 返回一个布尔值,如果该值是True,则该请求将被处理,如果是False,该请求将被拒绝。 |
创建一个服务器需要几个步骤:
1)创建类,继承请求处理类(BaseRequestHandler),并重载其handle()方法,此方法将处理传入的请求
2)实例化服务器类之一,它传递服务器的地址和请求处理程序类
3)调用handle_request()或serve_forever()服务器对象的方法来处理一个或多个请求
4)调用server_close()关闭套接字
17.2.1 TCP编程
服务端:
#!/usr/bin/python
# -*- coding: utf-8 -*
import SocketServer
class MyTCPHandler(SocketServer.BaseRequestHandler):
"""
请求处理程序类。
每个连接到服务器都要实例化一次,而且必须覆盖handle()方法来实现与客户端通信
"""
def handle(self):
# self.request 接收客户端数据
self.data = self.request.recv(1024).strip()
print "%s wrote:" % (self.client_address[0])
print self.data
# 把接收的数据转为大写发给客户端
self.request.sendall(self.data.upper())
if __name__ == "__main__":
HOST, PORT = "localhost", 9999
# 创建服务器并绑定本地地址和端口
server = SocketServer.TCPServer((HOST, PORT), MyTCPHandler)
# 激活服务器,会一直运行,直到Ctrl-C中断
server.serve_forever()
另一个请求处理程序类,利用流(类文件对象简化通信提供标准文件接口):
class MyTCPHandler(SocketServer.StreamRequestHandler):
def handle(self):
# self.rfile创建的是一个类文件对象处理程序,就可以调用readline()而不是recv()
self.data = self.rfile.readline().strip()
print "%s wrote:" % (self.client_address[0])
print self.data
# 同样,self.wfile是一个类文件对象,用于回复客户端
self.wfile.write(self.data.upper())
客户端:
import socket
import sys
HOST, PORT = "localhost", 9999
data = " ".join(sys.argv[1:])
sock = socket.socket(socket.AF_INET, socket.SOCK_STREAM)
try:
sock.connect((HOST, PORT))
sock.sendall(data + "\n")
received = sock.recv(1024)
finally:
sock.close()
print "Sent: %s" % data
print "Received: %s" % received
服务端结果:
# python TCPServer.py
127.0.0.1 wrote:
hello
127.0.0.1 wrote:
nice
客户端结果:
# python TCPClient.py hello
Sent: hello
Received: HELLO
# python TCPClient.py nice
Sent: nice
Received: NICE
17.2.2 UDP编程
服务端:
import SocketServer
class MyTCPHandler(SocketServer.BaseRequestHandler):
def handle(self):
self.data = self.request[0].strip()
self.socket = self.request[1]
print "%s wrote:" % (self.client_address[0])
print self.data
self.socket.sendto(self.data.upper(), self.client_address)
if __name__ == "__main__":
HOST, PORT = "localhost", 9999
server = SocketServer.UDPServer((HOST, PORT), MyTCPHandler)
server.serve_forever()
客户端:
import socket
import sys
HOST, PORT = "localhost", 9999
data = " ".join(sys.argv[1:])
sock = socket.socket(socket.AF_INET, socket.SOCK_DGRAM)
sock.sendto(data + "\n", (HOST, PORT))
received = sock.recv(1024)
print "Sent: %s" % data
print "Received: %s" % received
与TCP执行结果一样。
17.2.3 异步混合
创建异步处理,使用ThreadingMixIn和ForkingMixIn类。
ThreadingMixIn类的一个例子:
#!/usr/bin/python
# -*- coding: utf-8 -*
import socket
import threading
import SocketServer
class ThreadedTCPRequestHandler(SocketServer.BaseRequestHandler):
def handle(self):
data = self.request.recv(1024)
cur_thread = threading.current_thread()
response = "%s: %s" % (cur_thread.name, data)
self.request.sendall(response)
class ThreadedTCPServer(SocketServer.ThreadingMixIn, SocketServer.TCPServer):
pass
def client(ip, port, message):
sock = socket.socket(socket.AF_INET, socket.SOCK_STREAM)
sock.connect((ip, port))
try:
sock.sendall(message)
response = sock.recv(1024)
print "Received: %s" % response
finally:
sock.close()
if __name__ == "__main__":
# 端口0意味着随机使用一个未使用的端口
HOST, PORT = "localhost", 0
server = ThreadedTCPServer((HOST, PORT), ThreadedTCPRequestHandler)
ip, port = server.server_address
# 服务器启动一个线程,该线程将开始。每个线程处理每个请求
server_thread = threading.Thread(target=server.serve_forever)
# 作为守护线程
server_thread.daemon = True
server_thread.start()
print "Server loop running in thread:", server_thread.name
client(ip, port, "Hello World 1")
client(ip, port, "Hello World 2")
client(ip, port, "Hello World 3")
server.shutdown()
server.server_close()
# python socket-server.py
Server loop running in thread: Thread-1
Received: Thread-2: Hello World 1
Received: Thread-3: Hello World 2
Received: Thread-4: Hello World 3
第十八章 Python批量管理主机(paramiko、fabric与pexpect)
本章节主要讲解运维工程师比较感兴趣的知识,那就是运维批量管理,在Python下有paramiko、fabric和pexpect这三个模块可帮助运维实现自动化部署、批量执行命令、文件传输等常规任务,接下来一起看看它们的使用方法吧!
18.1 paramiko
paramiko模块是基于Python实现的SSH远程安全连接,用于SSH远程执行命令、文件传输等功能。
默认Python没有,需要手动安装:pip install paramiko
如安装失败,可以尝试yum安装:yum install python-paramiko
18.1.1 SSH密码认证远程执行命令
#!/usr/bin/python
# -*- coding: utf-8 -*-
import paramiko
import sys
hostname = '192.168.1.215'
port = 22
username = 'root'
password = '123456'
client = paramiko.SSHClient() # 绑定实例
client.set_missing_host_key_policy(paramiko.AutoAddPolicy())
client.connect(hostname, port, username, password, timeout=5)
stdin, stdout, stderr = client.exec_command('df -h') # 执行bash命令
result = stdout.read()
error = stderr.read()
# 判断stderr输出是否为空,为空则打印执行结果,不为空打印报错信息
if not error:
print result
else:
print error
client.close()
18.1.2 私钥认证远程执行命令
#!/usr/bin/python
# -*- coding: utf-8 -*-
import paramiko
import sys
hostname = '192.168.1.215'
port = 22
username = 'root'
key_file = '/root/.ssh/id_rsa'
cmd = " ".join(sys.argv[1:])
def ssh_conn(command):
client = paramiko.SSHClient()
key = paramiko.RSAKey.from_private_key_file(key_file)
client.set_missing_host_key_policy(paramiko.AutoAddPolicy())
client.connect(hostname, port, username, pkey=key)
stdin, stdout, stderr = client.exec_command(command) # 标准输入,标准输出,错误输出
result = stdout.read()
error = stderr.read()
if not error:
print result
else:
print error
client.close()
if __name__ == "__main__":
ssh_conn(cmd)
18.1.3 上传文件到远程服务器
#!/usr/bin/python
# -*- coding: utf-8 -*-
import os, sys
import paramiko
hostname = '192.168.1.215'
port = 22
username = 'root'
password = '123456'
local_path = '/root/test.txt'
remote_path = '/opt/test.txt'
if not os.path.isfile(local_path):
print local_path + " file not exist!"
sys.exit(1)
try:
s = paramiko.Transport((hostname, port))
s.connect(username = username, password=password)
except Exception as e:
print e
sys.exit(1)
sftp = paramiko.SFTPClient.from_transport(s)
# 使用put()方法把本地文件上传到远程服务器
sftp.put(local_path, remote_path)
# 简单测试是否上传成功
try:
# 如果远程主机有这个文件则返回一个对象,否则抛出异常
sftp.file(remote_path)
print "上传成功."
except IOError:
print "上传失败!"
finally:
s.close()
18.1.4 从远程服务器下载文件
#!/usr/bin/python
# -*- coding: utf-8 -*-
import os, sys
import paramiko
hostname = '192.168.1.215'
port = 22
username = 'root'
password = '123456'
local_path = '/root/test.txt'
remote_path = '/opt/test.txt'
try:
s = paramiko.Transport((hostname, port))
s.connect(username=username, password=password)
sftp = paramiko.SFTPClient.from_transport(s)
except Exception as e:
print e
sys.exit(1)
try:
# 判断远程服务器是否有这个文件
sftp.file(remote_path)
# 使用get()方法从远程服务器拉去文件
sftp.get(remote_path, local_path)
except IOError as e:
print remote_path + "remote file not exist!"
sys.exit(1)
finally:
s.close()
# 测试是否下载成功
if os.path.isfile(local_path):
print "下载成功."
else:
print "下载失败!"
18.1.5 上传目录到远程服务器
paramiko模块并没有实现直接上传目录的类,已经知道了如何上传文件,再写一个上传目录的代码就简单了,利用os库的os.walk()方法遍历目录,再一个个上传:
#!/usr/bin/python
# -*- coding: utf-8 -*-
import os, sys
import paramiko
hostname = '192.168.1.215'
port = 22
username = 'root'
password = '123456'
local_path = '/root/abc'
remote_path = '/opt/abc'
# 去除路径后面正斜杠
if local_path[-1] == '/':
local_path = local_path[0:-1]
if remote_path[-1] == '/':
remote_path = remote_path[0:-1]
file_list = []
if os.path.isdir(local_path):
for root, dirs, files in os.walk(local_path):
for file in files:
# 获取文件绝对路径
file_path = os.path.join(root, file)
file_list.append(file_path)
else:
print path + "Directory not exist!"
sys.exit(1)
try:
s = paramiko.Transport((hostname, port))
s.connect(username=username, password=password)
sftp = paramiko.SFTPClient.from_transport(s)
except Exception as e:
print e
for local_file in file_list:
# 替换目标目录
remote_file = local_file.replace(local_path, remote_path)
remote_dir = os.path.dirname(remote_file)
# 如果远程服务器没目标目录则创建
try:
sftp.stat(remote_dir)
except IOError:
sftp.mkdir(remote_dir)
print "%s -> %s" % (local_file, remote_file)
sftp.put(local_file, remote_file)
s.close()
sftp是安全文件传输协议,提供一种安全的加密方法,sftp是SSH的一部分,SFTPClient类实现了sftp客户端,通过已建立的SSH通道传输文件,与其他的操作,如下:
|
sftp.getcwd()
|
返回当前工作目录
|
|
sftp.chdir(path)
|
改变工作目录
|
|
sftp.chmod(path, mode)
|
修改权限
|
|
sftp.chown(path, uid, gid)
|
设置属主属组
|
|
sftp.close()
|
关闭sftp
|
|
sftp.file(filename, mode='r', bufsize=-1)
|
读取文件 |
|
sftp.from_transport(s)
|
创建SFTP客户端通道 |
|
sftp.listdir(path='.')
|
列出目录,返回一个列表
|
|
sftp.listdir_attr(path='.')
|
列出目录,返回一个SFTPAttributes列表
|
|
sftp.mkdir(path, mode=511)
|
创建目录
|
|
sftp.normalize(path)
|
返回规范化path
|
|
sftp.open(filename, mode='r', bufsize=-1)
|
在远程服务器打开文件
|
|
sftp.put(localpath, remotepath, callback=None)
|
localpath文件上传到远程服务器remotepath
|
|
sftp.get(remotepath, localpath, callback=None)
|
从远程服务器remotepath拉文件到本地localpath
|
|
sftp.readlink(path)
|
返回一个符号链接目标 |
|
sftp.remove(path)
|
删除文件
|
|
sftp.rename(oldpath, newpath)
|
重命名文件或目录
|
|
sftp.rmdir(path)
|
删除目录
|
|
sftp.stat(path)
|
返回远程服务器文件信息(返回一个对象的属性)
|
|
sftp.truncate(path, size)
|
截取文件大小
|
|
sftp.symlink(source, dest)
|
创建一个软链接(快捷方式)
|
|
sftp.unlink(path)
|
删除软链接
|
博客地址:http://lizhenliang.blog.51cto.com and https://yq.aliyun.com/u/lizhenliang
QQ群:323779636(Shell/Python运维开发群)
QQ群:323779636(Shell/Python运维开发群)
18.2 fabric
fabric模块是在paramiko基础上又做了一层封装,操作起来更方便。主要用于多台主机批量执行任务。
默认Python没有,需要手动安装:pip install fabric
如安装失败,可以尝试yum安装:yum install fabric
Fabric常用API:
|
API类
|
描述
|
示例
|
|
local
|
执行本地命令
|
local('uname -s') |
|
lcd
|
切换本地目录
|
lcd('/opt')
|
|
run
|
执行远程命令
|
run('uname -s')
|
|
cd
|
切换远程目录
|
cd('/opt')
|
| sudo |
sudo方式执行远程命令
|
sudo('/etc/init.d/httpd start')
|
| put |
上传本地文件或目录到远程主机
|
put(remote_path, local_path)
|
|
get
|
从远程主机下载文件或目录到本地
|
put(local_path, remote_path)
|
|
open_shell
|
打开一个shell,类似于SSH连接到了远程主机
|
open_shell("ifconfig eth0")
|
|
prompt
|
获得用户输入信息
|
prompt('Please input user password: ')
|
|
confirm
|
获得提示信息确认
|
confirm('Continue[Y/N]?')
|
|
reboot
|
重启远程主机
|
reboot()
|
|
@task
|
函数装饰器,引用说明函数可调用,否则不可见 |
|
|
@runs_once
|
函数装饰器,函数只会执行一次
|
|
当我们写好fabric脚本后,需要用fab命令调用执行任务。
命令格式:fab [options] <command>[:arg1,arg2=val2,host=foo,hosts='h1;h2',...] ...
fab命令有以下常用选项:
|
选项
|
描述
|
|
-l
|
打印可用的命令(函数)
|
|
--set=KEY=VALUE,...
|
逗号分隔,设置环境变量
|
|
--shortlist
|
简短打印可用命令
|
|
-c PATH
|
指定本地配置文件
|
|
-D
|
不加载用户known_hosts文件
|
|
-f PATH
|
指定fabfile文件
|
|
-g HOST
|
逗号分隔要操作的主机
|
|
-i PATH
|
指定私钥文件
|
|
-k
|
不加载来自~/.ssh下的私钥文件
|
|
-p PASSWORD
|
使用密码认证and/or sudo
|
|
-P
|
默认为并行执行方法
|
|
--port=PORT
|
指定SSH连接端口
|
|
-R ROLES
|
根据角色操作,逗号分隔
|
|
-s SHELL
|
指定新shell,默认是'/bin/bash -l -c'
|
|
--show=LEVELS
|
以逗号分隔的输出 |
|
--ssh-config-path=PATH
|
SSH配置文件路径
|
|
-t N
|
设置连接超时时间,单位秒
|
|
-T N
|
设置远程命令超时时间,单位秒
|
|
-u USER
|
连接远程主机用户名 |
|
-x HOSTS
|
以逗号分隔排除主机
|
|
-z INT
|
并发进程数
|
18.2.1 本地执行命令
from fabric.api import local
def command():
local('ls')
# fab command
[localhost] local: ls
fabfile.py fabfile.pyc tab.py tab.pyc
Done.
使用fab命令调用,默认寻找当前目录的fabfile.py文件。
18.2.2 远程执行命令
from fabric.api import run
def command():
run('ls')
# fab -H 192.168.1.120 -u user command
[192.168.1.120] Executing task 'command'
[192.168.1.120] run: ls
[192.168.1.120] Login password for 'user':
[192.168.1.120] out: access.log a.py
[192.168.1.120] out:
Done.
Disconnecting from 192.168.1.120... done.
如果在多台主机执行,只需要-H后面的IP以逗号分隔即可。
18.2.3 给脚本函数传入位置参数
from fabric.api import run
def hello(name="world"):
print("Hello %s!" % name)
# fab -H localhost hello
[localhost] Executing task 'hello'
Hello world!
Done.
# fab -H localhost hello:name=Python
[localhost] Executing task 'hello'
Hello Python!
Done.
18.2.4 主机列表组
from fabric.api import run, env
env.hosts = ['root@192.168.1.120:22', 'root@192.168.1.130:22']
env.password = '123.com'
env.exclude_hosts = ['root@192.168.1.120:22'] # 排除主机
def command():
run('ls')
env作用是定义fabfile全局设定,类似于变量。还有一些常用的属性:
|
env属性
|
描述
|
示例
|
|
env.hosts
|
定义目标主机
|
env.hosts = ['192.168.1.120:22']
|
|
env.exclude_hosts
|
排除指定主机
|
env.exclude_hosts = '[192.168.1.1]'
|
|
env.user
|
定义用户名
|
env.user='root'
|
|
env.port
|
定义端口
|
env.port='22'
|
|
env.password
|
定义密码
|
env.password='123'
|
|
env.passwords
|
定义多个密码,不同主机对应不同密码
|
env.passwords = {'root@192.168.1.120:22': '123'}
|
|
env.gateway
|
定义网关
|
env.gateway='192.168.1.2'
|
|
env.roledefs
|
定义角色分组
|
env.roledef = {'web':['192.168.1.11'], 'db':['192.168.1.12']}
|
|
env.deploy_release_dir
|
自定义全局变量,格式:env.+ '变量名'
|
env.var
|
18.2.5 定义角色分组
# vi install.py
from fabric.api import run, env
env.roledefs = {
'web': ['192.168.1.10', '192.168.1.20'],
'db': ['192.168.1.30', '192.168.1.40']
}
env.password = '123'
@roles('web')
def task1():
run('yum install httpd -y')
@roles('db')
def task2():
run('yum install mysql-server -y')
def deploy():
execute(task1)
execute(task2)
# fab -f install.py deploy
18.2.6 上传目录到远程主机
from fabric.api import *
env.hosts = ['192.168.1.120']
env.user = 'user'
env.password = '123.com'
def task():
put('/root/abc', '/home/user')
run('ls -l /home/user')
# fab task
18.2.7 从远程主机下载目录
from fabric.api import *
env.hosts = ['192.168.1.120']
env.user = 'user'
env.password = '123.com'
def task():
get('/home/user/b', '/opt')
local('ls -l /opt')
# fab task
18.2.8 打印颜色,有助于关键地方醒目
from fabric.colors import *
def show():
print green('Successful.')
print red('Failure!')
print yellow('Warning.')
# fab show
经过上面演示fabric主要相关功能,是不是觉得很适合批量自动部署呢!没错,通过编写简单的脚本,即可完成复杂的操作。
18.3 pexpect
pexpect是一个用来启动子程序,并使用正则表达式对程序输出做出特定响应,以此实现与其自动交互的Python模块。暂不支持Windows下的Python环境执行。
这里主要讲解run()函数和spawn()类,能完成自动交互,下面简单了解下它们使用。
18.3.1 run()
run()函数用来运行bash命令,类似于os模块中的system()函数。
参数:run(command, timeout=-1, withexitstatus=False, events=None, extra_args=None, logfile=None, cwd=None, env=None)
例1:执行ls命令
>>> import pexpect
>>> pexpect.run("ls")
例2:获得命令状态返回值
>>> command_output, exitstatus = pexpect.run("ls", withexitstatus=1)
command_outout是执行结果,exitstatus是退出状态值。
18.3.2 spawn()
spawn()是pexpect模块主要的类,实现启动子程序,使用pty.fork()生成子进程,并调用exec()系列函数执行命令。
参数:spawn(command, args=[], timeout=30, maxread=2000, searchwindowsize=None, logfile=None, cwd=None, env=None)
spawn()类几个常用函数:
|
expect(pattern, timeout=-1, searchwindowsize=None)
|
匹配正则表达式,pattern可以是正则表达式。
|
|
send(s)
|
给子进程发送一个字符串
|
|
sendline(s='')
|
就像send(),但添加了一个换行符(os.lineseq)
|
|
sendcontrol(char)
|
发送一个控制符,比如ctrl-c、ctrl-d
|
例子:ftp交互
用ftp命令登录是这样的,需要手动输入用户名和密码,才能登录进去。
# ftp 192.168.1.10
Connected to 192.168.1.10 (192.168.1.10).
220-FileZilla Server version 0.9.46 beta
220-written by Tim Kosse (tim.kosse@filezilla-project.org)
220 Please visit http://sourceforge.net/projects/filezilla/
Name (192.168.1.10:root): yunwei
331 Password required for yunwei
Password:
230 Logged on
Remote system type is UNIX.
ftp>
下面我们用pexpect帮我们完成输入用户名和密码:
import pexpect
child = pexpect.spawn('ftp 192.168.1.10')
child.expect('Name .*: ')
child.sendline('yunwei')
child.expect('Password:')
child.sendline('yunweipass')
child.expect('ftp> ')
child.sendline('ls')
child.sendline('bye')
child.expect(pexpect.EOF) # pexpect.EOF程序打印提示信息
print child.before # 保存命令执行结果
手动输入时,是来自键盘的标准输入,而pexpect是先匹配到关键字,再向子进程发送字符串。
pexpect.EOF打印提示信息,child.before保存的是命令执行结果。
通过上面的例子想必你已经知道pexpect主要功能了,在交互场景下很有用,这里就讲解这么多了,目的是给大家提供一个自动交互实现思路。
小结:
通过对Python下paramiko、fabric和pexpect模块使用,它们各有自己擅长的一面。
paramiko:方便嵌套系统平台中,擅长远程执行命令,文件传输。
fabric:方便与shell脚本结合,擅长批量部署,任务管理。
pexpect:擅长自动交互,比如ssh、ftp、telnet。
转自
博客地址:http://lizhenliang.blog.51cto.com and https://yq.aliyun.com/u/lizhenliang

 浙公网安备 33010602011771号