阿里云首次安装和部署nginx
1、执行yum命令安装依赖
yum -y install pcre*

yum -y install openssl*
2、下载nginx
//如果没有安装wget,下载已编译版本
yum install wget
//进入指定目录
cd /usr/local/

//下载nginx 安装包,“1.16.0”是指定的安装版本,可以选择自己需要或者最新的版本
wget http://nginx.org/download/nginx-1.16.0.tar.gz
3、编译安装
//通过tar解压安装包
tar -zxvf nginx-1.16.0.tar.gz

//进入nginx
cd nginx-1.16.0

//执行编译
./configure

//编译报错误的话比如:“C compiler cc is not found”,这个就是缺少编译环境,安装一下就可以了
yum -y install gcc make gcc-c++ openssl-devel wget

//编译成功执行
make -j4 && make install
4、nginx测试
//在nginx可执行命令下目录/usr/local/nginx/sbin执行
./nginx -t

//出现下面结果表示安装成功
nginx: the configuration file /usr/local/nginx/conf/nginx.conf syntax is ok
nginx: configuration file /usr/local/nginx/conf/nginx.conf test is successful
//也可以执行./nginx 启动,然后在浏览器访问此机器的 IP,如果浏览器出现 Welcome to nginx! 则表示 Nginx 已经安装并运行成功
//部分命令
//重启:./nginx -s reload
//停止:./nginx -s stop
5、配置开机启动-配置文件(如果先部署项目,跳过看第7条)
//进入目录,编辑nginx文件
cd /etc/init.d/
vi nginx
//添加如下,注内容修改PATH字段, 匹配自己的安装路径,如果按这个流程安装应该是一样的
#!/bin/bash
# Startup script for the nginx Web Server
# chkconfig: - 85 15
# description: nginx is a World Wide Web server. It is used to serve
# HTML files and CGI.
# processname: nginx
# pidfile: /usr/local/nginx/logs/nginx.pid
# config: /usr/local/nginx/conf/nginx.conf
PATH=/bin:/sbin:/usr/bin:/usr/sbin:/usr/local/bin:/usr/local/sbin:~/bin
export PATH
NGINX_HOME=/usr/local/nginx/sbin
NGINX_CONF=/usr/local/nginx/conf
PHP_HOME=/usr/local/php-fcgi/bin
if [ ! -f "$NGINX_HOME/nginx" ]
then
echo "nginxserver startup: cannot start"
exit
fi
case "$1" in
'start')
$PHP_HOME/spawn-fcgi -a 127.0.0.1 -p 10080 -C 20 -u nobody -f $PHP_HOME/php-cgi
$NGINX_HOME/nginx -c $NGINX_CONF/nginx.conf
echo "nginx start successful"
;;
'stop')
killall -TERM php-cgi
killall -TERM nginx
;;
esac
6、配置开机启动-启动
//设置执行权限
chmod  a+x  /etc/init.d/nginx

//注册成服务
chkconfig --add nginx

//重启, 查看nginx服务是否自动启动.
shutdown -h0 -r
netstat -apn|grep nginx
7、配置部署自己的项目,下面以一个node/vue前后端分离的项目为例:
//找到nginx。conf配置文件
cd /usr/local/nginx/conf/

//编辑文件
vi nginx.conf

//在server对象里改为自己要的端口,默认为80
listen 80;

//同样的配置前端打包地址: root为vue打包后存放在服务器的地址
location / {
    root /data/paulBlog/browseClient/dist;
    index index.html index.htm;
}
//同样的配置后端接口地址:proxy_pass 为后端接口地址
#解决跨域
location /api { # 自定义nginx接口前缀
proxy_pass http://127.0.0.1:3000; # 后台api接口地址
proxy_redirect default;
#设置主机头和客户端真实地址,以便服务器获取客户端真实IP
proxy_set_header Host $host;
proxy_set_header X-Real-IP $remote_addr;
proxy_set_header X-Forwarded-For $proxy_add_x_forwarded_for;
}
//整体文件如下
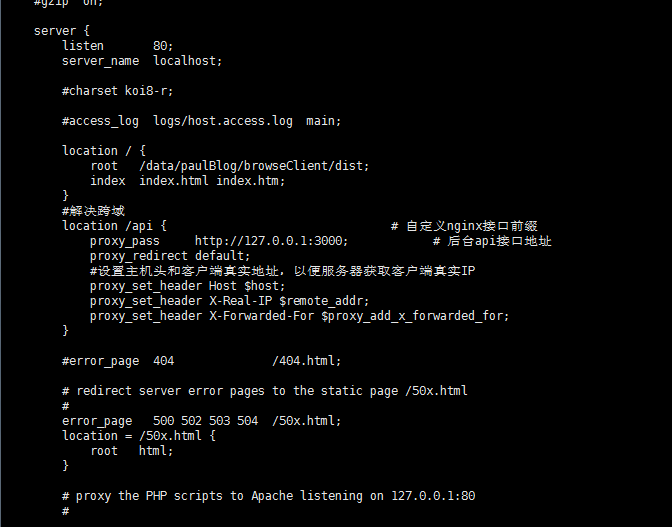
//通过命令:qw 保存成功后最好是重新启动下nginx
/usr/local/nginx/sbin/nginx -s reload
8、在阿里云后台配置安全组规制放出对应的端口,就可以通过阿里云提供的IP访问了。需要域名访问的话,同样在阿里云上申请,解析,最后备案后,可通过域名访问,备案挺麻烦的^**^
关注公众号“云海生活”获取更多技术分享


 浙公网安备 33010602011771号