
maven:通过maven构建可运行的jar
本文主要讲通过Maven打可运行jar的方式
-
springboot项目,使用maven打可运行jar
-
普通项目,通过maven构建可运行jar
1、springboot项目,使用maven打可运行jar
先看一下我的POM文件
<?xml version="1.0" encoding="UTF-8"?>
<project xmlns="http://maven.apache.org/POM/4.0.0"
         xmlns:xsi="http://www.w3.org/2001/XMLSchema-instance"
         xsi:schemaLocation="http://maven.apache.org/POM/4.0.0 http://maven.apache.org/xsd/maven-4.0.0.xsd">
    <modelVersion>4.0.0</modelVersion>

    <parent>
        <groupId>org.springframework.boot</groupId>
        <artifactId>spring-boot-starter-parent</artifactId>
        <version>1.5.2.RELEASE</version>
    </parent>
    <groupId>test.mj</groupId>
    <artifactId>test-example</artifactId>
    <version>1.0-SNAPSHOT</version>

    <dependencies>
        <dependency>
            <groupId>org.springframework.boot</groupId>
            <artifactId>spring-boot-starter-web</artifactId>
        </dependency>

        <dependency>
            <groupId>com.squareup.retrofit2</groupId>
            <artifactId>retrofit</artifactId>
            <version>2.8.2</version>
        </dependency>
        <dependency>
            <groupId>com.squareup.retrofit2</groupId>
            <artifactId>converter-gson</artifactId>
            <version>2.8.2</version>
            <exclusions>
                <exclusion>
                    <groupId>com.google.code.gson</groupId>
                    <artifactId>gson</artifactId>
                </exclusion>
            </exclusions>
        </dependency>
        <dependency>
            <groupId>com.google.code.gson</groupId>
            <artifactId>gson</artifactId>
            <version>2.8.2</version>
        </dependency>

        <dependency>
            <groupId>org.postgresql</groupId>
            <artifactId>postgresql</artifactId>
            <version>42.2.12</version>
        </dependency>

    </dependencies>
</project>
要构建可运行的jar,就是可以直接通过命令:java -jar xxxxx.jar 直接运行
由于使用的是Springboot,这时就很方便了
方式一、直接通过maven的命令的方式打成可运行的jar
第一步:在pom文件中下入如下配置:
 <build>
        <plugins>
            <plugin>
                <groupId>org.springframework.boot</groupId>
                <artifactId>spring-boot-maven-plugin</artifactId>
            </plugin>
        </plugins>
    </build>
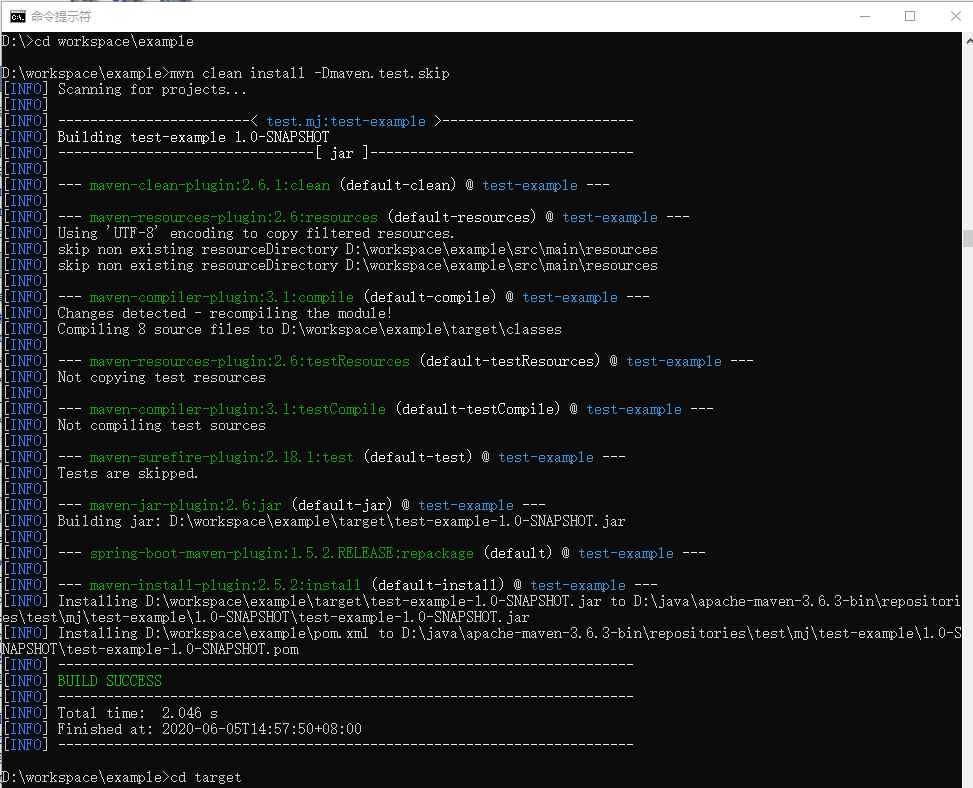
第二步:CMD中进入项目目录下执行打包
mvn clean install -Dmaven.test.skip
或者
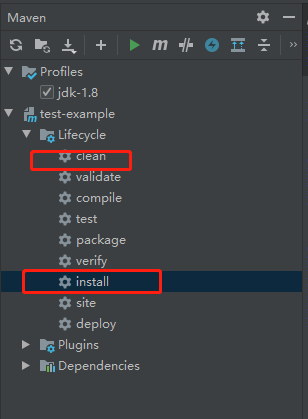
直接通过IDEA中的clean,install即可,如下图所示:
此时就会将创建好的可运行的jar放在target目录下
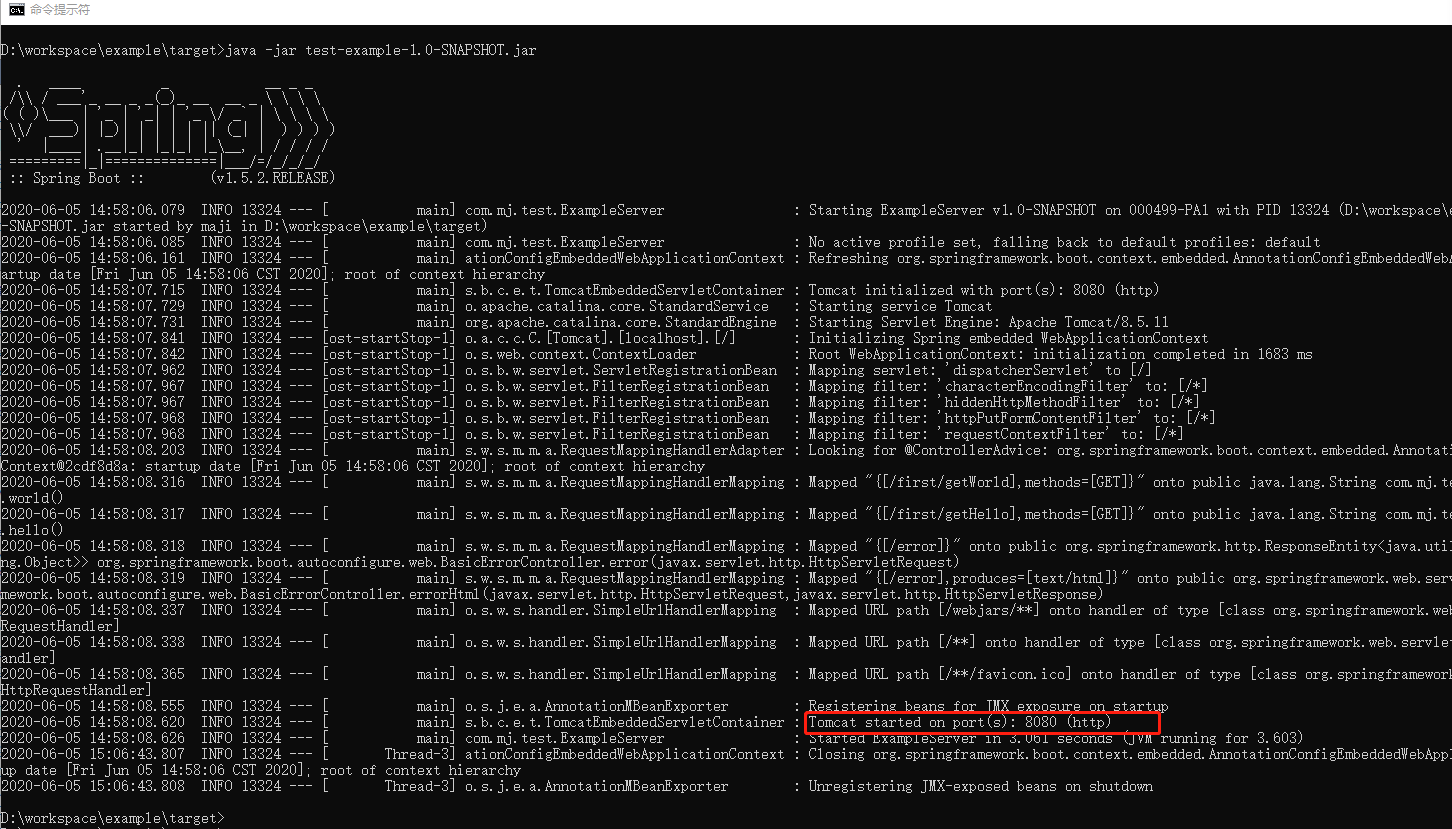
最后,我们测试一下
D:\workspace\example\target> java -jar test-example-1.0-SNAPSHOT.jar
结果如下图所示就说明打可运行jar成功
2、非Springboot项目,通过maven构建可运行jar
当项目不是springboot项目时,如果想通过maven构建可运行JAR,此时就要用到maven的assembly:assembly命令
第一步:pom文件需要加入如下依赖
 <build>
        <plugins>
             <plugin>
                 <groupId>org.apache.maven.plugins</groupId>
                 <artifactId>maven-assembly-plugin</artifactId>
                 <configuration>
                     <archive>
                         <manifest>
                             <mainClass>com.mj.test.ExampleServer</mainClass>
                         </manifest>
                     </archive>
                     <descriptorRefs>
                         <descriptorRef>jar-with-dependencies</descriptorRef>
                     </descriptorRefs>
                 </configuration>
                 <executions>
                     <execution>
                         <id>make-assembly</id>
                         <phase>package</phase>
                         <goals>
                             <goal>single</goal>
                         </goals>
                     </execution>
                 </executions>
             </plugin>
        </plugins>
    </build>
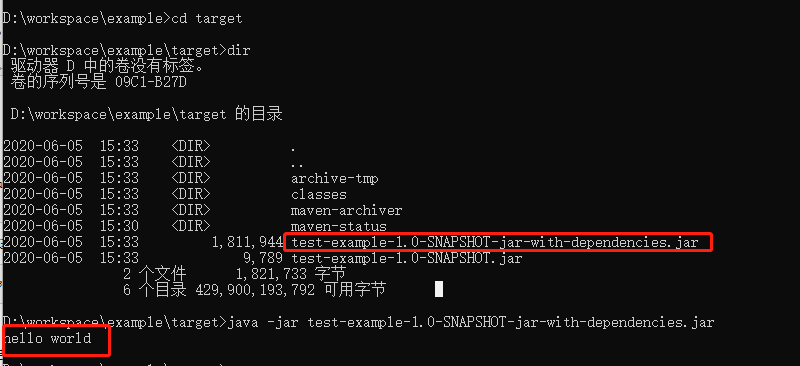
第二步:CMD中进入项目目录下执行打包
mvn clean assembly:assembly
最后,验证打包结果

 浙公网安备 33010602011771号