SpringBoot(二)
SpringBoot(二)
1、整合JDBC
创建测试项目测试数据源
1、我去新建一个项目测试:springboot-data-jdbc ; 引入相应的模块!基础模块
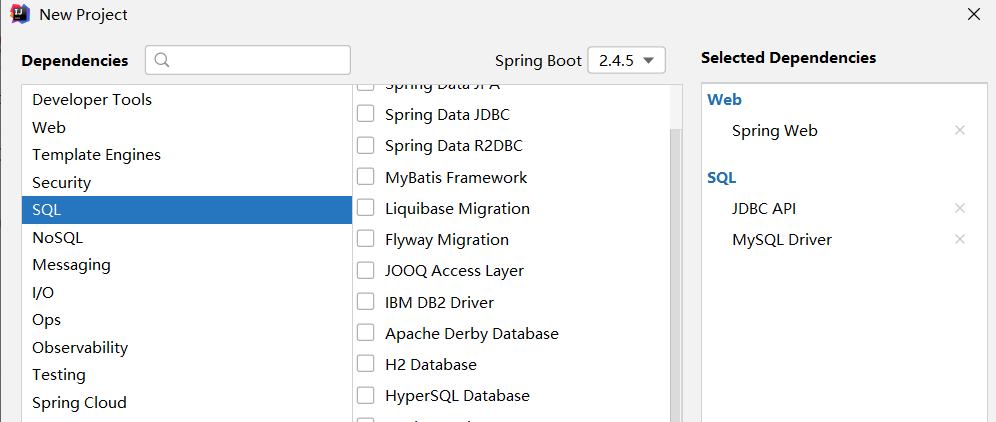
2、项目建好之后,发现自动帮我们导入了如下的启动器:
<dependency>
    <groupId>org.springframework.boot</groupId>
    <artifactId>spring-boot-starter-jdbc</artifactId>
</dependency>
<dependency>
    <groupId>mysql</groupId>
    <artifactId>mysql-connector-java</artifactId>
    <scope>runtime</scope>
</dependency>
3、编写yaml配置文件连接数据库
spring:
  datasource:
    username: root
    password: 123456
    url: jdbc:mysql://localhost:3306/blog1?serverTimezone=UTC&useUnicode=true&characterEncoding=utf-8
    driver-class-name: com.mysql.cj.jdbc.Driver
4、配置完这一些东西后,我们就可以直接去使用了,因为SpringBoot已经默认帮我们进行了自动配置;去测试类测试一下
@SpringBootTest
class SpringbootDataJdbcApplicationTests {


    //DI注入数据源
    @Autowired
    DataSource dataSource;


    @Test
    public void contextLoads() throws SQLException {
        //看一下默认数据源
        System.out.println(dataSource.getClass());
        //获得连接
        Connection connection = dataSource.getConnection();
        System.out.println(connection);
        //关闭连接
        connection.close();
    }
}
结果:我们可以看到他默认给我们配置的数据源为 : class com.zaxxer.hikari.HikariDataSource , 我们并没有手动配置
我们来全局搜索一下,找到数据源的所有自动配置都在 :DataSourceAutoConfiguration文件:
JDBCTemplate
1、有了数据源(com.zaxxer.hikari.HikariDataSource),然后可以拿到数据库连接(java.sql.Connection),有了连接,就可以使用原生的 JDBC 语句来操作数据库;
2、即使不使用第三方第数据库操作框架,如 MyBatis等,Spring 本身也对原生的JDBC 做了轻量级的封装,即JdbcTemplate。
3、数据库操作的所有 CRUD 方法都在 JdbcTemplate 中。
4、Spring Boot 不仅提供了默认的数据源,同时默认已经配置好了 JdbcTemplate 放在了容器中,程序员只需自己注入即可使用
5、JdbcTemplate 的自动配置是依赖 org.springframework.boot.autoconfigure.jdbc 包下的 JdbcTemplateConfiguration 类
JdbcTemplate主要提供以下几类方法:
- execute方法:可以用于执行任何SQL语句,一般用于执行DDL语句;
- update方法及batchUpdate方法:update方法用于执行新增、修改、删除等语句;batchUpdate方法用于执行批处理相关语句;
- query方法及queryForXXX方法:用于执行查询相关语句;
- call方法:用于执行存储过程、函数相关语句。
测试
编写一个Controller,注入 jdbcTemplate,编写测试方法进行访问测试;
package com.meng.controller;


import org.springframework.beans.factory.annotation.Autowired;
import org.springframework.jdbc.core.JdbcTemplate;
import org.springframework.web.bind.annotation.GetMapping;
import org.springframework.web.bind.annotation.PathVariable;
import org.springframework.web.bind.annotation.RequestMapping;
import org.springframework.web.bind.annotation.RestController;


import java.util.Date;
import java.util.List;
import java.util.Map;


@RestController
@RequestMapping("/jdbc")
public class JdbcController {


    /**
     * Spring Boot 默认提供了数据源,默认提供了 org.springframework.jdbc.core.JdbcTemplate
     * JdbcTemplate 中会自己注入数据源,用于简化 JDBC操作
     * 还能避免一些常见的错误,使用起来也不用再自己来关闭数据库连接
     */
    @Autowired
    JdbcTemplate jdbcTemplate;


    //查询employee表中所有数据
    //List 中的1个 Map 对应数据库的 1行数据
    //Map 中的 key 对应数据库的字段名,value 对应数据库的字段值
    @GetMapping("/list")
    public List<Map<String, Object>> userList(){
        String sql = "select * from employee";
        List<Map<String, Object>> maps = jdbcTemplate.queryForList(sql);
        return maps;
    }

    //新增一个用户
    @GetMapping("/add")
    public String addUser(){
        //插入语句,注意时间问题
        String sql = "insert into employee(last_name, email,gender,department,birth)" +
                " values ('狂神说','24736743@qq.com',1,101,'"+ new Date().toLocaleString() +"')";
        jdbcTemplate.update(sql);
        //查询
        return "addOk";
    }


    //修改用户信息
    @GetMapping("/update/{id}")
    public String updateUser(@PathVariable("id") int id){
        //插入语句
        String sql = "update employee set last_name=?,email=? where id="+id;
        //数据
        Object[] objects = new Object[2];
        objects[0] = "秦疆";
        objects[1] = "24736743@sina.com";
        jdbcTemplate.update(sql,objects);
        //查询
        return "updateOk";
    }


    //删除用户
    @GetMapping("/delete/{id}")
    public String delUser(@PathVariable("id") int id){
        //插入语句
        String sql = "delete from employee where id=?";
        jdbcTemplate.update(sql,id);
        //查询
        return "deleteOk";
    }

}
2、整合Druid
Druid 是阿里巴巴开源平台上一个数据库连接池实现,结合了 C3P0、DBCP 等 DB 池的优点,同时加入了日志监控。
Druid 可以很好的监控 DB 池连接和 SQL 的执行情况,天生就是针对监控而生的 DB 连接池。
Spring Boot 2.0 以上默认使用 Hikari 数据源,可以说 Hikari 与 Driud 都是当前 Java Web 上最优秀的数据源,我们来重点介绍 Spring Boot 如何集成 Druid 数据源,如何实现数据库监控。
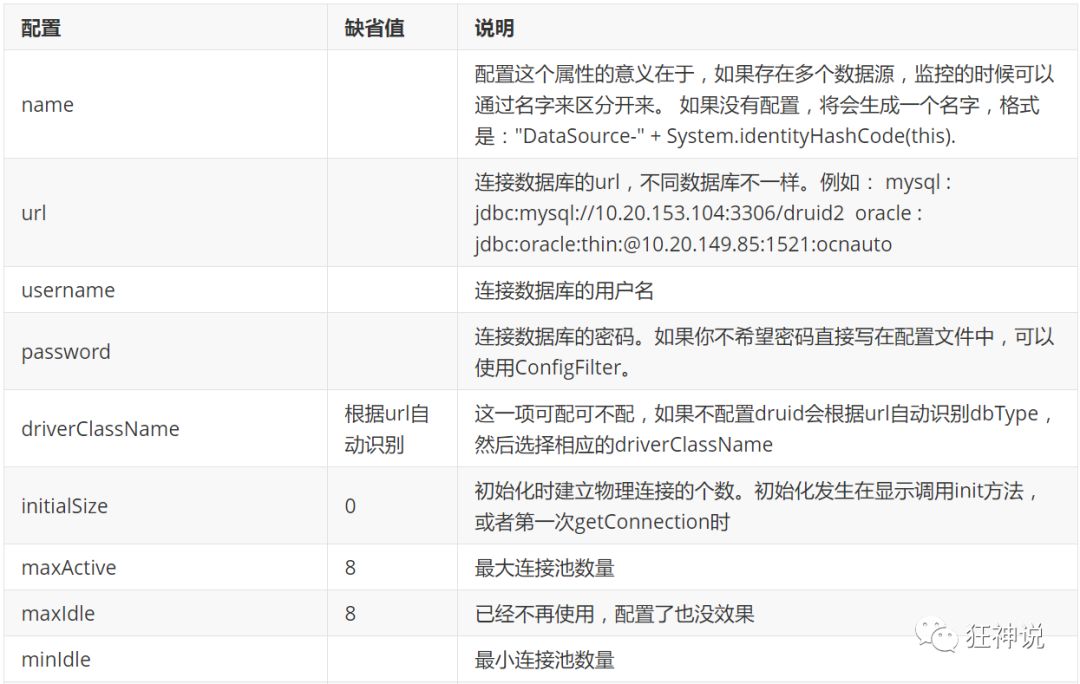
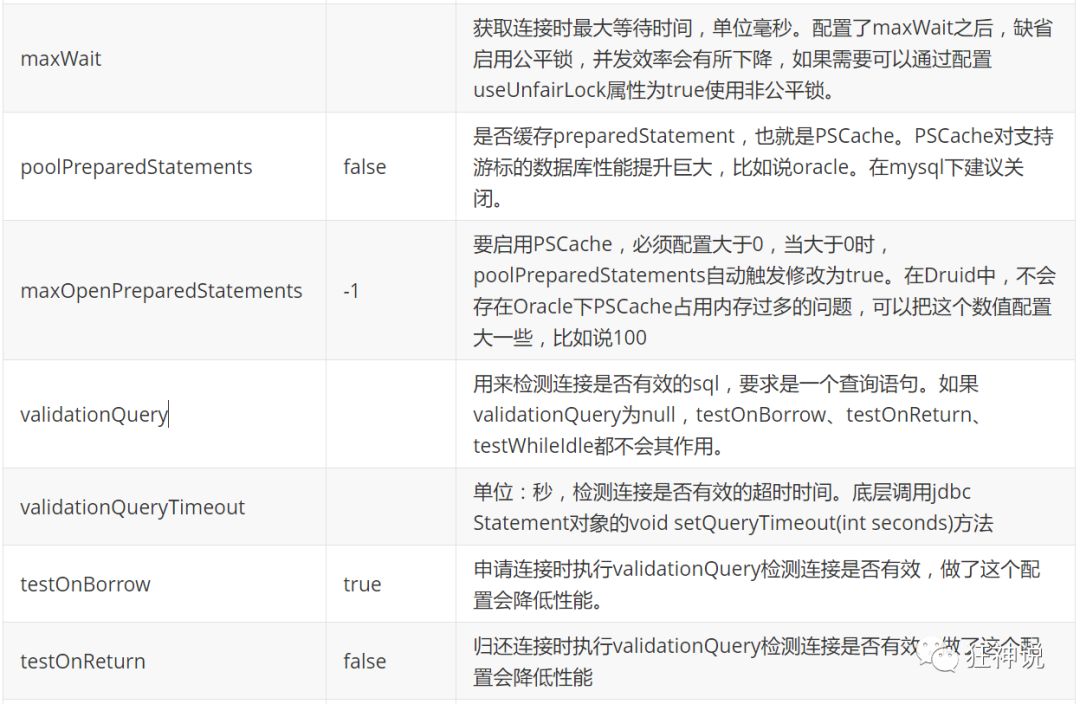
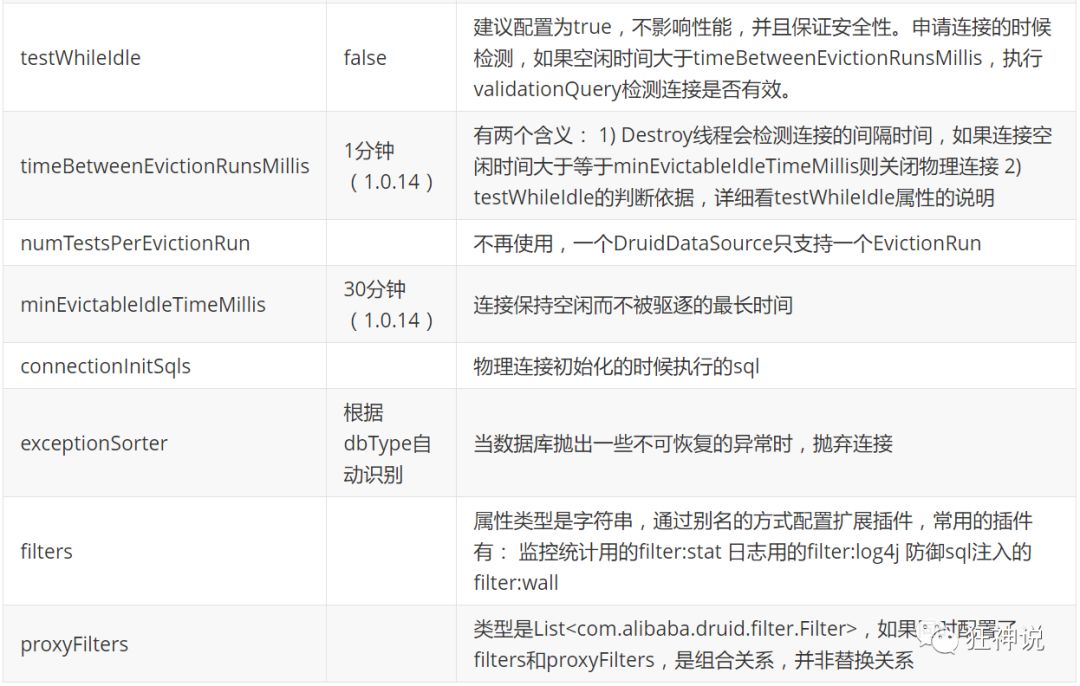
com.alibaba.druid.pool.DruidDataSource 基本配置参数如下:
配置数据源
1、添加上 Druid 数据源依赖。
<!-- https://mvnrepository.com/artifact/com.alibaba/druid -->
<dependency>
    <groupId>com.alibaba</groupId>
    <artifactId>druid</artifactId>
    <version>1.1.21</version>
</dependency>
2、切换数据源;之前已经说过 Spring Boot 2.0 以上默认使用 com.zaxxer.hikari.HikariDataSource 数据源,但可以 通过 spring.datasource.type 指定数据源。
spring:
  datasource:
    username: root
    password: 123456
    url: jdbc:mysql://localhost:3306/springboot?serverTimezone=UTC&useUnicode=true&characterEncoding=utf-8
    driver-class-name: com.mysql.cj.jdbc.Driver
    type: com.alibaba.druid.pool.DruidDataSource # 自定义数据源
3、数据源切换之后,在测试类中注入 DataSource,然后获取到它,输出一看便知是否成功切换。

4、切换成功!既然切换成功,就可以设置数据源连接初始化大小、最大连接数、等待时间、最小连接数 等设置项。
spring:
  datasource:
    username: root
    password: 123456
    #?serverTimezone=UTC解决时区的报错
    url: jdbc:mysql://localhost:3306/springboot?serverTimezone=UTC&useUnicode=true&characterEncoding=utf-8
    driver-class-name: com.mysql.cj.jdbc.Driver
    type: com.alibaba.druid.pool.DruidDataSource

    #Spring Boot 默认是不注入这些属性值的,需要自己绑定
    #druid 数据源专有配置
    initialSize: 5
    minIdle: 5
    maxActive: 20
    maxWait: 60000
    timeBetweenEvictionRunsMillis: 60000
    minEvictableIdleTimeMillis: 300000
    validationQuery: SELECT 1 FROM DUAL
    testWhileIdle: true
    testOnBorrow: false
    testOnReturn: false
    poolPreparedStatements: true

    #配置监控统计拦截的filters,stat:监控统计、log4j:日志记录、wall:防御sql注入
    #如果允许时报错  java.lang.ClassNotFoundException: org.apache.log4j.Priority
    #则导入 log4j 依赖即可,Maven 地址:https://mvnrepository.com/artifact/log4j/log4j
    filters: stat,wall,log4j
    maxPoolPreparedStatementPerConnectionSize: 20
    useGlobalDataSourceStat: true
    connectionProperties: druid.stat.mergeSql=true;druid.stat.slowSqlMillis=500
5、导入Log4j 的依赖
<!-- https://mvnrepository.com/artifact/log4j/log4j -->
<dependency>
    <groupId>log4j</groupId>
    <artifactId>log4j</artifactId>
    <version>1.2.17</version>
</dependency>
6、现在需要程序员自己为 DruidDataSource 绑定全局配置文件中的参数,再添加到容器中,而不再使用 Spring Boot 的自动生成了;我们需要 自己添加 DruidDataSource 组件到容器中,并绑定属性;
config
package com.kuang.config;


import com.alibaba.druid.pool.DruidDataSource;
import org.springframework.boot.context.properties.ConfigurationProperties;
import org.springframework.context.annotation.Bean;
import org.springframework.context.annotation.Configuration;


import javax.sql.DataSource;


@Configuration
public class DruidConfig {


    /*
       将自定义的 Druid数据源添加到容器中,不再让 Spring Boot 自动创建
       绑定全局配置文件中的 druid 数据源属性到 com.alibaba.druid.pool.DruidDataSource从而让它们生效
       @ConfigurationProperties(prefix = "spring.datasource"):作用就是将 全局配置文件中
       前缀为 spring.datasource的属性值注入到 com.alibaba.druid.pool.DruidDataSource 的同名参数中
     */
    @ConfigurationProperties(prefix = "spring.datasource")
    @Bean
    public DataSource druidDataSource() {
        return new DruidDataSource();
    }


}
7、去测试类中测试一下;看是否成功!
@SpringBootTest
class SpringbootDataJdbcApplicationTests {


    //DI注入数据源
    @Autowired
    DataSource dataSource;


    @Test
    public void contextLoads() throws SQLException {
        //看一下默认数据源
        System.out.println(dataSource.getClass());
        //获得连接
        Connection connection =   dataSource.getConnection();
        System.out.println(connection);


        DruidDataSource druidDataSource = (DruidDataSource) dataSource;
        System.out.println("druidDataSource 数据源最大连接数:" + druidDataSource.getMaxActive());
        System.out.println("druidDataSource 数据源初始化连接数:" + druidDataSource.getInitialSize());


        //关闭连接
        connection.close();
    }
}
8、输出结果

配置数据源监控
Druid 数据源具有监控的功能,并提供了一个 web 界面方便用户查看,类似安装 路由器 时,人家也提供了一个默认的 web 页面。
所以第一步需要设置 Druid 的后台管理页面,比如 登录账号、密码 等;配置后台管理;
//配置 Druid 监控管理后台的Servlet;
//内置 Servlet 容器时没有web.xml文件,所以使用 Spring Boot 的注册 Servlet 方式
@Bean
public ServletRegistrationBean statViewServlet() {
    ServletRegistrationBean bean = new ServletRegistrationBean(new StatViewServlet(), "/druid/*");


    // 这些参数可以在 com.alibaba.druid.support.http.StatViewServlet
    // 的父类 com.alibaba.druid.support.http.ResourceServlet 中找到
    Map<String, String> initParams = new HashMap<>();
    initParams.put("loginUsername", "admin"); //后台管理界面的登录账号
    initParams.put("loginPassword", "123456"); //后台管理界面的登录密码


    //后台允许谁可以访问
    //initParams.put("allow", "localhost"):表示只有本机可以访问
    //initParams.put("allow", ""):为空或者为null时,表示允许所有访问
    initParams.put("allow", "");
    //deny:Druid 后台拒绝谁访问
    //initParams.put("kuangshen", "192.168.1.20");表示禁止此ip访问


    //设置初始化参数
    bean.setInitParameters(initParams);
    return bean;
}
配置完毕后,我们可以选择访问 :http://localhost:8080/druid/login.html
进入之后

配置 Druid web 监控 filter 过滤器
//配置 Druid 监控 之  web 监控的 filter
//WebStatFilter:用于配置Web和Druid数据源之间的管理关联监控统计
@Bean
public FilterRegistrationBean webStatFilter() {
    FilterRegistrationBean bean = new FilterRegistrationBean();
    bean.setFilter(new WebStatFilter());


    //exclusions:设置哪些请求进行过滤排除掉,从而不进行统计
    Map<String, String> initParams = new HashMap<>();
    initParams.put("exclusions", "*.js,*.css,/druid/*,/jdbc/*");
    bean.setInitParameters(initParams);


    //"/*" 表示过滤所有请求
    bean.setUrlPatterns(Arrays.asList("/*"));
    return bean;
}
3、整合MyBatis
1、导入 MyBatis 所需要的依赖
<dependency>
    <groupId>org.mybatis.spring.boot</groupId>
    <artifactId>mybatis-spring-boot-starter</artifactId>
    <version>2.1.1</version>
</dependency>
2、配置数据库连接信息
spring:
  datasource:
    username: root
    password: 123456
    #?serverTimezone=UTC解决时区的报错
    url: jdbc:mysql://localhost:3306/blog1?serverTimezone=UTC&useUnicode=true&characterEncoding=utf-8
    driver-class-name: com.mysql.cj.jdbc.Driver
3、测试数据库是否连接成功
package com.meng;

import org.junit.jupiter.api.Test;
import org.springframework.beans.factory.annotation.Autowired;
import org.springframework.boot.test.context.SpringBootTest;

import javax.sql.DataSource;
import java.sql.SQLException;

@SpringBootTest
class SpringbootMybatisApplicationTests {

    @Autowired
    DataSource dataSource;

    @Test
    void contextLoads() throws SQLException {

        System.out.println(dataSource.getClass());
        System.out.println(dataSource.getConnection());

    }

}
4、创建实体类,导入 Lombok!
package com.meng.pojo;

import lombok.AllArgsConstructor;
import lombok.Data;
import lombok.NoArgsConstructor;

@Data
@AllArgsConstructor
@NoArgsConstructor
public class User {

    private int userId;
    private String username;
    private String password;
    private String email;
    private String phone;

}
5、创建mapper目录以及对应的 Mapper 接口
package com.meng.mapper;


import com.meng.pojo.User;
import org.apache.ibatis.annotations.Mapper;
import org.springframework.stereotype.Repository;

import java.util.List;

@Mapper
@Repository
public interface UserMapper {

    List<User> queryUserList();

    User queryUserById(int id);

    int addUser(User user);

    int updateUser(User user);

    int deleteUser(int id);
}
6、对应的Mapper映射文件
<?xml version="1.0" encoding="UTF-8" ?>
<!DOCTYPE mapper
        PUBLIC "-//mybatis.org//DTD Mapper 3.0//EN"
        "http://mybatis.org/dtd/mybatis-3-mapper.dtd">

<mapper namespace="com.meng.mapper.UserMapper">

    <select id="queryUserList" resultType="User">
        select * from user_info;
    </select>

    <select id="queryUserById" resultType="User">
        select * from user_info where userId = #{userId}
    </select>

    <insert id="addUser" parameterType="User">
        insert into user_info (userId, username, password, email, phone) values (#{userId},#{username},#{password},#{email},#{phone})
    </insert>

    <update id="updateUser" parameterType="User">
        update user_info set username=#{username},password=#{password},email=#{email},phone=#{phone} where userId=#{userId}
    </update>

    <delete id="deleteUser" parameterType="int">
        delete from user_info where userId = #{userId}
    </delete>

</mapper>
7、yaml 整合mybatis
spring:
  datasource:
    username: root
    password: 123456
    #?serverTimezone=UTC解决时区的报错
    url: jdbc:mysql://localhost:3306/blog1?serverTimezone=UTC&useUnicode=true&characterEncoding=utf-8
    driver-class-name: com.mysql.cj.jdbc.Driver

# 整合mybatis
mybatis:
  type-aliases-package: com.meng.pojo
  mapper-locations: classpath:mybatis/mapper/*.xml
8、UserController测试
package com.meng.controller;


import com.meng.mapper.UserMapper;
import com.meng.pojo.User;
import org.springframework.beans.factory.annotation.Autowired;
import org.springframework.web.bind.annotation.GetMapping;
import org.springframework.web.bind.annotation.RestController;

import java.util.List;

@RestController
public class UserController {

    @Autowired
    private UserMapper userMapper;

    @GetMapping("/queryUserList")
    public List<User> queryUserList(){
        List<User> userList = userMapper.queryUserList();
        return userList;
    }

}
4、SpringSecurity(安全)
1.安全简介
在 Web 开发中,安全一直是非常重要的一个方面。安全虽然属于应用的非功能性需求,但是应该在应用开发的初期就考虑进来。如果在应用开发的后期才考虑安全的问题,就可能陷入一个两难的境地:一方面,应用存在严重的安全漏洞,无法满足用户的要求,并可能造成用户的隐私数据被攻击者窃取;另一方面,应用的基本架构已经确定,要修复安全漏洞,可能需要对系统的架构做出比较重大的调整,因而需要更多的开发时间,影响应用的发布进程。因此,从应用开发的第一天就应该把安全相关的因素考虑进来,并在整个应用的开发过程中。
市面上存在比较有名的:Shiro,Spring Security !
2.环境搭建
1、新建一个初始的springboot项目web模块,thymeleaf模块
2、导入静态资源
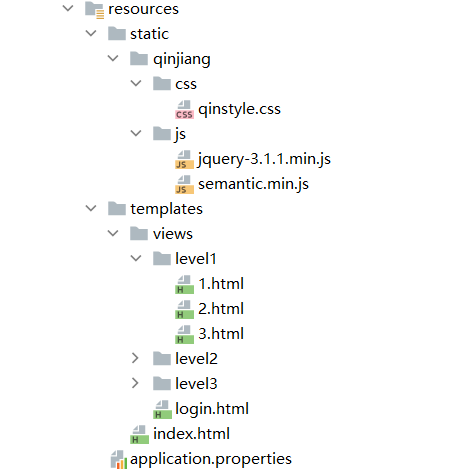
3、controller跳转!
package com.meng.controller;

import org.springframework.stereotype.Controller;
import org.springframework.web.bind.annotation.PathVariable;
import org.springframework.web.bind.annotation.RequestMapping;


@Controller
public class RouterController {

    @RequestMapping({"/","/index"})
    public String index(){
        return "index";
    }

    @RequestMapping("/toLogin")
    public String toLogin(){
        return "views/login";
    }

    @RequestMapping("/level1/{id}")
    public String level1(@PathVariable("id") int id){
        return "views/level1/"+id;
    }

    @RequestMapping("/level2/{id}")
    public String level2(@PathVariable("id") int id){
        return "views/level2/"+id;
    }

    @RequestMapping("/level3/{id}")
    public String level3(@PathVariable("id") int id){
        return "views/level3/"+id;
    }

}
3.认识SpringSecurity
Spring Security 是针对Spring项目的安全框架,也是Spring Boot底层安全模块默认的技术选型,他可以实现强大的Web安全控制,对于安全控制,我们仅需要引入 spring-boot-starter-security 模块,进行少量的配置,即可实现强大的安全管理!
记住几个类:
- WebSecurityConfigurerAdapter:自定义Security策略
- AuthenticationManagerBuilder:自定义认证策略
- @EnableWebSecurity:开启WebSecurity模式
Spring Security的两个主要目标是 “认证” 和 “授权”(访问控制)。
“认证”(Authentication)
身份验证是关于验证您的凭据,如用户名/用户ID和密码,以验证您的身份。
身份验证通常通过用户名和密码完成,有时与身份验证因素结合使用。
“授权” (Authorization)
授权发生在系统成功验证您的身份后,最终会授予您访问资源(如信息,文件,数据库,资金,位置,几乎任何内容)的完全权限。
这个概念是通用的,而不是只在Spring Security 中存在。
4.认证和授权
目前,我们的测试环境,是谁都可以访问的,我们使用 Spring Security 增加上认证和授权的功能
1、引入 Spring Security 模块
<dependency>
    <groupId>org.springframework.boot</groupId>
    <artifactId>spring-boot-starter-security</artifactId>
</dependency>
2、编写 Spring Security 配置类
package com.meng.config;

import org.springframework.security.config.annotation.web.builders.HttpSecurity;
import org.springframework.security.config.annotation.web.configuration.EnableWebSecurity;
import org.springframework.security.config.annotation.web.configuration.WebSecurityConfigurerAdapter;


@EnableWebSecurity
public class SecurityConfig extends WebSecurityConfigurerAdapter {
    @Override
    protected void configure(HttpSecurity http) throws Exception {

    }
}
3、定制请求的授权规则
@Override
protected void configure(HttpSecurity http) throws Exception {
    // 定制请求的授权规则
    // 首页所有人可以访问
    http.authorizeRequests().antMatchers("/").permitAll()
    .antMatchers("/level1/**").hasRole("vip1")
    .antMatchers("/level2/**").hasRole("vip2")
    .antMatchers("/level3/**").hasRole("vip3");
}
4、测试一下:发现除了首页都进不去了!因为我们目前没有登录的角色,因为请求需要登录的角色拥有对应的权限才可以!
5、在configure()方法中加入以下配置,开启自动配置的登录功能!
// 开启自动配置的登录功能
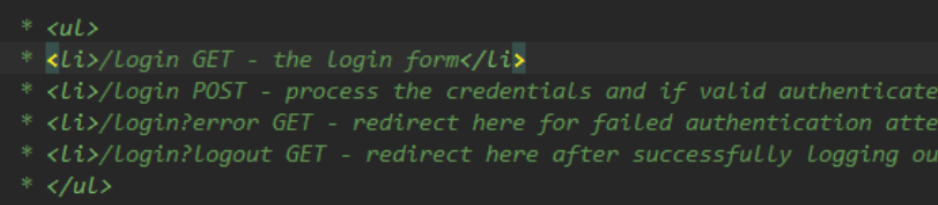
// /login 请求来到登录页
// /login?error 重定向到这里表示登录失败
http.formLogin();
6、测试一下:发现,没有权限的时候,会跳转到登录的页面!
7、查看刚才登录页的注释信息;
我们可以定义认证规则,重写configure(AuthenticationManagerBuilder auth)方法
//定义认证规则
@Override
protected void configure(AuthenticationManagerBuilder auth) throws Exception {

    //在内存中定义,也可以在jdbc中去拿.... auth.jdbcAuthentication()
    auth.inMemoryAuthentication()
            .withUser("kuangshen").password("123456").roles("vip2","vip3")
            .and()
            .withUser("root").password("123456").roles("vip1","vip2","vip3")
            .and()
            .withUser("guest").password("123456").roles("vip1","vip2");
}
8、测试,我们可以使用这些账号登录进行测试!发现会报错!
There is no PasswordEncoder mapped for the id “null”
9、原因,我们要将前端传过来的密码进行某种方式加密,否则就无法登录,修改代码
//定义认证规则
@Override
protected void configure(AuthenticationManagerBuilder auth) throws Exception {
    //在内存中定义,也可以在jdbc中去拿....
    //Spring security 5.0中新增了多种加密方式,也改变了密码的格式。
    //要想我们的项目还能够正常登陆,需要修改一下configure中的代码。我们要将前端传过来的密码进行某种方式加密
    //spring security 官方推荐的是使用bcrypt加密方式。

    auth.inMemoryAuthentication().passwordEncoder(new BCryptPasswordEncoder())
            .withUser("kuangshen").password(new BCryptPasswordEncoder().encode("123456")).roles("vip2","vip3")
            .and()
            .withUser("root").password(new BCryptPasswordEncoder().encode("123456")).roles("vip1","vip2","vip3")
            .and()
            .withUser("guest").password(new BCryptPasswordEncoder().encode("123456")).roles("vip1","vip2");
}
10、测试,发现,登录成功,并且每个角色只能访问自己认证下的规则!搞定

5.注销和权限控制
1、开启自动配置的注销的功能
//定制请求的授权规则
@Override
protected void configure(HttpSecurity http) throws Exception {
    //....
    //开启自动配置的注销的功能
       // /logout 注销请求
    http.logout();
}
2、我们在前端,增加一个注销的按钮,index.html 导航栏中
<a class="item" th:href="@{/logout}">
    <i class="address card icon"></i> 注销
</a>
3、我们可以去测试一下,登录成功后点击注销,发现注销完毕会跳转到登录页面!
4、但是,我们想让他注销成功后,依旧可以跳转到首页,该怎么处理呢?
// .logoutSuccessUrl("/"); 注销成功来到首页
http.logout().logoutSuccessUrl("/");
5、测试,注销完毕后,发现跳转到首页OK
6、我们现在又来一个需求:用户没有登录的时候,导航栏上只显示登录按钮,用户登录之后,导航栏可以显示登录的用户信息及注销按钮!还有就是,比如kuangshen这个用户,它只有 vip2,vip3功能,那么登录则只显示这两个功能,而vip1的功能菜单不显示!这个就是真实的网站情况了!该如何做呢?
我们需要结合thymeleaf中的一些功能
sec:authorize="isAuthenticated()":是否认证登录!来显示不同的页面
Maven依赖:
<!-- https://mvnrepository.com/artifact/org.thymeleaf.extras/thymeleaf-extras-springsecurity4 -->
<dependency>
    <groupId>org.thymeleaf.extras</groupId>
    <artifactId>thymeleaf-extras-springsecurity5</artifactId>
    <version>3.0.4.RELEASE</version>
</dependency>
7、修改我们的 前端页面
导入命名空间
xmlns:sec="http://www.thymeleaf.org/thymeleaf-extras-springsecurity5"
修改导航栏,增加认证判断
<!--登录注销-->
<div class="right menu">

    <!--如果未登录-->
    <div sec:authorize="!isAuthenticated()">
        <a class="item" th:href="@{/login}">
            <i class="address card icon"></i> 登录
        </a>
    </div>

    <!--如果已登录-->
    <div sec:authorize="isAuthenticated()">
        <a class="item">
            <i class="address card icon"></i>
            用户名:<span sec:authentication="principal.username"></span>
            角色:<span sec:authentication="principal.authorities"></span>
        </a>
    </div>

    <div sec:authorize="isAuthenticated()">
        <a class="item" th:href="@{/logout}">
            <i class="address card icon"></i> 注销
        </a>
    </div>
</div>
8、重启测试,我们可以登录试试看,登录成功后确实,显示了我们想要的页面;
9、如果注销404了,就是因为它默认防止csrf跨站请求伪造,因为会产生安全问题,我们可以将请求改为post表单提交,或者在spring security中关闭csrf功能;我们试试:在 配置中增加 http.csrf().disable();
http.csrf().disable();//关闭csrf功能:跨站请求伪造,默认只能通过post方式提交logout请求
http.logout().logoutSuccessUrl("/");
10、我们继续将下面的角色功能块认证完成!
<!-- sec:authorize="hasRole('vip1')" -->
<div class="column" sec:authorize="hasRole('vip1')">
    <div class="ui raised segment">
        <div class="ui">
            <div class="content">
                <h5 class="content">Level 1</h5>
                <hr>
                <div><a th:href="@{/level1/1}"><i class="bullhorn icon"></i> Level-1-1</a></div>
                <div><a th:href="@{/level1/2}"><i class="bullhorn icon"></i> Level-1-2</a></div>
                <div><a th:href="@{/level1/3}"><i class="bullhorn icon"></i> Level-1-3</a></div>
            </div>
        </div>
    </div>
</div>
<div class="column" sec:authorize="hasRole('vip2')">
    <div class="ui raised segment">
        <div class="ui">
            <div class="content">
                <h5 class="content">Level 2</h5>
                <hr>
                <div><a th:href="@{/level2/1}"><i class="bullhorn icon"></i> Level-2-1</a></div>
                <div><a th:href="@{/level2/2}"><i class="bullhorn icon"></i> Level-2-2</a></div>
                <div><a th:href="@{/level2/3}"><i class="bullhorn icon"></i> Level-2-3</a></div>
            </div>
        </div>
    </div>
</div>
<div class="column" sec:authorize="hasRole('vip3')">
    <div class="ui raised segment">
        <div class="ui">
            <div class="content">
                <h5 class="content">Level 3</h5>
                <hr>
                <div><a th:href="@{/level3/1}"><i class="bullhorn icon"></i> Level-3-1</a></div>
                <div><a th:href="@{/level3/2}"><i class="bullhorn icon"></i> Level-3-2</a></div>
                <div><a th:href="@{/level3/3}"><i class="bullhorn icon"></i> Level-3-3</a></div>
            </div>
        </div>
    </div>
</div>
11、测试一下!
6.记住我
现在的情况,我们只要登录之后,关闭浏览器,再登录,就会让我们重新登录,但是很多网站的情况,就是有一个记住密码的功能,这个该如何实现呢?很简单
1、开启记住我功能
//定制请求的授权规则
@Override
protected void configure(HttpSecurity http) throws Exception {
    //。。。。。。。。。。。
    //记住我
    http.rememberMe();
}
2、我们再次启动项目测试一下,发现登录页多了一个记住我功能,我们登录之后关闭 浏览器,然后重新打开浏览器访问,发现用户依旧存在!
思考:如何实现的呢?其实非常简单
我们可以查看浏览器的cookie
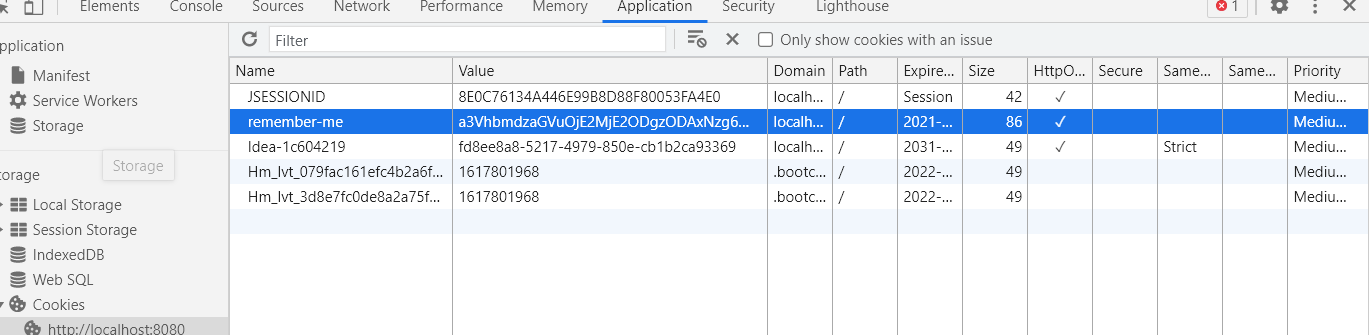
3、我们点击注销的时候,可以发现,spring security 帮我们自动删除了这个 cookie
4、结论:登录成功后,将cookie发送给浏览器保存,以后登录带上这个cookie,只要通过检查就可以免登录了。如果点击注销,则会删除这个cookie,具体的原理我们在JavaWeb阶段都讲过了,这里就不在多说了!
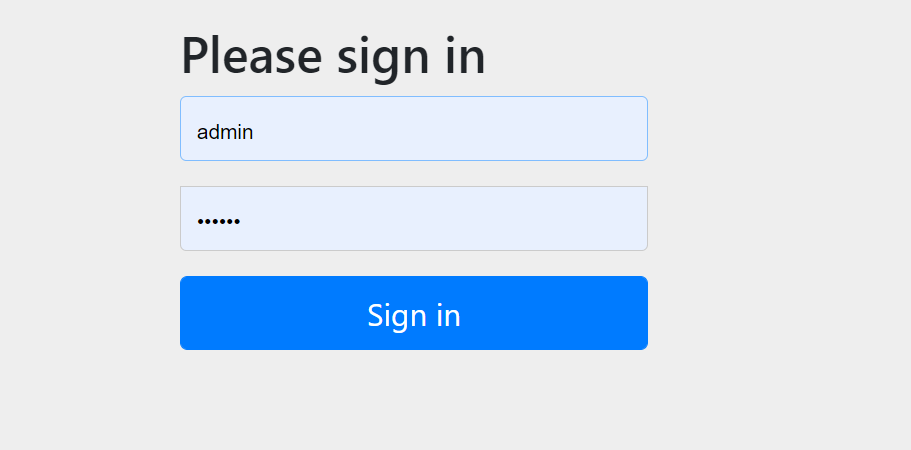
7.定制登录页
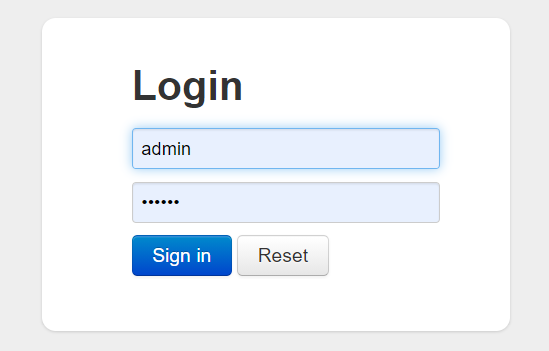
现在这个登录页面都是spring security 默认的,怎么样可以使用我们自己写的Login界面呢?
1、在刚才的登录页配置后面指定 loginpage
http.formLogin().loginPage("/toLogin");
2、然后前端也需要指向我们自己定义的 login请求
<a class="item" th:href="@{/toLogin}">
    <i class="address card icon"></i> 登录
</a>
3、我们登录,需要将这些信息发送到哪里,我们也需要配置,login.html 配置提交请求及方式,方式必须为post:
在 loginPage()源码中的注释上有写明:
<form th:action="@{/login}" method="post">
    <div class="field">
        <label>Username</label>
        <div class="ui left icon input">
            <input type="text" placeholder="Username" name="username">
            <i class="user icon"></i>
        </div>
    </div>
    <div class="field">
        <label>Password</label>
        <div class="ui left icon input">
            <input type="password" name="password">
            <i class="lock icon"></i>
        </div>
    </div>
    <input type="submit" class="ui blue submit button"/>
</form>
4、这个请求提交上来,我们还需要验证处理,怎么做呢?我们可以查看formLogin()方法的源码!我们配置接收登录的用户名和密码的参数!
http.formLogin()
    .usernameParameter("username")
    .passwordParameter("password")
    .loginPage("/toLogin")
    .loginProcessingUrl("/login"); // 登陆表单提交请求
5、在登录页增加记住我的多选框
<input type="checkbox" name="remember"> 记住我
6、后端验证处理!
//定制记住我的参数!
http.rememberMe().rememberMeParameter("remember");
7、测试,OK

 浙公网安备 33010602011771号