


Unraid上用docker安装FileBrowser_Authelia_Cloudreve_AList (有图)
转载注明来源: 本文链接 来自osnosn的博客,写于 2025-01-20.
FileBrowser
- 2025-01 记录。fileBrowser-3.31.2.
- 在unraid的APP中搜索 fileBrowser 找到 FileBrowser-PNP, 点击 Install 安装。
- 在容器设置时,点击 "Add another Path,Port,Variable,Label Or Device"
如果不添加这个"变量"的设置,容器修改配置,升级,重启,会导致FileBrowser设置被重置,如,账号密码变为默认。Config Type: Variable Name: database path (随便写) Key: FB_DATABASE (照抄) Value: /db/database.db (照抄) Default Value: /db/database.db (可选) - 可选。为fileBrowser增加一层目录,为了后续nginx反代配置。
在容器设置时,点击 "Add another Path,Port,Variable,Label Or Device"
如果不添加这个"变量"的设置,FileBrowser运行在网站根目录,需要单独占用一个域名/IP,无法与网站其他内容共存。Config Type: Variable Name: BaseURL (随便写) Key: BASEURL (照抄) Value: /fb (照抄)- nginx 反代设置。设置反代之前,记得修改 fileBrowser 账号和密码,否则,开放到外网,账号密码简单就危险啦。
这样你就可以用 https://[nginx运行的域名]/fb/ 访问你的fileBrowser。location /fb/ { # 与 FB_BASEURL 变量相同,末尾加上/; allow all; proxy_redirect off; proxy_http_version 1.1; proxy_set_header Upgrade $http_upgrade; proxy_set_header Connection "upgrade"; proxy_set_header Host $http_host; proxy_cache_bypass $http_upgrade; proxy_set_header X-Real-IP $remote_addr; proxy_set_header X-Forwarded-For $proxy_add_x_forwarded_for; proxy_pass http://192.168.1.10:8080; #no trailing /; #指向filebrowser的 docker; } - 配置的上传目录中,已有文件和目录,在FileBrowser中直接就能看到。
- 对用户上传的空间,系统无限制,可以塞满对应的硬盘。
- 登录界面,不支持"图片验证码",不支持 2FA。要另外配置外挂,甚至需要重新编译。
- 可以设置是否允许用户自行注册账号。账号也可以由管理员手工添加。
- 文件分享链接,可以设置"提取码",过期时间。
- 打开分享链接,里头有个二维码可以扫描。
- 不支持 WEBDAV 协议。
- 主页 https://filebrowser.org/
![]()
![]()
![]()
![]()
- 如果要增加2FA,可以考虑 authelia 或 authentik 或 webauthn_proxy。
- authelia 支持 TOTP, webauthn。
- authentik 不支持 TOTP, 支持 webauthn。
- webauthn 无密码的公钥身份验证机制。


Authelia
使用 authelia需要一个单独的子域名,比如 auth.my.ddns-domain.xx
也可以不要单独子域名,而使用单独的子目录,subpath,见后文。
- 2025-02 记录。
- FileBrowser 升级到 2.32.0
- Authelia 的版本为 v4.38.18 (下文的安装配置)
升级到 Authelia v4.39.3,web页面可以修改用户密码。
修改 fileBrowser 的 auth.method=proxy
- 打开 fileBrowser 容器的 console (容器内执行命令)。
把默认配置文件copy到 db目录,为了下一步的映射。
cp /.filebrowser.json /db/config.json - 修改 filebrowser 的docker配置。(这一节的操作可以跳过,因为没啥用)
- 把默认的json配置文件 .filebrowser.json 映射出来。映射到 config.json 文件
点击 "Add another Path,Port,Variable,Label Or Device"Config Type: Path Name: json file path (随便写) Container Path: /.filebrowser.json (照抄) Host Path: /mnt/user/appdata/filebrowser/db/config.json (照抄) Access Mode: Read/Write 其他项留空。 - 删除之前的 FB_DATABASE, FB_BASEURL 变量的配置。
修改 config.json 文件为{ "port": 80, "baseURL": "/fb", "address": "", "log": "stdout", "database": "./db/database.db", "root": "/srv" } - 到此为止,filebrowser的配置没有变化。filebrowser的表现与之前相同。
- 在config.json 的 "root" 后,加入
重启filebrowser,无效果。"auth" : { "method": "proxy", "header": "X-FB-Username" }
重启filebrowser,都无效果。加入 "auth.method": "proxy", "auth.header": "X-FB-Username" 或加入 "authmethod": "proxy", "authheader": "X-FB-Username" - filebrowser 的 docker配置中,加入变量 FB_AUTH_METHOD: proxy, FB_AUTH_HEADER: X-FB-Username 无效果。
- filebrowser 的 docker配置中,加入变量 FB_AUTHMETHOD: proxy, FB_AUTHHEADER: X-FB-Username 无效果。
- 看来白改了。auth.method 模式只能在 db文件中改。
- 把默认的json配置文件 .filebrowser.json 映射出来。映射到 config.json 文件
- 打开 fileBrowser 容器的 console (容器内执行命令)。
把默认配置文件和执行程序copy到 db目录,为了下一步修改配置。
查看或修改配置的命令,docker运行时无法修改db文件。# 把默认配置copy出来 cp /.filebrowser.json /db/tmp_config.json #如果上面的docker修改都退回去 # cp /db/config.json /db/tmp_config.json #如果上面的docker修改保留 cp /filebrowser /db/ #把filebrowser命令copy出来
比如,docker运行时执行./filebrowser -c tmp_config.json config cat会显示 timeout- Stop 掉 filebrowser的docker
进入unraid的终端。cd /mnt/user/appdata/filebrowser/db vim tmp_config.json #修改这一行 "database": "./database.db" (只需修改一次即可) ./filebrowser -c tmp_config.json config set --auth.method proxy --auth.header X-FB-Username - 启动 docker,发现filebrowser,无法用任何用户登录,
出现提示500 Internal Server Error就正常了。
达到修改目的,认证类型auth.method=proxy。
- Stop 掉 filebrowser的docker
Authelia 安装和配置
-
在unraid 的 APP 中搜索
authelia,显示Repository authelia/authelia,安装。
docker的设置,全部默认,不修改。
装好后,查看 docker的log,发现提示
Configuration did not exist so a default one has been generated at /config/configuration.yml, you will need to configure this
启动失败。正常,因为需要配置。 -
进入unraid的终端,
cd /mnt/user/appdata/Authelia/
缺省的 configuration.yml 太长,改名/备份一下。
重新创建 configuration.yml 文件,如下,(#以及之后的注释,可删可不删)configuration.yml (点击展开)
---
server:
  address: 'tcp://:9091/'    #必须配置项
  #address: 'tcp://:9091/authelia'    #不能/结尾。配置到subpath,见后文
totp:
  issuer: 'auth.my.ddns-domain.xx'  #这个用于显示在TOTP的签发方
webauthn:
  display_name: 'auth.my.ddns-domain.xx'   #这个也是用于显示
identity_validation:
  reset_password:
    jwt_secret: 'secret_123123_先随便打点乱码'    #必须配置项
authentication_backend:
  password_reset:
    disable: true   #禁止在web页面上"重置密码"
  file:
    path: '/config/users_database.yml'    #必须配置项
access_control:
  default_policy: 'deny'
  rules:
    - domain:
      - '192.168.1.2'
      - 'my.ddns-domain.xx'
      resources:       #这些目录,无需登录,为了"分享链接"
        - '^/fb/share/'
        - '^/fb/static/assets/'
        - '^/fb/static/img/'
        - '^/fb/api/public/share/'
        - '^/fb/api/public/dl/'
      policy: 'bypass'      #bypass要在two_factor前面
    - domain:
      - '192.168.1.2'
      - 'my.ddns-domain.xx'        #必须配置项
      policy: 'two_factor'   #如是'one_factor',则不会要求TOTP,webauthn的添加
session:
  secret: 'session_secret_123jfowh_先随便打点乱码'    #必须配置项
  cookies:
    -
      domain: '192.168.1.2'
      authelia_url: 'https://192.168.1.2:9091'
    -
      domain: 'my.ddns-domain.xx'  #cookie域,有填写限制。见下面的说明(不允许使用的域)
      authelia_url: 'https://auth.my.ddns-domain.xx:8443'
      #authelia_url: 'https://my.ddns-domain.xx:8443/authelia'   #配置到subpath,见后文
      default_redirection_url: 'https://my.ddns-domain.xx:8443/fb/'
      inactivity: '15m'    #改成15分钟
  name: 'authelia_session'
  inactivity: '15m'       #默认5m太短,改成15分钟
storage:
  encryption_key: 'random_string_of_more_than_twenty_chars_123fjssdl_先随便打点乱码'
  local:
    path: '/config/db.sqlite3'      #必须配置项
notifier:
  filesystem:
    filename: '/config/notification.txt'    #必须配置项
...
启动authelia,发现又失败,说是 users_database.yml 没有,但它创建了一个默认的。里头有个用户 authelia/authelia
再次启动authelia,成功。
用浏览器访问,http://192.168.1.2:9091 能访问authelia。
尝试登录,如果失败有提示,如果成功没反应。
docker启动成功后,logs 可以看到 authelia 的版本为 v4.38.18。
说明:【不允许使用的域(公共后缀列表Public Suffix List)】 -
修改authelia的配置,账号。
在 authelia 的 Console 中 (容器内执行命令),authelia crypto rand --length 32生成随机字串,用于配置 configuration.yml。- 注意,修改了
storage: encryption_key: xxxxxx之后,
要执行authelia storage encryption change-key --config /config/configuration.yml --new-encryption-key xxxxxxx更新db数据库中的数据,否则就要删除数据库重建。
- 注意,修改了
authelia crypto hash generate --password 'my-password'生成用户密码,用于修改 users_database.yml。- 记得创建一个与 fileBrowser管理员 同名的账号。
- authelia 用户和密码的管理,是在后台手工修改users_database.yml文件完成的。
- 用户的 2FA管理,是在后台通过命令管理的。【authelia storage user totp -h】
- authelia本身的管理员,目前版本4.38基本没什么特别的权限,也不能管理用户。也许以后的版本会有更多权限。
- 重启 authelia的 docker容器 生效。
nginx 反向代理,配置的准备工作。
-
authelia 需要用到的 nginx 的配置段/配置文件,如下,
#常用的有 3个,这里只需要用到常用的 3个文件
  proxy.conf
  authelia-location.conf
  authelia-authrequest.conf
#不常用的有另外 5个
  websocket.conf
  authelia-location-basic.conf
  authelia-authrequest-basic.conf
  authelia-location-detect.conf
  authelia-authrequest-detect.conf
常用的 3个文件,贴在这里。
-
proxy.conf (点击展开)
做了点小改动,去掉了两行 set_real_ip_from 关于 192 和 fc00 的注释,请根据自己的内网IP修改。## Headers proxy_set_header Host $host; proxy_set_header X-Original-URL $scheme://$http_host$request_uri; proxy_set_header X-Forwarded-Proto $scheme; proxy_set_header X-Forwarded-Host $http_host; proxy_set_header X-Forwarded-URI $request_uri; proxy_set_header X-Forwarded-Ssl on; proxy_set_header X-Forwarded-For $remote_addr; proxy_set_header X-Real-IP $remote_addr; ## Basic Proxy Configuration client_body_buffer_size 128k; proxy_next_upstream error timeout invalid_header http_500 http_502 http_503; ## Timeout if the real server is dead. proxy_redirect http:// $scheme://; proxy_http_version 1.1; proxy_cache_bypass $cookie_session; proxy_no_cache $cookie_session; proxy_buffers 64 256k; ## Trusted Proxies Configuration ## Please read the following documentation before configuring this: ## https://www.authelia.com/integration/proxies/nginx/#trusted-proxies # set_real_ip_from 10.0.0.0/8; # set_real_ip_from 172.16.0.0/12; set_real_ip_from 192.168.0.0/16; set_real_ip_from fc00::/7; real_ip_header X-Forwarded-For; real_ip_recursive on; ## Advanced Proxy Configuration send_timeout 5m; proxy_read_timeout 360; proxy_send_timeout 360; proxy_connect_timeout 360; -
authelia-location.conf (点击展开)(需要改第一行)
需要修改第一行的 IP和端口,192.168.1.2:9091,指向authelia的docker,根据自己的情况修改。set $upstream_authelia http://192.168.1.2:9091/api/authz/auth-request; #指向authelia的docker ## Virtual endpoint created by nginx to forward auth requests. location /internal/authelia/authz { ## Essential Proxy Configuration internal; proxy_pass $upstream_authelia; ## Headers ## The headers starting with X-* are required. proxy_set_header X-Original-Method $request_method; proxy_set_header X-Original-URL $scheme://$http_host$request_uri; proxy_set_header X-Forwarded-For $remote_addr; proxy_set_header Content-Length ""; proxy_set_header Connection ""; ## Basic Proxy Configuration proxy_pass_request_body off; proxy_next_upstream error timeout invalid_header http_500 http_502 http_503; # Timeout if the real server is dead proxy_redirect http:// $scheme://; proxy_http_version 1.1; proxy_cache_bypass $cookie_session; proxy_no_cache $cookie_session; proxy_buffers 4 32k; client_body_buffer_size 128k; ## Advanced Proxy Configuration send_timeout 5m; proxy_read_timeout 240; proxy_send_timeout 240; proxy_connect_timeout 240; } -
authelia-authrequest.conf (点击展开)
## Send a subrequest to Authelia to verify if the user is authenticated and has permission to access the resource.
auth_request /internal/authelia/authz;

## Save the upstream metadata response headers from Authelia to variables.
auth_request_set $user $upstream_http_remote_user;
auth_request_set $groups $upstream_http_remote_groups;
auth_request_set $name $upstream_http_remote_name;
auth_request_set $email $upstream_http_remote_email;

## Inject the metadata response headers from the variables into the request made to the backend.
proxy_set_header Remote-User $user;
proxy_set_header Remote-Groups $groups;
proxy_set_header Remote-Email $email;
proxy_set_header Remote-Name $name;

## Configure the redirection when the authz failure occurs. Lines starting with 'Modern Method' and 'Legacy Method'
## should be commented / uncommented as pairs. The modern method uses the session cookies configuration's authelia_url
## value to determine the redirection URL here. It's much simpler and compatible with the mutli-cookie domain easily.

## Modern Method: Set the $redirection_url to the Location header of the response to the Authz endpoint.
auth_request_set $redirection_url $upstream_http_location;

## Modern Method: When there is a 401 response code from the authz endpoint redirect to the $redirection_url.
error_page 401 =302 $redirection_url;

## Legacy Method: Set $target_url to the original requested URL.
## This requires http_set_misc module, replace 'set_escape_uri' with 'set' if you don't have this module.
# set_escape_uri $target_url $scheme://$http_host$request_uri;

## Legacy Method: When there is a 401 response code from the authz endpoint redirect to the portal with the 'rd'
## URL parameter set to $target_url. This requires users update 'auth.dedyn.xx/' with their external authelia URL.
# error_page 401 =302 https://auth.dedyn.xx/?rd=$target_url;
总共 8个文件,都可以在官网的文档中获取(复制/粘贴),【Authelia/Integration/Proxies/Nginx】
-
登录验证节点的 nginx 反向代理配置
authelia 需要占用一个域名。也可以把 authelia配置在子目录中,subpath,见后文。
- 对应 auth.my.ddns-domain.xx 的 nginx的反代配置,
以下是把 authelia配置在一个单独的子域名中。
首先对 auth.my.ddns-domain.xx 域名配置好 https,
访问 "https://auth.my.ddns-domain.xx:8443/" 显示正常。location / { allow all; proxy_pass http://192.168.1.2:9091; #指向authelia的docker include authelia/proxy.conf; }
可以登录,登录失败,有提示。
登录成功,可以管理二次验证的设备,添加设备会发邮件,实际是写在 notification.txt,
在unraid的终端,查看/mnt/user/appdata/Authelia/notification.txt就能看到邮件验证码。
可以成功添加 TOTP,也能添加 webauthn的密钥认证。
authelia无论是重置密码,删除TOTP,添加TOTP,删除/添加webauthn,都会显示发送了邮件,发到了notification.txt 中。
且,notification.txt 中,只保留了最后一封邮件,之前的丢弃了。记得要及时看。
所以,如果是多用户,高负荷使用,还是配置好email的发送功能吧。
应用系统节点的 nginx 反向代理配置
- 对应 my.ddns-domain.xx 应用系统的 nginx的反代配置,以下是针对 FileBrowser。
authelia-authrequest.conf 中Remote-User Remote-Name对应的$user $name变量的含义,见【Trusted Header SSO】。
修改 fileBrowser的nginx配置,如下,
authelia的登录用户,如果fileBrowser中有同名账号,则以此账号登录。include authelia/authelia-location.conf; #对于同一个域名网站的配置,此行只配置一次 location /fb/ { allow all; include authelia/proxy.conf; include authelia/authelia-authrequest.conf; #里头有 $user变量 proxy_set_header Upgrade $http_upgrade; proxy_set_header Connection "upgrade"; proxy_set_header X-FB-Username $user; #filebrowser设置的auth.header值 proxy_pass http://192.168.1.10:8080; #no trailing /; #指向filebrowser的 docker; }
如果fileBrowser没有同名账号,就自动创建一个普通用户。
fileBrowser的管理员,需要之前已经创建的管理员账号。是不是authelia的管理员无所谓。
登录成功,跳转到fileBrowser后,页面没有"退出登录"的指示,只能手工访问"auth.my.ddns-domain.xx"才能退出登录。 - 到此,Authelia 加 FileBrowser 的配置完成。
其他的反代
- 如果使用 NPM(Nginx Proxy Manager)管理,原理一样。
先准备好和上面一样的 3个nginx的配置文件,放在npm可以访问到的地方。
然后分别配置 auth.my.ddns-domain.xx 和 my.ddns-domain.xx 把对应的配置写在,
Edit Proxy Host->Advanced->Custom Nginx Configuration
见官方文档【Integration/Proxies/NGINX Proxy Manager】。 - 如果用 Caddy,见官方文档【Integration/Proxies/Caddy】。
登录验证节点可以配置到子目录
- 配置到最后,才发现,authelia 登录验证节点,可以配置在子目录中(subpath,subfolder),
configuration.yml中server: address: 'tcp://:9091/authelia' #不能用'/'结尾就能实现。
【官网文档 address】说,这样authelia会同时运行在/and/authelia/path.
docker 的 Logs中也显示,同时运行在 '/' 和 '/authelia'。
配置 my.ddns-domain.xx 的 nginx的反代,
访问 "https://my.ddns-domain.xx:8443/authelia/" 显示正常,也能登录。location /authelia/ { #用/结尾 allow all; proxy_pass http://192.168.1.2:9091/authelia/; #用/结尾; #指向authelia的docker include authelia/proxy.conf; }
与访问 "https://auth.my.ddns-domain.xx:8443/" 一样。
到此,两个登录入口,都可以登录跳转到 FileBrowser。
Cloudreve
- 2025-01 记录。 Cloudreve-3.5.1.
- 在unraid的APP中搜索 Cloudreve, 点击 Install 安装。
- 在容器设置时,无需添加什么其他设置。
- 启动容器,点击 "Console" (容器内执行命令),进入容器,修改 /config/conf.ini 文件。
添加两行,
如果不添加这两行,容器修改配置,升级,重启,会导致Cloudreve设置被重置,如,账号密码被重置。[Database] DBFile = /cloudreve/db/cloudreve.db - 重启 restart 容器。
- Cloudreve 只能运行在网站的根目录。不能加一层目录。
所以nginx反代,只能使用独立域名,或独立端口。nginx的反代配置,官网的说明中有。
cloudreve感觉不合适我的使用场景,所以没有配nginx反代。 - Cloudreve 基于 DBMS 构建了一层文件系统抽象,将用户文件和物理文件结构隔离。
对于某个目录<源目录>中,已有文件和目录,需要管理员,对每用户/每目录,创建一个"导入"任务。 才能在Cloudreve看到。
每个导入任务,是一次性的。如果<源目录>中文件变化,需要再次创建导入任务。
导入任务只会导入新增的文件,源目录中被删除的,不会同步到Cloudreve。被改名的文件,按新增文件导入处理。 - 在Cloudreve中上传的文件/目录,实际会存放在"上传目录",按用户UID分别存放。
比如 UID=2 的用户上传了 tt/abc.txt,则存放在 <上传目录>/2/tt/abc.txt - 对用户上传的空间,系统默认限制1G,可以修改。
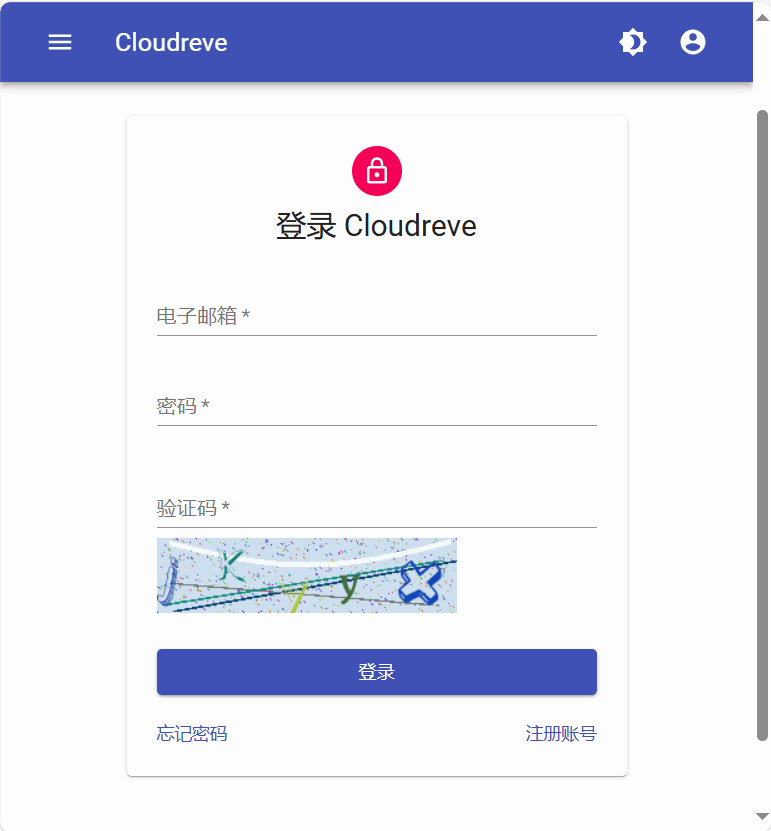
- 登录界面,支持"图片验证码",支持 2FA。默认没有,需要在系统中设置。
图片验证码由管理员决定,是否统一开启。
每个用户可以自行选择是否开启 2FA。登录时,输完密码提交后,下一个页面才问 2FA密码。
用户开启2FA后,管理员重置密码也不能取消其他用户的2FA,只能由用户登录后,自行关闭2FA,关闭时需要2FA密码验证。
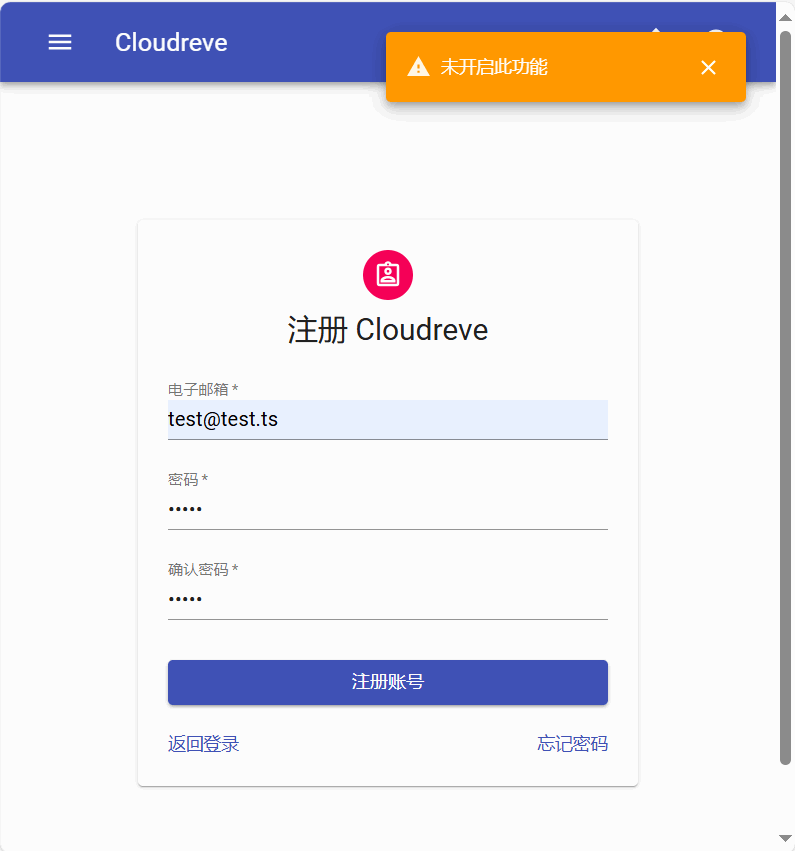
如果用户丢失2FA,似乎只能由管理员删除账号再重建账号(没测试)。 - 可以设置是否允许用户自行注册账号。账号也可以由管理员手工添加。
修改/创建的账号名,必须是email格式,即,包含@,且@之后有一个点。否则无法登录。 - 如果系统无法发送邮件,或者用户email不存在,则无法使用"密码找回"功能。只能由管理员重置密码。
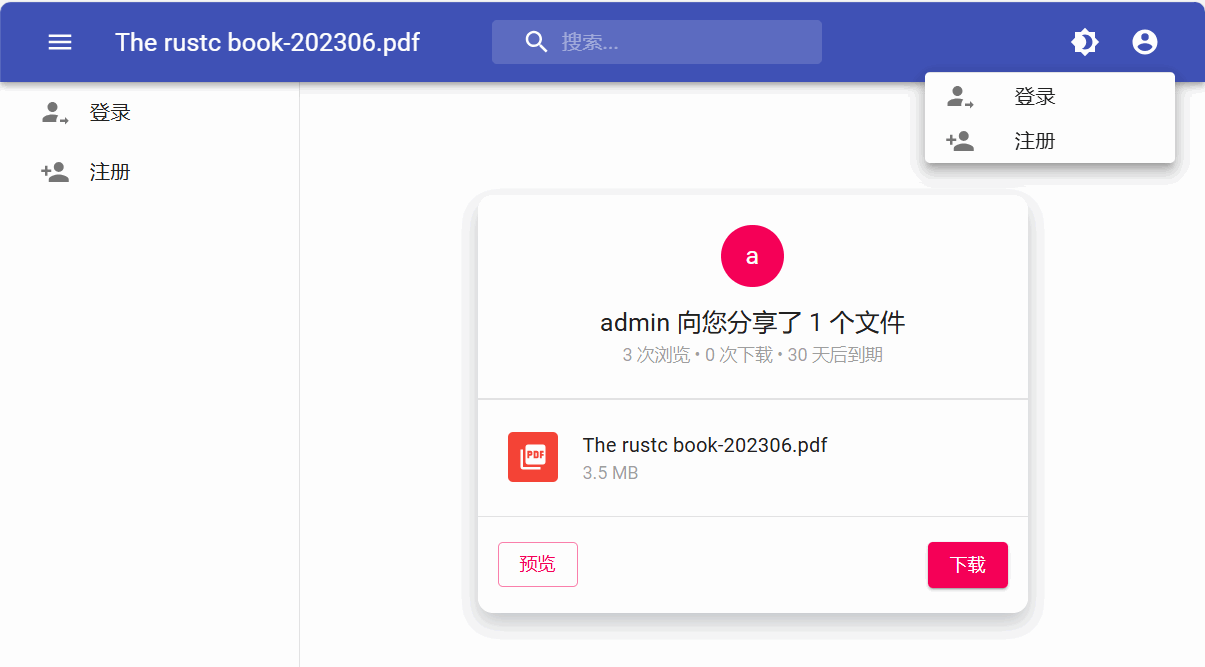
- 文件分享链接,可以设置"提取码",过期时间和下载次数。
- 打开分享链接,没有二维码显示。
- 支持 WEBDAV 协议。
- 支持 API 访问,支持主从同步。
- 默认上传的文件,存入硬盘时,会自动改名(自动加上唯一前缀串),可以通过设置禁用此特性。
- 支持挂载部分云盘。七牛,OSS,OneDrive。。。
- 有个"pro捐助版",多出的功能在他的主页有写。
- 主页 https://cloudreve.org/
![]()
![]()
![]()
![]()

AList
- 2025-01 记录。
- 支持更多的云盘。
- 支持 WEBDAV。
- 目前不支持 文件分享链接。所以,我没有尝试安装。
- 主页 https://alist.nn.ci/zh/
- 项目地址:https://github.com/alist-org/alist/blob/main/README_cn.md
----end----
转载注明来源: 本文链接 https://www.cnblogs.com/osnosn/p/18682668.html
来自 osnosn的博客 https://www.cnblogs.com/osnosn/ .

 浙公网安备 33010602011771号