
(筆記) 如何設計計數器? (SOC) (Verilog) (MegaCore)
Abstract
計數器是循序電路最基本的應用,將來可以用此設計除頻器。
Introduction
使用環境:Quartus II 7.2 SP3 + ModelSim-Altera 6.1g
Method 1:
使用Verilog
counter10.v / Verilog
2 (C) OOMusou 2008 http://oomusou.cnblogs.com
3
4 Filename : counter10.v
5 Compiler : Quartus II 7.2 SP3 + ModelSim-Altera 6.1g
6 Description : Demo how to write synchronous decimal counter
7 Release : 07/13/2008 1.0
8 */
9
10 module counter10 (
11 input clk,
12 input clr,
13 input load,
14 input en,
15 input [3:0] data,
16 output reg [3:0] q,
17 output reg cout
18 );
19
20 always@(posedge clk) begin
21 if (clr == 1'b1)
22 q <= 0;
23 else if (load == 1'b1)
24 q <= data;
25 else if (en == 1'b1) begin
26 if (q == 9)
27 q <= 0;
28 else
29 q <= q + 1;
30 end
31 end
32
33 always@(q) begin
34 if (q == 9)
35 cout = 1;
36 else
37 cout = 0;
38 end
39
40 endmodule
Method 2:
使用Megafunction
counter10_mf.v / Verilog
2 (C) OOMusou 2008 http://oomusou.cnblogs.com
3
4 Filename : counter10_mf.v
5 Compiler : Quartus II 7.2 SP3 + ModelSim-Altera 6.1g
6 Description : Demo how to write synchronous decimal counter by lpm_counter
7 Release : 07/13/2008 1.0
8 */
9 module counter10_mf (
10 input clk,
11 input clr,
12 input load,
13 input en,
14 input [3:0] data,
15 output [3:0] q,
16 output cout
17 );
18
19 wire [9:0] eq;
20
21 lpm_counter # (
22 .lpm_width(4),
23 .lpm_direction("UP"),
24 .lpm_modulus(10))
25 u0 (
26 .clock(clk),
27 .data(data),
28 .sload(load),
29 .sclr(clr),
30 .cnt_en(en),
31 .q(q),
32 .eq(eq)
33 );
34
35 assign cout = eq[9];
36
37 endmodule
testbench
counter10_tb.v / Verilog
2 (C) OOMusou 2008 http://oomusou.cnblogs.com
3
4 Filename : counter10.v
5 Compiler : Quartus II 7.2 SP3 + ModelSim-Altera 6.1g
6 Description : Demo how to write synchronous decimal counter testbench
7 Release : 07/13/2008 1.0
8 */
9
10 `timescale 1ns/10ps
11 module counter10_tb;
12 reg clk;
13 reg clr;
14 reg load;
15 reg en;
16 reg [3:0] data;
17
18 wire [3:0] q;
19 wire cout;
20
21 counter10_mf u0 (
22 .clk(clk),
23 .clr(clr),
24 .load(load),
25 .en(en),
26 .data(data),
27 .q(q),
28 .cout(cout)
29 );
30
31 initial begin
32 clk = 0;
33 clr = 0;
34 load = 1;
35 en = 1;
36 data = 4'b0101;
37 end
38
39 always #50 clk = ~clk;
40
41 initial #100 load = 1'b0;
42 initial #400 load = 1'b1;
43 initial #500 load = 1'b0;
44 initial #300 clr = 1'b1;
45 initial #400 clr = 1'b0;
46 initial #1900 en = 1'b0;
47
48 endmodule
執行結果
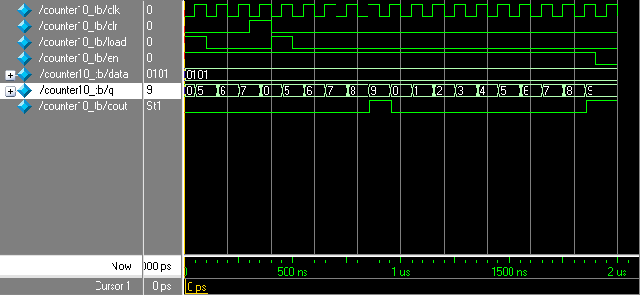
Method 1用的是很正規的寫法,第一個always用的是循序電路,第二個always用的是組合電路,也是很好的coding style,這樣寫不僅清楚的代表實際的電路,也幫助合成器合出更好的電路,或許你會想將兩個always合成一個來寫,讓程式看起來更精簡。
counter10_2.v / Verilog (錯的寫法)
2 (C) OOMusou 2008 http://oomusou.cnblogs.com
3
4 Filename : counter10_2.v
5 Compiler : Quartus II 7.2 SP3 + ModelSim-Altera 6.1g
6 Description : Demo how to write synchronous decimal counter
7 Release : 07/13/2008 1.0
8 */
9
10 module counter10_2 (
11 input clk,
12 input clr,
13 input load,
14 input en,
15 input [3:0] data,
16 output reg [3:0] q,
17 output reg cout
18 );
19
20 always@(posedge clk) begin
21 if (clr == 1'b1)
22 q <= 0;
23 else if (load == 1'b1)
24 q <= data;
25 else if (en == 1'b1) begin
26 if (q == 9) begin
27 q <= 0;
28 cout <= 1;
29 end
30 else begin
31 q <= q + 1;
32 cout <= 0;
33 end
34 end
35 end
36
37 endmodule
乍看之下都很完美吧,但一模擬之後,發現cout會慢一個clock出現!!

為什麼會這樣呢?這實際上這是Verilog初學者常犯的錯,我也深受其害,哈,我們來看一下26行最關鍵的幾行程式碼
q <= 0;
cout <= 1;
end
else begin
q <= q + 1;
cout <= 0;
end
若以邏輯的角度來看,非常完美,當q == 9時,q再度變成0,且cout <= 1,完全合乎我們的『演算法』!!
但在循序電路內,就有兩個要考慮:
1.使用的是non-blocking,所以q <= 0和cout <= 1一起執行。
2.因為是循序電路,所以q <= 0和 cout <= 1並不會馬上有結果,必須等到下一個clock才出現。
所以在ModelSim的模擬,我們看到『q等於0和cout等於1』同時在下一個clock時出現,所以若要cout『馬上』等於1,就不能用循序電路,而要改用組合電路,這樣就會『馬上』等於1,所以用另外一個always block來表示這個組合電路的結果才正確。
Conclusion
這個小例子,再次證明Verilog只是語法跟C靠攏,但觀念卻是硬體電路的概念,所以Verilog的優點是讓你不用再花時間去學習一個新的語言(如VHDL),但缺點是很容易用C的思維去寫Verilog而不自知,因為code實在太像了!!記得大學時,教授曾說:『C太厲害的Verilog會學不好!!』,現在深切領悟,哈~~。
See Also
(原創) 如何設計除頻器? (SOC) (Verilog) (MegaCore)
(原創) 哪一個計數器才會出現9呢? (SOC) (Verilog)
(原創) 如何設計電子鐘? (SOC) (Verilog) (DE2)
(原創) 如何設計電子鐘(II)? (SOC) (Verilog) (MegaCore) (DE2)
Reference
陸自強 2007,數位系統實習 Quartus II,儒林圖書公司


