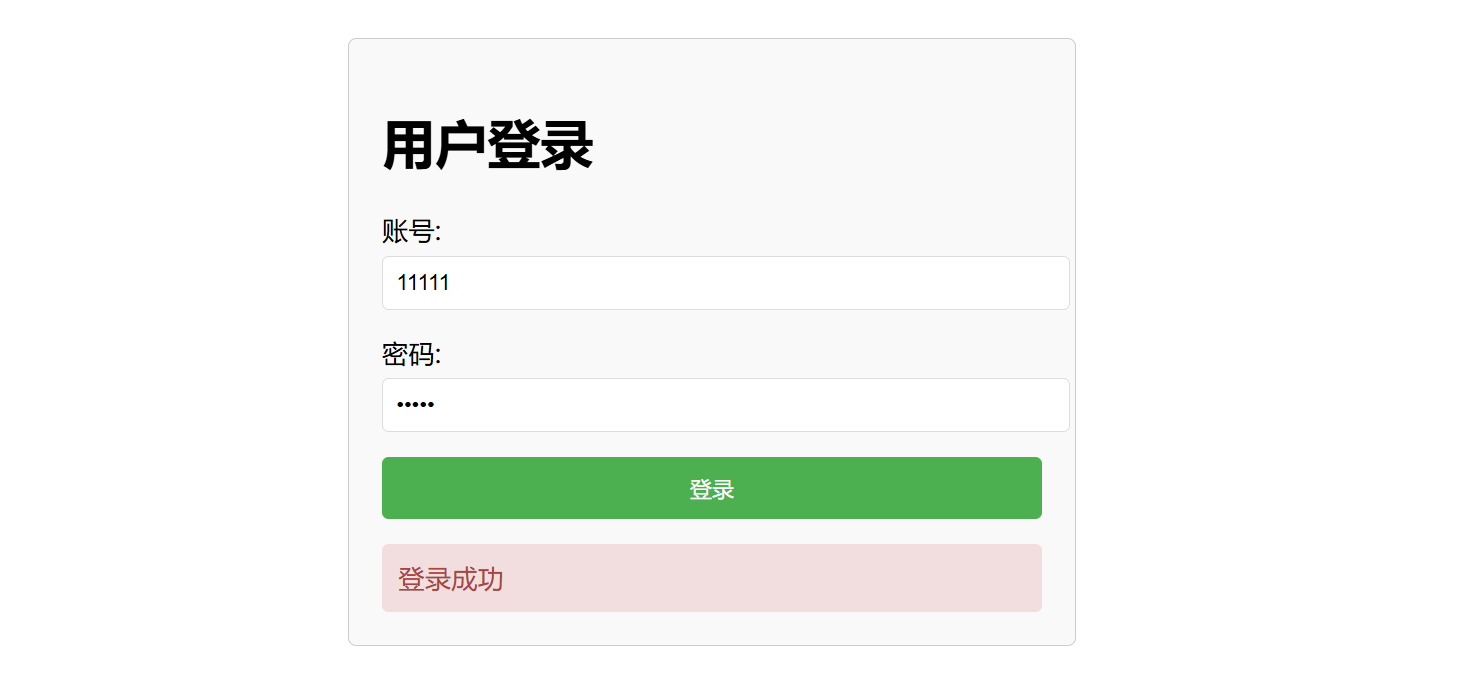
初次使用Spring boot3+vue3前后端分离的实现
这是我第一次尝试使用前后端分离的spring boot+vue实现简单项目,除去我安装各种插件,依赖,配置环境变量的时间,我学习并制作了大概2到3小时。这只是初次的尝试,我之后会将其运用在我的其他项目里。
后端:
com/example/demo/comtroller/AuthController.java:
package com.example.demo.controller;

import com.example.demo.entity.User;
import com.example.demo.repository.UserRepository;
import org.springframework.beans.factory.annotation.Autowired;
import org.springframework.http.ResponseEntity;
import org.springframework.web.bind.annotation.*;

@RestController
@RequestMapping("/api")
public class AuthController {
    @Autowired
    private UserRepository userRepository;

    @PostMapping("/login")
    public ResponseEntity<String> login(@RequestBody User loginUser) {
        System.out.println("收到登录请求: " + loginUser.getAccount() + ", " + loginUser.getPassword());

        User user = userRepository.findByAccount(loginUser.getAccount());
        if (user != null) {
            System.out.println("数据库用户: " + user.getAccount() + ", " + user.getPassword());
        }

        if (user != null && loginUser.getPassword().equals(user.getPassword())) {
            return ResponseEntity.ok("登录成功");
        }
        return ResponseEntity.status(401).body("账号或密码错误");
    }
}
com/example/demo/entity/User.java:
package com.example.demo.entity;

import jakarta.persistence.*;

@Entity
@Table(name = "user")
public class User {
    @Id
    @GeneratedValue(strategy = GenerationType.IDENTITY)
    private int id;

    @Column(unique = true, nullable = false)
    private String account;

    @Column(nullable = false)
    private String password;

    public int getId() { return id; }
    public void setId(int id) { this.id = id; }
    public String getAccount() { return account; }
    public void setAccount(String account) { this.account = account; }
    public String getPassword() { return password; }
    public void setPassword(String password) { this.password = password; }
}
com/example/demo/repository/UserRepository.java:
package com.example.demo.repository;

import org.springframework.data.jpa.repository.JpaRepository;
import com.example.demo.entity.User;

public interface UserRepository extends JpaRepository<User, Integer> {
    User findByAccount(String account);
}
com/example/demo/DemoApplication.java:
package com.example.demo;

import org.springframework.boot.SpringApplication;
import org.springframework.boot.autoconfigure.SpringBootApplication;
import org.springframework.context.annotation.Bean;
import org.springframework.web.servlet.config.annotation.CorsRegistry;
import org.springframework.web.servlet.config.annotation.WebMvcConfigurer;

@SpringBootApplication
public class DemoApplication {

    public static void main(String[] args) {
        SpringApplication.run(DemoApplication.class, args);
    }

    // 添加跨域支持
    @Bean
    public WebMvcConfigurer corsConfigurer() {
        return new WebMvcConfigurer() {
            @Override
            public void addCorsMappings(CorsRegistry registry) {
                registry.addMapping("/**")
                    .allowedOrigins("http://localhost:8081") // Vue 开发服务器地址
                    .allowedMethods("*")
                    .allowedHeaders("*");
            }
        };
    }
}
resources/application.properties:
spring.datasource.url=jdbc:mysql://localhost:3306/test1?useSSL=false&serverTimezone=UTC
spring.datasource.username=root
spring.datasource.password=222735

spring.jpa.hibernate.ddl-auto=update
spring.jpa.show-sql=true

server.port=8080
前端:
src/main.js:
import { createApp } from 'vue'
import App from './App.vue'

createApp(App).mount('#app')
src/APP.vue:
<template>
  <LoginView />
</template>

<script>
import LoginView from './views/LoginView.vue';

export default {
  components: {
    LoginView
  }
}
</script>
src/views/LoginView.vue:
<template>
  <div class="login-container">
    <h1>用户登录</h1>
    <div class="form-group">
      <label>账号:</label>
      <input type="text" v-model="account" placeholder="输入账号">
    </div>
    <div class="form-group">
      <label>密码:</label>
      <input type="password" v-model="password" placeholder="输入密码">
    </div>
    <button @click="login">登录</button>
    <div v-if="message" class="message">{{ message }}</div>
  </div>
</template>

<script>
export default {
  data() {
    return {
      account: '',
      password: '',
      message: ''
    };
  },
  methods: {
    async login() {
      if (!this.account || !this.password) {
        this.message = '请输入账号和密码';
        return;
      }

      try {
        const response = await fetch('http://localhost:8080/api/login', {
          method: 'POST',
          headers: {
            'Content-Type': 'application/json'
          },
          body: JSON.stringify({
            account: this.account,
            password: this.password
          })
        });

        if (response.ok) {
          this.message = await response.text();
        } else {
          this.message = await response.text();
        }
      } catch (error) {
        this.message = '登录失败:服务器错误';
      }
    }
  }
};
</script>

<style>
.login-container {
  max-width: 400px;
  margin: 50px auto;
  padding: 20px;
  border: 1px solid #ccc;
  border-radius: 5px;
  background-color: #f9f9f9;
}

.form-group {
  margin-bottom: 15px;
}

label {
  display: block;
  margin-bottom: 5px;
}

input {
  width: 100%;
  padding: 8px;
  border: 1px solid #ddd;
  border-radius: 4px;
}

button {
  width: 100%;
  padding: 10px;
  background-color: #4CAF50;
  color: white;
  border: none;
  border-radius: 4px;
  cursor: pointer;
}

button:hover {
  background-color: #45a049;
}

.message {
  margin-top: 15px;
  padding: 10px;
  border-radius: 4px;
  background-color: #f2dede;
  color: #a94442;
}
</style>
成功的画面:


 浙公网安备 33010602011771号