
# 第12章 消息推送与内容审核
今日内容介绍
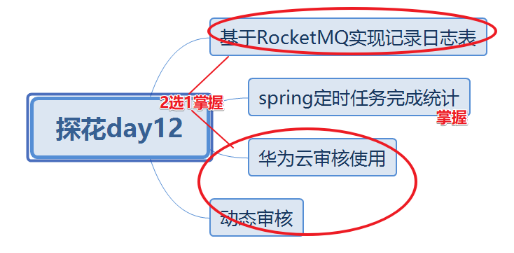
学习目标
- 基于RocketMQ实现消息推送
- 定时任务完成定时统计
- 华为云内容审核
1. 基于RocketMQ实现记录日志表
【目标】
掌握RocketMQ实现消息推送
【路径】
1:APP端操作记录分析
2:生产者环境搭建
3:消费者环境搭建
【讲解】
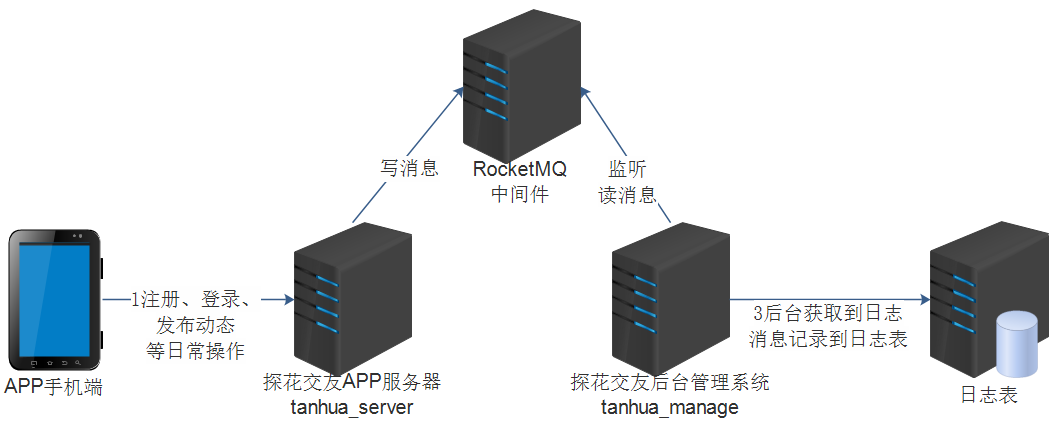
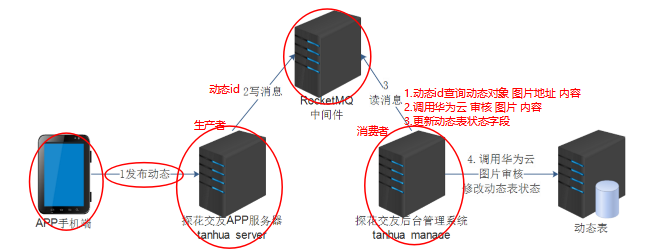
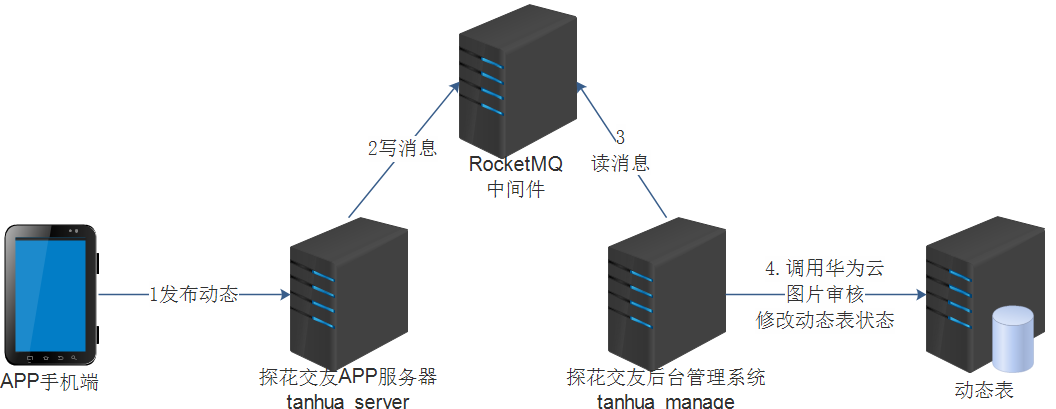
用户在APP端的所有操作都需要记录到后台管理系统数据库中。我们这里采用的是RocketMQ来实现,整体的流程如下
- 用户在APP完成登录或者注册操作
- tanhua-server端正常完成业务后,发送MQ消息
- tanhua-manager端,获取MQ消息体
- 解析消息,记录日志信息到数据库中
1.1. 生产者
1.2.1. 引入依赖
tanhua-server模块pom.xml中
<dependency>
    <groupId>org.apache.rocketmq</groupId>
    <artifactId>rocketmq-spring-boot-starter</artifactId>
    <version>2.0.3</version>
</dependency>
<dependency>
    <groupId>org.apache.rocketmq</groupId>
    <artifactId>rocketmq-client</artifactId>
    <version>4.6.0</version>
</dependency>
1.2.2. application.yml
tanhua-server模块application.yml配置rocketMQ服务器相关信息
rocketmq:
  name-server: 192.168.136.160:9876
  producer:
    group: tanhua
    sendMessageTimeout: 10000
1.2.2. UserService
tanhua-server模块UserService的登录方法loginVerification,发送MQ消息。
@Autowired
private RocketMQTemplate rocketMQTemplate;

/**
  * 注册登录-第一步:验证码校验(登录)
  */
public Map<String, Object> loginVerification(String phone, String verificationCode) {
    //消息类型为:用户注册
    String type = "0101";
    ......
    //5用户不存在,自动注册用户
    if (user == null) {
        ......
        //消息类型为:用户登录
     	type = "0202";
    }
    //10.发送消息,记录用户登录注册信息,用于后台统计
    Map<String,Object> message = new HashMap<>();
    message.put("userId",user.getId().toString());
    message.put("type",type);
    message.put("date",new SimpleDateFormat("yyyy-MM-dd").format(new Date()));
    rocketMQTemplate.convertAndSend("tanhua-log",message);
}
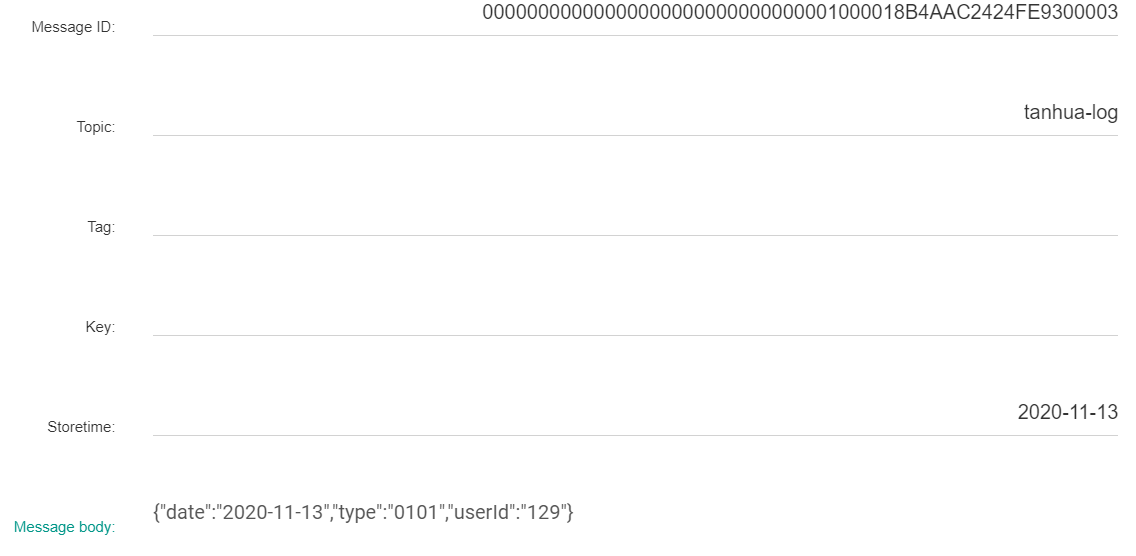
1.2.3. 测试
用户登录后,打开RocketMQ管理控制台查看消息是否已经发送成功。
1.2. 消费者
1.2.1. 引入依赖
tanhua-manage模块pom.xml中
<dependency>
    <groupId>org.apache.rocketmq</groupId>
    <artifactId>rocketmq-spring-boot-starter</artifactId>
    <version>2.0.3</version>
</dependency>
<dependency>
    <groupId>org.apache.rocketmq</groupId>
    <artifactId>rocketmq-client</artifactId>
    <version>4.6.0</version>
</dependency>
1.2.2. Log
tanhua-manage模块domain包中
package com.tanhua.manage.domain;

import lombok.AllArgsConstructor;
import lombok.Builder;
import lombok.Data;
import lombok.NoArgsConstructor;

import java.util.Date;

@Data
@Builder
@NoArgsConstructor
@AllArgsConstructor
public class Log {
    /**
     * id
     */
    private Long id;
    /**
     * 用户id
     */
    private Long userId;
    /**
     * 操作时间
     */
    private String logTime;
    /**
     * 登陆地点
     */
    private String place;
    /**
     * 登陆设备
     */
    private String equipment;
    /**
     * 操作类型,
     * 0101为登录,0102为注册,0201为发动态,0202为浏览动态,0203为动态点赞,0204为动态喜欢,0205为评论,0206为动态取消点赞,0207为动态取消喜欢,0301为发小视频,0302为小视频点赞,0303为小视频取消点赞,0304为小视频评论
     */
    private String type;

    /**
     * 日志创建时间
     */
    private Date created;
}
1.2.3. LogMapper
tanhua-manage模块mapper包中
package com.tanhua.manage.mapper;

import com.baomidou.mybatisplus.core.mapper.BaseMapper;
import com.tanhua.manage.domain.Log;
import org.apache.ibatis.annotations.Mapper;

@Mapper
public interface LogMapper extends BaseMapper<Log> {
}
1.2.4. LogService
tanhua-manage模块service包中
package com.tanhua.manage.service;

import com.baomidou.mybatisplus.extension.service.impl.ServiceImpl;
import com.tanhua.manage.domain.Log;
import com.tanhua.manage.mapper.LogMapper;
import org.springframework.stereotype.Service;

@Service
public class LogService extends ServiceImpl<LogMapper, Log> {

}
1.2.5. application.yml
tanhua-manage模块application.yml配置rocketMQ服务器相关信息
rocketmq:
  name-server: 192.168.136.160:9876
#日志配置
logging:
  level:
    root: info
    com:
      tanhua: debug
  pattern:
    console: '%d{yyyy-MM-dd HH:mm:ss.SSS} %-5level [%thread] %msg - %logger{15}%n\'
1.2.6. LogMessageListener
tanhua-manage模块listener包中
package com.tanhua.manage.listener;

import com.alibaba.fastjson.JSON;
import com.tanhua.manage.domain.Log;
import com.tanhua.manage.service.LogService;
import lombok.extern.slf4j.Slf4j;
import org.apache.rocketmq.spring.annotation.RocketMQMessageListener;
import org.apache.rocketmq.spring.core.RocketMQListener;
import org.springframework.beans.factory.annotation.Autowired;
import org.springframework.stereotype.Component;

import java.util.Date;
import java.util.Map;

/**
 * 消费者-日志监听类-往日志表写日志\
 * 1.实现RocketMQListener接口 onMessage方法
 * 2.将监听类放入spring容器@Compent
 * 3.设置@RocketMQMessageListener 监听的主题 消费者组名
 * 4.onMessage方法中业务逻辑编码实现
 */
@Component
@RocketMQMessageListener(
        topic = "tanhua_logs", consumerGroup = "tanhua-log-consumer"
)
@Slf4j
public class LogMessageListener implements RocketMQListener<String> {

    @Autowired
    private LogService logService;

    /**
     * 往日志表写入日志
     * {"userId":"1100","type":"0101","logTime":"2021-01-01"}
     *
     * @param message
     */
    @Override
    public void onMessage(String message) {
        log.debug("*******messsage**********"+message);
        //{"userId":"1100","type":"0101","logTime":"2021-01-01"}
        //1.将message转为map
        Map map = JSON.parseObject(message, Map.class);
        //2.获取每一个数据
        Long userId = Long.parseLong(map.get("userId").toString());
        String type = (String)map.get("type");
        String logTime = (String)map.get("logTime");
        //3.操作数据库日志表
        Log dbLog = new Log();
        dbLog.setUserId(userId);
        dbLog.setLogTime(logTime);
        dbLog.setPlace("中粮");
        dbLog.setEquipment("华为666");
        dbLog.setType(type);
        dbLog.setCreated(new Date());//日志创建时间
        logService.save(dbLog);
        log.debug("*******日志记录成功了**********");

    }
}
【小结】
掌握RocketMQ实现消息推送
2. 定时任务
【目标】
掌握定时统计功能实现
【路径】
1:Spring定时任务入门案例
2:定时数据统计功能实现
【讲解】
在实际项目开发中,除了Web应用、SOA服务外,还有一类不可缺少的,那就是定时任务调度。定时任务的场景可以说非常广泛:
-
某些网站会定时发送优惠邮件;
-
银行系统还款日信用卡催收款;
-
某些应用的生日祝福短信等。
完成这些功能都需要用到定时任务调度。那究竟何为定时任务调度,一句话概括就是:基于给定的时间点、给定的时间间隔、给定的执行次数自动执行的任务
2.1. 入门案例
案例:每隔5秒钟。打印系统时间
2.1.1. ManageApplication
@EnableScheduling:开启定时任务支持
@EnableScheduling
public class ManageApplication {

    public static void main(String[] args) {
        SpringApplication.run(ManageApplication.class,args);
    }
}
2.1.2. AnalysisJob
编写定时执行方法
package com.tanhua.manage.job;

import org.springframework.scheduling.annotation.Scheduled;
import org.springframework.stereotype.Component;

import java.text.SimpleDateFormat;
import java.util.Date;

@Component
public class AnalysisJob {

    @Scheduled(cron = "0/5 * * * * ?")
    public void analysis() {
        System.out.println("当前时间:"+new SimpleDateFormat("yyyy-MM-dd HH:mm:ss").format(new Date()));
    }
}
执行效果:每5秒打印当前系统时间
@Scheduled:配置定时执行的方法
2.2. CRON表达式
对于定时任务,我们使用的时候主要是注重两个方面,一个是定时任务的业务,另一个就是Cron表达式。
**Cron 表达式支持到六个域 **
| 名称 | 是否必须 | 允许值 | 特殊字符 |
|---|---|---|---|
| 秒 | 是 | 0-59 | , - * / |
| 分 | 是 | 0-59 | , - * / |
| 时 | 是 | 0-23 | , - * / |
| 日 | 是 | 1-31 | , - * ? / L W C |
| 月 | 是 | 1-12 或 JAN-DEC | , - * / |
| 周 | 是 | 1-7 或 SUN-SAT | , - * ? / L C # |
月份和星期的名称是不区分大小写的。FRI 和 fri 是一样的。 域之间有空格分隔
*** 星号**
使用星号(*) 指示着你想在这个域上包含所有合法的值。例如,在月份域上使用星号意味着每个月都会触发这个 trigger。
表达式样例:
0 * 17 * * ?
意义:每天从下午5点到下午5:59中的每分钟激发一次 trigger。它停在下午 5:59 是因为值 17 在小时域上,在下午 6 点时,小时变为 18 了,也就不再理会这个 trigger,直到下一天的下午5点。 在你希望 trigger 在该域的所有有效值上被激发时使用 * 字符。
? 问号
? 号只能用在日和周域上,但是不能在这两个域上同时使用。你可以认为 ? 字符是 "我并不关心在该域上是什么值。" 这不同于星号,星号是指示着该域上的每一个值。? 是说不为该域指定值。

不能同时这两个域上指定值的理由是难以解释甚至是难以理解的。基本上,假定同时指定值的话,意义就会变得含混不清了:考虑一下,如果一个表达式在日域上有值11,同时在周域上指定了 WED。那么是要 trigger 仅在每个月的11号,且正好又是星期三那天被激发?还是在每个星期三的11号被激发呢?要去除这种不明确性的办法就是不能同时在这两个域上指定值。 只要记住,假如你为这两域的其中一个指定了值,那就必须在另一个字值上放一个 ?。

表达式样例:
0 10,44 14 ? 3 WED
意义:在三月中的每个星期三的下午 2:10 和 下午 2:44 被触发。
, 逗号
逗号 (,) 是用来在给某个域上指定一个值列表的。例如,使用值 0,15,30,45 在秒域上意味着每15秒触发一个 trigger。
表达式样例:
0 0,15,30,45 * * * ?
意义:每刻钟触发一次 trigger。
/ 斜杠
斜杠 (/) 是用于时间表的递增的。我们刚刚用了逗号来表示每15分钟的递增,但是我们也能写成这样 0/15。
表达式样例:
0/15 0/30 * * * ?
意义:在整点和半点时每15秒触发 trigger。
-中划线
中划线 (-) 用于指定一个范围。例如,在小时域上的 3-8 意味着 "3,4,5,6,7 和 8 点。"  域的值不允许回转,所以像 50-10 这样的值是不允许的。
表达式样例:
0 45 3-8 ? * *
意义:在上午的3点至上午的8点的45分时触发 trigger。
L 字母
L 说明了某域上允许的最后一个值。它仅被日和周域支持。当用在日域上,表示的是在月域上指定的月份的最后一天。例如,当月域上指定了 JAN 时,在日域上的 L 会促使 trigger 在1月31号被触发。假如月域上是 SEP,那么 L 会预示着在9月30号触发。换句话说,就是不管指定了哪个月,都是在相应月份的时最后一天触发 trigger。
表达式 0 0 8 L * ? 意义是在每个月最后一天的上午 8:00 触发 trigger。在月域上的 * 说明是 "每个月"。
当 L 字母用于周域上,指示着周的最后一天,就是星期六 (或者数字7)。所以如果你需要在每个月的最后一个星期六下午的 11:59 触发 trigger,你可以用这样的表达式 0 59 23 ? * L。
当使用于周域上,你可以用一个数字与 L 连起来表示月份的最后一个星期 X。例如,表达式 0 0 12 ? * 2L 说的是在每个月的最后一个星期一触发 trigger。
不要让范围和列表值与 L 连用
虽然你能用星期数(1-7)与 L 连用,但是不允许你用一个范围值和列表值与 L 连用。这会产生不可预知的结果。
W 字母
W 字符代表着*日 (Mon-Fri),并且仅能用于日域中。它用来指定离指定日的最*的一个*日。大部分的商业处理都是基于工作周的,所以 W 字符可能是非常重要的。例如,日域中的 15W 意味着 "离该月15号的最*一个*日。" 假如15号是星期六,那么 trigger 会在14号(星期四)触发,因为距15号最*的是星期一,这个例子中也会是17号(译者Unmi注:不会在17号触发的,如果是15W,可能会是在14号(15号是星期六)或者15号(15号是星期天)触发,也就是只能出现在邻*的一天,如果15号当天为*日直接就会当日执行)。W 只能用在指定的日域为单天,不能是范围或列表值。
#井号
字符仅能用于周域中。它用于指定月份中的第几周的哪一天。例如,如果你指定周域的值为 6#3,它意思是某月的第三个周五 (6=星期五,#3意味着月份中的第三周)。另一个例子 2#1 意思是某月的第一个星期一 (2=星期一,#1意味着月份中的第一周)。注意,假如你指定 #5,然而月份中没有第 5 周,那么该月不会触发。
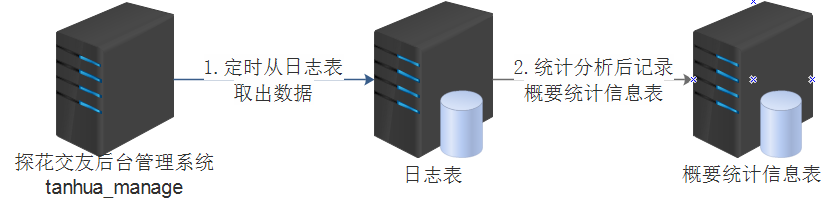
2.3. 定时统计
2.3.1. 数据来源分析
统计tb_log表中数据,按照要求存入到tb_analysis_by_day表中
#案例:统计2020-11-14数据
#将tb_log表中的数据,进行统计,记录到tb_analysis_by_day


#新注册用户数
select count(*) from tb_log where log_time ='2021-11-08' and type = '0102'
#活跃用户数
select count(DISTINCT user_id) from tb_log where log_time ='2021-11-08'

#登陆次数
select count(*) from tb_log where log_time ='2021-11-08' and type = '0101'

#次日留存用户数
select count(DISTINCT user_id) from tb_log where log_time ='2021-11-08'
and user_id in (select user_id from tb_log where log_time ='2021-11-07' and type = '0102'
)
2.3.2 AnalysisByDay
package com.tanhua.manage.domain;

import com.tanhua.domain.db.BasePojo;
import lombok.AllArgsConstructor;
import lombok.Builder;
import lombok.Data;
import lombok.NoArgsConstructor;

import java.util.Date;

@Data
@NoArgsConstructor
@AllArgsConstructor
@Builder
public class AnalysisByDay extends BasePojo {

    private Long id;
    /**
     * 日期
     */
    private Date recordDate;
    /**
     * 新注册用户数
     */
    private Integer numRegistered = 0;
    /**
     * 活跃用户数
     */
    private Integer numActive = 0;
    /**
     * 登陆次数
     */
    private Integer numLogin = 0;
    /**
     * 次日留存用户数
     */
    private Integer numRetention1d = 0;

    /**
     * 创建时间
     */
    private Date created;

    /**
     * 更新时间
     */
    private Date updated;
}
2.3.3. AnalysisJob
package com.tanhua.manage.job;

import cn.hutool.core.date.DateTime;
import cn.hutool.core.date.DateUtil;
import com.baomidou.mybatisplus.core.conditions.query.QueryWrapper;
import com.tanhua.manage.domain.AnalysisByDay;
import com.tanhua.manage.mapper.AnalysisByDayMapper;
import com.tanhua.manage.utils.ComputeUtil;
import lombok.extern.slf4j.Slf4j;
import org.springframework.beans.factory.annotation.Autowired;
import org.springframework.scheduling.annotation.Scheduled;
import org.springframework.stereotype.Component;

import java.text.SimpleDateFormat;
import java.util.Date;

/**
 * 任务类
 */
@Component
@Slf4j
public class AnalysisJob {

    @Autowired
    private AnalysisByDayMapper analysisByDayMapper;

    /**
     * 每隔30分钟将日志表数据统计到概要统计分析表中
     */
    @Scheduled(cron = "* 0/30 * * * ?")
    public void analysis(){
        log.debug("任务运行了***"+new SimpleDateFormat("yyyy-MM-dd HH:mm:ss").format(new Date()));
        //1 获取当前系统时间 根据时间查询统计分析表 记录是否存在
        DateTime today = DateTime.now();//今天时间
        String todayStr = today.toDateStr();//今天时间字符串
        String yesterday = ComputeUtil.offsetDay(today, -1);
        QueryWrapper<AnalysisByDay> queryWrapper = new QueryWrapper<>();
        queryWrapper.eq("record_date",todayStr);
        AnalysisByDay analysisByDay = analysisByDayMapper.selectOne(queryWrapper);
        //2 如果概要统计分析表 记录不存在 保存记录
        Date nowDate = new Date();
        if(analysisByDay == null){
            analysisByDay = new AnalysisByDay();
            analysisByDay.setRecordDate(DateUtil.parse(todayStr));
            //#新注册用户数
            //select count(*) from tb_log where log_time ='2021-11-08' and type = '0102'
            analysisByDay.setNumRegistered(analysisByDayMapper.findNumRegisteredLogin(todayStr,"0102"));//新注册用户数
            //#活跃用户数
            //select count(DISTINCT user_id) from tb_log where log_time ='2021-11-08'
            analysisByDay.setNumActive(analysisByDayMapper.findNumActive(todayStr));//活跃用户数
            //#登陆次数
            //select count(*) from tb_log where log_time ='2021-11-08' and type = '0101'
            analysisByDay.setNumLogin(analysisByDayMapper.findNumRegisteredLogin(todayStr,"0101"));//登陆次数

            //#次日留存用户数
            //select count(DISTINCT user_id) from tb_log where log_time ='2021-11-08'
            //and user_id in (select user_id from tb_log where log_time ='2021-11-07' and type = '0102')
            analysisByDay.setNumRetention1d(analysisByDayMapper.findNumRetention1d(todayStr,yesterday));//次日留存用户数
            analysisByDay.setCreated(nowDate);
            analysisByDay.setUpdated(nowDate);
            analysisByDayMapper.insert(analysisByDay);
        }
        else {
            //3. 如果概要统计分析表 记录存在,则更新
            //#新注册用户数
            //select count(*) from tb_log where log_time ='2021-11-08' and type = '0102'
            analysisByDay.setNumRegistered(analysisByDayMapper.findNumRegisteredLogin(todayStr,"0102"));//新注册用户数
            //#活跃用户数
            //select count(DISTINCT user_id) from tb_log where log_time ='2021-11-08'
            analysisByDay.setNumActive(analysisByDayMapper.findNumActive(todayStr));//活跃用户数
            //#登陆次数
            //select count(*) from tb_log where log_time ='2021-11-08' and type = '0101'
            analysisByDay.setNumLogin(analysisByDayMapper.findNumRegisteredLogin(todayStr,"0101"));//登陆次数

            //#次日留存用户数
            //select count(DISTINCT user_id) from tb_log where log_time ='2021-11-08'
            //and user_id in (select user_id from tb_log where log_time ='2021-11-07' and type = '0102')
            analysisByDay.setNumRetention1d(analysisByDayMapper.findNumRetention1d(todayStr,yesterday));//次日留存用户数
            analysisByDay.setUpdated(nowDate);
            analysisByDayMapper.updateById(analysisByDay);
        }
    }
}
2.3.4. AnalysisByDayMapper
package com.tanhua.manage.mapper;

import com.baomidou.mybatisplus.core.mapper.BaseMapper;
import com.tanhua.manage.domain.AnalysisByDay;
import org.apache.ibatis.annotations.Mapper;
import org.apache.ibatis.annotations.Param;
import org.apache.ibatis.annotations.Select;

@Mapper
public interface AnalysisByDayMapper extends BaseMapper<AnalysisByDay> {
    /**
     *新注册用户数 登陆次数
     * @param todayStr
     * @param type
     * @return
     */
    @Select("select count(*) from tb_log where log_time =#{logTime} and type = #{type} ")
    Integer findNumRegisteredLogin(@Param("logTime") String todayStr,@Param("type")String type);

    /**
     *活跃用户数
     * @param todayStr
     * @return
     */
    @Select("select count(DISTINCT user_id) from tb_log where log_time =#{todayStr}")
    Integer findNumActive(String todayStr);

    /**
     *次日留存用户数
     * @param todayStr
     * @param yesterday
     * @return
     */
    @Select("select count(DISTINCT user_id) from tb_log where log_time =#{todayStr}  " +
            "and user_id in (select user_id from tb_log where log_time =#{yesterday} and type = '0102')")
    Integer findNumRetention1d(@Param("todayStr") String todayStr,@Param("yesterday")  String yesterday);
}
【小结】
掌握定时统计功能实现
3. 华为云内容审核
【目标】
掌握华为云内容审核组件使用
【路径】
1:华为云内容介绍
2:华为云内容组件使用
【讲解】
对于用户发布的动态信息是需要进行审核的,这里我们选择华为云的内容审核服务。
3.1. 介绍
地址:https://www.huaweicloud.com/product/moderation.html
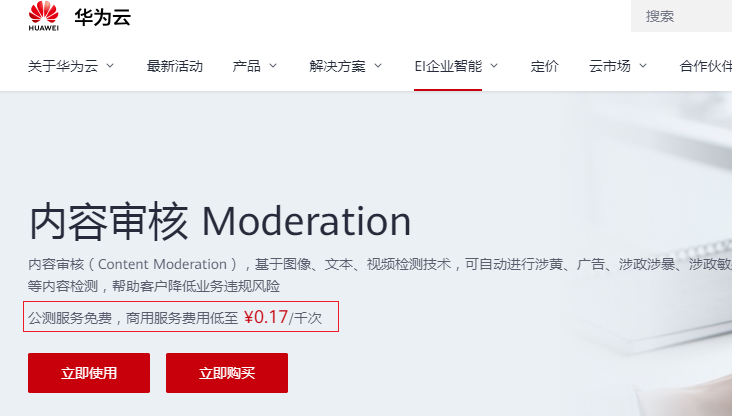
https://www.huaweicloud.com/product/textmoderation.html
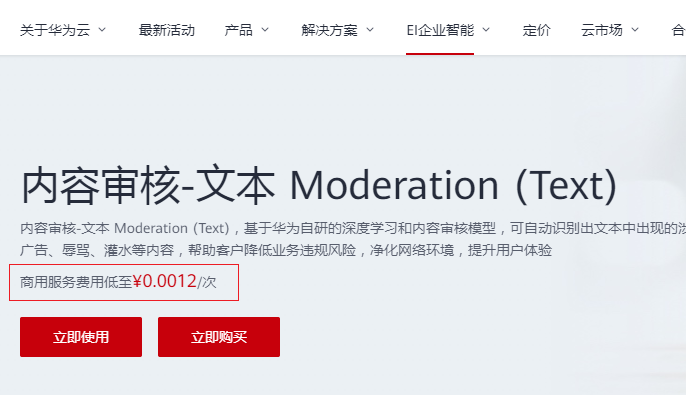
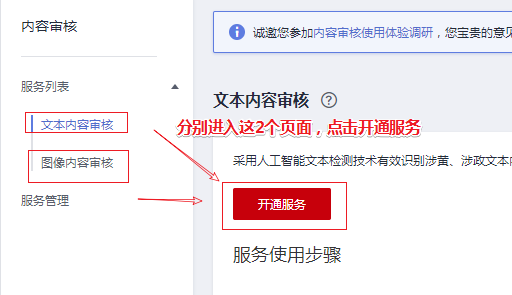
我们暂时只需要本和图像审核即可。
3.2. 使用说明
需要先注册华为云账户并且完成实名认证。
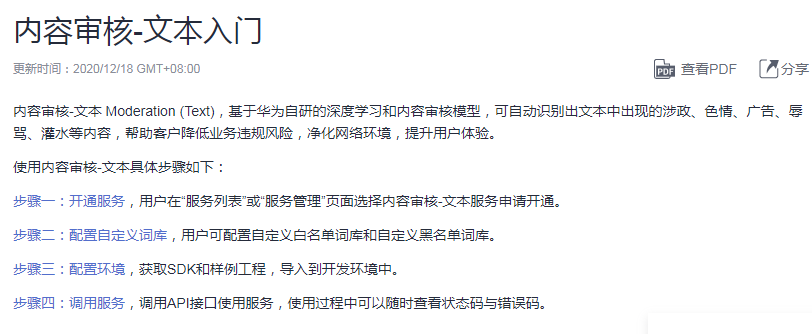
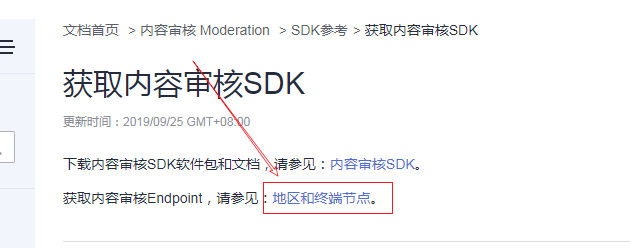
快速入门文档
文本审核:https://support.huaweicloud.com/qs-moderation/moderation_07_0001.html
图像审核: https://support.huaweicloud.com/qs-moderation/moderation_07_0002.html
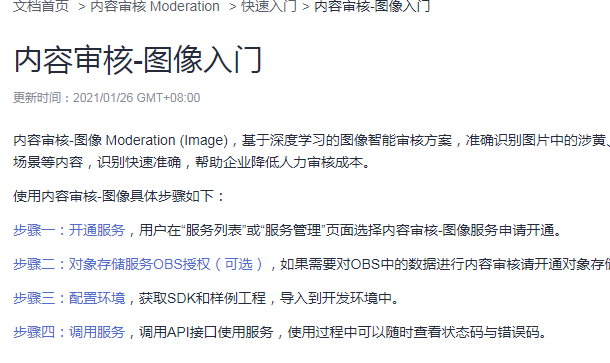
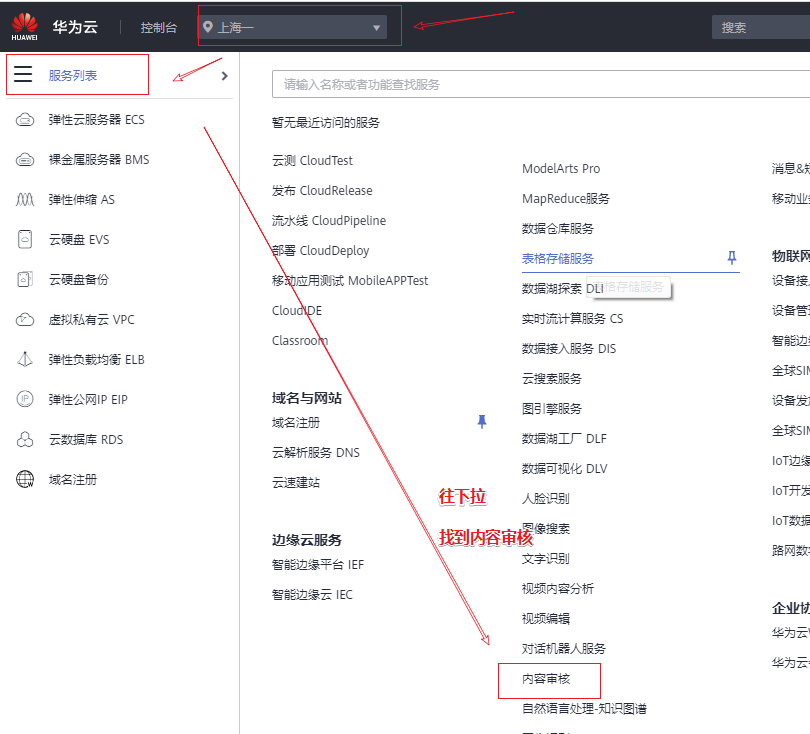
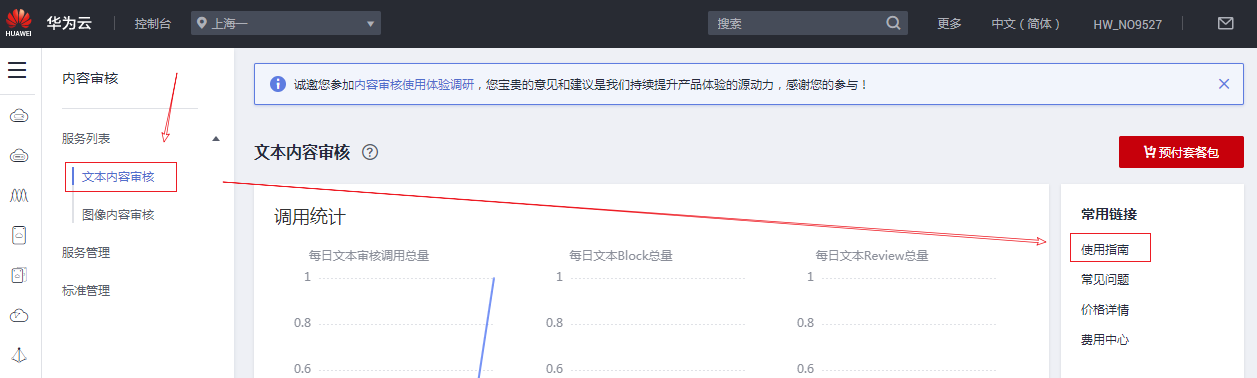
3.2.1. 开通服务
登陆后进入控制台,选择区域为 华东-上海一

3.2.2. API调用信息收集
① domain name
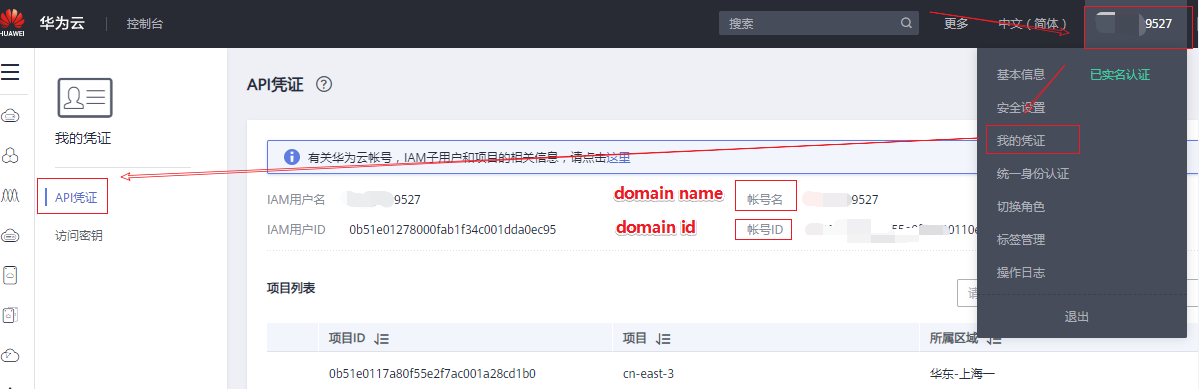
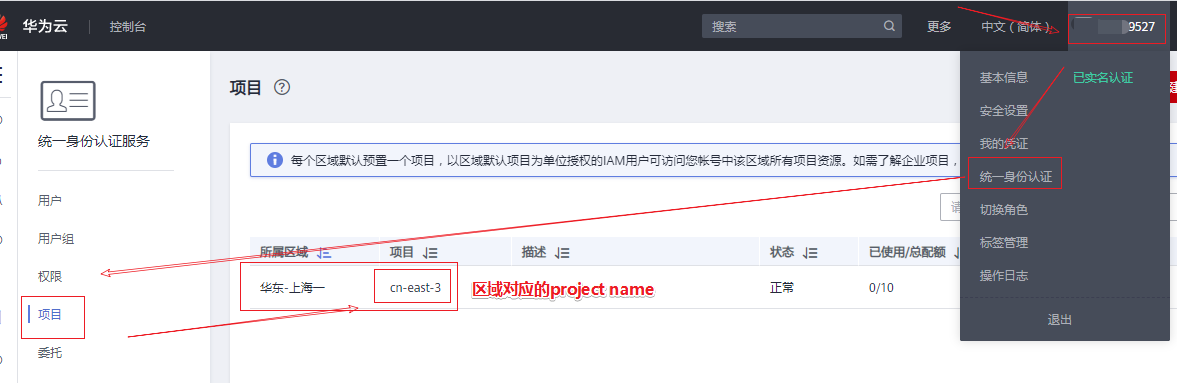
② project name
③ Api基本路径

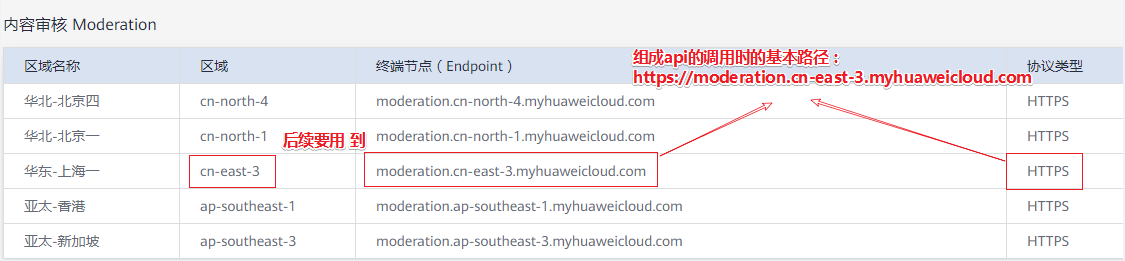
【注意】要根据开通内容审核时选择的区域来选择
这里我们获得调用api的基本路径
Api基本路径
https://moderation.cn-east-3.myhuaweicloud.com
④ 文本与图像审核api获取
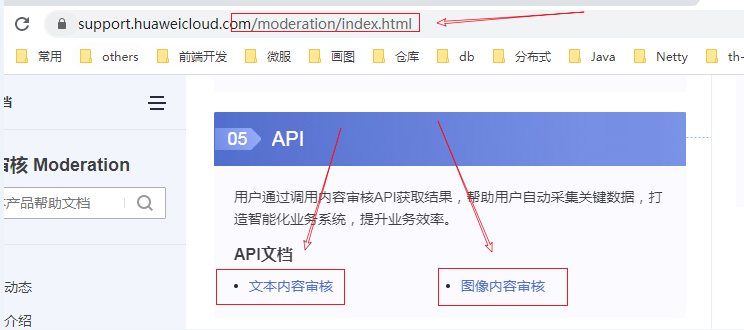
文本:POST /v1.0/moderation/text
图像:POST /v1.0/moderation/image
批量:POST /v1.0/moderation/image/batch
文本审核完整api api基本路径+api
POST: https://moderation.cn-east-3.myhuaweicloud.com/v1.0/moderation/text
图像审核完整api api基本路径+api,项目里使用批量,用户发布动态时上传多个图片
POST: https://moderation.cn-east-3.myhuaweicloud.com/v1.0/moderation/image/batch
⑤ Token授权获取
在文本内容审核api获取的上方,点开【如何调用API】->【认证鉴权】
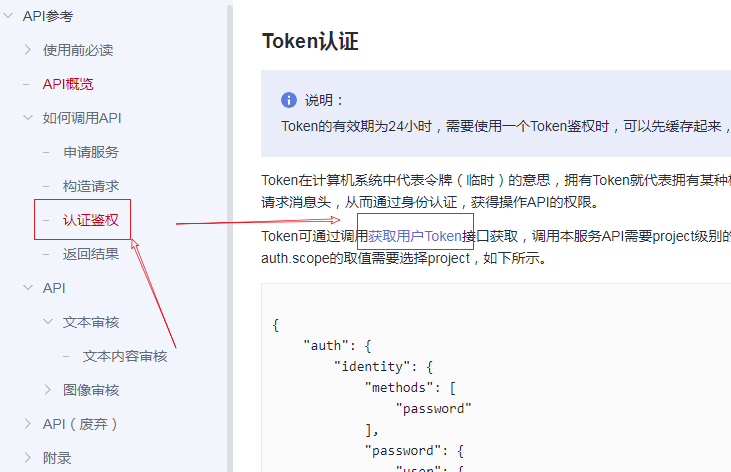
点击【获取用户Token】链接,在弹出的窗口中往下拉,找到 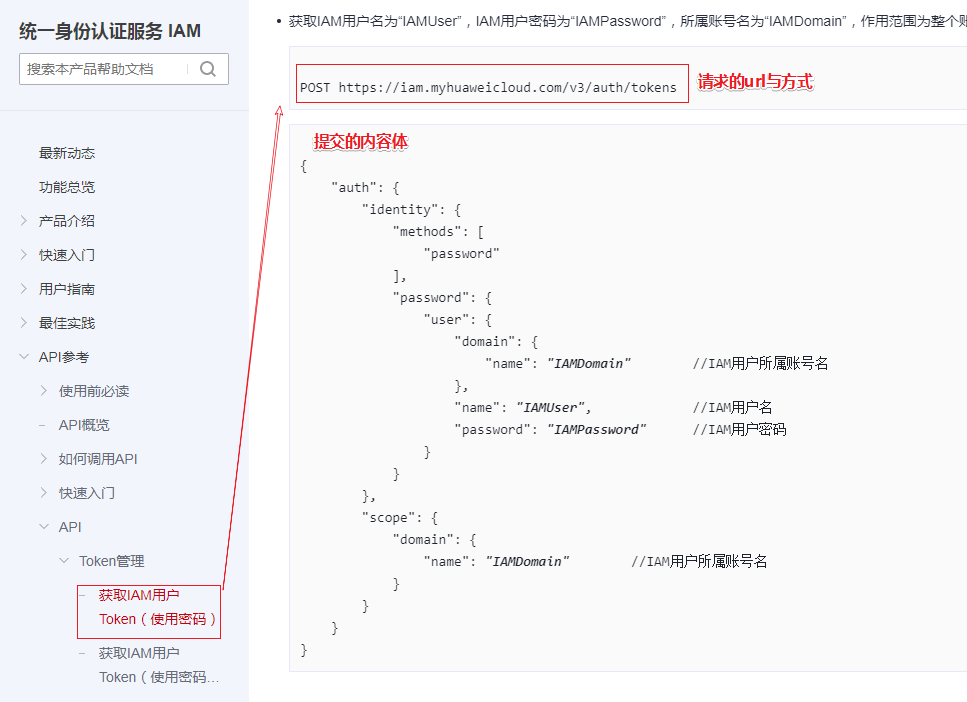
3.4. 抽取组件
tanhua:
  huawei:
    username: hw23848243
    password: aaqq!!
    project: cn-east-3
    domain: hw23848243
    # 图片检测内容 politics:是否涉及政治人物的检测,terrorism:是否包含涉政暴恐元素的检测,porn:是否包含涉黄内容元素的检测,ad:是否包含广告的检测(公测特性),all:包含politics、terrorism和porn三种场景的检测
    categoriesImage: politics,terrorism,porn
    # 文字检测内容 politics:涉政,porn:涉黄,ad:广告,abuse:辱骂,contraband:违禁品,flood:灌水
    categoriesText: politics,porn,ad,abuse,contraband,flood
    textApiUrl: https://moderation.cn-east-3.myhuaweicloud.com/v1.0/moderation/text
    imageApiUrl: https://moderation.cn-east-3.myhuaweicloud.com/v1.0/moderation/image/batch
tanhua-commons模块导入hutool依赖
<dependency>
    <groupId>cn.hutool</groupId>
    <artifactId>hutool-all</artifactId>
    <version>5.4.3</version>
</dependency>
tanhua父工程中
<!--通用依赖-->
<dependencies>
    。。。。。。
    <dependency>
        <groupId>com.apifan.common</groupId>
        <artifactId>common-random</artifactId>
        <version>1.0.5</version>
    </dependency>
</dependencies>
3.4.1. 引入依赖
<dependency>
    <groupId>cn.hutool</groupId>
    <artifactId>hutool-all</artifactId>
    <version>5.4.3</version>
</dependency>
<dependency>
    <groupId>org.apache.commons</groupId>
    <artifactId>commons-lang3</artifactId>
</dependency>
3.4.2. HuaWeiUGCProperties
package com.tanhua.commons.properties;

import lombok.Data;
import org.springframework.boot.context.properties.ConfigurationProperties;
import org.springframework.context.annotation.Configuration;

@Configuration
@ConfigurationProperties(prefix = "tanhua.huawei")
@Data
public class HuaWeiUGCProperties {

    private String username;
    private String password;
    private String project;
    private String domain;
    private String categoriesText;
    private String categoriesImage;
    private String textApiUrl;
    private String imageApiUrl;
}
3.4.3. HuaWeiUGCTemplate
package com.tanhua.commons.templates;

import cn.hutool.core.util.StrUtil;
import cn.hutool.http.HttpRequest;
import cn.hutool.http.HttpResponse;
import cn.hutool.json.JSONObject;
import cn.hutool.json.JSONUtil;
import com.tanhua.commons.properties.HuaWeiUGCProperties;
import org.apache.commons.lang3.time.DateUtils;

import java.util.Date;

/**
 * 华为 内容审核 工具模板
 */
public class HuaWeiUGCTemplate {

    private HuaWeiUGCProperties properties;

    private String token;

    private long expire = 0L;

    public HuaWeiUGCTemplate(HuaWeiUGCProperties properties) {
        this.properties = properties;
    }

    /**
     * 文本审核
     * 参考:https://support.huaweicloud.com/api-moderation/moderation_03_0018.html
     * @param textModeration
     * @return
     */
    public boolean textContentCheck(String textModeration) {
        String url = properties.getTextApiUrl();
        String reqBody = JSONUtil.createObj()
            .set("categories", StrUtil.split(properties.getCategoriesText(), ','))
            .set("items", JSONUtil.createArray()
                .set(JSONUtil.createObj()
                    .set("text", textModeration)
                    .set("type", "content")
                )
            ).toString();

        String resBody = HttpRequest.post(url)
            .header("X-Auth-Token", this.getToken())
            .contentType("application/json;charset=utf8")
            .setConnectionTimeout(3000)
            .setReadTimeout(2000)
            .body(reqBody)
            .execute()
            .body();

        JSONObject jsonObject = JSONUtil.parseObj(resBody);
        if (jsonObject.containsKey("result") && jsonObject.getJSONObject("result").containsKey("suggestion")) {
            String suggestion = jsonObject.getJSONObject("result").getStr("suggestion").toUpperCase();
            if ("PASS".equals(suggestion)) {
                return true;
            }
        }
        return false;
    }

    /**
     * 图片审核
     * 参数:https://support.huaweicloud.com/api-moderation/moderation_03_0036.html
     * @param urls 多个图片的完整地址
     * @return
     */
    public boolean imageContentCheck(String[] urls) {
        String url = properties.getImageApiUrl();
        String reqBody = JSONUtil.createObj()
            .set("categories", properties.getCategoriesImage().split(","))
            .set("urls", urls)
            .toString();

        String resBody = HttpRequest.post(url)
            .header("X-Auth-Token", this.getToken())
            .contentType("application/json;charset=utf8")
            .setConnectionTimeout(5000)
            .setReadTimeout(3000)
            .body(reqBody)
            .execute()
            .body();

        System.out.println("resBody=" + resBody);
        JSONObject jsonObject = JSONUtil.parseObj(resBody);
        if (jsonObject.containsKey("result")) {
            //审核结果中如果出现一个block或review,整体结果就是不通过,如果全部为PASS就是通过
            if (StrUtil.contains(resBody, "\"suggestion\":\"block\"")) {
                return false;
            } else if (StrUtil.contains(resBody, "\"suggestion\":\"review\"")) {
                return false;
            } else {
                return true;
            }
        }

        //默认人工审核
        return false;
    }

    /**
     * 获取授权Token
     * 参考 https://support.huaweicloud.com/api-iam/iam_30_0001.html
     * @return
     */
    public synchronized String getToken() {
        // 获取当前系统时间
        Long now = System.currentTimeMillis();
        // 判断token是否超时,超时需要重新获取
        if (now > expire) {
            // token的url
            String url = "https://iam.myhuaweicloud.com/v3/auth/tokens";
            // 构建请求体内容
            String reqBody = JSONUtil.createObj().set("auth", JSONUtil.createObj()
                .set("identity", JSONUtil.createObj()
                    .set("methods", JSONUtil.createArray().set("password"))
                    .set("password", JSONUtil.createObj()
                        .set("user", JSONUtil.createObj()
                            .set("domain", JSONUtil.createObj().set("name", properties.getDomain()))
                            .set("name", properties.getUsername())
                            .set("password", properties.getPassword())
                        )
                    )
                )
                .set("scope", JSONUtil.createObj()
                    .set("project", JSONUtil.createObj()
                        .set("name", properties.getProject())
                    )
                )
            ).toString();
            // 执行请求获取响应结果
            HttpResponse response = HttpRequest.post(url)
                .contentType("application/json;charset=utf8")
                .setConnectionTimeout(3000).setReadTimeout(5000)
                .body(reqBody).execute();
            // 获取返回的token
            token = response.header("X-Subject-Token");
            //设置Token有效时长 避免频繁获取
            setExpireTime(response.body());
        }
        return token;
    }

    /**
     * 设置Token有效时长,如果api有返回,则要提前5分钟获取新的Token
     * 默认有效时长2小时
     * @param jsonString
     */
    private void setExpireTime(String jsonString) {
        try {
            JSONObject jsonObject = JSONUtil.parseObj(jsonString);
            if (jsonObject.containsKey("token") && jsonObject.getJSONObject("token").containsKey("expires_at")) {
                String str = jsonObject.getJSONObject("token").getStr("expires_at");
                str = str.replace("T", " ");
                Date expireAt = DateUtils.parseDate(str.substring(0, 16), "yyyy-MM-dd HH:mm");
                expire = expireAt.getTime()-5*60*1000; // 提前5分钟
            }
        } catch (Exception e) {
        }
        // 没获取到有效期,则1小时后过期
        expire = System.currentTimeMillis() + 60*60*1000;
    }
}
3.4.4. CommonsAutoConfiguration
@Configuration
//自动的读取yml中配置信息,并复制到SmsProperties对象,将此对象存入容器
@EnableConfigurationProperties({
        SmsProperties.class,
        OssProperties.class,
        AipFaceProperties.class,
        HuanXinProperties.class,
        HuaWeiUGCProperties.class
})
public class CommonsAutoConfiguration {

    。。。。。。

    @Bean
    public HuaWeiUGCTemplate huaWeiUGCTemplate(HuaWeiUGCProperties properties) {
        return new HuaWeiUGCTemplate(properties);
    }
}
3.4.5. application.yml
修改tanhua-manage工程application.yml
tanhua:
  huawei:
    username: 【用户名】
    password: 【密码】
    project: 【project name】
    domain: 【domain name】
    # 图片检测内容 politics:是否涉及政治人物的检测,terrorism:是否包含涉政暴恐元素的检测,porn:是否包含涉黄内容元素的检测,ad:是否包含广告的检测(公测特性),all:包含politics、terrorism和porn三种场景的检测
    categoriesImage: politics,terrorism,porn
    # 文字检测内容 politics:涉政,porn:涉黄,ad:广告,abuse:辱骂,contraband:违禁品,flood:灌水
    categoriesText: politics,porn,ad,abuse,contraband,flood
    textApiUrl: https://moderation.cn-east-3.myhuaweicloud.com/v1.0/moderation/text
    imageApiUrl: https://moderation.cn-east-3.myhuaweicloud.com/v1.0/moderation/image/batch
3.4.6. 测试
package com.tanhua.manage.test;

import com.tanhua.commons.templates.HuaWeiUGCTemplate;
import org.junit.Test;
import org.junit.runner.RunWith;
import org.springframework.beans.factory.annotation.Autowired;
import org.springframework.boot.test.context.SpringBootTest;
import org.springframework.test.context.junit4.SpringRunner;

@RunWith(SpringRunner.class)
@SpringBootTest
public class HuaWeiTest {

    @Autowired
    private HuaWeiUGCTemplate template;

    @Test
    public void testToken() {
        System.out.println(template.getToken());
    }

    @Test
    public void testText() {
        boolean check = template.textContentCheck("好好先生");
        System.out.println(check);
    }

    @Test
    public void testImages() {
        String[] urls = new String[]{
                "http://tanhua-dev.oss-cn-zhangjiakou.aliyuncs.com/images/logo/9.jpg",
                "http://tanhua-dev.oss-cn-zhangjiakou.aliyuncs.com/images/logo/10.jpg"
        };
        boolean check = template.imageContentCheck(urls);
        System.out.println(check);
    }
}
【小结】
掌握华为云内容审核组件使用
4. 动态审核
【目标】
掌握动态审核功能实现
【路径】
1:了解动态发布审核流程
2:掌握动态审核功能实现
【讲解】
4.1. quanzi_publish
修改mongodb数据表,添加状态(state)字段,执行命令如下
添加新字段,并设置初始值为未审核状态
db.getCollection('quanzi_publish').update({},{$set:{state:NumberInt(0)}},{multi:1})
4.2. Publish
修改tanhua-domain中修改Publish对象,添加状态state属性
@Data
@NoArgsConstructor
@AllArgsConstructor
@Document(collection = "quanzi_publish")
public class Publish implements java.io.Serializable {

    private static final long serialVersionUID = 8732308321082804771L;
    private ObjectId id; //主键id
    private Long pid; //Long类型,用于推荐系统的模型(自动增长)

    private Long userId;
    private String textContent; //文字
    private List<String> medias; //媒体数据,图片或小视频 url
    private Integer seeType; // 谁可以看,1-公开,2-私密,3-部分可见,4-不给谁看
    private String longitude; //经度
    private String latitude; //纬度
    private String locationName; //位置名称

    private Long created; //发布时间
    private Integer state=0;// 状态0:待审核,1:已审核,2:已驳回

    private Integer likeCount=0; //点赞数
    private Integer commentCount=0; //评论数
    private Integer loveCount=0; //喜欢数
}
添加状态属性state
state=0:待审核
state=1:已审核
state=2:已驳回
4.3. MovementsService
修改tanhua-server中的MovementsService类,在添加动态之后,发送MQ消息
   /**
     * 发布动态
     */
    public void savePublish(PublishVo publishVo, MultipartFile[] imageContent) throws IOException {
        Long userId = UserHolder.getUserId();
        // 1.封装PublishVo 用户id
        publishVo.setUserId(userId);//当前用户id
        //2 图片地址
        List<String> medias = new ArrayList<>();
        if(imageContent != null && imageContent.length>0) {
            for (MultipartFile multipartFile : imageContent) {
                String imgUrl = ossTemplate.upload(multipartFile.getOriginalFilename(), multipartFile.getInputStream());
                medias.add(imgUrl);
            }
        }
        publishVo.setMedias(medias);//图片地址
        //3. 调用服务将publishVo传入
        String publishId = publishApi.savePublish(publishVo);

        //4.将动态发布主键id 写入 rocketMQ中
        rocketMQTemplate.convertAndSend("tanhua_publish",publishId);
    }
4.4. PublishApi
修改publishApi中的add方法返回值
    /**
     * 发布动态
     * @param publishVo
     */
    String savePublish(PublishVo publishVo);

    /**
     * 更新动态发布表状态字段
     * @param publishId
     * @param state
     */
    void updatePublish(String publishId, Integer state);
4.5. PublishApiImpl
修改PublishApiImpl中的add方法返回值
    /**
     * 发布动态
     * @param publishVo
     */
    @Override
    public String savePublish(PublishVo publishVo) {
        Long userId = publishVo.getUserId();///当前用户id
        long nowTime = System.currentTimeMillis();
        //1.往发布表插入动态数据
        Publish publish = new Publish();
        BeanUtils.copyProperties(publishVo,publish);//用户id 文本内容 经纬度 图片URL
        publish.setLocationName(publishVo.getLocation());//地址位置
        publish.setId(ObjectId.get());//设置主键id 后续相册表 时间线表 都跟此id 产生关系
        publish.setPid(66l);//推荐系统 忽略此字段即可
        publish.setSeeType(1);//谁可以看,1-公开,2-私密,3-部分可见,4-不给谁看
        publish.setCreated(nowTime);//发布时间
        mongoTemplate.insert(publish);
        //2.往相册表插入我的动态记录
        Album album = new Album();
        album.setId(ObjectId.get());//主键id
        album.setPublishId(publish.getId());//发布id
        album.setCreated(nowTime);//当前时间
        mongoTemplate.insert(album,"quanzi_album_"+userId);
        //3,查询好友表 得到好友ids
        Query query = new Query();
        query.addCriteria(Criteria.where("userId").is(userId));
        List<Friend> friendList = mongoTemplate.find(query, Friend.class);
        //4.根据好友ids往好友时间线表插入数据
        if(!CollectionUtils.isEmpty(friendList)){
            for (Friend friend : friendList) {
                TimeLine timeLine = new TimeLine();
                timeLine.setId(ObjectId.get());//主键id
                timeLine.setUserId(userId);//好友id
                timeLine.setPublishId(publish.getId());//发布id
                timeLine.setCreated(nowTime);//创建时间
                mongoTemplate.insert(timeLine,"quanzi_time_line_"+friend.getFriendId());
            }
        }
        return publish.getId().toHexString();
    }

   /**
     * 更新动态发布表状态字段
     * @param publishId
     * @param state
     */
    @Override
    public void updatePublish(String publishId, Integer state) {
        Query query = new Query();
        query.addCriteria(Criteria.where("id").is(new ObjectId(publishId)));
        Update update = new Update();
        update.set("state",state);
        mongoTemplate.updateFirst(query,update,Publish.class);
    }
4.6. PublishMessageListener
tanhua-manage中添加监听器处理消息
package com.tanhua.manage.listener;

import com.tanhua.commons.templates.HuaWeiUGCTemplate;
import com.tanhua.domain.mongo.Publish;
import com.tanhua.dubbo.api.mongo.PublishApi;
import lombok.extern.slf4j.Slf4j;
import org.apache.dubbo.config.annotation.Reference;
import org.apache.rocketmq.spring.annotation.RocketMQMessageListener;
import org.apache.rocketmq.spring.core.RocketMQListener;
import org.springframework.beans.factory.annotation.Autowired;
import org.springframework.stereotype.Component;

import java.util.List;

/**
 * 动态审核监听类(机器审核)
 */
@Component
@RocketMQMessageListener(
        topic = "tanhua_publish", consumerGroup = "tanhua-publish-consumer"
)
@Slf4j
public class PublishMessageListener implements RocketMQListener<String> {

    @Reference
    private PublishApi publishApi;

    @Autowired
    private HuaWeiUGCTemplate huaWeiUGCTemplate;

    /**
     * 动态审核
     * @param publishId
     */
    @Override
    public void onMessage(String publishId) {
        //1根据动态发布id 查询动态对象
        Publish publish = publishApi.findPublish(publishId);
        //2获取出图片地址 文本内容
        List<String> urlList = publish.getMedias(); //图片地址
        String content = publish.getTextContent();//内容
        //3调用华为云组件进行审核
        Integer state = 2;// 状态0:待审核,1:已审核,2:已驳回
        boolean flag1 = huaWeiUGCTemplate.textContentCheck(content);
        boolean flag2 = huaWeiUGCTemplate.imageContentCheck(urlList.toArray(new String[]{}));
        if(flag1 && flag2){
            state = 1;//已经审核通过
        }
        //4更新动态发布表状态字段
        publishApi.updatePublish(publishId,state);
    }
}
【小结】
掌握动态审核功能实现
总结
- 基于RocketMQ完成操作日志的收集
- 后台管理系统
- 手机端操作完成之后,tanhua-server向rocketMQ发送操作日志消息
- 后台系统tanhua-manage从RocketMQ获取消息,写入到后台系统的日表中 tb_log
- 通过定时任务,完成数据的统计和分析,写入到统计表中
- 从统计表中,查询统计结果
- 华为云内容审核
- 动态审核
- 整体执行流程

 浙公网安备 33010602011771号