基于Node.js的iOS自动化方案
一、基本原理:
1、相关概念
- WDA (WebDriverAgent):是一个最初由Facebook推出的一种iOS测试框架,目前由Appium社区团队在维护,WDA的作用就是可以通过它来实现模拟人对iOS的各种操作,比如:点击、拖拽、长按、滚动、多点触控等等。WDA的工作原理是它可以调用苹果的开发工具XCode自带的测试框架
XCTest.framework以及可以调用iOS的API,从而可以直接在设备上执行命令,WDA的使用依赖于XCode
- Appium:一个Node.js开发的自动化开源工具,可以实现对移动端(iOS、Android)、浏览器端和桌面(MacOS、Windows)自动化操作,运行起来的效果就是在本地起了一个服务,监听一个端口,执行不同语言(client)发过来的命令,翻译之后在对应的平台执行,再把执行后的结果返回给对应的client
官网:https://appium.io/docs/en/2.4/ecosystem/drivers/
中文文档:https://webdriver.io/docs/api
Github:https://github.com/appium/appium
那么Appium和WDA的区别在哪里呢?
- Appium支持跨平台,WebDriverAgent只支持iOS平台
- Appium在定位控件时会出现不稳定现象,相比之下WDA要稳定很多
- Appium可以借助它的驱动drivers,使用特定的驱动程序比如
XCUITest实现对WDA的调用 - XCUITest:Appium针对iOS平台的驱动程序
Appium所有驱动列表:https://appium.io/docs/en/2.4/ecosystem/drivers/
Github:https://github.com/appium/appium-xcuitest-driver
- Appium Inspect:有点类似于浏览器的控制台、Auto.js的安卓客户端,是一个带界面的工具,连接上iOS真机之后,可以将iPhone真机上显示的内容显示在左侧,可以抓取页面上对应的控件信息、录制步骤自动生成对应语言的脚本(自动生成的脚本仅供参考其实并不一定准确),不过这个工具有小bug,就是在定位控件时显示的坐标x、y并不准确,并不是真机上实际的坐标
- WebDriverIO:一个可以运行在Node.js环境上的自动化框架,可以作为Appium的客户端client使用。翻译翻译就是:Appium运行起来之后只是一个服务server,但是我们想实现自动化是不是要用不同的语言来写对应的脚本文件,Appium支持多种语言,但是官方支持的语言有:Java、Python、Ruby和C#,Appium官方在维护这些语言对应的包,但是如果想用Node.js写可以跑在Appium上的脚本,就需要借助第三方团队维护的包比如WebDriverIO,在
npm install webdriverio并且引入之后,填写一些配置信息,就能连接上运行中的Appium服务,WebDriverIO封装了对设备各种操作的API,直接调用即可非常方便~
官网:https://webdriver.io/
官方文档:https://webdriver.io/docs/api
Appium支持的语言Client列表:https://appium.io/docs/en/2.4/ecosystem/clients/
webdriverio对应的npm包:https://www.npmjs.com/package/webdriverio
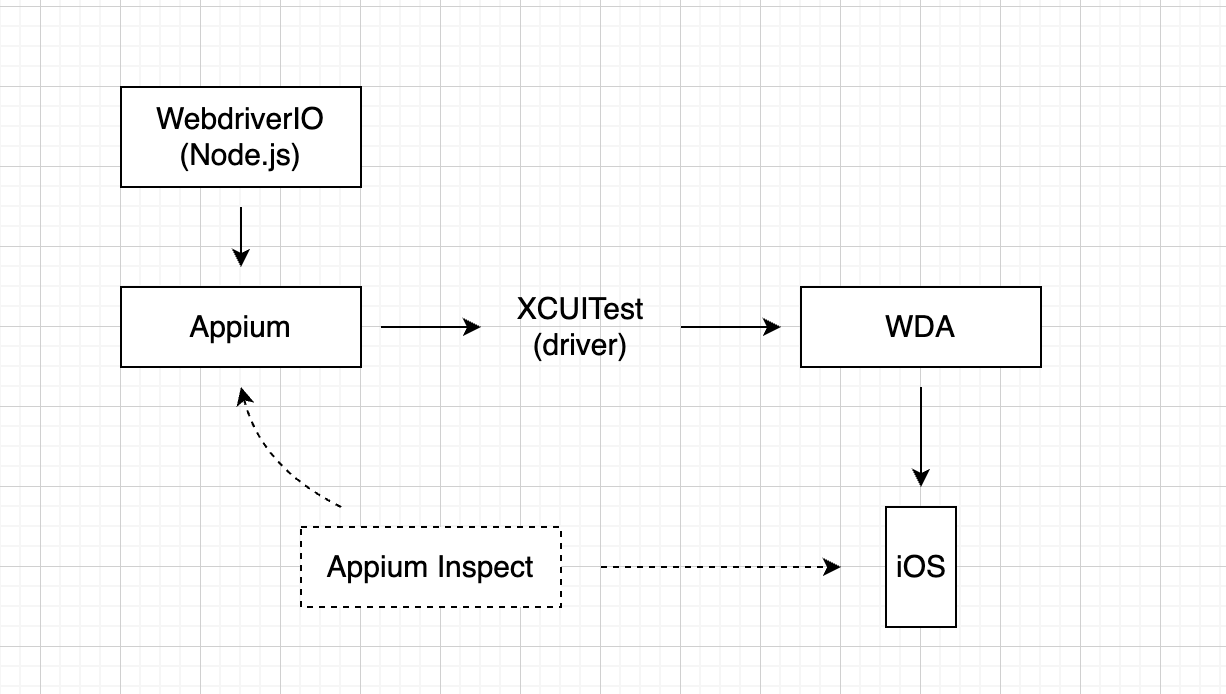
2、运行流程概括
- 脚本运行流程:
手机连接Mac -> XCode启动WDA -> 启动Appium Server -> 编写js脚本,连接Appium服务 -> 运行
- 检查控件相关信息:
手机连接Mac -> XCode启动WDA -> 启动Appium Server -> 打开Appium Inspect -> 开始会话
二、环境配置
1、环境配置流程概括
- 运行设备:Mac、iPhone(没有Mac的话,跑在虚拟机里面的MacOS貌似也可以,没试过)
- 在Github下载WebDriverAgent,AppStore下载XCode,将其中的
WebDriverAgent.xcodeproj用XCode打开 - 连接上iPhone,打开开发者模式,在XCode中配置一些信息,修改一些配置(具体内容参考下面环境配置一节)
- Github下载Appium Server(不要下载图形化界面的GUI版本,可能会有问题),直接下载的Appium大概率是不能直接与XCode运行WDA服务相连,识别不出来,所以要先下载Appium针对iOS平台的driver,
appium driver install xcuitest,Appium服务跑起来之后默认会跑在127.0.0.1:4723 - Github下载安装Appium Inspect,填写相关配置信息,点击开始会话
start session即可与真机相连,需要注意:Appium Inspect和下面要编写的JS脚本(或者其他语言的脚本)在运行的时候都会和4723端口的Appium Server服务相连,所以会出现Appium Inspect一开始会话,运行的脚本就会自动停掉,一执行脚本,Appium Inspect就会自动断开会话 - 下载安装Node.js,安装webdriverio的包并引入,填写配置信息,编写脚本,运行~
2、环境搭建详情
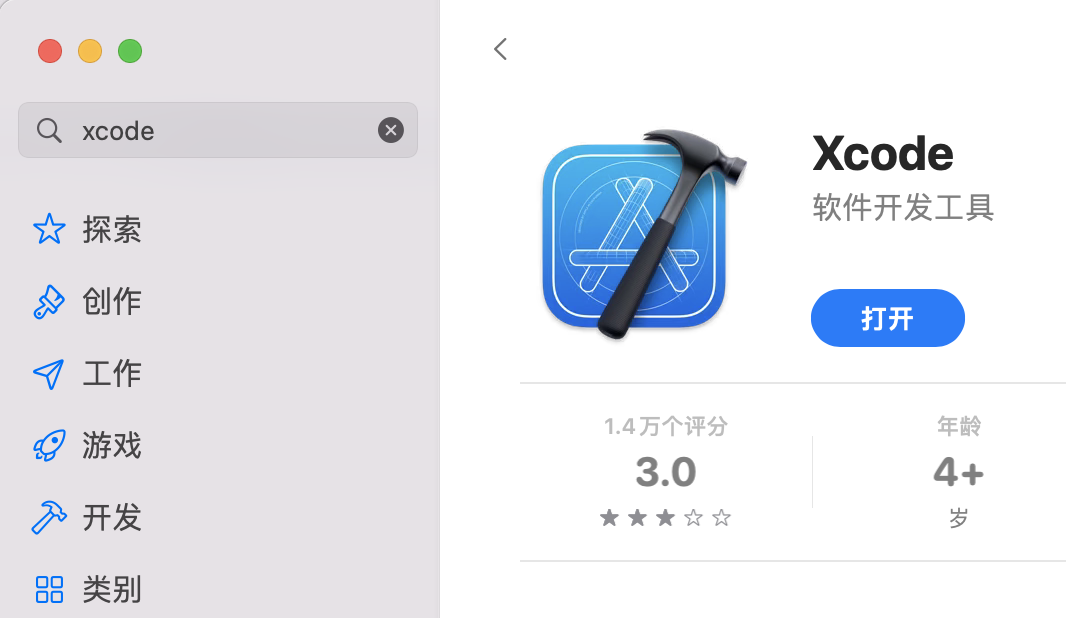
2.1 Xcode
Apple Store里面下载安装
2.2 Homebrew
Homebrew是Mac平台的软件管理软件,它可以使我们更加容易安装一些其他软件,仅需要执行简单的安装命令,就能下载安装所需要的软件。
/bin/bash -c "$(curl -fsSL https://gitee.com/ineo6/homebrew-install/raw/master/install.sh)"
2.3 Carthage
Carthage用来管理项目依赖,后面编译WebDriverAgent项目时就需要用到它
brew install carthage
carthage version
2.4 ios-deploy
终端安装和调试iPhone应用的是第三方开源库
(使用中好像没用到这个,但是看其他博文里面提到要安装,所以还是安装吧,防止缺失依赖)
brew install ios-deploy
2.5 ideviceinstaller
一个命令行工具,管理iOS设备上应用程序的安装和卸载,以及查看相关信息
brew install ideviceinstaller
查看所连接iOS设备里已经安装的应用信息
ideviceinstaller -l

# 会得到以下信息
# 第一列就是App对应的bundleId,在Appium Inspect的配置那块儿可能会用到
CFBundleIdentifier, CFBundleVersion, CFBundleDisplayName
com.toyopagroup.picaboo, "12.26.0.36", "Snapchat"
com.lemon.lvoverseas, "10.6.0.61", "CapCut"
com.google.ios.youtube, "18.12.2", "YouTube"
com.burbn.instagram, "460329226", "Instagram"
com.facebook.WebDriverAgentRunner.xctrunner, "1", "WebDriverAgentRunner-Runner"
com.zhiliaoapp.musically, "284100", "TikTok"
2.6 libimobiledevice
libimobiledevice是一个跨平台的软件库,不依赖任何已有的私有库,不需要越狱。应用软件可以通过这个开发包轻松访问设备的文件系统、获取设备信息,备份和恢复设备,管理 SpringBoard 图标,管理已安装应用,获取通讯录、日程、备注和书签等信息
#安装最新版本libimobiledevice
brew install libimobiledevice --HEAD
2.7 Appium
在其他文章中看到Appium有两种安装方式:
- Appium Desktop(桌面版)
- Appium Server(命令行)
但是实际操作下来,桌面版会遇到奇奇怪怪的问题,所以这里推荐只用Appium Server命令行版本
npm install -g appium
检查appium版本
appium -v
启动appium服务
# 可以直接使用下面的命令,服务默认启动在 0.0.0.0:4723
appium server

# 也可以自己指定端口号
# -a参数:设置appium工作地址
# -p参数,设置appium工作端口号
appium -a 127.0.0.1 -p 4723
2.8 Appium doctor
在上一步运行appium服务之前,可以使用appium doctor检测一下,运行appium所依赖的环境是否成功
npm install appium-doctor -g
#检测iOS环境是否安装成功
appium-doctor --ios
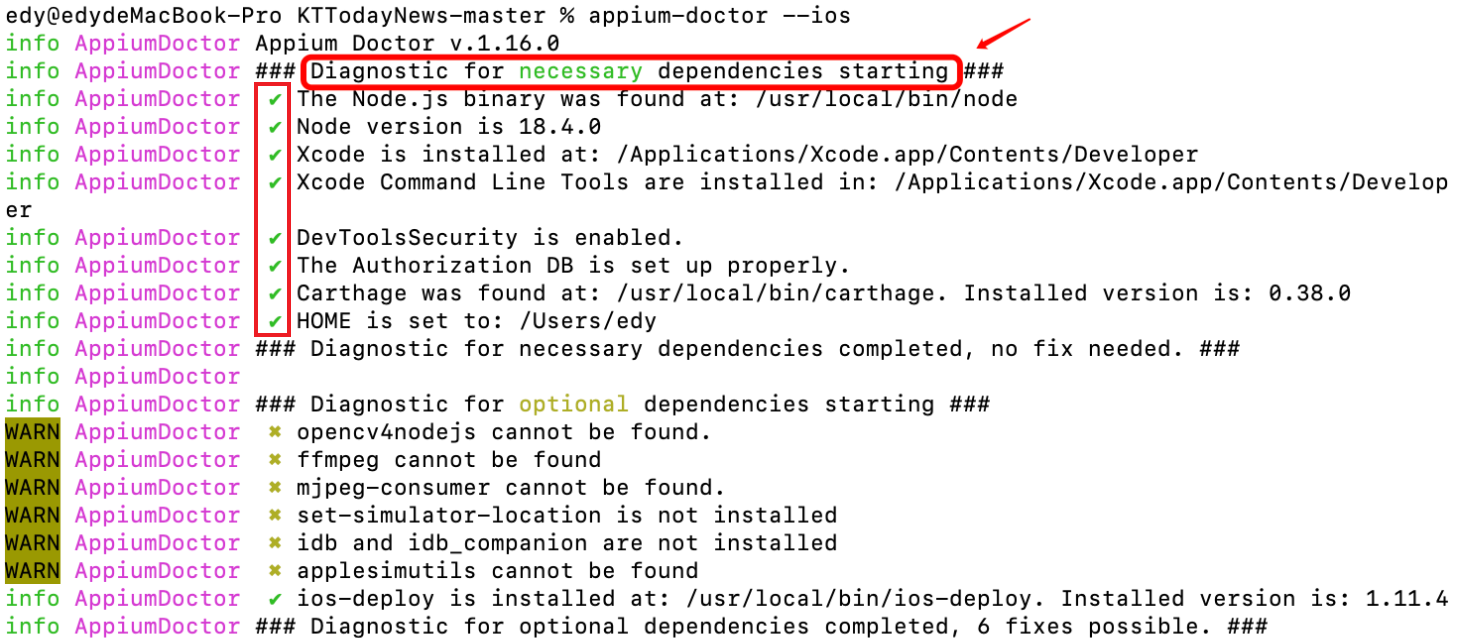
necessary dependcies必须全部是打勾状态,可选部分依赖可以不用安装
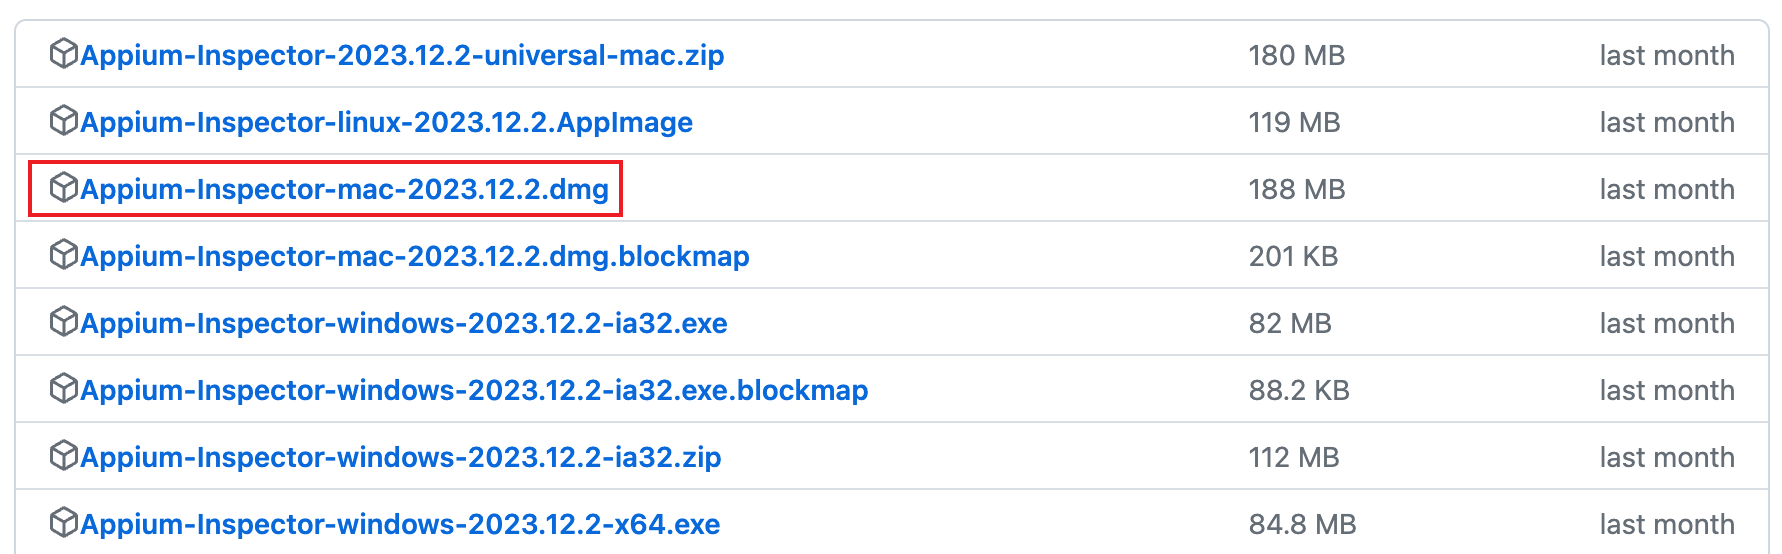
2.9 Appium inspector
类似于浏览器控制台的一个工具,原来是集成在Appium Desktop中,但是后来将Appium inspector(检查器)单独拆分出去了,所以需要单独下载,直接下载最新版安装就行
2.10 WebDriverAgent
2.10.1 下载WDA
WebDriverAgent是Appium测试iOS应用的自动化引擎,Appium Desktop和Appium Server都内置了WebDriverAgent,可以用Xcode来编译运行WebDriverAgent(但是不建议用这种方式,因为有奇奇怪怪的问题)
Appium内置的WebDriverAgent的路径:
Appium Server:
/usr/local/lib/node_modules/appium/node_modules/appium-webdriveragent/
Appium Desktop:
/Applications/Appium.app/Contents/Resources/app/node_modules/appium/node_modules/appium-webdriveragent
在访达中直接跳转路径,输入Command + Shift + G
推荐:直接去下载独立的WebDriverAgent而不是使用Appium Desktop或者Appium Server内置的WDA
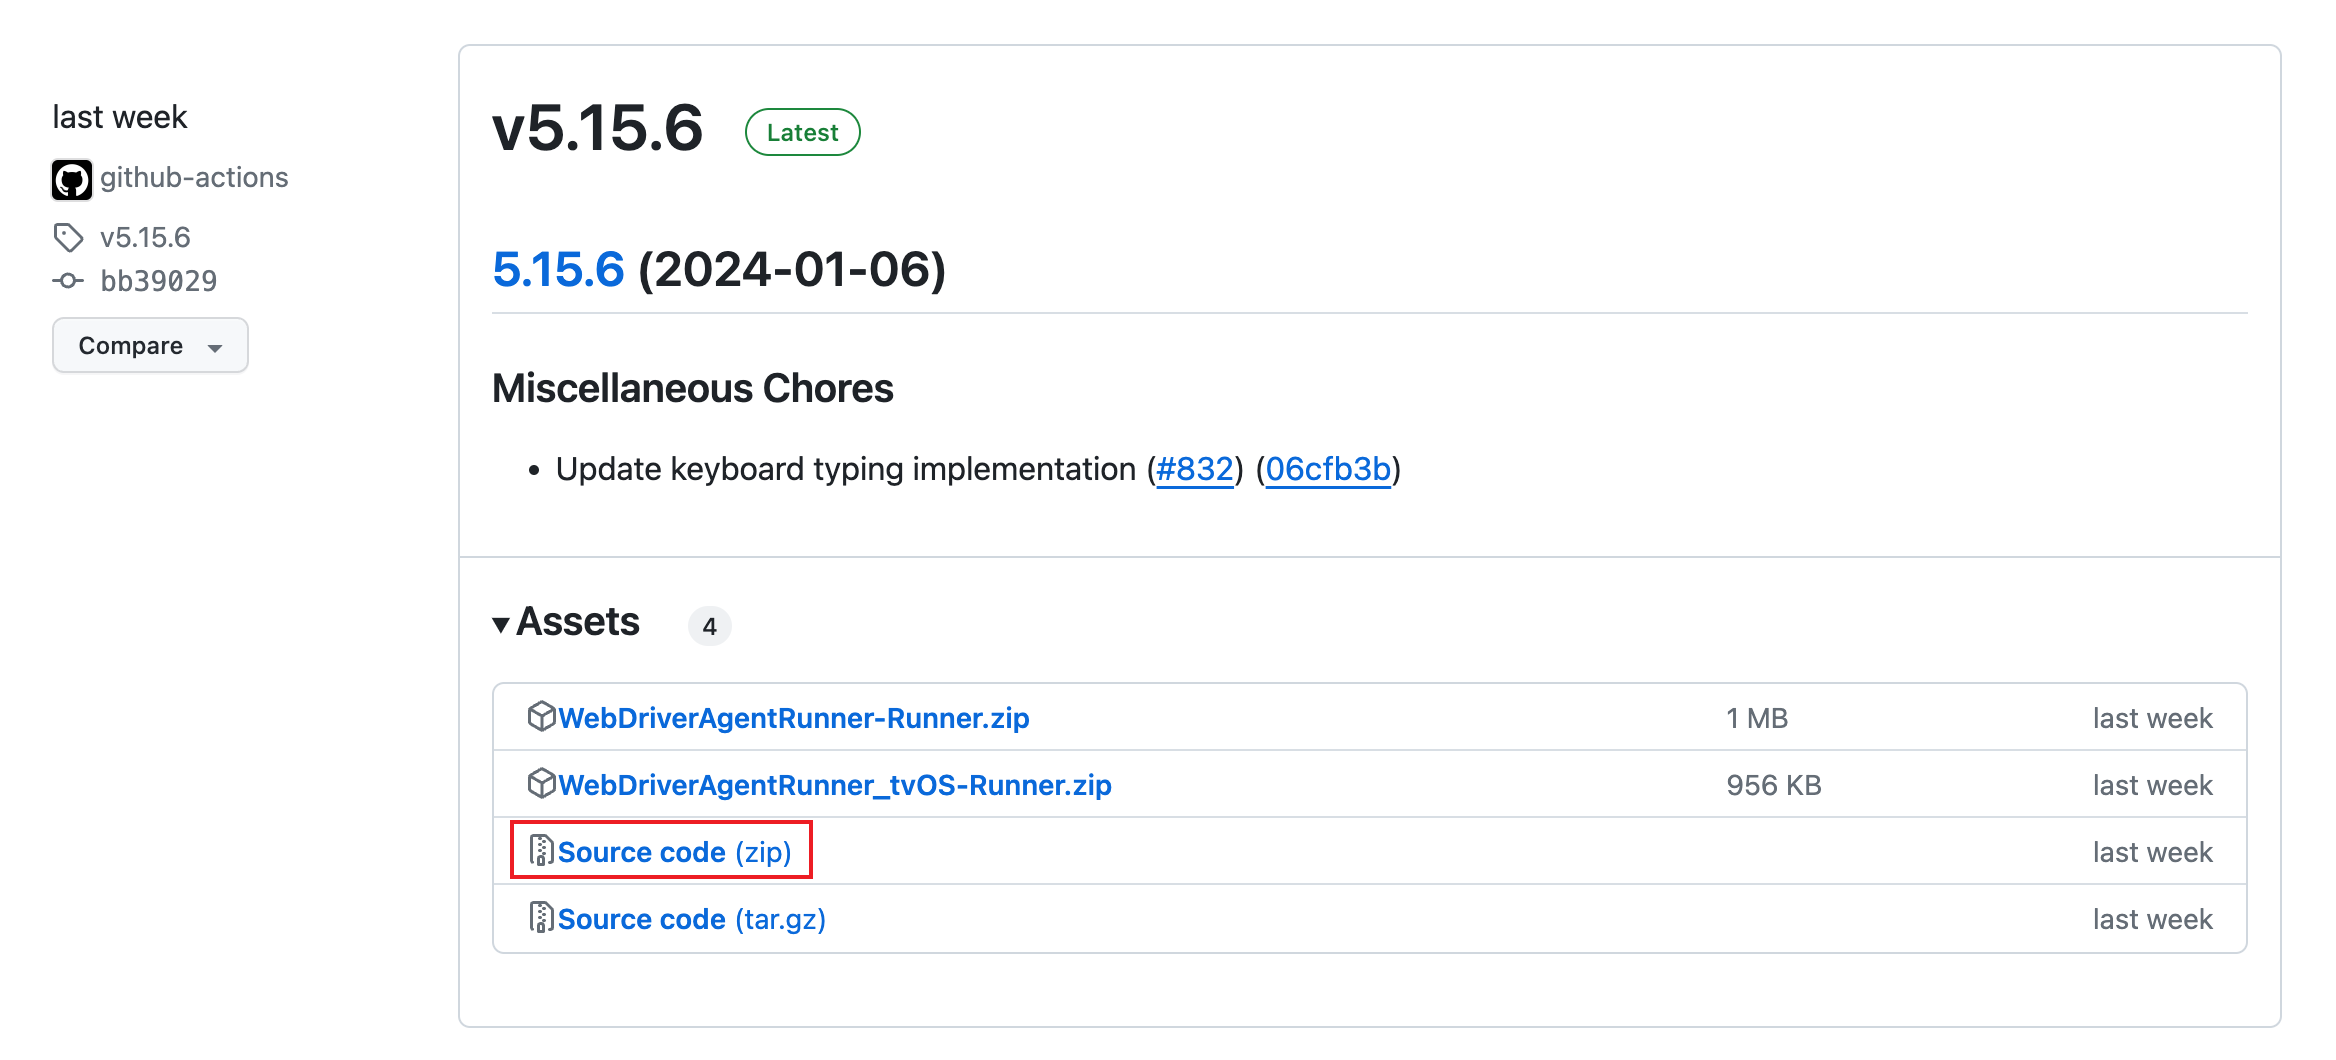
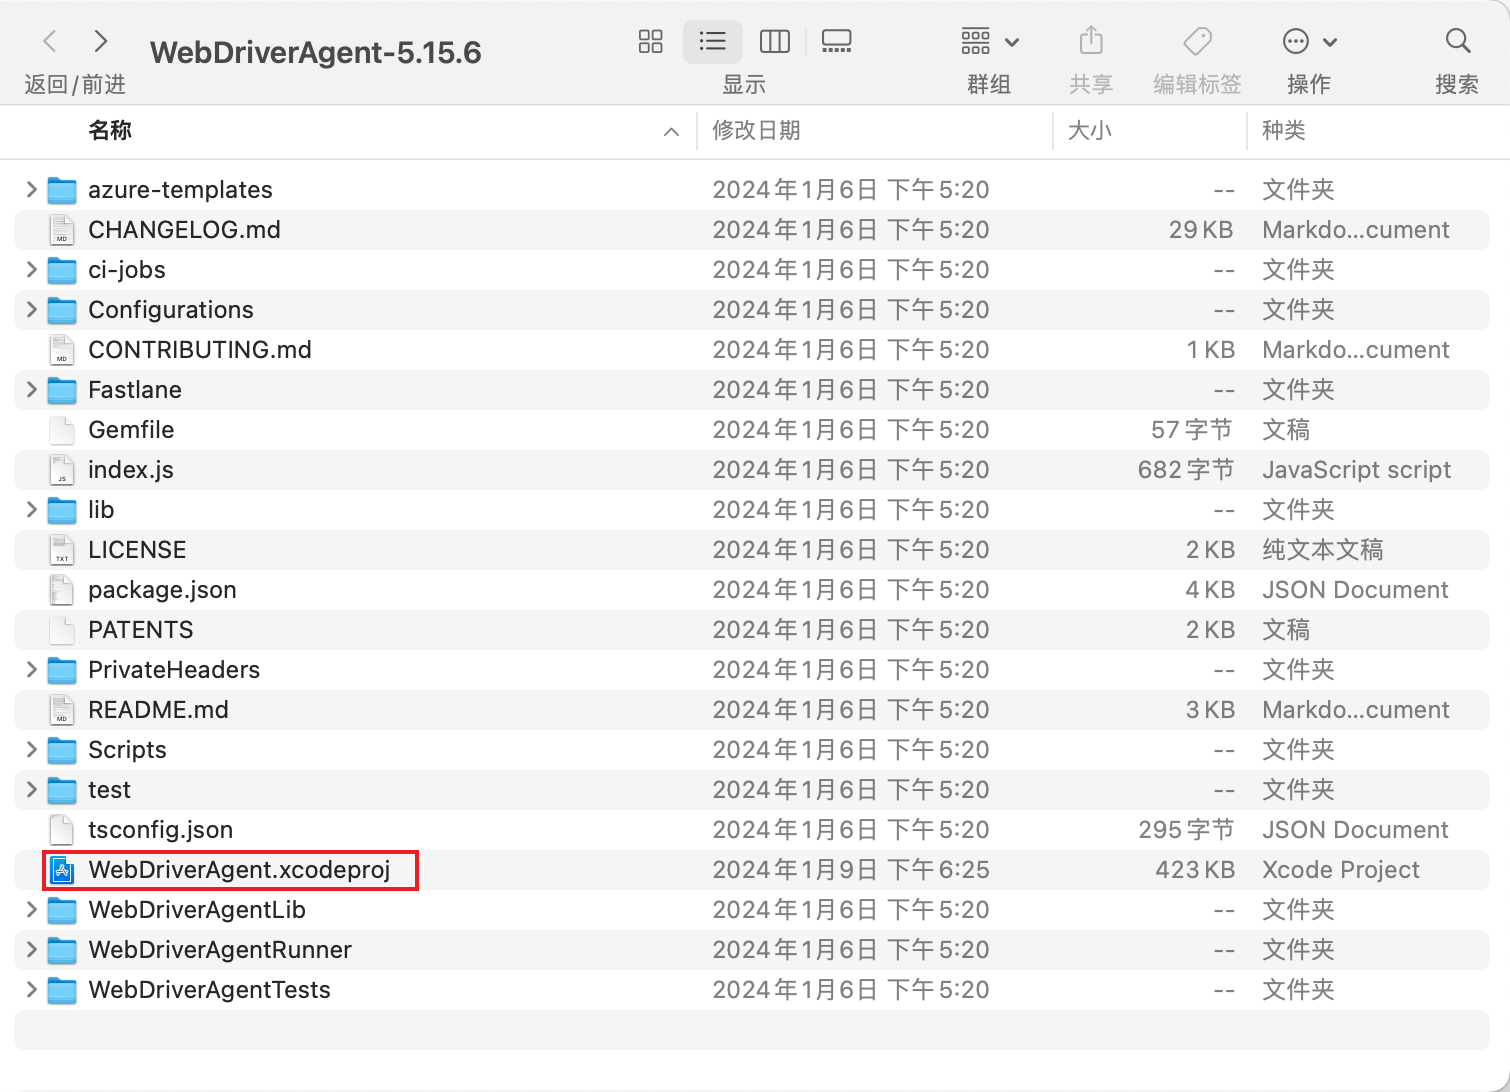
下载之后解压,安装好Xcode之后,打开其中的WebDriverAgent.xcodeproj
2.10.2 配置WDA
- 第一次需要配置开发者账号
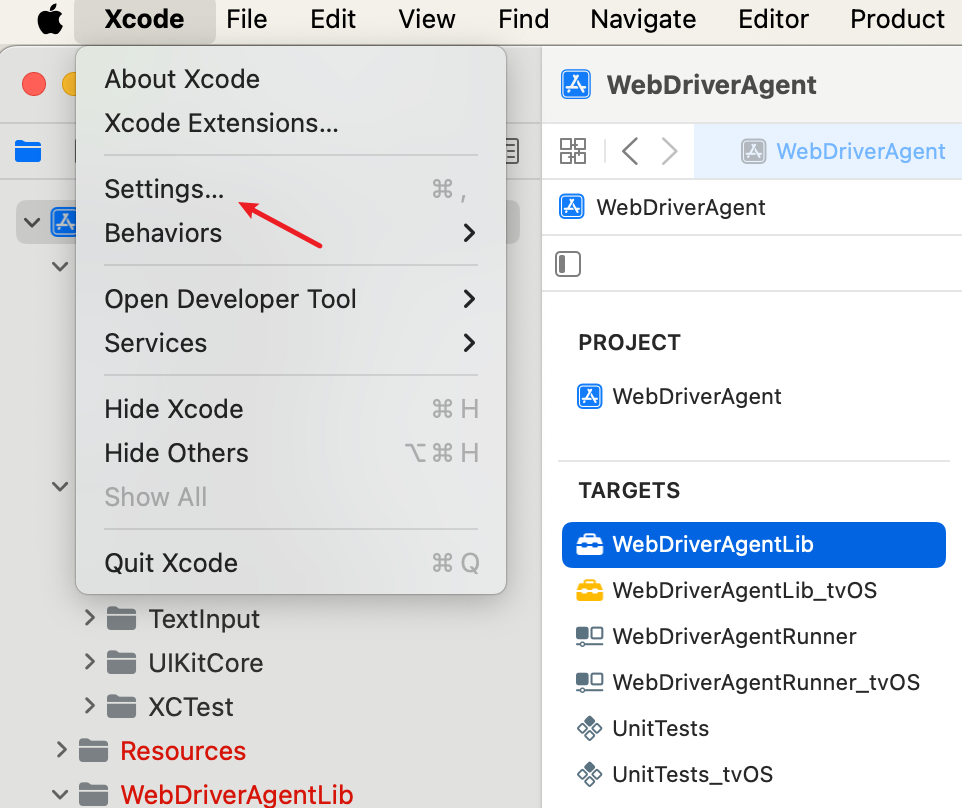
点击左上角Xcode -> Settings -> Accounts -> 左下角添加

可以选择多种登录方式

登录成功之后点击Download Manual Profiles,再点击Manage Certificates
添加好证书右下角点击Done

账户设置好之后,需要返回Xcode工具的Signing & Capabilities里面添加刚才添加好的Team
左上角双击项目名字WebDriverAgent -> 点击TARGETS里面的WebDriverAgentLib -> 点击上方Signing & Capabilities
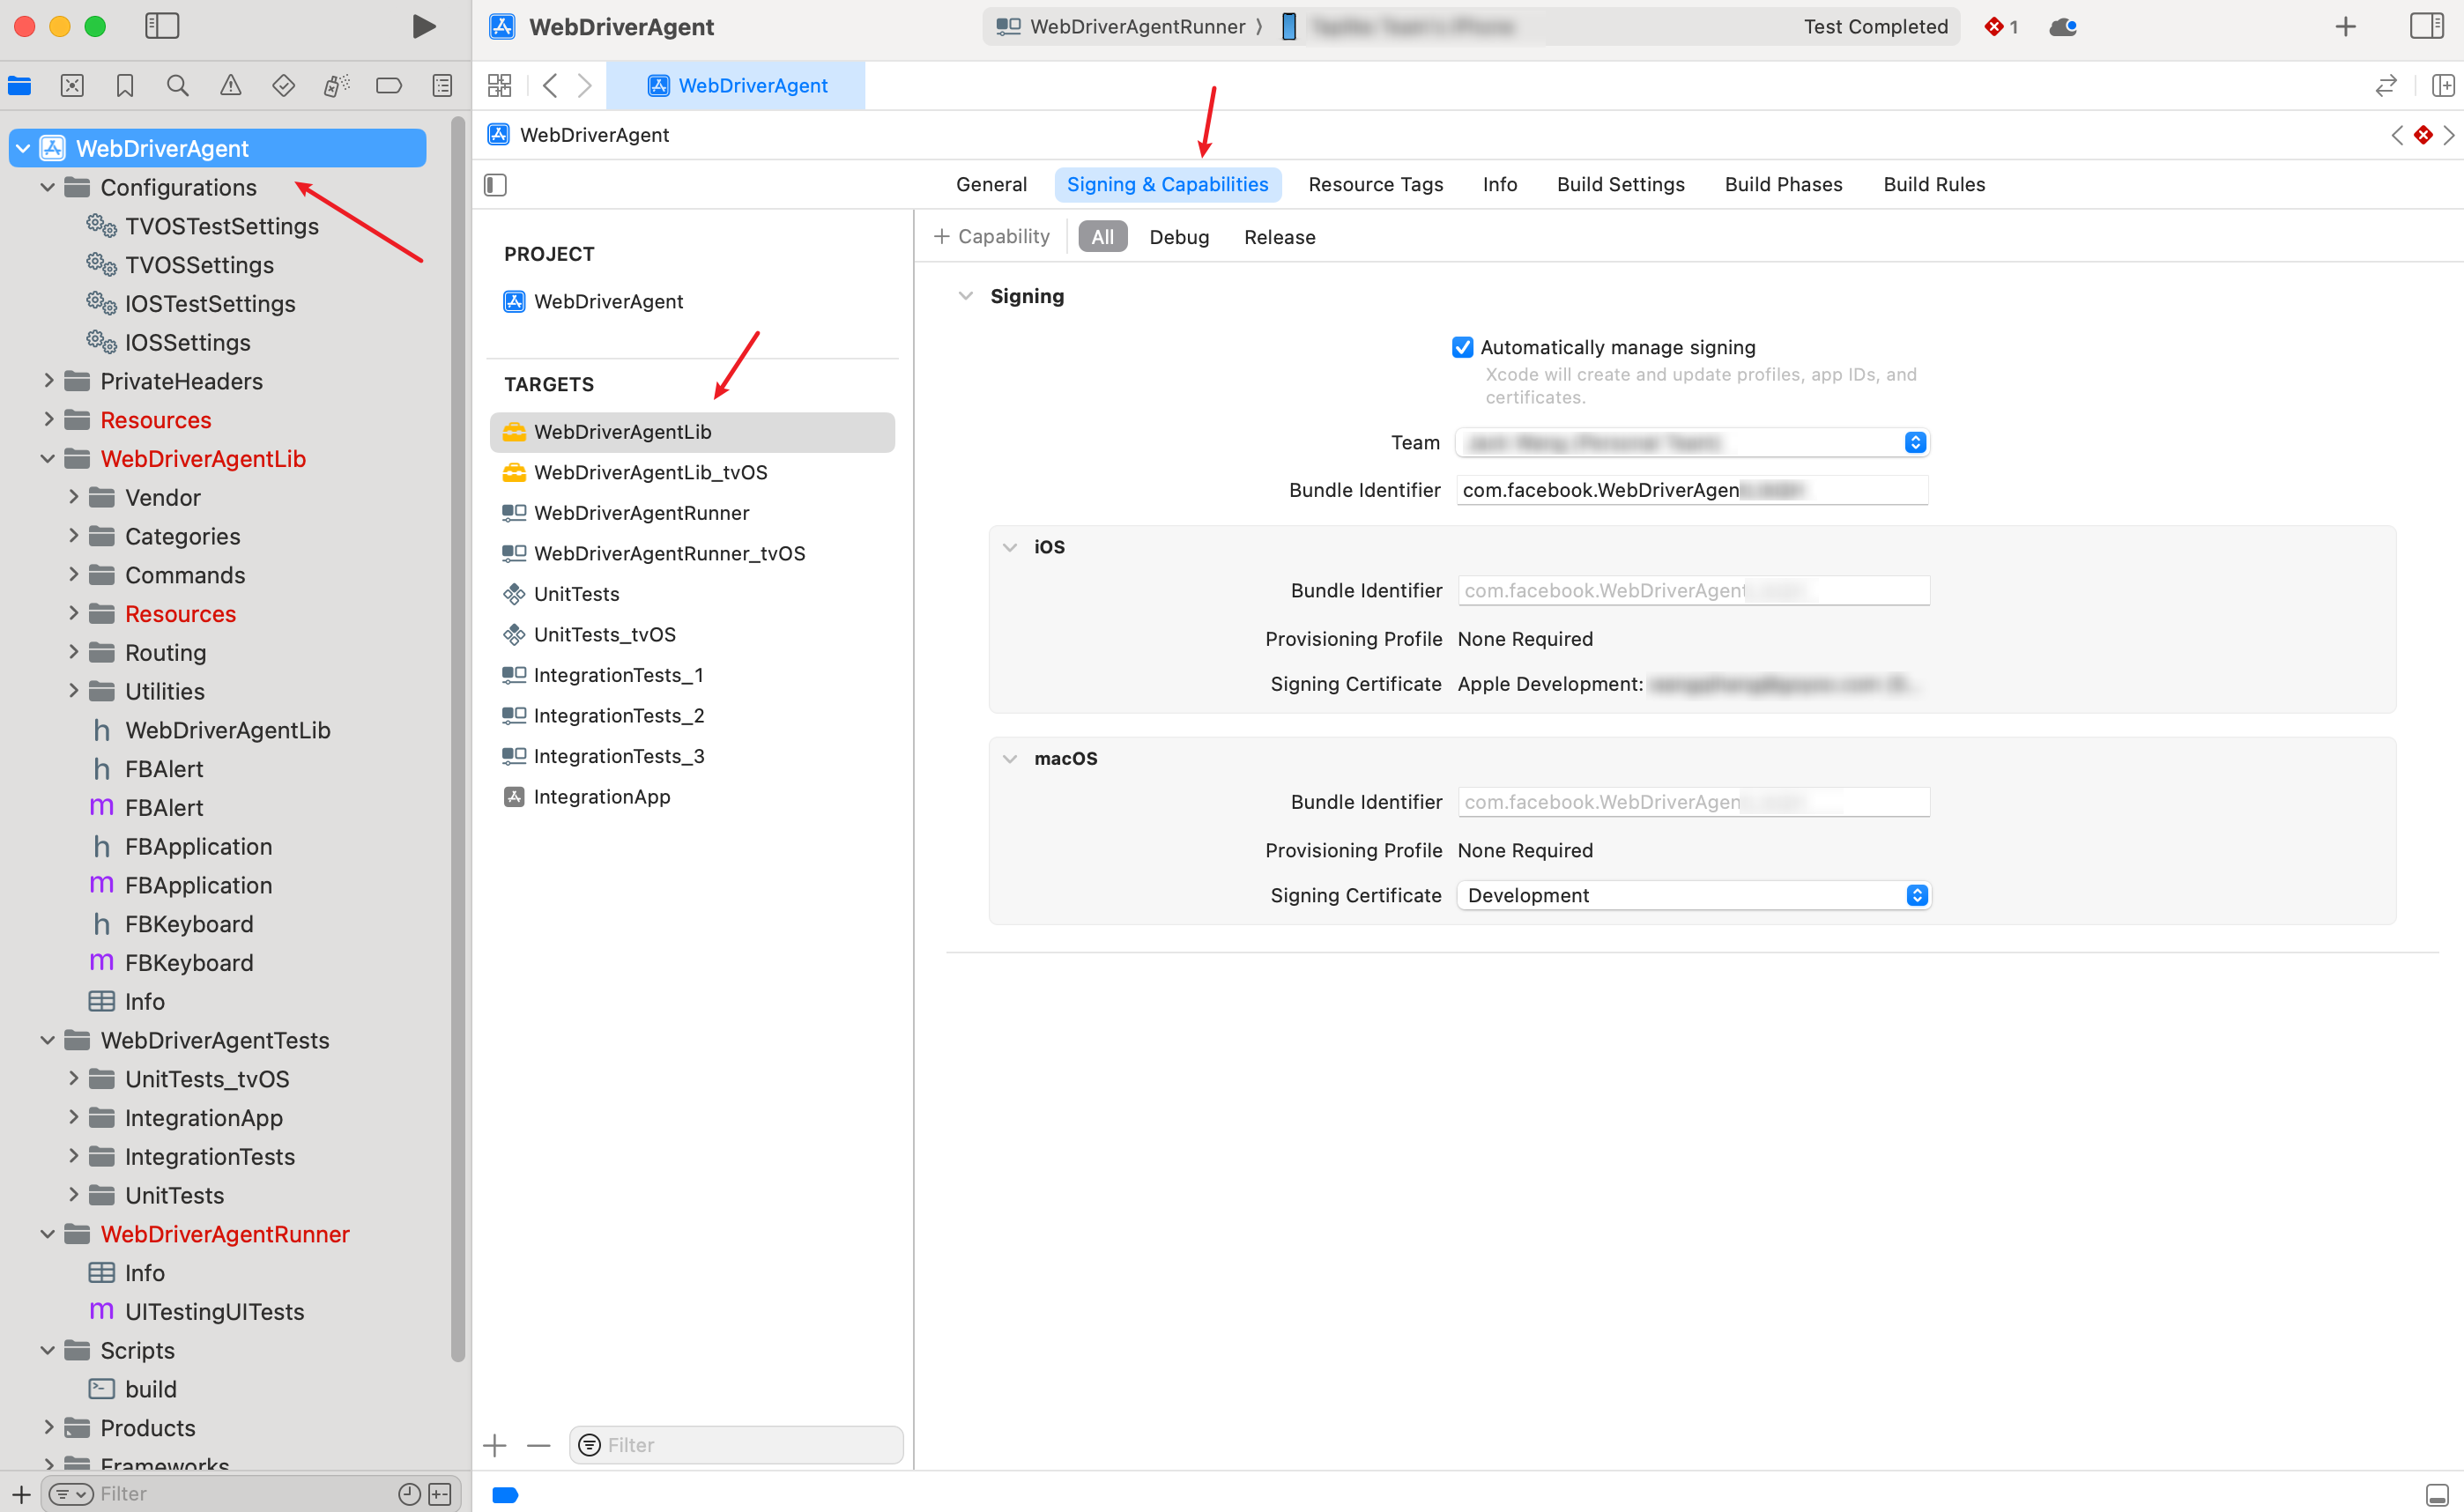
分别点击TARGETS里面的WebDriverAgentLib和WebDriverAgentRunner设置对应的Team
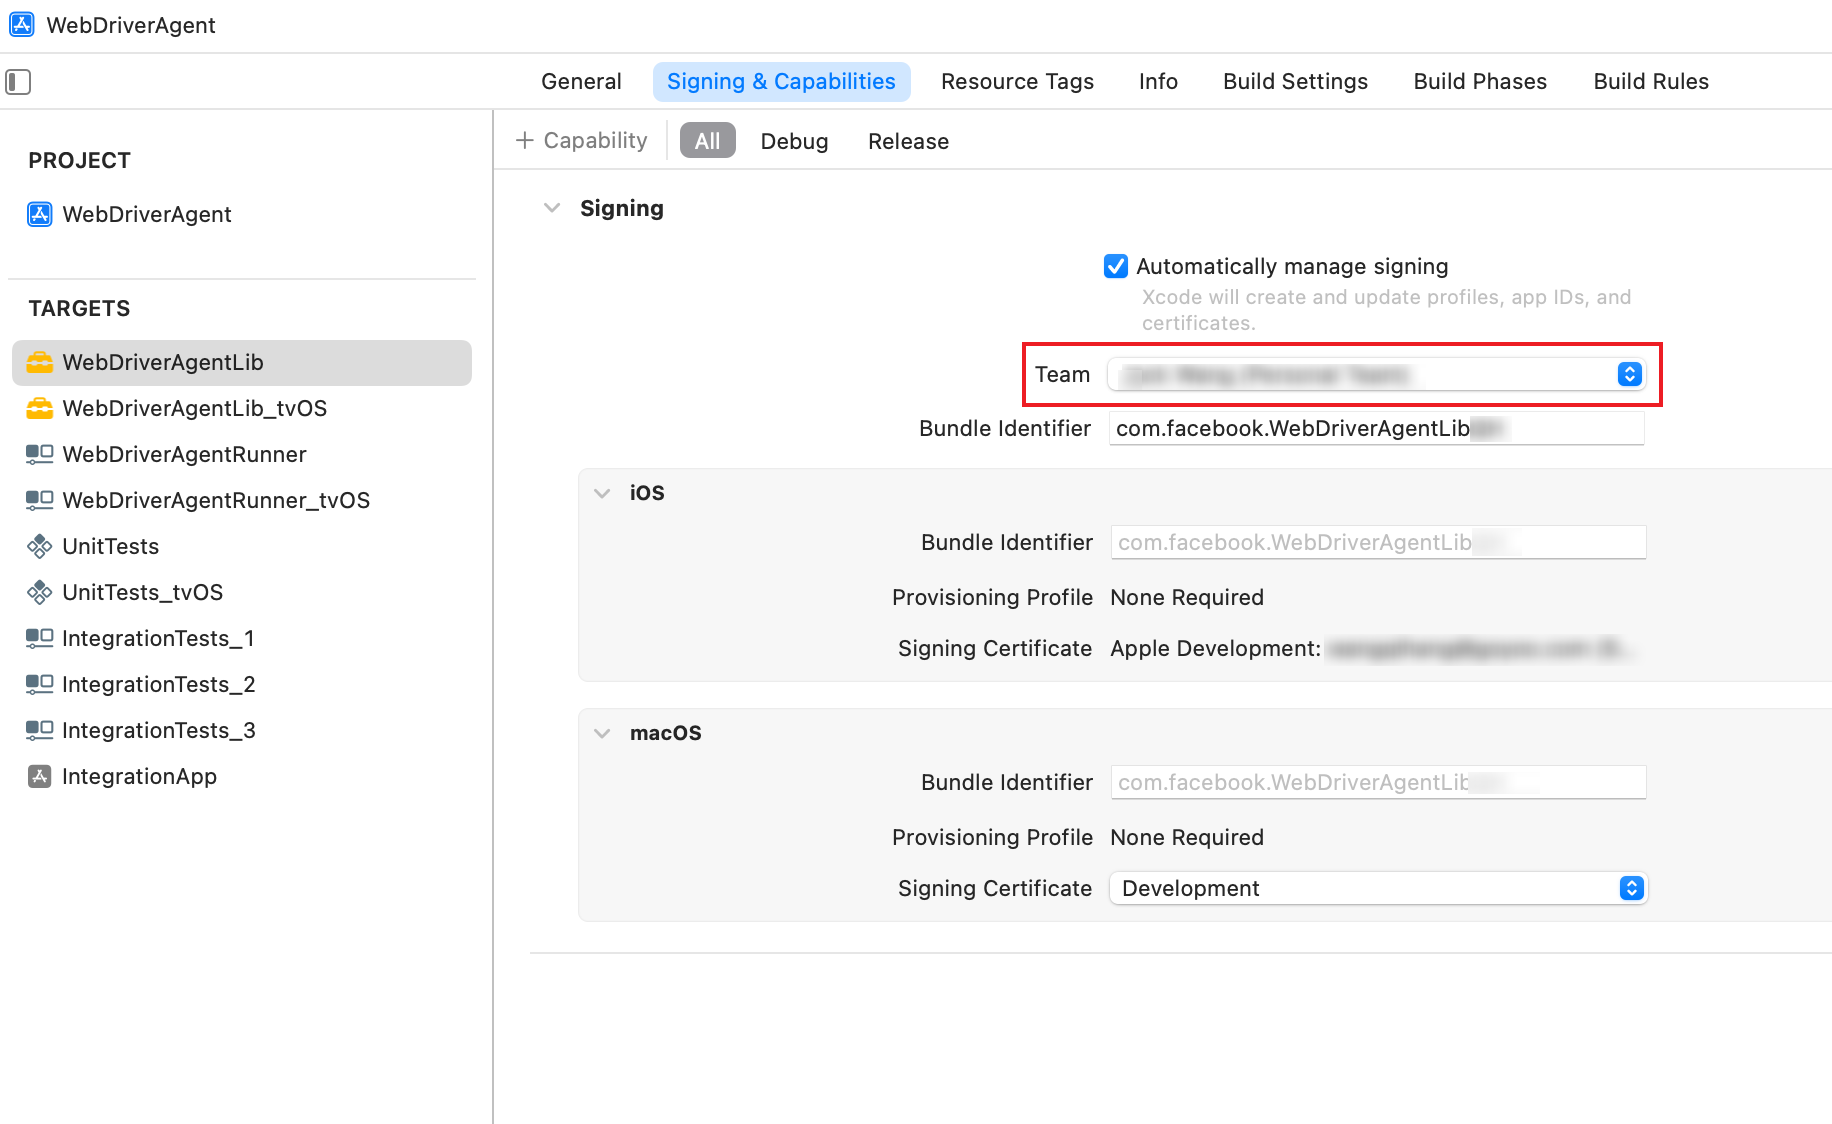
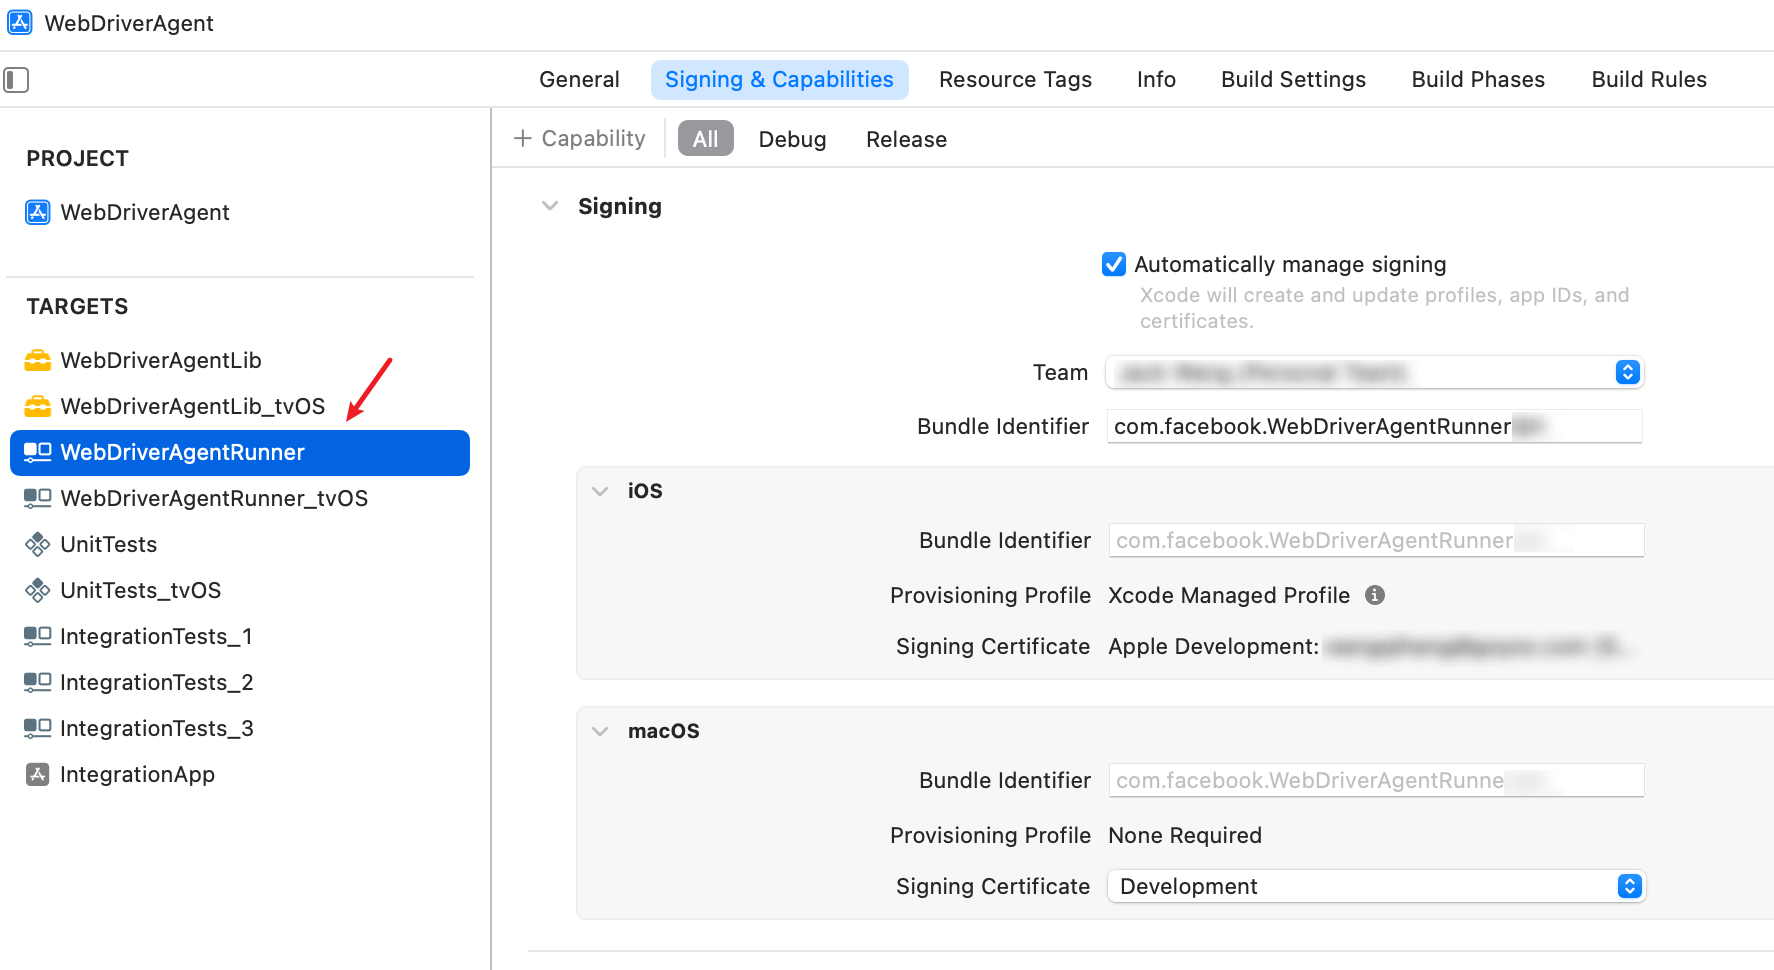
在后面执行的时候,有可能会提示Bundle Identifier重复什么的,需要改一下Bundle Identifier,可以在原来的名字后面随便加个后缀什么的,至于是改WebDriverAgentLib还是WebDriverAgentRunner里面的Bundle Identifier可以都试试,最后能运行成功就行
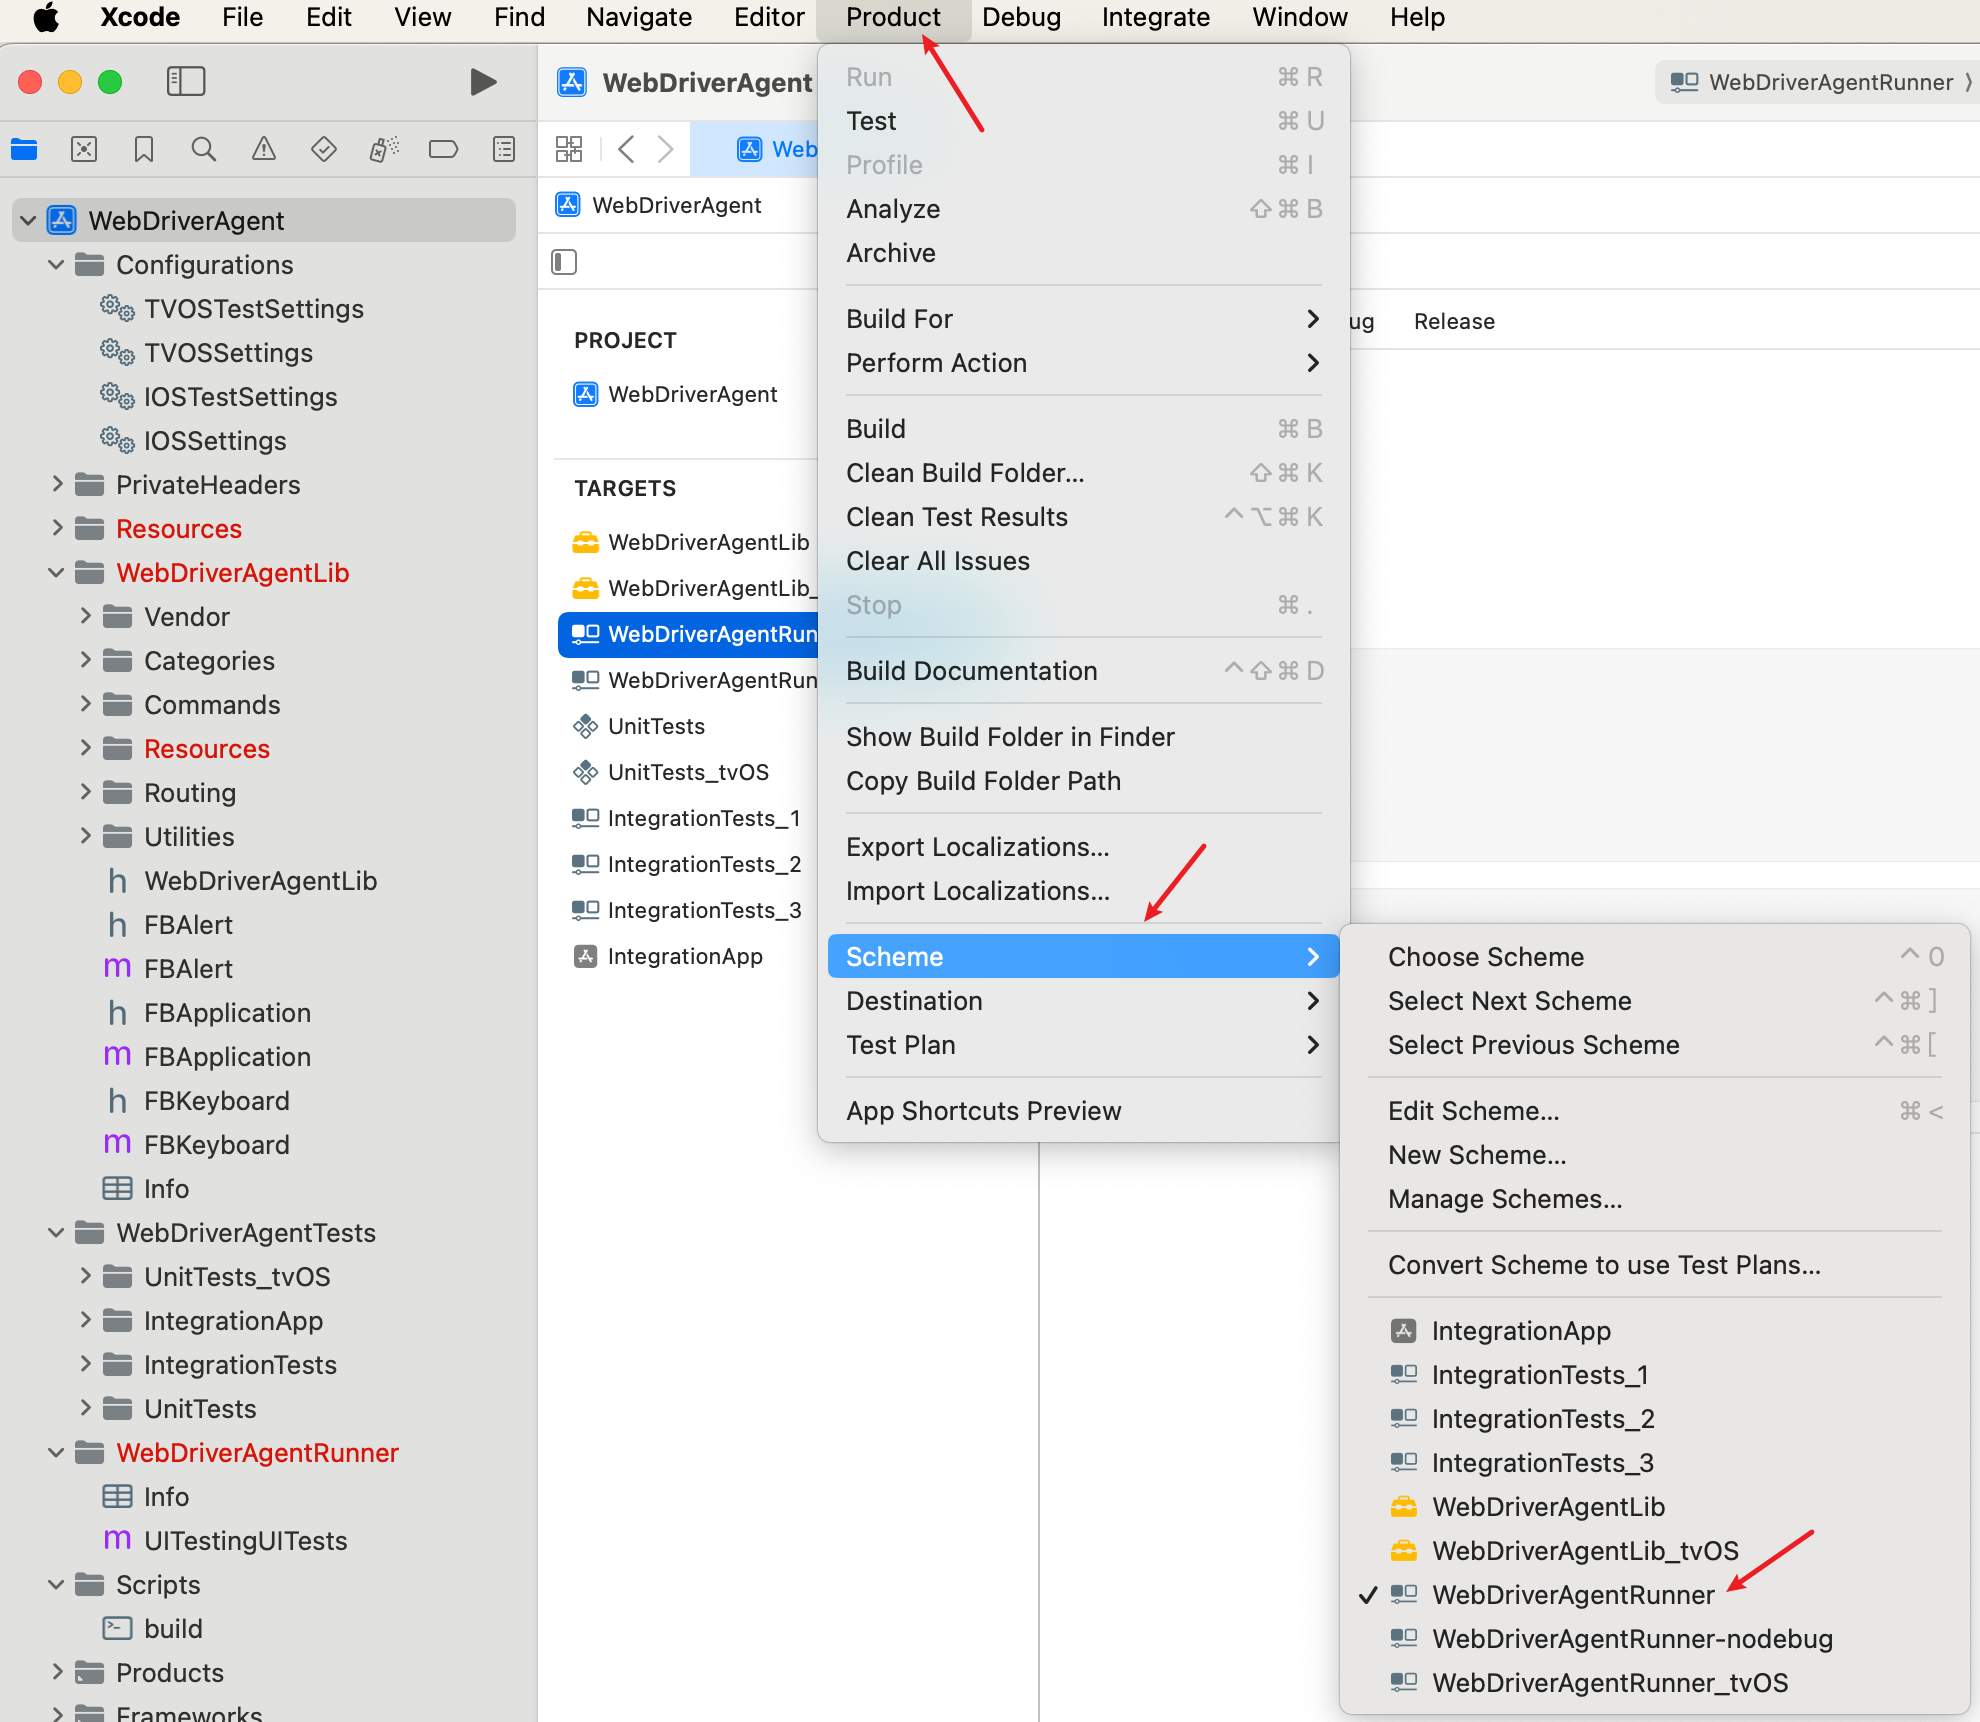
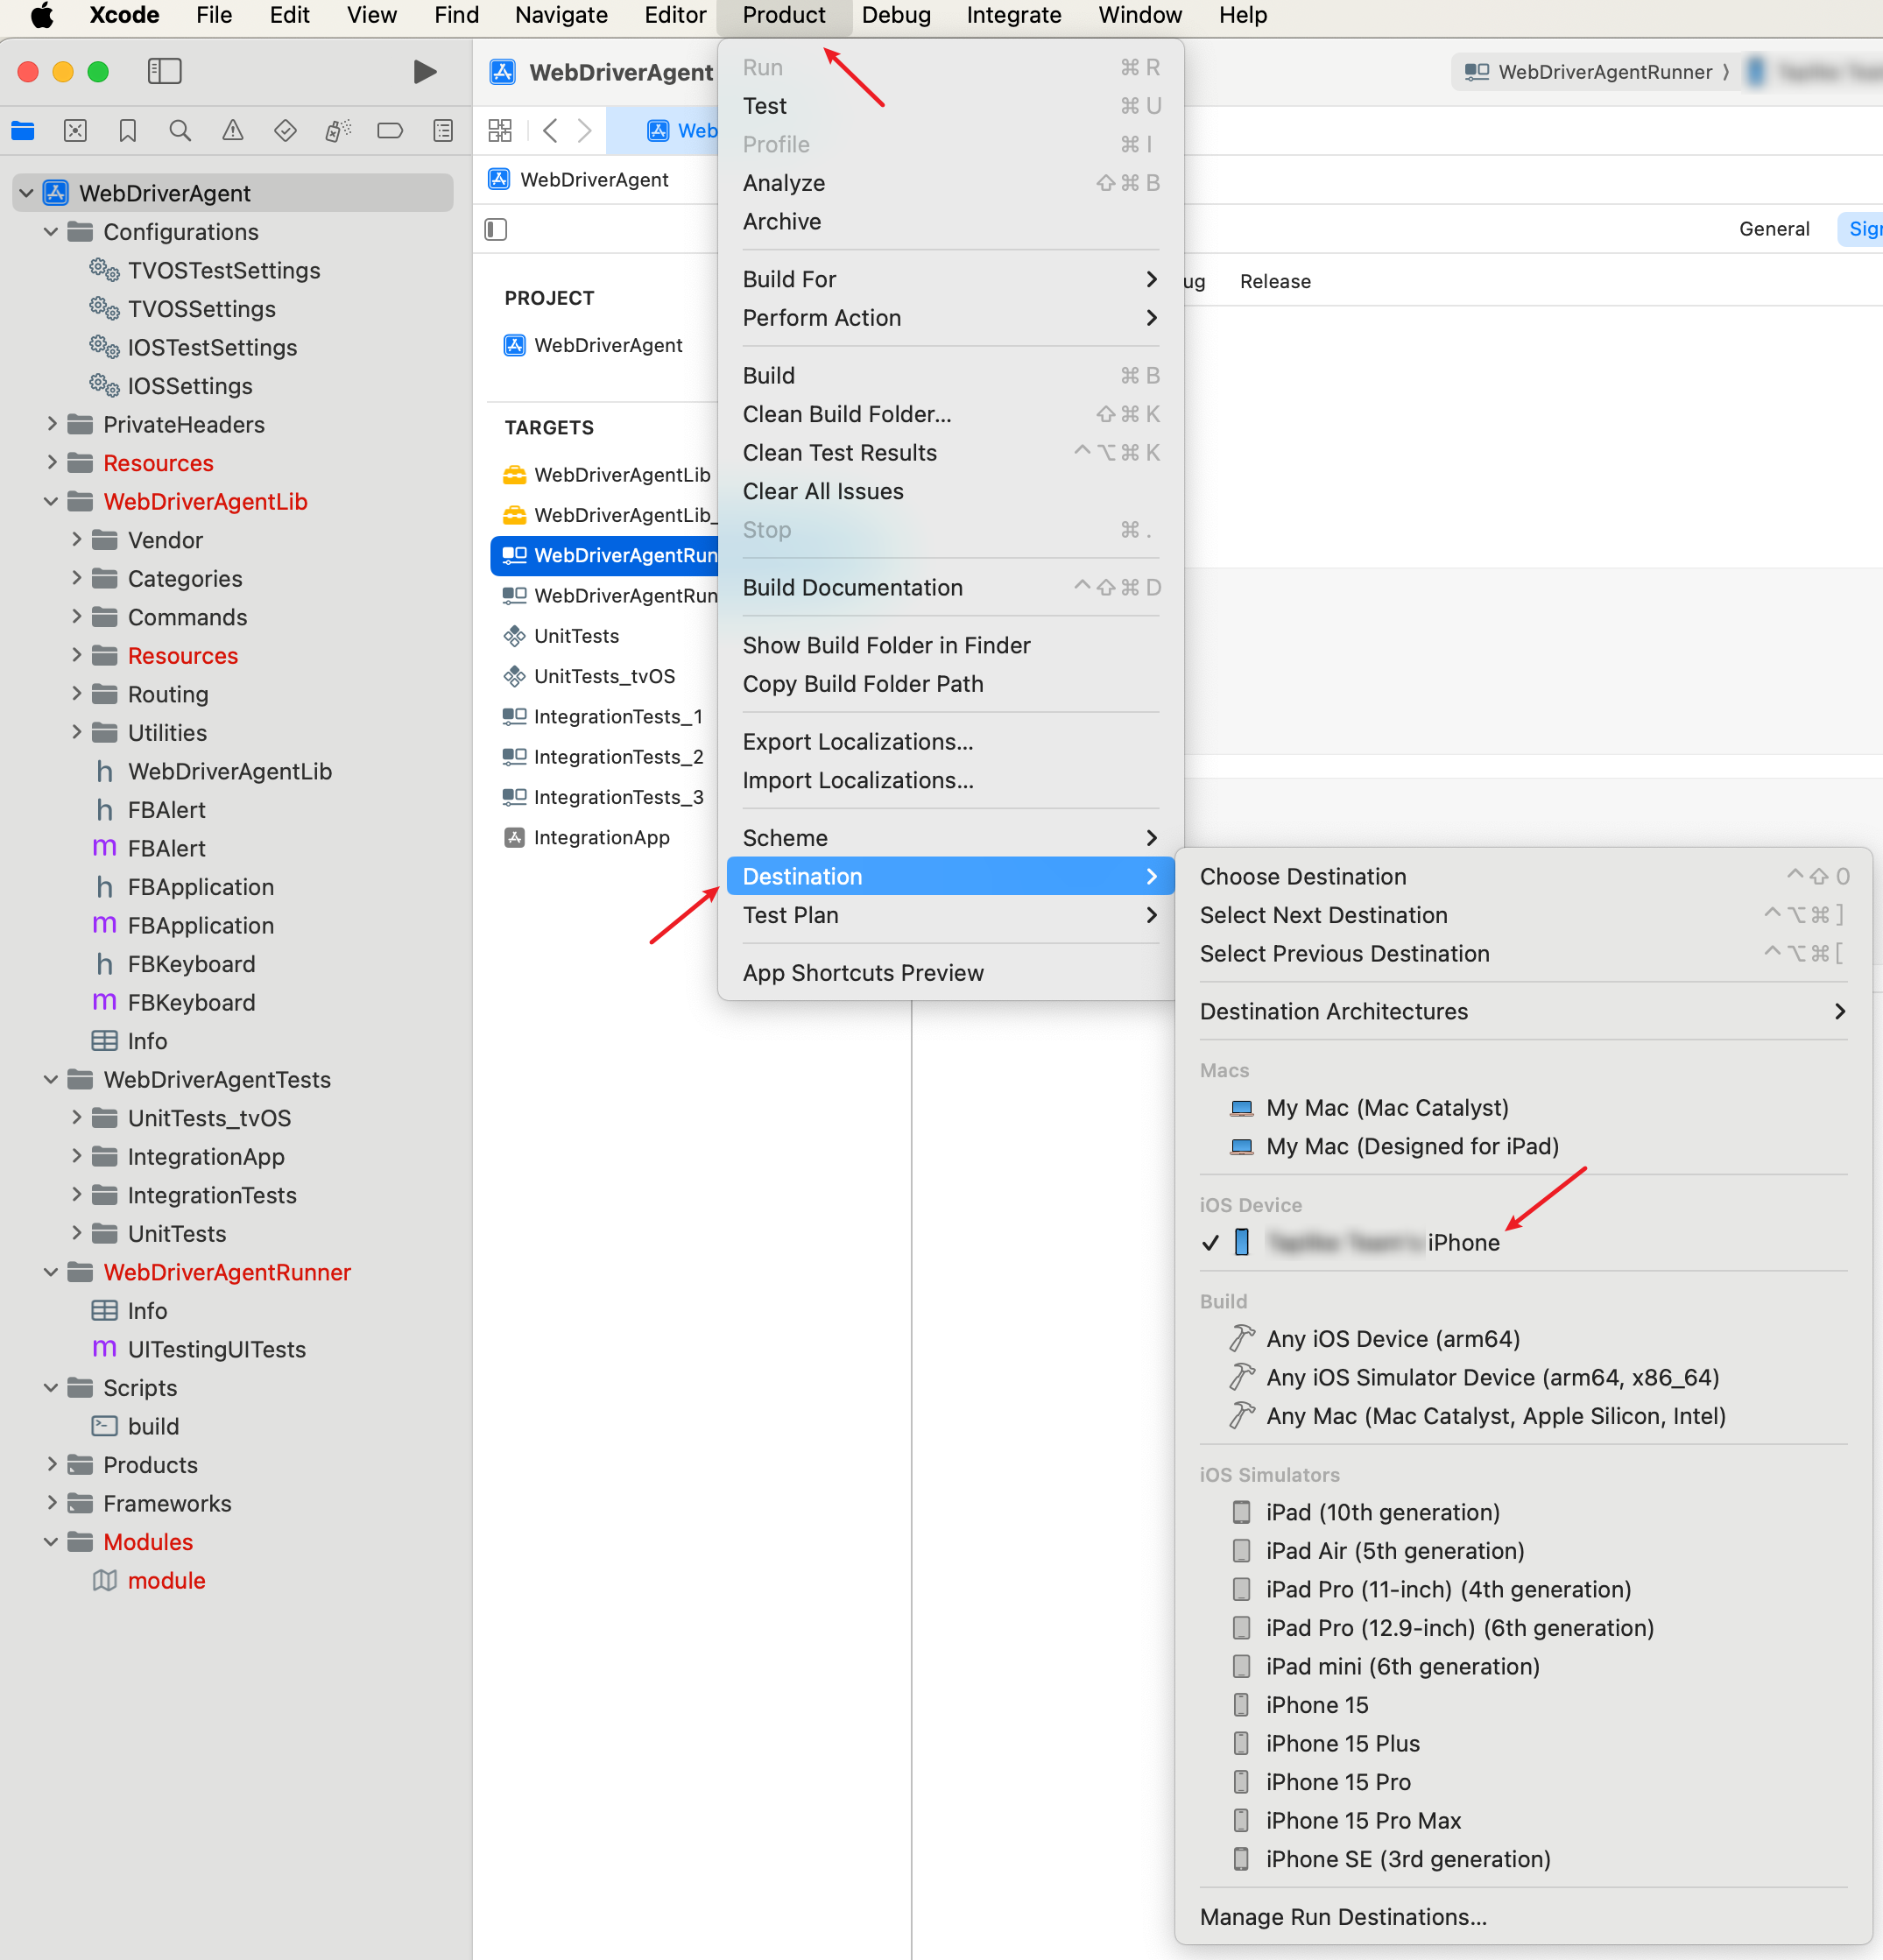
2.10.3 连接真机
将iPhone与Mac连接
打开Xcode,在顶部Product -> Scheme -> 选择WebDriverAgentRunner
在Product -> Destination -> 选择连接电脑的iOS设备
在iOS设备上打开开发者模式
点击Privacy & Security->Developer Mode->打开开发者模式

打开开发者模式后需要重启手机
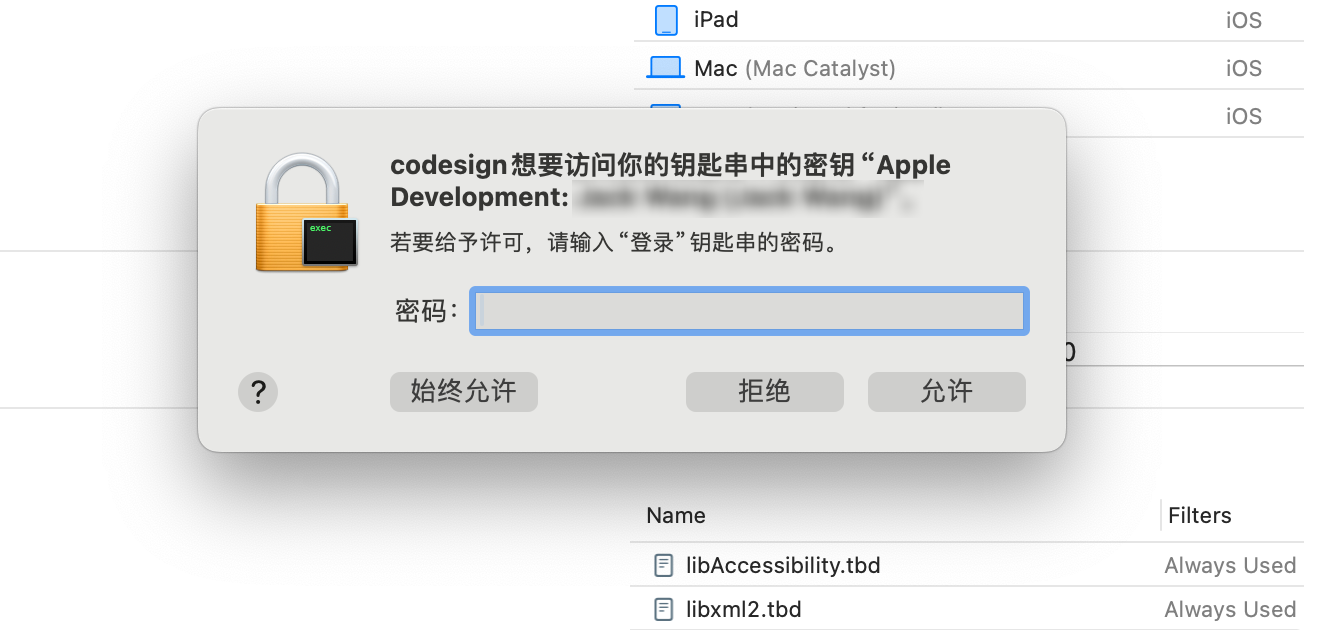
点击顶部的Product -> Test运行
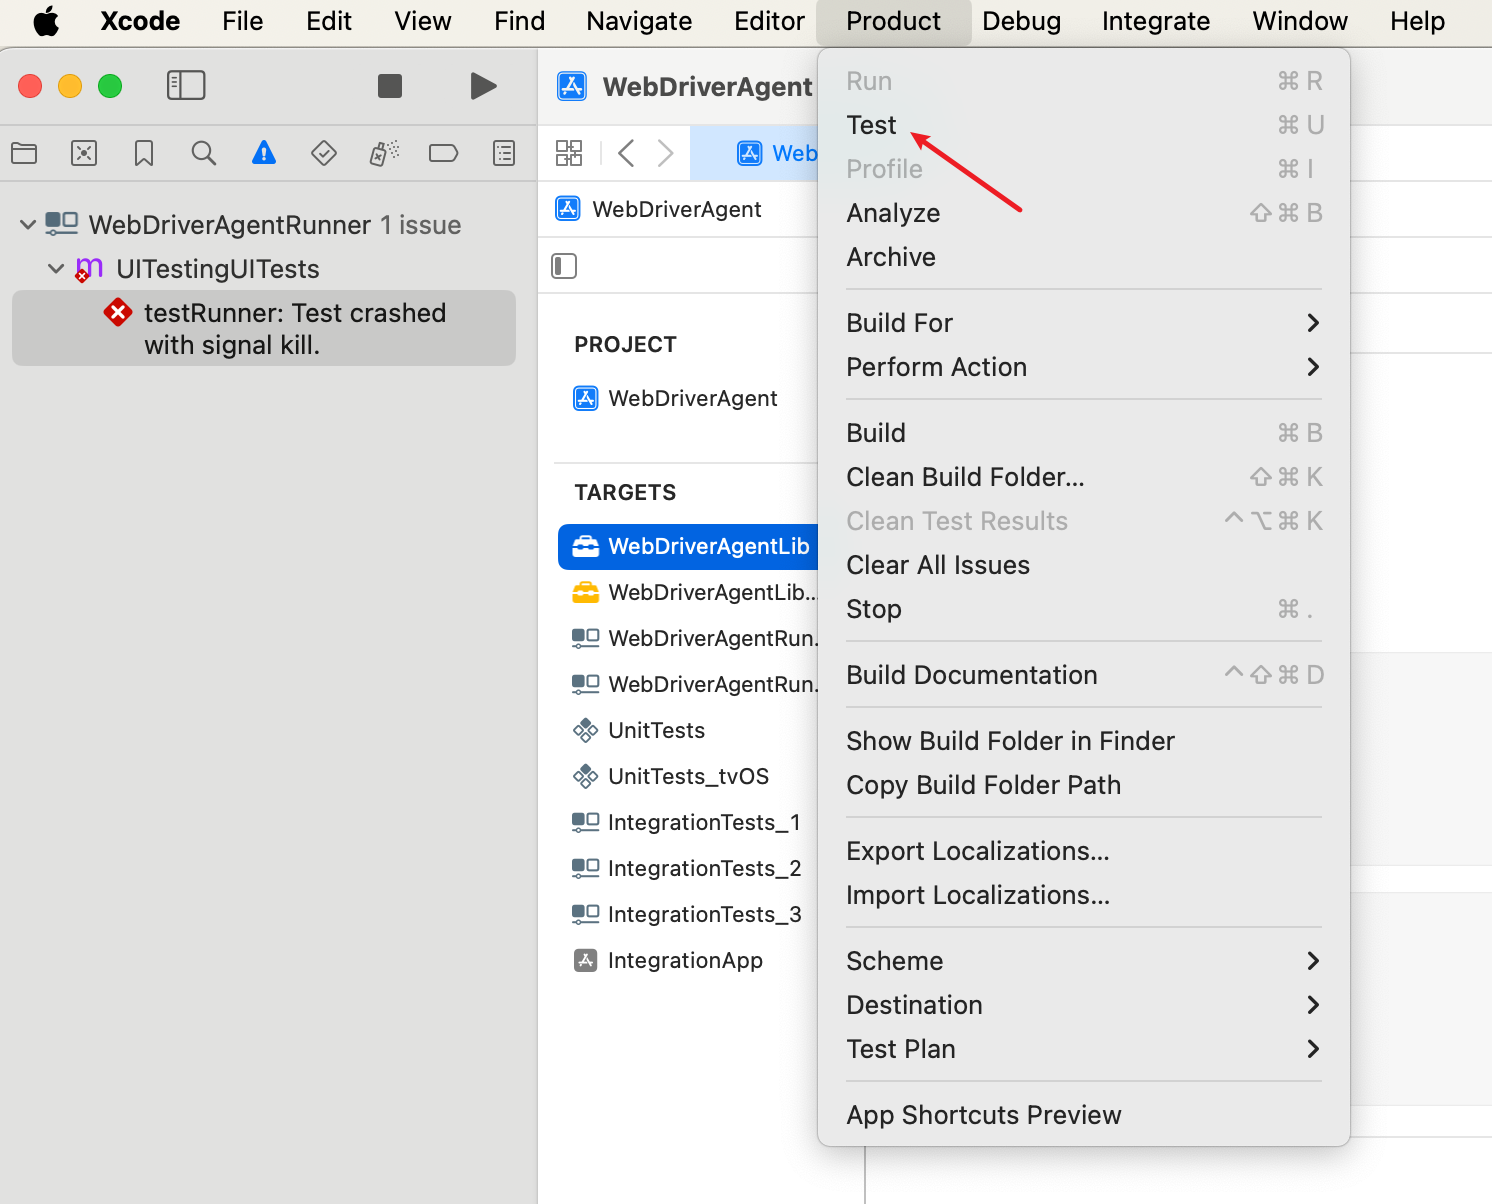
会提示访问钥匙串中的密码,输入Mac的开机密码即可,手机应该也会提示输入一下手机解锁密码
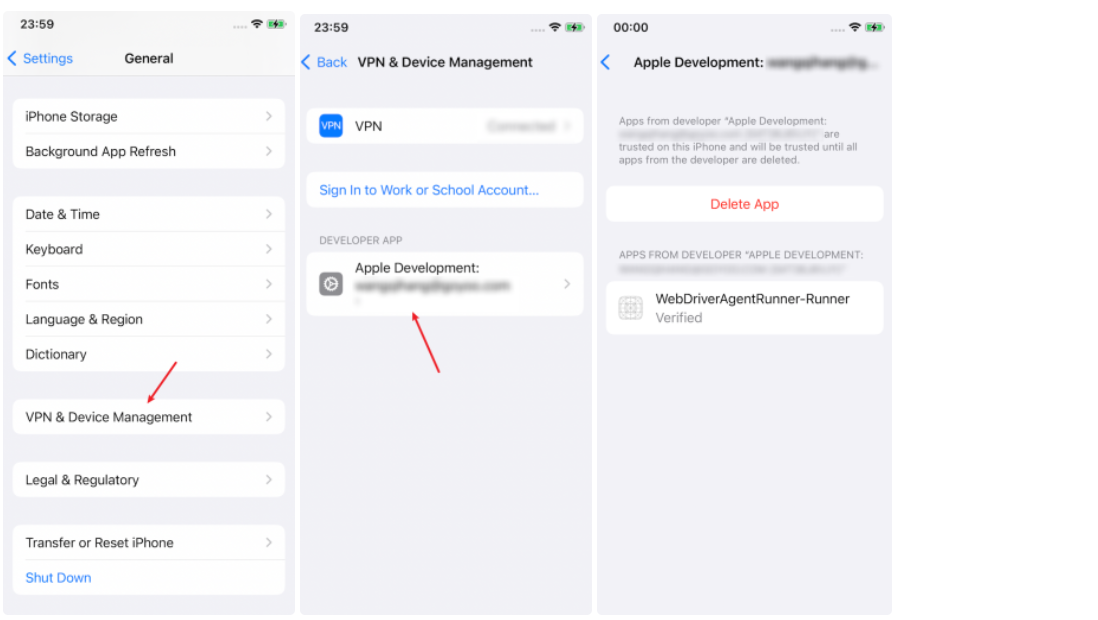
WDA会在手机上生成一个模拟App,需要将DEVELOPER APP添加信任
打开设置中的General -> VPN & Device Management -> 选择DEVELOPER APP下面的列表项 -> 点击trust
再次点击Xcode里面的 Product -> Test 运行,运行成功后,手机上会显示Automation Running的字样,并且会出现一个模拟的App,Xcode的控制台会显示一些信息
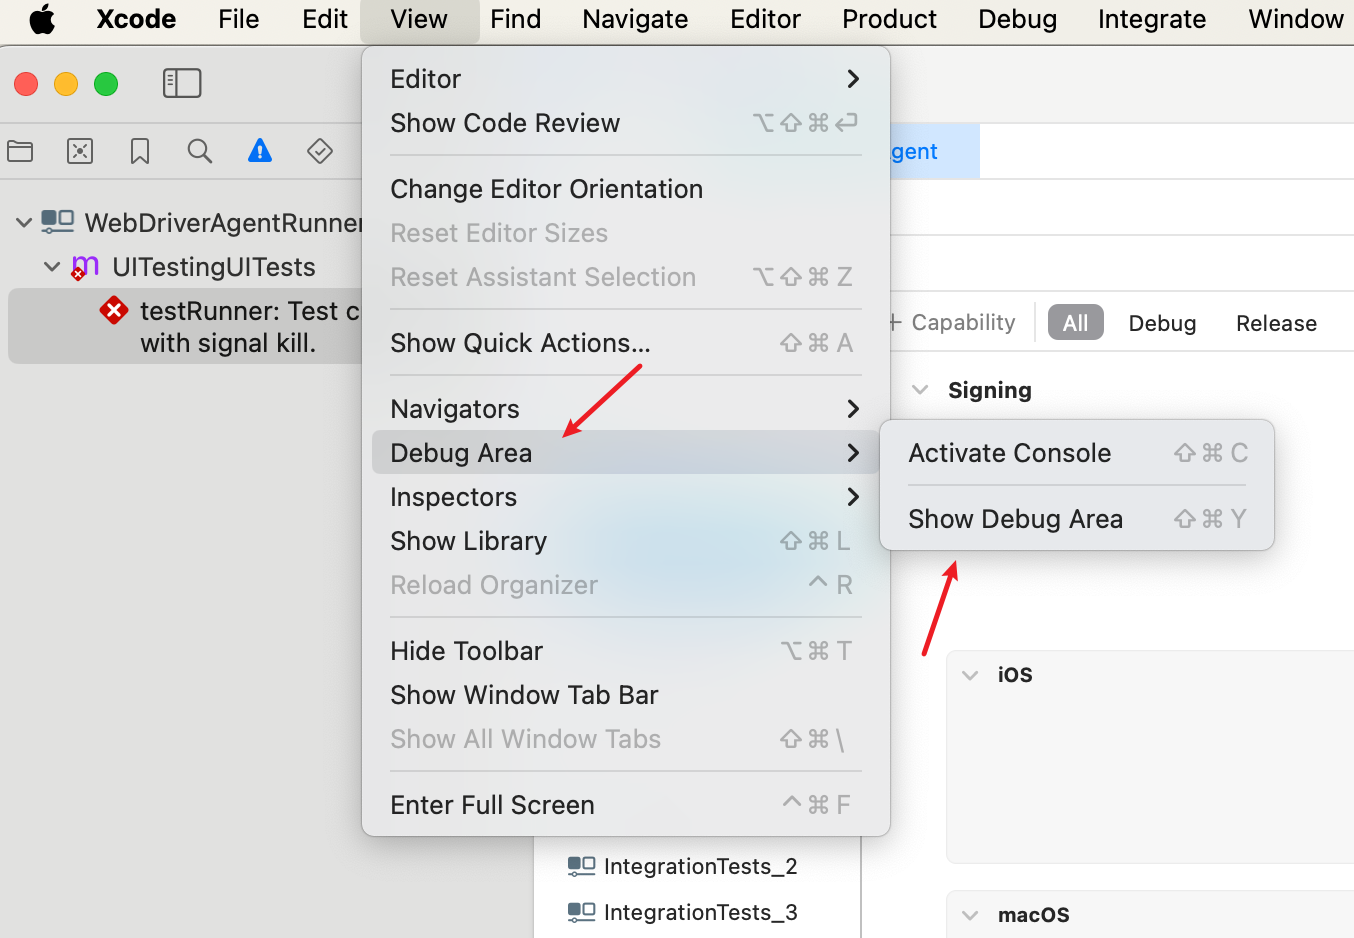
打开Xcode的控制台方法:View -> Debug Area -> Show Debug Area

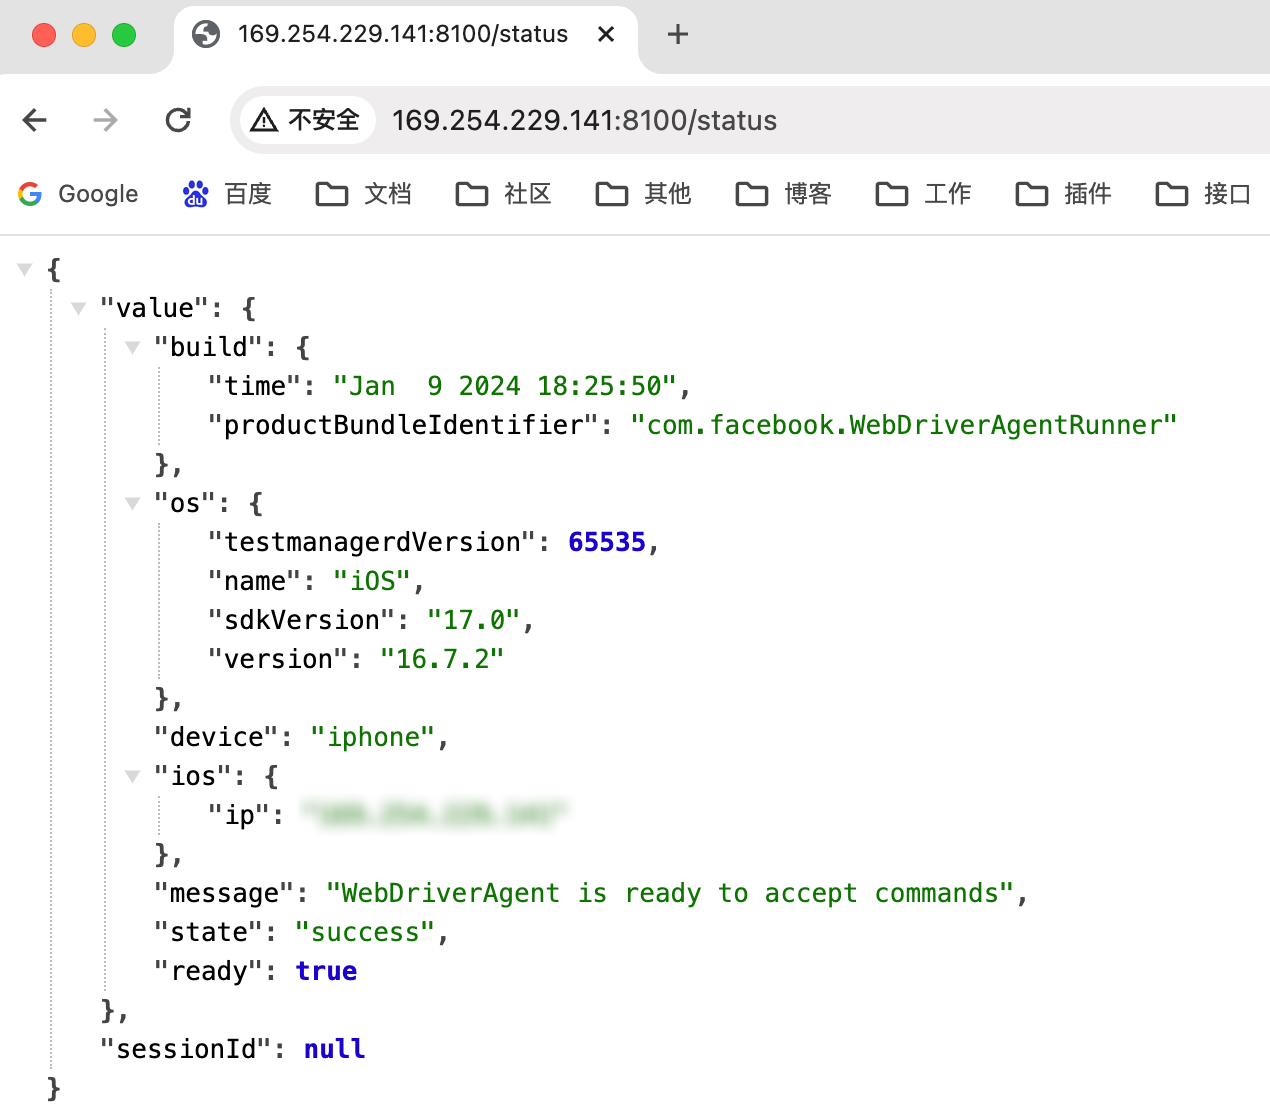
在浏览器中输入ServerURLHere中间的http://IP地址:端口/status,出现如下提示则表示WebDriverAgent安装配置成功并准备好接收请求了
三、运行
首先要按照第二节的步骤,成功连接iOS真机,并且成功运行WDA
打开终端,输入appium server运行appium服务,如果没有运行成功检查是否安装对应iOS设备的driver:XCUITest,详细步骤见第二章2.7节
1、Appium Inspector运行
打开Appium Inspector客户端
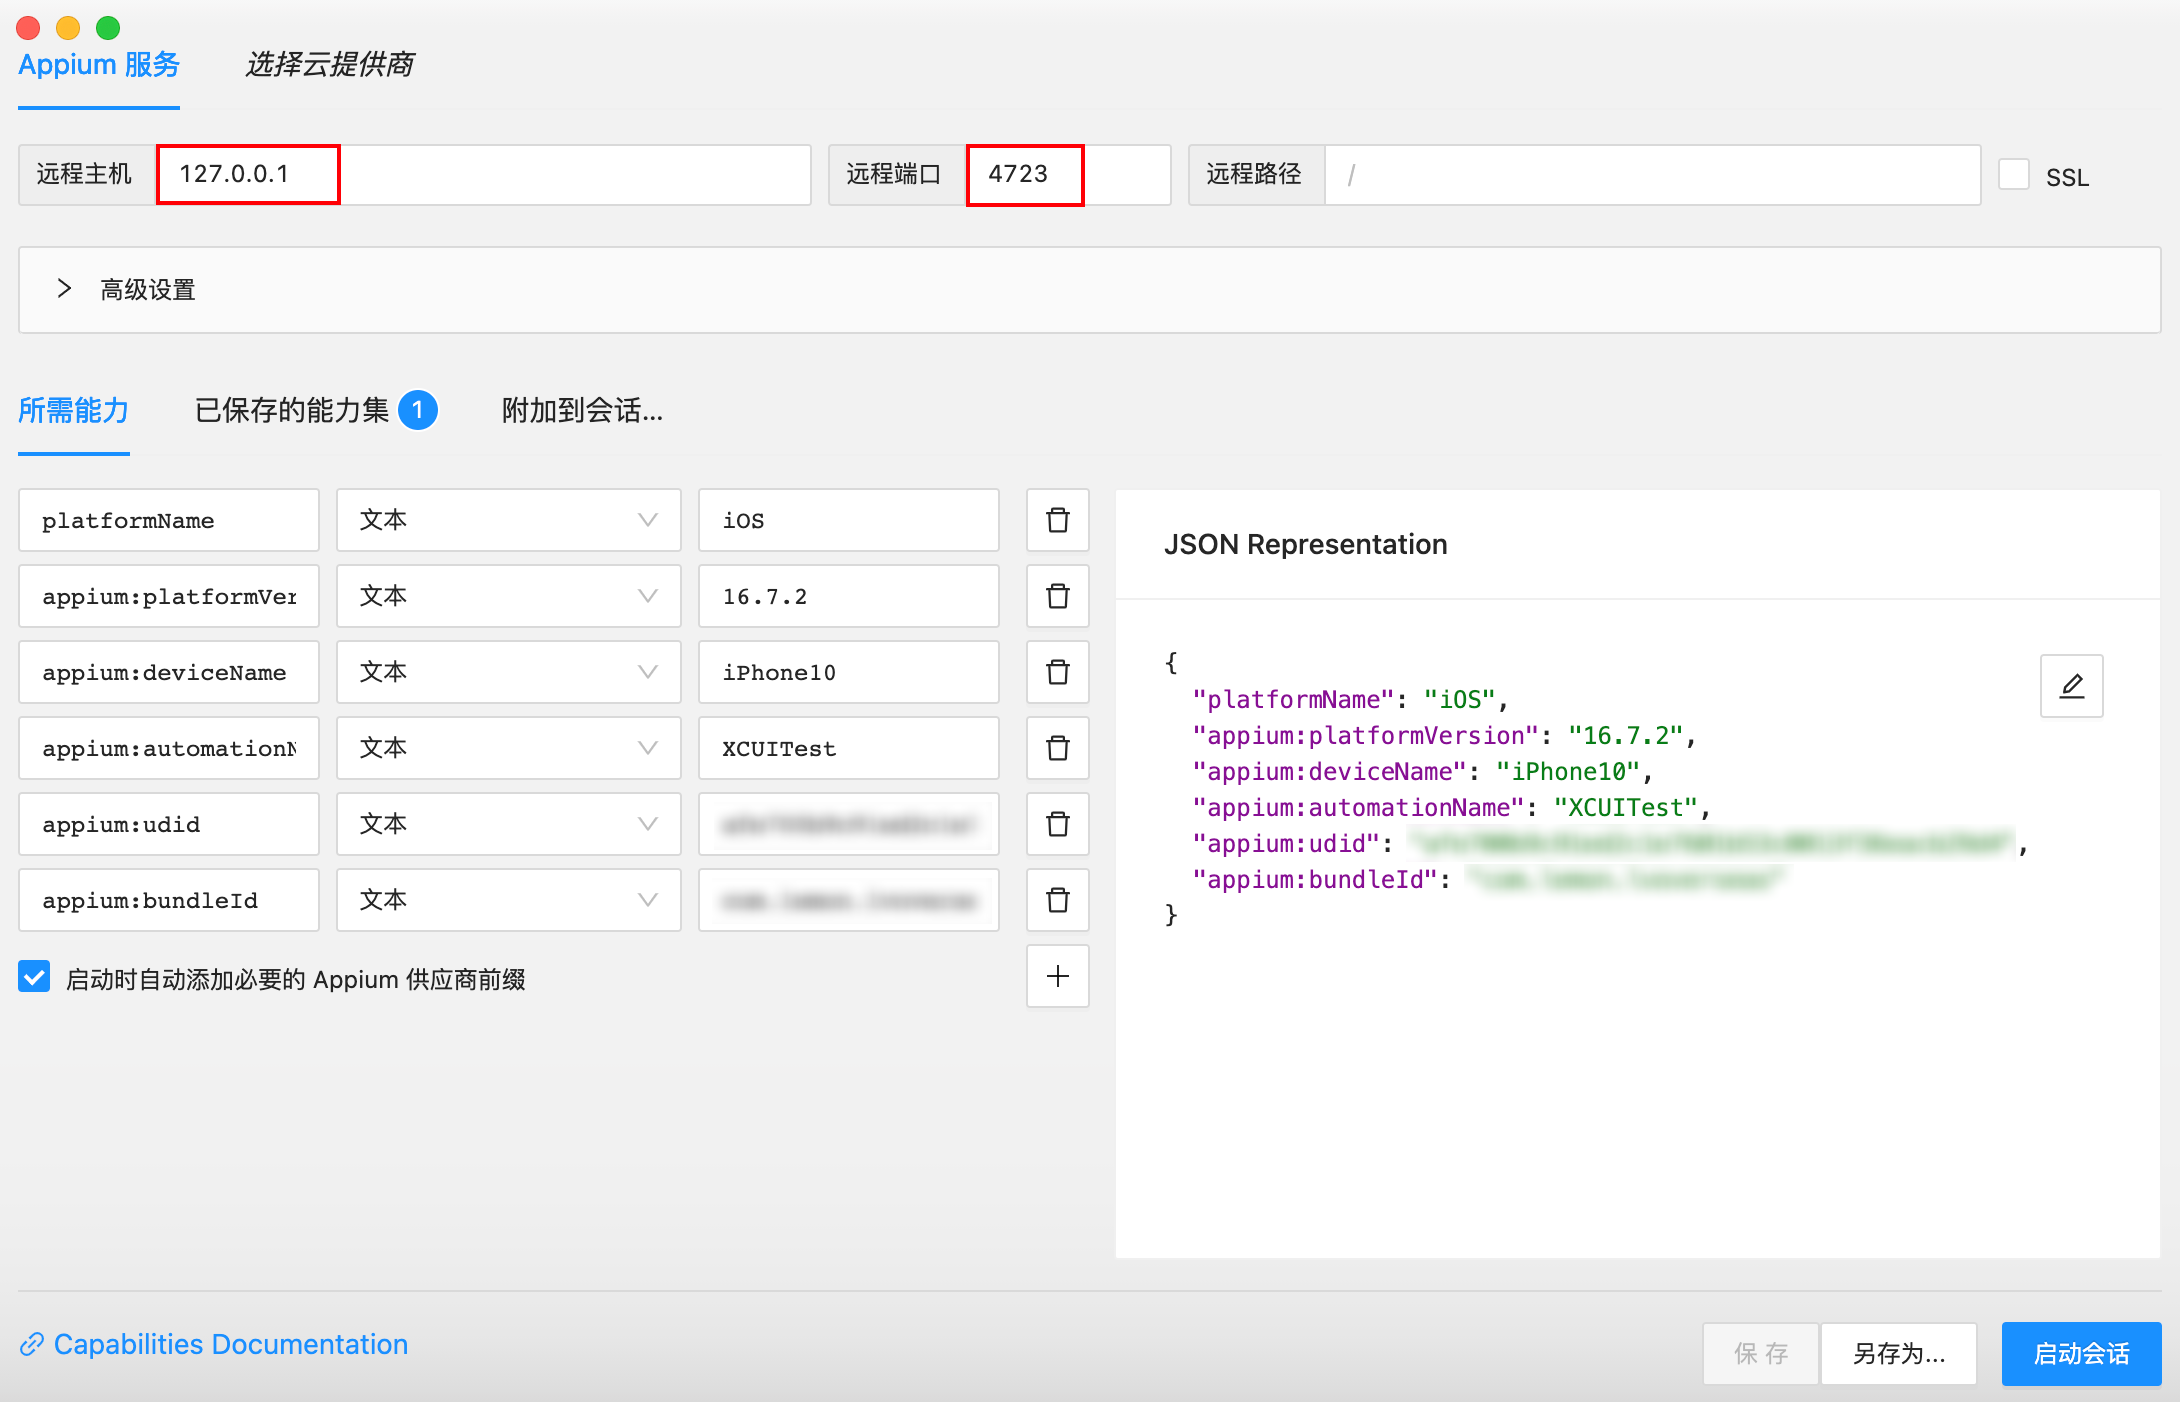
上面填上Appium Server运行的地址和端口
Appium Inspector需要借助 Appium Server -> XCUITest(driver) -> WDA -> iOS
实现真机的实时显示,并且抓取控件相关信息
所以需要填写所连手机的配置信息,才能正确启动会话

点击加号添加参数字段
- platformName:平台名称iOS
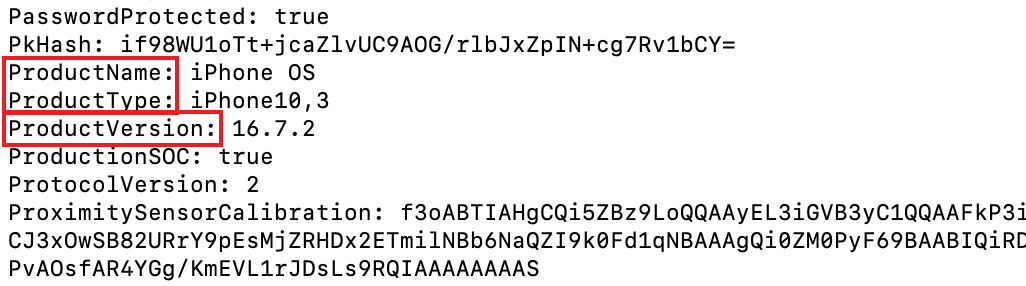
- appium:platformVersion:对应的平台版本(可以使用下面ideviceinfo里面的ProductVersion)
- appium:deviceName:设备名称(好像可以随便填)
- appium:automationName:填XCUITest
- appium:udid:iOS设备对应的id(设备唯一标识符,对应下面ideviceinfo里面的UniqueDeviceID)
- appium:bundleId:iOS设备上app对应的id,当启动会话时会自动打开这个bundleId对应的app
上述参数的获取方法:
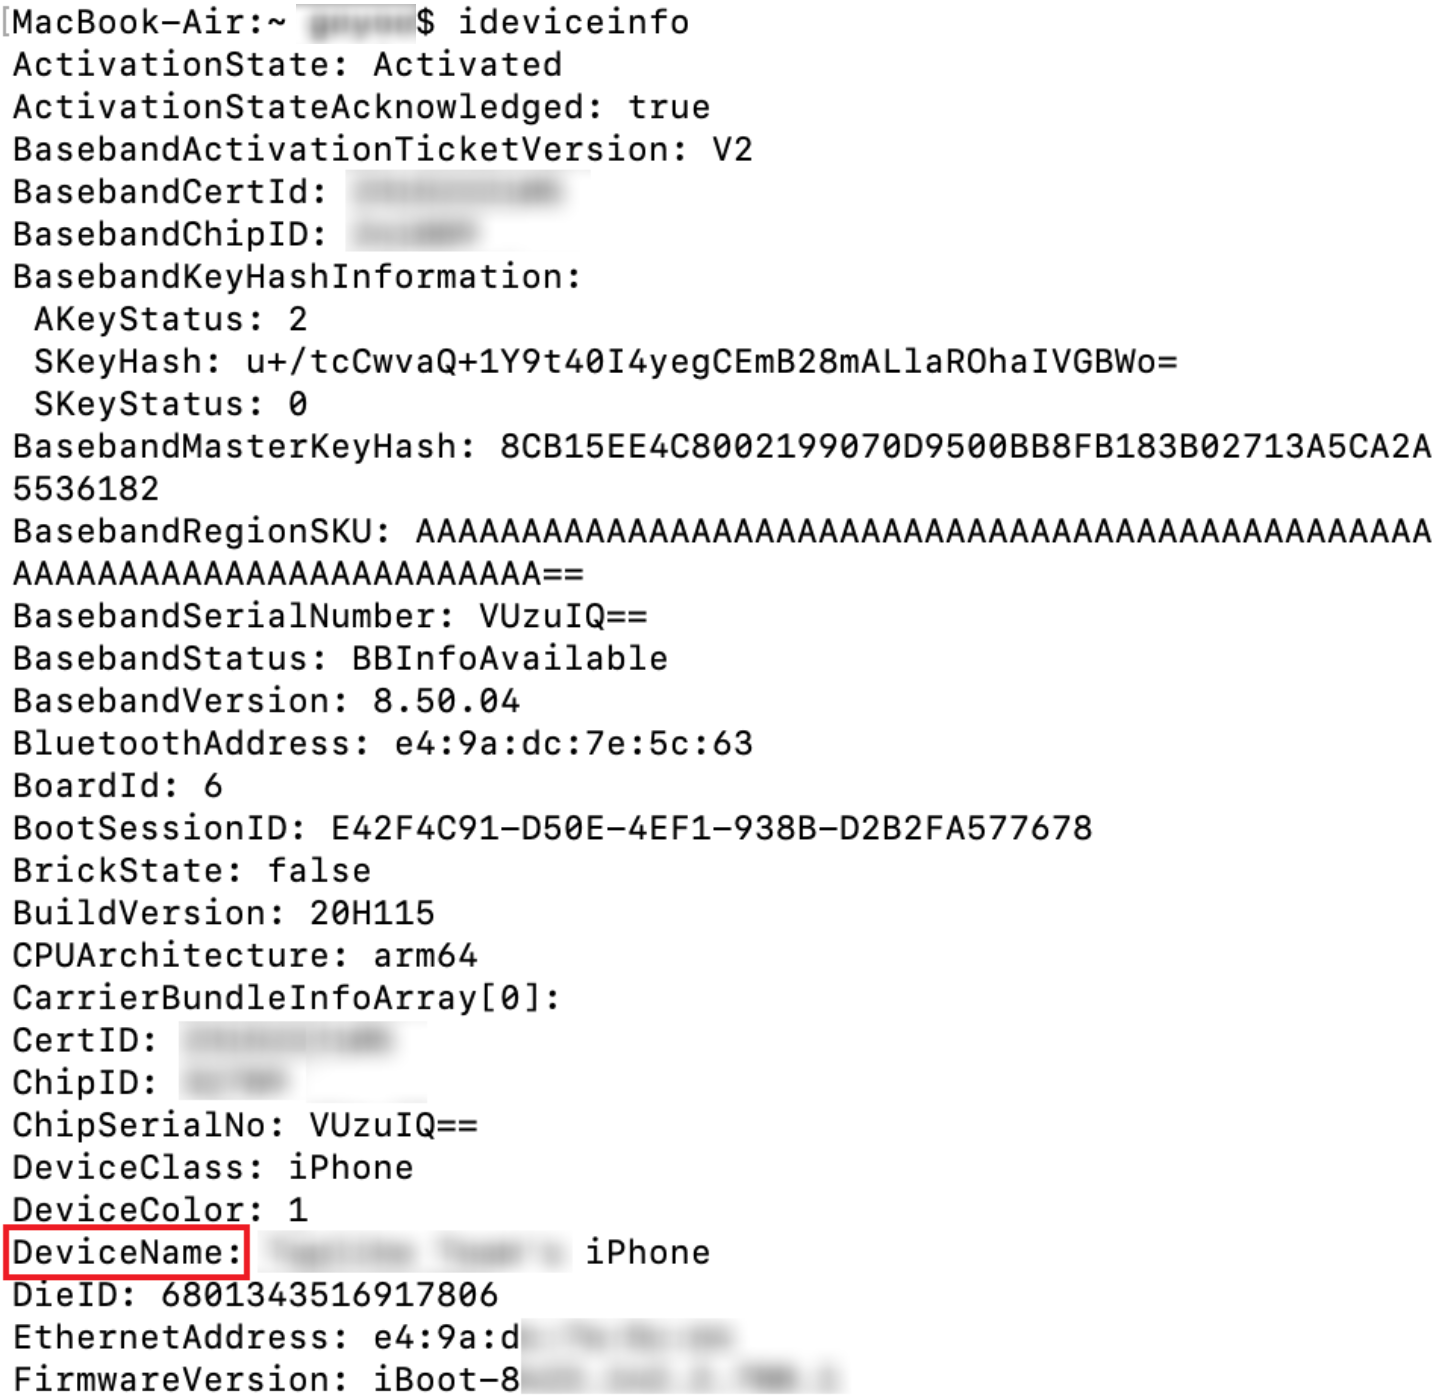
用到了在第二章2.5节 安装的ideviceinstaller
在终端中输入ideviceinfo,可以查看当前Mac所连接iPhone的相关信息,上面涉及到的大多数参数可以从这里找到
bundleId可以通过下面几种方式获取:
- 在终端输入
ideviceinstaller -l,第三列为App的名称,第一列为这个App对应的bundleId

- 根据iOS iTunes App ID来查询bundle Id
- iOS内置应用的bundle Id
官方链接:https://support.apple.com/zh-cn/guide/deployment/depece748c41/web
填写好配置信息之后,点击右下角保存,不然下次再打开会丢失这些信息
在启动会话之前,检查一下Xcode的WDA是否启动,手机上是否有了哪个名字叫做WebDriverAgent的App,如果点击Product -> Test失败的话,检查一下手机General设置中,是否将生成的哪个名字叫做WebDriverAgent的App添加信任,参考第二章2.10.3
WDA运行成功的话,手机屏幕上会显示Automation Running的字样
这个时候再去启动Appium Inspector的会话
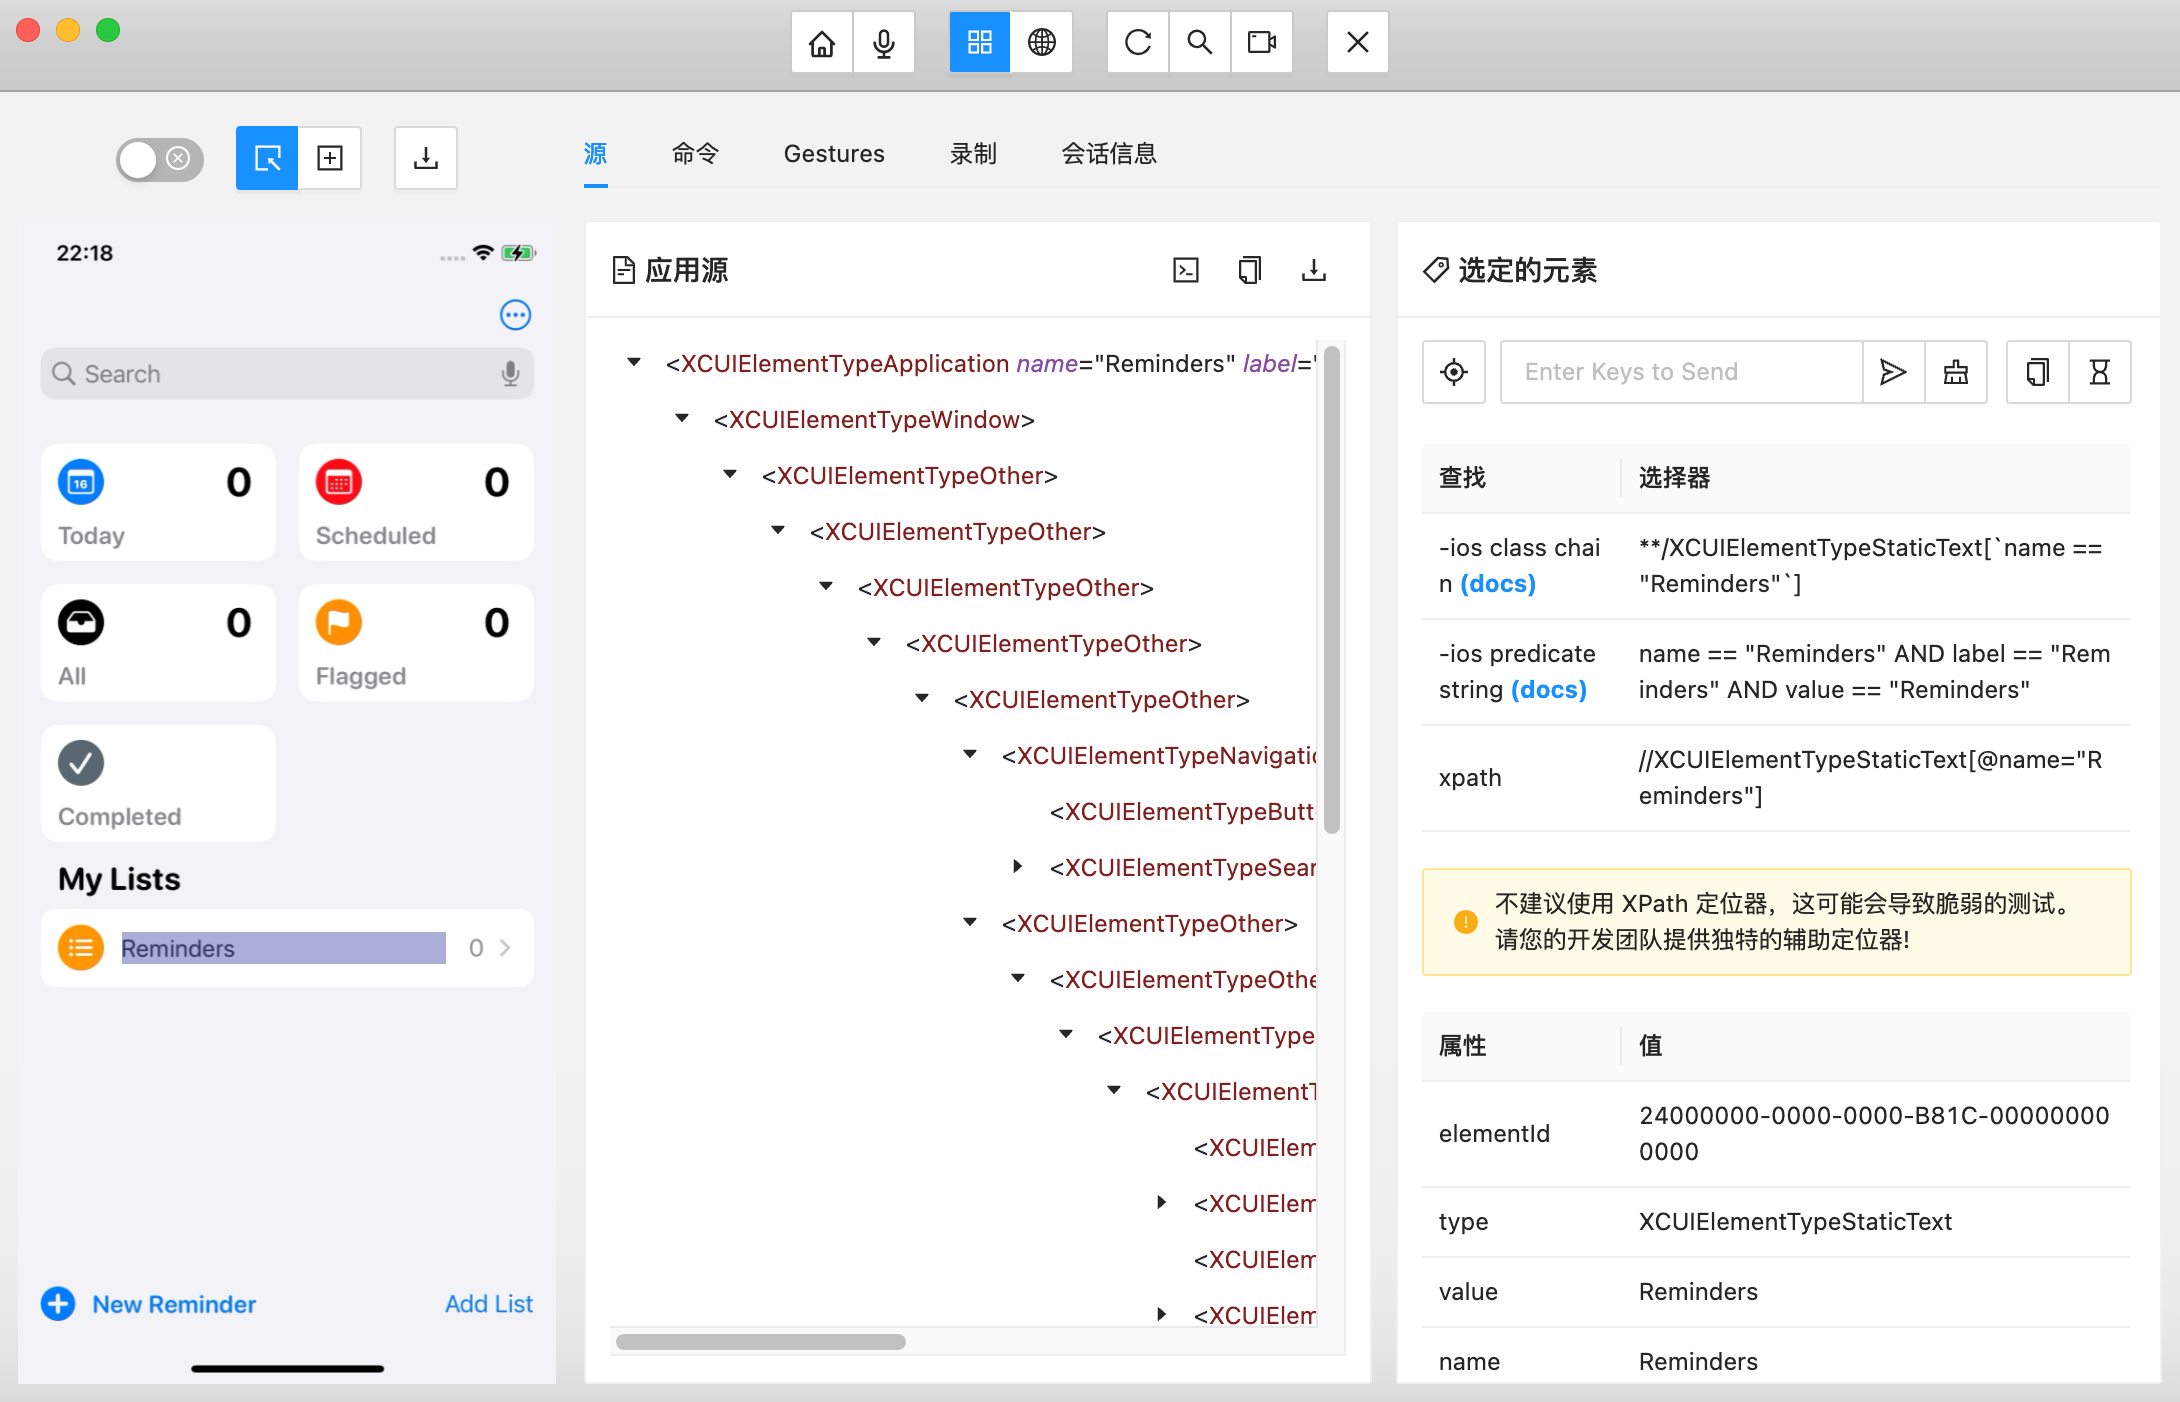
点击对应的控件,就可以在右侧获取相关信息
Appium Inspector还有很多其他的功能,可以自己去摸索尝试一下
2、Node.js编写自动化脚本
2.1 相关链接
Appium Clients:https://appium.io/docs/en/2.4/ecosystem/clients/
webdriverio的npm包:https://www.npmjs.com/package/webdriverio
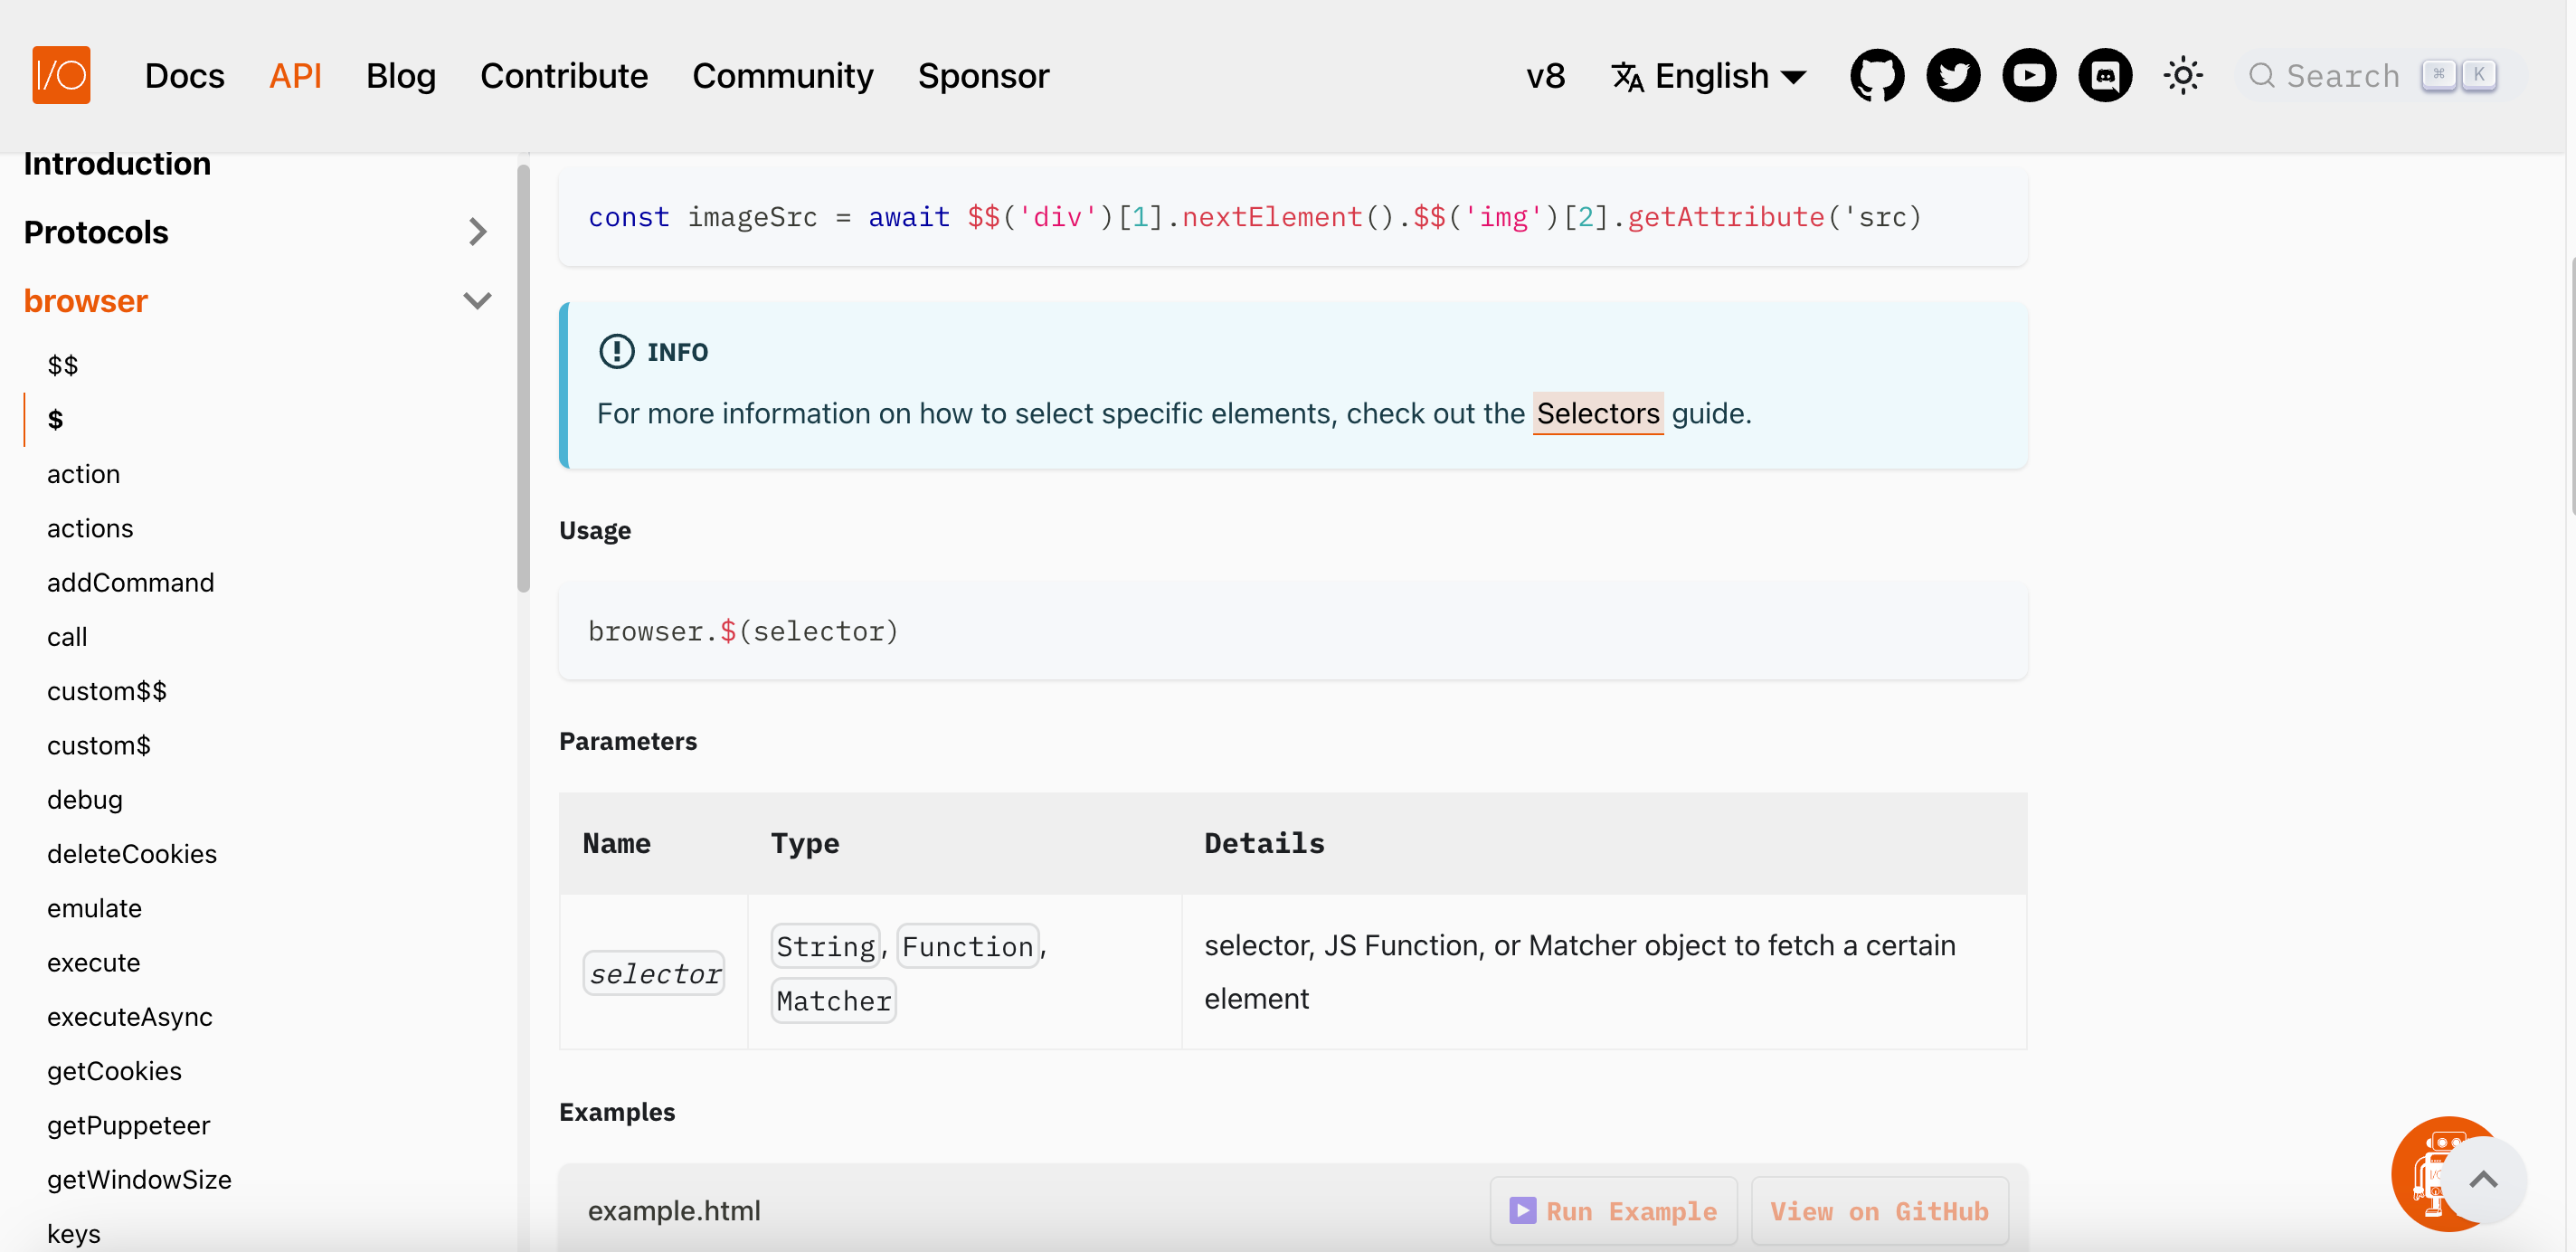
webdriverio的API文档:https://webdriver.io/docs/api

2.2 编写脚本
先下载webdriverio的包,再填写类似于上面Appium Inspector的配置信息,参考webdriverio的api文档编写脚本
案例:
import * as wdio from 'webdriverio'

const options = {
  path: '/',
  port: 4723,
  capabilities: {
    platformName: 'iOS',
    'appium:platformVersion': '16.7.2',
    'appium:deviceName': 'iPhone10',
    'appium:automationName': 'XCUITest',
    'appium:udid': 'afe700b9c91ed2c1e7601b53c0013f36ea....',
    'appium:bundleId': 'com.apple.reminders'
  }
}

async function main() {
  try {
    const client = await wdio.remote(options)
    await client.pause(500)

    // XCUITest选择器文档:https://webdriver.io/docs/selectors/#ios-xcuitest-predicate-strings-and-class-chains
    // 通过class chains获取元素
    const reminderSelector = '**/XCUIElementTypeStaticText[`name == "Reminders"`]'
    const reminderElement = await client.$(`-ios class chain:${reminderSelector}`)
    await reminderElement.click()
    await client.pause(300)

    // 设置剪切板
    const noteStr = '去码头整点儿薯条!'
    const noteBuff = Buffer.from(noteStr, 'utf-8')
    const base64Note = noteBuff.toString('base64')
    await client.activateApp('com.facebook.WebDriverAgentRunnerQH.xctrunner')
    await client.pause(100)
    await client.setClipboard(base64Note, 'plaintext')
    await client.pause(100)
    await client.activateApp('com.apple.reminders')
    await client.pause(200)

    // 通过predicate strings获取元素
    const addNewReminderSelector =
      'name == "New Reminder" AND label == "New Reminder" AND value == "New Reminder"'
    const addNewReminderElement = await client.$(`-ios predicate string:${addNewReminderSelector}`)
    await addNewReminderElement.click()
    await client.pause(300)

    // 通过accessibility id获取元素,id前面需要加上波浪号~
    const titleElement = await client.$('~Title')
    await titleElement.setValue('企鹅周末要去干什么')
    await client.pause(300)

    // 填写内容
    const titleLoacation = await titleElement.getLocation()
    await client
      .action('pointer')
      .move({ x: titleLoacation.x + 10, y: titleLoacation.y + 25 })
      .down({ button: 'left' })
      .pause(800)
      .down({ button: 'left' })
      .pause(800)
      .perform(true)
    await client.pause(300)
    const pasteSelector = '**/XCUIElementTypeStaticText[`name == "Paste"`]'
    const pasteElement = await client.$(`-ios class chain:${pasteSelector}`)
    await pasteElement.waitForExist({
      timeout: 10000
    })
    await pasteElement.click()
    await client.pause(300)

    // 点击空白区域
    await client
      .action('pointer')
      .move({ x: 187, y: 406 })
      .down({ button: 'left' })
      .up({ button: 'left' })
      .perform(true)
    await client.pause(300)

    // 模拟触摸滑动回到桌面
    await client.touchPerform([
      {
        action: 'press',
        options: {
          x: 187,
          y: 900
        }
      },
      {
        action: 'wait',
        options: {
          ms: 600
        }
      },
      {
        action: 'moveTo',
        options: {
          x: 187,
          y: 500
        }
      }
    ])
    await client.pause(300)

    // 打开相册
    await client.activateApp('com.apple.mobileslideshow')
      await client.pause(200)

    const dogeSelector = '**/XCUIElementTypeImage[`name == "Photo, January 18, 22:29"`]'
    const dogeElement = await client.$(`-ios class chain:${dogeSelector}`)
    await dogeElement.click()
    await client.pause(200)

    // 多指操作
    await client.actions([
      client.action('pointer').move(260, 300).down().pause(2400).up(),
      client
        .action('pointer')
        .move(150, 600)
        .down()
        .move({ x: 80, y: 530, duration: 600 })
        .move({ x: 150, y: 600, duration: 600 })
        .move({ x: 80, y: 530, duration: 600 })
        .move({ x: 150, y: 600, duration: 600 })
        .up()
    ])

    await client.pause(1000)
    console.log('执行完成')
  } catch (e) {
    console.log('err', e)
  }
}

main()

 浙公网安备 33010602011771号