

SpringBoot注解---1.组件添加

一、@Configuration和@Bean
1.使用XML配置文件注入bean
在工程的src/main/resources目录下创建Spring的配置文件,例如beans.xml,通过该配置文件将Person类注入到Spring的IOC容器中,最后创建一个MainTest类来进行测试。
| Person类 | beans.xml | MainTest类 |
package com.meimeixia.bean;

public class Person {

	private String name;
	private Integer age;

	public String getName() {
		return name;
	}
	public void setName(String name) {
		this.name = name;
	}
	public Integer getAge() {
		return age;
	}
	public void setAge(Integer age) {
		this.age = age;
	}
	public Person(String name, Integer age) {
		super();
		this.name = name;
		this.age = age;
	}
	public Person() {
		super();
		// TODO Auto-generated constructor stub
	}
	@Override
	public String toString() {
		return "Person [name=" + name + ", age=" + age + "]";
	}

}
|
<?xml version="1.0" encoding="UTF-8"?>
<beans xmlns="http://www.springframework.org/schema/beans"
	xmlns:context="http://www.springframework.org/schema/context" xmlns:p="http://www.springframework.org/schema/p"
	xmlns:aop="http://www.springframework.org/schema/aop" xmlns:tx="http://www.springframework.org/schema/tx"
	xmlns:xsi="http://www.w3.org/2001/XMLSchema-instance"
	xsi:schemaLocation="http://www.springframework.org/schema/beans
                        http://www.springframework.org/schema/beans/spring-beans-4.2.xsd">

	<!-- 注册组件 -->
	<bean id="person" class="com.meimeixia.bean.Person">
		<property name="age" value="18"></property>
		<property name="name" value="liayun"></property>
	</bean>

</beans>
|
package com.meimeixia;

import org.springframework.context.ApplicationContext;
import org.springframework.context.support.ClassPathXmlApplicationContext;

import com.meimeixia.bean.Person;

public class MainTest {

	public static void main(String[] args) {
		ApplicationContext applicationContext = new ClassPathXmlApplicationContext("beans.xml");
		Person person = (Person) applicationContext.getBean("person");
		System.out.println(person);
	}

}
|

2.使用注解注册组件
Spring IOC和DI
- IOC(控制反转):由spring容器来管理创建类对象
- DI(依赖注入):在创建类的过程中给类的属性赋值
DI和IOC它俩之间的关系是DI不能单独存在,DI需要在IOC的基础上来完成。
创建MainConfig类,并在该类上添加@Configuration注解来标注该类是一个Spring的配置类,最后通过@Bean注解将Person类注入到Spring的IOC容器中。
| Person类 | MainConfig类 | MainTest类 |
package com.meimeixia.bean;

public class Person {

	private String name;
	private Integer age;

	public String getName() {
		return name;
	}
	public void setName(String name) {
		this.name = name;
	}
	public Integer getAge() {
		return age;
	}
	public void setAge(Integer age) {
		this.age = age;
	}
	public Person(String name, Integer age) {
		super();
		this.name = name;
		this.age = age;
	}
	public Person() {
		super();
		// TODO Auto-generated constructor stub
	}
	@Override
	public String toString() {
		return "Person [name=" + name + ", age=" + age + "]";
	}

}
|
ackage com.meimeixia.config;

import org.springframework.context.annotation.Bean;
import org.springframework.context.annotation.Configuration;

import com.meimeixia.bean.Person;
/**
 * 以前配置文件的方式被替换成了配置类,即配置类==配置文件
 * @author liayun
 *
 */
// 这个配置类也是一个组件
@Configuration // 告诉Spring这是一个配置类
public class MainConfig {

	// @Bean注解是给IOC容器中注册一个bean,类型自然就是返回值的类型,id默认是用方法名作为id
	@Bean
	public Person person() {
		return new Person("liayun", 20);
	}

}
|
package com.meimeixia;

import org.springframework.context.ApplicationContext;
import org.springframework.context.annotation.AnnotationConfigApplicationContext;
import org.springframework.context.support.ClassPathXmlApplicationContext;

import com.meimeixia.bean.Person;
import com.meimeixia.config.MainConfig;

public class MainTest {

	public static void main(String[] args) {
//		ApplicationContext applicationContext = new ClassPathXmlApplicationContext("beans.xml");
//		Person person = (Person) applicationContext.getBean("person");
//		System.out.println(person);

		ApplicationContext applicationContext = new AnnotationConfigApplicationContext(MainConfig.class);
		Person person = applicationContext.getBean(Person.class);
		System.out.println(person);
	}

}
|

使用注解注入JavaBean时,bean在IOC容器中的名称就是使用@Bean注解标注的方法名称,也可以通过在@Bean注解中自定义指定名称。
package com.meimeixia.config;

import org.springframework.context.annotation.Bean;
import org.springframework.context.annotation.Configuration;

import com.meimeixia.bean.Person;
/**
 * 以前配置文件的方式被替换成了配置类,即配置类==配置文件
 * @author liayun
 *
 */
// 这个配置类也是一个组件
@Configuration // 告诉Spring这是一个配置类
public class MainConfig {

	// @Bean注解是给IOC容器中注册一个bean,类型自然就是返回值的类型,id默认是用方法名作为id
	@Bean("person")
	public Person person01() {
		return new Person("liayun", 20);
	}

}

二、@ComponentScan自动扫描组件并指定扫描规则
在实际项目中,我们更多的是使用Spring的包扫描功能对项目中的包进行扫描,凡是在指定的包或其子包中的类上标注了@Repository、@Service、@Controller、@Component注解的类都会被扫描到,并将这个类注入到Spring容器中。
Spring包扫描功能可以使用XML配置文件进行配置,也可以直接使用@ComponentScan注解进行设置,使用@ComponentScan注解进行设置比使用XML配置文件来配置要简单的多。
1.使用XML配置文件配置扫描文件
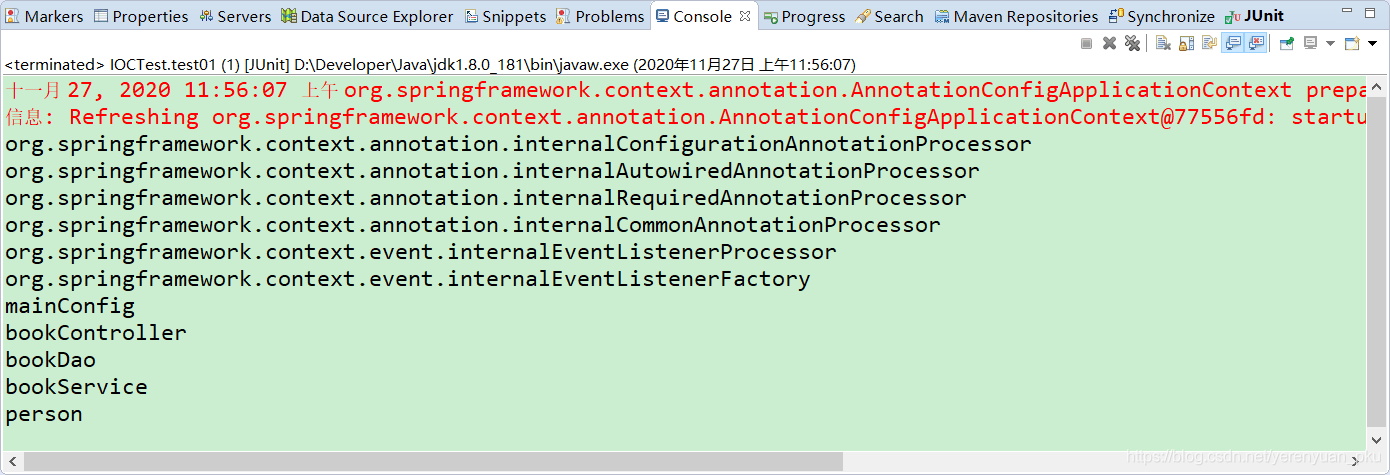
这样配置以后,只要在com.meimeixia包下,或者com.meimeixia的子包下标注了@Repository、@Service、@Controller、@Component注解的类都会被扫描到,并自动注入到Spring容器中。此时,我们分别创建BookDao、BookService以及BookController这三个类,并在这三个类中分别添加@Repository、@Service、@Controller注解
| beans.xml | BookDao、BookService以及BookController | IOCTest类 |
<?xml version="1.0" encoding="UTF-8"?> <beans xmlns="http://www.springframework.org/schema/beans" xmlns:context="http://www.springframework.org/schema/context" xmlns:p="http://www.springframework.org/schema/p" xmlns:aop="http://www.springframework.org/schema/aop" xmlns:tx="http://www.springframework.org/schema/tx" xmlns:xsi="http://www.w3.org/2001/XMLSchema-instance" xsi:schemaLocation="http://www.springframework.org/schema/beans http://www.springframework.org/schema/beans/spring-beans-4.2.xsd http://www.springframework.org/schema/context http://www.springframework.org/schema/context/spring-context-4.2.xsd"> <!-- 包扫描:只要是标注了我们熟悉的@Controller、@Service、@Repository、@Component这四个注解中的任何一个的组件,它就会被自动扫描,并加进容器中 --> <context:component-scan base-package="com.meimeixia"></context:component-scan> <!-- 注册组件 --> <bean id="person" class="com.meimeixia.bean.Person"> <property name="age" value="18"></property> <property name="name" value="liayun"></property> </bean> </beans> |
1.BookDao
package com.meimeixia.dao;

import org.springframework.stereotype.Repository;

// 名字默认是类名首字母小写
@Repository
public class BookDao {

}

2.BookService
package com.meimeixia.service;

import org.springframework.stereotype.Service;

@Service
public class BookService {

}

3.BookController
package com.meimeixia.controller;

import org.springframework.stereotype.Controller;

@Controller
public class BookController {

}
|
package com.meimeixia.test;

import org.junit.Test;
import org.springframework.context.annotation.AnnotationConfigApplicationContext;

import com.meimeixia.config.MainConfig;

public class IOCTest {

	@SuppressWarnings("resource")
	@Test
	public void test() {
		ClassPathXmlApplicationContext applicationContext = new ClassPathXmlApplicationContext("beans.xml");
		// 我们现在就来看一下IOC容器中有哪些bean,即容器中所有bean定义的名字
		String[] definitionNames = applicationContext.getBeanDefinitionNames();
		for (String name : definitionNames) {
			System.out.println(name);
		}
	}

}
|

2.使用@ComponentScan注解设置扫描规则
a.扫描时包含所有注解需要的类
使用@ComponentScan注解之前我们先将beans.xml配置文件中的下述配置注释掉。
<context:component-scan base-package="com.meimeixia"></context:component-scan>
注释掉之后,我们就可以使用@ComponentScan注解来配置包扫描了。使用@ComponentScan注解配置包扫描只须在MainConfig类上添加@ComponentScan注解,并将扫描的包指定为com.meimeixia即可,如下所示。
| MainConfig类 | IOCTest类 |
package com.meimeixia.config;

import org.springframework.context.annotation.Bean;
import org.springframework.context.annotation.ComponentScan;
import org.springframework.context.annotation.Configuration;

import com.meimeixia.bean.Person;
/**
 * 以前配置文件的方式被替换成了配置类,即配置类==配置文件
 * @author liayun
 *
 */
// 这个配置类也是一个组件
@ComponentScan(value="com.meimeixia") // value指定要扫描的包
@Configuration // 告诉Spring这是一个配置类
public class MainConfig {

	// @Bean注解是给IOC容器中注册一个bean,类型自然就是返回值的类型,id默认是用方法名作为id
	@Bean("person")
	public Person person01() {
		return new Person("liayun", 20);
	}

}
|
@SuppressWarnings("resource")
@Test
public void test01() {
    AnnotationConfigApplicationContext applicationContext = new AnnotationConfigApplicationContext(MainConfig.class);
    // 我们现在就来看一下IOC容器中有哪些bean,即容器中所有bean定义的名字
    String[] definitionNames = applicationContext.getBeanDefinitionNames();
    for (String name : definitionNames) {
        System.out.println(name);
    }
}
|
b.扫描时排除注解标注的类
当我们使用includeFilters()方法来指定只包含哪些注解标注的类时,需要禁用掉默认的过滤规则。 还记得我们以前在XML配置文件中配置这个只包含的时候,应该怎么做吗?我们需要在XML配置文件中先配置好use-default-filters="false",也就是禁用掉默认的过滤规则,因为默认的过滤规则就是扫描所有的,只有我们禁用掉默认的过滤规则之后,只包含才能生效。
<context:component-scan base-package="com.meimeixia" use-default-filters="false"></context:component-scan>
@ComponentScan注解是一个重复注解,我们可以在一个类上重复使用这个注解,如下所示:
@ComponentScan(value="com.meimeixia", includeFilters={
		/*
		 * type:指定你要排除的规则,是按照注解进行排除,还是按照给定的类型进行排除,还是按照正则表达式进行排除,等等
		 * classes:我们需要Spring在扫描时,只包含@Controller注解标注的类
		 */
		@Filter(type=FilterType.ANNOTATION, classes={Controller.class})
}, useDefaultFilters=false) // value指定要扫描的包
@ComponentScan(value="com.meimeixia", includeFilters={
		/*
		 * type:指定你要排除的规则,是按照注解进行排除,还是按照给定的类型进行排除,还是按照正则表达式进行排除,等等
		 * classes:我们需要Spring在扫描时,只包含@Service注解标注的类
		 */
		@Filter(type=FilterType.ANNOTATION, classes={Service.class})
}, useDefaultFilters=false) // value指定要扫描的包
可以使用@ComponentScan注解来指定Spring扫描哪些包,可以使用excludeFilters()方法来指定扫描时排除哪些组件,也可以使用includeFilters()方法来指定扫描时只包含哪些组件。当使用includeFilters()方法指定只包含哪些组件时,需要禁用掉默认的过滤规则。
3.自定义TypeFilter指定@ComponentScan注解的过滤规则
在使用@ComponentScan注解实现包扫描时,我们可以使用@Filter指定过滤规则,在@Filter中,通过type来指定过滤的类型。而@Filter注解中的type属性是一个FilterType枚举
- FilterType.ANNOTATION:按照注解进行包含或者排除
- FilterType.ASSIGNABLE_TYPE:按照给定的类型进行包含或者排除
- FilterType.ASPECTJ:按照ASPECTJ表达式进行包含或者排除
- FilterType.REGEX:按照正则表达式进行包含或者排除
- FilterType.CUSTOM:按照自定义规则进行包含或者排除
当我们实现TypeFilter接口时,需要实现该接口中的match()方法,match()方法的返回值为boolean类型。当返回true时,表示符合规则,会包含在Spring容器中;当返回false时,表示不符合规则,那就是一个都不匹配,自然就都不会被包含在Spring容器中。另外,在match()方法中存在两个参数,分别为MetadataReader类型的参数和MetadataReaderFactory类型的参数,含义分别如下。
- metadataReader:读取到的当前正在扫描的类的信息
- metadataReaderFactory:可以获取到其他任何类的信息的工厂
三、@Scope设置组件的作用域

1.singleton
单实例bean是整个应用所共享的,所以需要考虑到线程安全问题。
| Person.java | MainConfig2.java | IOCTest.java |
package com.huawei.bean;

/**
 * 功能描述
 *
 * @author n00568290
 * @since 2021-02-26
 */
public class Person {

    private String name;
    private Integer age;

    public String getName() {
        return name;
    }
    public void setName(String name) {
        this.name = name;
    }
    public Integer getAge() {
        return age;
    }
    public void setAge(Integer age) {
        this.age = age;
    }
    public Person(String name, Integer age) {
        super();
        this.name = name;
        this.age = age;
    }
    public Person() {
        super();
        // TODO Auto-generated constructor stub
    }
//    @Override
//    public String toString() {
//        return "Person [name=" + name + ", age=" + age + "]";
//    }

}
|
package com.xxx.config;

import com.xxx.bean.Person;

import org.springframework.context.annotation.Bean;
import org.springframework.context.annotation.Configuration;
import org.springframework.context.annotation.Scope;

/**
 * 功能描述
 *
 * @author n00568290
 * @since 2021-03-02
 */
@Configuration
public class MainConfig2 {

    @Scope("prototype")
    @Bean("person")
    public Person person() {
        System.out.println("给容器中添加咱们这个Person对象...");
        return new Person("美美侠", 26);
    }
}
|

|
2.prototype
多实例bean每次获取的时候都会重新创建,如果这个bean比较复杂,创建时间比较长,那么就会影响系统的性能
3.自定义Scope
a.实现Scope接口
b.将自定义Scope注册到容器中。此时,需要调用org.springframework.beans.factory.config.ConfigurableBeanFactory#registerScope这个方法
c.使用自定义的作用域。也就是在定义bean的时候,指定bean的scope属性为自定义的作用域名称。
4.懒加载@Lazy
- 当bean是单实例,并且没有设置懒加载时,Spring容器启动时,就会实例化bean,并将bean注册到IOC容器中,以后每次从IOC容器中获取bean时,直接返回IOC容器中的bean,而不用再创建新的bean了。
- 若bean是单实例,并且使用@Lazy注解设置了懒加载,则Spring容器启动时,不会立即实例化bean,自然就不会将bean注册到IOC容器中了,只有第一次获取bean的时候,才会实例化bean,并且将bean注册到IOC容器中。
懒加载,也称延时加载,仅针对单实例bean生效。 单实例bean是在Spring容器启动的时候加载的,添加@Lazy注解后就会延迟加载,在Spring容器启动的时候并不会加载,而是在第一次使用此bean的时候才会加载,但当你多次获取bean的时候并不会重复加载,只是在第一次获取的时候才会加载,这不是延迟加载的特性,而是单实例bean的特性。
四、@Conditional按条件注册bean
Spring支持按照条件向IOC容器中注册bean,满足条件的bean就会被注册到IOC容器中,不满足条件的bean就不会被注册到IOC容器中。
1.使用场景
@Conditional注解不仅可以添加到类上,也可以添加到方法上。
(1)作为类级别直接或者间接的与@Component相关联,包括@Configuration类
(2)可以作为元注解,用于自动编写构造性注解
(3)作为方法级别的注解,作用在任何@Bean方法上。
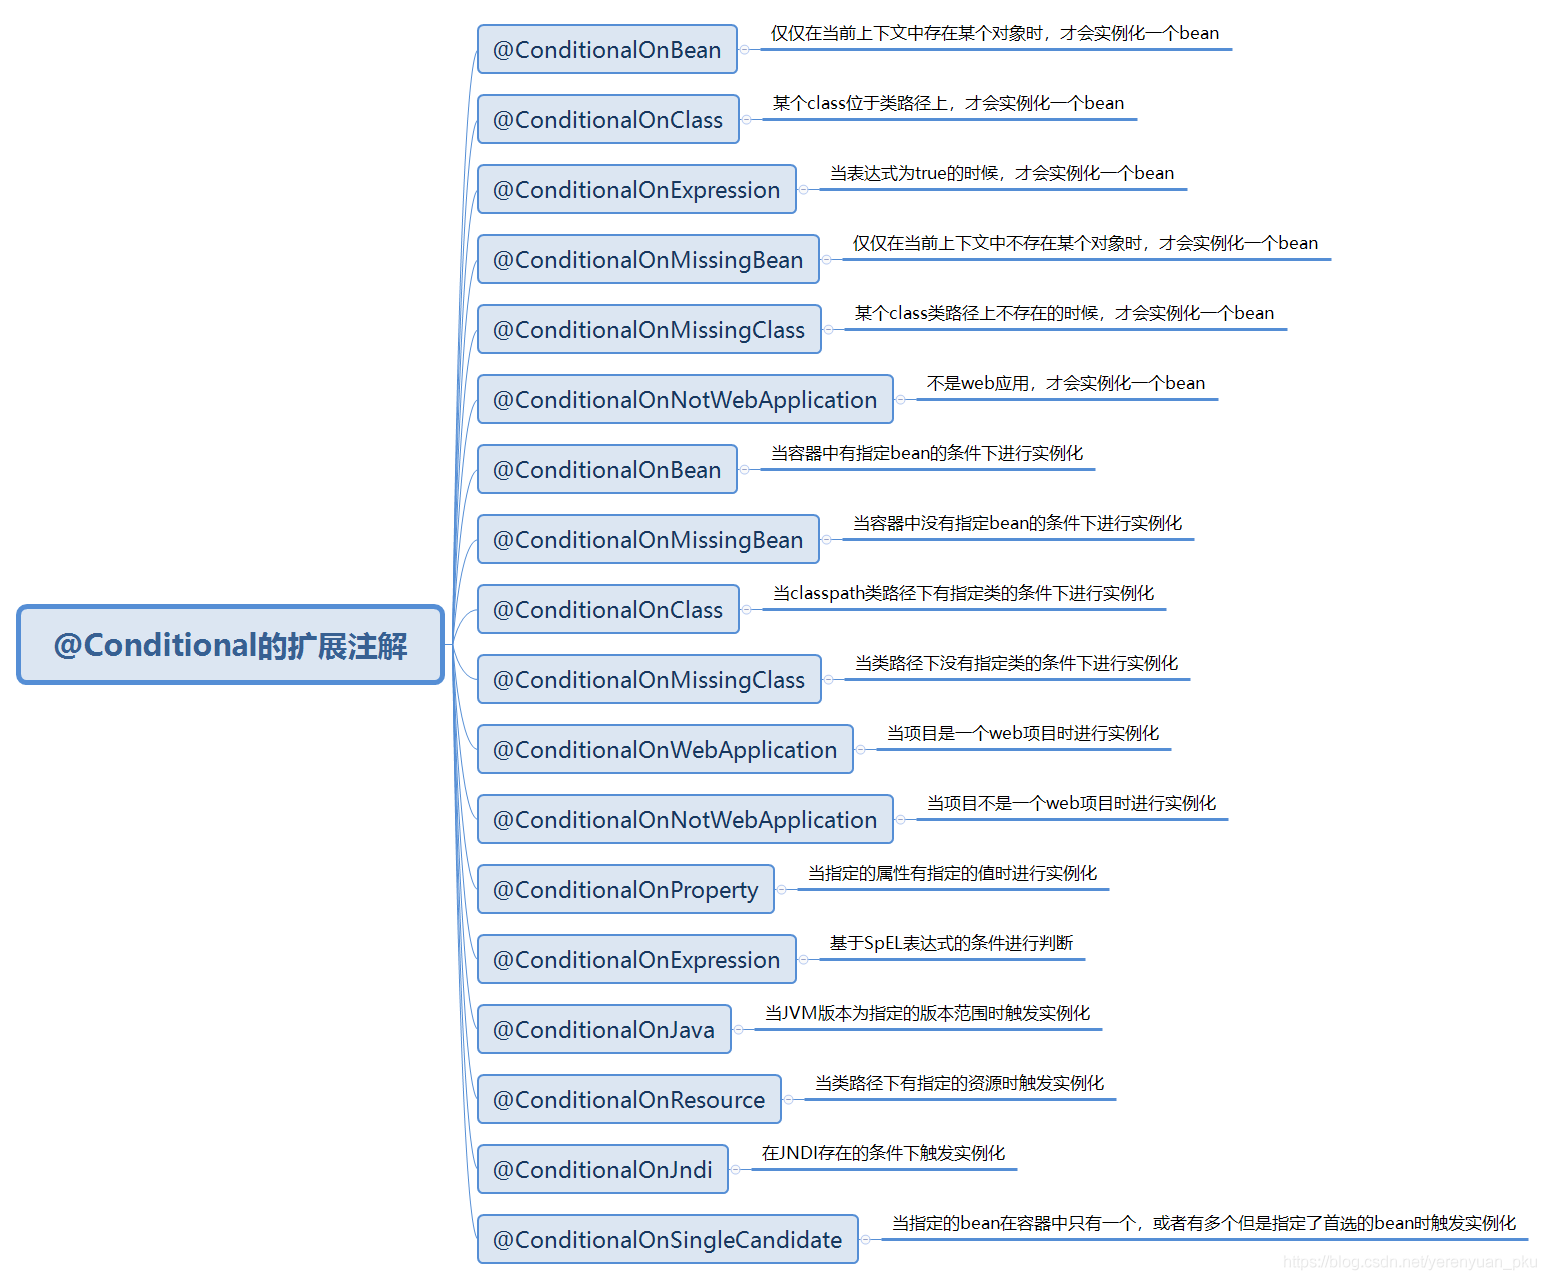
2.@Conditional的扩展注解
3.@Conditional与@Profile的对比
Spring中的@Profile和@Conditional这俩注解都是用来检查If...then...else的语义。然而,Spring 4.0之后的@Conditional注解是@Profile注解的更新用法。
- Spring 3.0中的@Profile仅用于编写基于Environment变量的条件检查。配置文件可用于基于环境加载应用程序配置。
- Spring 4.0之后的@Conditional注解允许开发人员为条件检查定义用户定义的策略。此外,@Conditional注解还可以用于条件bean注册。
五、@Import给容器中快速导入一个组件
1.注册bean的方式
向Spring容器中注册bean通常有以下几种方式:
- 包扫描+给组件标注注解(@Controller、@Servcie、@Repository、@Component),但这种方式比较有局限性,局限于我们自己写的类
- @Bean注解,通常用于导入第三方包中的组件
- @Import注解,快速向Spring容器中导入一个组件
2.@Import使用方法
@Import注解@Import可以配合Configuration、ImportSelector以及ImportBeanDefinitionRegistrar来使用,@Import注解只允许放到类上面,不允许放到方法上。
@Import注解的三种用法主要包括:
- 直接填写class数组的方式
- ImportSelector接口的方式,即批量导入,这是重点。在ImportSelector接口的selectImports()方法中,存在一个AnnotationMetadata类型的参数,这个参数能够获取到当前标注@Import注解的类的所有注解信息,也就是说不仅能获取到@Import注解里面的信息,还能获取到其他注解的信息。
- ImportBeanDefinitionRegistrar接口方式,即手工注册bean到容器中
六、FactoryBean向Spring容器中注册bean
一般情况下,Spring是通过反射机制利用bean的class属性指定实现类来实例化bean的。在某些情况下,实例化bean过程比较复杂,如果按照传统的方式,那么则需要在标签中提供大量的配置信息,配置方式的灵活性是受限的,这时采用编码的方式可以得到一个更加简单的方案。Spring为此提供了一个org.springframework.bean.factory.FactoryBean的工厂类接口,用户可以通过实现该接口定制实例化bean的逻辑。

- T getObject():返回由FactoryBean创建的bean实例,如果isSingleton()返回true,那么该实例会放到Spring容器中单实例缓存池中
- boolean isSingleton():返回由FactoryBean创建的bean实例的作用域是singleton还是prototype
- Class getObjectType():返回FactoryBean创建的bean实例的类型
注意:当配置文件中标签的class属性配置的实现类是FactoryBean时,通过 getBean()方法返回的不是FactoryBean本身,而是FactoryBean#getObject()方法所返回的对象,相当于FactoryBean#getObject()代理了getBean()方法。
参考链接:

 浙公网安备 33010602011771号