Asp.netCore之安装centos7 资料收集
2018-12-30 19:49 糯米粥 阅读(452) 评论(0) 收藏 举报虚拟机的安装和centos的安装看博友的文章:https://www.cnblogs.com/zhaopei/p/netcore.html
ifconfig
在centons中用终端写命令比较费劲,可以在外部用工具连接:
可以用Xshell或者putty
Xshell下载:https://xshell.en.softonic.com/
http://xiazai.xshellcn.com/wm/XshellPlus6_wm.exe
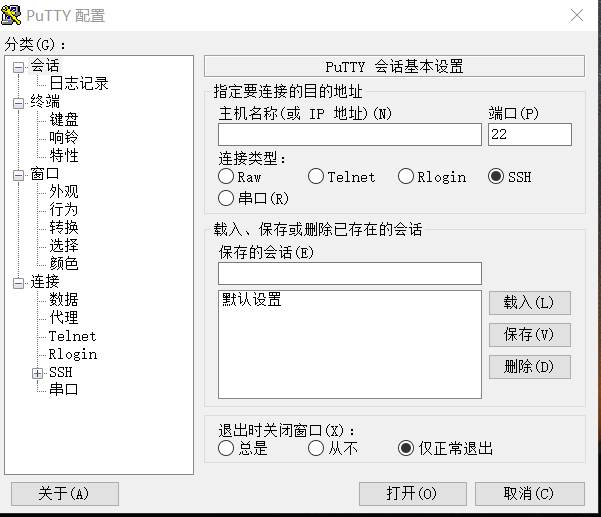
putty界面
发布代码到centons可以用winscp
下载地址https://winscp.net/eng/docs/lang:chs
https://www.centos.org/
centos安装netcore 步骤
https://dotnet.microsoft.com/learn/dotnet/hello-world-tutorial
centos安装ngnix步骤
https://www.digitalocean.com/community/tutorials/how-to-install-nginx-on-centos-7
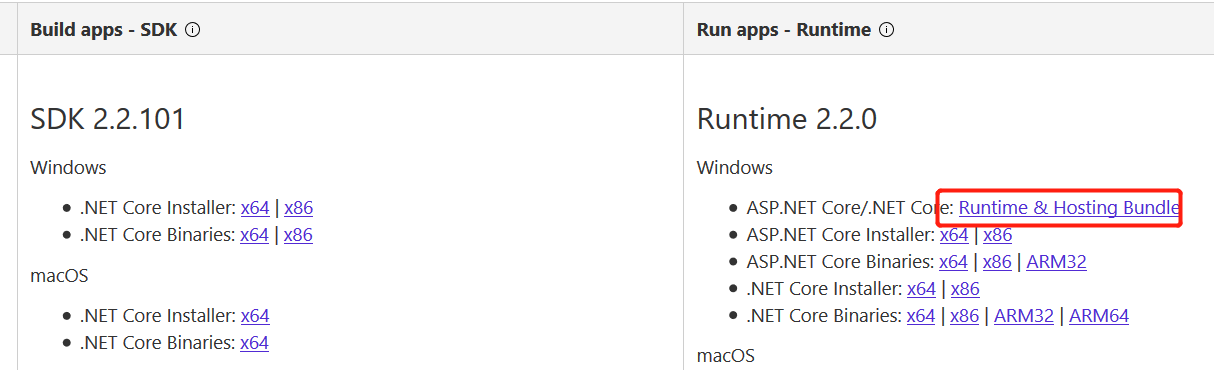
dotnet-hosting-2.1.6-win下载:
dotnet -hosting 就是IIS上的AspNetCoreModel模块
https://dotnet.microsoft.com/download/dotnet-core/2.2
SDK包含了Runtime
如果是只运行不开发的,只安装Runtime即可
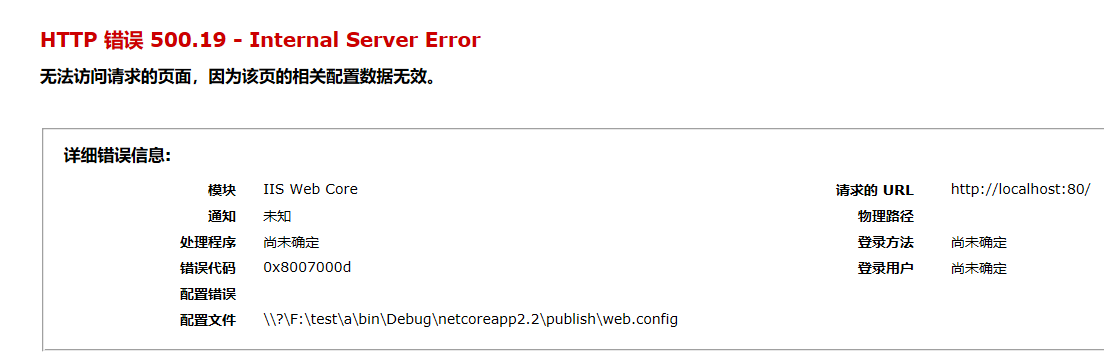
如果core项目部署IIS异常,说明是升级了.NET Core2.0 ,电脑上没有安装 dotnet-hosting-2.1.1-win.exe
参考:https://www.cnblogs.com/w2011/p/9229111.html
收集网络,并自己尝试成功
配置守护着进程,这样关掉dos界面,或者程序关掉,可以自动重启
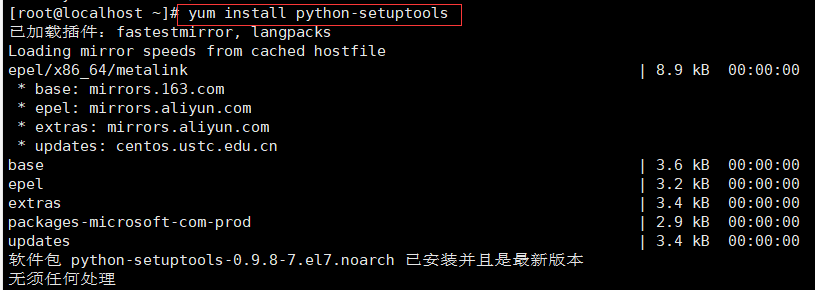
安装:supervisor
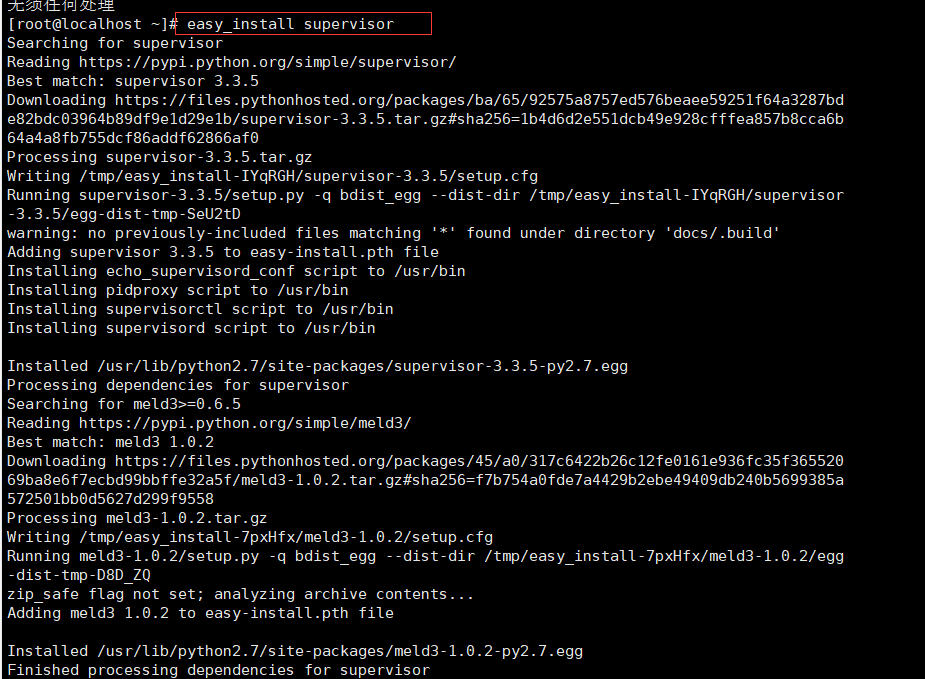
第一步:输入,yum install python-setuptools
第二步:输入:easy_install supervisor
第三步:创建文件夹,输入:mkdir /etc/supervisor
第四步: #配置Supervisor 输入 echo_supervisord_conf > /etc/supervisor/supervisord.conf
此时:supervisor文件夹下面有了supervisord.conf文件,
第五步:把文件末尾的,替换,或者在末尾添加
;[include] ;files = relative/directory/*.ini
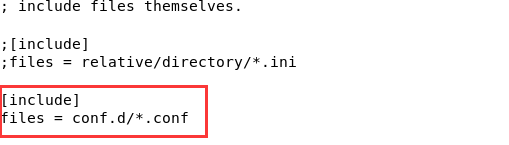
第五步:进入目录 /etc/supervisor/ 新建 conf.d文件夹,conf.d文件夹下新建 netcore.conf文件

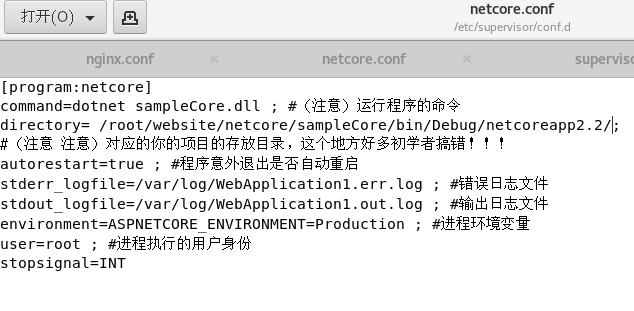
配置netcore.conf内容,我这里是源文件放到了centos系统上
[program:netcore]
command=dotnet sampleCore.dll ; #(注意)运行程序的命令
directory= /root/website/netcore/sampleCore/bin/Debug/netcoreapp2.2/;
#(注意 注意)对应的你的项目的存放目录,这个地方好多初学者搞错!!!
autorestart=true ; #程序意外退出是否自动重启
stderr_logfile=/var/log/WebApplication1.err.log ; #错误日志文件
stdout_logfile=/var/log/WebApplication1.out.log ; #输出日志文件
environment=ASPNETCORE_ENVIRONMENT=Production ; #进程环境变量
user=root ; #进程执行的用户身份
stopsignal=INT
最后执行:
supervisord -c /etc/supervisor/supervisord.conf
ps -ef | grep netcore #【注意】netcore是上面 program:netcore 的命名
supervisorctl reload #重新加载

如果修改了文件:执行:supervisorctl reload重新加载
这样就可以访问了
配置Supervisor开机启动
打开目录 /usr/lib/systemd/system/ 新建文件 supervisord.service
内容:
# dservice for systemd (CentOS 7.0+)
# by ET-CS (https://github.com/ET-CS)
[Unit]
Description=Supervisor daemon

[Service]
Type=forking
ExecStart=/usr/bin/supervisord -c /etc/supervisor/supervisord.conf
ExecStop=/usr/bin/supervisorctl shutdown
ExecReload=/usr/bin/supervisorctl reload
KillMode=process
Restart=on-failure
RestartSec=42s

[Install]
WantedBy=multi-user.target
将nginx添加至SELinux的白名单,否则会报502错误。
yum install policycoreutils-python  #(选y)
cat /var/log/audit/audit.log | grep nginx | grep denied | audit2allow -M mynginx
semodule -i mynginx.pp

重新加载生效
nginx -s reload #使其即时生效
执行命令:
systemctl enable supervisord
systemctl is-enabled supervisord #来验证是否为开机启动
systemctl start nginx.service
systemctl stop nginx.service
systemctl reload nginx.service
systemctl status nginx.service
要先启动后 systemctl start nginx.service
执行nginx -s reload 否则会异常
参考:https://www.cnblogs.com/zhaopei/p/netcore.html
nginx 配置开机启动 ,参考: https://www.cnblogs.com/jepson6669/p/9131217.html
http://blog.51cto.com/jschu/1699581
先搜索是否存在nginx.service 文件,版本不同。路径不同
第一步:进入到/lib/systemd/system/目录
[root@iz2z init.d]# cd /lib/systemd/system/
第二步:创建nginx.service文件,并编辑
# vim nginx.service
内如如下:

[Unit]
Description=nginx service
After=network.target

[Service]
Type=forking
ExecStart=/usr/sbin/nginx
ExecReload=/usr/sbin/nginx -s reload
ExecStop=/usr/sbin/nginx -s quit
PrivateTmp=true

[Install]
WantedBy=multi-user.target
[Unit]:服务的说明
Description:描述服务
After:描述服务类别
[Service]服务运行参数的设置
Type=forking是后台运行的形式
ExecStart为服务的具体运行命令
ExecReload为重启命令
ExecStop为停止命令
PrivateTmp=True表示给服务分配独立的临时空间
注意:[Service]的启动、重启、停止命令全部要求使用绝对路径
[Install]运行级别下服务安装的相关设置,可设置为多用户,即系统运行级别为3
保存退出。
第三步:加入开机自启动
# systemctl enable nginx
如果不想开机自启动了,可以使用下面的命令取消开机自启动
# systemctl disable nginx
第四步:服务的启动/停止/刷新配置文件/查看状态
# systemctl start nginx.service          启动nginx服务

# systemctl stop nginx.service           停止服务

# systemctl restart nginx.service        重新启动服务

# systemctl list-units --type=service     查看所有已启动的服务

# systemctl status nginx.service          查看服务当前状态

# systemctl enable nginx.service          设置开机自启动

# systemctl disable nginx.service         停止开机自启动
一个常见的错误
Warning: nginx.service changed on disk. Run 'systemctl daemon-reload' to reload units.
直接按照提示执行命令systemctl daemon-reload 即可。
# systemctl daemon-reload
如果在安装双系统,先安装win7,在安装centos7后,开机启动项没有win7,需要修改
路径:boot/grub2/grub.cfg
文件末尾添加:
menuentry 'win10_pro_x64' {
set root=(hd0,1)
chainloader +1
}
注意:chainloader后面有个空格
添加后,重启就有了

 浙公网安备 33010602011771号