
SpringBoot应用操作Rabbitmq(topic交换器高级操作)
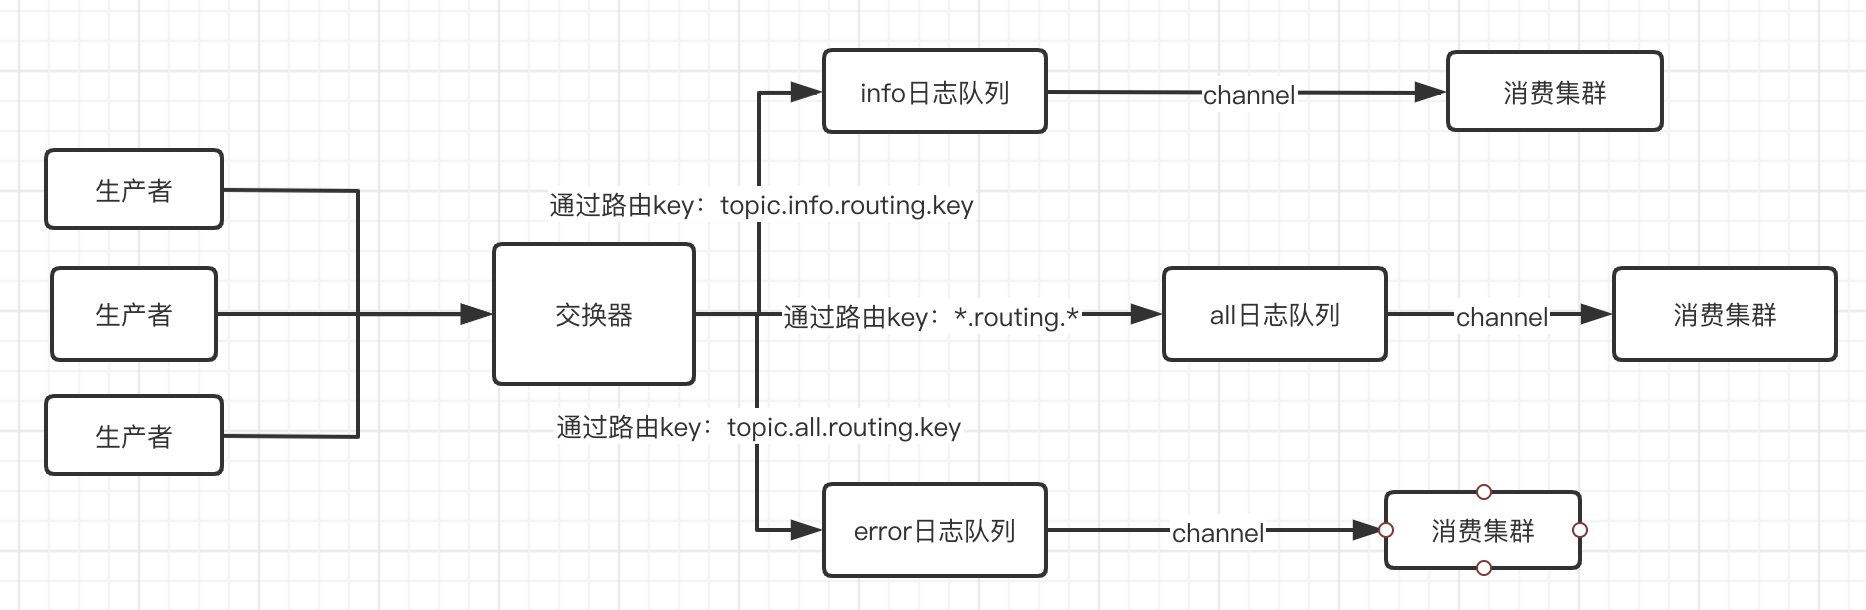
一、topic交换器为主题交换器,可以根据路由key模糊匹配
实现模型图
二、实战
1、引入maven
        <dependency>
            <groupId>org.springframework.amqp</groupId>
            <artifactId>spring-rabbit</artifactId>
        </dependency>
2、修改配置文件
server:
  port: 8080
  servlet:
    context-path: /rabbitmq

spring:
  application:
    #指定应用的名字
    name: rabbit-add
  #配置rabbitmq
  rabbitmq:
  #链接主机
    host: 127.0.0.1
  #端口
    port: 5672
  #已经授权的用户账号密码
    username: user
    password: user
  #指定的虚拟主机,默认/,
    virtual-host: my_vhost

# 自定义配置应用于topic交换器
mq:
  config:
   #自定义交换器名称
     exchange: log.topic
     queue:
        #自定义error、info、all队列名称
        errorName: topic.error.log
        infoName: topic.info.log
        allName: topic.all.log
        #自定义error、info、all路由键的名称
        routingInfoKey: topic.info.routing.key
        routingErrorKey: topic.error.routing.key
3、消费者代码
a、模糊匹配所有的数据队列,注意在配置路由key的时候是*代表阶段的配置,.不在匹配范围内


package com.niu.topic;

import lombok.extern.slf4j.Slf4j;
import org.springframework.amqp.core.ExchangeTypes;
import org.springframework.amqp.rabbit.annotation.*;
import org.springframework.stereotype.Component;

/**
 * @author niunafei
 * @function
 * @email niunafei0315@163.com
 * @date 2020/4/28  7:20 PM
 * @RabbitListener 自定义监听事件
 * @QueueBinding 绑定交换器与队列的关系value 指定队列exchange指定交换器
 * value= @Queue 指定配置队列的信息 value队列名称 autoDelete是否是临时队列
 * exchange= @Exchange 指定交换器 value指定交换器名称 type交换器类型
 * key  指定路由键
 */
@Component
@Slf4j
@RabbitListener(
        bindings = @QueueBinding(
                value = @Queue(
                        value = "${mq.config.queue.allName}", autoDelete = "true"
                ),
                exchange = @Exchange(
                        value = "${mq.config.exchange}", type = ExchangeTypes.TOPIC),
                key = "*.*.routing.*")
)
public class AllReceiver {

    /**
     * 设置监听方法
     *
     * @param msg
     * @RabbitHandler 声明监听方法是下面的 isDefault属性是默认false接受的完整对象,true接受body体
     */
    @RabbitHandler(isDefault = true)
    public void process(String msg) {
        log.info("接受到消息:all {}", msg);
    }
}
b、error的消费端
 1 package com.niu.topic;
 2
 3 import lombok.extern.slf4j.Slf4j;
 4 import org.springframework.amqp.core.ExchangeTypes;
 5 import org.springframework.amqp.rabbit.annotation.*;
 6 import org.springframework.stereotype.Component;
 7
 8 /**
 9  * @author niunafei
10  * @function
11  * @email niunafei0315@163.com
12  * @date 2020/4/28  7:20 PM
13  * @RabbitListener 自定义监听事件
14  * @QueueBinding 绑定交换器与队列的关系value 指定队列exchange指定交换器
15  * value= @Queue 指定配置队列的信息 value队列名称 autoDelete是否是临时队列
16  * exchange= @Exchange 指定交换器 value指定交换器名称 type交换器类型
17  * key  指定路由键
18  */
19 @Component
20 @Slf4j
21 @RabbitListener(
22         bindings = @QueueBinding(
23                 value = @Queue(value = "${mq.config.queue.errorName}", autoDelete = "true"),
24                 exchange = @Exchange(value = "${mq.config.exchange}", type = ExchangeTypes.TOPIC),
25                 key = "${mq.config.queue.routingErrorKey}")
26 )
27 public class ErrorReceiver {
28
29     /**
30      * 设置监听方法
31      *  @RabbitHandler 声明监听方法是下面的 isDefault属性是默认false接受的完整对象,true接受body体
32      *
33      * @param msg
34      */
35     @RabbitHandler(isDefault = true)
36     public void process(String msg) {
37         log.info("接受到消息:error {}", msg);
38     }
39 }
c、info的消费端
package com.niu.topic;

import lombok.extern.slf4j.Slf4j;
import org.springframework.amqp.core.ExchangeTypes;
import org.springframework.amqp.rabbit.annotation.*;
import org.springframework.stereotype.Component;

/**
 * @author niunafei
 * @function
 * @email niunafei0315@163.com
 * @date 2020/4/28  7:20 PM
 * @RabbitListener 自定义监听事件
 * @QueueBinding 绑定交换器与队列的关系value 指定队列exchange指定交换器
 * value= @Queue 指定配置队列的信息 value队列名称 autoDelete是否是临时队列
 * exchange= @Exchange 指定交换器 value指定交换器名称 type交换器类型
 * key  指定路由键
 */
@Component
@Slf4j
@RabbitListener(
        bindings = @QueueBinding(
                value = @Queue(
                        value = "${mq.config.queue.infoName}", autoDelete = "true"
                ),
                exchange = @Exchange(
                        value = "${mq.config.exchange}", type = ExchangeTypes.TOPIC),
                key = "${mq.config.queue.routingInfoKey}")
)
public class InfoReceiver {

    /**
     * 设置监听方法
     *
     * @param msg
     * @RabbitHandler 声明监听方法是下面的 isDefault属性是默认false接受的完整对象,true接受body体
     */
    @RabbitHandler(isDefault = true)
    public void process(String msg) {
        log.info("接受到消息:info {}", msg);
    }
}
4、生产者
 1 package com.niu.topic;
 2
 3 import org.springframework.amqp.rabbit.core.RabbitTemplate;
 4 import org.springframework.beans.factory.annotation.Autowired;
 5 import org.springframework.beans.factory.annotation.Value;
 6 import org.springframework.stereotype.Component;
 7
 8 /**
 9  * @author niunafei
10  * @function
11  * @email niunafei0315@163.com
12  * @date 2020/4/29  9:44 AM
13  */
14 @Component
15 public class Sender {
16     /**
17      * spring整合的操作类
18      * Message 发送的消息对象
19      * void send(Message var1) throws AmqpException;
20      * <p>
21      * var1 路由键 Message 发送的消息对象
22      * void send(String var1, Message var2) throws AmqpException;
23      * <p>
24      * var1 指定交换器名称 var2 路由键 Message 发送的消息对象
25      * void send(String var1, String var2, Message var3) throws AmqpException;
26      *
27      * convertAndSend() 方法不需要指定MessageProperties属性即可发布
28      */
29     @Autowired
30     private RabbitTemplate rabbitTemplate;
31
32     @Value("${mq.config.queue.routingInfoKey}")
33     private String routingInfoKey;
34     @Value("${mq.config.queue.routingErrorKey}")
35     private String routingErrorKey;
36     @Value("${mq.config.exchange}")
37     private String exchange;
38
39     public void send(String msg) {
40         //需要指定交换器和路由键就可以转发
41         rabbitTemplate.convertAndSend(exchange, routingInfoKey, "info+"+msg);
42         rabbitTemplate.convertAndSend(exchange, routingErrorKey,"error+"+ msg);
43         rabbitTemplate.convertAndSend(exchange, "topic.order.routing.key","order+"+ msg);
44         rabbitTemplate.convertAndSend(exchange, "topic.warn.routing.key", "warn+"+msg);
45     }
46
47 }
5、测试截屏

注意:ack确认机制,容易产生数据丢失,和产生内存泄漏,消费者进行死循环,配置这两个属性进行确认。
1、autoDelete属性设置为false
@Queue(value = "${mq.config.queue.orderName}", autoDelete = "false"
2、消费者进行死循环问题

docker安装rabbitmq:rabbitMQ安装docker版 /权限管理命令
简单应用来这里吧: SpringBoot应用操作Rabbitmq
简单应用来这里吧: SpringBoot应用操作Rabbitmq(direct高级操作)
简单应用来这里吧:SpringBoot应用操作Rabbitmq(topic交换器高级操作)
简单应用来这里吧:SpringBoot应用操作Rabbitmq(fanout广播高级操作)

 浙公网安备 33010602011771号