JWT Bearer 认证和授权 for ASP.NET Core 5 (授权的干货)
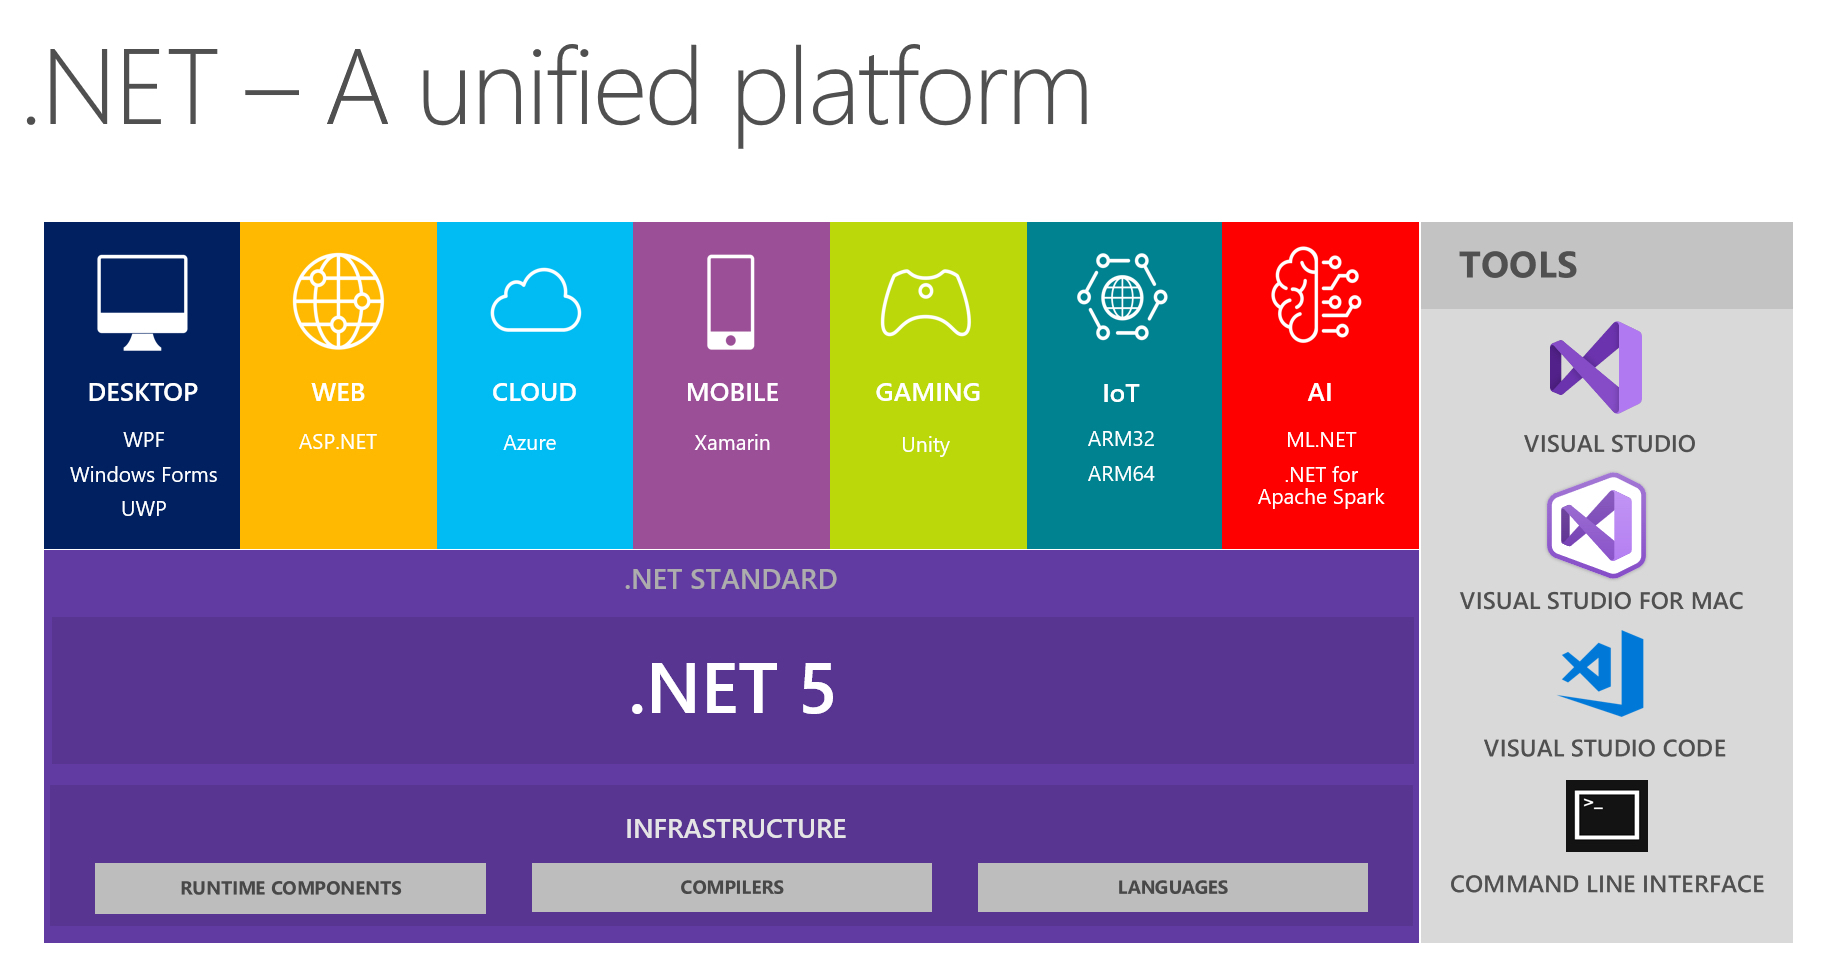
2020 年 11 月 10 日,Microsoft 发布了 .NET 5 和更新 ASP.NET Core 平台,其中包括一长串性能改进。
在本文中,我们将介绍如何为使用 Core 5 构建的 API 配置 JWT 持有者身份验证和授权 ASP.NET。有很多资源涵盖了如何使用对称签名构建自己的“JWT身份验证”,但在本文中,我们将重点介绍利用OpenID连接和OAuth 2流(使用身份验证0/身份服务器/Okta/...),其中API是受保护的资源。让我们首先从高层次上看一下所有部分是如何组合在一起的。您构建的 API 通常由应用程序代表用户或代表用户自己调用。
用户与 SPA/移动应用程序/桌面应用程序/Web 应用程序/CLI/...并将使用OpenID连接(授权码授予)进行身份验证。授权服务器将发出 (由应用程序用于对用户进行身份验证) 和 应用程序用来代表用户调用 API 的 。id_tokenaccess_token
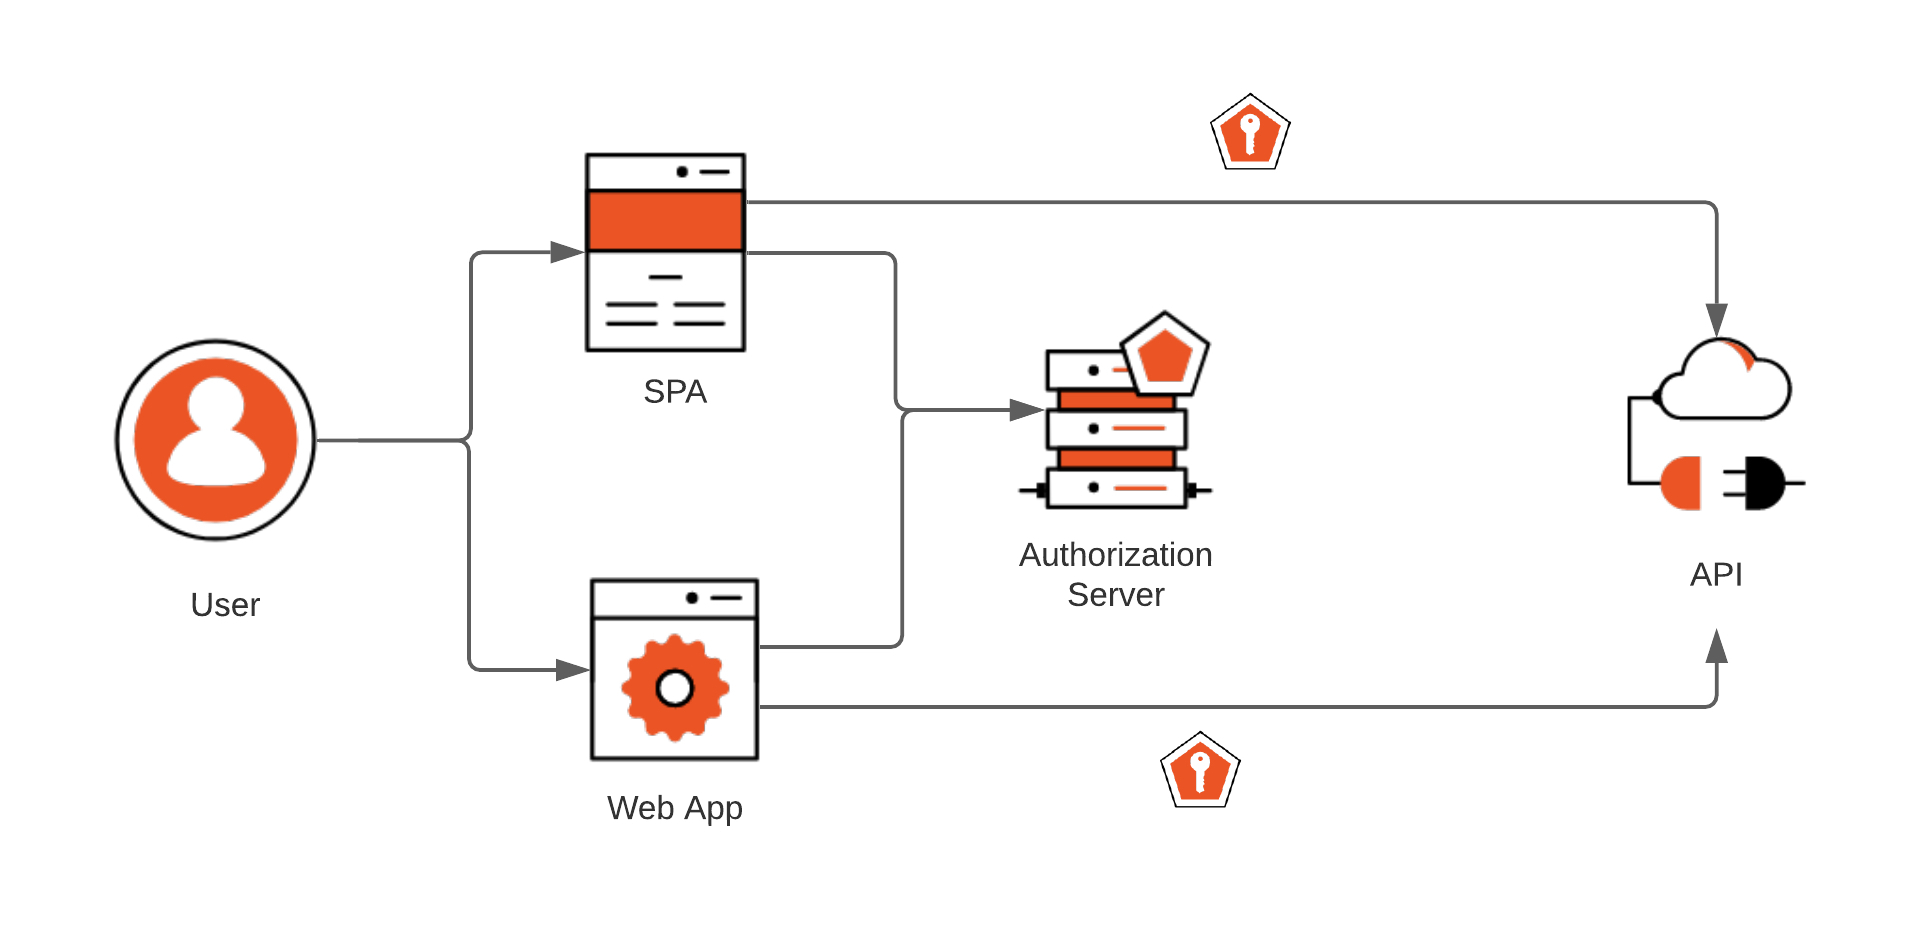
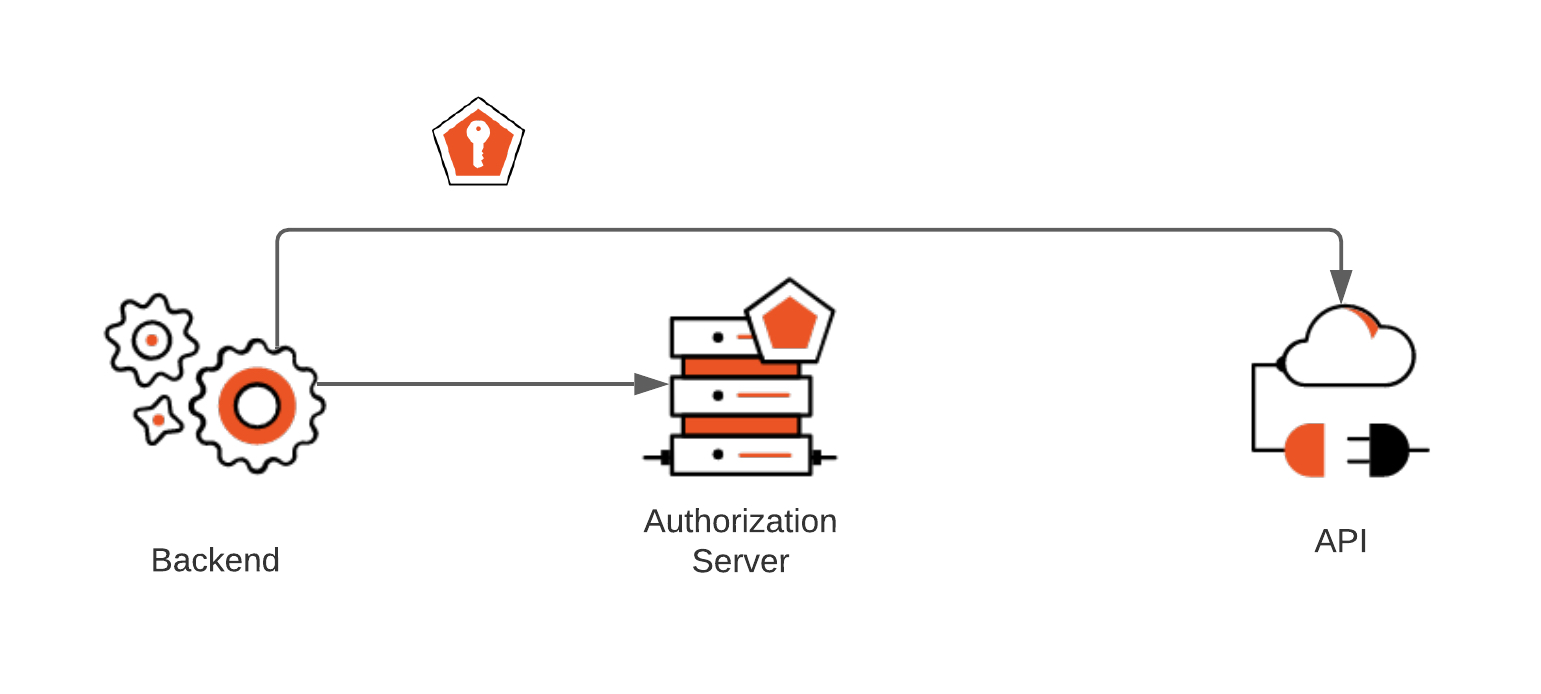
当应用程序需要代表自己调用 API 时,它们将使用 OAuth 2.0 客户端凭据授予直接获取:access_token
我们将首先创建一个帮助器方法,该方法将使用包处理所有 JWT 承载配置.Microsoft.AspNetCore.Authentication.JwtBearer
using System.Text.Json;
using Microsoft.AspNetCore.Authentication;
using Microsoft.AspNetCore.Authentication.JwtBearer;
using Microsoft.AspNetCore.Http;
using Microsoft.Extensions.DependencyInjection;
using Microsoft.IdentityModel.Tokens;

public static class JwtBearerConfiguration
{
  public static AuthenticationBuilder AddJwtBearerConfiguration(this AuthenticationBuilder builder, string issuer, string audience)
  {
    return builder.AddJwtBearer(options =>
    {
      options.Authority = issuer;
      options.Audience = audience;
      options.TokenValidationParameters = new TokenValidationParameters()
      {
        ClockSkew = new System.TimeSpan(0, 0, 30)
      };
      options.Events = new JwtBearerEvents()
      {
        OnChallenge = context =>
        {
          context.HandleResponse();
          context.Response.StatusCode = StatusCodes.Status401Unauthorized;
          context.Response.ContentType = "application/json";

          // Ensure we always have an error and error description.
          if (string.IsNullOrEmpty(context.Error))
            context.Error = "invalid_token";
          if (string.IsNullOrEmpty(context.ErrorDescription))
            context.ErrorDescription = "This request requires a valid JWT access token to be provided";

          // Add some extra context for expired tokens.
          if (context.AuthenticateFailure != null && context.AuthenticateFailure.GetType() == typeof(SecurityTokenExpiredException))
          {
            var authenticationException = context.AuthenticateFailure as SecurityTokenExpiredException;
            context.Response.Headers.Add("x-token-expired", authenticationException.Expires.ToString("o"));
            context.ErrorDescription = $"The token expired on {authenticationException.Expires.ToString("o")}";
          }

          return context.Response.WriteAsync(JsonSerializer.Serialize(new
          {
            error = context.Error,
            error_description = context.ErrorDescription
          }));
        }
      };
    });
  }
}
在上面的代码中,我们使用以下命令配置该方法:AddJwtBearer
Authority:颁发者(例如:https://sandrino.auth0.com/)Audience:通常是已在授权服务器上注册的 API 的标识符(例如:http://my-api)ClockSkew:默认情况下,此值设置为 5 分钟,但在大多数情况下,30 秒应该没问题。这是为了处理授权服务器和 API 之间的任何时间差异。
我们还修改了任何 JWT 验证错误的响应,以返回 JSON 对象而不是标准质询。这是可选的,它为客户端提供了更多可用于处理错误的上下文。WWW-Authenticate
现在,可以使用帮助程序在类中注册身份验证服务:Startup
public class Startup
{
  private readonly IConfiguration _configuration;

  public Startup(IConfiguration configuration)
  {
    _configuration = configuration;
  }

  public void ConfigureServices(IServiceCollection services)
  {
    services.AddControllers();

// Configure JWT authentication. }
public void Configure(IApplicationBuilder app, IWebHostEnvironment env)
{
app.UseRouting();
app.UseAuthentication();
app.UseAuthorization();
app.UseEndpoints(endpoints =>
{
endpoints.MapControllers();
});
}
}
和 设置将被读取配置文件:Jwt.IssuerJwt.Audienceappsettings.json
{
  "Jwt": {
    "Issuer": "https://sandrino-dev.auth0.com/",
    "Audience": "urn:my-api"
  },
  ...
}
就是这样,我们现在可以开始创建必要的API并保护它们。
让我们首先创建一个简单的 API,该 API 返回当前标识的声明。在操作中,我们将使用要求对 HTTP 请求进行身份验证的属性。Get[Authorize]
public class UserInfo
{
  [JsonPropertyName("id")]
  public string Id { get; set; }

  [JsonPropertyName("claims")]
  public Dictionary<string, string> Claims { get; set; }
}

[ApiController]
[Route("/api/claims")]
public class UserController : ControllerBase
{
[HttpGet] public UserInfo Get()
{
return new UserInfo()
{
Id = this.User.GetId(),
Claims = this.User.Claims.ToDictionary(claim => claim.Type, claim => claim.Value)
};
}
}
为了使用获取用户的标识符,我们可以编写一个小的帮助器类:GetId()
using System.Security.Claims;

public static class UserHelpers
{
  public static string GetId(this ClaimsPrincipal principal)
  {
    var userIdClaim = principal.FindFirst(c => c.Type == ClaimTypes.NameIdentifier) ?? principal.FindFirst(c => c.Type == "sub");
    if (userIdClaim != null && !string.IsNullOrEmpty(userIdClaim.Value))
    {
      return userIdClaim.Value;
    }

    return null;
  }
}
让我们继续并启动我们的 API。如果我们调用此终结点而不在标头中提供有效值,这将导致以下错误:access_tokenAuthorization
{
  "error": "invalid_token",
  "error_description": "This request requires a valid JWT access token to be provided"
}
现在,我们可以在标头中使用有效令牌尝试相同的请求:Authorization
curl \
  --request GET 'http://localhost:5001/api/claims' \
  --header 'Authorization: Bearer eyJhbGciOiJSUzI1NiIsInR5cCI6IkpXVCIsImtpZCI6InA0UVUtODVUY09GeG03c05JMWlaYyJ9.eyJpc3MiOiJodHRwczovL3NhbmRyaW5vLWRldi5hdXRoMC5jb20vIiwic3ViIjoiYXV0aDB8NTk3YTA2NTExM2Y0MGIwODQ4NWVlN2JkIiwiYXVkIjpbInVybjpteS1hcGkiLCJodHRwczovL3NhbmRyaW5vLWRldi5hdXRoMC5jb20vdXNlcmluZm8iXSwiaWF0IjoxNjA4Mjg2OTMxLCJleHAiOjE2MDgyOTY5MzEsImF6cCI6IllRd0Q0YTBBMTFreURJQzJPcVBLNnVDR3FHNEQ3cnVJIiwic2NvcGUiOiJvcGVuaWQgcHJvZmlsZSBvZmZsaW5lX2FjY2VzcyIsImd0eSI6InBhc3N3b3JkIn0.l9dOVOXvnFhmMbUAelGiQJTwlCpgXqE6nbrdbTJhg1shxhMiGSuMg3YN3eFLD3-TfU8T5nHNttjgHdlIus-oQuJspYg4Mqu6NTIE0PxGnQQDYqADnXzpLV4OdFc2k1YuZwCpE8dJDJ0lzvXTsio3DKvWq_Vq3gL7qAWtF5EefKbsfTOaLhVPZ8YIcY8C0VSReJnC2M8da0KAdP0SqYJB_BIZYeQiPg668MrGFWsKuQv1h4C9DU3o9Ol0S1nHZ6r8KiiMSQRJyFV7v82VQ3dZWjrj5YWGGR4Uk1Wuf3iochLxRz64MQp-iV_fuE1DECLjKTt6Bj-nLR2PZFDTHAheCA'
然后,这将按预期返回用户的 ID 和声明:
{
  "id": "auth0|597a065113f40b08485ee7bd",
  "claims": [
    {
      "name": "iss",
      "value": "https://sandrino-dev.auth0.com/"
    },
    {
      "name": "http://schemas.xmlsoap.org/ws/2005/05/identity/claims/nameidentifier",
      "value": "auth0|597a065113f40b08485ee7bd"
    },
    {
      "name": "aud",
      "value": "urn:my-api"
    },
    {
      "name": "aud",
      "value": "https://sandrino-dev.auth0.com/userinfo"
    },
    {
      "name": "iat",
      "value": "1608286931"
    },
    {
      "name": "exp",
      "value": "1608296931"
    },
    {
      "name": "azp",
      "value": "YQwD4a0A11kyDIC2OqPK6uCGqG4D7ruI"
    },
    {
      "name": "scope",
      "value": "openid profile offline_access"
    },
    {
      "name": "gty",
      "value": "password"
    }
  ]
}
请注意,您可以使用Auth0和失眠轻松测试上述内容。
你可能想知道刚刚发生了什么?!API 如何能够在不配置机密或公钥的情况下验证 JWT 持有者令牌?这是因为身份验证服务将使用 OIDC 元数据终端节点来获取所有必要的信息。
- 首先读取 OpenID 配置:https://sandrino-dev.auth0.com/.well-known/openid-configuration
- 从那里,它将找到该网址,然后加载该网址:https://sandrino-dev.auth0.com/.well-known/jwks.json
jwks_uri - 公钥从该文档加载,并用于验证传入的 JWT 持有者令牌
以上是创建安全 API 的一个好步骤,但它可能不够精细。并非每个人都有权访问 API 中公开的所有操作。这是您需要创建授权策略的位置,您可以在其中限制对某些操作的访问。
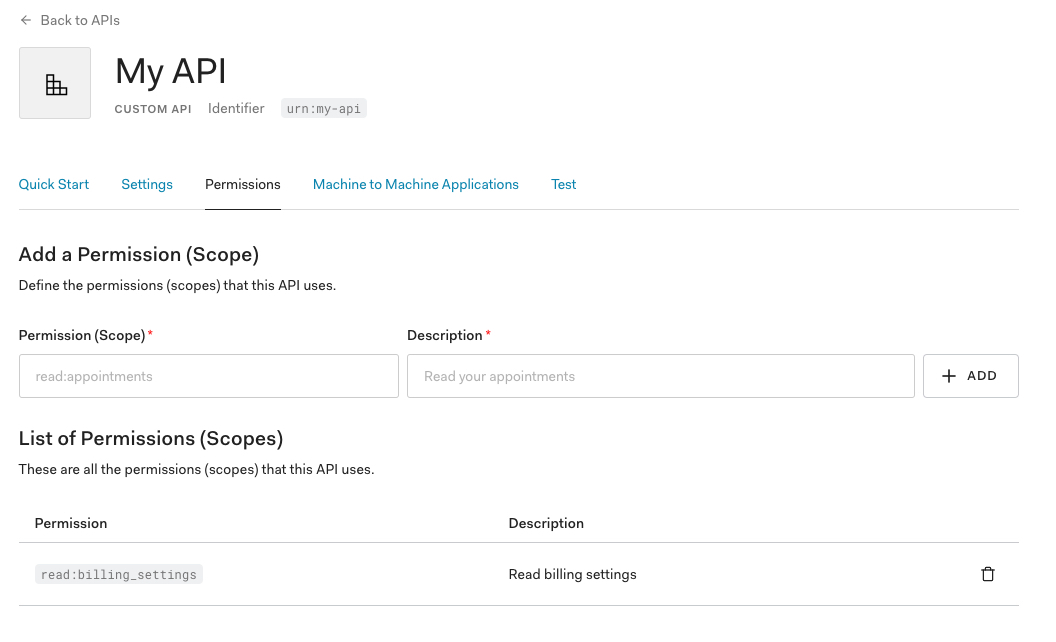
在我们的示例中,我们将创建一个终结点来查询计费设置,该设置仅适用于具有作用域的用户。在授权服务器中,您通常会配置只有属于特定组成员的用户,只有具有特定角色或权限的用户...可以接收此范围。但是,一旦应用程序可以代表用户请求该作用域,它将在 中可用,并且对此终结点的调用将成功。read:billing_settingsaccess_token
授权处理程序实现我们的业务需求。它将从当前主体中提取声明,然后验证配置的声明(例如:)是否可用。如果是,则允许请求继续。scoperead:billing_settings
public class ScopeRequirement : IAuthorizationRequirement
{
  public string Issuer { get; }

  public string Scope { get; }

  public ScopeRequirement(string issuer, string scope)
  {
    Issuer = issuer ?? throw new ArgumentNullException(nameof(issuer));
    Scope = scope ?? throw new ArgumentNullException(nameof(scope));
  }
}

public class RequireScopeHandler : AuthorizationHandler<ScopeRequirement>
{
  protected override Task HandleRequirementAsync(AuthorizationHandlerContext context, ScopeRequirement requirement)
  {
    // The scope must have originated from our issuer.
    var scopeClaim = context.User.FindFirst(c => c.Type == "scope" && c.Issuer == requirement.Issuer);
    if (scopeClaim == null || String.IsNullOrEmpty(scopeClaim.Value))
      return Task.CompletedTask;

    // A token can contain multiple scopes and we need at least one exact match.
    if (scopeClaim.Value.Split(' ').Any(s => s == requirement.Scope))
      context.Succeed(requirement);
    return Task.CompletedTask;
  }
}
然后,我们应该为 API 支持的每个范围注册此策略,并注册处理程序:
// Create an authorization policy for each scope supported by my API.
services.AddAuthorization(options =>
{
  var scopes = new[] {
    "read:billing_settings",
    "update:billing_settings",
    "read:customers",
    "read:files"
  };

Array.ForEach(scopes, scope => );
});
// Register our authorization handler.对于每个作用域,我们使用该作用域的名称注册一个策略,以便稍后在代码中使用。[Authorize("read:billing_settings")]
作为最后一步,我们现在可以创建一个,在其中向用户公开必要的功能,以管理其计费设置。终结点需要存在作用域:BillingController/api/billing/settingsread:billing_settings
[ApiController]
[Route("/api/billing")]
public class BillingController : ControllerBase
{
  [HttpGet]
[Route("settings")] public BillingSettings Get()
{
return new BillingSettings()
{
Country = "United States",
State = "Washington",
Street = "Microsoft Road 1",
VATNumber = "987654321"
};
}
}
与我的授权服务器交互时,我需要确保请求此作用域:
https://sandrino-dev.auth0.com/authorize
?client_id=5CMfGLsLworduMTOfVD0Kap2IQm4xpLH &redirect_uri=https://jwt.io
&response_type=code
&audience=urn:my-api
&...
然后,现在包含作用域的结果可用于调用终结点:access_tokenread:billing_settings
GET /api/billing/settings
Host: localhost:5001
Authorization: Bearer eyJhbGciOiJSUzI1NiIsInR5cCI6IkpXVCIsImtpZCI6InA0UVUtODVUY09GeG03c05JMWlaYyJ9.eyJpc3MiOiJodHRwczovL3NhbmRyaW5vLWRldi5hdXRoMC5jb20vIiwic3ViIjoiYXV0aDB8NTk3YTA2NTExM2Y0MGIwODQ4NWVlN2JkIiwiYXVkIjpbInVybjpteS1hcGkiLCJodHRwczovL3NhbmRyaW5vLWRldi5hdXRoMC5jb20vdXNlcmluZm8iXSwiaWF0IjoxNjA4Mjg3MzY4LCJleHAiOjE2MDgyOTczNjgsImF6cCI6IllRd0Q0YTBBMTFreURJQzJPcVBLNnVDR3FHNEQ3cnVJIiwic2NvcGUiOiJvcGVuaWQgcHJvZmlsZSByZWFkOmJpbGxpbmdfc2V0dGluZ3Mgb2ZmbGluZV9hY2Nlc3MiLCJndHkiOiJwYXNzd29yZCJ9.CMvAa4gVO5dFnXBqWK8UIq5mB--3JacVv9MwocnWFTSR5p938zhw5hMREqUGCesIWy5UUZeb7ka7Dhp4Mf3tK-8h3psfsPMMpI3OP4q8IglKplt1KaXe5rn8Fmm2daNDnxmMccXusLI7T_Ea3hfVrjrfURprNfXW9vCS17Xj6mRHF9RBHNkeg8CKyotatPQojY_uex2L3qBhJhGXBd8CHvnnbEVZMYVlc_D02tqMu4bvs9QCml8y3qQkyvBHOAEJcE7b84trIJK2vIh7B339l-ukeSyK1AEkf5hHAlUjGRuB1dhtfodWLexEd5rH-Tn55xwdvL2CyQI-J2JVIQS0Kw

{
  "country": "United States",
  "state": "Washington",
  "street": "Microsoft Road 1",
  "vat_number": "987654321"
}
在没有所需作用域的情况下调用此终结点将导致“403 禁止访问”。read:billing_settings
如果使用 Auth0 作为授权服务器,则可以为 API 配置“RBAC 授权策略”:
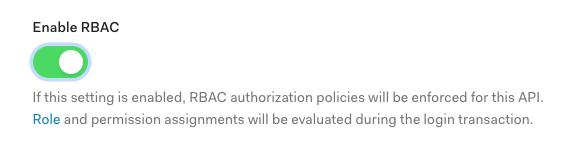
这会将对 API 上定义的作用域的访问权限限制为分配了所需角色或权限的用户。
现在,我们可以创建一个角色计费管理员,我们将在其中添加权限:read:billing_settings
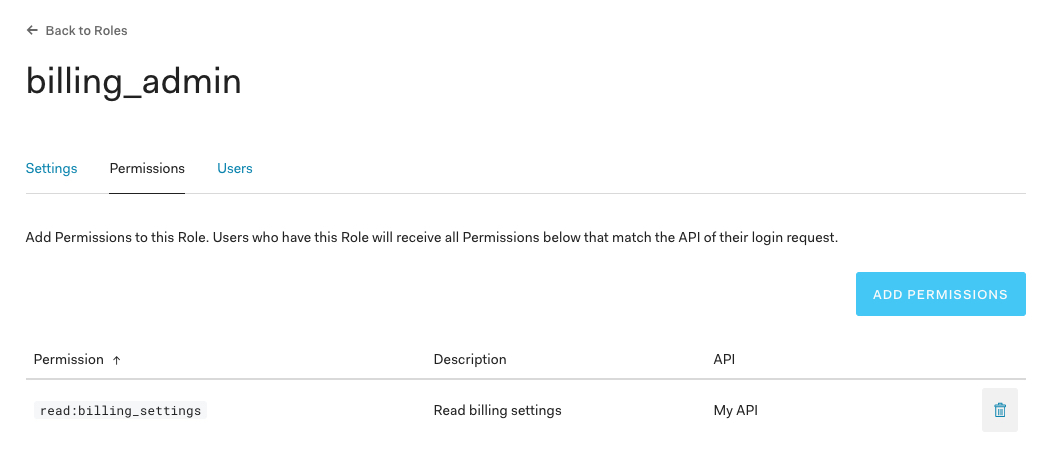
作为最后一步,我们可以将角色分配给我们的用户,允许应用程序请求他们的范围。read:billing_settings
完成上述所有操作后,您应该都可以在自己的 API 中配置 JWT 持有者身份验证和授权。
完整的演示应用程序可在 GitHub 上使用: https://github.com/sandrinodimattia/aspnet-core-5-jwt-bearer-demo
JWT Bearer Authentication and Authorization for ASP.NET Core 5 – sandrino.dev

 浙公网安备 33010602011771号