使用 HTTPS、自签名证书和 ASP.NET Core 进行本地开发
在 Windows、Mac OSX 和 Linux 上为 ASP.NET Core 的本地开发环境设置 HTTPS 和自签名证书的详细指南
注意:这篇文章和 GitHub 存储库已更新为 ASP.NET Core 2.0 的示例
在本教程中,我将向您展示如何在 Windows、Mac OSX 和 Ubuntu Linux 上设置使用 HTTPS 和 ASP.NET Core 2.0 的本地开发环境。我将向您展示如何创建自签名证书并将它们添加到您受信任的根证书存储中,以摆脱烦人的浏览器消息。最后,我将介绍如何设置 Kestrel(ASP.NET Core 的内置 Web 服务器)以使用 HTTPS。
创建自签名证书、信任它们并摆脱浏览器警告充满了许多细微差别,而且创建自签名证书的过程在 Internet 上的文档很少。在 Windows 和 Linux 上安装证书涉及完全不同的过程,但它在 ASP.NET Core 世界中变得至关重要,因为跨平台开发是开发过程中不可或缺的一部分。然后是 Chrome 中无处不在且令人讨厌的“您的连接不安全”消息、与证书中的通用名称匹配相关的 Chrome 消息以及围绕在 ASP.NET Core 和 Kestrel 中配置 HTTPS 的细节。
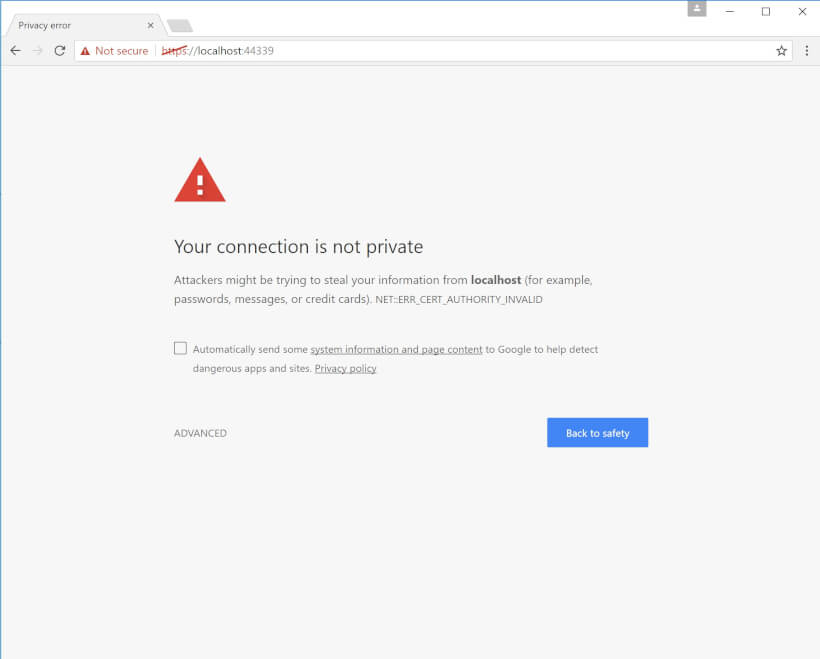
我已经记不清我不得不用谷歌搜索这个过程的次数了,所以我认为创建一个涵盖 Windows 和 Linux 的所有细节的指南是个好主意。
为什么是 HTTPS?
如果您是一个不知道如何实现 HTTPS 的开发人员,那么您就缺乏一项关键技能。我们所知道的互联网正在迅速迈向一个所有流量都将通过 HTTPS 提供服务的时代。 按照今天的情况,HTTPS 已经无处不在。你每天使用的网站,比如谷歌、Facebook、微软,你的银行网站——甚至是这个网站——它们都在使用 HTTPS。
如果您在过去 2 到 3 年内开发过应用程序,那么您的 Web 应用程序的生产版本很可能是在 HTTPS 中运行的。展望未来,绝大多数网站都将使用 HTTPS。
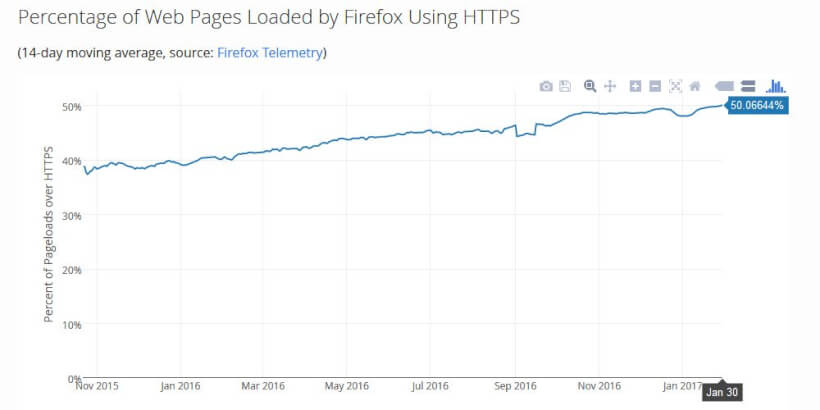
互联网上超过 50% 的页面浏览量已经通过 HTTPS 提供服务,并且Google Chrome 的最终目标是将所有 HTTP 站点标记为不安全,绝大多数流量通过 HTTPS 提供服务只是时间问题。
最后但同样重要的是:所有通过 HTTPS 进行的通信都是加密的。这意味着没有人可以窥探您的流量。
证书的简要说明以及为什么需要自签名证书进行本地开发
证书和 HTTPS 是一个巨大的话题,即使是简短的解释也会涉及很多。但是,为了本教程的目的,让我们看一些关于颁发证书的高级概念。
每次访问 HTTPS 站点时,您的浏览器都会下载该站点的证书,其中包含托管该站点的服务器的公钥,并使用证书颁发机构 (CA) 的私钥签名。
您的操作系统 (OS) 带有预安装的受信任根 CA 列表。浏览器使用这些根 CA 列表来验证证书。这是通过验证您的浏览器从站点下载的证书中的公钥是否由颁发该证书的 CA 签名来完成的。
该证书还包含服务器的域名,您的浏览器使用该证书来确认浏览器连接的站点与 CA 颁发的证书中列出的站点相同。之后,将发生加密,这是本教程范围之外的主题。
由于我们不使用 CA 颁发的证书进行本地开发,因此我们可以颁发自签名证书,然后将此自签名证书添加到我们受信任的根证书颁发机构存储中。这样,您的浏览器将信任该证书。
论自签名证书的安全性
自签名证书通过 HTTPS 提供加密通信,就像证书颁发机构 (CA) 颁发的证书一样,至少在建立连接后。这本身并不能使自签名证书安全。
例如,如果未正确安装和信任自签名证书,则很容易受到中间人攻击。由于信任自签名证书的唯一方法是为访问站点的每台设备手动导入受信任的根 CA 存储中的证书,因此默认情况下自签名证书实际上是不安全的,这是您应该使用的主要原因之一切勿在生产中使用自签名证书。
在本地主机上,我们没有与面向公众的站点相同的安全要求。因此,使用自签名证书进行本地开发的主要目的是能够使用 HTTPS 进行本地开发。
创建自签名证书并在 Windows 上信任它
在 Windows 中使用 ASP.NET Core 创建自签名证书在 Powershell 中非常容易。我编写了一个处理所有事情的 Powershell 脚本。
只需以管理员权限打开 Powershell,在脚本中设置证书密码,然后运行脚本。
# setup certificate properties including the commonName (DNSName) property for Chrome 58+
$certificate = New-SelfSignedCertificate `
    -Subject localhost `
    -DnsName localhost `
    -KeyAlgorithm RSA `
    -KeyLength 2048 `
    -NotBefore (Get-Date) `
    -NotAfter (Get-Date).AddYears(2) `
    -CertStoreLocation "cert:CurrentUser\My" `
    -FriendlyName "Localhost Certificate for .NET Core" `
    -HashAlgorithm SHA256 `
    -KeyUsage DigitalSignature, KeyEncipherment, DataEncipherment `
    -TextExtension @("2.5.29.37={text}1.3.6.1.5.5.7.3.1")
$certificatePath = 'Cert:\CurrentUser\My\' + ($certificate.ThumbPrint)

# create temporary certificate path
$tmpPath = "C:\tmp"
If(!(test-path $tmpPath))
{
New-Item -ItemType Directory -Force -Path $tmpPath
}

# set certificate password here
$pfxPassword = ConvertTo-SecureString -String "YourSecurePassword" -Force -AsPlainText
$pfxFilePath = "c:\tmp\localhost.pfx"
$cerFilePath = "c:\tmp\localhost.cer"

# create pfx certificate
Export-PfxCertificate -Cert $certificatePath -FilePath $pfxFilePath -Password $pfxPassword
Export-Certificate -Cert $certificatePath -FilePath $cerFilePath

# import the pfx certificate
Import-PfxCertificate -FilePath $pfxFilePath Cert:\LocalMachine\My -Password $pfxPassword -Exportable

# trust the certificate by importing the pfx certificate into your trusted root
Import-Certificate -FilePath $cerFilePath -CertStoreLocation Cert:\CurrentUser\Root

# optionally delete the physical certificates (don’t delete the pfx file as you need to copy this to your app directory)
# Remove-Item $pfxFilePath
Remove-Item $cerFilePath
在 Mac OSX 上创建自签名证书并信任它
为您的证书创建一个配置文件:
sudo nano localhost.conf将内容粘贴到conf文件中并保存文件
[req]
default_bits       = 2048
default_keyfile    = localhost.key
distinguished_name = req_distinguished_name
req_extensions     = req_ext
x509_extensions    = v3_ca

[req_distinguished_name]
countryName                 = Country Name (2 letter code)
countryName_default         = US
stateOrProvinceName         = State or Province Name (full name)
stateOrProvinceName_default = New York
localityName                = Locality Name (eg, city)
localityName_default        = Rochester
organizationName            = Organization Name (eg, company)
organizationName_default    = localhost
organizationalUnitName      = organizationalunit
organizationalUnitName_default = Development
commonName                  = Common Name (e.g. server FQDN or YOUR name)
commonName_default          = localhost
commonName_max              = 64

[req_ext]
subjectAltName = @alt_names

[v3_ca]
subjectAltName = @alt_names

[alt_names]
DNS.1   = localhost
DNS.2   = 127.0.0.1
确保在 Max OSX 上安装了 OpenSSL 库。
运行以下命令检查是否安装了 OpenSSL
which openssl如果未安装 OpenSSL,请使用 brew 安装 OpenSSL
brew install openssl使用 OpenSSL 运行以下 2 个命令,在 Mac OSX 中使用 OpenSSL 创建自签名证书:
sudo openssl req -x509 -nodes -days 365 -newkey rsa:2048 -keyout localhost.key -out localhost.crt -config localhost.conf -passin pass:YourSecurePasswordsudo openssl pkcs12 -export -out localhost.pfx -inkey localhost.key -in localhost.crt
在 Mac OSX 上信任自签名证书非常简单。
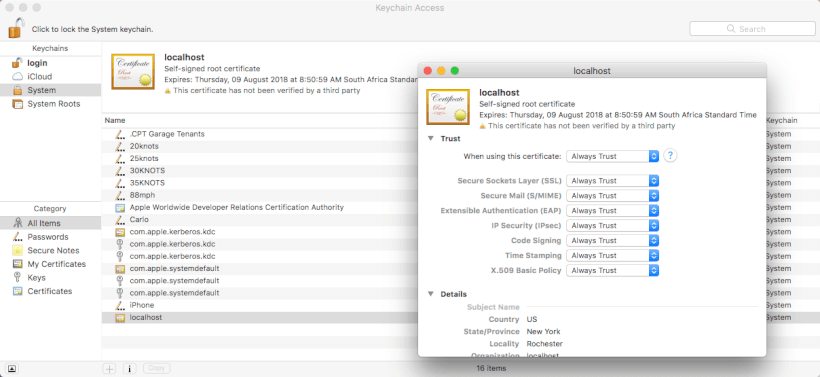
打开 KeyChain Access 应用程序(聚焦搜索 KeyChain 以找到它)。
在 Keychains 窗格中选择 System,然后将您的 .pfx 证书拖到证书列表窗格中。

要信任您的自签名证书,请双击您的证书,然后在信任部分下选择始终信任。
在 Ubuntu Linux 上创建自签名证书并信任它
在 Ubuntu Linux 中创建自签名证书更加简单。只需要 2 个简单的命令来生成自签名证书,以及将证书复制到受信任的存储区的单个命令。
为您的证书创建一个配置文件:
cat << EOL > localhost.conf
[req]
default_bits       = 2048
default_keyfile    = localhost.key
distinguished_name = req_distinguished_name
req_extensions     = req_ext
x509_extensions    = v3_ca

[req_distinguished_name]
countryName                 = Country Name (2 letter code)
countryName_default         = US
stateOrProvinceName         = State or Province Name (full name)
stateOrProvinceName_default = New York
localityName                = Locality Name (eg, city)
localityName_default        = Rochester
organizationName            = Organization Name (eg, company)
organizationName_default    = localhost
organizationalUnitName      = organizationalunit
organizationalUnitName_default = Development
commonName                  = Common Name (e.g. server FQDN or YOUR name)
commonName_default          = localhost
commonName_max              = 64

[req_ext]
subjectAltName = @alt_names

[v3_ca]
subjectAltName = @alt_names

[alt_names]
DNS.1   = localhost
DNS.2   = 127.0.0.1
EOL
使用 openssl 运行以下 2 个命令,在 Ubuntu Linux 中创建自签名证书:
sudo openssl req -x509 -nodes -days 365 -newkey rsa:2048 -keyout localhost.key -out localhost.crt -config localhost.conf -passin pass:YourSecurePasswordsudo openssl pkcs12 -export -out localhost.pfx -inkey localhost.key -in localhost.crt
运行上述导出命令时,请务必在提示输入导出密码时输入您的密码。然后,导出完成后,将 localhost.pfx 复制到项目的根文件夹 (src/https.web)。
然后,运行以下 certutil 命令将证书添加到受信任的 CA 根存储:
certutil -d sql:$HOME/.pki/nssdb -A -t "P,," -n "localhost" -i localhost.crt要确认或列出使用 certutil 安装的受信任证书,请运行以下命令:
certutil -L -d sql:${HOME}/.pki/nssdb要从受信任的 CA 根存储中删除证书,请运行以下命令:
certutil -D -d sql:${HOME}/.pki/nssdb -n "localhost"在 ASP.NET Core 2.0 中配置 HTTPS
在 Mac、Linux 或 Windows 上创建自签名证书并信任根 CA 存储中的证书后,将 ASP.NET Core 配置为使用 HTTPS 的过程是相同的。
首先将您之前在 Mac、Linux 或 Windows 中创建的 .pfx 证书复制到项目目录的根目录。然后,创建一个包含证书文件名和密码的 certificate.json 配置文件。我更喜欢将其保存在单独的文件中,因为它可以使事情分开且简单。ASP.NET Core 2 允许您在 appsettings.json 中配置 Kestrel 和 HTTPS,但配置比较复杂,我更喜欢这种配置更简单的方法。
certificate.json
{
  "certificateSettings": {
    "fileName": "localhost.pfx",
    "password": "YourSecurePassword"
  }
}
program.cs
public class Program
{
    public static void Main(string[] args)
    {
        var config = new ConfigurationBuilder()
            .SetBasePath(Directory.GetCurrentDirectory())
            .AddEnvironmentVariables()
            .AddJsonFile("certificate.json", optional: true, reloadOnChange: true)
            .AddJsonFile($"certificate.{Environment.GetEnvironmentVariable("ASPNETCORE_ENVIRONMENT")}.json", optional: true, reloadOnChange: true)
            .Build();

        var certificateSettings = config.GetSection("certificateSettings");
        string certificateFileName = certificateSettings.GetValue<string>("filename");
        string certificatePassword = certificateSettings.GetValue<string>("password");

        var certificate = new X509Certificate2(certificateFileName, certificatePassword);

        var host = new WebHostBuilder()
            .UseKestrel(
                options =>
                {
                    options.AddServerHeader = false;
                    options.Listen(IPAddress.Loopback, 44321, listenOptions =>
                    {
                        listenOptions.UseHttps(certificate);
                    });
                }
            )
            .UseConfiguration(config)
            .UseContentRoot(Directory.GetCurrentDirectory())
            .UseStartup<Startup>()
            .UseUrls("https://localhost:44321")
            .Build();

        host.Run();
    }
}
记住将防伪令牌 cookie 显式设置为使用安全 cookie 尤为重要。
startup.cs
public void ConfigureServices(IServiceCollection services)
{
    // ...

    services.AddMvc(
        options =>
        {
            options.SslPort = 44321;
            options.Filters.Add(new RequireHttpsAttribute());
        }
    );

    services.AddAntiforgery(
        options =>
        {
            options.Cookie.Name = "_af";
            options.Cookie.HttpOnly = true;
            options.Cookie.SecurePolicy = CookieSecurePolicy.Always;
            options.HeaderName = "X-XSRF-TOKEN";
        }
    );

    // ...
}

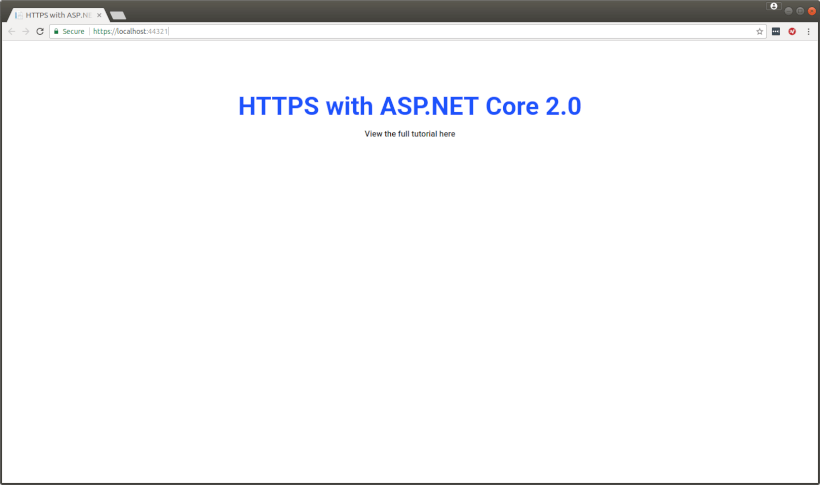
进行更改后,只需构建并运行该项目,您就会看到 Chrome 打开而没有任何警告消息,并显示您的网站是安全的。
如果遇到问题,请遵循以下故障排除指南
- 在 Visual Studio Code 中使用 F5 启动项目时,确保在浏览器中打开的 URL 是 https://localhost:44321 而不是 https://127.0.0.1:44321。Windows、Ubuntu 和 OSX 中的 Visual Studio Code 上的启动 URL 存在不一致。在 Windows 上,浏览器使用 localhost 启动,但在 Ubuntu 上,它使用 127.0.0.1 启动
- 确保将您使用自己的密码生成的 localhost.pfx 文件复制到 Web 项目的根文件夹 (src/https.web)
- 安装证书后请务必关闭所有浏览器窗口,以便新证书在 Chrome 中生效
- 在 Windows 上,如果安装了 IIS Express,则已经为 localhost 安装了 HTTPS 证书。在安装新证书之前,最好先删除这些证书或任何其他本地主机证书。
删除 Windows 上的现有证书
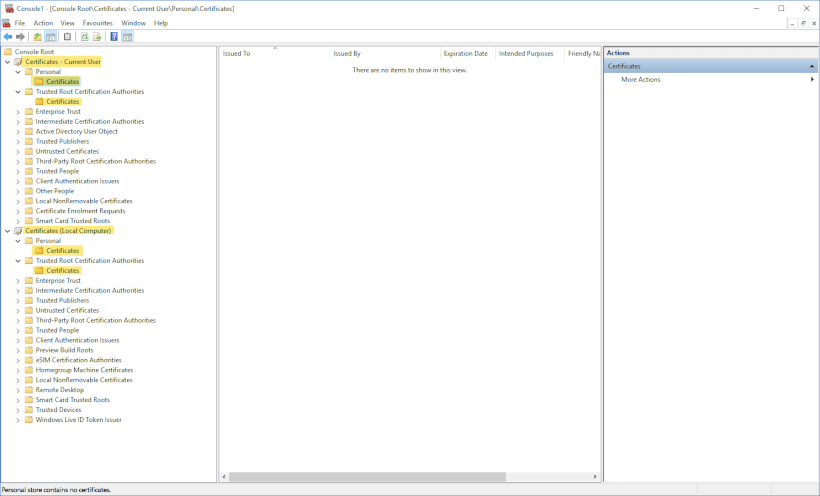
要删除现有证书,请打开 Microsoft 管理控制台并为当前用户和本地计算机添加证书管理单元。
然后,在添加您自己的证书之前,从下面突出显示的位置删除 localhost 证书,如本教程中所述。
代码
克隆 Github 存储库:https ://github.com/thecarlo/https-with-asp-net-core


 浙公网安备 33010602011771号