
centOS 7.9 k8s 安装 和 基本命令
CentOS-7-x86_64-DVD-2009.iso
vi /etc/sysconfig/network-scripts/ifcfg-ens33
最后一行改为 yes
systemctl restart network
官方参考
https://kubernetes.io/zh/docs/home/
快速安装
禁用SELINUX,目的是为了让容器可以读取主机文件系统,重启生效
vim /etc/selinux/config
将
SELINUX=enforcing
改成
SELINUX=disabled
设置阿里云yum源
vim /etc/yum.repos.d/k8s.repo
[kubernetes]
name=Kubernetes
baseurl=https://mirrors.aliyun.com/kubernetes/yum/repos/kubernetes-el7-x86_64
enabled=1
gpgcheck=1
repo_gpgcheck=1
gpgkey=https://mirrors.aliyun.com/kubernetes/yum/doc/yum-key.gpg
https://mirrors.aliyun.com/kubernetes/yum/doc/rpm-package-key.gpg
yum install -y kubelet kubeadm kubectl docker
启用服务
systemctl enable docker
systemctl start docker
systemctl enable kubelet
systemctl start kubelet
初始化
kubeadm init
[init] Using Kubernetes version: v1.20.2
[preflight] Running pre-flight checks
[WARNING Firewalld]: firewalld is active, please ensure ports [6443 10250] are open or your cluster may not function correctly
error execution phase preflight: [preflight] Some fatal errors occurred:
[ERROR NumCPU]: the number of available CPUs 1 is less than the required 2
[ERROR Mem]: the system RAM (972 MB) is less than the minimum 1700 MB
[ERROR Swap]: running with swap on is not supported. Please disable swap
[preflight] If you know what you are doing, you can make a check non-fatal with `--ignore-preflight-errors=...`
To see the stack trace of this error execute with --v=5 or higher
禁用master和node上的防火墙,因为如果有其他防火墙规则管理工具的话,docker会无法正常运行
systemctl disable iptables-services firewalld
systemctl stop iptables-services firewalld
iptable -F
kubernetes集群部署必须关闭swap分区
vim /etc/fstab
注释掉带有swap的那一行
必须要2核 CPU 和 2GB 内存?
[root@localhost ~]# kubeadm init
[init] Using Kubernetes version: v1.20.2
[preflight] Running pre-flight checks
[WARNING Firewalld]: firewalld is active, please ensure ports [6443 10250] are open or your cluster may not function correctly
[preflight] Pulling images required for setting up a Kubernetes cluster
[preflight] This might take a minute or two, depending on the speed of your internet connection
[preflight] You can also perform this action in beforehand using 'kubeadm config images pull'
[certs] Using certificateDir folder "/etc/kubernetes/pki"
[certs] Generating "ca" certificate and key
[certs] Generating "apiserver" certificate and key
[certs] apiserver serving cert is signed for DNS names [kubernetes kubernetes.default kubernetes.default.svc kubernetes.default.svc.cluster.local localhost.localdomain] and IPs [10.96.0.1 172.16.5.131]
[certs] Generating "apiserver-kubelet-client" certificate and key
[certs] Generating "front-proxy-ca" certificate and key
[certs] Generating "front-proxy-client" certificate and key
[certs] Generating "etcd/ca" certificate and key
[certs] Generating "etcd/server" certificate and key
[certs] etcd/server serving cert is signed for DNS names [localhost localhost.localdomain] and IPs [172.16.5.131 127.0.0.1 ::1]
[certs] Generating "etcd/peer" certificate and key
[certs] etcd/peer serving cert is signed for DNS names [localhost localhost.localdomain] and IPs [172.16.5.131 127.0.0.1 ::1]
[certs] Generating "etcd/healthcheck-client" certificate and key
[certs] Generating "apiserver-etcd-client" certificate and key
[certs] Generating "sa" key and public key
[kubeconfig] Using kubeconfig folder "/etc/kubernetes"
[kubeconfig] Writing "admin.conf" kubeconfig file
[kubeconfig] Writing "kubelet.conf" kubeconfig file
[kubeconfig] Writing "controller-manager.conf" kubeconfig file
[kubeconfig] Writing "scheduler.conf" kubeconfig file
[kubelet-start] Writing kubelet environment file with flags to file "/var/lib/kubelet/kubeadm-flags.env"
[kubelet-start] Writing kubelet configuration to file "/var/lib/kubelet/config.yaml"
[kubelet-start] Starting the kubelet
[control-plane] Using manifest folder "/etc/kubernetes/manifests"
[control-plane] Creating static Pod manifest for "kube-apiserver"
[control-plane] Creating static Pod manifest for "kube-controller-manager"
[control-plane] Creating static Pod manifest for "kube-scheduler"
[etcd] Creating static Pod manifest for local etcd in "/etc/kubernetes/manifests"
[wait-control-plane] Waiting for the kubelet to boot up the control plane as static Pods from directory "/etc/kubernetes/manifests". This can take up to 4m0s
[apiclient] All control plane components are healthy after 16.010714 seconds
[upload-config] Storing the configuration used in ConfigMap "kubeadm-config" in the "kube-system" Namespace
[kubelet] Creating a ConfigMap "kubelet-config-1.20" in namespace kube-system with the configuration for the kubelets in the cluster
[upload-certs] Skipping phase. Please see --upload-certs
[mark-control-plane] Marking the node localhost.localdomain as control-plane by adding the labels "node-role.kubernetes.io/master=''" and "node-role.kubernetes.io/control-plane='' (deprecated)"
[mark-control-plane] Marking the node localhost.localdomain as control-plane by adding the taints [node-role.kubernetes.io/master:NoSchedule]
[bootstrap-token] Using token: xgh658.fdrn8durzlh8s900
[bootstrap-token] Configuring bootstrap tokens, cluster-info ConfigMap, RBAC Roles
[bootstrap-token] configured RBAC rules to allow Node Bootstrap tokens to get nodes
[bootstrap-token] configured RBAC rules to allow Node Bootstrap tokens to post CSRs in order for nodes to get long term certificate credentials
[bootstrap-token] configured RBAC rules to allow the csrapprover controller automatically approve CSRs from a Node Bootstrap Token
[bootstrap-token] configured RBAC rules to allow certificate rotation for all node client certificates in the cluster
[bootstrap-token] Creating the "cluster-info" ConfigMap in the "kube-public" namespace
[kubelet-finalize] Updating "/etc/kubernetes/kubelet.conf" to point to a rotatable kubelet client certificate and key
[addons] Applied essential addon: CoreDNS
[addons] Applied essential addon: kube-proxy
Your Kubernetes control-plane has initialized successfully!
To start using your cluster, you need to run the following as a regular user:
mkdir -p $HOME/.kube
sudo cp -i /etc/kubernetes/admin.conf $HOME/.kube/config
sudo chown $(id -u):$(id -g) $HOME/.kube/config
Alternatively, if you are the root user, you can run:
export KUBECONFIG=/etc/kubernetes/admin.conf
You should now deploy a pod network to the cluster.
Run "kubectl apply -f [podnetwork].yaml" with one of the options listed at:
https://kubernetes.io/docs/concepts/cluster-administration/addons/
Then you can join any number of worker nodes by running the following on each as root:
kubeadm join 172.16.5.131:6443 --token xgh658.fdrn8durzlh8s900 \
--discovery-token-ca-cert-hash sha256:6e0576e879c61a4573bfc4cd67590e44178195da2dc6bd78f0acad1c29097c5e
kubectl apply -f "https://cloud.weave.works/k8s/net?k8s-version=$(kubectl version | base64 | tr -d '\n')"
Pod 节点安装
修改不同的主机名
cat /etc/hostname
pod1
cat /etc/hosts
127.0.0.1 pod1
yum install -y kubelet kubeadm kubectl docker
启用服务
systemctl enable docker
systemctl start docker
systemctl enable kubelet
systemctl start kubelet
加入主节点
[root@localhost ~]# kubeadm join 172.16.5.131:6443 --token xgh658.fdrn8durzlh8s900 \
--discovery-token-ca-cert-hash sha256:6e0576e879c61a4573bfc4cd67590e44178195da2dc6bd78f0acad1c29097c5e
加入成功
[root@localhost /]# kubectl get node
NAME STATUS ROLES AGE VERSION
localhost.localdomain Ready control-plane,master 134m v1.20.2
pod1 Ready <none> 3m37s v1.20.2
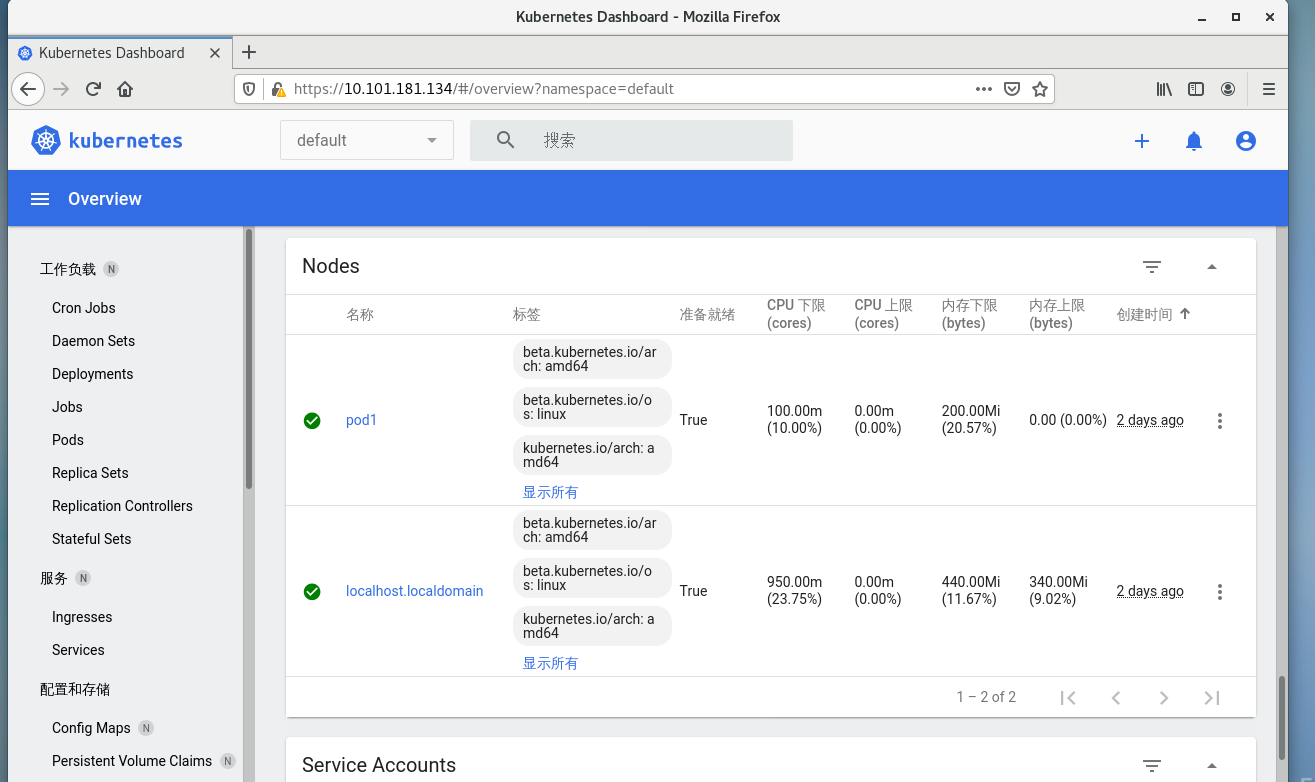
WEB UI dashboard
curl -v https://raw.githubusercontent.com/kubernetes/dashboard/v2.1.0/aio/deploy/recommended.yaml -o kubernetes-dashboard.yaml
kubectl apply -f kubernetes-dashboard.yaml
Creating sample user
https://github.com/kubernetes/dashboard/blob/master/docs/user/access-control/creating-sample-user.md
vi dashboard-adminuser.yaml
apiVersion: v1
kind: ServiceAccount
metadata:
name: admin-user
namespace: kubernetes-dashboard
kubectl apply -f dashboard-adminuser.yaml
serviceaccount/admin-user created
vi dashboard-ClusterRoleBinding.yaml
apiVersion: rbac.authorization.k8s.io/v1
kind: ClusterRoleBinding
metadata:
name: admin-user
roleRef:
apiGroup: rbac.authorization.k8s.io
kind: ClusterRole
name: cluster-admin
subjects:
- kind: ServiceAccount
name: admin-user
namespace: kubernetes-dashboard
kubectl apply -f dashboard-ClusterRoleBinding.yaml
clusterrolebinding.rbac.authorization.k8s.io/admin-user created
[root@localhost ~]# kubectl -n kubernetes-dashboard get secret $(kubectl -n kubernetes-dashboard get sa/admin-user -o jsonpath="{.secrets[0].name}") -o go-template="{{.data.token | base64decode}}"
eyJhbGciOiJSUzI1NiIsImtpZCI6IkhpS1lEV1pZalBMcVJ5YkNqQVpmcmtEOTFkbFVNSkxnYmE2T1V2ZnExM28ifQ.eyJpc3MiOiJrdWJlcm5ldGVzL3NlcnZpY2VhY2NvdW50Iiwia3ViZXJuZXRlcy5pby9zZXJ2aWNlYWNjb3VudC9uYW1lc3BhY2UiOiJrdWJlcm5ldGVzLWRhc2hib2FyZCIsImt1YmVybmV0ZXMuaW8vc2VydmljZWFjY291bnQvc2VjcmV0Lm5hbWUiOiJhZG1pbi11c2VyLXRva2VuLXA2a3I0Iiwia3ViZXJuZXRlcy5pby9zZXJ2aWNlYWNjb3VudC9zZXJ2aWNlLWFjY291bnQubmFtZSI6ImFkbWluLXVzZXIiLCJrdWJlcm5ldGVzLmlvL3NlcnZpY2VhY2NvdW50L3NlcnZpY2UtYWNjb3VudC51aWQiOiJiMjdmMTNiNi0wMTcxLTRjZjgtYmM2My0xNjcyZTYwYjI3ZGUiLCJzdWIiOiJzeXN0ZW06c2VydmljZWFjY291bnQ6a3ViZXJuZXRlcy1kYXNoYm9hcmQ6YWRtaW4tdXNlciJ9.Xb6rxT2M_AgJw3vp7_oYUtT57lASHPMqLtnrt2rWCMluQ_s0t-OQuXIKXE1TDaj04pyb0xfZDhCtLMbKefFwWkziEPdvnlFBcFfYep48fAZnnfaSStco6Dx_yDTNw70dMVnZcuISi324MUQFrJwCXdg23PeUDGKyiOcbctvlyO_PXPOZkYcoKWnD_FzWpmTRzaE1lr1e2jBhOxygHk_-6fLm99o5D-oCgZKCFd4UpBo8cO_E3xBWw-Pr7vMrtFIfCTXSWXcc3QYHgu6AqI15Ws3hw0uJMX4ZVyQGZtFJRuHpdjkSCBmVmMcvw4yaTKBmIIeJhQIKRnaLWKz0Gfy9hA
从 1.20 版本开始,不能在通过 IP 方式访问了,必须使用 HTTPS 。
这里有1个方法:
1,在 master 安装桌面环境,在里面使用 火狐登录查看
yum -y groups install "GNOME Desktop"
启动桌面
startx

 浙公网安备 33010602011771号