开源沙箱Cuckoo Sandbox 的部署
cuckoo@sandbox:~$ sudo apt-get install curl git wget openconnect
Step2:安装python
cuckoo@sandbox:~$ curl https://bootstrap.pypa.io/pip/2.7/get-pip.py -O
cuckoo@sandbox:~$ sudo python get-pip.py
cuckoo@sandbox:~$ sudo apt-get install -y python-dev libffi-dev libssl-dev libfuzzy-dev libtool flex autoconf libjansson-dev git
cuckoo@sandbox:~$ sudo apt-get install -y python-setuptools
Step3:安装jpeg和接口工具
cuckoo@sandbox:~$ sudo apt-get install -y libjpeg-dev zlib1g-dev swig
Step4:安装mongodb
cuckoo@sandbox:~$ sudo apt-get install -y mongodb
step5:安装PostgreSQL
cuckoo@sandbox:~$ sudo apt-get install -y postgresql libpq-dev
step6:安装VirtualBox
cuckoo@sandbox:~$ sudo apt-get install -y virtualbox
step7:安装volatile
cuckoo@sandbox:~$ mkdir -pv Downloads
cuckoo@sandbox:~$ cd Downloads/
cuckoo@sandbox:~/Downloads$ git clone https://github.com/volatilityfoundation/volatility.git
cuckoo@sandbox:~/Downloads$ cd volatility
cuckoo@sandbox:~/Downloads/volatility$ sudo python setup.py build
cuckoo@sandbox:~/Downloads/volatility$ sudo python setup.py install
cuckoo@sandbox:~/Downloads/volatility$ cd ..
step8:安装Distorm3
cuckoo@sandbox:~/Downloads$ sudo -H pip install distorm3==3.4.4

step9:安装Yara
cuckoo@sandbox:~/Downloads$ sudo -H pip install yara-python==3.6.3

step10:安装ssdeep
cuckoo@sandbox:~/Downloads$ sudo apt-get install -y ssdeep
step11:安装pydeep
cuckoo@sandbox:~/Downloads$ sudo -H pip install pydeep

step12:安装openpyxl
cuckoo@sandbox:~/Downloads$ sudo -H pip install openpyxl

step13:安装ujson
cuckoo@sandbox:~/Downloads$ sudo -H pip install ujson

step14:安装jupyter
cuckoo@sandbox:~/Downloads$ sudo -H pip install jupyter
step15:安装tcpdump
cuckoo@sandbox:~/Downloads$ sudo apt-get install tcpdump
cuckoo@sandbox:~/Downloads$ sudo apt-get install libcap2-bin
cuckoo@sandbox:~/Downloads$ sudo setcap cap_net_raw,cap_net_admin=eip /usr/sbin/tcpdump
cuckoo@sandbox:~/Downloads$ getcap /usr/sbin/tcpdump

step16:安装apparmor
cuckoo@sandbox:~/Downloads$ sudo apt-get install -y apparmor-utils
cuckoo@sandbox:~/Downloads$ sudo aa-disable /usr/sbin/tcpdump
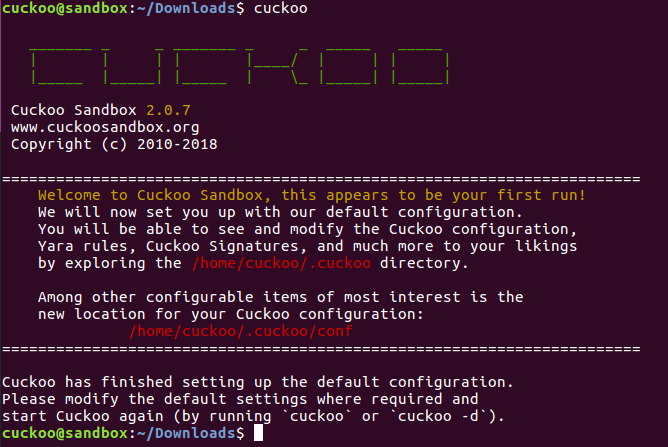
step17:安装cuckoo sandbox
cuckoo@sandbox:~/Downloads$ pip install -U pip setuptools
cuckoo@sandbox:~/Downloads$ sudo -H pip install -U cuckoo
cuckoo@sandbox:~/Downloads$ cuckoo
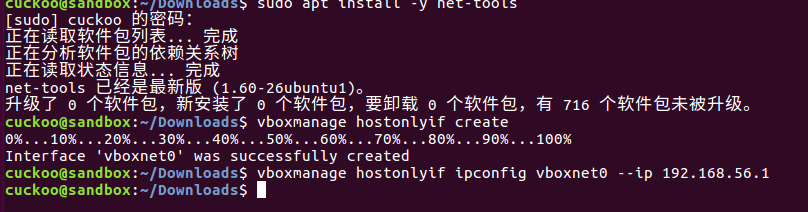
step18:配置虚拟机网络
cuckoo@sandbox:~/Downloads$ sudo apt install -y net-tools
cuckoo@sandbox:~/Downloads$ vboxmanage hostonlyif create
cuckoo@sandbox:~/Downloads$ vboxmanage hostonlyif ipconfig vboxnet0 --ip 192.168.56.1
cuckoo@sandbox:~/Downloads$ sudo mkdir /opt/systemd/
cuckoo@sandbox:~/Downloads$ sudo nano /opt/systemd/vboxhostonly
#!/bin/bash
vboxmanage hostonlyif ipconfig vboxnet0 --ip 192.168.56.1
cuckoo@sandbox:~/Downloads$ cd /opt/systemd/
cuckoo@sandbox:/opt/systemd$ sudo chmod a+x vboxhostonly
cuckoo@sandbox:/opt/systemd$ sudo touch /etc/systemd/system/vboxhostonlynic.service
cuckoo@sandbox:/opt/systemd$ sudo touch /etc/systemd/system/vboxhostonlynic.service
[Unit]
Description=Setup VirtualBox Hostonly Adapter
After=vboxdrv.service

[Service]
Type=oneshot
ExecStart=/opt/systemd/vboxhostonly

[Install]
WantedBy=multi-user.target
cuckoo@sandbox:/opt/systemd$ systemctl daemon-reload
cuckoo@sandbox:/opt/systemd$ systemctl enable vboxhostonlynic.service

step19:安装分析虚拟机,安装软件和调整
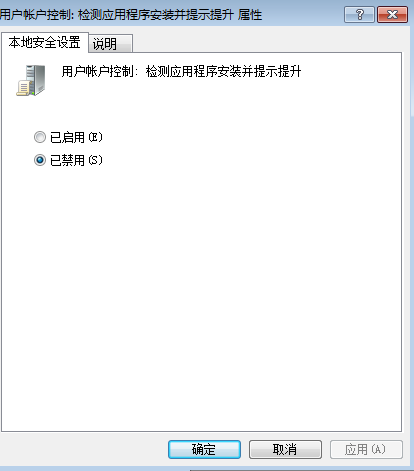
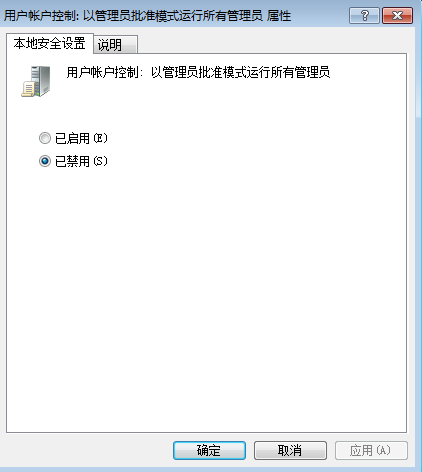
调整组策略
windows设置->安全设置->安全选项->用户账户控制的“管理员批准模式中管理员的提升权限的行为” 下选择"不提示,直接升"

windows设置->安全设置->安全选项->用户账户控制的“用户账户控制:检测应用程序安装并提升提升,下选择“禁用”
windows设置->安全设置->安全选项->用户账户控制的 用户账户控制:以管理员批准模式运行所有管理员,选择“禁用”
在win7虚拟机上安装python2.7和Pillow-2.5.3
复制agent.py到虚拟机
cuckoo@sandbox:~/.cuckoo/agent$ cd /home/cuckoo/.cuckoo/agent/
cuckoo@sandbox:~/.cuckoo/agent$ cp agent.py /home/cuckoo/ISO/
将agent.py复制到C:\Users\Administrator\AppData\Roaming\Microsoft\Windows\Start Menu\Programs\Startup下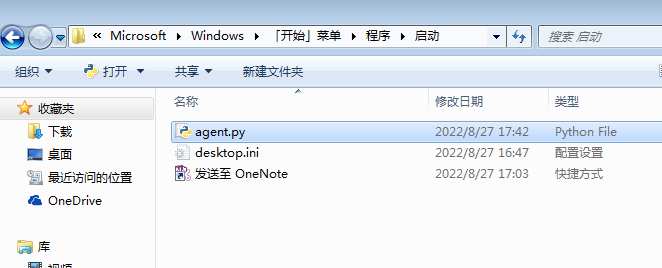
step20:配置虚拟机网络
cuckoo@sandbox:~$ sudo apt-get install -y iptables-persistent
cuckoo@sandbox:~$ sudo iptables -A FORWARD -o eth0 -i vboxnet0 -s 192.168.56.0/24 -m conntrack --ctstate NEW -j ACCEPT
cuckoo@sandbox:~$sudo iptables -A FORWARD -m conntrack --ctstate ESTABLISHED,RELATED -j ACCEPT
cuckoo@sandbox:~$sudo iptables -t nat -A POSTROUTING -o ens33 -j MASQUERADE
cuckoo@sandbox:~$echo 1 | sudo tee -a /proc/sys/net/ipv4/ip_forward
cuckoo@sandbox:~$sudo sysctl -w net.ipv4.ip_forward=1
step21:修改配置文件
cuckoo@sandbox:~$ cd ~/.cuckoo/conf
cuckoo@sandbox:~/.cuckoo/conf$ sudo nano cuckoo.conf
修改内容如下:
ignore_vulnerabilities =no ->ignore_vulnerabilities = yes
memory_dump = no->memory_dump = yes
[resultserver]
# The Result Server is used to receive in real time the behavioral logs
# produced by the analyzer.
# Specify the IP address of the host. The analysis machines should be able
# to contact the host through such address, so make sure it's valid.
# NOTE: if you set resultserver IP to 0.0.0.0 you have to set the option
# `resultserver_ip` for all your virtual machines in machinery configuration.
ip = 192.168.56.1 ->修改为实际的
cuckoo@sandbox:~/.cuckoo/conf$ sudo nano auxiliary.conf
修改内容如下:
[sniffer]
# Enable or disable the use of an external sniffer (tcpdump) [yes/no].
enabled = yes ->确保enable
cuckoo@sandbox:~/.cuckoo/conf$ sudo nano virtualbox.conf
修改内容如下:
mode = headless->mode = gui
machines = cuckoo1->machines = cuckoo1 实际的虚拟机名称
ip = 192.168.56.101->ip = 192.168.56.110 虚拟机实际的IP
snapshot = ->snapshot = Snapshot 1 虚拟机快照的名称
cuckoo@sandbox:~/.cuckoo/conf$ sudo nano processing.conf
修改内容如下:
[memory]
# Create a memory dump of the entire Virtual Machine. This memory dump will
# then be analyzed using Volatility to locate interesting events that can be
# extracted from memory.
enabled = no ->enabled = yes 开启
cuckoo@sandbox:~/.cuckoo/conf$ sudo nano memory.conf
修改内容如下:
[basic]
# Profile to avoid wasting time identifying it
guest_profile = WinXPSP2x86 -> guest_profile = Win7SP1x64 根据实际修改
cuckoo@sandbox:~/.cuckoo/conf$ sudo nano reporting.conf
修改内容如下:
[mongodb]
enabled = no -> enabled = yes 开启
host = 127.0.0.1
port = 27017
db = cuckoo
[singlefile]
# Enable creation of report.html and/or report.pdf?
enabled = no
# Enable creation of report.html?
html = no -> html = yes 开启
step22:启动cuckoo沙箱
cuckoo@sandbox:~$ cuckoo community

新开一个终端窗口打开cuckoo
cuckoo@sandbox:~$ cuckoo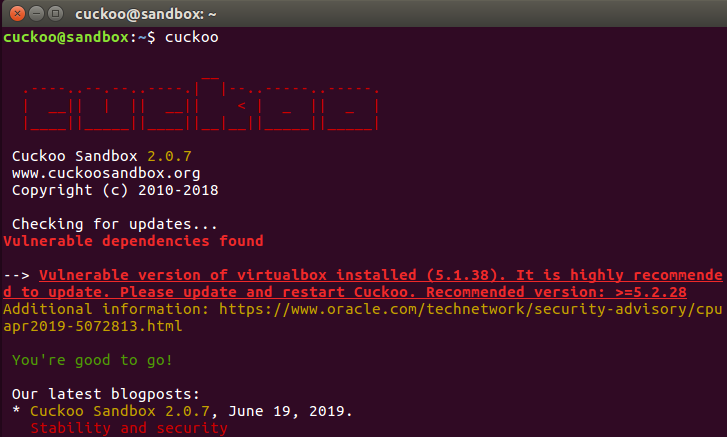
新开一个终端窗口打开cuckoo web管理页面
cuckoo@sandbox:~$ cuckoo web runserver 0.0.0.0:8000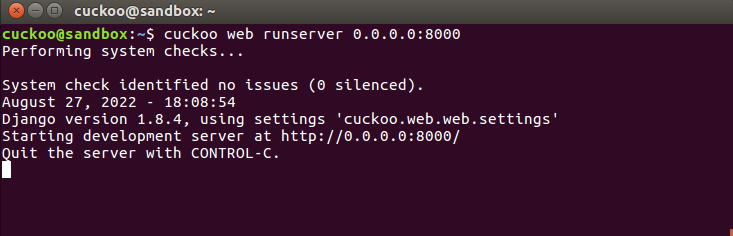
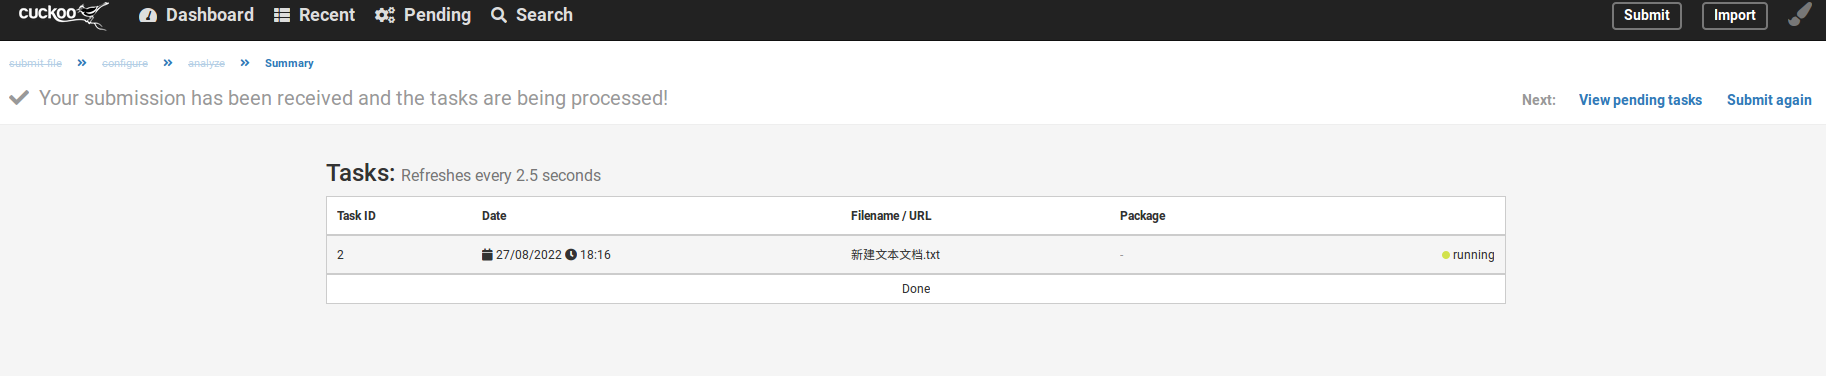
step23:上传一个样本测试
使用浏览器打开http://127.0.0.1:8000
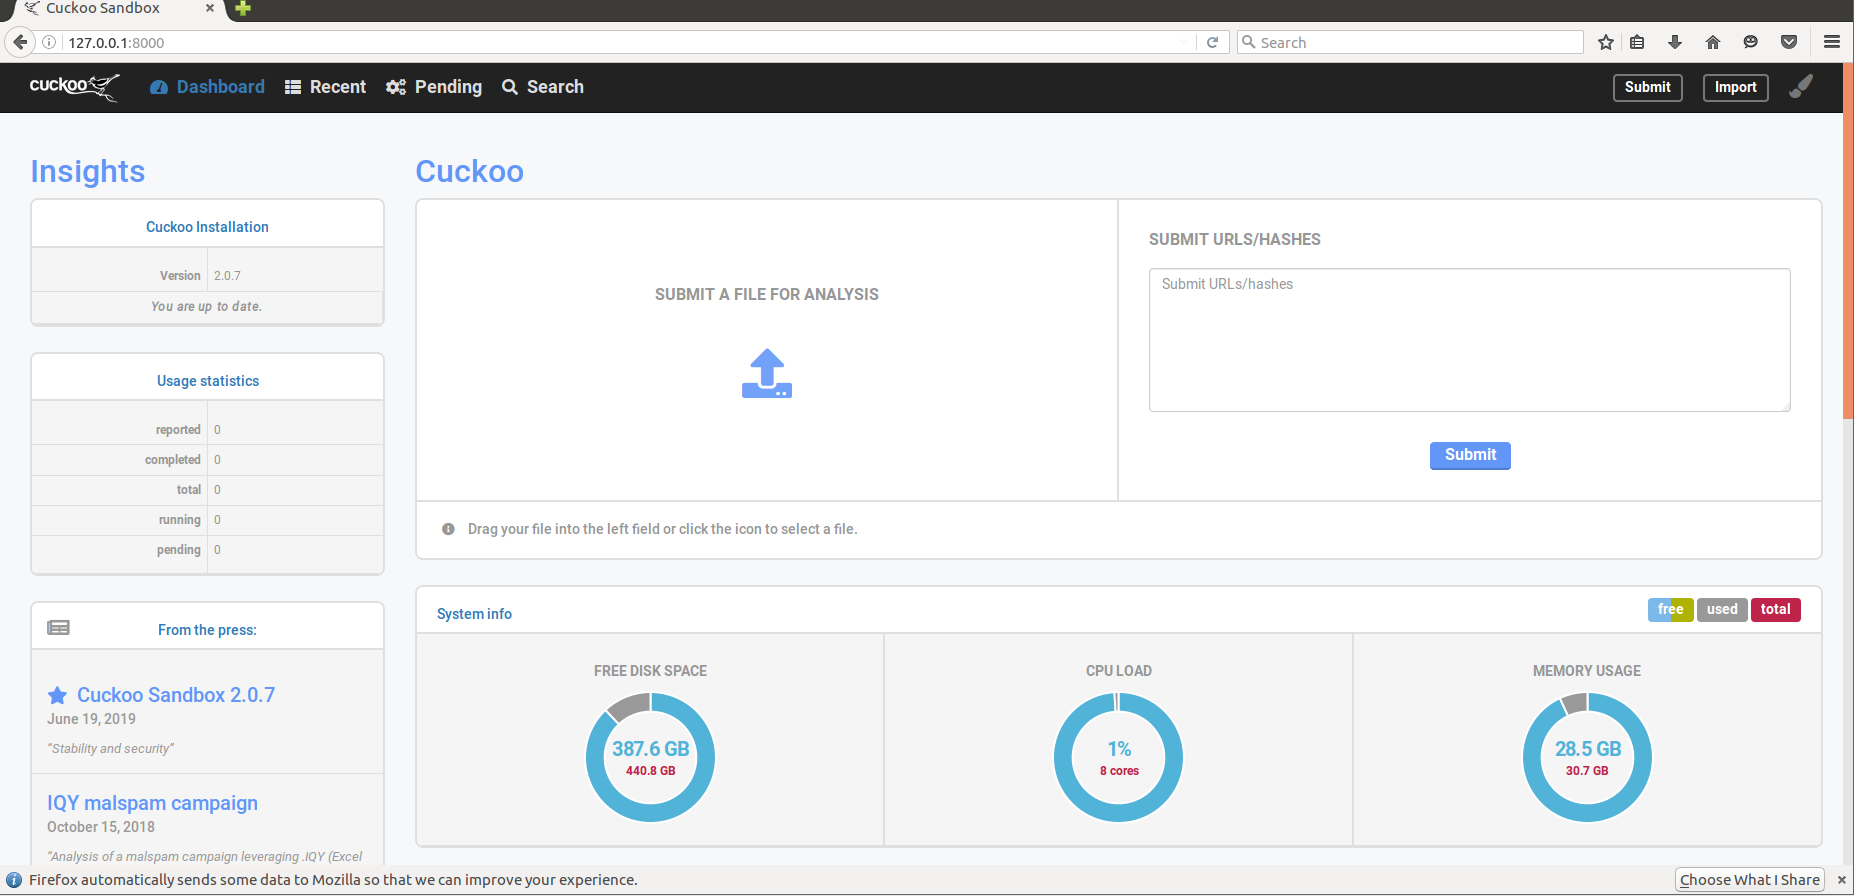
提交测试如下:
posted on 2022-08-27 14:35 CyberSecurityBook 阅读(2133) 评论(0) 收藏 举报

 浙公网安备 33010602011771号