
《云操作系统(OpenStack)第二版》学习笔记03-第三章:OpenStack环境准备
《云操作系统(OpenStack)第二版》学习笔记03-第三章:OpenStack环境准备
说明:以前做过这个过程,但是没有做完,现在又重新做的。在原来的基础上有所修改。
- 使用的虚拟机平台从vmware变成了virtualbox
- 安装的OpenStack还是Train版本
- 使用的系统是CentOS-7-x86_64-Minimal-2009,内核版本是3.10.0-1160.el7.x86_64
- 虚拟机硬盘大小为80G,有两块网卡,分别用于外网和内网(管理网络),都是NAT模式
- root的密码为123456,普通用户为user01,密码为111111.
一、3.1 OpenStack回顾
二、3.2 架构选择
三、3.3 系统环境配置
1. 3.3.1 安全配置
1-1. 防火墙配置
在控制节点和计算节点上都关闭防火墙
- systemctl stop firewalld
- systemctl disable firewalld
1-2. Selinux设置
在控制节点和计算节点上都关闭Selinux。
- vi /etc/selinux/config
把第7行的SELINUX=enforcing修改为SELINUX=disabled。
重启系统。
2. 3.3.2 网络配置
外网为192.168.100.0/24网段。
内网为192.168.200.0/24网段。
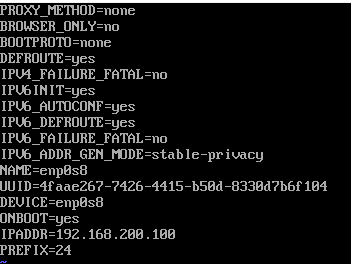
2-1. 配置controller节点的网络信息
网卡enp0s3:作为外部网络使用,IP地址为:192.168.100.100/24。
- cd /etc/sysconfig/network-scripts/
- cp ifcfg-enp0s3 ifcfg-enp0s3.bak
- vi ifcfg-enp0s3
修改后的结果为:

网卡enp0s8:作为内部网络使用,IP地址为:192.168.200.100/24。
- cd /etc/sysconfig/network-scripts/
- cp ifcfg-enp0s8 ifcfg-enp0s8.bak
- vi ifcfg-enp0s8
修改的结果为:
内网可以不用设置网关(存疑)。
2-2. 配置compute节点内外网口
网卡enp0s3:作为外部网络使用,IP地址为:192.168.100.101/24。
- cd /etc/sysconfig/network-scripts/
- cp ifcfg-enp0s3 ifcfg-enp0s3.bak
- vi ifcfg-enp0s3
修改后的结果为:

网卡enp0s8:作为内部网络使用,IP地址为:192.168.200.101/24。
- cd /etc/sysconfig/network-scripts/
- cp ifcfg-enp0s8 ifcfg-enp0s8.bak
- vi ifcfg-enp0s8
修改的结果为:

内网可以不用设置网关(存疑)。
2-3. 补充:配置DNS
两个虚拟机现在没有DNS服务器,所以无法访问网址,需要配置。
- vi /etc/resolv.conf
添加如下DNS服务器:
- nameserver 211.137.191.26
- nameserver 218.201.96.130
测试网络连通性:内网互ping、外网互ping、ping百度都没有问题。


3. 3.3.3 配置主机映射
之前忘了修改主机名了,这里补上。在控制节点和计算节点分别使用命令hostnamectl set-hostname controller和hostnamectl set-hostname compute把它们的主机名修改为controller和compute。
在所有节点中,修改/etc/hosts文件,添加以下内容(这里添加的是管理网卡的IP地址)。
- 192.168.200.100 controller
- 192.168.200.101 compute
使用ping命令测试连通性。

4. 3.3.4 配置yum源
按照书的上意思,应该是事先就准备好的软件包,这里要通过配置yum源和ftp服务器使controller和compute都能从事先准备的软件包中下载安装软件。但是我手头是没有书中的那个软件包的。再加上我这里是可以上网的。所以我的做法是修改yum源为阿里云的源,希望加快下载速度。
但是我也做了一点,那就是,创建了一个文件夹,设置yum的配置文件,把所有下载的软件包都存放在这个文件夹中,这样的话后面部署离线环境时也可以用到。
4-1. 控制节点设置下载缓存
- mkdir /root/OpenStackControllerRPMs-Train
- vi /etc/yum.conf
修改yum.conf中的cachedir和keepcache。我这里修改的结果是:
- cachedir=/root/OpenStackControllerRPMS-Train/yum/$basearch/$releasever
- keepcache=1
4-2. 计算结点设置下载缓存
- mkdir /root/OpenStackComputeRPMs-Train
- vi /etc/yum.conf
修改yum.conf中的cachedir和keepcache。我这里修改的结果是:
- cachedir=/root/OpenStackComputeRPMS-Train/yum/$basearch/$releasever
- keepcache=1
4-3. 控制节点和计算节点设置CentOS yum源
- mv /etc/yum.repos.d/CentOS-Base.repo /etc/yum.repos.d/CentOS-Base.repo.backup
- curl -o /etc/yum.repos.d/CentOS-Base.repo https://mirrors.aliyun.com/repo/Centos-7.repo
- yum clean all
- yum makecache

4-4. 控制节点和计算节点配置OpenStack-Train源
- vi /etc/yum.repos.d/OpenStack-Train.repo
添加如下内容:
- [OpenStack-Train]
- name=OpenStack Train Repository
- baseurl=http://mirrors.aliyun.com/centos/7/cloud/x86_64/openstack-train/
- enable=1
- gpgcheck=0
然后执行:
- yum clean all
- yum makecache
- yum repolist

安装软件,测试是否配置成功
- yum install -y vim net-tools wget

四、3.4 软件环境配置
1. 3.4.1 安装NTP服务
以控制节点作为时钟服务器,其他节点以控制节点的时钟作为标准调整自己的时钟。
1-1. 控制节点和计算节点
- yum install chrony -y

1-2. 配置控制节点
1-2-1. 编辑配置文件
- vi /etc/chrony.conf
在我这里,文件的开头六行为:
- # Use public servers from the pool.ntp.org project.
- # Please consider joining the pool (http://www.pool.ntp.org/join.html).
- server 0.centos.pool.ntp.org iburst
- server 1.centos.pool.ntp.org iburst
- server 2.centos.pool.ntp.org iburst
- server 3.centos.pool.ntp.org iburst
进行了修改,注释了四句,添加了两句。然后文件的前8行为:
- # Use public servers from the pool.ntp.org project.
- # Please consider joining the pool (http://www.pool.ntp.org/join.html).
- # server 0.centos.pool.ntp.org iburst
- # server 1.centos.pool.ntp.org iburst
- # server 2.centos.pool.ntp.org iburst
- # server 3.centos.pool.ntp.org iburst
- server controller iburst
- allow 192.168.200.0/24
这里允许的网络地址是管理网络的地址。
1-2-2. 启动NTP服务并设置开机自动启动:
- systemctl enable chronyd
- systemctl restart chronyd
- chronyc sources
最后一句是验证操作,如果看到controller节点则表示成功。

1-3. 配置计算节点
1-3-1. 编辑配置文件
- vi /etc/chrony.conf
注释掉已有的服务器(我这里有4个),再添加如下内容
- server controller iburst
修改的结果为(开头7行):
- # Use public servers from the pool.ntp.org project.
- # Please consider joining the pool (http://www.pool.ntp.org/join.html).
- # server 0.centos.pool.ntp.org iburst
- # server 1.centos.pool.ntp.org iburst
- # server 2.centos.pool.ntp.org iburst
- # server 3.centos.pool.ntp.org iburst
- server controller iburst
1-3-2. 启动NTP服务并设置开机自动启动:
- systemctl enable chronyd
- systemctl restart chronyd
- chronyc sources
最后一句是验证操作,输出结果与controller节点运行结果相同,表示成功。

NTP服务需要在每个节点上安装,并与控制节点同步。
2. 3.4.2 安装OpenStack包
在控制节点和计算节点上安装OpenStack包:
- yum install python-openstackclient -y

3. 3.4.3 安装并配置SQL数据库
3-1. 安装MariaDB数据库
在控制节点安装就可以了,计算节点不需要安装。当我从书上读到这个意思的时候我已经在计算节点上安装了数据库了。希望以后不要有什么问题。
- yum install mariadb mariadb-server python2-PyMySQL -y

3-2. 配置数据库
3-2-1. 创建和编辑/etc/my.cnf.d/openstack.cnf
- vi /etc/my.cnf.d/openstack.cnf
输入如下内容:
- [mysqld]
- bind-address=192.168.200.100
- default-storage-engine=innodb
- innodb_file_per_table
- max_connections=4096
- collation-server=utf8_general_ci
- character-set-server=utf8
3-2-2. 启动数据库
- systemctl enable mariadb
- systemctl start mariadb
3-2-3. 运行mysql_secure_installation,初始化数据库并设置密码。
- mysql_secure_installation
我把密码设置为123456。配置过程如下:
- [root@controller ~]# mysql_secure_installation
- NOTE: RUNNING ALL PARTS OF THIS SCRIPT IS RECOMMENDED FOR ALL MariaDB
- SERVERS IN PRODUCTION USE! PLEASE READ EACH STEP CAREFULLY!
- In order to log into MariaDB to secure it, we'll need the current
- password for the root user. If you've just installed MariaDB, and
- you haven't set the root password yet, the password will be blank,
- so you should just press enter here.
- Enter current password for root (enter for none):
- OK, successfully used password, moving on...
- Setting the root password ensures that nobody can log into the MariaDB
- root user without the proper authorisation.
- Set root password? [Y/n] y
- New password:
- Re-enter new password:
- Password updated successfully!
- Reloading privilege tables..
- ... Success!
- By default, a MariaDB installation has an anonymous user, allowing anyone
- to log into MariaDB without having to have a user account created for
- them. This is intended only for testing, and to make the installation
- go a bit smoother. You should remove them before moving into a
- production environment.
- Remove anonymous users? [Y/n]
- ... Success!
- Normally, root should only be allowed to connect from 'localhost'. This
- ensures that someone cannot guess at the root password from the network.
- Disallow root login remotely? [Y/n] n
- ... skipping.
- By default, MariaDB comes with a database named 'test' that anyone can
- access. This is also intended only for testing, and should be removed
- before moving into a production environment.
- Remove test database and access to it? [Y/n]
- - Dropping test database...
- ... Success!
- - Removing privileges on test database...
- ... Success!
- Reloading the privilege tables will ensure that all changes made so far
- will take effect immediately.
- Reload privilege tables now? [Y/n]
- ... Success!
- Cleaning up...
- All done! If you've completed all of the above steps, your MariaDB
- installation should now be secure.
- Thanks for using MariaDB!
- [root@controller ~]#
4. 3.4.4 安装并配置消息服务器
在控制节点上操作。
4-1. 安装RabbitMQ
- yum install rabbitmq-server -y

4-2. 启动RabbitMQ服务并设置为开机自动启动
- systemctl enable rabbitmq-server
- systemctl start rabbitmq-server
4-3. 创建rabbitmq用户并设置密码。用户名为openstack,密码为000000。
- rabbitmqctl add_user openstack 000000
4-4. 给openstack用户授予读/写访问权限
- rabbitmqctl set_permissions openstack ".*" ".*" ".*"

5. 3.4.5 安装Memcached
在控制节点上操作。
安装Memcached
- yum install memcached python-memcached -y
编辑/etc/sysconfig/memcached文件并完成以下操作。
配置服务器以使用控制节点的管理IP地址,这是为了允许其它节点通过管理网络进行访问。
- vi /etc/sysconfig/memcached
文件的最后一行是OPTIONS="-l 127.0.0.1,::1",进行修改,修改的结果是:
- OPTIONS="-l 127.0.0.1,::1,controller"
也就是加上了controller。
5-1. 启动Memcached服务并设置为开机自动启动。
- systemctl enable memcached
- systemctl start memcached
6. 3.4.6 安装Etcd
在控制节点上运行。
6-1. 安装软件包
- yum install etcd -y
6-2. 编辑配置文件/etc/etcd/etcd.conf
- vi /etc/etcd/etcd.conf
取消对ETCD_LISTEN_PEER_URLS、ETCD_INITIAL_ADVERTISE_PEER_URLS、ETCD_INITIAL_CLUSTER、ETCD_INITIAL_CLUSTER_TOKEN、ETCD_INITIAL_CLUSTER_STATE五个选项前面的注释。修改ETCD_LISTEN_PEER_URLS、ETCD_LISTEN_CLIENT_URLS、ETCD_INITIAL_ADVERTISE_PEER_URLS、ETCD_ADVERTISE_CLIENT_URLS、ETCD_INITIAL_CLUSTER五个地方的IP地址,把localhost换成控制节点的管理IP地址192.168.200.100。把ETCD_NAME从default设置为controller,并且把ETCD_INITIAL_CLUSTER中的default改为controller(这个地方两者必须是一致的,否则后面服务启动会失败,不知道是一定要改成controller呢,还是保持原来的default也可以,倾向于后者)。
书上还把ETCD_INITIAL_CLUSTER_TOKEN设置为了etcd-cluster-01。但是我这里默认为etcd-cluster,并且到现在还没有提到过etcd-cluster-01是什么东西,所以我现在没有修改。等到后面能确定用它的时候再改。
6-3. 设置开机启动
- systemctl enable etcd
- systemctl start etcd
7. 3.4.7 验证基础环境
使用命令查看各服务端口是否开启。
- netstat -tunlp
结果如下:

可以看到,mysqld、etcd、memcached、chronyd都已经开启,消息队列由于没有配置Web界面,所以未发现端口。
也可以使用命令查看进程是否正常运行:
- systemctl status mysqld etcd memcached chronyd
都是绿色active(running),就没有问题。
至此,OpenStack基础环境配置完成。
第三章工作做完。

 浙公网安备 33010602011771号