

win7-64bit下基于VMware12.5安装rhel-server-6.3-i386
/*************************************************************************************
宿主PC:win7-64bit
虚拟软件:VMware12.5
虚拟PC:rhel-server-6.3-i386
时间:2016-10-02
*************************************************************************************/
1、安装rhel6
安装英文版,添加简体中文字体
登录时切换到中文,选择不改文件夹名称
如下修改,并重启,可做到英文系统显示中文。
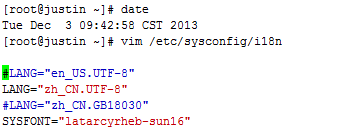
关闭防火墙和SELinux
#关闭防火墙/etc/init.d/iptables stop#关闭Selinuxsetenforce permissive
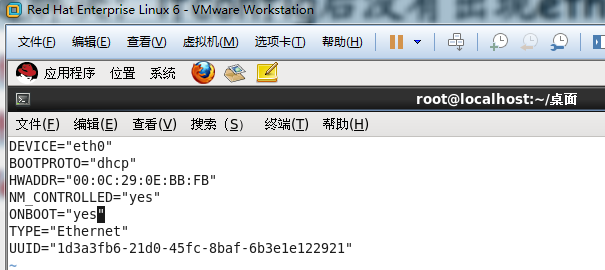
2、启用网络设备
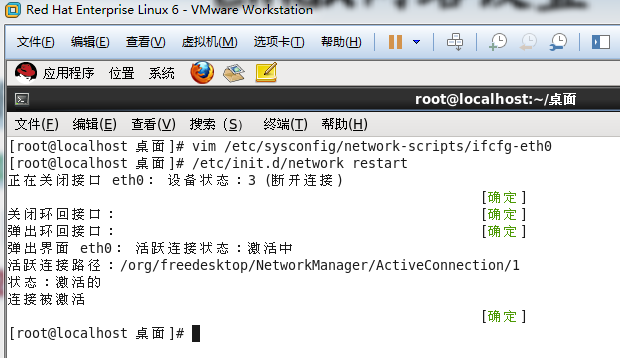
修改eth0网卡的配置文件,将ONBOOT=“no”改为”yes”,文件位置:/etc/sysconfig/network-scripts/ifcfg-eth0
/etc/init.d/network restart 重新启动网络
3、安装VMware-Tools
安装VMware-Tools
./vmware-install.pl
4、安装vim
检查是否安装
[root@localhost 桌面]# rpm -qa |grep vimvim-minimal-7.2.411-1.8.el6.i686vim-common-7.2.411-1.8.el6.i686vim-enhanced-7.2.411-1.8.el6.i686[root@localhost 桌面]#
5、安装ctags
检查
[root@localhost 桌面]# rpm -qa |grep tagtaglib-1.6.1-1.1.el6.i686ctags-5.8-2.el6.i686[root@localhost 桌面]#
6、安装cscope
检查
[root@localhost 桌面]# rpm -qa |grep cscopecscope-15.6-6.el6.i686[root@localhost 桌面]#
7、更新yum为网易源
下载rpm包的地址
http://mirrors.163.com/centos/6/os/i386/Packages/
查看rhel是否安装python
python-2.6.6-64.el6.i686
python-iniparse-0.3.1-2.1.el6.noarch
没有安装的话,重新安装
查看rhel是否安装yum
yum-3.2.29-73.el6.centos.noarch
yum-metadata-parser-1.1.2-16.el6.i686
yum-plugin-fastestmirror-1.1.30-37.el6.noarch
没有安装的话,重新安装
更换yum源 使用163的源
#cd /etc/yum.repos.d/
#wget http://mirrors.163.com/.help/CentOS6-Base-163.repo
#vim CentOS6-Base-163.repo
把文件里面的$releasever全部替换为版本号,即6 最后保存!
清除原有缓存
#yum clean all
重建缓存
以提高搜索安装软件的速度
#yum makecache
有可能第一遍不起作用,需要多做几遍
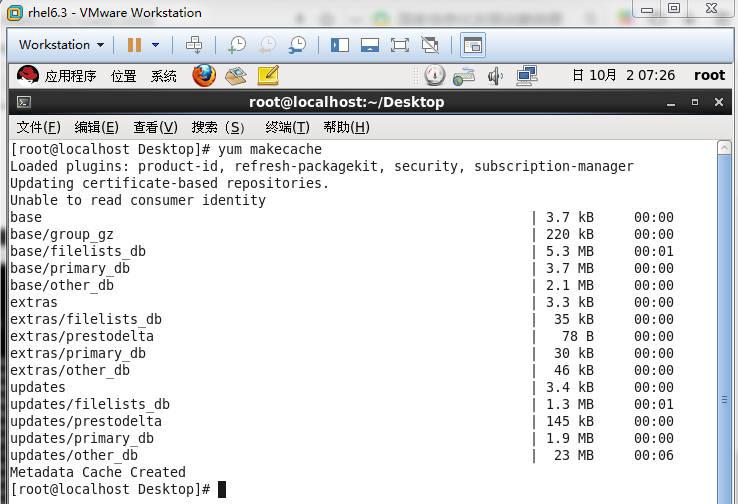
此时,网易yum源已经配置好。各位可以享受高质量且免费的yum服务了!
构建多个yum源
yum源可用
/etc/yum.repos.d/rhel-source.repo
# CentOS-Base.repo## The mirror system uses the connecting IP address of the client and the# update status of each mirror to pick mirrors that are updated to and# geographically close to the client. You should use this for CentOS updates# unless you are manually picking other mirrors.## If the mirrorlist= does not work for you, as a fall back you can try the# remarked out baseurl= line instead.##[base]name=CentOS-6 - Base - 163.combaseurl=http://mirrors.163.com/centos/6/os/$basearch/#mirrorlist=http://mirrorlist.centos.org/?release=6&arch=$basearch&repo=osgpgcheck=1gpgkey=http://mirror.centos.org/centos/RPM-GPG-KEY-CentOS-6#released updates[updates]name=CentOS-6 - Updates - 163.combaseurl=http://mirrors.163.com/centos/6/updates/$basearch/#mirrorlist=http://mirrorlist.centos.org/?release=6&arch=$basearch&repo=updatesgpgcheck=1gpgkey=http://mirror.centos.org/centos/RPM-GPG-KEY-CentOS-6#additional packages that may be useful[extras]name=CentOS-6 - Extras - 163.combaseurl=http://mirrors.163.com/centos/6/extras/$basearch/#mirrorlist=http://mirrorlist.centos.org/?release=6&arch=$basearch&repo=extrasgpgcheck=1gpgkey=http://mirror.centos.org/centos/RPM-GPG-KEY-CentOS-6#additional packages that extend functionality of existing packages[centosplus]name=CentOS-6 - Plus - 163.combaseurl=http://mirrors.163.com/centos/6/centosplus/$basearch/#mirrorlist=http://mirrorlist.centos.org/?release=6&arch=$basearch&repo=centosplusgpgcheck=1enabled=0gpgkey=http://mirror.centos.org/centos/RPM-GPG-KEY-CentOS-6#contrib - packages by Centos Users[contrib]name=CentOS-6 - Contrib - 163.combaseurl=http://mirrors.163.com/centos/6/contrib/$basearch/#mirrorlist=http://mirrorlist.centos.org/?release=6&arch=$basearch&repo=contribgpgcheck=1enabled=0gpgkey=http://mirror.centos.org/centos/RPM-GPG-KEY-CentOS-6# CentOS-Base.repo## The mirror system uses the connecting IP address of the client and the# update status of each mirror to pick mirrors that are updated to and# geographically close to the client. You should use this for CentOS updates# unless you are manually picking other mirrors.## If the mirrorlist= does not work for you, as a fall back you can try the# remarked out baseurl= line instead.##[base]name=CentOS-6 - Base - mirrors.aliyun.comfailovermethod=prioritybaseurl=http://mirrors.aliyun.com/centos/6/os/$basearch/http://mirrors.aliyuncs.com/centos/6/os/$basearch/#mirrorlist=http://mirrorlist.centos.org/?release=6&arch=$basearch&repo=osgpgcheck=1gpgkey=http://mirrors.aliyun.com/centos/RPM-GPG-KEY-CentOS-6#released updates[updates]name=CentOS-6 - Updates - mirrors.aliyun.comfailovermethod=prioritybaseurl=http://mirrors.aliyun.com/centos/6/updates/$basearch/http://mirrors.aliyuncs.com/centos/6/updates/$basearch/#mirrorlist=http://mirrorlist.centos.org/?release=6&arch=$basearch&repo=updatesgpgcheck=1gpgkey=http://mirrors.aliyun.com/centos/RPM-GPG-KEY-CentOS-6#additional packages that may be useful[extras]name=CentOS-6 - Extras - mirrors.aliyun.comfailovermethod=prioritybaseurl=http://mirrors.aliyun.com/centos/6/extras/$basearch/http://mirrors.aliyuncs.com/centos/6/extras/$basearch/#mirrorlist=http://mirrorlist.centos.org/?release=6&arch=$basearch&repo=extrasgpgcheck=1gpgkey=http://mirrors.aliyun.com/centos/RPM-GPG-KEY-CentOS-6#additional packages that extend functionality of existing packages[centosplus]name=CentOS-6 - Plus - mirrors.aliyun.comfailovermethod=prioritybaseurl=http://mirrors.aliyun.com/centos/6/centosplus/$basearch/http://mirrors.aliyuncs.com/centos/6/centosplus/$basearch/#mirrorlist=http://mirrorlist.centos.org/?release=6&arch=$basearch&repo=centosplusgpgcheck=1enabled=0gpgkey=http://mirrors.aliyun.com/centos/RPM-GPG-KEY-CentOS-6#contrib - packages by Centos Users[contrib]name=CentOS-6 - Contrib - mirrors.aliyun.comfailovermethod=prioritybaseurl=http://mirrors.aliyun.com/centos/6/contrib/$basearch/http://mirrors.aliyuncs.com/centos/6/contrib/$basearch/#mirrorlist=http://mirrorlist.centos.org/?release=6&arch=$basearch&repo=contribgpgcheck=1enabled=0gpgkey=http://mirrors.aliyun.com/centos/RPM-GPG-KEY-CentOS-6
3、导入KEY
rpm --import http://mirror.centos.org/centos/RPM-GPG-KEY-CentOS-6
rpm --import http://mirrors.aliyun.com/centos/RPM-GPG-KEY-CentOS-6
4、安装自动源选择插件--自动选择最快的源
yum install yum-fastestmirror -y
5、如何确认正在使用的是哪个源?
cd /var/cache/yum
cat timedhosts.txt
如果我在那个目录里放了很多源,怎么知道当前用的是那个呢?如果你没有改yum.conf,那么看/var/cache/yum/文件夹里的一个time开头的文件,就知道了
如果在使用yum install安装找不到某些包的时候,可以使用下面办法试试
wget http://dag.wieers.com/rpm/packages/rpmforge-release/rpmforge-release-0.3.6-1.el5.rf.i386.rpm
rpm -Uvh rpmforge-release-0.3.6-1.el5.rf.i386.rpm
yum常用命令
yum -y install 包名(支持*) :自动选择y,全自动
yum install 包名(支持*) :手动选择y or n
yum remove 包名(不支持*)
rpm -ivh 包名(支持*):安装rpm包
rpm -e 包名(不支持*):卸载rpm包
更新和升级
yum update 全部更新
yum update package1 更新指定程序包package1
yum check-update 检查可更新的程序
yum upgrade package1 升级指定程序包package1
yum groupupdate group1 升级程序组group1
1 安装
yum install 全部安装
yum install package1 安装指定的安装包package1
yum groupinsall group1 安装程序组group1
2 更新和升级
yum update 全部更新
yum update package1 更新指定程序包package1
yum check-update 检查可更新的程序
yum upgrade package1 升级指定程序包package1
yum groupupdate group1 升级程序组group1
3 查找和显示
yum info package1 显示安装包信息package1
yum list 显示所有已经安装和可以安装的程序包
yum list package1 显示指定程序包安装情况package1
yum groupinfo group1 显示程序组group1信息yum search string 根据关键字string查找安装包
4 删除程序
yum remove | erase package1 删除程序包package1
yum groupremove group1 删除程序组group1
yum deplist package1 查看程序package1依赖情况
5 清除缓存
yum clean packages 清除缓存目录下的软件包
yum clean headers 清除缓存目录下的 headers
yum clean oldheaders 清除缓存目录下旧的 headers
yum clean, yum clean all (= yum clean packages; yum clean oldheaders) 清除缓存目录下的软件包及旧的headers
8、安装tree
yum -y install tree dos2unix
9、安装vimrc
vimrc
"=========================================================================" DesCRiption: 适合自己使用的vimrc文件,for Linux/Windows, GUI/Console"" Last Change: 2010年08月02日 15时13分"" Version: 1.80""=========================================================================set nocompatible " 关闭 vi 兼容模式syntax on " 自动语法高亮colorscheme molokai " 设定配色方案set number " 显示行号set cursorline " 突出显示当前行set ruler " 打开状态栏标尺set shiftwidth=4 " 设定 << 和 >> 命令移动时的宽度为 4set softtabstop=4 " 使得按退格键时可以一次删掉 4 个空格set tabstop=4 " 设定 tab 长度为 4set nobackup " 覆盖文件时不备份set autochdir " 自动切换当前目录为当前文件所在的目录filetype plugin indent on " 开启插件set backupcopy=yes " 设置备份时的行为为覆盖set ignorecase smartcase " 搜索时忽略大小写,但在有一个或以上大写字母时仍保持对大小写敏感set nowrapscan " 禁止在搜索到文件两端时重新搜索set incsearch " 输入搜索内容时就显示搜索结果set hlsearch " 搜索时高亮显示被找到的文本set noerrorbells " 关闭错误信息响铃set novisualbell " 关闭使用可视响铃代替呼叫set t_vb= " 置空错误铃声的终端代码" set showmatch " 插入括号时,短暂地跳转到匹配的对应括号" set matchtime=2 " 短暂跳转到匹配括号的时间set magic " 设置魔术set hidden " 允许在有未保存的修改时切换缓冲区,此时的修改由 vim 负责保存set guioptions-=T " 隐藏工具栏set guioptions-=m " 隐藏菜单栏set smartindent " 开启新行时使用智能自动缩进set backspace=indent,eol,start" 不设定在插入状态无法用退格键和 Delete 键删除回车符set cmdheight=1 " 设定命令行的行数为 1set laststatus=2 " 显示状态栏 (默认值为 1, 无法显示状态栏)set statusline=\ %<%F[%1*%M%*%n%R%H]%=\ %y\ %0(%{&fileformat}\ %{&encoding}\ %c:%l/%L%)\" 设置在状态行显示的信息set foldenable " 开始折叠set foldmethod=syntax " 设置语法折叠set foldcolumn=0 " 设置折叠区域的宽度setlocal foldlevel=1 " 设置折叠层数为" set foldclose=all " 设置为自动关闭折叠" nnoremap <space> @=((foldclosed(line('.')) < 0) ? 'zc' : 'zo')<CR>" 用空格键来开关折叠" return OS type, eg: windows, or linux, mac, et.st..function! MySys()if has("win16") || has("win32") || has("win64") || has("win95")return "windows"elseif has("unix")return "linux"endifendfunction" 用户目录变量$VIMFILESif MySys() == "windows"let $VIMFILES = $VIM.'/vimfiles'elseif MySys() == "linux"let $VIMFILES = $HOME.'/.vim'endif" 设定doc文档目录let helptags=$VIMFILES.'/doc'" 设置字体 以及中文支持if has("win32")set guifont=Inconsolata:h12:cANSIendif" 配置多语言环境if has("multi_byte")" UTF-8 编码set encoding=utf-8set termencoding=utf-8set formatoptions+=mMset fencs=utf-8,gbkif v:lang =~? '^\(zh\)\|\(ja\)\|\(ko\)'set ambiwidth=doubleendifif has("win32")source $VIMRUNTIME/delmenu.vimsource $VIMRUNTIME/menu.vimlanguage messages zh_CN.utf-8endifelseechoerr "Sorry, this version of (g)vim was not compiled with +multi_byte"endif" Buffers操作快捷方式!nnoremap <C-RETURN> :bnext<CR>nnoremap <C-S-RETURN> :bprevious<CR>" Tab操作快捷方式!nnoremap <C-TAB> :tabnext<CR>nnoremap <C-S-TAB> :tabprev<CR>"关于tab的快捷键" map tn :tabnext<cr>" map tp :tabprevious<cr>" map td :tabnew .<cr>" map te :tabedit" map tc :tabclose<cr>"窗口分割时,进行切换的按键热键需要连接两次,比如从下方窗口移动"光标到上方窗口,需要<c-w><c-w>k,非常麻烦,现在重映射为<c-k>,切换的"时候会变得非常方便.nnoremap <C-h> <C-w>hnnoremap <C-j> <C-w>jnnoremap <C-k> <C-w>knnoremap <C-l> <C-w>l"一些不错的映射转换语法(如果在一个文件中混合了不同语言时有用)nnoremap <leader>1 :set filetype=xhtml<CR>nnoremap <leader>2 :set filetype=css<CR>nnoremap <leader>3 :set filetype=javascript<CR>nnoremap <leader>4 :set filetype=php<CR>" set fileformats=unix,dos,mac" nmap <leader>fd :se fileformat=dos<CR>" nmap <leader>fu :se fileformat=unix<CR>" use Ctrl+[l|n|p|cc] to list|next|previous|jump to count the result" map <C-x>l <ESC>:cl<CR>" map <C-x>n <ESC>:cn<CR>" map <C-x>p <ESC>:cp<CR>" map <C-x>c <ESC>:cc<CR>" 让 Tohtml 产生有 CSS 语法的 html" syntax/2html.vim,可以用:runtime! syntax/2html.vimlet html_use_css=1" Python 文件的一般设置,比如不要 tab 等autocmd FileType python set tabstop=4 shiftwidth=4 expandtabautocmd FileType python map <F12> :!python %<CR>" 选中状态下 Ctrl+c 复制vmap <C-c> "+y" 打开javascript折叠let b:javascript_fold=1" 打开javascript对dom、html和css的支持let javascript_enable_domhtmlcss=1" 设置字典 ~/.vim/dict/文件的路径autocmd filetype javascript set dictionary=$VIMFILES/dict/javascript.dictautocmd filetype css set dictionary=$VIMFILES/dict/css.dictautocmd filetype php set dictionary=$VIMFILES/dict/php.dict"-----------------------------------------------------------------" plugin - bufexplorer.vim Buffers切换" \be 全屏方式查看全部打开的文件列表" \bv 左右方式查看 \bs 上下方式查看"-----------------------------------------------------------------"-----------------------------------------------------------------" plugin - taglist.vim 查看函数列表,需要ctags程序" F4 打开隐藏taglist窗口"-----------------------------------------------------------------if MySys() == "windows" " 设定windows系统中ctags程序的位置let Tlist_Ctags_Cmd = '"'.$VIMRUNTIME.'/ctags.exe"'elseif MySys() == "linux" " 设定windows系统中ctags程序的位置let Tlist_Ctags_Cmd = '/usr/bin/ctags'endifnnoremap <silent><F4> :TlistToggle<CR>let Tlist_Show_One_File = 1 " 不同时显示多个文件的tag,只显示当前文件的let Tlist_Exit_OnlyWindow = 1 " 如果taglist窗口是最后一个窗口,则退出vimlet Tlist_Use_Right_Window = 1 " 在右侧窗口中显示taglist窗口let Tlist_File_Fold_Auto_Close=1 " 自动折叠当前非编辑文件的方法列表let Tlist_Auto_Open = 0let Tlist_Auto_Update = 1let Tlist_Hightlight_Tag_On_BufEnter = 1let Tlist_Enable_Fold_Column = 0let Tlist_Process_File_Always = 1let Tlist_Display_Prototype = 0let Tlist_Compact_Format = 1"-----------------------------------------------------------------" plugin - mark.vim 给各种tags标记不同的颜色,便于观看调式的插件。" \m mark or unmark the word under (or before) the cursor" \r manually input a regular expression. 用于搜索." \n clear this mark (i.e. the mark under the cursor), or clear all highlighted marks ." \* 当前MarkWord的下一个 \# 当前MarkWord的上一个" \/ 所有MarkWords的下一个 \? 所有MarkWords的上一个"-----------------------------------------------------------------"-----------------------------------------------------------------" plugin - NERD_tree.vim 以树状方式浏览系统中的文件和目录" :ERDtree 打开NERD_tree :NERDtreeClose 关闭NERD_tree" o 打开关闭文件或者目录 t 在标签页中打开" T 在后台标签页中打开 ! 执行此文件" p 到上层目录 P 到根目录" K 到第一个节点 J 到最后一个节点" u 打开上层目录 m 显示文件系统菜单(添加、删除、移动操作)" r 递归刷新当前目录 R 递归刷新当前根目录"-----------------------------------------------------------------" F3 NERDTree 切换map <F3> :NERDTreeToggle<CR>imap <F3> <ESC>:NERDTreeToggle<CR>"-----------------------------------------------------------------" plugin - NERD_commenter.vim 注释代码用的," [count],cc 光标以下count行逐行添加注释(7,cc)" [count],cu 光标以下count行逐行取消注释(7,cu)" [count],cm 光标以下count行尝试添加块注释(7,cm)" ,cA 在行尾插入 /* */,并且进入插入模式。 这个命令方便写注释。" 注:count参数可选,无则默认为选中行或当前行"-----------------------------------------------------------------let NERDSpaceDelims=1 " 让注释符与语句之间留一个空格let NERDCompactSexyComs=1 " 多行注释时样子更好看"-----------------------------------------------------------------" plugin - DoxygenToolkit.vim 由注释生成文档,并且能够快速生成函数标准注释"-----------------------------------------------------------------let g:DoxygenToolkit_authorName="Asins - asinsimple AT gmail DOT com"let g:DoxygenToolkit_briefTag_funcName="yes"map <leader>da :DoxAuthor<CR>map <leader>df :Dox<CR>map <leader>db :DoxBlock<CR>map <leader>dc a /* */<LEFT><LEFT><LEFT>"-----------------------------------------------------------------" plugin – ZenCoding.vim 很酷的插件,HTML代码生成" 插件最新版:http://github.com/mattn/zencoding-vim" 常用命令可看:http://nootn.com/blog/Tool/23/"-----------------------------------------------------------------"-----------------------------------------------------------------" plugin – checksyntax.vim JavaScript常见语法错误检查" 默认快捷方式为 F5"-----------------------------------------------------------------let g:checksyntax_auto = 0 " 不自动检查"-----------------------------------------------------------------" plugin - NeoComplCache.vim 自动补全插件"-----------------------------------------------------------------let g:AutoComplPop_NotEnableAtStartup = 1let g:NeoComplCache_EnableAtStartup = 1let g:NeoComplCache_SmartCase = 1let g:NeoComplCache_TagsAutoUpdate = 1let g:NeoComplCache_EnableInfo = 1let g:NeoComplCache_EnableCamelCaseCompletion = 1let g:NeoComplCache_MinSyntaxLength = 3let g:NeoComplCache_EnableSkipCompletion = 1let g:NeoComplCache_SkipInputTime = '0.5'let g:NeoComplCache_SnippetsDir = $VIMFILES.'/snippets'" <TAB> completion.inoremap <expr><TAB> pumvisible() ? "\<C-n>" : "\<TAB>"" snippets expand keyimap <silent> <C-e> <Plug>(neocomplcache_snippets_expand)smap <silent> <C-e> <Plug>(neocomplcache_snippets_expand)"-----------------------------------------------------------------" plugin - matchit.vim 对%命令进行扩展使得能在嵌套标签和语句之间跳转" % 正向匹配 g% 反向匹配" [% 定位块首 ]% 定位块尾"-----------------------------------------------------------------"-----------------------------------------------------------------" plugin - vcscommand.vim 对%命令进行扩展使得能在嵌套标签和语句之间跳转" SVN/git管理工具"-----------------------------------------------------------------"-----------------------------------------------------------------" plugin – a.vim"-----------------------------------------------------------------
10、关闭防火墙和SELinux
#关闭防火墙/etc/init.d/iptables stop#关闭Selinuxsetenforce permissive
11、RHEL7开机自动运行程序的脚本(fedora20通用)
方法如下:
cd /etc/init.d
vi youshell.sh #将youshell.sh修改为你自己的脚本名
编写自己的脚本后保存退出。
在编写脚本的时候,请先加入以下注释
#add for chkconfig
#chkconfig: 2345 70 30
#description: the description of the shell #关于脚本的简短描述
#processname: servicename #第一个进程名,后边设置自启动的时候会用到
说明:
2345是指脚本的运行级别,即在2345这4种模式下都可以运行,234都是文本界面,5就是图形界面X
70是指脚本将来的启动顺序号,如果别的程序的启动顺序号比70小(比如44、45),则脚本需要等这些程序都启动以后才启动。
30是指系统关闭时,脚本的停止顺序号。
给脚本添加上可执行权限:
chmod +x youshell.sh
chkconfig --level 2345 youshell.sh on
-----------
Ok ! Success!
12、安装samba
RHEL6.3 Samba服务器安装配置
1、安装Samba软件包
yum -y install samba samba-client samba-common samba-winbind samba-winbind-clients
2、启动、查看Samba服务器状态
# service smb start# service smb status
3、设置Samba服务器为开机启动
# chkconfig smb on# chkconfig --list smbsmb 0:off 1:off 2:on 3:on 4:on 5:on 6:off
4、修改 Samba 服务器住配置文件 smb.conf
4.1、备份源文件
# cp -p /etc/samba/smb.conf /etc/samba/smb.conf.orig
4.2、在 [global] 部分修改字符集设置
[global]unix charset= UTF-8dos charset=GBKworkgroup = SHAREGROUP
4.3、在文件结尾加上客户自定义共享模块
[share]comment = RHEL6-Windows Sharepath=/home/sharepublic=yeswriteable = yes# 是否可写browseable = yes# 是否可浏览create mode = 0777# 创建文件时的默认属性directory mode = 0777# 创建目录时的默认属性valid users = root# 指定可访问用户
5、添加用户root
# smbpasswd -a rootNew SMB password:Retype new SMB password:Added user demo.#
6、检测配置参数
# testparm
7、重启 Samba 服务器
/etc/init.d/smb restart
PS:WINDOWS机器需要注销重新登录,才可以注销原有的用户信息,登录Samba服务共享

 浙公网安备 33010602011771号