


前期准备:
同步时间
(两个节点)
节点一(172.16.21.6)
[root@stu21 heartbeat2]# ntpdate 172.16.0.1
31 Dec 20:59:25 ntpdate[6950]: adjust time server 172.16.0.1 offset 0.379319 sec
[root@stu21 heartbeat2]#
最好几分钟同步一下
[root@stu21 heartbeat2]# crontab -e
no crontab for root - using an empty one
*/3 * * * * /usr/sbin/ntpdate 172.16.0.1 &> /dev/null
~
~
节点二:(172.16.21.10)
[root@stu21 heartbeat2]# ntpdate 172.16.0.1
31 Dec 21:00:50 ntpdate[4737]: adjust time server 172.16.0.1 offset 0.380532 sec
[root@stu21 heartbeat2]#
最好每个几分钟同步一下
[root@stu21 heartbeat2]# crontab -e
no crontab for root - using an empty one
*/3 * * * * /usr/sbin/ntpdate 172.16.0.1 &> /dev/null
~
~
在节点1 上生成密钥,使得两节点间检测心跳信息无须密码
[root@stu21 .ssh]# ssh-keygen -P ''
Generating public/private rsa key pair.
Enter file in which to save the key (/root/.ssh/id_rsa):
Your identification has been saved in /root/.ssh/id_rsa.
Your public key has been saved in /root/.ssh/id_rsa.pub.
The key fingerprint is:
75:cc:d5:7e:f8:ae:d6:c7:7b:36:45:f6:22:a8:06:dc root@node1.stu21.com
The key's randomart image is:
+--[ RSA 2048]----+
| .. |
| o . .|
| . + o |
| . . . =|
| . .S . +o|
| o E . . . +|
| . . . =.|
| o ..B|
| . ..+=|
+-----------------+
[root@stu21 .ssh]#
在 节点1 的 /etc/hosts 下增加 " uname -n " 所显示两个节点的内容
172.16.21.6 node1.stu21.com node1(别名)
172.16.21.10 node2.stu21.com node2(别名)
[root@stu21 ~]# ssh-copy-id -i .ssh/id_rsa.pub root@node2
The authenticity of host 'node2 (172.16.21.10)' can't be established.
RSA key fingerprint is 6a:5a:71:de:61:ca:29:01:c2:7d:8d:6f:06:27:2b:b2.
Are you sure you want to continue connecting (yes/no)? yes
Warning: Permanently added 'node2' (RSA) to the list of known hosts.
root@node2's password:
Now try logging into the machine, with "ssh 'root@node2'", and check in:
.ssh/authorized_keys
to make sure we haven't added extra keys that you weren't expecting.
[root@stu21 ~]# cd .ssh/
[root@stu21 .ssh]# ls
authorized_keys id_rsa id_rsa.pub known_hosts
[root@stu21 .ssh]# ssh node2 'date';date
Wed Dec 31 21:38:29 CST 2014
Wed Dec 31 21:38:29 CST 2014
[root@stu21 .ssh]#
[root@stu21 ~]# scp /etc/hosts node2:/etc/hosts
hosts 100% 358 0.4KB/s 00:00
[root@stu21 ~]#
在节点2 的终端上生成密钥一份给 节点2的机子上
[root@stu21 ~]# ssh-keygen -t rsa -P ''
Generating public/private rsa key pair.
Enter file in which to save the key (/root/.ssh/id_rsa):
Your identification has been saved in /root/.ssh/id_rsa.
Your public key has been saved in /root/.ssh/id_rsa.pub.
The key fingerprint is:
fe:fe:67:a7:c2:da:23:a9:91:28:05:4b:06:ea:87:84 root@node2.stu21.com
The key's randomart image is:
+--[ RSA 2048]----+
| . |
|.. . |
|E. + |
|o .o o |
| o .. . S |
| . . o . |
| . . + o |
| . oo.+ o .|
| .o++o=.o |
+-----------------+
[root@stu21 ~]#
[root@stu21 ~]# ssh-copy-id -i .ssh/id_rsa.pub root@node1
The authenticity of host 'node1 (172.16.21.6)' can't be established.
RSA key fingerprint is 6a:5a:71:de:61:ca:29:01:c2:7d:8d:6f:06:27:2b:b2.
Are you sure you want to continue connecting (yes/no)? yes
Warning: Permanently added 'node1,172.16.21.6' (RSA) to the list of known hosts.
root@node1's password:
Permission denied, please try again.
root@node1's password:
Now try logging into the machine, with "ssh 'root@node1'", and check in:
.ssh/authorized_keys
to make sure we haven't added extra keys that you weren't expecting.
验证下是否能检测对方时间
[root@stu21 ~]# ssh node1 'date' ; date
Wed Dec 31 21:50:55 CST 2014
Wed Dec 31 21:50:55 CST 2014
[root@stu21 ~]#
前期准备结束。。。。。
[root@node1 ~]# lftp 172.16.0.1
lftp 172.16.0.1:~> cd pub/Sources/6.x86_64/drbd/
lftp 172.16.0.1:/pub/Sources/6.x86_64/drbd>
lftp 172.16.0.1:/pub/Sources/6.x86_64/drbd> ls
-rw-r--r-- 1 500 500 290076 Sep 15 2013 drbd-8.4.3-33.el6.x86_64.rpm
-rw-r--r-- 1 500 500 148728 Sep 15 2013 drbd-kmdl-2.6.32-358.el6-8.4.3-33.el6.x86_64.rpm
-rw-r--r-- 1 0 0 149004 Apr 17 2014 drbd-kmdl-2.6.32-431.11.2.el6.centos.plus-8.4.3-33.el6.x86_64.rpm
-rw-r--r-- 1 0 0 148716 Apr 17 2014 drbd-kmdl-2.6.32-431.el6-8.4.3-33.el6.x86_64.rpm
-rw-r--r-- 1 0 0 316878 Jan 02 03:38 drbd84-kmod-8.4.5-2.el6.elrepo.src.rpm
-rw-r--r-- 1 0 0 316737 Jan 02 04:08 drbd84-kmod-8.4.5-504.1.el6.src.rpm
-rw-r--r-- 1 0 0 738021 Aug 18 03:16 drbd84-utils-8.9.1-1.el6.elrepo.src.rpm
-rw-r--r-- 1 0 0 468732 Aug 18 03:14 drbd84-utils-8.9.1-1.el6.elrepo.x86_64.rpm
-rw-r--r-- 1 0 0 189208 Oct 28 14:35 kmod-drbd84-8.4.5-2.el6.elrepo.x86_64.rpm
-rw-r--r-- 1 0 0 188824 Jan 02 04:08 kmod-drbd84-8.4.5-504.1.el6.x86_64.rpm
lftp 172.16.0.1:/pub/Sources/6.x86_64/drbd> mget kmod-drbd84-8.4.5-504.1.el6.x86_64.rpm drbd84-utils-8.9.1-1.el6.elrepo.x86_64.rpm

[root@node1 ~]# ls
anaconda-ks.cfg install.log kmod-drbd84-8.4.5-504.1.el6.x86_64.rpm
drbd84-utils-8.9.1-1.el6.elrepo.x86_64.rpm install.log.syslog rpmbuild
[root@node1 ~]# rpm -ivh kmod-drbd84-8.4.5-504.1.el6.x86_64.rpm drbd84-utils-8.9.1-1.el6.elrepo.x86_64.rpm
warning: drbd84-utils-8.9.1-1.el6.elrepo.x86_64.rpm: Header V4 DSA/SHA1 Signature, key ID baadae52: NOKEY
Preparing... ########################################### [100%]
1:drbd84-utils ########################################### [ 50%]
2:kmod-drbd84 ########################################### [100%]
Working. This may take some time ...
Done.
[root@node1 ~]#
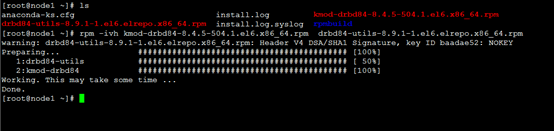
ps :上面的一个警告不会影响,不用担心
节点node1 装完,再配置节点node2,此处省略,跟上面步骤一样
两个节点分别准备一个磁盘分区:
[root@node1 ~]# fdisk /dev/sda
WARNING: DOS-compatible mode is deprecated. It's strongly recommended to
switch off the mode (command 'c') and change display units to
sectors (command 'u').
Command (m for help): p
Disk /dev/sda: 128.8 GB, 128849018880 bytes
255 heads, 63 sectors/track, 15665 cylinders
Units = cylinders of 16065 * 512 = 8225280 bytes
Sector size (logical/physical): 512 bytes / 512 bytes
I/O size (minimum/optimal): 512 bytes / 512 bytes
Disk identifier: 0x00069751
Device Boot Start End Blocks Id System
/dev/sda1 * 1 26 204800 83 Linux
Partition 1 does not end on cylinder boundary.
/dev/sda2 26 7859 62914560 8e Linux LVM
Command (m for help): n
Command action
e extended
p primary partition (1-4)
p
Partition number (1-4): 3
First cylinder (7859-15665, default 7859):
Using default value 7859
Last cylinder, +cylinders or +size{K,M,G} (7859-15665, default 15665): +2G
Command (m for help): w
The partition table has been altered!
Calling ioctl() to re-read partition table.
WARNING: Re-reading the partition table failed with error 16: Device or resource busy.
The kernel still uses the old table. The new table will be used at
the next reboot or after you run partprobe(8) or kpartx(8)
Syncing disks.
[root@node1 ~]# partx -a /dev/sda
BLKPG: Device or resource busy
error adding partition 1
BLKPG: Device or resource busy
error adding partition 2
[root@node1 ~]# partx -a /dev/sda
BLKPG: Device or resource busy
error adding partition 1
BLKPG: Device or resource busy
error adding partition 2
BLKPG: Device or resource busy
error adding partition 3
[root@node1 ~]# cat /proc/partitions
major minor #blocks name
8 0 125829120 sda
8 1 204800 sda1
8 2 62914560 sda2
8 3 2103516 sda3
253 0 20971520 dm-0
253 1 2097152 dm-1
253 2 10485760 dm-2
253 3 20971520 dm-3
[root@node1 ~]#
节点node2 也是按照上步骤来进行
接下来是启用drbd集群
[root@node1 ~]# cd /etc/drbd.d/
[root@node1 drbd.d]# ls
global_common.conf
[root@node1 drbd.d]# vim global_common.conf
下面参数段,按我这个来设置


[root@node1 drbd.d]# vim mystore.res
resource mystore {
on node1.stu21.com {
device /dev/drbd0;
disk /dev/sda3;
address 172.16.21.1:7789;
meta-disk internal;
}
on node2.stu21.com {
device /dev/drbd0;
disk /dev/sda3;
address 172.16.21.2:7789;
meta-disk internal;
}
}
~
~

同样节点node2 也是同样设置:
[root@node1 drbd.d]#
[root@node1 drbd.d]# scp * node2:/etc/drbd.d/
global_common.conf 100% 2108 2.1KB/s 00:00
mystore.res 100% 253 0.3KB/s 00:00
[root@node1 drbd.d]#

资源初始化(drbd设备)(两节点都要设置)
节点1
[root@node1 drbd.d]# drbdadm create-md mystore
initializing activity log
NOT initializing bitmap
Writing meta data...
New drbd meta data block successfully created.
[root@node1 drbd.d]#

别忘了节点2
[root@node2 ~]# drbdadm create-md mystore
initializing activity log
NOT initializing bitmap
Writing meta data...
New drbd meta data block successfully created.
[root@node2 ~]#
启动brdb设备服务
节点1:
[root@node1 drbd.d]# service drbd start
Starting DRBD resources: [
create res: mystore
prepare disk: mystore
adjust disk: mystore
adjust net: mystore
]
..........
***************************************************************
DRBD's startup script waits for the peer node(s) to appear.
- In case this node was already a degraded cluster before the
reboot the timeout is 0 seconds. [degr-wfc-timeout]
- If the peer was available before the reboot the timeout will
expire after 0 seconds. [wfc-timeout]
(These values are for resource 'mystore'; 0 sec -> wait forever)
To abort waiting enter 'yes' [ 38]:
.
[root@node1 drbd.d]#
节点2:
[root@node2 ~]# service drbd start
Starting DRBD resources: [
create res: mystore
prepare disk: mystore
adjust disk: mystore
adjust net: mystore
]
.
[root@node2 ~]#
当前drbd同步状态的信息
我在节点一
[root@node1 drbd.d]# watch -n 10 'cat /proc/drbd'
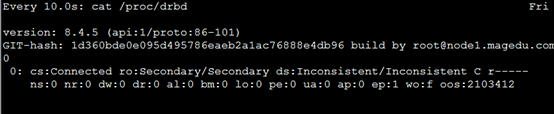
因为没有做主从同步,所以只有secondary(节点的测试也是这样的,我就不测了)
对于上一步骤,也可以用下面的命令来查看drbd的状态信息
[root@node1 drbd.d]# drbd-overview
0:mystore/0 Connected Secondary/Secondary Inconsistent/Inconsistent
[root@node1 drbd.d]#
强行提升主从角色:步骤如下
节点1:
[root@node1 drbd.d]# drbdadm primary --force mystore
再次查看drbd状态信息,与之前开始不一样啦
[root@node1 drbd.d]# drbd-overview
0:mystore/0 SyncSource Primary/Secondary UpToDate/Inconsistent
[=>..................] sync'ed: 10.2% (1892468/2103412)K
节点2
[root@node2 ~]# drbd-overview
0:mystore/0 Connected Secondary/Primary UpToDate/UpToDate
[root@node2 ~]#
在尝试用下面的命令多次观察状态信息
[root@node1 drbd.d]# watch -n 100 'cat /proc/drbd'

出现以上图片内容,说明同步结束(UpToDate/UpToDate)
接下来就是开始格式化,那么节点2会被同步初始化,用命令 blkid 查看
节点1:
[root@node1 drbd.d]# mke2fs -t ext4 /dev/drbd0
mke2fs 1.41.12 (17-May-2010)
Filesystem label=
OS type: Linux
Block size=4096 (log=2)
Fragment size=4096 (log=2)
Stride=0 blocks, Stripe width=0 blocks
131648 inodes, 525853 blocks
26292 blocks (5.00%) reserved for the super user
First data block=0
Maximum filesystem blocks=541065216
17 block groups
32768 blocks per group, 32768 fragments per group
7744 inodes per group
Superblock backups stored on blocks:
32768, 98304, 163840, 229376, 294912
Writing inode tables: done
Creating journal (16384 blocks): done
Writing superblocks and filesystem accounting information: done
This filesystem will be automatically checked every 21 mounts or
180 days, whichever comes first. Use tune2fs -c or -i to override.
[root@node1 drbd.d]#
[root@node1 drbd.d]# mount /dev/drbd0 /mnt
[root@node1 drbd.d]# cd /mnt
[root@node1 mnt]# cp /etc/fstab /mnt
[root@node1 mnt]# ls
fstab lost+found
[root@node1 mnt]# vim fstab
[root@node1 mnt]# cd
实现节点1降级之前可不能有挂载
[root@node1 ~]# umount /mnt
[root@node1 ~]# drbdadm secondary mystore
[root@node1 ~]# drbd-overview
0:mystore/0 Connected Secondary/Secondary UpToDate/UpToDate
[root@node1 ~]#
那么节点2得升级
[root@node2 ~]#
[root@node2 ~]# drbdadm primary mystore
[root@node2 ~]# drbd-overview
0:mystore/0 Connected Primary/Secondary UpToDate/UpToDate
[root@node2 ~]#
不要格式化,因为已经同步好了
[root@node2 ~]# mount /dev/drbd0 /mnt
[root@node2 ~]# cd /mnt
[root@node2 mnt]# ls
fstab lost+found
下面的文件出现new,说明同步是好的
[root@node2 mnt]# cat fstab
#
# /etc/fstab
# Created by anaconda on Thu Jan 1 10:48:34 2015
#
# Accessible filesystems, by reference, are maintained under '/dev/disk'
# See man pages fstab(5), findfs(8), mount(8) and/or blkid(8) for more info
#
/dev/mapper/vg0-root / ext4 defaults 1 1
UUID=3d45455f-a8d5-4961-a79a-e61f9ab247df /boot ext4 defaults 1 2
/dev/mapper/vg0-usr /usr ext4 defaults 1 2
/dev/mapper/vg0-var /var ext4 defaults 1 2
/dev/mapper/vg0-swap swap swap defaults 0 0
tmpfs /dev/shm tmpfs defaults 0 0
devpts /dev/pts devpts gid=5,mode=620 0 0
sysfs /sys sysfs defaults 0 0
proc /proc proc defaults 0 0
newline
[root@node2 mnt]#

出现上面的错误信息,源于未卸载
[root@node2 ~]# umount /mnt
[root@node2 ~]# drbdadm secondary mystore
[root@node2 ~]# drbd-overview
0:mystore/0 Connected Secondary/Secondary UpToDate/UpToDate
如果以后我们希望通过高可用集群来管理,因为任何服务,配用高可用集群,那么我们得关掉这个服务。
[root@node2 ~]# service drbd stop
Stopping all DRBD resources: .
[root@node2 ~]# chkconfig drbd off
[root@node2 ~]#
还没有完成,既然节点2降级,那么节点1必须升级才行
[root@node1 ~]#
[root@node1 ~]# drbdadm primary mystore
[root@node1 ~]# drbd-overview
0:mystore/0 Connected Primary/Secondary UpToDate/UpToDate
[root@node1 ~]#
然后也得关掉服务,为配置高可用集群做准备
[root@node1 ~]# service drbd stop
Stopping all DRBD resources: .
[root@node1 ~]# chkconfig drbd off
[root@node1 ~]#
接下就是让drbd成为高可用集群的可用资源
节点1:
[root@node1 ~]# yum -y install corosync pacemaker
节点2:
[root@node2 ~]# yum -y install corosync pacemaker
如何配置主从资源?集群中的主机节点的切换而切换,再配置成高可用性的MYSQL的集群
模型:corosync + pacemaker +drbd + drbd
配置corosync
节点 1:
[root@node1 ~]# cd /etc/corosync/
[root@node1 corosync]# ls
corosync.conf.example corosync.conf.example.udpu service.d uidgid.d
[root@node1 corosync]# cp corosync.conf.example corosync.conf
[root@node1 corosync]#
[root@node1 corosync]# vim corosync.conf


关掉to_syslog:yes


保存退出
[root@node1 corosync]# corosync-keygen
Corosync Cluster Engine Authentication key generator.
Gathering 1024 bits for key from /dev/random.
Press keys on your keyboard to generate entropy.
Press keys on your keyboard to generate entropy (bits = 320).
Press keys on your keyboard to generate entropy (bits = 384).
Press keys on your keyboard to generate entropy (bits = 448).
Press keys on your keyboard to generate entropy (bits = 512).
Press keys on your keyboard to generate entropy (bits = 584).
Press keys on your keyboard to generate entropy (bits = 680).
Press keys on your keyboard to generate entropy (bits = 744).
Press keys on your keyboard to generate entropy (bits = 808).
Press keys on your keyboard to generate entropy (bits = 872).
Press keys on your keyboard to generate entropy (bits = 952).
Writing corosync key to /etc/corosync/authkey.
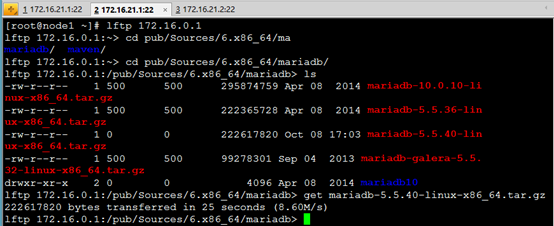
密钥生成随机数,如果熵池里边不够,我们可以再打开一个会话口,下载我们接下来要用的mariadb来填充熵池
[root@node1 ~]# lftp 172.16.0.1
lftp 172.16.0.1:~> cd pub/Sources/6.x86_64/ma
mariadb/ maven/
lftp 172.16.0.1:~> cd pub/Sources/6.x86_64/mariadb/
lftp 172.16.0.1:/pub/Sources/6.x86_64/mariadb> ls
-rw-r--r-- 1 500 500 295874759 Apr 08 2014 mariadb-10.0.10-linux-x86_64.tar.gz
-rw-r--r-- 1 500 500 222365728 Apr 08 2014 mariadb-5.5.36-linux-x86_64.tar.gz
-rw-r--r-- 1 0 0 222617820 Oct 08 17:03 mariadb-5.5.40-linux-x86_64.tar.gz
-rw-r--r-- 1 500 500 99278301 Sep 04 2013 mariadb-galera-5.5.32-linux-x86_64.tar.gz
drwxr-xr-x 2 0 0 4096 Apr 08 2014 mariadb10
lftp 172.16.0.1:/pub/Sources/6.x86_64/mariadb> get mariadb-5.5.40-linux-x86_64.tar.gz 222617820 bytes transferred in 25 seconds (8.60M/s)
lftp 172.16.0.1:/pub/Sources/6.x86_64/mariadb>
节点1:在此目录下生成了密钥 authkey
[root@node1 corosync]# ll
total 24
-r-------- 1 root root 128 Jan 3 08:56 authkey
-rw-r--r-- 1 root root 2700 Jan 2 23:28 corosync.conf
-rw-r--r-- 1 root root 2663 Oct 15 14:19 corosync.conf.example
-rw-r--r-- 1 root root 1073 Oct 15 14:19 corosync.conf.example.udpu
drwxr-xr-x 2 root root 4096 Oct 15 14:19 service.d
drwxr-xr-x 2 root root 4096 Oct 15 14:19 uidgid.d
[root@node1 corosync]#
同样节点2 也得同样上面步骤设置
[root@node1 corosync]# scp -rp authkey corosync.conf node2:/etc/corosync/
authkey 100% 128 0.1KB/s 00:00
corosync.conf 100% 2700 2.6KB/s 00:00
查看节点2 的 /etc/porosync 目录
[root@node2 corosync]# ll
total 24
-r-------- 1 root root 128 Jan 3 08:56 authkey
-rw-r--r-- 1 root root 2700 Jan 2 23:28 corosync.conf
-rw-r--r-- 1 root root 2663 Oct 15 14:19 corosync.conf.example
-rw-r--r-- 1 root root 1073 Oct 15 14:19 corosync.conf.example.udpu
drwxr-xr-x 2 root root 4096 Oct 15 14:19 service.d
drwxr-xr-x 2 root root 4096 Oct 15 14:19 uidgid.d
[root@node2 corosync]#
可以启动集群corosync
节点1 :
[root@node1 corosync]# service corosync start
Starting Corosync Cluster Engine (corosync): [ OK ]
[root@node1 corosync]#
节点2:
[root@node2 corosync]# service corosync start
Starting Corosync Cluster Engine (corosync): [ OK ]
[root@node2 corosync]#
节点1:查看集群日记信息
[root@node1 corosync]# tail /var/log/cluster/corosync.log
节点2:
[root@node2 corosync]# tail /var/log/cluster/corosync.log
切记:上面corosync配置才能配置 corosync的yum源
节点1 :
[root@node1 yum.repos.d]# ls
centos6.6.repo CentOS-Debuginfo.repo CentOS-Media.repo
CentOS-Base.repo.bak CentOS-fasttrack.repo CentOS-Vault.repo
[root@node1 yum.repos.d]# vim corosync.repo
[root@node1 yum.repos.d]# cat corosync.repo
[corosync]
name=Corosync 2 from suse
baseurl=ftp://172.16.0.1/pub/Sources/6.x86_64/corosync
gpgcheck=0
enabled=1
[root@node1 yum.repos.d]#
节点2:
[root@node1 yum.repos.d]# scp corosync.repo node2:/etc/yum.repos.d/
corosync.repo
本地安装crmsh
节点1:
[root@node1 yum.repos.d]# yum install crmsh –y

节点2:
[root@node2 corosync]# yum install crmsh -y

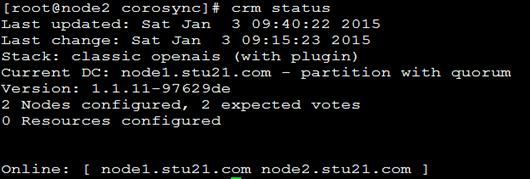
查看当前crm状态
节点1:
[root@node1 yum.repos.d]# crm status

节点2:
[root@node2 corosync]# crm status
节点1:
[root@node1 corosync]# crm_verify -L –V
这里可能会报错,因此我们得关掉stonith
[root@node1 corosync]# crm
crm(live)# configure
crm(live)configure# property stonith-enabled=false
crm(live)configure# commit
crm(live)configure# property no-quorum-policy=ignore
crm(live)configure# commit
crm(live)configure# show
node node1.stu21.com
node node2.stu21.com
property cib-bootstrap-options: \
dc-version=1.1.11-97629de \
cluster-infrastructure="classic openais (with plugin)" \
expected-quorum-votes=2 \
stonith-enabled=false \
no-quorum-policy=ignore
crm(live)configure# cd
crm(live)# ra
crm(live)ra# list ocf pacemaker
ClusterMon Dummy HealthCPU HealthSMART Stateful SysInfo SystemHealth
controld ping pingd remote
crm(live)ra# classes
lsb
ocf / heartbeat linbit pacemaker
service
stonith
crm(live)ra# list ocf linbit
drbd
crm(live)ra# cd
crm(live)# configure
crm(live)configure# primitive mydrbd ocf:linbit:drbd params drbd_resource="mystore" op monitor role=Slave interval=20s timeout=20s op monitor role=Master interval=10s timeout=20s op start timeout=240s op stop timeout=100s
crm(live)configure# verity
ERROR: configure.verity: No such command
出现错误是因为verify 错写成verity,那么就把mydrbd 删除,再重新设置
crm(live)configure# delete mydrbd
crm(live)configure# primitive mydrbd ocf:linbit:drbd params drbd_resource="mystore" op monitor role=Slave interval=20s timeout=20s op monitor role=Master interval=10s timeout=20s op start timeout=240s op stop timeout=100s
crm(live)configure# verify
crm(live)configure#
crm(live)configure# ms ms_mydrbd mydrbd meta master-max="1" master-node-max="1" clone-max="2" clone-node-max="1" notify="true"
crm(live)configure# show
node node1.stu21.com
node node2.stu21.com
primitive mydrbd ocf:linbit:drbd \
params drbd_resource=mystore \
op monitor role=Slave interval=20s timeout=20s \
op monitor role=Master interval=10s timeout=20s \
op start timeout=240s interval=0 \
op stop timeout=100s interval=0
ms ms_mydrbd mydrbd \
meta master-max=1 master-node-max=1 clone-max=2 clone-node-max=1 notify=true
property cib-bootstrap-options: \
dc-version=1.1.11-97629de \
cluster-infrastructure="classic openais (with plugin)" \
expected-quorum-votes=2 \
stonith-enabled=false \
no-quorum-policy=ignore
crm(live)configure# verify
crm(live)configure# commit
crm(live)configure# cd
crm(live)# status
Last updated: Sat Jan 3 11:07:22 2015
Last change: Sat Jan 3 11:07:11 2015
Stack: classic openais (with plugin)
Current DC: node1.stu21.com - partition with quorum
Version: 1.1.11-97629de
2 Nodes configured, 2 expected votes
2 Resources configured
Online: [ node1.stu21.com node2.stu21.com ]
Master/Slave Set: ms_mydrbd [mydrbd]
Masters: [ node1.stu21.com ]
Slaves: [ node2.stu21.com ]
crm(live)#
在节点1 由上面看出我们设置的是主节点
那么检测节点2是否是从的
[root@node2 corosync]# cd
[root@node2 ~]# drbd-overview
0:mystore/0 Connected Secondary/Primary UpToDate/UpToDate
由上面看出,我们定义的节点1主,节点2从是正确的
假如我们把node1变成主从节点的备用节点,该如何设置?
此时在节点1上:
[root@node1 ~]# drbd-overview
0:mystore/0 Connected Primary/Secondary UpToDate/UpToDate
[root@node1 ~]# crm node standby
[root@node1 ~]# drbd-overview
0:mystore/0 Unconfigured . .
[root@node1 ~]# crm status
Node node1.stu21.com: standby
Online: [ node2.stu21.com ]
Master/Slave Set: ms_mydrbd [mydrbd]
Masters: [ node2.stu21.com ]
Stopped: [ node1.stu21.com ]
由上面看出node1已经停啦,node2变成主的
验证节点2是否是主的,看看我们的猜想是否正确
[root@node2 ~]# drbd-overview
0:mystore/0 WFConnection Primary/Unknown UpToDate/DUnknown
[root@node2 ~]#
出现Unknown是因为节点没有上线,我们可以在节点1上设置,让它重新上线
步骤是在节点1上执行 [root@node1 ~]# crm node online
在节点2上,再次查看
[root@node2 ~]# drbd-overview
0:mystore/0 Connected Primary/Secondary UpToDate/UpToDate
[root@node2 ~]#
在节点1上:
[root@node1 ~]# crm status
Online: [ node1.stu21.com node2.stu21.com ]
Master/Slave Set: ms_mydrbd [mydrbd]
Masters: [ node2.stu21.com ]
Slaves: [ node1.stu21.com ]
由上面操作发现主从互换啦
我还可以把上面复原回来,让主的还是节点1 ,从的是节点2
只需在节点2上执行:
[root@node2 ~]# crm node standby
[root@node2 ~]# crm status
Node node2.stu21.com: standby
Online: [ node1.stu21.com ]
Master/Slave Set: ms_mydrbd [mydrbd]
Masters: [ node1.stu21.com ]
Stopped: [ node2.stu21.com ]
[root@node2 ~]# crm node online
[root@node2 ~]# crm status
Online: [ node1.stu21.com node2.stu21.com ]
Master/Slave Set: ms_mydrbd [mydrbd]
Masters: [ node1.stu21.com ]
Slaves: [ node2.stu21.com ]
创建文件系统
怎么定义一个filesystem啦?
打开crm
[root@node1 ~]# mkdir /mydata
[root@node1 ~]# crm
crm(live)# configure
crm(live)configure# primitive myfs ocf:heartbeat:Filesystem params device=/dev/drbd0 directory=/mydata fstype="ext4" op monitor interval=20s timeout=40s op start timeout=60s op stop timeout=60s
crm(live)configure# verify
crm(live)configure# colocation myfs_with_ms_mydrbd_master inf: myfs ms_mydrbd:Master
crm(live)configure# order ms_mydrbd_master_before_myfs inf: ms_mydrbd:promote myfs:start
crm(live)configure# verify
crm(live)configure# commit
crm(live)configure# cd
crm(live)# status

myfs工作在节点1,而节点1又是主节点
下面我是在两节点上测试两节点的高可用性
节点1:
[root@node1 ~]# cd /mydata/
[root@node1 mydata]# ls
fstab lost+found
[root@node1 mydata]# rm fstab
rm: remove regular file `fstab'? y
[root@node1 mydata]# ls
lost+found
[root@node1 mydata]#
删除的fstab,那么节点2同时也会删除的
我们把当前主节点(node1)变成备用节点
[root@node1 ~]# crm node standby
[root@node1 ~]# crm status

此时的myfs已经挂载到到节点2(node2),节点1未上线,且节点2(node2)成主节点
此时在节点1上,切换到 /mydata 查看会发现什么也没有,同时查看挂载点
#mount 不能找到 /dev/drbd0 on /mydata type ext4 (rw)
#cd /mydata
#ls
相反在节点2上:
[root@node2 ~]# cd /mydata/
[root@node2 mydata]# ls
lost+found
[root@node2 mydata]# mount

节点1(node1):
[root@node1 ~]# crm node online
[root@node1 ~]# crm status

此时节点1(又重新上线啦)
节点2:
由于上面,节点2(node2)是主,我们把它变成备用节点
[root@node2 ~]# crm node standby
[root@node2 ~]# crm status

让节点2 从新上线
[root@node2 ~]# crm node online
[root@node2 ~]# crm status

两个节点测试完毕
接下来配置MYSQL高可用集群
先配置节点1:(确保主节点在node1)

[root@node1 ~]# groupadd -r -g 306 mysql
[root@node1 ~]# useradd -r -g 306 -u 306 mysql
[root@node1 ~]# tar xf mariadb-5.5.40-linux-x86_64.tar.gz -C /usr/local/
[root@node1 ~]# cd /usr/local
[root@node1 local]# ls
bin etc games include lib lib64 libexec mariadb-5.5.40-linux-x86_64 sbin share src
[root@node1 local]# ln mariadb-5.5.40-linux-x86_64 mysql -sv
`mysql' -> `mariadb-5.5.40-linux-x86_64'
[root@node1 local]# ls
bin etc games include lib lib64 libexec mariadb-5.5.40-linux-x86_64 mysql sbin share src
[root@node1 local]#

节点2(node2):
参照节点1,步骤完全一样
继续节点1(node1):
[root@node1 local]# mkdir /mydata/data
[root@node1 local]# chown -R mysql:mysql /mydata/data/
[root@node1 local]# cd mysql/
[root@node1 mysql]# ll
total 220
drwxr-xr-x 2 root root 4096 Jan 3 14:02 bin
-rw-r--r-- 1 500 500 17987 Oct 8 21:19 COPYING
-rw-r--r-- 1 500 500 26545 Oct 8 21:19 COPYING.LESSER
drwxr-xr-x 3 root root 4096 Jan 3 14:02 data
-rw-r--r-- 1 500 500 8245 Oct 8 21:19 EXCEPTIONS-CLIENT
drwxr-xr-x 3 root root 4096 Jan 3 14:02 include
-rw-r--r-- 1 500 500 8694 Oct 8 21:19 INSTALL-BINARY
drwxr-xr-x 3 root root 4096 Jan 3 14:02 lib
drwxr-xr-x 4 root root 4096 Jan 3 14:02 man
drwxr-xr-x 11 root root 4096 Jan 3 14:02 mysql-test
-rw-r--r-- 1 500 500 108813 Oct 8 21:19 README
drwxr-xr-x 2 root root 4096 Jan 3 14:02 scripts
drwxr-xr-x 27 root root 4096 Jan 3 14:02 share
drwxr-xr-x 4 root root 4096 Jan 3 14:02 sql-bench
drwxr-xr-x 3 root root 4096 Jan 3 14:02 support-files
[root@node1 mysql]# pwd
/usr/local/mysql
[root@node1 mysql]# chown -R root:mysql ./*
[root@node1 mysql]# ll
total 220
drwxr-xr-x 2 root mysql 4096 Jan 3 14:02 bin
-rw-r--r-- 1 root mysql 17987 Oct 8 21:19 COPYING
-rw-r--r-- 1 root mysql 26545 Oct 8 21:19 COPYING.LESSER
drwxr-xr-x 3 root mysql 4096 Jan 3 14:02 data
-rw-r--r-- 1 root mysql 8245 Oct 8 21:19 EXCEPTIONS-CLIENT
drwxr-xr-x 3 root mysql 4096 Jan 3 14:02 include
-rw-r--r-- 1 root mysql 8694 Oct 8 21:19 INSTALL-BINARY
drwxr-xr-x 3 root mysql 4096 Jan 3 14:02 lib
drwxr-xr-x 4 root mysql 4096 Jan 3 14:02 man
drwxr-xr-x 11 root mysql 4096 Jan 3 14:02 mysql-test
-rw-r--r-- 1 root mysql 108813 Oct 8 21:19 README
drwxr-xr-x 2 root mysql 4096 Jan 3 14:02 scripts
drwxr-xr-x 27 root mysql 4096 Jan 3 14:02 share
drwxr-xr-x 4 root mysql 4096 Jan 3 14:02 sql-bench
drwxr-xr-x 3 root mysql 4096 Jan 3 14:02 support-files
[root@node1 mysql]#
接下来执行MYSQL的初始化
[root@node1 mysql]# scripts/mysql_install_db --user=mysql --datadir=/mydata/data/
验证下,看文件有没有
[root@node1 mysql]# ls /mydata/data/
aria_log.00000001 aria_log_control mysql performance_schema test
[root@node1 mysql]# mkdir /etc/mysql
[root@node1 mysql]# cp support-files/my-large.cnf /etc/mysql/my.cnf
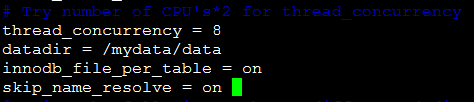
[root@node1 mysql]# vim /etc/mysql/my.cnf
datadir = /mydata/data
innodb_file_per_table = on
skip_name_resolve = on
对于上面节点1 的操作,节点2(node2)按照原样步骤进行配置
节点1:
添加MYSQL开机启动启动脚本
[root@node1 mysql]# cp support-files/mysql.server /etc/init.d/mysqld
[root@node1 mysql]# chkconfig --add mysqld
[root@node1 mysql]# chkconfig mysqld off
[root@node1 mysql]#
[root@node1 mysql]# service mysqld start
Starting MySQL.... [ OK ]
[root@node1 mysql]# /usr/local/mysql/bin/mysql
Welcome to the MariaDB monitor. Commands end with ; or \g.
Your MariaDB connection id is 2
Server version: 5.5.40-MariaDB-log MariaDB Server
Copyright (c) 2000, 2014, Oracle, Monty Program Ab and others.
Type 'help;' or '\h' for help. Type '\c' to clear the current input statement.
MariaDB [(none)]> create database testdb;
Query OK, 1 row affected (0.00 sec)
MariaDB [(none)]> exit
Bye

[root@node1 mysql]# cd
[root@node1 ~]# service mysqld stop
Shutting down MySQL.
-------------------------------------------------------------------(从下面就开始出错,由于节点2上的数据库不要初始化)
接下来是对节点2(node2)的设置:
同样的重复上面节点1的步骤,加入启动脚本
不同处只需要增加如下
MariaDB [(none)]> grant all on *.* to 'root'@'172.16.%.%' identified by 'mageedu';
Query OK, 0 rows affected (0.00 sec)
MariaDB [(none)]> flush privileges;
Query OK, 0 rows affected (0.00 sec)
MariaDB [(none)]> \q
#定义数据库集群的VIP
[root@node2 ~]# crm
crm(live)# configure
crm(live)configure# primitive myip ocf:heartbeat:IPaddr params ip="172.16.21.150" op monitor interval=10s timeout=20s
crm(live)configure# verify
crm(live)configure#
#定义数据库集群的服务资源mysqld
crm(live)configure# primitive myserver lsb:mysqld op monitor interval=20s timeout=20s
crm(live)configure# verify
#将资源加入资源组,进行结合资源在一起
crm(live)configure# group myservice myip ms_mydrbd:Master myfs myserver
ERROR: myservice refers to missing object ms_mydrbd:Master
INFO: resource references in colocation:myfs_with_ms_mydrbd_master updated
INFO: resource references in order:ms_mydrbd_master_before_myfs updated
crm(live)configure# verify
上面的错误不影响,继续执行下面的步骤
#定义资源顺序约束,启动好myfs资源后再启动myserver资源:
crm(live)configure# order myfs_before_myserver inf: myfs:start myserver:start
crm(live)configure# verify
crm(live)configure# commit
#所有都定义完成后就提交!可能mysql服务启动有点慢,等一下即可!
crm(live)configure# cd
crm(live)# status
crm(live)# status
Online: [ node13.stu21.com node14.stu21.com ]
Master/Slave Set: ms_mydrbd [mydrbd]
Masters: [ node14.stu21.com ]
Slaves: [ node13.stu21.com ]
Resource Group: myservice
myip (ocf::heartbeat:IPaddr): Started node14.stu21.com
myfs (ocf::heartbeat:Filesystem): Started node14.stu21.com
myserver (lsb:mysqld): Started node14.stu21.com

 浙公网安备 33010602011771号