

在minikube中部署tomcat和nginx 并可访问
-
一些基础知识关于Pod和Deployment
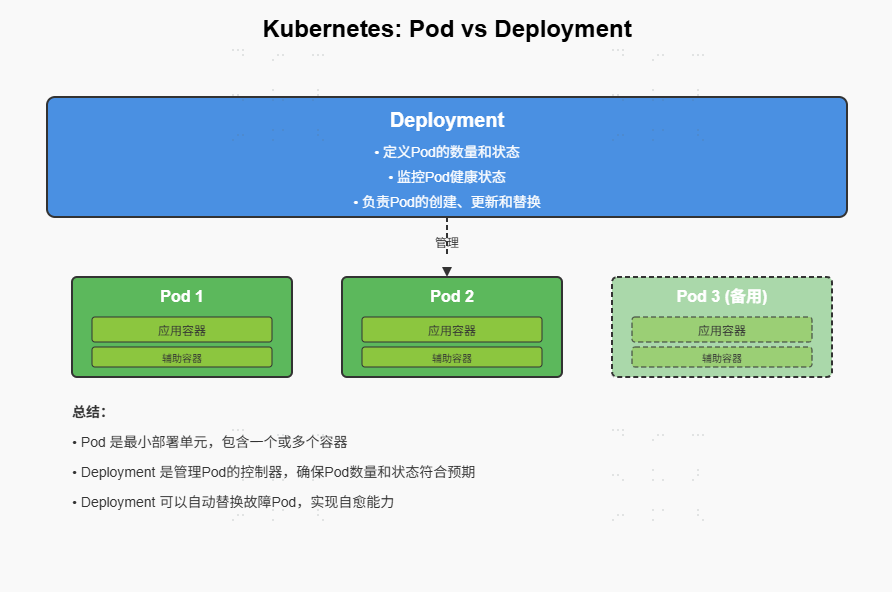
1. Pod(最小部署单元)
-
类比:Pod 就像一个「快递盒」,里面装着一个或多个紧密关联的「应用容器」(比如一个前端容器 + 一个日志收集容器)。
-
- 是 k8s 中最小的部署单位,不能再拆分。
- 里面的容器共享网络和存储(相当于在同一个盒子里,能直接互相访问)。
- 生命周期短,可能因故障、升级等被销毁重建(IP 会变)。
-
2. Deployment(管理 Pod 的控制器)
-
类比:Deployment 就像一个「管理员」,负责看管一群 Pod(比如保证始终有 3 个相同的 Pod 运行)。
-
- 定义 Pod 的「模板」(比如用什么镜像、资源限制等),自动创建和管理 Pod。
- 支持滚动更新(比如逐步替换旧版本 Pod 为新版本,不中断服务)。
- 支持回滚(如果新版本有问题,一键切回旧版本)。
-
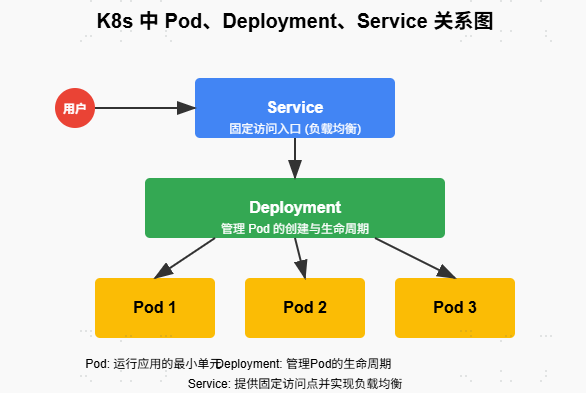
3. Service(Pod 的访问入口)
- 类比:Service 就像一个「固定的门牌号」,无论 Pod 怎么销毁重建(IP 变化),通过这个门牌号都能找到对应的 Pod。
-
- 给一组相同功能的 Pod 分配一个固定的虚拟 IP(ClusterIP)。
- 自动负载均衡:当有多个 Pod 时,请求会分摊到不同 Pod 上。
- 解决 Pod 动态变化导致的访问问题(Pod 重建后 IP 变了,但 Service 不变)。
![image]()
![image]()
-
-
-
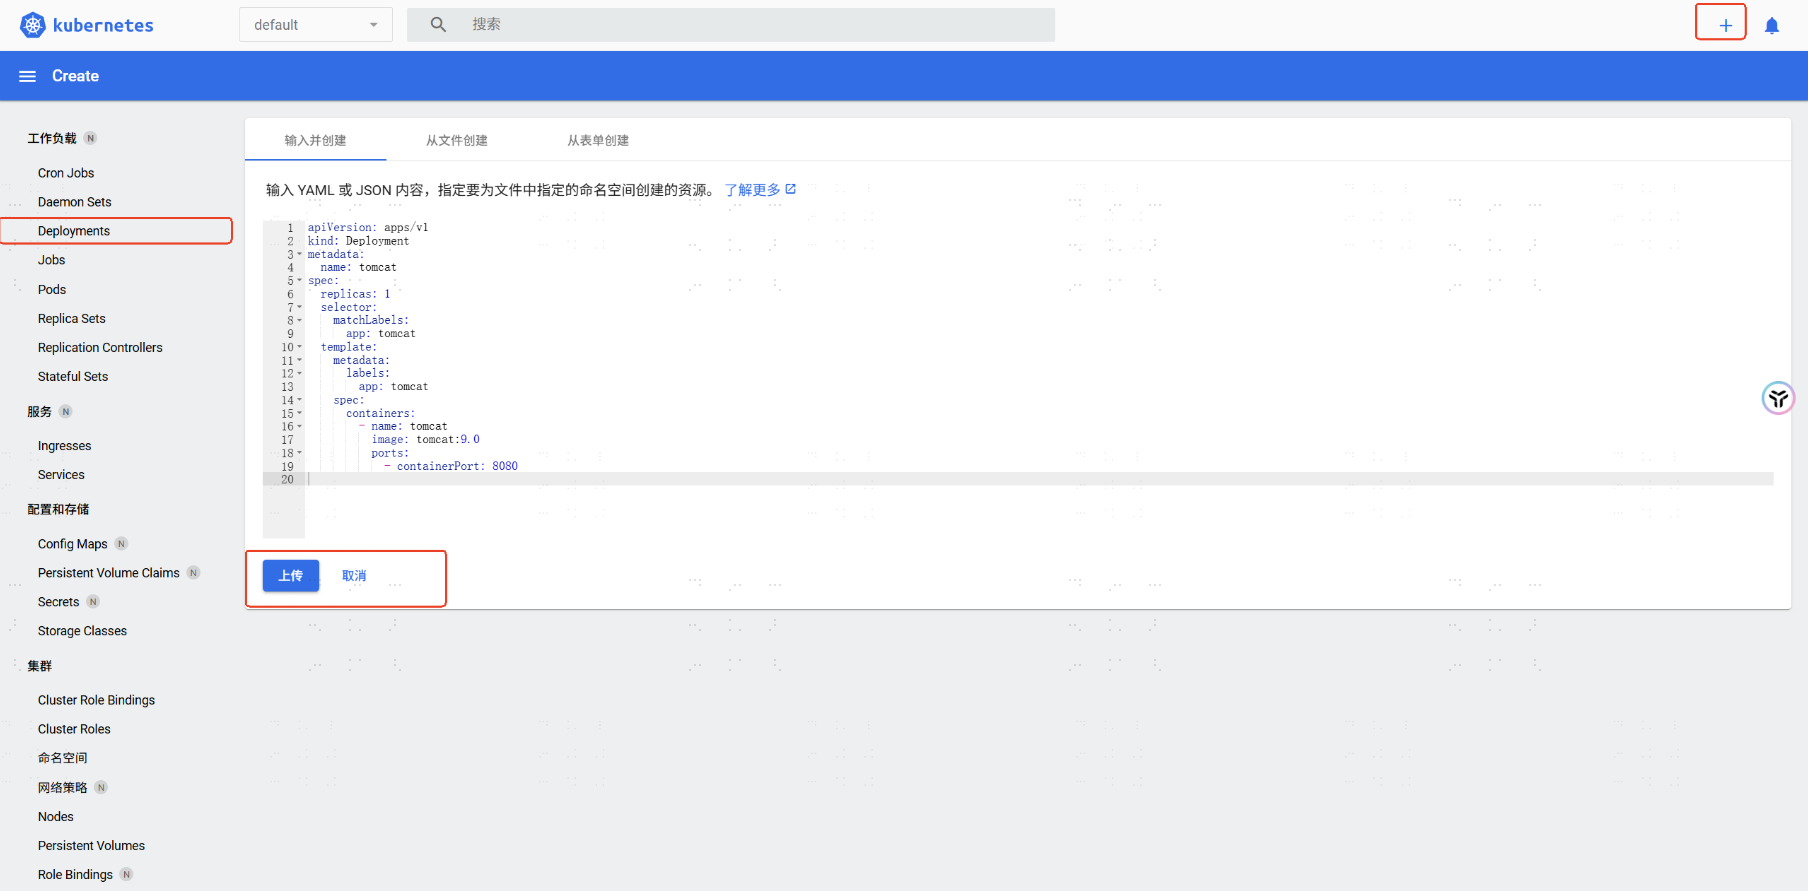
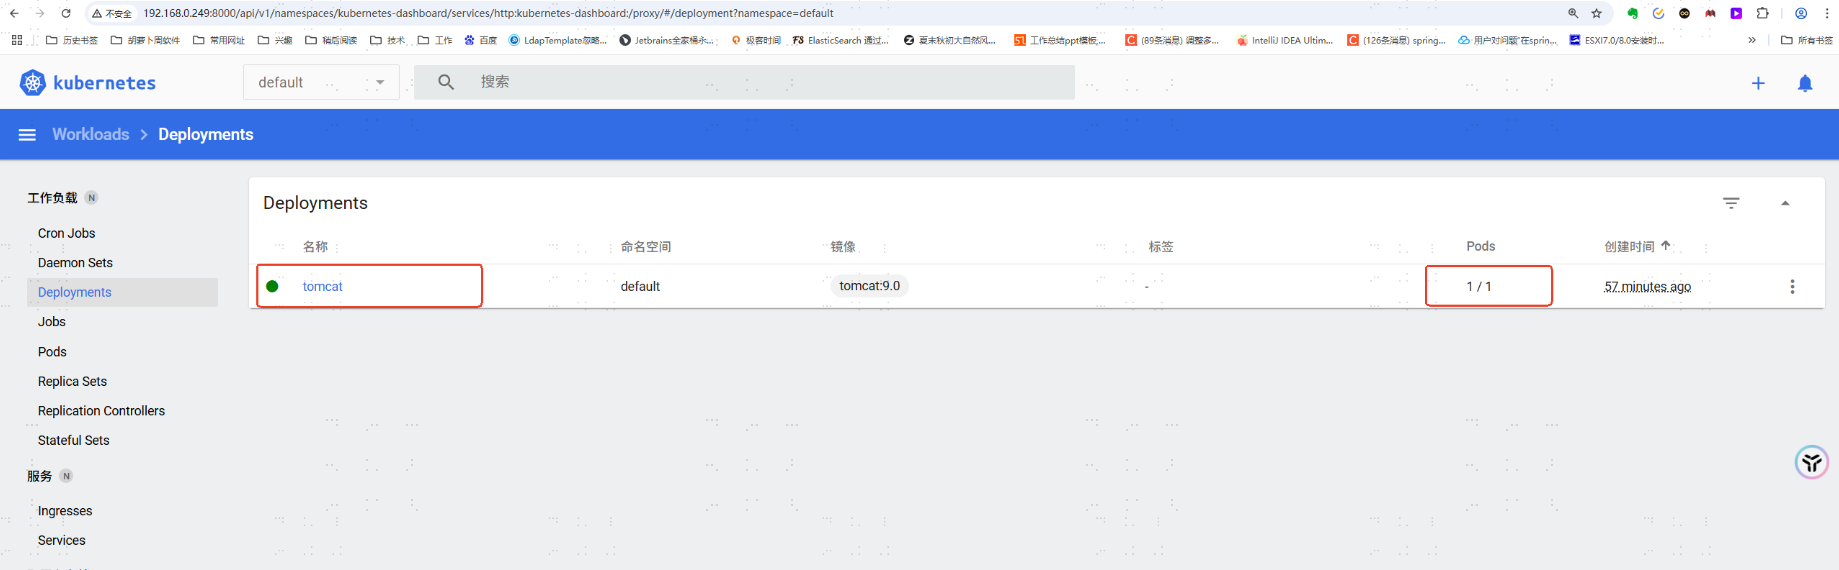
创建Deployments
-
编写 tomcat-deployment.yaml
通过 Dashboard 上传,也可以在终端用命令创建→通过DashBoard上传。
apiVersion: apps/v1 kind: Deployment metadata: name: tomcat spec: replicas: 1 selector: matchLabels: app: tomcat template: metadata: labels: app: tomcat spec: containers: - name: tomcat image: tomcat:9.0 ports: - containerPort: 8080![image]()
-
报错找不到镜像
![image]()
-
错误排查,检查之前的启动命令,没有指定参数--image-mirror-country=cn,尝试停止集群加上参数再试 -- 失败。
![image]()
[root@localhost ~]# minikube stop * Stopping node "minikube" ... * 1 nodes stopped. [root@localhost ~]#minikube start \ --registry-mirror=https://docker.m.daocloud.io \ --image-mirror-country=cn \ --driver=none * Centos 7.9.2009 上的 minikube v1.23.1 * 根据现有的配置文件使用 none 驱动程序 * Starting control plane node minikube in cluster minikube * Restarting existing none bare metal machine for "minikube" ... * OS release is CentOS Linux 7 (Core) * minikube 1.35.0 is available! Download it: https://github.com/kubernetes/minikube/releases/tag/v1.35.0 * To disable this notice, run: 'minikube config set WantUpdateNotification false' * 正在 Docker 26.1.4 中准备 Kubernetes v1.22.1… * 开始配置本地主机环境... * ! The 'none' driver is designed for experts who need to integrate with an existing VM * Most users should use the newer 'docker' driver instead, which does not require root! * For more information, see: https://minikube.sigs.k8s.io/docs/reference/drivers/none/ * ! kubectl 和 minikube 配置将存储在 /root 中 ! 如需以您自己的用户身份使用 kubectl 或 minikube 命令,您可能需要重新定位该命令。例如,如需覆盖您的自定义设置,请运行: * - sudo mv /root/.kube /root/.minikube $HOME - sudo chown -R $USER $HOME/.kube $HOME/.minikube * * 此操作还可通过设置环境变量 CHANGE_MINIKUBE_NONE_USER=true 自动完成 * Verifying Kubernetes components... - Using image registry.cn-hangzhou.aliyuncs.com/google_containers/dashboard:v2.3.1 - Using image registry.cn-hangzhou.aliyuncs.com/google_containers/metrics-scraper:v1.0.7 - Using image registry.cn-hangzhou.aliyuncs.com/google_containers/storage-provisioner:v5 * Enabled addons: storage-provisioner, default-storageclass, dashboard ! /usr/local/bin/kubectl is version 1.33.1, which may have incompatibilites with Kubernetes 1.22.1. - Want kubectl v1.22.1? Try 'minikube kubectl -- get pods -A' * Done! kubectl is now configured to use "minikube" cluster and "default" namespace by default -
怀疑还是拉不到镜像的原因,配置阿里镜像源,直接在宿主机使用docker pull tomcat:9.0失败。目前可能是阿里有限制了
当前仅支持阿里云用户使用具备公网访问能力的阿里云产品进行镜像加速,且仅限于特定范围内的容器镜像。详情请见公告。
-
多方查找,找到截止2025.06可用的镜像源
https://blog.csdn.net/qq_44866828/article/details/148569247
{ "registry-mirrors": [ "https://docker.hpcloud.cloud", "https://docker.m.daocloud.io", "https://docker.unsee.tech", "https://docker.1panel.live", "http://mirrors.ustc.edu.cn", "https://docker.chenby.cn", "http://mirror.azure.cn", "https://dockerpull.org", "https://dockerhub.icu", "https://hub.rat.dev" ] } -
手动拉取后,使用daocloud启动,成功启动tomcat的Deployments
![image]()
-
111
-
-
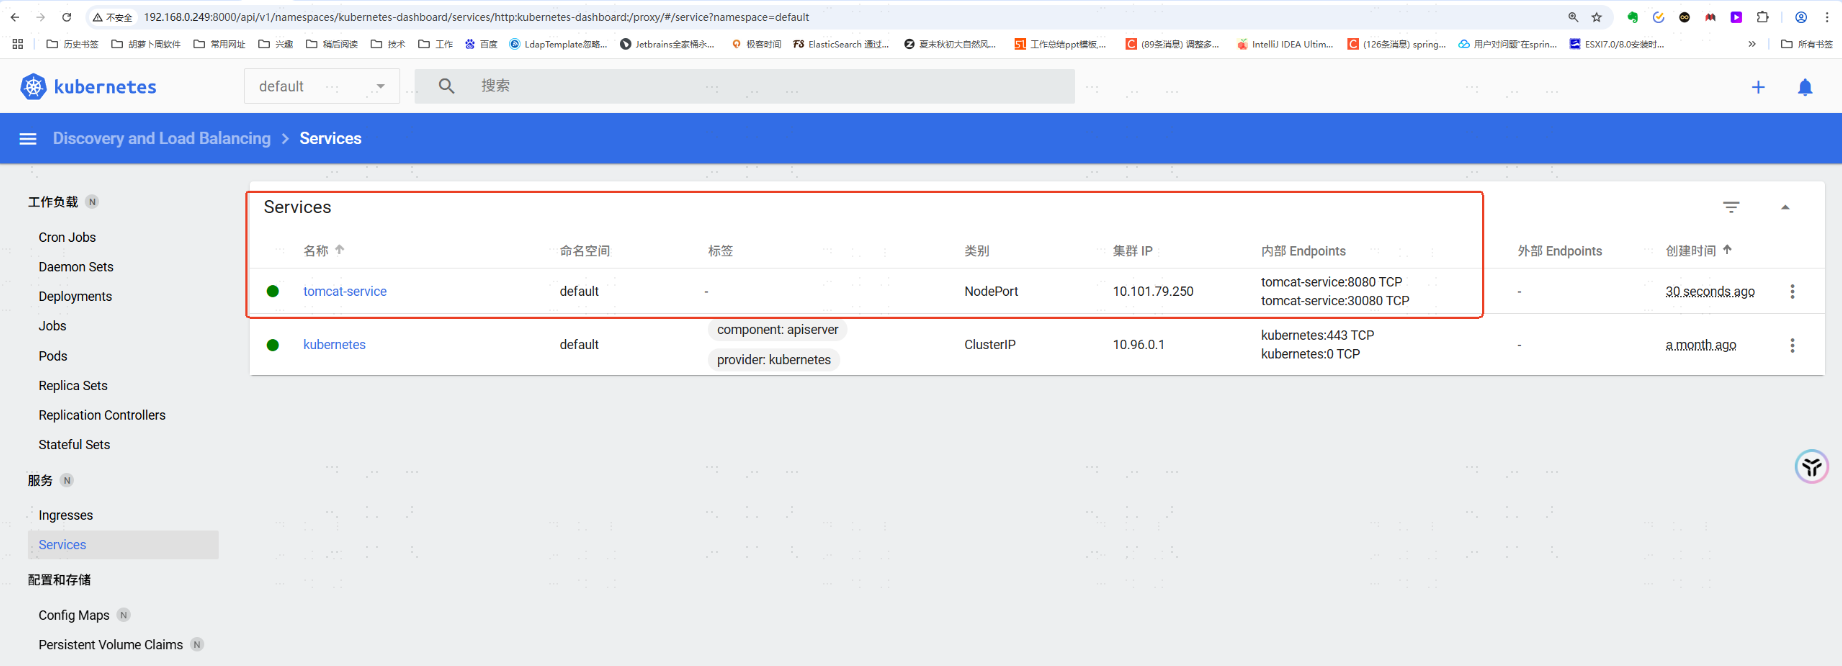
创建 Service 进行端口暴露
-
apiVersion: v1 kind: Service metadata: name: tomcat-service spec: type: NodePort selector: app: tomcat ports: - protocol: TCP port: 8080 targetPort: 8080 nodePort: 30080 # 外部访问端口,可自定义30000-32767 -
创建成功
![image]()
-
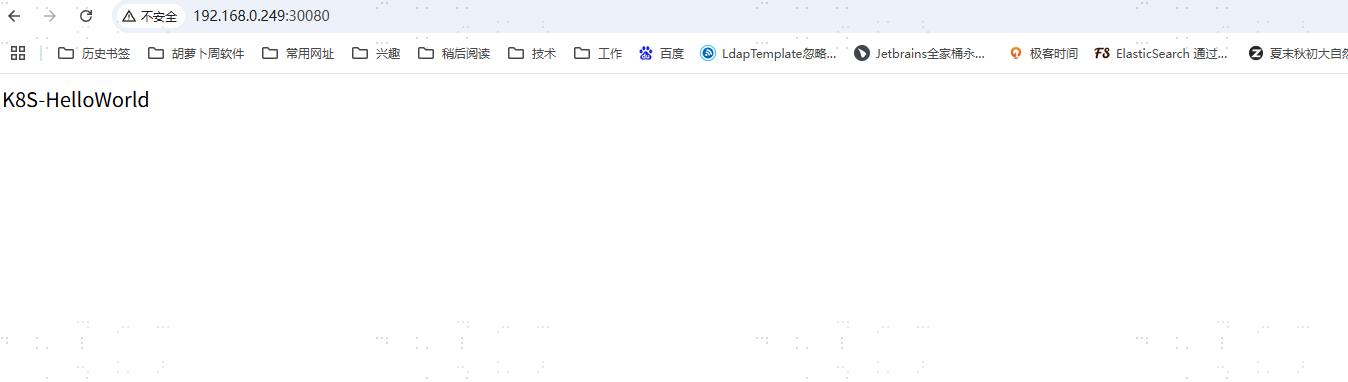
获取tomcat的访问地址
[root@localhost ~]# minikube service tomcat-service --url http://192.168.0.249:30080![image]()
-
阿斯蒂芬
-
-
使用命令行创建一个Nginx
-
创建Deployments
[root@localhost ~]# kubectl create deployment nginx --image=nginx:1.25
deployment.apps/nginx created
((20250713202927-lrckrwz '创建Deployments期间怎么查看镜像拉取进度呢'))
[root@localhost ~]# kubectl describe pod nginx-5f798ddb68-gkx8r Name: nginx-5f798ddb68-gkx8r Namespace: default Priority: 0 Service Account: default Node: localhost.localdomain/192.168.0.249 Start Time: Sun, 13 Jul 2025 20:24:27 +0800 Labels: app=nginx pod-template-hash=5f798ddb68 Annotations: <none> Status: Pending IP: IPs: <none> Controlled By: ReplicaSet/nginx-5f798ddb68 Containers: nginx: Container ID: Image: nginx:1.25 Image ID: Port: <none> Host Port: <none> State: Waiting Reason: ContainerCreating Ready: False Restart Count: 0 Environment: <none> Mounts: /var/run/secrets/kubernetes.io/serviceaccount from kube-api-access-g9qjc (ro) Conditions: Type Status Initialized True Ready False ContainersReady False PodScheduled True Volumes: kube-api-access-g9qjc: Type: Projected (a volume that contains injected data from multiple sources) TokenExpirationSeconds: 3607 ConfigMapName: kube-root-ca.crt Optional: false DownwardAPI: true QoS Class: BestEffort Node-Selectors: <none> Tolerations: node.kubernetes.io/not-ready:NoExecute op=Exists for 300s node.kubernetes.io/unreachable:NoExecute op=Exists for 300s Events: Type Reason Age From Message ---- ------ ---- ---- ------- Normal Scheduled 8m14s default-scheduler Successfully assigned default/nginx-5f798ddb68-gkx8r to localhost.localdomain Normal Pulling 8m14s kubelet Pulling image "nginx:1.25" # 截止到这里,镜像问题还未处理,必须手动拉取。这个是手动拉取后的效果 [root@localhost ~]# docker pull nginx:1.25 1.25: Pulling from library/nginx 09f376ebb190: Already exists a11fc495bafd: Pull complete 933cc8470577: Pull complete 999643392fb7: Pull complete 971bb7f4fb12: Pull complete 45337c09cd57: Pull complete de3b062c0af7: Pull complete [root@localhost ~]# kubectl describe pod nginx-5f798ddb68-gkx8r …… Events: Type Reason Age From Message ---- ------ ---- ---- ------- Normal Scheduled 35m default-scheduler Successfully assigned default/nginx-5f798ddb68-gkx8r to localhost.localdomain Normal Pulling 35m kubelet Pulling image "nginx:1.25" Normal Pulled 6m45s kubelet Successfully pulled image "nginx:1.25" in 28m53.639376648s Normal Created 6m45s kubelet Created container nginx Normal Started 6m45s kubelet Started container nginx -
创建Service ,暴露80端口
kubectl expose deployment nginx --port=80 --type=NodePort --name=nginx-service -
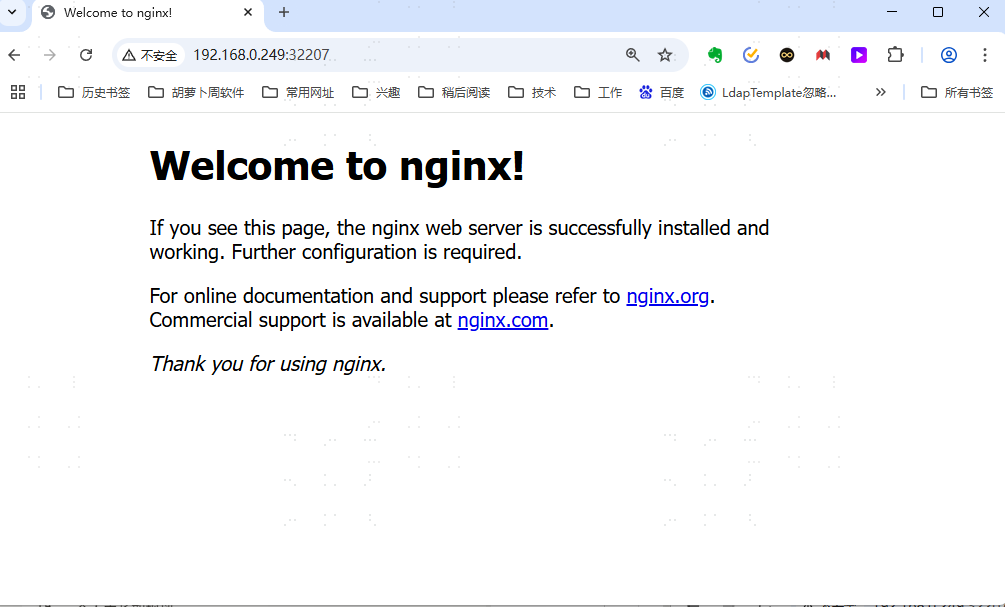
查看访问url
[root@localhost ~]# minikube service nginx-service --url http://192.168.0.249:32207 -
效果
![image]()
-


 浙公网安备 33010602011771号