

Android调用Google Map
Google为android的开发者提供了一套相当完善的地图应用接口,开发者可以很方便的使用这些接口来做一些LBS应用程序。
我所使用的开发环境是eclipse,另外再用ADT工具安装Google Maps library组件(这个库是Google APIs add-on的一部分,要确保开发环境里已经安装了这个库)。
具体调用 google map 的流程为:网上申请Maps API Key=>创建一个MapActivity=>在地图上添加自定义图层
一.如何获得Maps API Key?
1.在命令行里用keytool命令生成一个MD5 certificate fingerprint
$ keytool -list -alias alias_name -keystore my-release-key.keystore
根据提示输入密码等信息,然后可以得到如下MD5 certificate fingerprint
Certificate fingerprint (MD5): 94:1E:43:49:87:73:BB:E6:A6:88:D7:20:F1:8E:B5:98
只有获得了这个MD5 certificate fingerprint才可以在注册页面获取key.
2.注册Maps API Key
打开http://code.google. com/android/maps-api-signup.html
在这个页面输入你的MD5 certificate fingerprint就可以获取Maps API Key.这里我们得到的key为
08dkmLW5o********PgzGDxT9mb1JKOoV3Rhrlw
二、创建一个MapActivity
1.在eclipse中创建一个名字为HelloGoogleMaps的android工程。因为我们要调用地图API,所以在选择Build Target的时候一定要选择Google APIs。
2.编辑XML文件。
mail.xml
<?xml version="1.0" encoding="utf-8"?>
<com.google.android.maps.MapView
    xmlns:android="http://schemas.android.com/apk/res/android"
    android:id="@+id/mapview"
    android:layout_width="fill_parent"
    android:layout_height="fill_parent"
    android:clickable="true"
    android:apiKey="08dkmLW5o********PgzGDxT9mb1JKOoV3Rhrlw"
/>
android:apiKey即是我们刚才申请得到的Maps Key,这里一定不能出错,否则可能会无法得到map tiles。
3.修改AndroidManifest.xml
<?xml version="1.0" encoding="utf-8"?>
<manifest xmlns:android="http://schemas.android.com/apk/res/android"
      package="com.HelloGoogleMaps"
      android:versionCode="1"
      android:versionName="1.0">

    <uses-permission android:name="android.permission.INTERNET" />

    <application android:icon="@drawable/icon" android:label="@string/app_name">
        <activity android:name=".HelloGoogleMaps"
                  android:theme="@android:style/Theme.NoTitleBar"
                  android:label="@string/app_name">
            <intent-filter>
                <action android:name="android.intent.action.MAIN" />
                <category android:name="android.intent.category.LAUNCHER" />
            </intent-filter>
        </activity>
        <uses-library android:name="com.google.android.maps" />
    </application>

    <uses-sdk android:minSdkVersion="8" />

</manifest>
因为map tiles来自于google map server,所以我们需要加上
<uses-permission android:name="android.permission.INTERNET" /> 让application可以访问internet.
另外再application标签下面需要添加<uses-library android:name="com.google.android.maps" /> 指明我们要用到google map的library。
4.创建一个继承自MapActivity的类。
    package com.HelloGoogleMaps;

    import android.os.Bundle;
    import com.google.android.maps.MapActivity;
    import com.google.android.maps.MapView;

    public class HelloGoogleMaps extends MapActivity {
        /** Called when the activity is first created. */
        @Override
        public void onCreate(Bundle savedInstanceState) {
            super.onCreate(savedInstanceState);
            setContentView(R.layout.main);

            MapView mapView = (MapView) findViewById(R.id.mapview);
            mapView.setBuiltInZoomControls(true);
        }

        @Override
        protected boolean isRouteDisplayed() {
            // TODO Auto-generated method stub
            return false;
        }
    }
完成了以上步骤,运行程序就可以看到自己的activity可以显示google map了。
三、添加自定义图层
我们调用google map的目的是为了在map上面显示自己想显示的内容,比如显示用户当前的位置(需要调用GPS) ,或是将某一个兴趣点(Point Of Interest)在地图上显示出来等。这样就需要在google map上面添加自定义的图层了。
1.创建一个继承自ItemizedOverlay的class
    import java.util.ArrayList;

    import android.app.AlertDialog;
    import android.content.Context;
    import android.graphics.drawable.Drawable;

    import com.google.android.maps.ItemizedOverlay;
    import com.google.android.maps.OverlayItem;

    public class ZPoiItem extends ItemizedOverlay {

        private ArrayList<OverlayItem> mOverlays = new ArrayList<OverlayItem>();
        private Context mContext;

        public ZPoiItem(Drawable defaultMarker) {
            super(boundCenterBottom(defaultMarker));
        }
        public ZPoiItem(Drawable defaultMarker, Context context) {
            super(defaultMarker);
            mContext = context;
        }

        public void addOverlay(OverlayItem overlay) {
            mOverlays.add(overlay);
            populate();
        }

        @Override
        protected OverlayItem createItem(int i) {
            // TODO Auto-generated method stub
            return mOverlays.get(i);

        }

        @Override
        public int size() {
            // TODO Auto-generated method stub
            return mOverlays.size();
        }

        @Override
        protected boolean onTap(int index) {
    //    OverlayItem item = mOverlays.get(0);//OverlayItem item = mOverlays.get(index);
    //    AlertDialog.Builder dialog = new AlertDialog.Builder(mContext);
    //    dialog.setTitle(item.getTitle());
    //    dialog.setMessage(item.getSnippet());
    //    dialog.show();
          return true;
        }
    }
创建好了ZPoiItem类,回到HelloGoogleMaps类,添加变量
private MapController mMapController
该变量用于控制地图的,比如设置地图中心点,设置地图比例尺等。
然后在onCreate函数的末尾添加如下代码:
    mMapController = mapView.getController();

    List<Overlay> mapOverlays = mapView.getOverlays();
            Drawable drawable = this.getResources().getDrawable(R.drawable.star_big_on);//star_big_on is an icon id.
            ZPoiItem itemizedoverlay = new ZPoiItem(drawable);

            GeoPoint point = new GeoPoint(1288515,103853388); //a poi in Singapore
            mMapController.setCenter(point);//set map center
            mMapController.setZoom(12);//set map scale
            mMapController.animateTo(point);

            OverlayItem overlayitem = new OverlayItem(KeywordSearchResultActivity.mSelPoint, "Hola, Mundo!", "I'm in Mexico City!");
            itemizedoverlay.addOverlay(overlayitem);
            mapOverlays.add(itemizedoverlay);
至此已完成了在google map上添加自定义图层。效果图如下:
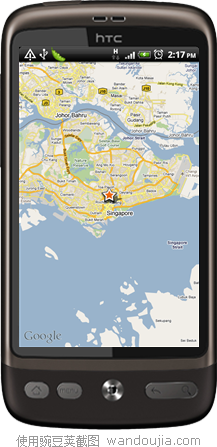
后 记:值得一提的是,android的map软件需要签名以后才能发布给其他手机,这个签名过程用eclipse的GUI可以很方便的完成,右键工程根目录 选择Android Tools->Export signed application package...,进入签名设置界面,根据提示一步步完成签名。用签好名的.apk安装到手机里可以看到如上所示的结果。Google map的API非常丰富,开发者可以利用这些函数接口编写各种各样的LBS软件或是其他基于地图的应用软件。Foursuqare就是一个不错的调用 google map的LBS软件。

 浙公网安备 33010602011771号